Let's see how you feel about power tools. This is the survey mentioned in the September 20, 2017 AsktheBuilder Newsletter.
There are no trick questions here!
Let's see how you feel about power tools. This is the survey mentioned in the September 20, 2017 AsktheBuilder Newsletter.
There are no trick questions here!
Brick Wall Leaks Driving Rain TIPS
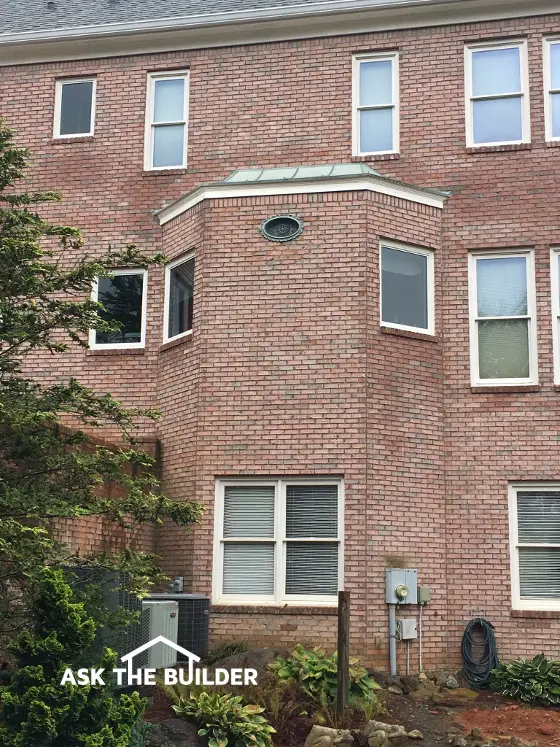
DEAR TIM: As result of Hurricane Irma, I had a leak in the ceiling in the bay area of our kitchen. It happened in the past with other intense storms.
I suspect the problem could be water penetrating the brick and/or wind driven rain entering under the facia and over and down the inside of the inside face of the brick. The brick lentil spans across the bay, so if water is making its way in, it has nowhere to go but to the drywall ceiling in the kitchen.
Before I dig into this and hire contractors, I’d like your opinion. What’s going on and what’s the best way to fix it? How could this leak have been prevented when my house was built? Jim McV., Cumming, GA
DEAR JIM: You and thousands and thousands of other homeowners suffered damage from wind-driven rain from Hurricane Irma.
Physics Formula
All you have to do is recall your high school physics class and it starts to make sense. Remember the simple formula: Force equals mass multiplied by acceleration?
F = ma
Water is heavy. If you need a refresher course on this, just open up your car window as you drive in a gentle rain shower and see what the drops feel like hitting your hand at only 50 mph much less 100 mph or greater!
Free & Fast Bids
Each Drop A Hammer Blow
Each water drop that smashes against the side of your house is like a hammer driving the previous water drop deeper into any crack, opening or other tiny space where normal down-falling rain causes no issues.
The fable about the three little pigs and brick homes didn’t cover wind-driven rain! ©2017 Tim Carter
Brick walls leak water. It’s been a known fact for well over 100 years.
Builders and brick masons many decades ago realized this and used two different bricks to construct exterior walls. The entry point of most of the water is the vertical mortar joints that are called head joints.
While to the naked eye it seems that the mortar and brick make an impenetrable barrier, such is not the case. Old brick buildings had a softer absorbent brick that was used on the inside of the wall.
This brick was designed to soak up the leaking water and then immediately release it back to the air once the sun came out and the breeze pulled all moisture from the wall.
The soft inner brick was made by not firing the brick in the kiln as long as the harder outer layer brick that had to be more weather resistant. The hotter and longer you fire a brick in a kiln, the more weather resistant the brick becomes.
You can fire some brick so long that they become almost as hard as granite and as durable. Many older streets in cities and towns had these super-hard brick laid as roadways. You can still see them in downtown Athens, Ohio at the entrance to Ohio University.
This is a pretty decent very BASIC video about brick wall construction. In parts of the video you can see the wall is two brick wide. Imagine if this were for a home and the inner layer was a different softer brick.
Modern brick veneer construction discarded this wonderful system that’s worked for ages. Now the water that leaks into the wall, as you’ve already surmised, runs down the back of the brick much like the water over Niagara Falls. It’s easy for it to find a way into most homes as you’ve discovered.
Modern builders who use brick veneer are supposed to install flashings at every horizontal break in the brick wall. This means there needs to be a flashing at the lintel that’s hidden behind the roof of your kitchen bay, above and below every window, door and any other thing on the wall that’s not brick.
The wall framing must be covered with a waterproof material that overlaps like roof shingles so any water that ends up touching it can’t get to the wood framing of the home nor to the interior wall and ceiling systems.
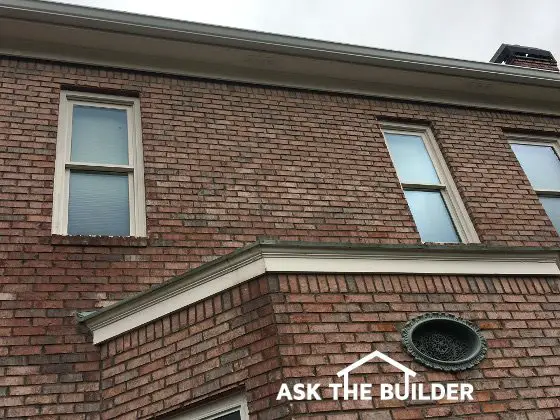
Photo Credit: Tim Carter
At the base of the brick wall, there needs to be a flashing that captures all the water and redirects it to the outside of the house. This means there needs to be plentiful weep holes, and there needs to be a mesh product or some other system behind the wall that ensures wet mortar that falls behind the wall can’t interfere with the movement of the water to the outside of the house.
It takes great skill to install all these flashings and membranes. The Brick Industry Association has many detailed technical publications showing how all this is supposed to happen during construction. But for you, it’s now a moot point. You need to go to plan B.
Your job now is to apply the best silane siloxane water repellent money can buy.
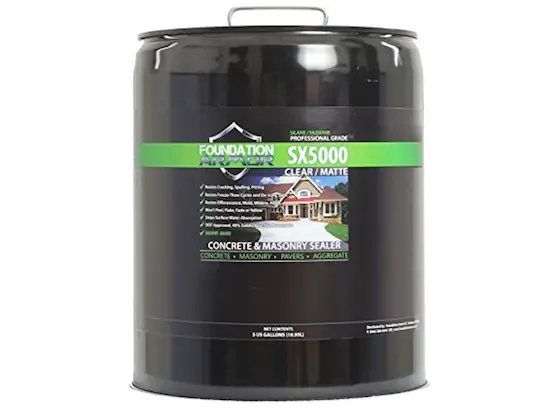
This is a magnificent silane - siloxane water repellent that soaks into brick and mortar joints. CLICK THIS IMAGE NOW TO HAVE THIS DELIVERED TO YOUR HOME.
It may require two coats. What’s more, these two applications need to happen within minutes of each other. If you wait too long between coats, the first coat could block the second coat from penetrating the mortar and brick!
The best of these clear sealers have microscopic solids that can help plug up the minute passageways that water is using to cause your leaks. It’s going to take a little research on your part to locate the best sealer.
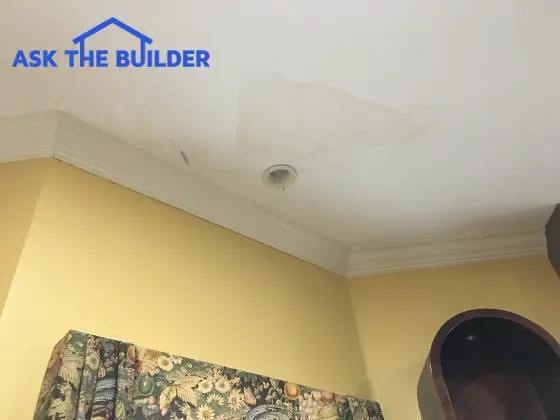
Water damage to the ceiling, due to driving rain. ©2017 Tim Carter
When you apply it, be sure two people are working as a team. One will be equipped with a backpack leaf blower.

This is a fantastic backpack leaf blower. I own this one and love it. CLICK THE IMAGE NOW TO HAVE IT DELIVERED TO YOUR HOME.
As the person with the spray wand applies the sealer, the worker with the blower directs the wind blast right at the wall driving the wet sealer deep into the brick and mortar joints just as Irma did with the rain. You want the sealer to penetrate deep into the wall.
Years ago I ran across a milky liquid you could brush on the mortar joints and a small amount of the brick. It would dry clear and act as a barrier to the driving rain. But recent research of mine while writing a book about defective asphalt shingles indicates this product will no doubt break down with exposure to direct sunlight. While it may work for a while, eventually the ultraviolet rays of the sun will destroy the film.
Column 1214
How To Sink Finishing Nails TIPS
Sheila Wilde from Pocatello, Idaho emailed me. She's an energetic older DIY woman who had a great question.
"How can I sink the finishing head nail into the wood near the curved areas of a molding I'm installing?
I started there and then went on to use the wider area with the nail gun, which holds 1-inch finishing nails.
I've tried two ways, but one marred the wood and the other just didn't work out. Any help would be appreciated."
I compliment you Sheila on your spirit and drive!
Nail Gun Issues
Let's talk about the nail gun issue. The wood trim you're using must be very soft or you pressed too hard when using the nail gun.
Most nail guns will not mar the surface and the only depression you see is the shape of the finish nail.
I'll also add that a 1-inch nail is probably not long enough. You need the nail to penetrate the molding, then through the drywall into solid wood. You'll discover you often need a 2-inch nail to accomplish this.
If you're applying a wood trim over solid wood, then a 1-inch nail might be sufficient.
Great Finish Nail Gun
Here's a fantastic cordless nail gun I've used. It requires no gas cartridges, no hoses, no compressor, etc. You just take it out of the bag and squeeze the trigger.
It drives nails perfectly each time I've used it. What's more, my first nail gun was a Senco. It's a brand I love and trust!
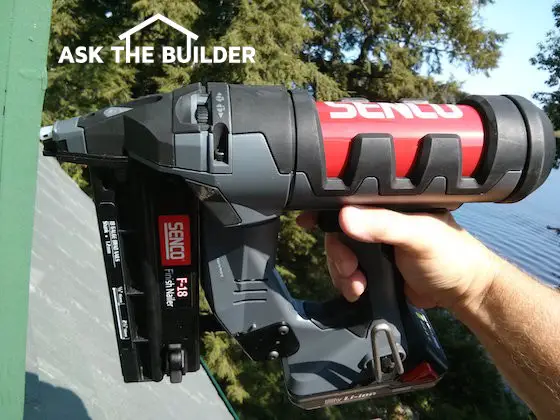
This is an amazing cordless finish nailer. Here I'm using it outdoors on a piece of exterior trim. It works even better indoors on fine pieces of small woodwork. CLICK THE PHOTO NOW to have this tool delivered to your doorstep in days.
Free & Fast Bids
CLICK HERE to get FREE & FAST BIDS from local finish carpenters who can sink finish nails with ease.
Finish Nail Gun Video
Watch this very informative video about how to use a finish nail gun to get perfect results.
Traditional Nail Sets
If you can't afford a finish nail gun, then you just need to use a traditional nail set.
These are small hand tools that allow you to drive a finish nail into wood keeping the head of the hammer far away from the wood.

These are standard nail sets. The yellow one has the smallest tip. These are very affordable and work well. CLICK THE PHOTO to have these nail sets delivered to your doorstep in days.
Different Sizes
The nail sets come in different sizes or widths. The tip of the nail set is designed to fit into the tiny dimple you probably have overlooked that in the head of a finish nail.
This dimple cradles the tip of the nail set so it doesn't drift or slip off the nail as you tap the nail set with the hammer.
Nail Set Video
Watch this carpenter use a nail set to drive a nail below the surface of the wood.
IMPORTANT TIP: The only mistake I feel he made is that he gave the nail one extra blow to get it VERY CLOSE to the wood.
I wouldn't do this if you're a rookie! There's too great a chance the hammer head will touch the wood.
CLICK HERE to get FREE & FAST BIDS from local finish carpenters who can sink finish nails with ease.
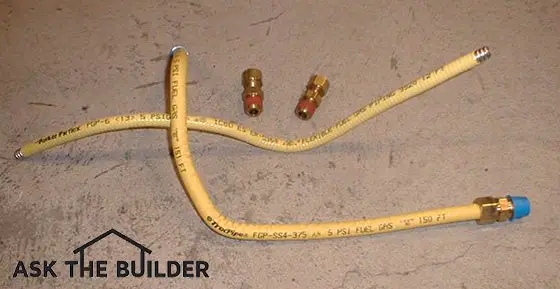
Flexible Gas Line | Here's a flexible gas line. These are two short pieces of the flexible stainless-steel gas lines or CSST. You can practically tie it in a knot it's so flexible. If you have lots of pipes to run, this may be the way to go. But before you decide, realize there's a fire and an explosion hazard with this because of lightning! Keep reading! © 2021 Tim Carter
"A flexible gas line is made from thin-wall stainless steel. It's not durable as a traditional black-iron pipe. Lightning has caused many house fires that have flexible gas lines."
Revised January 2021
DEAR TIM: The natural gas lines that are being installed in our new home are not the heavy black iron pipe. They're a new flexible stainless steel piping system that is installed like electrical wire.
What is this material? Is it safe to use? Are there advantages to using this pipe?
Can you cut into the pipe at a future date to install an added gas appliance? Is there another alternative gas piping material? Betsy F., Augusta, GA
Related Links
Easy How To Thread Black Iron Pipe Video
Pipe Threading Compound To Permanently Seal Black Iron - Great Video
Sizing Gas Lines - Tim Carter Can Draw Your Gas Line Plan
Free & Fast Bids
CLICK HERE to get FREE & FAST BIDS from local plumbers who install gas lines.
DEAR BETSY: Congratulations! You're now the proud owner of some wonderful corrugated stainless steel tubing (CSST). This material was approved for residential use in 1988 by the National Fuel Gas Code.
A flexible gas line is an ingenious method of supplying natural gas to fireplaces, furnaces, cooktops, clothes dryers and any other gas appliance. Virtually all state and local code authorities permit its use and many contractors are finally embracing it.
I have this flexible gas line in my own home in central New Hampshire and never worry about it at all. Some plumbers will tell you it's faster and cheaper to install this new CSST piping. However, we don't get frequent thunderstorms here in central New Hampshire.
I happen to be a master plumber and given the choice, I'd install traditional threaded black iron pipe. More on this in a just a moment.
CLICK HERE to get FREE & FAST BIDS from local plumbers to install flexible gas lines in your home.
CSST Video
Watch this video to see how CSST pipe is installed.
I remember when the material was first introduced in 1989. Many of my fellow contractors who install gas lines thought it was unsafe. Some of their arguments never made sense to me.
For as long as I have been in the home building business, we always used similar brass appliance connector tubing when gas was supplied to a clothes dryer, a cooktop, or a gas range.
Hundreds of thousands of houses have these corrugated appliance connectors in service right now. They have worked well for many years.
I was afraid of CSST because of the thin nature of the pipe. There are lots of instances of houses that have been destroyed in gas fires because CSST pipe was ruptured by a lightning strike.
The pipe in the walls acts as an interior lightning rod. It's vital to follow all instructions provided by CSST manufacturers and to BOND the tubing electrically.
Errant screws or nails used to attach cabinets, trim, pictures, etc. can puncture this pipe. That would never happen with a piece of traditional black iron pipe.
Only a direct hit from a hot bolt of lightning will bore a hole in a traditional black iron pipe.
Dangers Of CSST Video
Watch this video to see what you think about the dangers of the material.
The current home I live in here in central New Hampshire had these flexible gas lines installed in 2001. I've had no issues with them at all and I even had to do a kitchen remodel where I extended an existing line.
CLICK HERE to get FREE & FAST BIDS from local plumbers who install gas lines.
The CSST has many advantages. Perhaps the biggest one is labor savings. Traditional black iron pipe takes a lot of time to cut and thread.
I know as I have installed thousands of linear feet of the heavy material. As you said, the new CSST is installed like electrical wire.
You simply pull the material between two points and cut it to length with simple tubing cutters.
Black iron pipe is very labor intensive. A typical black iron pipe installation requires a professional to precisely measure, cut, and thread the individual pieces of pipe. All of these steps are very time-consuming.
It's important to realize you need to think about overall safety. Spending hundreds of dollars more for black iron pipe may be well worth it in the long run if you have a house fire.
CLICK HERE to get FREE BIDS from Plumbers to install Flexible Gas Lines.
When you use CSST, you can minimize potential gas leaks. A typical black iron pipe installation has many 90-degree, tee, and coupling fittings.
These fittings are used each time you change directions or join two pieces of straight pipe together. Each of the cast fittings can be the source of a leak.
What's more, the threaded joints on both sides of the fitting can also be potential leak points. Because the CSST snakes its way around bends and obstructions as one solid piece of tubing, you only have a fitting at each end of the line. If you do have a leak, these fittings are almost always readily accessible for adjustment.
CSST is not user friendly for a DIY installer. It's not really a do-it-yourself proposition. Many of the manufacturers of this material require professional installers to take a short training course that familiarizes them with the small nuances of this unique gas piping system.
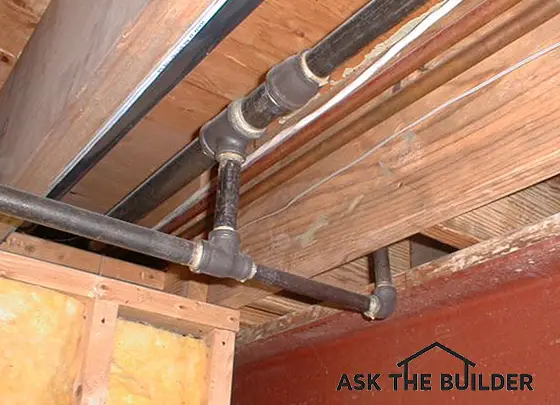
These are traditional black iron pipes that I installed in 1987. Each end of a piece of pipe must be threaded. It's messy and hard work, but I must admit I sort of enjoy it. The pipe is extremely durable and rarely has a lightning strike cause a fire in a house with black iron pipe. © 20187 Tim Carter
Adding additional gas lines at a future date is not a problem if you plan for the possibility during the original installation. The CSST systems can be installed one of two ways:
The series installation resembles traditional black iron piping. A larger diameter mainline CSST pipe supplies gas to smaller branch tubes that feed each appliance. This is often the easiest system to adapt at a future date.
A parallel CSST manifold system mimics an electric panel. All of the gas lines that feed each appliance start at a central distribution point or manifold. To add a line in the future you need to have an extra gas port on the manifold within the panel.
Yes, you can use approved soft copper for gas line work.
If you are not able to get CSST tubing and can't handle working with black iron pipe, consider using soft copper. It offers all of the same advantages of the CSST systems.
Soft copper is approved for interior residential gas piping in many cities and towns. You don't solder it like water lines.
Connections are made with common flare fittings that tighten with standard wrenches. The only specialized tool you need is a flaring tool made to fit the pipe size you are working with.
If you use copper for gas lines in your home, be sure to paint them yellow and label them with red lettering "GAS LINE" so a future weekend warrior doesn't mistake them for a water line!
CLICK HERE to get FREE & FAST BIDS from local plumbers who install gas lines.
Author's Notes:
If you have ANY DOUBTS about flexible gas lines or CSST, visit a local firehouse and talk to the team leader that's on duty. Visit SEVERAL firehouses to get different opinions.
In regard to your article on the CSST systems being installed in new homes. If you care to, read an article that was published in April of 2003 in the Dallas News regarding banning this installation in the city of Frisco, Collin County, Texas. Lightning strikes have caused numerous fires in residential homes as a result of CSST failing. Although the manufacturer states that it is completely safe, in fact safer than ridged black pipe, it has some serious issues. I have seen three fires in our own community as a result of CSST failure. The manufacturer accepts no responsibility for improper installation, and does not provide in any great detail, of detrimental or catastrophic failure if done so. I just saw your article and thought I would provide feedback. If you have questions on the article I mentioned, you may contact the Dallas News. Thank you for your time.
Maxwell J. Brunner
Lieutenant
Menomonee Falls Fire Department
Email- [email protected]
I responded to this very interesting email with a few thoughts of my own. My first suspicion would be that the tubing acts like a lightning rod of sorts. The thin walls of CSST might not seem to handle as much of a strike as black iron. Black iron is so much thicker that it may actually take a lightning strike better.
I suggest you look up the article in the Dallas News if you want more details.
Column 296
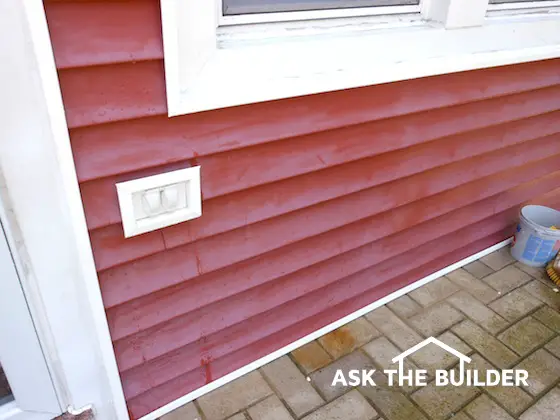
Paint Vinyl Siding - You can paint vinyl siding. This faded siding was dark red from the factory. Use a light color paint for the best results. A link to a GREAT paint that will stick is below. Vinyl siding trim should be a different color than the siding. What are exterior painting costs 2021? Copyright 2021 Tim Carter
You can paint vinyl siding. It's important to realize you must use urethane paint and chose a light color for the best results.
DEAR TIM: My house has a combination of wood and vinyl siding. The wood siding needs a fresh coat of paint, but I want the color of the two sidings to be consistent.
My wife wants a new color that is different than what we have now. Can you paint vinyl siding?
If it is possible, are there special paints and techniques that I must use? Donald N., Scranton, PA
CLICK or TAP HERE to get FREE BIDS from local painters.
DEAR DONALD: You can paint vinyl siding! If you had asked this question several years ago, I don't think you would have liked the answer. But fortunately, there have been some major breakthroughs in the paint and coatings industry.
You paint vinyl siding using a special paint made for vinyl siding. The paint must have a special urethane resin or glue.
Several new exterior paints are available that have been formulated to stick to vinyl siding. They perform so well that the paint manufacturers offer a long-term warranty so long as you follow the paint label instructions.
Paint peels from vinyl siding because vinyl expands and contracts as it gets hot and cold. This back-and-forth movement breaks the bond between the paint and siding.
Painting vinyl siding is challenging for several reasons. Vinyl siding has a very high expansion/contraction coefficient.
This simply means that it expands and contracts significantly as it experiences periods of exposure to sunlight and then periods of shade or darkness. When direct sunlight hits the siding, it grows dramatically.
This movement of the siding caused older traditional exterior paints to fail in short order as the bond between the paint and the siding was severed by this constant back and forth movement.
CLICK or TAP HERE to get FREE BIDS from local painters.
Do not paint vinyl siding with a dark paint. It will absorb too much heat when the sun strikes it. Vinyl siding soaks up the heat to a great degree. If it gets too hot, it can buckle and distort.
Light colors reflect more of the sun's heat and are best for vinyl siding.
This is why many vinyl products are offered in lighter colors. Because of this fact, you can actually damage your vinyl siding if you paint it a color that is too dark.
IMPORTANT TIP: The paint manufacturers highly recommend that you paint the vinyl siding a color that is no darker than the current shade of your vinyl siding.
Yes, paint your siding a very similar shade if possible using a high-quality paint that says on the label it's made for vinyl.
For example, if your siding is currently a light shade of beige, you can paint it a light shade of green, blue, tan, etc. The trick is to use paint store color chip cards to guide you.
Locate a color that is as close as possible to your existing vinyl siding. Use that color chip card as a benchmark and find complimentary paint chip cards that have the same depth of color as the paint chip that matches your siding.
You can then select a color that is equal to or less in color richness and depth as your existing vinyl siding color.
Painting Vinyl Siding Video
Here's how pros paint vinyl siding. I can't vouch that everything they're doing in the video is correct, but if you do decide to paint, you may want to use a sprayer as you see in the video. It's the ONLY way to apply paint to vinyl.
You must use the right paint to achieve victory. The ones that seem to work best with vinyl siding are ones that have a urethane resin. You can also use a paint that has a blend of urethane and acrylic resins.
CLICK HERE to get FREE & FAST BIDS from local painters.
Water-based urethane paints have extraordinary adhesive qualities. This is exactly what one needs to combat the daily movement of the vinyl siding.

Here's a great urethane-fortified paint. That's why on the label it says it's for porches and floors! It's tough enough to walk on so you know it will perform really well on your vinyl siding where no one can walk except squirrels. CLICK THE IMAGE NOW TO have this paint delivered to your home.
Exterior latex paints that contain urethane are readily available. Simply look for the word urethane on the label of the paint can.
Yes, you must clean the siding before you paint. Follow the exact directions on the paint can label to get the absolute best results from this paint job. I feel that a clean, dry surface is very important.
If you clean your house like your own body or your car, you'll have a great head start. This means using soap and water and some good old-fashioned elbow grease.
Rub & Scrub

Stain Solver is MADE in the USA with USA ingredients that are food-grade quality. CLICK THE IMAGE to order some NOW.
You must mechanically remove the dirt film from the existing painted surfaces with soapy sponges, rags or brushes.
The best cleaning solution is a mixture of Stain Solver certified organic oxygen bleach and a small amount of liquid Dawn dish soap.
Stain Solver is a powder you mix with water. I use hot water and stir it for two minutes making sure all of the powder is dissolved.
You apply it to vinyl siding that's in the shade. Keep the siding wet with the solution for up to 15 minutes then scrub the siding with a brush used to clean RVs.
Don't count on pressure washers to clean your existing surfaces. Not only do they not get all the dirt off the surfaces, but they also can inject massive amounts of water into and behind the siding. This hidden water can cause big problems as you begin to apply the new paint.
If mildew is present on the existing surfaces, use an oxygen bleach solution to remove it. Stain Solver Oxygen bleach will not harm the vinyl siding nor any vegetation near your home.
IMPORTANT TIP: Avoid chlorine bleach as it's highly toxic to vegetation.
Painting in direct sunlight is also not the best idea. If you can paint your home in cooler weather and preferably on overcast days, the paint will have excellent conditions in which to dry and bond to the vinyl siding and existing wood siding.
Windy, hot and sunny weather is not the best time to paint contrary to what many people believe.
CLICK HERE to get FREE & FAST BIDS from local painters.
| Message from Tim:
Years ago while researching a column about cleaning decks, I discovered the wonders of Oxygen Bleach. It is perhaps the 'greenest' cleaner I know of as it uses oxygen ions to break apart stains, dirt and odor molecules. There are no harsh chemicals, and it works on just about anything that is water washable. I decided to create my own special blend using ingredients made in the USA. In fact, the raw materials in the active ingredient are food-grade quality registered with the FDA. I call my product Stain Solver. I urge you to use it to help with cleaning your vinyl siding. You will be amazed at the results! |
Painting vinyl siding was mentioned in Tim's May 20, 2018 AsktheBuilder Newsletter.
Are you captivated by the weather news? Have you ever thought why this is so?
I think it's a scale issue. The wonders of Mother Nature are so much larger than us and contain such vast amounts of power and fury.
Your appetite to know more about hurricanes, cyclones, tornadoes, earthquakes, forest fires, blizzards, etc. no doubt is hard coded into your brain stem.
I feel part of the attraction is scarcity. All of those natural forces can take away something from you that's pretty valuable - your life.
Then there's the inner morbid curiosity we all seem to possess that Don Henley explores in his famous hit song Dirty Laundry.
If you've not listened closely to the lyrics, you should.
CLICK HERE to read them.
You & Clutter
Let's be honest with one another. I'd like you to answer these questions:
The past three weeks I've been involved in a massive project here at my house solving all those above problems. It's a project you might have to do to, but have been putting off.
I put mine off for nine years and simple could no longer stand it.
Years of clutter are disappearing. I've just about wrestled the demon to the ground. I can see large sections of floor again in my shed.
I'll be able to park two vehicles in the garage this winter with lots of extra space.
My garage attic will be so open I may create a man cave extension with a lounge chair and my model-trains-under-glass coffee table!
I inherited the horrible packratitis disease from my mother. She had a chronic case. I don't have it quite as bad as she did, but I'm infected. My wife Kathy may disagree.
I just wanted to share how liberating it is to be free of so much stuff. It's a fantastic feeling.
I was able to sell many things. Other things went to the free room at our town dump. I discovered the best thing to do is create a FREE pile in the garage and when someone comes to buy something, they can pick anything they want from the pile. It's a FUN GAME and people are delighted to get something for free in addition to paying for what they came for. It's a win win win.
To help put the declutter icing on the cake, I had Kathy order a few things for me yesterday from Amazon.com. I need to finish organizing decades of accumulated nails, screws, bolts, nuts and many other small items that are very handy to have.
You can have your own small hardware store and save yourself LOTS of money. Have you noticed the outlandish price hardware stores and big box stores charge for one screw, bolt or nut? WOWZA! No way I'm throwing all mine out!!!
I've had lots of great durable plastic bins for years. I got most of mine 30 years ago. They were in the rear of my utility body truck holding nails, screws and other small parts.
Now they're on some narrow shelves in my garage, but I need more.

What you see above is an Akro bin. They come in all sorts of great sizes. They're also very affordable.
They come in about seven or eight colors. Black, red, blue, gray, green, yellow, purple, clear, bone, etc.
They stack very nicely. You can store lots of different things in these bins so you can find them!
I'm using different colors to help me easily identify groups of things like:
CLICK HERE to see all the Akro bins.
They have a lip on the back you can hang them from the Wall Control metal pegboard I so love. CLICK HERE to see the wonderful Wall Control pegboard I've got in my garage.
Stop the BANG!
Are you remodeling or getting ready to build a new home? Then you MUST give SERIOUS consideration to pocket doors.
Not just any pocket doors, but ones made by LE Johnson that have the newer soft-close feature. Yes, you can get heavy pocket doors to close SOFTLY and not BANG!!!
You've surely seen cabinet drawers and shelves and other sliding things that have this wonderful feature.

CLICK HERE to discover more about the fantastic LE Johnson soft close hardware.
Guess what? If you have an existing LE Johnson pocket door, there's a great chance you can ADD this new hardware.
It only takes a decent handyman about an hour to complete the job.
CLICK HERE to watch a video showing how the soft close STOPS a pocket door from SLAMMING going either direction.
CLICK HERE to see how to install the soft close hardware in a pocket door frame.
Subway Tile Backsplash - It's All In The Prep
I got a great question from Pam in Columbus, Ohio on Saturday.
It was so good I turned it into one of my national columns.
CLICK HERE to see an amazing photo.
Hurricanes / Floods & Mold
With all the extreme weather happening, it's time for you to get back up to speed on mold and how to STOP IT.
CLICK HERE for a quick refresher course on MOLD PREVENTION.
That's quite enough for today.
I've got some great projects happening here at my house this week and need to take advantage of the great weather.
I'll be taping a swell video or two tomorrow showing you step-by-step how to create threads on black iron pipe. You may not realize how easy it is to do assuming you've got the right tools!
I want you to understand it's not magic to cut threads on a smooth black iron pipe.
Tim Carter
Founder - www.AsktheBuilder.com
Do It Right, Not Over!
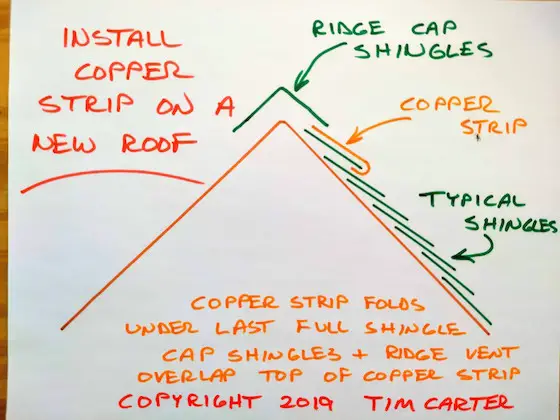
Install Copper Strip on Roof | You can install a 12-inch-wide thin copper strip on a new roof so an inch of the copper strip rests under the cap shingles and the copper folds under the last full shingle on the roof. Copyright 2019 Tim Carter. Click on the sketch to purchase copper roof strips for your roof.
Tim Carter | Founder - AsktheBuilder.com
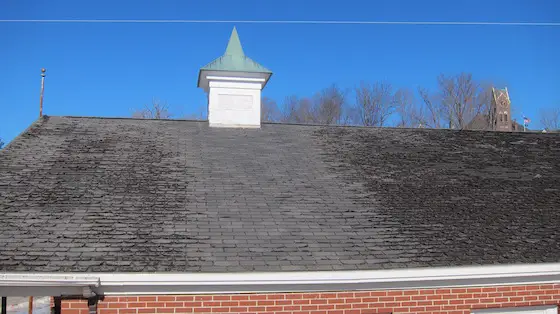
Look at how the small amount of the copper on the roof of the cupola prevents the shingles from aging.
Watch this short video first. It shows installing the copper strip on an existing roof, not a new one.
The column below it was written ten years before I taped the video.
Think of how many people are out there who just had a new roof put on this past year. Not counting the one million new homes built last year I'll bet there were at least three million new asphalt shingle roofs installed on existing homes in the USA.
Asphalt shingles are going bad too fast because many manufacturers blow too much air into the liquid asphalt at the plant. This extra air pre-ages the asphalt making it think it's already thirty years old.
I wrote a book - Roofing Ripoff - about WHY asphalt shingles are failing and how I was the FIRST PERSON in the world to discover that copper prevents asphalt shingles from becoming brittle. Brittle asphalt produces loss of colored granules and curled shingles.
CLICK HERE to discover more about my Roofing Ripoff book. You can read the first part of the book for FREE.

Yes, copper will stop the growth of roof algae too. This has been known for hundreds of years and it's why copper plates were put on the hulls of wooden warships and clipper ships. The copper stopped the growth of barnacles on the hull that would slow the ships moving through the water.
The sad fact is that the wide majority of those new roofs have no protection against roof algae. The roofers or the homeowners simply are unaware of the problem and unaware that you can buy shingles that have copper coated colored granules.
I hope you are not in this situation. If so, no problem, as there is a way for you to poison those little devils, bacteriologically known as Gloeocapsa magma. We just need to clean your roof and then introduce copper onto your shingles. I know, you may not like the look of a 2-inch copper strip at the top of your roof. However, it will look a whole lot better than the unsightly algae stains!
Common sense should tell you that you need to clean your roof first. That process is described in another article.
Sheet copper or zinc is usually available at any roofing supply house. These are the places that REAL roofers go to purchase their roofing products.
The best copper is a lightweight version.
Do NOT confuse these places with the large home center stores sprouting up everywhere! The roofing supply houses sell copper for all kinds of roofing uses. They also sell zinc. Both metals will kill the algae, but I think you should use copper. Zinc has a tendency to produce a grayish film over time, so it may discolor your shingles. Copper should not cause a problem on your roof.
That's tough for me to answer without seeing your individual roof. One thing is for sure, you need the strips as high up on the roof as possible, so that the copper coats as many shingles as possible.
Most asphalt shingles are installed so that they have a five-inch area of the shingle exposed to the weather.
On a new asphalt shingle roof, just install a 12-inch-wide strip up at the top of the roof just before you apply the cap shingles.
The bottom edge of the copper strip can fold underneath the last full shingle placed on the roof. Fold the copper back over so it's exposed to the weather and extend it up to about an inch or two ABOVE where the cap shingles will overlap it.
The key is to adjust the placement of the copper so you have about 10 inches exposed if possible and the cap shingles overlap the top of the copper so the roof remains watertight.
It's really easy to accomplish this.
Column B374

Here are the two monster defects in Pam's wall. See that uneven old yellow adhesive? It's got to go. Copyright 2017 Tim Carter
DEAR TIM: We’re in the home stretch of a delightful bathroom remodel job. One of the final steps is to install subway ceramic tile as the backsplash above the dual-bowl sink.
The plaster wall above the new granite top needs to be repaired. After we removed the old ceramic tile there were giant holes.
My husband is in a hurry and wants to do the patch fast with a pre-mixed product that comes in a tub from the local big box store. I want your expert opinion as to the best way to repair the massive depressions in the wall from where old trim tile pieces were removed.
Do we need to remove the old hardened glue from the walls too? Pam L., Columbus, OH
DEAR PAM: I’m humbled that you feel the expert opinion will emanate from my fingertips as I type this!
The truth be told I’ve been in the exact situation you’re now facing countless times while working in paying customers’ homes. The tile style changes from year to year, but the method of getting the wall ready for the tile has not changed.
Let’s first talk about high-gloss finish ceramic tile first before we go much farther. We need to do this to slow down your husband so he keeps the key out of the car’s ignition as he tries to get to the big box store.
Have you ever noticed how a small dent in the door of a new car stands out like a sore thumb? The paint may not be chipped or scratched, but you can clearly see the inward depression.
Free & Fast Bids
CLICK HERE to get FREE & FAST BIDS from local tile contractors who can do this repair for you.
This happens on high gloss surfaces like car paint because the reflected light off the metal is bent by the dent. In other words, high gloss finishes are unforgiving if the surface beneath the gloss is not in the same plane.
If you want every aspect of your bathroom remodeling to be gorgeous, you need to be sure the wall surface under the tile is not only perfectly smooth, it needs to be in the same plane. If the subway tile pieces are not in the same plane on a flat surface, they’ll reflect light differently and it will look like a drunk tile setter installed them.
I see by the photos you sent that the new granite top and faucets are installed. This is going to make the job of repairing the wall much harder as you work around these finished items. The wall repair should have been done long before the cabinet, top and faucets were installed.
You also need to be concerned with what I call the chain of adhesion. What’s that old saying? “A chain is only as strong as its weakest link.” I can clearly see in your photo that you’ve got traditional plaster applied to gypsum lath panels nailed to the wall studs.
For the tile to stay affixed to the wall for decades, the bond between all the wall elements needs to be as strong as possible. The pre-mixed compounds I see in the big box stores contain very weak glues in almost all cases. What’s worse is some of the glues in these products are water soluble. Premixed drywall joint compound and common spackling are great examples of products with these weak glues.
Once these two products are dry, you can dissolve them by rubbing them with a wet sponge. Rub your plaster walls for days with a wet sponge and nothing happens except for you getting blisters and sore muscles. Plaster is waterproof and it bonds tenaciously to just about anything.
Here’s how I’d proceed to make your walls ready for the stunning subway tile I’m sure you’ve selected. First you need to purchase some liquid adhesive remover.

Here's a great adhesive and mastic remover. Don't use just any adhesive remover. It needs to say it's made for tile mastic. CLICK THE IMAGE NOW to have this delivered to your home in days.
This product brushes on much like liquid paint remover. it’s imperative you protect the granite top and faucets and any other finished item like the front of the vanity cabinets from this harsh chemical.
CLICK HERE to get FREE & FAST BIDS from local tile contractors who can do this repair for you.
Follow the directions and get all the old yellowed tile glue off the plaster exposing the original white lime finish plaster. Once it’s off, now it’s time to start to repair the deep depressions.
Purchase a bag of Structolite base plaster. You can get this online or from a local building supply store. Be sure the holes in the wall have all loose material removed and brush away and dust.

This is a fantastic gypsum base-coat plaster. You just mix it with water and it really sticks to wallboard and other old gypsum plaster. CLICK THE IMAGE NOW to have this bag at your doorstep in days.
Mix up the Structolite plaster per directions on the bag. You want it to be the consistency of somewhat stiff applesauce.
Watch this video to see how to mix Structolite. For small amounts you can just mix by hand with a stiff 3-inch broad scraping knife.
Take a wet sponge and lightly pat the old base plaster in the hole to get it slightly damp just before you’re ready to apply the Structolite. Pack in the new plaster being sure to keep the new plaster 1/8-inch lower than the existing white lime plaster finish you exposed once you removed the old glue.
Use a straightedge to ensure the Structolite is lower than the old white lime plaster. Allow the Structolite to cure for one day.
The next day fill in the slight depression and all other tiny holes in the plaster wall with Durabond 90. This is a dry-setting joint compound that’s much like the white lime finish plaster on the wall.

This is the dry setting joint compound I prefer. It mixes easily with water. Use COLD water to slow set time. Mix until it's like warm cake icing. CLICK THE PHOTO NOW TO HAVE THIS DELIVERED TO YOUR HOME. NO NEED TO FIGHT TRAFFIC AND RUDE SHOPPERS.
Mix it with water to the consistency of warm cake icing so it’s silky smooth. You only have 90 minutes to work with it before it gets hard. You can use cold water to slow the hardening process.
Take your time and be sure the wall surface is as smooth as glass and in the same plane. Use a long straightedge or metal level to help you locate small depressions that may exist in the old white plaster finish. Fill those with the Durabond 90 product so the final surface under the new subway tile is as flat as possible.
Watch this video to get an idea of how to work with quick-setting plaster or setting compound.
CLICK HERE to get FREE & FAST BIDS from local tile contractors who can do this repair for you.
Related Column: Tile Setting on Cold Surfaces
Column 1213
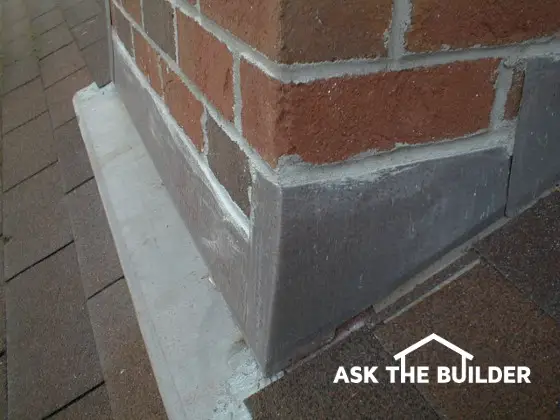
Here's an example of some excellent chimney flashing and mortar joints that prevent water from entering a home. The water would create severe mold and rot issues in the attic and roof framing. Copyright 2017 Tim Carter
DEAR TIM: There's been so much news lately about mold that I am very concerned about what might happen to my family and myself in my new home. When I was growing up, mold was never and issue.
What is different now? Why is mold such a problem with newer homes?
Older homes seem to be somewhat immune.
How do you STOP mold growth?
Chad G., Birmingham, AL
DEAR CHAD: As much as I hate to say it, I think the mold problem is just starting to raise its ugly head.
For many years I have witnessed building construction practices that, in my opinion, contribute to severe mold growth and subsequent structural failure from wood rot. The problems can be traced to several things.
First and foremost among them, many modern builders simply do not understand the dynamics of water vapor, condensation, ventilation and exterior moisture protection.
In the years ahead, I predict that mold discovery and mold related issues will reach epidemic proportions in recently built homes.
CLICK HERE to get FREE & FAST BIDS from local mold control experts.
Let's discuss the older home you grew up in and the thousands of older homes that are still occupied and in excellent condition in your community and others around the USA.
Older homes simply were not built as tightly as the homes of today. The weatherstripping around doors and windows was poor or non-existent.
Many homes had little or no wall insulation. The houses were drafty.
Inexpensive heating fuel allowed these building practices to exist. Residential central air conditioning had yet to be invented. Builders understood the importance of tar paper beneath wood siding.
Brick structures were two or often three courses thick. Indoor humidity in the winter time was very low.
Mold and mildew require just three things to form and grow:
It's virtually impossible to eliminate the first two in the list. Mold spores are everywhere. Thousands or hundreds of thousands are in your home.
Food for mold is everywhere. Dust, sugars, dirt, wood, paper, fabric, are all food sources for mold.
But you can stop WATER. If no water is in contact with the spores and food, there's NO MOLD.
Watch this short video. He explains what I just mentioned above.
Because of these factors and several more, water that triggers mold growth didn't collect inside of wall cavities, on interior wall surfaces and in attic spaces. The drafty nature of the construction allowed the water to rapidly evaporate into the atmosphere.
Mold most certainly did grow, but only in places where water leakage had become a chronic problem.
The energy crisis of the 1970s turned the residential construction industry on its ear. There was a rush to seal air leaks in houses and improve the weatherstripping on doors and windows.
But many didn't think about the secondary long-term effects of installing many of the new energy products.
Vapor barriers in exterior walls became a building code requirement. In many areas of the nation, forced air heating and central air conditioning with its necessary duct work replaced traditional hot water or steam radiant heating systems.
Along with the duct work came whole house humidifiers. Humidifiers are a good thing, but if not operated properly, they can become mold's best friend.
The rapid growth in the overall population created a housing boom. This led to an influx of builders and sub-contractors into the residential housing industry that had little or no formal training.
CLICK HERE to get FREE & FAST BIDS from local mold control experts.
These individuals, without knowing it, started a trend of poor building that was, and continues to be, unknowingly passed on to subsequent builders and sub contractors. Just because an individual has been doing something for 20 or 25 years doesn't mean it is right!
For example, go back in time and you would never see a roofer caulk metal flashing in place. Sure, modern caulks are a far cry better than old brittle butyl caulks, but they can and do break down over time.
On the other hand, 40-pound tin flashing embedded 3/4 inch deep into a mortar joint has been known to last 70 years or more. It's hard to get tin-coated steel now, so opt for 1/32-inch-thick sheet lead.
Old builders discovered well over 100 years ago that overlapping layers of ordinary 15 pound tar paper stopped rain water and snow melt from touching vital wall sheathing and wood framing members.
Today we have modern air and water infiltration barriers, but many houses are built without this vital secondary moisture protection. Wind-driven rain can and will get behind all types of siding.
It can also penetrate the single layer of brick veneer that so many homeowners think is waterproof.
To stop mold growth, your builder must be well educated and be able to demonstrate a knowledge of how to use modern building materials in such a way that water does not condense within wall cavities and attic spaces.
He needs to build your home to standards that exceed what the building code states. The building code is a wonderful set of guidelines but many code officials will agree that is a set of minimum standards.
If he does not agree with this point, it is time to re-open the bidding process on your new home.
If you have mold growing on a surface, it can be removed by using different types of bleaches. Not all bleaches are the same.
The most common bleach that most people use is chlorine bleach. It's a liquid purchased at just about any grocery store. The chemical name for chlorine bleach is sodium hypochlorite.
CLICK HERE to get FREE & FAST BIDS from local mold control experts.
Chlorine bleach is a very effective mildew and mold killer, but its fumes can bother some people. Mixing a 50/50 solution of chlorine bleach and water is often all you need to do to make a powerful solution.
Spray it on the mold and mildew and let it sit for several minutes. Scrub it with soap and water and then rinse.
Stain Solver is MADE in the USA with USA ingredients that are food-grade quality. CLICK THE IMAGE to order some NOW.
If you want a less toxic bleach, you may want Stain Solver Oxygen bleach. Oxygen bleach is a powder you mix with water.
Stain Solver produces no fumes and it also does a good job or removing mold and mildew, but it doesn't do it quite as fast as chlorine bleach.
The Oxygen bleach solution is also safe for any vegetation and nearby plants should you be working with it outdoors.
Message from Tim:
Years ago while researching a column about cleaning decks, I discovered the wonders of Oxygen Bleach. It is perhaps the 'greenest' cleaner I know of as it uses oxygen ions to break apart stains, dirt and odor molecules. There are no harsh chemicals, and it works on just about anything that is water washable.
I decided to create my own special blend using ingredients made in the USA. In fact, the raw materials in the active ingredient are food-grade quality registered with the FDA. I call my product Stain Solver. I urge you to use it to help with your cleaning project. You will be amazed at the results!
CLICK HERE to get FREE & FAST BIDS from local mold control experts.
This is a RARE EMERGENCY alert message.
I did this a few years back with Hurricane Sandy that pummeled New Jersey and New York City back in late October, 2012.
This is really for folks who live NORTH of FL. If you're in Florida, you're about out of time and you may have already evacuated.
Here's what you need to know about the aftermath of Hurricane Irma:
Your local police and fire department will BE THERE TO HELP after the storm, but you're not their top priority. It's not because they don't care, it's just they have more valuable community assets they have to protect.
For example, think about fuel depots, grocery stores, hospitals, nursing homes, all energy infrastructure, etc. Anything that's important to get the community back up on its feet so the masses like you and me can get things are far more important than some house located at 4893 Vista View Drive.
Your home and all others in the community are at the BOTTOM of the pre-plan list fire departments maintain. Investing valuable first responder assets after natural disasters into one single home is not a wise thing to do. It works when just your home is on fire, but not when 10,000 houses in the community are destroyed.
How many fire trucks are within fifty miles of your house? How many ambulances? Unless you live in a huge city like Chicago, Los Angeles or New York City, I'd venture to say less than 250 TOTAL.
How many houses are going to be damaged by the storm? Tens of thousands / hundreds of thousands?
Do you see why you can't count on first responders to come to your assistance?
Your neighbors and friends probably will NOT be able to help you. They'll have their own homes to contend with.
It's going to take MONTHS to get repairs done. The law of supply and demand is in play. There are only so many contractors and if 20,000 homeowners need work, many are going to wait. That'll be you.
You're going to have to make emergency repairs to protect your home from more weather after the storm.
You need to TAKE ACTION NOW to protect VALUABLE things. Get sentimental items that can't be replaced protected. Wrap in heavy garbage bags to keep them dry. Keep them up high somewhere.
How are you going to survive?? What about food and water? What about temporary shelter?
What about all your important papers? WHERE ARE THEY? Gather them up. They should have been scanned and put up in the cloud, but it's too late for that now.
TAKE PHOTOS NOW of everything you own to show the insurance company. Upload the photos to the CLOUD!!!! You could lose your cell phone in the storm.
Cover important furniture with plastic tarps or sheets to prevent water damage from roof leaks. This will only work in areas where the windows and doors won't be blown out by the storm.
Don't try to stick around if you're near the coast and you think you can win. The storm surge will kill you.
I could go on and on and on....
The biggest thing I want you to realize is it's up to YOU to protect yourself and to account for your survival. Don't count on any first responders. They'll be busy with MORE IMPORTANT community assets.
I wish you the best of luck if you're in harms way.....
Tim Carter
Founder - www.AsktheBuilder.com
Do It Right, Not Over!
Author's Note:
Within eight hours of sending out this emergency newsletter, I heard from Butch. Here's what he sent me:
Tim,
This is well written and very true. I’m a retired emergency management director from a Florida coastal county. Everything you said, I have already said to the people in my county. Thank you for putting this on your web site.
Butch Baker
Subscribe to the FREE Ask the Builder newsletter to receive professional advice for your home. Complete the form below and each week you'll get:
Unsubscribe at any time. We respect your email privacy.