Tomorrow is going to be a big day. My oldest daughter Meghan and her husband Brent are coming from Silicon Valley, CA for a one-week visit.
Kathy and I will join them for a five-day trip to Bar Harbor, Maine. We're pretty stoked about the adventure as you might suspect!
Yesterday, I finished a Pelican case project. I'll be doing some low-powered outdoor ham radio from Acadia National Park and don't want my gear to get damaged if I slip and fall on the granite hillsides where I'll be hiking.
These durable cases can be ordered with or without inner protective foam. The foam can be cut with ease to the shapes you need so your gear is protected from shock if the case is dropped.
Everything I need to get on the air is in the photo sans my coax cable and a simple small 8 oz water bottle I use to get my yellow cord up and over a tree branch.
The cord is the halyard that allows me to pull up the ultra-thin black antenna wire you may see between the yellow cord and the blue Bioenno Power lithium-iron-phosphate battery.
Bar Harbor Meet Up?
If you live on Mt. Desert Island or in Bangor, Maine, do you want to do a little meet up? The best I can do is meet for an early breakfast perhaps next Monday, October 16th. If this is of interest to you, email me.
Driveway Erosion
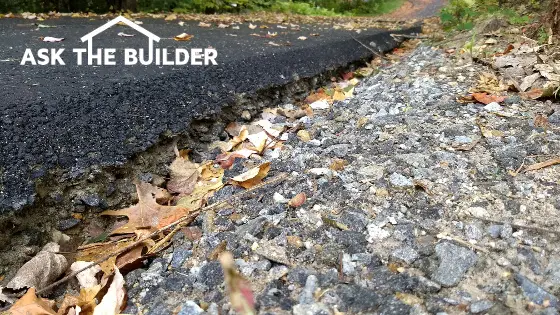
Look at the photo below. What would you say if I told you that blacktop driveway is less than two weeks old?
This brand new blacktop driveway is two weeks old. Driveway erosion repair is needed because the contractor used the wrong gravel at the edge. (C) Copyright 2017 Tim Carter
Do you see what the issue is? It's a very steep driveway near my home.
The water from a recent heavy rainstorm has started to UNDERCUT the new blacktop!!!! What did the contractor do wrong????
CLICK HERE to discover how to prevent this from happening at your home or in your yard.
Win Tools & More!
I met Tom Kraeutler about twenty years ago at a Sears Editors Conference in Florida. Tom is a friendly competitor of mine. He devotes much of his work week to his nationally syndicated radio show The Money Pit.
He asked me if I'd consider promoting a weekend warrior sweepstakes contest he's doing with Home Depot. The answer was an immediate "Yes".
It's a win-win-win. Tom has helped promote my Stain Solver, my recent Roofing Ripoff book and I've been a guest on his show a few times. You may win by entering the sweepstakes.
CLICK HERE to enter and if you WIN SOMETHING, please let me know!
Dedicated Page to You!
Would you like a web page dedicated to you for the rest of time? Yes, your name forever on a page! Imagine the bragging rights!!!!!
Here's the Bosch Bulldog doing what it does best. Drilling into solid granite like a sharp wood bit burrows into balsa wood. CLICK THE PHOTO NOW to have the drill kit delivered to your home in days. Copyright 2017 Tim Carter
18-Volt Bosch Bulldog Hammer Drill Power
This cordless hammer drill is powered by batteries. The batteries have copious amounts of energy.
The battery is shy. It's hiding behind my rain jacket. It provides plenty of power when you need it. As a matter of fact it's got 18 volts and 6.3 Ah of power. Copyright 2017 Tim Carter
Hammer Drill Features
The photographs do a much better job of telling the story. With this in mind, look closely at all the great features!
The black accordion-shaped part is a vibration damper. You can see it above my right index finger. CLICK THE PHOTO NOW to have this handsome drill in your hands in days. Copyright 2017 Tim Carter
I drilled into solid granite on a rainy day. This helps dampen the dust created by the powerful drill. CLICK HERE to have this SDS-plus hammer drill in your truck in days. Copyright 2017 Tim Carter
The tool has three settings. It will chip, drill or hammer drill. CLICK THE PHOTO NOW to BUY. Copyright 2017 Tim Carter
This brand new blacktop driveway is two weeks old. Driveway erosion repair is needed because the contractor used the wrong gravel at the edge. (C) Copyright 2017 Tim Carter
Driveway Erosion Repair
DEAR TIM: I need to make a driveway erosion repair. My new blacktop driveway is already falling apart. A heavy rain washed away the gravel on the edge of the driveway.
As a result, the gravel under the new blacktop is starting to erode. Why is this happening?
What's the best driveway erosion repair I can do so it never happens again? I’m handy and not afraid to work. Will your repair method stop soil erosion in other areas of my yard? Sally C., Hartselle, AL (This question was asked in Tim's October 10, 2017 Newsletter.)
DEAR SALLY: I’m sorry your new driveway is not holding up. The good news is you can restore it. Moreover follow my driveway erosion repair advice and you'll have a much better drive than before.
Driveway Erosion Repair & Mother Nature
Erosion is a natural process. I studied geology in college and hiked to the bottom of the Grand Canyon on my first major field trip. I witnessed the power of running water over solid rock. Water and gravity are great partners when it comes to erosion!
I also studied physics while in college. A point often overlooked by folks is the simple force equals mass multiplied by acceleration equation . This may seem complex to you, but your driveway erosion is a perfect example of this simple equation.
To put it another way, think about how much energy it takes to move a grain of sand. You can move a simple dry grain of sand with a puff of your breath. Use the same amount of breath but aim it at a small angular rock about the size of a grape. Your breath will not budge this small stone.
Size & Shape Of Stones Is Critical
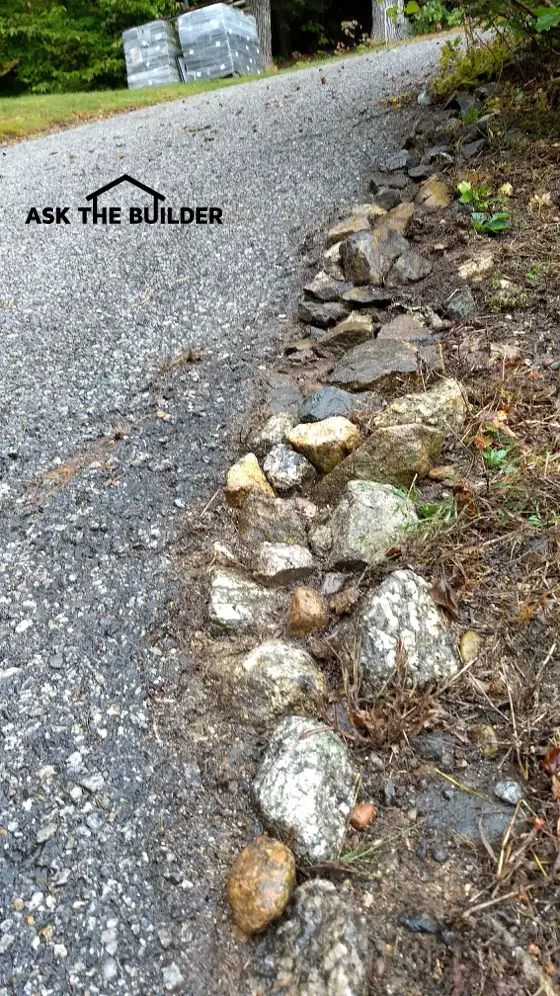
Once you decide to start your driveway erosion repair, focus on both the size and shape of the stones you'll use along the edge of your drive. By all means increase the size of the stones.
Your contractor installed the wrong sized gravel along the edge of your driveway. For one thing the gravel must be the correct shape. Large pieces of angular stone require lots of energy or force to move them. In contrast, small pieces of round stone similar to ball bearings can be moved with a tiny amount of force.
My Own Driveway Repair Project
The gravel on the edge of my own steep driveway used to erode with each moderate rainstorm. I replaced the small 3/4-inch pieces of gravel with 3-inch sized stones. All of a sudden my problem disappeared!
At the present time my town needs to do driveway erosion repair but on its roads! The road crews install small angular stones in the road shoulder. The gravel is eroded by the force of the car and truck tires on right-hand curves. In the long run this erosion can be stopped by installing the same 3-inch sized interlocking angular pieces of rock. Much more force is needed to dislodge these.
Without delay you need to install the larger pieces of stone. Install the stone a minimum of 6 inches deep by 12 inches wide. Small angular pieces of crushed stone can be used to fill the gaps between the larger stones.
The angular stone is available at local gravel pits. This stone is used beneath new roads built near your home. The gravel pit will deliver the stone to your home. You’ll need to calculate how many cubic yards of stone you’ll need.
Large stones prevent blacktop erosion. These edge stones don't budge in the worst rainstorms. Copyright 2017 Tim Carter
Place Stone Below Drive Surface
By all means make sure the large stone is about 1 inch below the top surface of your driveway. Lawn mowers, snow plows and string trimmers must not be able to kick up the stones.
On the negative side you may not like the look of these larger stones. In that case think about the anguish you’ll feel as soon as a car or truck drives along the edge of your driveway and a large crack appears in the blacktop! The large stones provide support to the edge of your blacktop.
Prevent Soil Erosion In Yards
Stop soil erosion in your yard using the same method. In general, water flowing in small channels causes erosion. With this in mind make a hardscape feature in the channel. The rock will stop the erosion.
Fill the channel or rut in the yard with larger angular stone and place alongside much larger rocks as you might see in a local stream. Take photographs of a few creeks or streams near your home. The photos will guide you as long as you pay attention to the overall look of the natural stream.
Colorful Stones Add Accent
All things considered I believe you’ll love the look of the large stones next to your driveway. Install about five or ten feet of them and stand back thirty feet to look at your work. Use colorful angular stones to accent to your drive. Do your best to look at all the types of angular stone at the gravel pit and select one that you like.
This is my DR string trimmer. It's not all shiny and new like you might see in other tool reviews. The machine cut acres and acres of grass and weeds without fail. The weeds behind the string trimmer were gobbled up by the trimmer mower just minutes after this photo was shot. Copyright 2017 Tim Carter
DR String Trimmer Review TIPS
Elegant simple design and lightweight
22-inch cutting width
Watch string trimmer video below
Cut in a counterclockwise pattern in your field or yard
My DR string trimmer is now two years old. Surprisingly it's been put to the test several times a month as long as there's no snow on the ground here in central New Hampshire.
DR String Trimmer Power
A walk-behind string trimmer is a weed-wacker on steroids. Not only is it larger than a hand-held trimmer, but it also has significantly more power. It also cuts a 22-inch-wide swath of nasty weeds or grass.
Power is your friend when you decide you want to cut down weeds taller than you in a field or large backyard!
Another key point is the engine. The engine is a Briggs & Stratton that starts each time on the first pull.
The engine is equipped with a smart self-adjusting choke. For this reason, you can get to work faster and you save your shoulder.
In the event you like specifications, they can be found at the DR Power website.
DR String Trimmer Video
This video gives you a great overview of my machine. You'll note the machines in the video are super clean, not at all like my beast that's been hard at work for two years!
Lightweight & Simple Design
The DR string trimmer weighs only 62 pounds. I frequently lift it up onto the tailgate of my Ford F-250 Super Duty 4x4 pickup truck.
It's important to point out that you provide the power to push the machine around your fields and yard. With this in mind, you'll appreciate how the DR engineers created such a strong machine using such little steel.
Likewise I came to admire the simple design. The engine is connected directly to a pulley. A rubber belt weaves through two other tension pulleys before it gets out to the pulley that's connected to the spinning trimmer head. Certainly you can see how fewer moving parts means fewer things can go wrong.
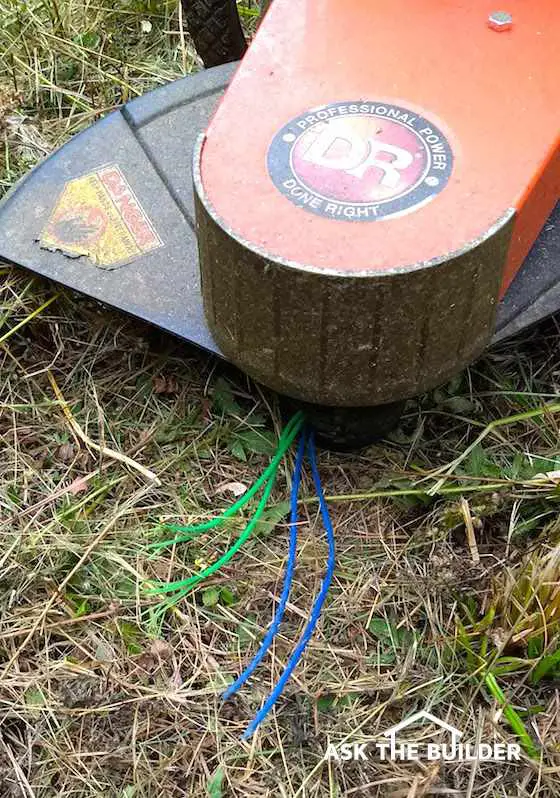
This is the business end of a DR string trimmer. You can see two different cutting cords. The green one has seen more service and has flayed ends. The blue twisted cord cuts better than the green one. Copyright 2017 Tim Carter
Tough Testing Conditions
Sooner or later you want to know how well the string trimmer cuts. The machine instantly impressed me.
It cut down 18-inch tall weeds like a regular lawn mower might cut 4-inch-tall dry grass. With this in mind I decided to put it to the real test.
I own 90 acres of wooded land in central New Hampshire. Eight acres of open meadow and cleared area along the driveway are here.
This is the bottom of the driveway to my 90 acres. The DR string trimmer has already cut lots of weeds. In the foreground, the field is free of tall weeds. Five-foot-tall weeds are to the left of my truck on the other side of the driveway. Despite the tall weeds and hilly ground, it only took me about three hours to cut the nearly one acre of cleared land in this photo. Copyright 2017 Tim Carter
Cutting Performance
The DR string trimmer can do a great job. A point often overlooked in other reviews is the mulching capability of the machine. When you have the engine throttle on high, the spinning 175 mil cutting cord pulls the weeds into the vortex under the head of the cutter. Weeds become fragments.
Walk slow to cut exceptionally tall weeds.
Cutting Tips
As you look down on top of the string trimmer, the spinning cutting cord rotates clockwise. The first thing to remember is you want to cut your weeds or grass in a counter clockwise pattern. The string trimmer instantly sends the cut weeds and grass out of the way.
Another key point is woody tree saplings. I was able to cut small oak saplings but it significantly reduces the life of the cutting cord.
With this in mind, if you just cut annual weeds with soft stalks, you'll soon discover the blue twisted 175 mil cutting cord can last for hours with little wear.
My Wishlist
On the negative side, I found the foam handle grip to be very inferior. Within a month of use, it fell apart. I feel most people would wear medium or lightweight work gloves. With this in mind an abrasive tape grip should be on the smooth steel handlebar.
Five Stars
In the final analysis, I feel the DR string trimmer is a tough lawn and field machine. The large diameter wheels and the machine's balance make it a dream to use on bumpy terrain like I have on my 90 acres.
As long as you keep the air filter clean and change the oil as recommended, this string trimmer will serve you well for many years.
These interior french doors just need trim, paint and hardware to be complete. PHOTO CREDIT: Brent Walter
Interior French Doors TIPS
"It's important to realize the first thing to get right as you begin to tackle your double interior french doors is the rough opening. This is the hole in the wall where the door fits."
Gaps between doors and jambs must be equal
Rough opening must not be twisted - SEE TEST BELOW
DEAR TIM: I’ve decided to install some interior french doors. At the present time I’m a rookie carpenter, hence I’m intrigued by some pre-hung interior french doors I saw at a lumber yard.
What’s your opinion of these doors? What else can you share that will help me install interior french doors like you might do it?
What secret tips will make the job go faster and easier? Michael G., Burbank, CA
DEAR MICHAEL: Installing interior french doors, assuming you’re a real rookie carpenter, is going to sap you of every bit of skill and patience you have at this point in your DIY career.
Are Interior French Doors Hard To Install?
It’s hard enough hanging a single pre-hung door, much less a set of double french doors. I’ve installed many pre-hung interior french doors with great success.
Double interior french doors are hard to install because you have additional tolerances you must satisfy to make the install look professional. The gap around all the doors and in between the two doors needs to be consistent and as equal as possible. This is much harder to achieve than you might think.
Should I Buy Prehung Interior French Doors?
Yes, buy prehung doors by all means. The prehung doors have the correct clearances between the jambs and the doors. You have enough other things to worry about and you'll get a better-looking job.
The first step is to inspect the doors at the store. If you can see the hinge side of the doors, look to see if the reveal or gap between the doors and the jambs is pretty close all the way around the door.
You want a gap of just about one eighth inch everywhere. With this in mind, look at other doors if the jamb is bowed or the gap is wildly different. You certainly want everything in your favor before you take the door home.
How Do You Check the Rough Opening?
You check the rough opening to make sure it's wide enough and tall enough for the door. It's important to realize the first thing to get right as you begin to tackle your double interior french doors is the rough opening. This is the hole in the wall where the door fits.
I prefer to have my rough openings at least one-half inch wider than the overall unit size of the door. The unit size is the overall height and width of the frame that the doors hang from.
The same is true for the height. I like having the rough opening one-half inch higher than the the door frame’s overall height.
Interior French Door Installation Video
By all means this is a good video showing you many important steps in the install process.
How High Should the Rough Opening Be?
Remember, this height distance is measured from the top of the finished floor. It’s always better to have the door jambs sit on top of a finished floor instead of installing the door and then trying to butt up flooring to the door jamb.
Do the Interior French Door Jambs Have to be Parallel?
The interior french door jambs need to be parallel. Since the actual doors in your new french doors are undoubtedly perfectly square, this means that if the reveal or spacing in between the doors and the frame are equal, then the overall door frame is square. The two door jambs must be installed plumb, parallel and in the same plane.
IMPORTANT PRO TIP: Not only must the vertical rough studs must be plumb in both directions, but they also must not be bowed nor crooked.
Not only does the rough opening need to be square and plumb, but it’s also very important the opening is not a helix. This means that the opening has to be straight and plumb in both directions. If one leg of the rough opening is not plumb then the two doors, when closed, will not be even at the bottom. Are you still wanting to do this install? It’s now just getting interesting.
What is the Helix String Test?
Use two pieces of string to check the rough opening. The rough opening is simply a square or rectangle when you stand back and look at it.
With this in mind, attach a string from one lower corner of the rough stud to the opposite upper corner. Do the same with the other two remaining corners.
These strings must be on the same side of the wall.
The string will create the letter X across the rough opening. The rough opening is twisted if there's a gap between the two strings.
This is a crude drawing of a rough opening for interior french doors. The green lines are pieces of string attached to the corners of the rough opening. They must barely touch at the center of the "X". Copyright 2017 Tim Carter ALL RIGHTS RESERVED. Do NOT COPY
It's important to check the second string on both sides of the first string. A twisted or helical opening can look okay with the two strings touching in the center of the X, but the one string is actually putting pressure on the other string.
How Important is it for the Floor To Be Level?
It's important to have the floor level. You’ll also have an easy time if the floor under the door unit is level from one side of the opening to the other. If the floor is out of level, you’ll have to precisely cut down the door jamb on the high side of the floor the amount it’s out of level from jamb to jamb.
If you don’t do this, you’ll have to shim up the one jamb off the finished floor creating an ugly gap. Your margin of error here is less than one-sixteenth of an inch.
Do You Tack the Door Frame In Place?
Once you get the frame and the door jambs into the opening, tack it in place with 10-penny finish nails. Be sure to use thin shims to ensure the door jamb is plumb.
You’ll have to open and close the doors numerous times as you nail to constantly check the reveal and spacing between the doors and the door jambs.
Should I Use Hidden Screws Under Top Hinges?
Yes, you should install hidden screws under the hinges. After you’re satisfied that the door is installed and the spacing is perfect, I recommend installing a hidden screw behind the top hinge of each door. For this reason I prefer to use a 2.5-inch-long screw that’s driven through the door jamb into the rough opening framing lumber.
This screw ensures that the doors stay in position for years. After all there’s tremendous tension on the top hinge, and the screw will anchor the doors to the rough framing.
How Do You Set the Finish Nails?
You’ll also need a nail set tool to drive and set the finish nails below the surface of the door jamb. Be very careful as you hammer the nails so the head of the hammer never touches the surface of the wood. You don’t want any rookie beauty marks on the door jamb.
These are standard nail sets. The yellow one has the smallest tip. These are very affordable and work well. CLICK THE PHOTO to have these nail sets delivered to your doorstep in days.
Should I Seal the Tops & Bottoms Of The Doors?
Yes, you should seal the tops and bottoms of the doors with multiple coats of paint or clear urethane finish. The french doors must not warp. For this reason, paint the top and the bottom of your wood doors with a minimum of two coats of paint or clear urethane.
This paint significantly slows the absorption of water vapor into the long vertical stiles of the doors. If too much water gets into the door, it can warp it.
Generally speaking, you'll struggle with your first attempt. Don't beat yourself up. Installing interior french doors like a pro can be done, however, you'll have to work hard this first time to get superb results.
DEAR TIM: A compound miter saw has bubbled to the top of my power-tool wish list. To be sure I need a compound miter saw to put up some crown molding.
Would it be better to get a sliding saw if I do go ahead? I'm a serious DIYr and would like a great saw. Furthermore I've read quite a few tool reviews for these saws and I'm confused. Andy D., Nashville, TN
DEAR ANDY: I am sorry to hear about your confusion after reading the tool reviews. That's unfortunate as a compound miter saw is a significant investment, and you do not want to make a mistake when you are buying a specialized tool.
Compound Miter Saw & Crown Molding
A compound miter saw is a specialized saw. It allows the saw blade to pivot in two different directions at the same time. This feature allows the saw to make a compound cut you'd find on the ends of crown molding. Hip and valley roof rafters have compound cuts.
Compound cuts are very rare in typical residential construction. To put it differently the vast majority of angled cuts in a home are simple 90 or 45-degree cuts.
Baseboards and window and door trim casing miter cuts are made with the saw blade cutting down through the material at a 90-degree angle. Consequently the saw needs to swing to the left or right 45 degrees to make most miter cuts. With this in mind the saw you want to purchase will make these cuts with ease.
You can cut crown molding without a compound miter saw. The first thing to remember is to place the crown molding in the saw so it thinks it is already hanging up against the ceiling.
As an illustration the table of a regular miter saw and the vertical fence that rises up from the saw table are oriented at 90 degrees to one another, just like the typical wall / ceiling interface so it is easy to hold the molding at the funny angle.
If you put the crown molding upside down in the saw and hold it in the saw the same way it will be installed it your home, all you need to do is rotate the regular miter saw to the correct miter angle and make the cut. Because the crown molding is being held against the saw fence tilted down at an angle towards the table of the saw, the resulting cut is a compound cut even though you were not using a compound miter saw. Isn't that amazing?
The compound miter saw is set at 45 degrees in both orientations for the purpose of making a compound cut. You'd use this setting to cut a cheek cut on a valley rafter for a 12:12 pitch roof. CLICK THE PHOTO NOW to have this saw at your home in days. Copyright 2017 Tim Carter
Sliding Saws Are The Best
I own a sliding compound miter saw. It is a fantastic tool and I use it frequently.
It's important to realize the 10-inch blade and the sliding function allow me to make precision cross cuts on material as wide as 12 inches.
A sliding miter saw in not much different from a small portable radial arm saw. While it can't do everything a radial arm saw can do, but it sure comes in handy most of the time.
This angle gauge allows the saw to tilt one way or the other past 90 degrees. In fact you can see you can go a few degrees past 45 degrees. CLICK THE PHOTO to have this delightful saw delivered to your home. Copyright 2017 Tim Carter
Very Versatile
A sliding compound miter saw is a wonderful tool to have around the shop or for a serious do-it-yourselfer. For one thing, you'll use it for many purposes. By all means don't buy it just to cut crown molding.
There are many finish carpenters who love their compound miter saws and use them regularly to cut crown molding. But realize that the master carpenters of yesteryear installed crown molding without this fancy tool, much less a saw powered by electricity!
The best compound miter saw is hard to pin down. In general, tool reviews include bias. A point often overlooked is five different carpenters can have five different opinions when they test the exact same compound miter saw.
With this in mind here's a partial list of things to consider when deciding on a saw:
weight of the saw
size and horsepower of the electric motor
range of cutting angles
type and shape of the handle
diameter of the blade
Cut Past 45 Degrees
My miter saws can swing and cut past 45 degrees. For this reason all of the miter saws I own can make cuts up to 50 degrees.
For instance this characteristic comes in very handy when installing crown molding on outside corners. Frequently the needed angle to make perfect cuts is 47 or 46 degrees.
This is the table miter gauge on my compound miter saw. Note how the table can rotate to 60 degrees! This is a very useful feature. CLICK THE PHOTO to have one delivered to your home. Copyright 2017 Tim Carter
Miter Saw Stand Essential
A miter saw stand is the number one accessory you should buy. My stand is lightweight and furthermore it keeps the saw safe and stable.
The four-legged saw stand is made primarily from aluminum. It folds up for easy storage and transport. You can place the saw anywhere you want along the horizontal aluminum beam. CLICK THE PHOTO to have this stand delivered to your home. Copyright 2017 Tim Carter
Miter Saw Stand Video
Watch this video of my miter stand. The saw stand will make your mouth water.
Price Is A Good Measure of Quality
Price is often a very accurate measuring device when you are comparing the quality of compound miter saws. This is a very competitive marketplace, and there are enough manufacturers that they have to create crisp features that set them apart.
If you're a manufacturer that wants to deliver exceptional quality, then you will probably include high-quality parts that cost more. These costs result in higher retail costs to the consumer.
In conclusion, I try to purchase high-quality power tools to avoid heartbreak. I want to know it will be durable, and that it will produce accurate work. All things considered those things are very important to me.
This standing water next my own shed is unacceptable. I finished the shed in late fall and was unable to start to work on the wall and drainage issues until the spring. It can cause many different problems. There are several ways to solve the problem. Look at the after photo below. Copyright 2017 Tim Carter
"Adding soil to the low spots is usually not a good method to fix poor drainage problems. There's a much better way to dry the soil."
Water Drainage Checklist
The ground around your home must slope away from the foundation
More slope is better
Watch the linear french drain video below
A trench drain will solve subsurface water problems
DEAR TIM:Spring is here and so are the incessant heavy rains. I have several places near my house where water ponds and I need some water drainage tips from you.
It can't be a good thing for my house, as I constantly am battling water in my basement and part of the house that has a crawlspace under it. My lot isn't really that flat, so I'm at a loss as to what's going on.
Do I have to call a professional to solve this issue, or can I just add soil to fill in the low spots? What are my options to get the standing water away from my home? Marion R., Evansville, IN
Water Drainage Solution | Let Gravity Suck Water From the Soil
DEAR MARION: While I don't have accurate statistics to support my feelings, I suspect you're in a vast majority of homeowners who have varying degrees of poor drainage issues on their land or near their homes. You're correct in assuming that ponding water is not a good thing for houses.
How Can a Geology Degree Solve Water Drainage Problems?
A geology degree can solve water drainage issues because water and soil are a core area of study.
My college degree was in geology. I gravitated to two disciplines within geology: geomorphology and hydrogeology. Geomorph, as we students affectionately called it, is the study of the Earth's surface features. Hydrogeology examines ground and subsurface water. I studied these topics for three years while in college.
Both of these areas of geology are especially relevant when it comes to understanding and solving water drainage issues.
If you think about the Earth on a very large scale and take into consideration gravity, you quickly discover that Mother Nature is doing her best to constantly carry all soil, rock, your house, your car, your possessions and you down and into the oceans.
Mother Nature is also a very patient woman. She also has a split personality.
Her evil twin is constantly pushing land out of the ocean. This tectonic activity builds mountains where two crustal plates crash into one another. This is why the Earth has dry land that we build upon.
Lots of land can be sloping towards your home. I have a giant mountain just above my house that funnels water towards my home.
What does all this have to do with the water at and around your home? Simple. Topographic maps can be found online. Older topographic maps are sometimes archived and might show what your land looked like before it was developed.
This is a topographic map from Google Maps. You just select the Terrain option from the menu to see it. Note the red arrow pointing to the gray line that has the number 800 on it. Any point on that line is 800 feet above sea level as the number. The magenta arrow points to where my house is. The land slopes quite a bit towards Lake Winnisquam. 2017 Copyright Google, Inc. ALL RIGHTS RESERVED
Your builder, or possibly the subdivision developer, undoubtedly moved dirt on your lot to prepare it for building your home. This process disturbed the natural slope of your lot as virtually no undisturbed land is perfectly flat.
What Causes Natural Water Drainage and Slope?
Natural erosion causes all land to have some natural fall or slope. You don't see water drainage issues on most land you walk across because it naturally slopes so water heads to a creek, stream or river.
When you do encounter marshy land, it's because of some temporary geomorphological process.
Lakes are a great example. You can find marshes next to lakes. Lakes are temporary geological features. Mother Nature is constantly trying to fill lakes in.
Is Adding Soil to Low Spots a Good Idea?
Adding soil to the low spots is usually not a good method to fix poor drainage problems. There's a much better way to dry the soil. Ponding water on your lot tells me that you don't have low-slope culverts surrounding your house like a moat surrounds a castle.
These depressions, or culverts, should have been created by the builder so surface water always flows around your house to the towards the lowest spot of land on your lot.
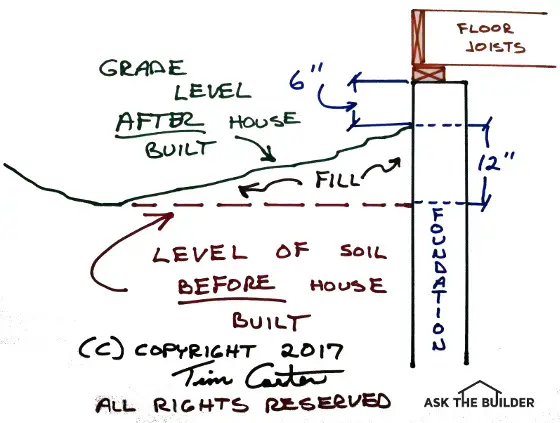
To provide great drainage around your home, you should always have the ground slope away from your home. The building code used to require that the ground should have 6 inches of fall in the first 10 feet of horizontal run away from your home. That can be confusing to some.
I made this drawing. You can see the foundation wall with a typical sill plate and floor joist. The red line is the lot before the excavator shows up. The top of the foundation should end up 18 inches ABOVE the red line. Use the dirt from the hole to create the slope away from the foundation. (C) Copyright 2017 Tim Carter ALL RIGHTS RESERVED
All it means is that within 10 feet of your foundation, the ground should slope at least 6 inches. This change in elevation could happen within a foot, meaning it would be a very visible slope very close to your foundation walls.
Can You Create a Sloped Swale Around Your Entire Home?
Yes, you can create a water drainage channel or swale around your home.
The builder should have then created an artificial channel around and away from your home that also has a slope to it. The water flowing away from your foundation would enter this channel and then flow, by gravity, completely around your home.
There should never be any ponding in this shallow channel. To achieve great water drainage, a slope of at least 1/8 inch per foot is required. More slope is better if you can tolerate it on your lot.
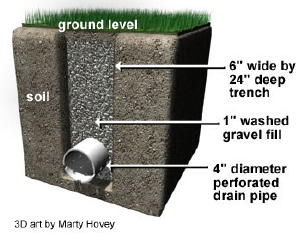
Subsurface water can be captured using a perforated pipe in a trench.
Cross-section of a Linear French Drain including the all-important perforated french drain pipe. Copyright 2017 Tim Carter ALL RIGHTS RESERVED - Do NOT COPY this graphic.
Surface water is but one challenge around your home. You also need to deal with subsurface water that flows through the soil towards your foundation and crawlspace walls.
You can capture and divert this subsurface water by digging a narrow trench in the center of the artificial channel around your home. The trench contains a perforated pipe that collects and diverts the water away from your home.
In the center of this gravel is a linear french drain. Some call them trench drains as I dug a trench and put in a perforated pipe. This area never has standing water in it now. Copyright 2017 Tim Carter ALL RIGHTS RESERVED
How Deep and Wide Should the Linear French Drain Be?
The linear french drain should be about 2 feet deep and 6 inches wide. The bottom of the trench should be parallel with the top of the artificial channel until it gets around your home.
The trench extends past your home towards the lowest point of your lot. The pipe slope can be reduced when the pipe passes the house. The pipe eventually pops out of the ground.
If you do this job, you're creating a linear french drain. They are extremely effective at solving water drainage issues because they intercept the water flowing through the soil. The water is channeled away from the house after it enters the perforated pipe.
Are There Step-by-Step Instructions to Install a Linear French Drain?
Do you want a step-by-step procedure on installing a Linear French Drain? Tim's Linear French Drain Streaming Video Series shows you how to keep your basement and crawl spaces dry or on the image below to order Tim's Streaming Video.
Do your own DIY install of a Linear French Drain with Tim Carter's time-tested methods and materials! CLICK IMAGE TO ORDER NOW!
What Kind of Gravel Should be in the Trench?
You install a 1-inch layer of rounded or slightly angular gravel that's the size of large acorns into the bottom of the trench.
This is perfect gravel to put in the trench for great water drainage. Note there's NO SAND. The water can move fast through the large voids around each stone. Copyright 2018 Tim Carter
Gravel is laid on the perforated drain pipe. The entire trench is then filled with the rounded gravel. This system readily collects subsurface water before it attacks your home. Water will flow from the end of the drainpipe where it eventually breaks through the surface of the ground.
In conclusion, you can easily improve the water drainage around your home using a combination of sloped soil and simple linear french drains. You should install the linear french drains after the final grading is completed. Be sure to do it before the grass seed is sown.
DEAR TIM:Every now and then I have to deal with a clogged toilet. But lately the blocked toilet seems to be happening with greater frequency.
I don't know if the toilet or a clogged drain line is the problem. What can I do to troubleshoot the cause of the problem?
Is it possible for me to damage the bowl while clearing a clogged toilet? What do you do when faced with this unpleasant task? Harmony T., Sandusky, OH
DEAR HARMONY: You'd be surprised how many folks are stymied by this common problem.
What's the Best Clogged Toilet Fix?
The best clogged toilet fix might be to just using more water to force the clog past the toilet colon.
Most toilet clogs happen within the curved passageway in the china. Water is heavy and you'd be surprised by how it can fix a clogged toilet.
Clearing a clogged toilet happens all over the world each day. While traveling, you could even come across a blocked toilet in London! I've dealt with my fair share of toilets that don't want to drain, some even in hotel rooms I've stayed in.
I've been a master plumber since age 29 and know how to clear most clogged toilets using nothing more than a few gallons of water.
Also, poor toilet internal design and using too much toilet paper are almost always the cause of most clogged toilets.
A toilet clogs because toilet paper, solid waste and other debris gets stuck in a narrow passageway behind and under the toilet bowl. This passageway is called the colon.
You probably have never seen what the underside of a toilet looks like or seen the piping system that connects to a common residential toilet. If you did, you'd probably shake your head wondering how they don't get clogged more often.
Toilet bowls have a colon. A colon is a convoluted pathway inside a toilet bowl. It's much the same as a curvy road rally course with one or more hairpin turns. It's called a colon because it resembles your own large intestine! This pathway inside the toilet bowl helps create the water seal keeping sewer gas and vermin from entering your bathroom.
Do Toilet Drain Lines Clog Frequently?
A toilet drain line is the pipe in the floor under the toilet. These lines rarely clog. Almost all clogs are in the actual toilet.
The diameter of this colon is usually over 2 inches, and it connects to a 3-inch drain pipe in the floor. In some houses, the drain line may even be a 4-inch pipe.
If waste and paper can make it through the colon in the toilet, you can see that the larger drain pipe in the floor can easily accommodate the waste from the toilet. Hence, this is why a clogged drain line is almost never the problem.
How Can I Test to See If My Toilet Drain Pipe is Clogged?
You can do a quick test to see if the drain pipe in the floor is clogged. You just have to pour water into the toilet bowl fast.
It's important to realize you should make sure the toilet is flushing normally before you test to see if your drain line or colon is clogged or partially clogged. If you see the water swirl around the bowl and disappear with that classic slurping noise, you're ready to begin the test.
Fill a 5-gallon bucket with water and pour it into the toilet bowl as fast as you possibly can. I mean quickly!
If the toilet bowl does not overflow, this means that the toilet colon and the drain line are wide open. A plastic army man wedged in the colon allows the water to pass. However, the toy can block toilet paper and solid waste.
What Toilets Clog Most Often?
The toilets that clog most often are those with a sharp 90-degree bend where the colon ends at the underside of the toilet bowl. Toilets that have slow water flow from the tank to the bowl clog because the water is not getting into the bowl fast enough.
If the water from the bucket drains rapidly, you could still have a design problem with the toilet. I've seen discount toilets that have a very tight turn at the end of the colon where it connects to the drain pipes at the floor.
Solid waste and toilet paper can have a tough time passing through this very tight turn. High-quality name brand toilets don't have this design flaw.
Bucket Of Water Flush Video
Watch this very short video showing how small volumes of water do nothing to flush a toilet, but lots of water work to flush!
Do Water-Saving Toilets Clog More Often?
First-generation water-saving toilets do clog more often than newer toilets that have a better design.
The Federal government passed laws years ago. The laws limit the amount of fresh water that can be used to flush a toilet.
Toilet manufacturers rushed to create toilets that conformed to this law, but some toilets would not flush well.
If you want a great flush, you need to have the water from the tank enter into the bowl as rapidly as possible.
Commercial toilets flush fast because they use high-pressure water from water supply lines to do the flushing. There is not storage tank of water like you find on the toilet in your home.
This is why commercial toilets you use all the time don't have a tank. They use the high pressure from the water supply lines to create the flush.
The chrome valve assembly that you see at the airport, shopping mall, or rest stop toilets creates loud and furious "whooooshing" flush. The Sloan company makes most of these chrome valves. They inject lots of water FAST into the toilet bowl whisking away the waste.
How Can I Prevent Toilet Bowl Damage?
You can prevent toilet bowl damage by not using anything metal to unclog the toilet.
You can damage a toilet if you use the wrong tools while fixing a clogged toilet. Therefore I'd only use a plunger and a bucket of water. That's all I've ever used in all the years of working on toilets. The clogged drain snakes made from flexible metal can scratch the polished china surface of your toilet if you get too aggressive.
As crazy as this sounds, water alone can often fix a clogged toilet without a plunger. You may have noticed in the past that when a toilet clogs, the toilet bowl fills with water from the tank but doesn't overflow. But when you come back minutes later to look at it, the water level in the bowl has mysteriously fallen.
Why Does Water Leak Slowly Past The Clog?
Water leaks slowly past a clog because of simple hydrostatic pressure. The nasty water that's almost overflowing in the bowl is higher than the top of the water seal trap in the toilet bowl. When the water drops to that level, no more water seeps past the water seal in most instances.
This happens because water from the bowl is seeping by the clog. Wait for the water level in the toilet bowl to drop on its own. Pour a bucket of clear water into the toilet as fast as you can. In addition, be sure the water doesn't splash out or overflow the rim of the bowl. The rush of the water dislodges most clogs.
I only use a plunger when several buckets full of clear water don't do the trick. Be sure the toilet bowl has more water in it than the normal level of water when using the plunger. The weight of the water, in addition to the action of the plunger, is what helps to clear the clog.
Should I Scoop Out Some Of The Nasty Water?
You need to scoop out lots of the nasty water in the toilet bowl to unclog it. Dump this water in an old bucket. Once the toilet is unclogged you can dump it back into the bowl to dispose of it.
You don't want to use a plunger when the water in the toilet bowl is almost overflowing the rim of the bowl, because you'll have a real mess on your hands. Remember that water is heavy and its weight alone can persuade a mass of toilet paper and solid waste to pass through the toilet colon.
Do Hard Water Deposits Slow Water?
Mineral deposits that collect around the siphon jet hole in the bottom of the toilet bowl can also cause the problem. The water from the toilet tank needs to enter the toilet bowl rapidly to force waste through the toilet into the drain pipe. A partially clogged siphon jet hole can mimic a clogged toilet.
Most of all a flapper valve can fool you. Flapper valves can close too rapidly not allowing enough water to enter the bowl.
The bucket-of-water test can clear clogs caused by this. Muriatic acid will dissolve hard water deposits that are clogging the siphon jet hole.
Muriatic acid is powerful and needs to be treated with lots of respect. CLICK THE IMAGE TO ORDER SOME NOW.
Should Clean Clear Water Be in the Bowl Before Using Muriatic Acid?
Clear water should be in the bowl before you try muriatic acid. The toilet must be free of clogs. Pour a bucket of water rapidly into the toilet bowl to lower the water level in the bowl. Then add 12 ounces of muriatic acid to the water in the bowl. Allow it to sit in the toilet for several hours.
First of all be sure to wear goggles and old clothes as you do this. Pour the acid into the toilet slowly to minimize splashing. Open the bathroom window to ventilate the harmful fumes. Put the toilet lid down so that animals can't get into the harmful brew.
Are Wood Sticks the Best Thing to Use To Scrape Deposits?
After waiting several hours, and wearing rubber gloves, carefully use a small wooden stick to gently scrape the opening of the siphon jet hole. Do not use any metal to do this.
Before you flush the toilet, it's a good idea to neutralize the acid. You can use a cup of baking soda to achieve this goal. Add it slowly to the liquid solution in the bottom of the bowl and stir it with a paint-stirring stick.
Flush to Check For Progress
Now it's time to flush the toilet to see if the acid did its job. If deposits clogged the siphon jet hole, you should see a significant difference in the flushing action. The acid will not hurt the toilet bowl or the plumbing drain pipes.
In conclusion, you now know that you can use water and muriatic acid to solve most toilet clogs.
Patrick had an issue with his toilet clogging all the time. Read his story in the May 29, 2009 Newsletter.
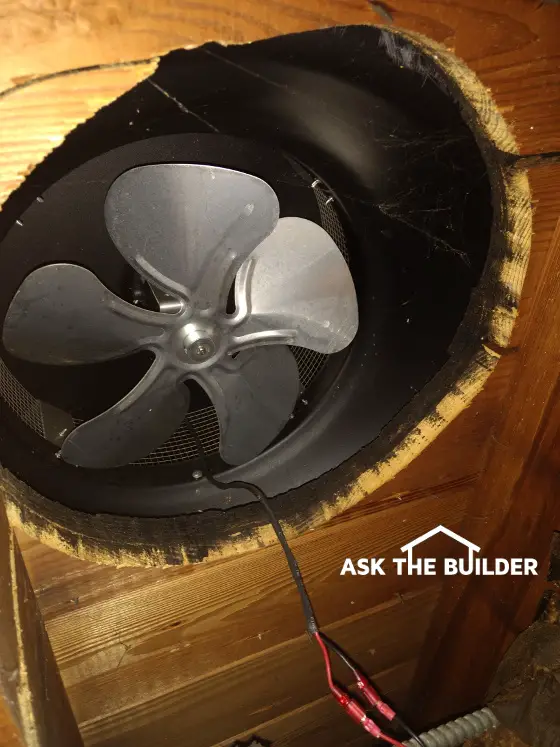
This is a powered roof ventilation fan. You’re in the attic looking at the underside of the fan. (C) Copyright 2017 Tim Carter
Roof Ventilation Fan
DEAR TIM:I’ve got a two-year-old and eighteen months ago I moved into a gorgeous ranch home built in 1950. Money is tight and I don’t want to make mistakes. The house needs a new roof. I climbed into the attic and noticed foil-faced insulation is attached to the underside of the roof and I see I have a powered ventilation fan. The roofers want to put in a ridge vent and I’m afraid to cut into my precious roof. What would you do? Is the fan I have a good idea? Should there be more ventilation? What about soffit vents? The house has survived for sixty-seven years without them? I’ve been on countless blogs until 1 am until my eyes hurt and the information is so conflicting. Help me Tim! Stacey V., University Park, MD
DEAR STACEY: We’ve got lots of ground to cover and I’ve got limited space in this column. Let’s discuss the confusing information you’re seeing on the home improvement blogs.
I’ve had the good fortune to meet many of the bloggers at media events. When I chat with them, I quickly discover that most have never worked in or on the house of a paying customer. Most of the bloggers have day jobs and just an interest in home improvement. Some have worked on their own homes and think they’re now experts.
In my opinion, you need about twenty years or more of day-in day-out field experience working for paying customers to be able to give sound advice. From now on when you visit a home improvement blog, go to the About Us page first. If that blogger can’t convince you he/she has worked in the homes of paying customers for decades, you might want to leave that website and find one like mine.
I’ve worked on many 1950s ranch houses just like you bought. In fact, my in-laws house was nearly identical and I put a new roof on it back in the mid 1970s. Back in the 1950s weatherstripping was minimal, air leaks were plentiful and heating fuel was cheap. So much air leaked into and out of these houses that humidity issues were rare.
Fast forward and many of these houses now have new windows and doors that have great weatherstripping. Air leaks have been caulked. Your house may be one that’s been retrofitted and the indoor humidity can be much higher than fifty years ago because cold dry air in the winter can no longer mix with the more humid air you have inside your home.
This is why roof ventilation is now much more important. The humid air needs to get up into the attic, which it does with ease, and escape back outdoors as fast as possible. You want air moving through your attic, even if it’s just enough to move the smoke from a burning incense stick.
The roofers are giving you good advice. I’d recommend a continuous ridge vent to help exhaust humid air from your attic space. For these to work well, you absolutely need soffit vents to supply the incoming air into the attic.
You’ve got a powered roof ventilation fan that the previous owner installed. You need to test it to make sure it works. Most have a built-in thermostat where they come on a set temperature and then turn off when the attic cools down. I’d have the turn-on temperature set to 120 F and the turn-off temperature set to 95 F.
I’m a big fan of roof turbine vents. Some people call these whirlybirds. They look like small round mushrooms sticking out of your roof. The vents have blades that are shaped to capture the wind and then spin. This spinning motion sucks air from your attic.
They work for free and can suck hundreds of cubic feet of air per minute out of your attic if the wind is really blowing. I’ve had these at my last house for years and they worked very well and never ever leaked. I’d install two of these turbine vents on the back side of the roof as high up as possible but not so high as you can see them from the street.
Whoever installed the foil-faced insulation up against the underside of the roof made a big mistake. I’d remove that as soon as possible and lay it on the floor of the attic with the foil facing up towards the sky. The foil, as long as it’s dust-free, will act as a radiant barrier and reflect the invisible infrared rays generated by the hot roof system back away from the inside of your home.
The way the insulation is now installed can cause condensation to build up on the underside of the roof sheathing. It also makes your attic hotter in the summertime which then makes your air conditioning work harder.
When the sun heats up the roof system, the insulation and the air in your attic my rise to 140 F or more on a brutal summer day. This heat in the attic space can’t easily escape back out to the outside because the foil-faced insulation is keeping the heat in the attic space.
Happy October! It's my favorite month of the year.
It's cool, the air is crisp and it's usually quiet in the woods as the birds and insects are getting ready for winter.
CLICK HERE and then scroll down to see photos of what Mother Nature has in store for all to see here in central New Hampshire in just two weeks.
There's some delicious eye candy at the above page. The photos were NOT enhanced in any way. What you see is what I saw when I took the photos last year.
New Stain Solver Website
The past week or so, my team has been hard at work creating a new Stain Solver website. I'm so very lucky to be surrounded by Ellen, Steve, Roger and of course Kathy my wife.
But we now need your help and valuable input.
My intention was to make the new site super sleek and easy to navigate. Below are two screenshots of the home page.
The top one is from a desktop computer and the second one is what it should look like on your phone or small tablet.
Using mobile devices to visit websites is a trend that's been growing by leaps and bounds. You may be reading this newsletter on your phone!
Creating a mobile-friendly Stain Solver website was long overdue, but now it's done and I think it's going to be easier for you to use. Next week we'll tackle updating the shopping cart making it more friendly.
Here's where we need your help.
What pages are missing at the new website?
What do you want to know about Stain Solver when you visit the site?
What things do you want to CLEAN using Stain Solver?
IMPORTANT TIP: The new site has a POWERFUL built-in SEARCH ENGINE.
Rather than give you pages of text links to slog through, we thought it best for you to just type in a keyword of what you want to know about.
All you have to do to find an answer to your problem is type one or two keywords into the Search Engine on each page.
Here are some examples of keywords that might directly relate to the problem you're trying to SOLVE:
deck
composite
shipping
red wine
algae
mold
boat
outdoor furniture
grease
Use the handy SEARCH box on each page and enter in just one or two keywords. See if the answer you need comes up in the search results.
If you don't find a page that has what you need, please respond to this email with the list of keywords you typed in that produced no useful results.
I'll then construct new pages to match what you need.
Happy hunting and CLEANING!
STOP Algae, Mold & Mildew on Patios FOREVER!
Do you have nasty algae, mold and mildew growing on your patio, sidewalk, driveway or wood deck?
What if I told you there was a way to stop it forever?
That's not a bowl of kid's cereal above. It's secret magic crystals of goodness!
All you have to do is CLICK HERE for the solution!
Hurricane-Proof Shingles
Two monster hurricanes recently ravaged parts of the USA. Harvey happened to hammer Texas.
When it came ashore as a category 4 beast, it aimed right at the Mustang Island Episcopal Conference Center.
There it is above after the storm. The green material on the mansard side walls is Davinci Roofscapes composite slate tiles.
It's the same material that I put on my roof here at my home two summers ago.
"Wind speeds were between 120 and 140 mph when Harvey came ashore," says Rob Watson, director of camps and conferences for Episcopal Diocese of West Texas. "We can't say enough about the DaVinci product. Only a few shingles blew off during the storm and the conference center received little structural damage.
"When we originally researched the DaVinci roof, we were told that it would stand up to hurricane conditions. I didn't expect we'd have to test that claim so soon. I was pleasantly surprised that the tiles held their ground."
I'm sharing this with you only so you know there are roofing materials that can handle just about anything Mother Nature can dish out.
Tool of the Week
I'm trying like the dickens to share a superb tool with you each week. Christmas is coming and you may want to surprise that special someone with a gift that keeps on giving.
This week, it's the Senco FinishPro XP25 finish nailer.
I tested this tool two months ago while helping my son build a custom desk out of used oak shipping pallets.
As you might imagine, I've used countless finish nailers in my life including the generation-one nailers made by Senco thirty-five years ago.
The FinishPro 25XP air-powered nailer was the lightest nail gun I've ever handled. It was a dream to use.
Senco has mastered nail guns and is, in my opinion, the undisputed leader in the industry. Their heritage with nail guns is both rich and deep.
CLICK HERE to get all the specs on this wonderful tool.
Christmas is just weeks away. If you're happy with information you've received in this newsletter throughout the year, it's a great time to reciprocate.
If you shop at Amazon using my affiliate links, then I get a tiny slice of the purchase price as a commission. This does not cause the price of the item you buy to be more expensive.
I'll start to put in a friendly reminder link each week that you can use. Please click the image below to see what I mean. It's EASY!
Of course you can use these links all year and there's always one in the RIGHT COLUMN of the newsletter each week.
THANKS!
I'd say that's enough for today, wouldn't you?
I'll be back soon with some revised columns for you.
Remember, please go visit Stain Solver and let me know what pages are missing. Only email me AFTER you've tried using the Search Engine at the website.
Tim Carter
Founder - www.AsktheBuilder.com
Do It Right, Not Over!
Expert Advice For Your Home
Subscribe to the FREE Ask the Builder newsletter to receive professional advice for your home. Complete the form below and each week you'll get:
DIY Tips
Tool Reviews
Project Guides
Product Discounts, Giveaways & more.
Unsubscribe at any time. We respect your email privacy.