Builder Abandons Job TIPS
- Talk with general manager of local lumberyard
- Request detailed cost breakdown in bidding process
- Only pay for satisfactory work and materials stored on job site
- Plans and specifications must be excellent
- CLICK HERE to Get Tim's FREE & FUNNY Newsletter!
This column will help prevent the agony caused when a builder abandons a job. Yesterday, my oldest daughter Meghan and her husband Brent arrived at my house here in central New Hampshire. They flew in from California and tomorrow my wife and I will join them on an adventure to Mount Desert Island on the coast of Maine.
They plan to buy a lot so they can build a new home. My wife and I were invited to tag along to help guide them so they don’t make a mistake purchasing a bad piece of land.
A No-Show Builder in New Hampshire
Three days before, as my wife and I were getting back home from church we drove past a new house on our street that’s still unfinished. The builder started the home in May of 2016 and it should have been occupied by last Christmas as it’s not a very big nor complicated home. I met the single mom who owns it back in March as the building site was covered in a slushy snow.
Free & Fast Bids
CLICK HERE to get FREE & FAST BIDS from local builders who can help your dreams come true.
Related Links:
Finding a Pro Builder / Contractor
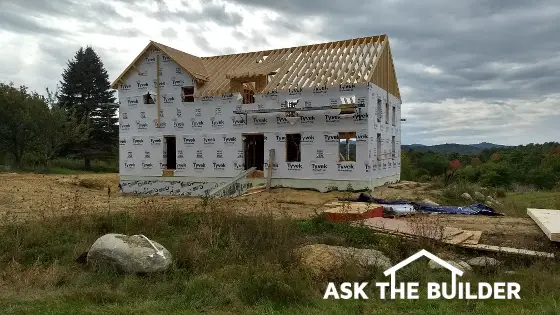
Construction started on this house three years ago. The builder poured the foundation and put on the first floor subfloor and then abandoned the job. A month ago, the walls and roof finally went up. (C) Copyright 2017 Tim Carter
On that day, she told me how she was having a tough time getting the builder to show up each day. She was bound and determined to move in by May 31st. It’s important to realize there were thousands of man-hours of work still left to do. Not knowing her at all, I didn’t have the heart to tell her that she’d be lucky to be in by Labor Day having seen how slow the project was moving.
The progress on this home has now ground to a halt. There’s been no activity for weeks. Kathy said as I was pulling into the garage, “That poor woman’s life has been ruined by the builder. I don’t want this to happen to Meghan and Brent.”
Job Restarted After Three Years
Each time I go into town, I pass another new home job site. The foundation was installed three years ago and the house sat. Construction has finally resumed in the past six weeks. I don’t know any facts about this situation, but I know how to avoid it.
How to Prevent a Builder Abandoning a Job
“Dad, how do you prevent a builder from abandoning a job?” Meghan asked me yesterday afternoon while we sat at a table. I know from reading hundreds and thousands of distressing emails that many homeowners suffer from this dilemma.
I shared the following advice with Meghan and Brent while we chatted. It’s important to realize the issue is complex. In the first place, you need to perform due diligence to find a professional builder who drives a project like a determined marathon runner runs a race.
CLICK HERE to get FREE & FAST BIDS from local builders who can help your dreams come true.
Go To The Lumberyard
Generally speaking, the first thing to do is talk with the general manager or owner of the largest lumber yard in the town or neighborhood where you’ll be building. You ask this business person for the names of builders that pay their bills early, only buy the best materials and are the only builders that the general manager or lumber yard owner would have bid on their own homes.
It must be remembered that the people running the lumberyard know who the true professionals are. They also know the builders who are to be avoided like the plague. It’s best to visit two different lumberyards if possible to see if you can get one builder’s name to pop up twice.
Find The Pro Video
Watch this video to see how to find a great builder or remodeler.
Know All the Costs
It’s equally important to obtain a very detailed cost breakdown of the new home. I created a spreadsheet years ago that’s available at my website. This document has 100-plus rows where you enter a crisp number for each thing that needs to be done to build a home.
For example, the spreadsheet forces you to put in a number for the foundation cost, the cost of the windows, all plumbing fixtures, the rough carpentry labor, and all the other costs to construct the home.
Tight-Fist Control of Money
You must have this information so you can control the flow of money as the project proceeds. You only should pay for items that have been installed to your satisfaction as the home is being built.
If you have a construction loan, the lender will usually only issue checks for work that’s been complete, but believe me their inspectors can be fooled or give away far too much money.
IMPORTANT TIP: Money is the only real motivator you have when building. You never have to worry if you have hired a professional.
However, having a choke hold on the flow of money allows you to sleep at night in the event your builder walks off the job or slows the project down. You’ll always have enough money to bring in another builder to complete the project.
Must Have Great Plans & Specs
A point often overlooked is it’s vital to have excellent plans and written specifications. A great set of house plans might contain twenty or more pages. Written specifications cover all the other things that don’t show up on the plans. These documents allow you to avoid confrontations or change orders that can cause delays and frustration.
Fire-The-Builder Clause
It’s equally important to have a simple paragraph in the contract that allows you to void the contract with the builder if no progress is made for a specified amount of time. There are certain weather conditions that might lead to a delay, but that should be discussed before you sign the contract with the builder.
In the final analysis, there’s more you have to do to ensure the builder does not abandon your job. The most important thing to do in my opinion is to spend the time up front asking tough questions of the lumber yard managers, the top local realtors and even talk with a few of the local residential architects who regularly work with builders.
All of these professionals know who the best builders are. Put on your Columbo trench coat and do the detective work required to locate the best builder. Rest assured I’ll be starting that process this weekend along the coast of Maine!
CLICK HERE to get FREE & FAST BIDS from local builders who can help your dreams come true.
Column 1218