Soil Testing for New Homes

Soil Test new house

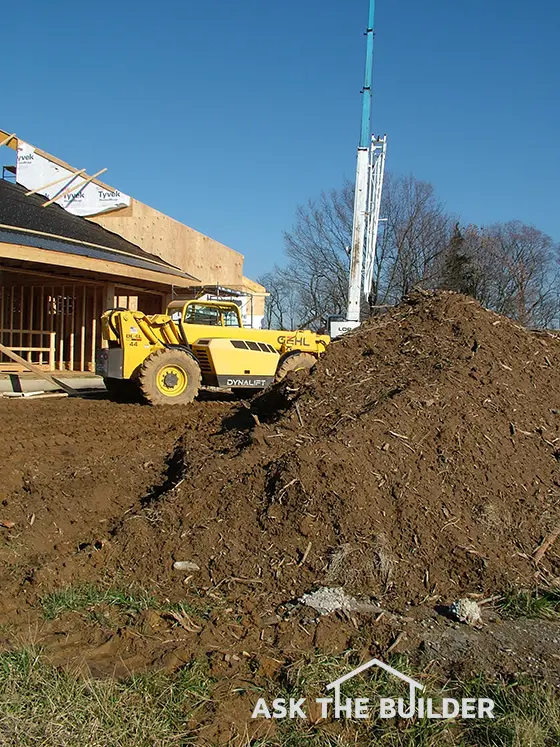
Soil Test New House | This large pile of clay soil was excavated to make room for the basement of this home. It's a strong soil and can easily support the weight of the new home. You need to check the soil even if building an A-Frame house. ©2021 Tim Carter

Soil Test New House

DEAR TIM: My husband and I are building a new home and were told by a friend that our soil testing certificate must have an official stamp. I don't see a stamp on the faxed copy I have.

Is this important? How concerned should we be about the soil under our foundation?

I see buildings near my new home that have been around for nearly 100 years and they are still standing. Should I be worried about the quality of the soil on my building lot? Shelley B., Lawton, OK

DEAR SHELLEY: The original soil testing certificate may have a faint or embossed seal that might not have been seen by the sending fax machine and/or your fax machine may not have been able to reproduce the image.

The safest thing to do is to talk with your local building inspector and see if the faxed copy is sufficient for his inspection. If it is not, then ask him what he needs to see before your builder proceeds to do any construction on the building site.

CLICK HERE to get FREE & FAST BIDS from local soil engineers before you build your home.

How Many Houses are Built on Soil vs Rock?

The vast majority of homes built in the USA are built on soil, not on bedrock. Soil is a mixture of small, decayed bedrock particles; organic material such as decaying plants, wood and animals; air; and often water.

Soils vary in type, composition, and strength. The differences can be significant. Some soils are very strong and can support significant weight, while other soils are weak and compress under light loads.

The old buildings that are structurally sound that you see near your new home undoubtedly have foundations that rest on high-quality soil or the weight of the structure has been transferred deeper into the ground where good soil or rock can be found.

Can You Build on Poor Soil?

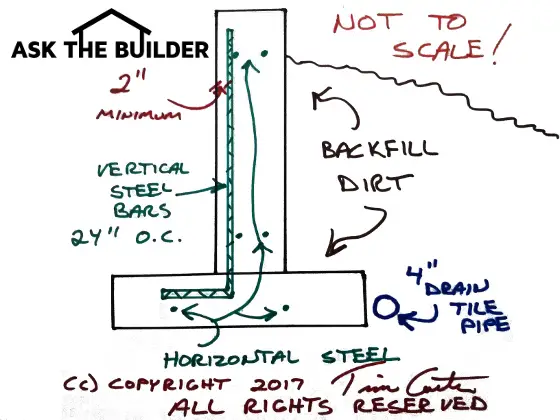
Structural and geotechnical engineers have countless solutions for erecting buildings on low-quality soil. Wide steel-reinforced concrete footings can be used as well as any number of different steel, wood and concrete vertical piers.

Piers are vertical columns that transfer the weight of a building deep down into firm soils or make direct contact with bedrock. The bottom of the building foundation rests on the top of these vertical piers much like a tabletop is supported by the table legs.

How Much Does a House Weigh?

You should be very concerned about the soil quality of your building lot. What you see on the surface is not indicative of what might be 10 or even 20 feet below the surface. Soil that feels firm under your feet may not be very strong.

Realize that houses weigh in the tens of tons. It's all a matter of how much weight per square inch the soil can support without moving down.

Are Landslide Dangers Real?

Some soils are very prone to landslides. Cincinnati, Ohio has two bedrock formations, as well as some glacial clay deposits, that cause millions of dollars of damage each year.

The Kope and Lower Fairview rock formations contain a high amount of shale rock that decomposes into a weak soil. This happens on the hillsides in the river valleys around Cincinnati and Northern Kentucky.

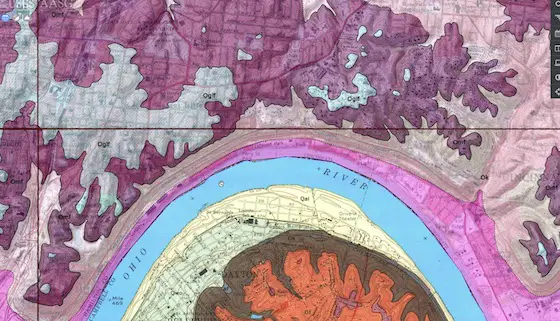
This is a copy of a United States Geologic Survey (USGS) geologic topographic map of the East End of Cincinnati, OH. The downtown area would be just to the left of what you see. The Kope and Lower Fairview formations are the light pink rock just above the magenta alluvium that's north of the Ohio River. (C) Copyright 2017 USGS and every US taxpayer that owns the maps. CLICK THE IMAGE TO BUY GEOLOGIC MAPS FOR YOUR AREA.

Can Blended Soils Be Bad?

Land developers might place a weaker soil on top a strong soil or vice versa. These same developers can also radically change the shape of the land with giant earth-moving equipment. Soil from high spots on a piece of land is cut away and transported to low spots.

This kind of land transformation is acceptable if it is done correctly. But sometimes developers or contractors take shortcuts.

CLICK HERE to get FREE & FAST BIDS from local soil engineers before you build your home.

Is Fill In Valleys?

For example, a friend of mine discovered his house was built on top of an old, deep ravine. His lot was level because 25 feet of fill dirt had been installed in the old valley.

But the contractor who installed the dirt buried trees and other vegetation in the ravine before the dirt was installed. Five years after the house was built, large cracks developed as the soil under the house began to sink as the buried vegetation decomposed.

Do Old Maps Have Clues?

You can help identify potential problems such as these by getting copies of older topographic maps from local government agencies, local colleges that have engineering or geology departments or the United States Geological Survey.

Using these older maps, you can see if a new land development has topography matching the old maps. You may quickly discover several lots are built on top of a preexisting creek or stream.

The local government may have copies of the developer's grading plan that show you which areas were cut and which were filled.

Where Can I Get Soil Surveys?

Many local governments also have copies of soil surveys. These extremely detailed studies show the different soil types and soil characteristics for a given county.

I currently live in Belknap County in New Hampshire. CLICK or TAP HERE to see my soil map.

Many of these soil surveys tell you which soils are strong and well-drained and which ones are weak and not well suited for building sites. It is always a good idea to study a soil map or survey before you buy a particular piece of ground.

What are Expansive Clay Soils?

Some soils that are strong have other problems that can wreak havoc on new homes. Certain clay soils are highly expansive and contractive. This means they swell and shrink in response to moisture content.

The soils move so much and so dramatically that they can tear a new home or slab apart with little effort.

Structural & Soil Engineers

Structural engineers know how to build foundations to resist this movement. In addition to a reinforced foundation, it is a good idea to install an irrigation system under the foundation so water can be slowly and regularly injected into the soil during periods of dry weather.

If the soil thinks it is raining at the surface because the moisture content stays the same, the soil stays the same shape and size and does not stress the foundation of the home.

CLICK HERE to get FREE & FAST BIDS from local soil engineers before you build your home.

Column 606

Fire Stop Construction

stud wall fire break

Older homes often have blocks of wood in the walls such as this one. They stop the vertical movement of fire and hot gases so that fires do not extend at break-neck speed through house walls.

Fire Stop Construction TIPS

DEAR TIM: Recently, I was adding new electrical wiring in my 80 year-old home. I discovered that it did not have any fire stopping or fire blocks within the walls.

Does the building code require me to install fire blocks at this time? Are they necessary?

Is there an alternative material other than adding solid wood blocking? Can I use foam? Gary F., Knoxville, TN

DEAR GARY: Talk with any seasoned firefighter and they will tell you that fire stops or fire blocks within walls are both life and property savers.

Simple Blocks Save Lives

The reason fire stopping is part of the modern building codes is not an accident or an exercise to waste lumber. Many people have died and others have been seriously injured in older structures that did not have this simple framing component installed as the house was built.

CLICK HERE to get FREE & FAST BIDS from local companies that specialize in fire prevention.

fire wall stop

The horizontal double 2x4s on top of the vertical studs create firestopping in modern wall systems. Once this wall is covered with drywall, you can imagine how each wall cavity will be sealed and separate from the once next to it.

Chimneys

A fire stop, when properly installed, does exactly what it says. It stops the spread or advancement of fire from one section of a structure to another. The second house I owned had balloon framing and this type of construction is a firefighter's worst nightmare.

Old framing created countless chimneys on exterior walls. You could actually go up into the third floor attic of that house and drop a stone or coin and it would end up on the basement floor seconds later.

If a fire broke out in the basement, the flames would be sucked up into the walls and blast out like a blowtorch in the attic space. If fire blocking or stopping is not in place, the space between each of the wall studs acts like its own high-velocity chimney.

Block Air Flow

But imagine what happens if you do put a solid piece of wood at the bottom and top of the wall in between all of the wall studs in this house. The bottom block stops the fire from getting into the wall cavity to begin with.

If a fire starts within the wall, the top block stops the fire from getting into the attic. It's important to add solid wood blocking as well if floor joists intersect a wall so that the fire can't go up a wall and then sideways in between floor or ceiling joists.

Modern Methods

Modern building methods create effective instant fire stopping or fire blocks. The continuous top and bottom wall plates at the ends of wall studs create this life-saving feature.

Once a wall is covered with drywall and or plywood/OSB on both sides, the covering material creates separate sealed compartments between each stud cavity. Nothing can get from one stud cavity to the other unless you cut a hole in either a wall stud or the top and bottom wall plates.

Tough To Add

Usually the building code is not retroactive. If this was the case, virtually every existing home in the USA would be in violation of the building code each time the code was upgraded.

In most cities and towns, a house only needs to meet the building code that was in force at the time it was built. That being said, you must check with your local building department to see what laws they have in place.

Major Remodel Issue

Sometimes if a major remodeling job happens at a house, the building department may make you upgrade certain very important aspects of the house. But once again, each city and town has their own set of rules, so you must see what is required in your locality.

Blocking Batts

Some building officials will allow you to install fireproof batts that function like solid wood blocking. The batts stop the drafting of air and combustion gasses in a wall cavity. If you do attempt to use foam, be sure it is approved for fire stopping.

Some foam materials are highly flammable and produce toxic gas as they burn. Fireproof caulking is also widely available to stop drafting through holes and cracks.

CLICK HERE to get FREE & FAST BIDS from local companies that specialize in fire prevention.

Sprinklers

If it's too costly and impractical to install fire stopping, you may look at a different alternative. Why not stop the fire from spreading by extinguishing it before it can spread into a wall cavity? You can do this with residential fire sprinklers.

Once a sprinkler head is activated, it can often put out a fire in less than a minute. You may discover it is far less costly and much less intrusive to install sprinklers in strategic locations where fires commonly start.

Fire Prevention Officer

Talk with your local fire department fire prevention officers and let them tell you the top ten places fires start in a residential home. Have them do a fire inspection of your home at the same time to target places where fire danger is very high.

Soffit Safety

Installing fire blocking in new homes is very critical where soffits and tray ceilings are used as design features. If you do not understand the principal behind fire stops and fire blocks, it is wise to have a professional install them.

Fire Stop Foam

Holes created by plumbers, heating contractors and electricians need to be filled to stop drafting. Expanding foams do a marvelous job.

fire stop foam

Here's a product that fills gaps fast and it's easy to work with. CLICK THE IMAGE NOW TO BUY IT.

Approved Materials

Always use approved materials for fire stops. Years ago regular caulk was considered fine by many building inspectors. CLICK HERE to see an assortment of different fire stop caulks.

Fire Stop Caulk

Here's a great brand name fire stop caulk.

fire stop caulk

This is a code-approved fire stop caulk. CLICK THE IMAGE NOW TO BUY IT.

But now many code officials like to see special fireproof caulks used instead of commodity caulk you use to fill cracks before painting. Some of the code-approved caulks are colored a deep red so that inspectors know the right caulk was used. These special caulks are not too expensive and they are very effective.

CLICK HERE to get FREE & FAST BIDS from local companies that specialize in fire prevention.


Column 544

Cutting Crown Molding

cutting crown molding

Cutting Crown Molding TIPS

Cutting crown molding is simple once you think it through.

The easiest way to get your head around crown molding is for you to watch a few of my videos.

They're all about cutting crown molding.

Each video has one or two tips, so watch them all.

Be sure to watch the one about fancy corner cuts. That's a detail you should try because only a small percentage of people take the time to make these two extra cuts.

The fancy corners will wow all your friends, neighbors and anyone that looks up at your gorgeous molding.

CLICK HERE to get FREE and FAST BIDS from local finish carpenters who install crown molding.

Crown Molding Videos

I don't know about you but I am ready to get to work.

Test Pieces

If you want to have great success and tight miter joints, then the best thing to do is start to cut the test pieces you saw me use in the videos above.

I'd make each piece about 14 inches long.

You'll need about twelve pieces total so that means you'll need about a 16-foot piece of crown to make all of them.

Inside Corner Test Pieces

I've discovered over the years that you need to cut the inside corner test pieces at the following angles. You need one set of each, meaning a left and right side.

  • 43 degrees
  • 44 degrees
  • 45 degrees

Outside Corner Test Pieces

The outside corner sets need to be:

  • 45 degrees
  • 46 degrees
  • 47 degrees

Mix & Match

You'll quickly discover that both inside and outside corners are not square. It's rare that you'll get a corner to have two 45-degree cuts where the miter joint is as tight as possible.

More often than not, one side of an inside corner will be a 45 degree cut and the other side might be 43 degrees! This happens because the walls are not perfectly straight.

CLICK HERE to get FREE and FAST BIDS from local finish carpenters who install crown molding.

Coping Corners

Ever talk politics or religion with someone? There's a reason why your parents told you NOT TO DO IT.

The reason is simple. Politics and religion are core building blocks of a person's reality. It defines their inner being.

If you challenge that, the average person gets very defensive. The inner being is something that's guarded like the crown jewels.

Coping inside crown molding corners ranks number three for finish carpenters. Some carpenters SWEAR it's the only way to make a tight miter joint.

Guess What?

To make a coped joint you need to make the correct compound cut on the molding so the coping saw has a line to follow.

How do you know the right line to create? Is it 43, 44 or 45 degrees?

This is why the test-piece method that I developed is so much better.

If you have two identical rooms to put crown in, I'll have my room finished and ready for paint while the other carpenter is still working with his saw on the third coped joint.

If he doesn't use test pieces, he'll be guessing at the intersection angle.

We both have to make end cuts. I'll have mine done first time and be nailing away while he's getting ready to cope, rasp, check for fit and rasp some more.


Would you like step-by-step photos and instructions that show you how I install crown molding anywhere in a home?  If so, you might want my Instant Download Crown Molding eBook.

But, if you want to actually see me install crown molding in all the same places while watching an action-packed interactive DVD that was filmed in High Definition, then you may want my Crown Molding DVD.


CLICK HERE to get FREE and FAST BIDS from local finish carpenters who install crown molding.

Column B234

Concrete Slabjacking Tips

Concrete Slabjacking

©2017 Tim Carter

Concrete Slabjacking TIPS

  • Soil under slabs can sink
  • Compacting soil is a must
  • Slabjacking usually a better deal
  • Concrete slurry is common filler
  • Expanding foams are good fillers

DEAR TIM: The concrete patio on my new home is sinking. It used to tilt away from the house. Now it tilts back towards the house.

A similar thing is happening to the concrete slab inside my neighbor's garage.

What do you think caused this to happen? Could it have been prevented? Is there a way to fix the problem, other than installing new concrete? S.W.

DEAR S. W.: There is a very good possibility that both concrete slabs were installed on poorly compacted fill dirt. Sub-surface erosion and shrinking soils are also possibilities. Fill dirt is almost always placed along side of house and garage foundations after the foundation work is completed.

CLICK HERE to get FREE & FAST BIDS from local contractors that do slabjacking. It could save you lots of money.

Compaction A Must

Rarely does a builder take the time to compact this dirt. Mother Nature will do the job, but she sometimes takes years to complete the task.

Void Spaces

Soils consist of solid particles and the spaces (voids) between these particles. The void spaces can be filled with either water and/or air. Void spaces are great for grass, bushes and trees.

However, void spaces in soil can cause big problems for buildings and concrete slabs. Concentrated loads, such as buildings or slabs can literally squeeze air and water from soils. When this happens, the soil sinks and the buildings or slabs follow closely behind.

Self-Compacting Fill

Your problem could have been avoided. Instead of installing fill dirt, your builder could have installed granular fill such as sand or a sand and gravel mix. These materials can be compacted quite easily with a hand held vibratory compactor. This material should also be used to fill trenches that cross sidewalks and driveways.

Pea gravel is a great self-compacting fill material. It's small rounded rocks about the size of green peas. Think about how tight marbles compact if put into a box or are otherwise constrained. The same is true for pea gravel.

If you use a granular fill that's got sand in it, be sure to add water when compacting to really drive the small sand down further into the fill material.

Pinning Slabs

Your builder also could have pinned your slab to your house foundation. This process involves drilling holes into your foundation and inserting steel bars (pins). A network of inexpensive steel reinforcing bars are then fastened to these pins.

The concrete patio or slab is then poured with this steel roughly in the center of the concrete. Should the soil beneath the slab settle or sink, the slab stays in place, supported by the pins. Do not use this method for structural slabs (those that support the weight of a structure or machine).

Haunches

Slabs next to foundations can rest on haunches. These are just like shelf supports that are cast as part of the concrete when the foundation is poured. They're often used to support front and back-porch slabs.

Local Contractors

If you are fortunate enough to have a slabjacker in your area, you should not have to replace the concrete. CLICK HERE to get FREE & FAST BIDS from local contractors that do slabjacking. It could save you lots of money.

Slurry

These individuals can float a slab back to its original position by pumping a mixture of sand, cement, fly ash, and other additives beneath your slab.  Not all companies use the same product to lift the concrete.

Foam Fillers

You may find a company or two that pump two fast-reacting chemicals that combine and expand under the concrete slab. These chemicals form a structural polyurethane foam that is unaffected by water that may seep under the slab.

Foam is a great material. Just be sure the foam can handle the weight you intend to apply to the slab.

2-Inch Holes

To install the mixtures or chemicals under a tilted or fallen slab, they simply drill strategically placed holes into the slab. Using a portable pump and flexible hoses, they fill these holes with the special mixture.

Lifting a slab using this method can often be accomplished in a few hours. Often the cost to perform this service is less than half that of replacing a new slab.

Benefits

There are numerous benefits to slabjacking. It can be done in virtually any weather. The material injected beneath the slab provides a strong base. There is little or no disruption to landscaping.

Nothing needs to be moved off the slab, as the pump can lift the weight of the slab and anything you have placed on it. This should be great news for your neighbor!

CLICK HERE to get FREE & FAST BIDS from local contractors that do slabjacking. It could save you lots of money.


Column 086

Cutting Crown Molding Inside Corner

cutting crown molding inside corner

Cutting crown molding is hard because of that void space behind the molding. All other moldings you work with don't have this missing wood. (c) 2018 Tim Carter

"What you're forgetting is the crown molding, once installed, is not laying flat. The cut lines on crown molding are compound cuts just like roof rafters that contact a hip or valley rafter."

Cutting Crown Molding - Inside Corners

DEAR TIM: I need to know how to cut crown molding. So far, I have wasted four long lengths.

The joints look good once cut but when held up in the corners of the room there are huge gaps. I have a high-quality power miter box saw so the problem is obviously me.

Once the molding is cut correctly, how do you easily and securely fasten the crown molding to the walls and ceiling? I don't want to mess up my new paint job. Chuck W., Port Huron, MI

DEAR CHUCK: I must admit this is one area of finish carpentry that's very similar to a magic show.

How to Cut Crown Molding - Is it Hard?

It's not hard to cut crown molding. You just need to hold the molding up against the fence a certain way in a standard miter box saw.

I can't tell you how many homeowners have watched me and a helper install crown molding easily and quickly. Then, several months later, I get a frantic call from them as they are trying to mimic my performance.

They're stuck just like you. Just like with most magic tricks, the secret is simple and it just takes a little practice to master the illusion. Soon you'll amaze yourself, your friends and neighbors with your skills.

CLICK HERE to get FREE & FAST BIDS from local carpenters who specialize in crown molding.

how to cut crown molding

This is a compound miter saw you can use to cut crown molding. It's not required as a normal miter saw will work just fine. CLICK THE PHOTO NOW to have this saw at your home in days. Copyright 2017 Tim Carter

Crown Molding Requires a Compound Cut

You're having trouble because you're cutting the crown molding in the same fashion as you'd probably cut baseboard or window or door casing. I can see why this happens.

What you're forgetting is the crown molding, once installed, is not laying flat. The cut lines on crown molding are compound cuts just like roof rafters that contact a hip or valley rafter.

Cutting Crown Molding Videos

Watch all these videos. Each one has some different info and tips. Make sure you watch the one below about fancy corners. WOW!

They were taped some years ago, but the information is rock solid. Once you watch them, you'll understand everything else in this column. If not, I owe you a mocha chip ice cream cone from Aglamesis in Cincinnati, Ohio.


Do You Cut Crown Molding Like Baseboard?

Baseboard trim and window and door case moldings are flat pieces of wood stock with a profiled face. Crown molding looks nearly identical. But look a little closer.

Crown molding has small angled faces as well as a large flat spot on the back of the profiled face. This is done by design.

I happen to call these small flat areas the foot and shoulder. Other carpenters may have a different name.

What is the Foot and Shoulder of Crown?

The angled cuts on the back of the trim are actually oriented at 90 degrees to one another. The foot is supposed to rest on the wall and the shoulder contacts the ceiling.

CLICK HERE to get FREE & FAST BIDS from local carpenters who specialize in crown molding.

What's the Best Way to Practice Cutting Crown Molding?

The best way to practice is to cut a few scrap pieces of crown molding. Do this until you get the hang of it.

Take one of your ruined pieces of molding and cut a one-foot-long piece. Get on a step ladder and hold the piece of scrap up to the ceiling and look down the back of the small scrap.

Adjust t so the foot and shoulder touch the surfaces with no gap at all. 

Note how the back of the crown molding does not touch the wall surface. Once you understand this relationship, the rest of the job is easy.

Does the Miter Box Resemble My Ceiling and Wall?

Your miter box has a flat machined table area and a vertical fence that you use as a guide. The vertical fence happens to be oriented at 90 degrees to the flat table surface.

In other words, your saw mimics your wall/ceiling relationship.  The issue is, the saw is upside down as the table of the saw represents your ceiling.

How Do You Cut Crown Molding Corners?

You cut and inside and outside crown molding corners at the exact same time when you hold the molding in the miter saw the correct way. It's magic I tell you!

When you cut the trim that frames windows and doors, you typically put the back of the molding flat on the table of the saw.

In this case, the flat bottom of the saw is representing the wall of your home. You swing the saw to 45 degrees and make the cut.

When you do this on another piece of trim cutting the opposite 45-degree angle, the two pieces of trim will meet nicely at the upper corner of a window or door.

If you're installing baseboard that's not tall, you place the back of the trim against the vertical saw fence. This vertical face now represents the actual wall the baseboard will be nailed to. You make your 45-degree cuts and all is well.

Note when the casing and baseboard are against the wall, there's no massive void space behind them. That's why they're so easy to cut in the saw.

If Crown Was Solid You'd Get It Right all the Time

If crown molding was solid, it would be easy to cut. But it's not.

You need to hold the crown molding in the saw as if it was solid. That's where the foot and shoulder come in.

Those two flat areas represent the flat faces of the crown molding that would meet at a 90-degree corner if all that extra wood was still there.

How To Cut Crown Molding Inside Corner

You cut a crown molding inside corner the exact way you see me do it in this video. Watch it:

To create perfect crown molding cuts, you just hold the crown upside down in the saw as if the saw fence/table represents the ceiling/wall intersection. WATCH THE ABOVE VIDEOS to see how this is done.

Do You Need a Nailing Strip?

It's a good idea to install a triangular nailing strip in the corner behind the crown molding. It should be secured to the ceiling joists, not the top wall plate.

I always install an angled filler strip along the entire length of each wall that fills up the hollow spot created by the angled crown molding. 

You can almost always make a perfect strip cutting a 2x2 piece of lumber at a 45-degree angle with a table saw.

Drive a test nail about one-half inch below the ceiling at random locations to see if you can find this top plate. With this strip in place, you can easily and quickly nail the crown molding in place without using a divining rod or mystic powers to locate wall studs or ceiling joists.

CLICK HERE to get FREE & FAST BIDS from local carpenters who specialize in crown molding.


Remember, my Crown Molding eBook has complete step-by-step instructions with tons of color photographs that show you exactly how to cut crown molding. 100% Satisfaction Guarantee!

Column 234

Rain on Framing Lumber

Framing Lumber

You may be upset at all the water on the new wood, but there’s little to fret about. Photo Credit: Seth Pabst

Rain on Framing Lumber TIPS

DEAR TIM: I'm having a new house built and it's been raining for a week. The roof is partially framed and every piece of lumber and all the flat OSB is soaked.

My builder says this is normal and I still get my ten-year warranty. Is it okay for a house to get wet while it's being built? Will it hurt the lumber?

What can be done to prevent mold and rot that probably will happen? What did you do to protect the homes you built? Seth P., Titusville, FL

DEAR SETH: Here's the good news.

Trees Grow In Rain

The lumber that is being used to build your home came from trees that were out in the rain all the time as they grew. I'll grant you it had a protective layer of bark that works very well to protect the wood in the center of the trunk.

CLICK HERE to get FREE & FAST BIDS from local rough framing carpenters.

Realize it takes quite a bit of time for lumber to start to decay from water.

No O² - No Rot

You'd probably be surprised to know that lumber that is submersed in fresh water can be in great shape and rot-free for hundreds of years. This happens in lakes that have cold water at the bottom. As we all know, there's virtually no air or oxygen under water as well.

You need oxygen, water and warm temperatures to get wood to rot fairly fast.

Prized Catches

Timbered logs are routinely salvaged that never made it to sawmills over a hundred years and these logs are prized pieces of wood. Not too long ago, I knew of at least one company that did nothing but salvage old logs from the bottom of a few of the Great Lakes here in the USA.

This lumber was old growth timber and highly prized. It was in near perfect condition once raised from the depths of the lake-bed.

The wood rot you're familiar with happens in the presence of water and oxygen.

Relax, Take A Vali....

Your framing lumber and the oriented strand board (OSB) are going to be fine. The glues used to make OSB are water-resistant because the manufacturers know that virtually no one can build a home that won't get wet before the roof and siding is applied.

Houses I built got wet routinely during the framing process and I never had an issue.

20 Percent

Wood rot can and will start when the moisture content of the wood reaches 20 percent. But wood rot is a slow process where the fungi start to grow and feed on the cellulose in the wood.

The wood needs to remain damp and wet all the time for wood rot to advance. It's a much better likelihood that you'll start to see mold growth in as little as 48 hours as mold spores are everywhere on your home construction site.

Clean Job Site

To minimize or eliminate any chance of damage, you need to get rid of the water as fast as possible. This means the job site needs to be clean. All scraps of lumber, sawdust, etc. need to be off the OSB.

The OSB floors should be swept clean each day after work concludes. This debris can trap water and hold it against the OSB.

CLICK HERE to get FREE & FAST BIDS from local rough framing carpenters.

Sweep Standing H²O

You want all the lumber to dry out as fast as possible after each rain. Standing water on the OSB needs to be swept away. Some OSB panels are created that have drainage slot in the tongues to help get rid of water.

Raise & Cover

Lumber on the job site that's in piles needs to be covered and up off the ground. You don't want to wrap the lumber like you would a sandwich with plastic. It needs to breathe.

It's key that the lumber is up off the ground at least 4 inches, if possible, so that air can get under the stacked lumber. Try to create a storage method that mimics a rain fly on a camping tent.

You want the sides of the stacked lumber exposed to the air but protected so rainfall can't hit the lumber.

Sealed OSB

Newer building products are available for subfloors that contain resins that protect the wood fibers from absorbing any water. These are great materials to use and I'd absolutely use them on any home I was building today.

Seal Untreated OSB

One thing I used to do when I was building was to spend the extra money and apply a clear penetrating water repellant to the plywood and OSB I used on the floors. I never worried about the sheathing on walls or roofs because water rapidly ran off and never collected there.

Before any walls were built on a subfloor, I'd blow off all saw dust, pour out the clear water repellant and apply it with a large paint roller on a pole. It only took about 30 minutes to do an average subfloor. The water repellant prevented swelling of plywood and untreated OSB.

Stain Solver Mold Cleaner

Oxygen Bleach

Stain Solver is MADE in the USA with USA ingredients that are food-grade quality. CLICK THE IMAGE to order some NOW.

Once your house is under roof and there's little chance of the lumber getting wet, you may want to do some first aid and preventative care. If you do have mold growing on the lumber, you can clean it easily with Stain Solver.

It's a pure certified organic powder you mix with warm water. Using a hand-pump sprayer, you apply the solution to any mildew you see.

You can also use chlorine bleach, but many complain about its fumes and toxicity to nearby plants and vegetation.

Stain Solver is Made in the USA with USA ingredients. It has no odor and will do an excellent job of cleaning mold. Once the lumber is clean and dry, you can then decide if you want to prevent wood rot in case the wood somehow gets wet after you move in.

Borates Are Amazing

You can prevent wood rot by saturating the framing lumber with borates. These are safe chemicals to use around humans and pets.

borate powder

This is a 25-pound pail. You'll use this much to treat all the lumber in your new home. CLICK THE IMAGE NOW TO ORDER THIS GREAT PRODUCT.

Borate is a white powder that dissolves in water just like Stain Solver. You apply it to the wood with the same hand-pump sprayer.

This can be accomplished now while the framing lumber is accessible by spraying it with borate solutions. Borate chemicals are not toxic to humans or animals, but they are very toxic to many species of wood rot fungi and termites. You spray the lumber and OSB using a the same garden sprayer.

CLICK HERE to get FREE & FAST BIDS from local rough framing carpenters.

Column 1107

Black Spots on Deck Boards

broadwalk next lake

This is Jim's boardwalk. That's a lot of scrubbing. Good news! No more scrubbing! Keep reading. © Copyright 2017 Tim Carter

Black Spots on Deck Boards TIPS

DEAR TIM: I’ve got 1,500 square feet of lakefront boardwalk made from composite decking. The brand is Trex Accents. It started developing black spots within two years of the install.

I’m mad as heck about this as I thought I’d have a maintenance-free deck for life. I’m not able to get any help from the manufacturer nor the the big box retailer that I bought it from.

It’s going to cost me $20,000 to replace it. Can you help me at all? Jim C., Eaton, OH

DEAR JIM: I’ve got great news for you. You’re not going to have to replace that composite decking. I’ve also got a small dose of tough love too.

CLICK HERE to get FREE & FAST BIDS from local deck cleaning companies.

Half-Truth Claims

Let’s start with a story. I remember years ago when two products were introduced, both had to do with decks. I can clearly remember seeing a counter placard at Hyde Park Lumber Company in Cincinnati, Ohio that said, “Rot-Proof and Maintenance-FREE Deck Lumber”. It was advertising the new copper-chromate arsenic (CCA) lumber for deck framing and deck boards.

We all know how that turned out. You did have to seal the decks every two years and the lumber did rot.

I also remember similar early claims by the manufacturers of composite decking material. As a member of the working press, I was inundated for years by the public relations companies spreading the word about these miracle products.

My Black Spots

My own home here in New Hampshire, built by someone else not me, had this generation one composite decking that did fade and did develop deep black spots. It also allowed algae to grow on it. Millions of other homeowners did the slow burn like you’re doing as they discovered you do have to maintain the decking.

I permanently solved my problem last summer by ripping up all my old generation one Trex and replaced it with Trex Transcends decking.

The Transcends line has a solid plastic cap so no wood fibers are exposed on the visible portions of the boards.

Maintenance-Free Myth

There’s no such thing as maintenance-free when it comes to any outdoor product. The reasons are many. For starters, the sun’s ultraviolet (UV) rays are so powerful they break apart metal atomic bonds. So simple paint, plastic or wood molecules and fibers are child’s play for the sun.

closeup tex black spots

Here's a closeup of Jim's Trex Accents. You can see the dark spots. CLICK THE IMAGE NOW to BUY THE PRODUCT YOU NEED TO STOP THE SPOTS!

Spores Everywhere

Mother Nature is also quite adept at showering everything outdoors with mold spores, algae, dirt, diesel soot, dust, etc. Add water to this slew of ingredients and you’ve got perfect conditions for mildew, mold and algae growth on any surface.

Deck Cleaning Video

Watch the following video to show you why pressure washers hurt wood decks and how Stain Solver oxygen bleach is the better method.

Periodic Cleaning

Oxygen Bleach

Stain Solver is MADE in the USA with USA ingredients that are food-grade quality. CLICK THE IMAGE to order some NOW.

At the very least, maintenance involves periodic cleaning. You can clean some things with regular liquid dish soap and water. Tougher stains from barbecue grills, tree sap, mold, mildew and algae may need Stain Solver, a powerful powdered oxygen bleach you mix with water.

Stain Solver will not hurt any vegetation near the boardwalk nor any fish or other wildlife in the lake. It's certified organic and Made in the USA with USA ingredients.

You mix Stain Solver with warm tap water, stir until dissolved and then apply with a hand-pump sprayer. Work in the early morning allowing the Stain Solver solution to work on it's own for 15-30 minutes before scrubbing and rinsing.

The issue in your case is your composite deck, and several other brands, contain untreated lumber fibers that are encapsulated with recycled plastic. However, not all the wood gets coated with the plastic and as I mentioned earlier, the sun breaks apart the plastic exposing the wood.

CLICK HERE to get FREE & FAST BIDS from local deck cleaning companies.

Wood + Water + Spores = Mildew

Mix wood, spores and water and you get black spots. You can clean them off, but the spots come back because the mold and mildew spores are constantly floating down onto the deck and you have a nearly constant supply of water. Overnight dew that covers everything outdoors many days out of the year is perhaps the biggest source of the problem.

I think you can get some peace of mind, but it’s going to take a little periodic work on your part. Fortunately it’s easy to do.

Clipper Ship Clue

Years ago I had a fascination with clipper ships. I have two boxes filled with small parts of two ships I intend to build when I’m retired - the Cutty Sark and the Thermopylae. Both of these tea clippers had copper plating on their hulls.

Copper is a natural biocide. It prevented barnacles and other organisms from growing on the wood hulls of these fast ships. This nasty growth would slow other ships and reduce the owner’s profits.

Apply Copper Sulfate

You can introduce this copper to your boardwalk in a way that should not harm anything that’s next to the boardwalk. I’d clean the decking first and then apply a mist of copper sulfate solution to the decking.

copper sulfate

This is exactly what you need to keep algae, mildew and mold from decking and patios. CLICK THE IMAGE NOW TO BUY IT.

Copper sulfate is readily available and farmers have used it for decades. It controls fungus diseases, makes up for copper deficiencies in animals, and other things. If you drink wine, then you have to appreciate copper sulfate! Vintners use copper sulfate.

I’d mix up a solution and put it in a garden hand-pump sprayer. Set the nozzle tip to a fine mist. On a sunny warm day, spray the surface of the decking. Minimize overspray. The solution will soak into the wood fibers and possibly the tiny voids of the decking.

The only unknown is how often you need to respray. It could be once every six weeks, but it’s far easier to do than scrubbing that decking. Good luck!

CLICK HERE to get FREE & FAST BIDS from local deck cleaning companies.

Column 1183

Backfilling a Foundation Wall

Backfilling a Foundation Wall

Backfilling a Foundation Wall - Believe it or not, this is a precast foundation wall. It is made from poured concrete and rests on compacted gravel, not a poured concrete footer. If this wall was backfilled before the interior floor was poured, it would collapse in no time. ©2023 Tim Carter

Backfilling Foundation Wall TIPS

DEAR TIM: I am building a new home and the poured concrete foundation was installed 17 days ago. The weather has been cool with temperatures averaging about 51 F.

I was told to let the concrete cure for 25-30 days before backfilling it. However, the contractor is applying pressure to backfill so the rough carpentry subs can get to work.

Should I cave in and let them backfill against the walls or should I suffer the consequences of delaying the project? Shawn S., Pittsburgh, PA

DEAR SHAWN: In my opinion, concrete is a mystical building material. That said, you want to know about backfilling a foundation.

When Should A Foundation Be Backfilled?

A poured concrete foundation should be backfilled AFTER:

  • the concrete has achieved a minimum of 75% of its design strength
  • the basement slab, if there is one, has been installed. It acts as a support column at the base of the wall preventing it from sliding off the footing
  • the wood subfloor has been installed. The floor joists and subfloor assembly once bolted to the top of the foundation act as a support column at the top of the poured wall.

Think of a poured concrete wall as a BIG BEAM that needs support at each end (top and bottom) just like a floor joist needs support at each end. The soil is applying sideways pressure to the foundation wall just as a heavy load applies downward pressure to a floor joist.

Concrete is Liquid Rock

It often arrives at a job site in a truck pre-mixed and ready to pour. Typically it has the consistency of cooked oatmeal, but hours later it resembles damp solid rock.

CLICK HERE to get FREE & FAST BIDS from local foundation contractors near you!

This transformation happens because of a chemical reaction that starts to happen the instant water is added to the Portland cement powder. The hydration chemical reaction causes microscopic crystals to grow that connect all of the sand and gravel to one another.

Concrete Strength Achieved After Many Weeks 

The trouble is, this chemical reaction continues for weeks, and even months, after the concrete truck leaves the job site. In fact, standard concrete that is moist cured under ideal conditions often only achieves 40-45 percent of its design strength after three days.

After seven days, it should hit 75 percent of its final design strength. To get to 100% of it's design strength, you often have to wait 28 days or more. These numbers assume temperatures at or near 70F.

Cold Temperature Slows Strength

In cold weather, the strength-building process can slow considerably and even stop completely if the temperature gets very cold. Once the weather warms up, the concrete starts to strengthen again on its own so long as it still retains moisture.

That's why it's a big risk to backfill a cast, or poured, concrete foundation during the winter. You can build on top of the foundation with little risk.

It's the weight of all the dirt pressing against the new, tender concrete that's the issue.

bowed new foundation wall

This is what happens when you backfill a foundation too early. The red line indicates WHERE the top of the wall should be - in a straight line. Look at the snow on the ground. The builder of this home is an IDIOT. Copyright 2023 Tim Carter ALL RIGHTS RESERVED

When Should A Foundation Be Backfilled?

A poured concrete foundation should not be backfilled until:

  • the concrete has achieved a minimum of 75% of its design strength
  • the basement slab, if there is one, must be installed. It acts as a support column at the base of the wall preventing it from sliding off the footing
  • the wood subfloor must be installed. It acts as a support column at the top of the poured wall.

Think of a poured concrete wall as a BIG BEAM that needs support at each end (top and bottom) just like a floor joist needs support at each end. The soil is applying sideways pressure to the foundation wall just as a heavy load applies downward pressure to a floor joist.

Vertical Steel Prevents Horizontal Bending

If you had told me that you had vertical steel reinforcing bars in the poured concrete, then maybe I would say to move ahead and backfill. But vertical reinforcing steel is rarely placed in residential concrete foundation walls.

It's not hard to put it in, but it does cost extra money.

If you decide to put vertical steel in a foundation wall to resist backfill pressure, the steel needs to be placed closer to the inside face of the wall. The usual standard is 2 inches.

backfilling a foundation wall

This ATB drawing done in haste shows vertical and horizontal steel bars using teal color. There are four horizontal bars in the foundation wall and two in the footing. You can see the vertical steel bar. These would be put every 2 feet on center. NOTE: The vertical steel bars start at 2 inches from the inner face of the foundation wall. This placement is CRITICAL. ©2017 Tim Carter

Horizontal Steel Common

Foundation walls often have two rows of horizontal reinforcing steel placed near the bottom and top of the walls. This steel helps prevent vertical cracks in the foundation walls should the soil beneath the foundation shift or move. This movement is an up and down movement.

This steel is usually about one foot up from the top of the footing and one foot down from the top of the wall.

CLICK HERE to get FREE & FAST BIDS from local foundation contractors near you!

Backfill Creates Sideways Pressure

Backfill dirt that is placed against the foundation wall causes a lateral or sideways movement. Vertical steel bars add enormous strength to poured concrete and help prevent horizontal cracks that are caused by soil pressures.

Loaders & Dozers Are BAD!

Lateral pressure can also be caused by the heavy machinery that places the dirt against the walls. An inexperienced heavy equipment operator can crack a new foundation wall by pushing dirt into the void space against the wall instead of gently dropping it in from above.

Walls = Wide Beams

Backfilling a poured concrete wall or even a masonry concrete block wall can be very risky if two other tradespeople are not finished with their work. The basement slab and the first floor that sits on top of the foundation should be complete before backfilling proceeds.

These two building systems help lock the bottom and top of the foundation walls in place as the soil pressure pushes against the walls. I've seen poured concrete foundations that were backfilled before a basement slab was poured. In certain instances the wall cracked and slid off the footer from the intense soil pressure.

Backfill Dirt Is Heavy

Keep in mind that wet soil is very heavy. It's not uncommon for this material to weigh nearly 100 pounds per cubic foot. When you calculate the weight of all of the soil being dumped against the foundation you quickly discover it is tens of thousands of pounds.

A foundation wall is just a concrete slab turned on edge. Concentrated loads routinely crack flat concrete slabs so it's not hard to imagine soil pressure creating a crack.

Patience Pays Off

My advice to you is to wait. Your builder and many others will scoff at you and will put pressure on you to move ahead. But this pressure pales in comparison to the weight of the dirt that is placed against the foundation walls.

Furthermore, if the foundation does crack because of premature backfilling, this structural scar will haunt you until you eventually sell your home. In fact, you will probably have to explain what happened to the professional home inspector that is hired by the buyers after they see the ugly cracked foundation walls.

Vertical Steel is Easy

The vertical steel bars that should be placed in poured concrete walls are not hard to install. It often only takes an experienced crew maybe one extra day, perhaps two, to install this valuable structural component.

Steel is 100X Stronger Than Concrete

The reason steel is needed is simple. Concrete has fantastic compressive strength. This means if you squeeze or compress it, it takes enormous pressure to crack concrete. But if you try to bend or pull concrete, it only has one-tenth the strength it exhibits when you compress it.

This bending of concrete is referred to as tension by engineers and concrete professionals. The mix used by many foundation contractors might only have 350 pounds per square inch of tensile strength.

Steel, on the other hand has enormous tensile strength. The steel bars a contractor would often buy would require 40,000 pounds of tension applied to them before they'd rip apart. That's over 100 times stronger than the concrete.

These steel bars, once placed inside the wet concrete, transfer their strength to the concrete. Imagine how strong a foundation wall might be that has vertical steel bars placed two-feet on center. I can tell you that a wall built this way will stand the test of time.


Column 569

How to Build a Cheap Desktop

build desktop

This cheap desk was built in one hour with one sheet of plywood and two pieces of thin molding. ©2018 Tim Carter

"The first thing to realize when you're building a desk to work at is the height above the finished floor."

How To Build A Cheap Desk Checklist

DEAR TIM: I need to build two cheap desktops. I'm lucky in that I have small cabinets that the top can rest on.

One top is for my man cave and the other one is for a hobby and craft center for my wife and young kids. I'm looking for durability, affordability, ease of construction and good looks.

Realize that I have limited skills and tools. What would you do if you were me? Can I do this for less than $100? If you can offer a solution, I'd be most grateful. Travis S., Morgan Hill, CA

DEAR TRAVIS: I've got great news for you.

How Long Does it Take to Build a Cheap Desk?

You can build these desktops in no time at all and I can bring them in under budget for you assuming you need no more than 16 feet of total length for both desktops. Believe me, 16 feet of a desktop is quite a bit.

CLICK HERE to get FREE & FAST BIDS from local finish carpenters who can build this desktop in minutes.

How High Above the Floor Should the Desk Be?

The first thing to realize when you're building a desk to work at is the height above the finished floor. This is critical if you're using standard chairs that are not adjustable with respect to height.

Most tables that you eat at have a finished height above the floor of 29 to 30 inches. This works great for adults, but not so well for young children.

How High Should A Child's Desk Be?

A child's desk, depending on their age, can be anywhere from 18 to 25 inches high. As the child grows, so must the height of the desk.

You may want to keep this in mind as you build the desktop for your hobby and craft center. If I were you, I'd consider designing a simple desk or workstation where the top can be raised by putting blocks under the supports as your young children grow. Just keep that in mind.

What is the Cheapest Desk Material?

I've had huge success in the past by using 4 x 8-foot sheets of 3/4-inch-thick plywood as a desktop. If you cut a piece of plywood like this in half lengthwise, you end up with two pieces of wood that are 24 inches wide by 8 feet long.

What is the Best Desk Plywood?

My favorite plywood for a project like this is A/C Fir. Fir is a somewhat tough wood species and the letters A and C stand for what each side of the plywood looks like.

You'll rarely if ever, find this product at a home center. You'll need to visit a local old-fashioned lumberyard for great plywood like this. Believe me, when you make the trip to the lumberyard, you may make it your favorite place to get products!

What Does the "A" Mean in the Plywood Name?

The A side of the plywood looks almost like a gorgeous piece of furniture with no knots or major defects. The C side forms the underside of your desktop and that surface will have some shallow knotholes and other defects.

diy desktop

This is the A side of A/C fir plywood. Note how there are no knots and it looks like a fine piece of furniture. ©2018 Tim Carter

How Deep Should the Desk Be?

I almost always make my desktops 24 inches deep. This depth provides ample space for larger desktop computers and just about anything you'd put on a desk.

It's also a perfect depth, in my opinion, for a craft or hobby workspace because you can put along the back edge of the desktop 8-inch-wide shelves for supplies and still have an abundant workspace for most things you're working on.

Plywood Desk Video

Watch this video I made of desks I built for the AsktheBuilder.com Intergalactic headquarters. These had interesting plywood gussets that supported the ends.

What Tools are Required to Make the Cheap Desk?

You only need a circular saw to make the needed cuts in the plywood.

Circular Saw

This is a wonderful corded saw. It will last generations if you care for it. It cuts very accurately. CLICK THE IMAGE NOW TO BUY THIS SAW.

Be sure you use a sharp blade and always make your cuts with the A side of the plywood facing the ground. This minimizes splintering of the finished side of the desktops when you cut 90 degrees across the grain of the plywood.

CLICK HERE to get FREE & FAST BIDS from local finish carpenters who can build this desktop in minutes.

How Do You Plan Cuts for Minimal Waste?

You need to plan your cuts so that you end up with a factory edge of the plywood facing out where you'll sit at the desktop. It's very hard to cut a straight line using a hand-held circular saw without fancy clamps and straightedges to guide the saw.

Clamping Straigthedge for straight cuts

This clamping straightedge will allow you to make PERFECT straight cuts. You can get extensions so you can cut the full 8-foot length of the plywood. CLICK THE IMAGE NOW TO BUY THIS FANTASTIC TOOL.

How Do You Trim the Edges?

I always cover the unattractive edge of the plywood with thin strips of solid wood molding. Most old-fashioned lumberyards will stock a piece of wood that is as wide as the plywood is thick.

This wood strip will only be 1/4-inch thick and it is available in lengths up to 16-feet long! I always use regular yellow carpenter's glue and small 1 and 1/4-inch finish nails to attach this strip of wood to the plywood edge.

Do You Need to Sand the Plywood?

Once you have the desktop built and the wood strip on the edges, then you just need to sand it with a medium sandpaper and finish it.

What Stain & Urethane Should You Use?

You can stain the plywood if you want a rich color, or you can just urethane it with a clear finish if you want a light look. You can also paint the plywood if that's the style you want. If you do paint it, I'd then add two coats of clear water-based urethane to protect the softer painted film.

Polyurethane Satin Finish

SECRET TIP is to coat the drywall BEFORE finishing with this amazing urethane product. It WILL STOP water from penetrating into the paper of the drywall. CLICK IMAGE TO ORDER IT NOW. Always be sure to order the exact sheen you want. There's a big difference between satin and high-gloss!

If you just decide to urethane the bare plywood and you use a water-based urethane that dries within 90 minutes, then realize it's important to sand the desktop again before you add the second coat of urethane. The water in the urethane will raise the grain of the wood and it will feel rough. This roughness sands down easily and your second coat of urethane will be quite smooth.

How Long Do I Wait After the Urethane is Applied?

Once you have the final coat of urethane on, don't put anything on the desktop for at least 72 hours. The urethane, while it's dry, it's not cured.

If you set things on the finish, there's a good chance they'll stick. The curing time will take longer if it's cool where the top is. Hot dry conditions accelerate curing time.

Should I Buy Flat Sheets of Plywood?

When you do shop for the plywood, be sure to get pieces that are nice and flat. Don't transport the plywood in the rain or allow it to get wet as it can develop a warp to it so your desktop may not be as flat as it could.

How Strong is the Plywood?

You'll be stunned by how strong this plywood desktop will be. It can stand abuse and it can be modified or moved in seconds. That's one of the things I like best about these modular desktops as you can change what you have in just minutes.

You can't do that with a traditional desk that has the top and base as one complete unit.

How Long Will the Plywood Desk Last?

If you're wondering how long a desktop like this can last, let me share with you that I've had one in heavy daily use for over fifteen years and it looks like the day I built it.

Realize you can get other finish-grade plywood that has hardwood veneer if you desire a very upscale look.

Should I Get Birch Plywood?

You can also get wood species like birch that has very little grain to it and is very smooth. Spend some time at the lumberyard and see what they stock!

Brandi asked a similar question. Read her email in my Fast Desktop column.

CLICK HERE to get FREE & FAST BIDS from local finish carpenters who can build this desktop in minutes.

Column 1087

February 12, 2017 AsktheBuilder Newsletter

It's coming - perhaps the biggest storm of the season.

Twelve hours from now, the maw of the Nor'easter could be directly overhead. If you're a new subscriber, I live in central New Hampshire.

January was a fairly dry month with little snow, but February is making up for lost time.

Today may be the day I lose access to my front walk for a month or more.

I thought you'd be interested in this before photo I took just after 7:00 am this morning. It's the calm before the storm.

See that stick at the end of the walk? It's an 8-foot grade pole one uses with a laser level or builders transit.

The pile of snow at the end of the walk is 6-feet tall.

Snow cascades off the two roofs on either side of the walk and from above my head. It's a box canyon.

I didn't build this house and the architect that designed it was obviously from Antigua or Houston, Texas. IDIOT

I'll have an after photo, and probably video, for you on Tuesday.

​​​​​​​Assuming I survive.

3-Stage Snowblower Video Review

Two days ago, I taped a video of the best snowblower I've ever used. It's made in the USA.

It's a Troy-Bilt Vortex 2490. The vortex name comes from the unique center high-speed auger that chews through crusty snow like I eat a Skyline Chili 5-way after being deprived for six, or more, months.

CLICK HERE or the photo of the spinning auger below and watch the video. I was a little excited at the end. You'll probably laugh. If not, you may need to meet me in person.

Soft Close Photos

My very good friends at LE Johnson want me to share a few stunning photos with you.

Each one of the doors you'll see can be equipped with their revolutionary soft-close mechanism.

Cool Blue Glow

Green Trilobite Vase Destractor

Giant Tri-Panel Slider

Electric Linesman's Dream Bedroom

Hidden Red Rotating Machines of Cleanliness

To discover how you can adapt your current LE Johnson pocket, slider or wall-mount doors with the soft-close hardware, CLICK HERE NOW.

It goes without saying you can get it on new LE Johnson doors too!

Maggie's Paint-Review Observation

You may be one of my subscribers that I've shaken your hand or given you a hug. I'm blessed to have been able to see you in person.

Maybe I've stayed at your home, ridden in your Jeep in Sedona and flown around the red rocks in a helicopter you rented or gone to your splendid gun and rod club.

I could go on and on and it's my hope to meet you one day if our paths have yet to cross.

There's also an elite group of subscribers who've sent me things or made something for me. It's almost impossible to describe that joy or wonderment!

Maggie's in this group. She loves to knit and most recently made me a Morse muff. It's a stunning hand-warming muff I can use while doing outdoor amateur radio in the cold.

I had a case of frostbite in my late teens to both hands and the doctor told me I'd forever have heightened cold sensitivity. He was spot on.

But I digress!!!!!

Maggie emailed my last week after I introduced you to the two amazing True Value paints - the X-O Rust spray paint and the EasyCare interior paint.

Here are links to the two reviews I did:

X-O Rust spray paint

EasyCare interior paint

You can get these at your local True Value hardware store, but I also provided links to both paints at Amazon.com.

Maggie went to Amazon, poked around and read the reviews.

Here's what she emailed me:

"True Value might want to look at how few stars their paint is being given: not exactly a raving endorsement?

I’m not sure why I’d want to buy paint online unless it was exactly a color/brand I’ve had before but even that would be a stretch. Seeing those reviews would deter me from going to the store!"

I also received a grumble comment from a subscriber who had an issue with the X-O Rust spray paint.

Here was my response to Maggie and the other subscriber. My thoughts are based on selling my Stain Solver oxygen bleach for twenty-one years and having to deal with complaining customers.

1. You never ever should assume the person writing the review (complaining) knows how to do the project or use the material.

2. The reviewer could have a dog in the fight. They could work for a competing company, distributor or retailer.

3. The reviewer could be like many who NEVER EVER read the instructions on the label.

4. The reviewer may not possess the needed hand-eye coordination required to get excellent results.

I could go on and on......

When it comes to paint, you need to realize that MANY PEOPLE have NO CLUE how to apply paint. I know because I've WATCHED THEM TRY TO PAINT.

They might be using cheap rollers and brushes. They may not have washed the walls.

They may be over-rolling the paint and spreading it too thin.

They may not have shaken the can of spray paint enough so the solids needed for coverage get mixed in.

They may not know how to spray paint. Their lack of skill then causes runs or other defects.

Get the point? Don't ASSUME the reviewers are QUALIFIED to render a valid and objective opinion.

Latest Revised Columns

There's some unbelievable revised content below.

You'd be remiss if you don't at least CLICK EACH ONE and skim it.

Some of the photos and videos you'll see are beyond description:

Roof Ventilation with Turbine Vents - THE BEST

How to Wallpaper Over Drywall - SPECIAL TRICK

Can I Cut My Roof Trusses? Yes, But….!

Treated Wood Foundations - Not For Me

How to Connect Cabinets

Washing Machine Water Valve Stuck

Small Engine Storage Tips

How To Repair Chipped Ceramic Tile

R Value Meaning and Map

Painting Walls or Trim First - Well…..

Tile Falls Off Walls​​​​​​​

Shed Floor Material - What’s Best?

Hot Garage Ventilation

How to Clean a Deck

Drywall Cutting Tools and Tips

Foundation Footer or Footing

Water in Heating Ducts - STOP the Water!

Scissors Truss Design - Vaulted Ceiling Baby!

Kitchen Exhaust Fan 101 - Important!

Land Clearing - Rarely DIY

Painting Steps - They Look Great!

HOLY TOMATO!!!!

That's a boatload of revisions. I'm doing it so you have a better user experience at www.AsktheBuilder.com.

Do you LIKE the revisions???

Got to go get ready for the blizzard! Wish me luck!!!

Tim Carter
Founder - www.AsktheBuilder.com

Do It Right, Not Over!