Column and Beam Construction

column and beam construction

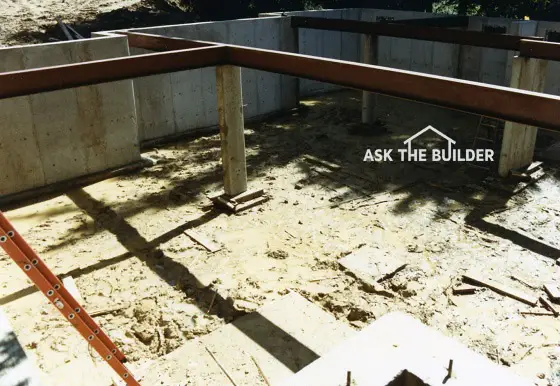
Column and beam constructon is in a home I built in Amberley Village, Ohio. The columns are poured concrete with steel reinforcing. The beams are 10 inches tall and weigh 31 pounds per linear foot. You can span up to 14 feet with these! © 2018 Tim Carter

Column and beam construction is common in most homes. Beams can be as short as 3 feet or as long as 16 feet. Don't guess sizes. Consult with a professional engineer.

Revised February 2018

Column and Beam Construction TIPS

Week In Week Out

Every week I get an email from a homeowner who wants to tear down a wall or she/he's contemplating some other structural modification to their abode.

In every case they want me to wave my magic wand and size a beam for them. If they only knew how complex beams and columns were!

My answer is ALWAYS the same. Hire a local structural engineer. You do this to prevent a collapse!

Column And Beam Construction Video

Here's a great video showing decorative wood columns and beams. Simple ones are made with 2x4s and 2x12s!


Related Links

Removing a Load Bearing Wall - Check Plans First

Column to Beam Connection Is Important - Don't Rely on Nails

Beam Installation Basics

Headers, Beams and Wall Sensors


Complex Math

The reason for this is simple. For one thing, each situation is different. The loads above the beam location can be significant or there may be very little load. Just about every situation is different.

Structural engineers need to look at your home or plans and calculate all the loads that will be carried by the beams. Don't underestimate the complexity of this.

Then they have to decide what material to use that will support the loads. It's not easy.

You don't just email someone and expect an answer.

CLICK HERE to get FREE & FAST BIDS from local structural engineers.

Columns = Concentrated Loads

The column locations at each end and under the beam are critical as well. Columns concentrate beam loads. These concentrated loads must rest on solid materials.

A rookie homeowner often forgets this vital aspect of beam construction.

For example, a rookie may nail two or three studs together that support a giant double 2x12 header beam.

These vertical studs are nailed to a wall bottom plate but there's nothing but air under the OSB, plywood or 1x6 flooring.

Over time the bottom plate sags and can, in the worst cases, punch through the bottom plate and floor.

column and beam construction

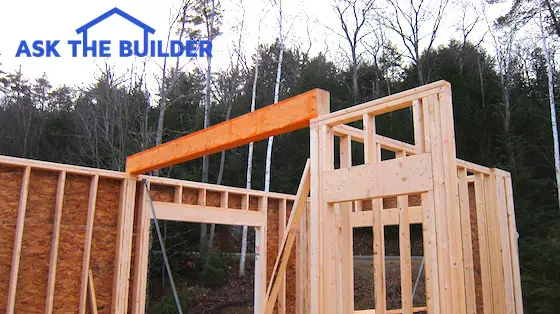
Here's a great shot of a triple laminated beam. The columns supporting it are solid wood 2x6's. You can see them packed together on the far wall and the corner where the two exterior walls meet. What we can't see in the photo is if the carpenter put extra blocking under the exterior bottom wall plate so the load is transferred to the poured, or cast, concrete foundation wall. The floor joists for the second floor will hang off this beam using galvanized joist hangers. This photo also shows three other beams in the exterior walls. They're made from 2x10s and pieces of OSB. They're over each window or door opening in the photo. © 2018 Tim Carter

Continuous Load Path For Beams & Columns

Structural engineers and great builders know all about continuous load pathways. 

This is a fancy phrase for creating a solid bearing pathway from the bottom of the beam all the way down to the soil under the footing of the structure.

This pathway can be complex and circuitous where columns rest on top of beams below. Believe me, you never want to guess so always hire a structural engineer to create your structural drawing of what needs to happen so your home doesn't collapse.

Beams Galore

There are many different materials that can be used to create beams. Here are a just a few common ones:

  • solid wood 2x material
  • engineered lumber of all sorts
  • steel
  • steel sandwiched with wood 2X material
  • steel-reinforced concrete
  • brick and stone arches

Bearing Wall Video

This is a video I shot inside my New Hampshire home. I was lucky enough to have halfway-decent plans that the previous owner gave me at the closing.

I didn't build the house in New Hampshire. But watch this video to see how beams and columns can be hidden and partially exposed in a home.

Pay close attention to the blueprints part of the video. Count your lucky stars if you have pages like I did!!

Floor Joists

A simple beam that most people forget about is a traditional floor joist. The normal floor system you may have in your home is simply a collection of beams that span between two points.

Windows and Doors

Over each exterior window and door in your home you'll almost always have a beam. It might be as small as two 2x6s nailed together with a piece of 1/2-inch oriented strand board (OSB) or plywood in between them. Or, it could be three long 2x12s spanning 12, or more, feet!

Beam Span & Species Tables

Beams are complicated beasts. If you decide to use lumber, not all lumber will support the same weight for a given size and species of lumber.

Douglas Fir lumber is stronger than hemlock. There are vast beam sizing tables that allow you to size lumber according to its species and grade. Leave this to professionals. Don't try to do it yourself.

CLICK HERE to get FREE & FAST BIDS from local structural engineers.

Different Beams

The last home I built for my family contained three different types of beams.

It had:

  • 10-inch-high W10 x 31 steel basement I-beams
  • Laminated veneer engineered lumber beams
  • 2x sandwich beams over windows and doors

Laminated Lumber

Laminated lumber beams are made by gluing 2x material on top of one another. Imagine stacking 10 or more 2 x 6's on top of one another.

These beams can be made to enormous sizes and can often be seen as architectural beams in public buildings. St. Vincent Ferrer church in Cincinnati, Ohio had massive laminated beams that supported a massive roof.

Solid Timbers

You can also use a giant sawn timber as a beam. These are found in post and beam construction you'd see in old barns or a simple log home.

Lally Column Video

Here's a video I shot at a new home in New Hampshire. It shows a steel column supporting a wood beam.


My 10-Inch Beams

That is why I chose to use 10-inch-high steel beams in my basement. I don't have steel columns every nine feet in my basement. My steel beams span 15 feet or more without support.

To make sure I didn't hit my head in the basement, I also poured nine foot four inch high foundation walls. This gives me plenty of clearance under my steel beams.

Flitch Beams

Imagine taking a 1/2 inch steel plate and putting it between two 2x10's. This is a flitch beam. You get the benefit of working with wood but the strength of a steel I-beam.

The steel comes from the fabricator with 9/16th-inch holes punched in it. You trace the hole locations onto the 2x material that will be on either side of the steel.

Taking your time to drill countersink holes, you create pockets to install carriage bolts with washers and nuts. You make it all work so the bolt ends are flush with the surface of the 2x material.

Box Beams

You can make a simple box beam by taking plywood and nailing and gluing it to 2x4's or 2x6's. This is called a box beam. I don't like using these unless an engineer calls for it.

Steel is King for Columns & Beams

The strongest of all beam materials is steel. You can span greater distances given the same beam height using steel in lieu of any other material.

The taller the steel beam, the longer distance it can span between columns.

All too often I see small 8-inch-tall steel beams in the basement of homes with steel columns every 8 or 9 feet. This isn't necessary if you go with a taller beam.

CLICK HERE to get FREE & FAST BIDS from local structural engineers.

Column B224

Brick Water Repellents

Brick water repellents

Brick water repellents look like this just after applying. This shine goes away completely once the silane/siloxane water repellent dries.

"These houses and commercial buildings often were constructed using two or three layers of brick or block behind the face brick you'd see on the outside of the wall. The brick in each layer was different."

Brick Water Repellent Checklist

DEAR TIM: I have a problem with my brick veneer house. It develops leaks during wind-driven rains. I can't seem to locate the source of the leaks. I purchased a brick sealer to solve my problem.

I saw water repellents at the store, but the salesperson said they don't work as well. What do you think? B. N.

DEAR B. N.: Slow down! Do you still have the receipt for the sealer? You may need it.

The sealer you purchased may actually harm your brick house. A water repellent may be a better choice.

Are Brick Leaks Normal?

The leaks you're experiencing are normal. Brick walls leak water and are not waterproof. 

Unfortunately, many homeowners think brick walls are waterproof.

Can Brick Absorb Water?

Bricks and mortar have a great capacity to absorb water. Both contain tiny passageways that actually suck water into the wall. Water can also enter through tiny cracks between the bricks and mortar.

You can build a brick wall that does not transfer water to the inside of a home. The way to do this was discovered hundreds of years ago.

CLICK HERE to get FREE & FAST BIDS from local painters that can apply the special water repellents.

Did Old Brick Buildings Leak?

Old brick buildings did leak water, but the builders knew how to construct them so the water didn't damage the interior of the building.

Water leakage into older homes is rarely noticeable. I'm talking about old brick buildings built before 1900.

How Were the Old Brick Buildings Constructed?

These houses and commercial buildings often were constructed using two or three layers of brick or block behind the face brick you'd see on the outside of the wall. The brick in each layer was different.

The outer brick that was exposed to the weather was fired longer and hotter in the brick kiln. This created a hard brick that had a low water absorption rate.

Were the Hidden Inner Brick Softer?

The inner, hidden, courses of brick in the wall were softer. They were not left in the kiln as long and were not as hard. They soaked up water like a sponge.

When it storms and wind blows rain against the brick wall the water drops are driven into the wall by the weight of the water and the wind pressure. Usually the water passes where the vertical mortar touches the brick.

The soft brick could absorb lots of water.

What Happens to the Water After a Storm?

When the sun appears after the storm, the water is released back into the atmosphere the same way it came into the brick. The breeze and sun pull the water out of the brick like a tow truck pulls a car out of a ditch.

What is Brick Veneer?

Brick veneer is a non-structural layer of brick on the outside of a building. It's only one wythe thick which is why it's considered a veneer.

In your case, you only have one layer of brick. Once this layer has been breached, the water finds its way into your house.

How Bad is the Water Leakage on Brick Veneer?

If you could look behind a brick wall that's being lashed by a wind-driven rainstorm, you'd see water flowing down the backside of the wall. It's one of the downsides to having only one layer of brick.

Where Does Most Water Enter Brick Veneer?

Water may enter through cracks or small holes in the mortar. Pay particular attention to the small vertical (head) joints between each brick. This is the most likely place where water is entering.

The method most modern bricklayers use to butter the one edge of a brick is to cut off the mortar from the bed joint of the brick they just laid and use this to butter the end of the same brick.

This does not fill the vertical joint completely and the bond between the mortar and brick is very narrow because the moisture has already been sucked from the mortar after it was cut off the bed joint.

Are the Vertical Head Joints Filled Solid?

Rarely are these vertical joints filled solid with mortar. When the bricklayer spreads mortar over the tops of the course of brick to lay the next course the mortar often bridges the vertical head joint below. There's no guarantee the joint fills solid with mortar.

Are Horizontal Bed Joints in Brick Solid?

The horizontal joints (bed) in your brick wall are usually filled in solid and resist water penetration. If you find small holes or cracks, repair these before applying any coating.

mortar joint

This is a closeup photo of a horizontal mortar joint between two layers of brick. Note the tiny cracks where wind-driven water can seep into the wall. (C) Copyright 2018 Tim Carter

What are the Types of Brick Coatings?

There are two categories of clear brick coatings:

  • film-forming sealants
  • penetrating water repellents

Film forming sealants create a continuous barrier on the surface of the brick and mortar. They should be avoided if your brick experiences cold weather.

They block the tiny passageways in the brick and mortar. Not only will they stop water from getting into the brick, but they also stop water from getting out. These compounds frequently contain acrylics, mineral waxes (paraffin), urethanes, and silicone resins.

CLICK HERE to get FREE & FAST BIDS from local painters that can apply the special water repellents.

How Do Brick Sealer Water Repellents Work?

Brick sealer water repellents work in a different way. These products are designed to penetrate deeply into the brick and mortar. Some can reach as far as 3/8 inch past the surface of the brick.

They coat the insides of the tiny passageways in the brick and mortar. However, the passageways remain open allowing the brick and mortar to breathe. These water repellent contain silanes, siloxanes, or a blend of these chemicals.

What is the Best Brick Sealer?

You want a silane-siloxane water repellent brick sealer that's soaks into the brick and mortar. CLICK HERE to get a great one.

silane - siloxane water repellent

This is a magnificent silane - siloxane water repellent that soaks into concrete. CLICK THIS IMAGE NOW TO ORDER IT.

Film forming sealants can cloud and haze over. They can contribute to brick spalling (flaking) in colder climates. Water repellents rarely discolor brick.

Because they soak into the brick and mortar, sunlight has a tough time breaking them down. Check the label on your product to see what chemicals it contains. If it's a film-forming sealant, think long and hard before applying it to your brick.

What is the Best Way to Apply a Brick Sealer?

The best way to apply a brick sealer is with a helper and a backpack leaf blower.

Read the label on the water repellent as they often say once they cure you can't put on a second coat. Some can cure in as little as 15 or 20 minutes.

brick sealer

The brick sealer has been applied on the left side of the wall. You can clearly see the wet edge. Once the water repellent is applied and it dries, the brick look just like they did before you started.

How Many Coats of Brick Sealer Should be Applied?

Many of the products recommend two coats of repellent so you can't get too far ahead of yourself. If the first coat dries, or cures, it will not allow the second coat to penetrate into the mortar joint.

Why Should I Use a Backpack Leaf Blower?

You use the backpack leaf blower to simulate what a fierce storm does. The wind pressure forces rain into the brick. Allow the leaf blower to drive the silane-siloxane water repellent deep into the brick wall. As you spray, your helper blows the repellent into the wall right behind you.

CLICK HERE to get FREE & FAST BIDS from local painters that can apply the special water repellents.

Column 095

Stair Trim Molding

Stair Trim Molding

Look at this detail. This is my actual main staircase. The trim molding on the sloping stringer was cut off the top of a piece of baseboard. You can see how the stringer of the staircase appears to just bend over the front edge of the landing and continue as a piece of baseboard on the landing. © 2017 Tim Carter

Stair Trim Molding TIPS

DEAR TIM: I have wasted about 25 linear feet of solid-wood baseboard trying to get perfect cuts. The problem is not in the rooms, but as I try to extend the trim moldings up the stairs of my house.

No matter how I set my miter saw, the angles I cut do not work. Surely there must be an easy way to determine what the angle must be. How do you do install stair trim moldings? Brian K., Levittown, NY

DEAR BRIAN: With the current cost of solid-wood trim going up instead of down, your failed carpentry experiments are death on a stick. You simply can't afford to make mistakes when using expensive trim moldings.

The sad fact is the answer to your dilemma was staring right at you the entire time. Your first piece of scrap trim molding, a pencil and 15 seconds of time would have produced an exact template of the angles that needed to be cut.

CLICK HERE to get FREE & FAST BIDS from local finish carpenters that can show you how to do this.

No Need For Geometry

Cutting stair trim moldings at precise angles can, and does, bring back memories of failed high school geometry tests to many a homeowner who tackles difficult carpentry tasks on an irregular basis.

Perhaps the most frustrating thing is the mental picture one often has of how the trim looks like in another person's house, but not being able to determine just how those simple angles are duplicated.

If you go back to the stairs and look at the flat landing and the stair stringer along the wall, you'll note that the top edge of the sloping stair stringer and the horizontal floor meet at a point.

The bottom of each of the two pieces of trim will indeed meet at this precise point. But the meeting point of the top of the trim pieces is shrouded in mystery.

Custom Trim Moldings Video

You may not realize it, but you can get molding custom made. If you don't like the trim selections at the lumber yard, and big-box home centers have the WORST selection, then consider having custom trim milled for you home.

WATCH THIS VIDEO:

Trace the Trim

To determine where the tops of the two trim pieces meet up on the wall, you need to use a small piece of the wasted trim you generated. This stair trim molding can be as little as one-foot long to serve as the tool you need.

Sloping Steps Baseboard

I've already drawn the pencil line that is parallel with the landing using the piece of white sloping baseboard you see as the guide. The white baseboard is now in place on the stringer and you can see how the top crosses the horizontal pencil line. Trace the top edge of the baseboard now so the two pencil marks cross one another. Remove the baseboard and draw a line from the top intersection point of the two lines down to the point on the stair stringer where it transitions from flat to sloped. This line represents the miter joint between the two pieces of finished trim. © 2017 Tim Carter


Place the piece of trim on the flat landing and extend the bottom of the trim 3 inches over the point where the sloping stringer meets the landing. Use a very sharp pencil and trace a line along the top of the entire piece of scrap trim.

Now place the trim on the sloping stringer and slide it up so the bottom of the trim projects up past the flat landing. Do so until the top of the trim intersects the pencil line you just drew on the wall. Use your pencil to trace a second line along the top of the sloped piece of trim.

Draw the Miter

Because the top and bottom of the stair trim are parallel, the two pencil lines you created with the trim will be parallel with the sloping stringer and the flat landing.

Use a straightedge to connect the point where the two pencil lines meet to the point where the top of the sloped stringer meets the flat landing. This angled line represents the cut line you will create on both pieces of trim.

You don't need a fancy angle finder to determine the angle. I prefer to cut test pieces of trim and see how they fit before transferring the angles to long pieces of expensive trim.

Mark & Cut Test Pieces

Take two pieces of the scrap trim and cut each one about one-foot long. Place one piece on the sloped stringer and slide it up the stringer until the tip of the trim just touches the intersection of the two pencil lines.

Hold the trim piece in this position and carefully make a mark on the bottom of this piece of trim where the sloped stringer meets the landing.

Place the piece of trim flat on the floor and use the straightedge to create a line across the face of the trim from the tip of the trim to the mark you just made on the bottom of the trim.

Place the trim in your miter saw so it lays flat and rotate the blade until the blade is parallel with the pencil line. Turn on the saw and make a precise cut along this line.

CLICK HERE to get FREE & FAST BIDS from local finish carpenters that can show you how to do this.

Check out these obtuse angle cuts on the same stair trim molding at the bottom of the staircase where the stairs dive into the first floor. © 2017 Tim Carter

Do this exact same exercise with the other piece of scrap trim as it sits on the landing. Once these two pieces of trim are cut and placed in position, the two angled cuts should meet perfectly and no filler should be needed at the joint. If you do this successfully, consider yourself a journeyman carpenter!

Obtuse Too

This method of bisecting the angle works in just about any situation where two straight lines meet at any given angle. In the case of an ascending set of stairs and a landing, the intersection produces an obtuse angle that creates short cuts across the face of the trim molding.

But the opposite happens on the small triangular wall where the stairs dive into the first floor. In this situation the baseboard trim and the matching trim on the underside of the stringer, not the top, create an acute angle.

The method of determining the cut angle is exactly the same as you attempt to figure out on the wall where the tops of the two moldings intersect.

Long Cuts Work

The cut angle across the face of the trim molding can be very long and one would think the two pieces of trim would never meet precisely. But if the angle is calculated correctly, the cuts are perfect and the resulting cuts produce a tight fit. If you don't believe me, stop by for a visit and look at my entrance hall staircase.

CLICK HERE to get FREE & FAST BIDS from local finish carpenters that can show you how to do this.

Column 557

Removing Ceramic Tile

removing tile floor

Removing ceramic tile and removing tile floor is easy with the right tools. © 2018 Tim Carter

"The first thing to do is stop hitting the tile with a hammer... Each hammer strike creates conchoidal fractures in the tile. The resulting shards have smooth curved edges that are just like a chipped-flint arrowhead and come at you like a bullet."

Removing Ceramic Tile TIPS

  • Do NOT use a hammer removing tile floor
  • Chip off tile at a low angle
  • Stiff wide putty knife superb
  • WATCH Tile Removal VIDEOS Below
  • CLICK HERE to Get Tim's FREE & FUNNY Newsletter!

DEAR TIM: It's time to remove the 18-year-old ceramic tile in one of my bathrooms. The tile is a smaller octagonal tile that is adhered to a cement board which is nailed to my wood subfloors.  I need to know how to remove tile from a wall.

I tried breaking the tile with a hammer, but the tile shatters into what look to be pieces of glass.

Is there a way to easily remove the tile from the cement board? What is the fastest and easiest way to remove the ceramic tile? What about wall tile? Debbie P., Wilmington, NC

Related Links

Remove Grout from Ceramic Tile

Repair Wall After Tile Removal

DEAR DEBBIE: I don't know if there is a best way to remove the ceramic tile. Each tile reacts differently to force, and the different types of adhesive can make the chore difficult to nearly impossible.

Over the years, I have taken up more than my fair share of ceramic tile, and there are several tricks that I have learned. I've got two great wall-tile removal videos for you below!

Free & Fast Bids

CLICK HERE to get FREE & FAST BIDS from local handymen who can remove ceramic tile for you.

Should I Use A Hammer Removing Tile Floor?

No, don't use a hammer when removing the ceramic tile.

The first thing to do is stop hitting the tile with a hammer. Based upon your description of the tile, it sounds as if you are dealing with porcelain tile. Porcelain tile is extremely hard and has a very high quartz content. These characteristics cause it to react as if it were glass. Each hammer strike creates conchoidal fractures in the tile. The resulting shards have smooth curved edges that are just like a chipped-flint arrowhead and come at you like a bullet. These edges can be razor sharp, so be extremely careful.

What are Good Tile Removal Tools?

The following is a list of good tile removal tools:

Click the image below to BUY all, or some, of the tools in the above list.

Ceramic Tool List

CLICK THIS IMAGE NOW TO ORDER ALL THE TOOLS YOU NEED TO DO CERAMIC TILE.

How Do You Remove Tile From Cement Board?

There are a few ways to remove tile from cement board. Watch this video for an easy way.


You're in luck that your tile has adhered to cement board. This will make the job somewhat easy.

Many years ago, ceramic tile was commonly adhered to fresh concrete that was poured between the floor joists of houses.

The tiles were actually mortared to the concrete mix, and once cured, the tiles and concrete became one unit. The only way to remove this matrix of material is to use a four-pound hammer and lots of muscle power. It's miserable work.

How Do You Remove Cement Board?

You can use a flat spade to pry up cement board. You can also use a wicked tool that resembles a trident. Watch this video to see the technique of driving the tool under the cement board.


If you are trying to remove the tile so as to save the cement board, it is a waste of time in my opinion. It is grueling work to try to remove ceramic tile in an effort to salvage inexpensive cement board.

Get this Honey Badger Demolition Fork you see in the video above. CLICK or TAP the image below to have it delivered to your home.

honey badger demo fork

CLICK or TAP here or the image to have this Honey Badger delivered to your home. 

I feel it is a far better idea to remove the cement board and tile all at the same time. You want to start removing tile where the ceramic tile ends and a different flooring material, such as carpet or hardwood flooring, begins. Don't try to start this job in the middle of the ceramic tile floor.

How Do You Get the Tool Under the Cement Board?

To remove the cement board and tile at the same time, you may have to remove some of the tile and cement board separately at first. I use the small hammer and putty knife for this task. Individual ceramic tiles come off a floor or wall with less effort if you remove the grout surrounding the tile.

The edge of the stiff putty knife can be used to pulverize and remove the grout. You can also use small electric tools with special grinding wheels to do the same thing.

CLICK HERE to get FREE & FAST BIDS from local handymen who can remove ceramic tile for you.

What is the Best Angle When Removing Tile Floor?

It's best to drive a tool under the tile at a low angle.

Once the grout is removed from around a tile, try to pop the tile off the cement board by driving the stiff putty knife under the tile at a low angle. The blade of the putty knife should be nearly parallel with the floor. Strike the end of the putty knife gently with the hammer.

remove tile floor

This is an excellent bent-blade 3-inch putty knife. It's got a chiseled edge to get a bite right away. CLICK THE IMAGE NOW TO BUY IT.

The tile will either break in several pieces, or it may pop off all at once. Try to remove an area of tile from the floor that is about 8 inches wide and perhaps 2 inches from the flooring material that touches up against the tile.

How Do You Create A Hole in Cement Board?

Strike the cement board with your hammer to pulverize it. It will take a few hammer blows to achieve this, but the cement board will disintegrate. Remove the debris so the wood floor is exposed. I prefer to use a wet-dry vacuum to get up all of the small debris.

Removing Ceramic Tile With a Garden Spade

Take the flat garden spade and drive it between the wood subfloor and the cement board. Try to get about 6 inches of the spade under the cement board. Lift up on the handle to lift the cement board.

removing ceramic tile

You can't get a better garden spade. It's got an arched back so it won't bend. CLICK THE IMAGE NOW TO BUY IT.

Move the spade left or right if possible to start to pop up the cement board from the wood subfloor. Once you get the cement board to move up, it will readily detach from the wood subfloor as you drive the spade farther under the cement board and tile.

The roofing nails used to attach the cement board to the wood subfloor will be somewhat problematic. You will feel them as you try to move the spade under the cement board. When this happens, move the spade left or right to try to bypass the nails.

Are Cement Board Nails Easy to Remove?

Yes, cement board nails are easy to remove if the nails have a smooth shank.

They will offer little resistance to lifting forces. The trick is to create a gap between the cement board and the wood subfloor. Once you can get the cement board to lift up, it is only a matter of moving the spade farther under the cement board and then using the spade as a lever to pry the cement board off the wood subfloor.

If the tile contractor screwed down the cement board and used thinset under it to fill hollow spots, you're screwed. You'll be beating it all out with a 4-pound hammer.

Wall Tile Removal Videos


CLICK HERE to get FREE & FAST BIDS from local handymen who can remove ceramic tile for you.

Column 620

Tape Measure Markings


various tape measures

Here are several tape measures. You can see the vast difference in markings. Some are easier to read than others! Photo credit: Tim Carter

Tape measure markings are black lines that represent fractions of an inch. The length of the line gives you a clue as to the fraction. Special markings are for different on-center measurements.

Revised February 2018

Tape Measure Markings TIPS

DEAR TIM: I'm just starting to get into building and remodeling as a do-it-yourselfer. Now that I'm using a tape measure, I'm having some difficulty.

Perhaps I should have paid more attention in math class in school. Can you tell me about the markings on tape measures, what they mean and about all the special markings?

Also, every tape measure I have and see in the store seems to be defective. The hook on the end is loose on all the tapes. The manufacturer is not tightening the rivets enough. What other tips do you have about using tape measures? Craig S., Billings, MT

Related Links

Measuring Using a Builders Transit Level - Cool Tool VIDEO!

Laser Level Measures Automagically - One Person Is All You Need - GREAT VIDEO

Free & Fast Bids

CLICK HERE to get FREE & FAST BIDS from local carpenters if you still can't figure out a tape measure.

DEAR CRAIG: I've got some sobering news for you. As you delve deeper into building and remodeling, you're going to really regret not paying more attention in all your math classes, especially geometry.

Math skills are very important. Fortunately, it's never too late to master mathematics. If you possess the passion to build and remodel, you'll get up on the math learning curve very fast.

Tape Measures Look Alike But Differences

I've been using tape measures for so many years that I've had the great fortune to see some that are worthless and others that are marvelous tools.

The best thing is in the past few years I've seen more improvements in tape measures than I've seen in the previous thirty-five years combined! It's hard to believe you could improve a tape measure, but believe me a few companies have really done an amazing job.

Fractions And Line Length

First, let's discuss the common markings on a tape measure. Most tape measures I use in carpentry and building have black lines at a 90-degree angle to the edge of the tape measure in between each of the inch markings.

These lines are different lengths to help you differentiate between them and to help you understand what they mean.

Tape Measure Close-up

Look closely at the tape at the bottom. See the markings to the left of the 6-inch mark? Those are 32nds of an inch!

The longest of these black lines indicates the halfway point between each inch. It's the half-inch mark. So if you want to cut a board 3 and ½ inches wide, you'd make a crisp pencil mark on the board at the longest line in between the 3 and 4-inch markings on the tape measure.

Tape Measure Markings Video

Watch this video made around the year 2004, that's still relevant today! My voice has changed!!!

CLICK HERE to get FREE & FAST BIDS from local carpenters if you still can't figure out a tape measure.

1/4-Inch Mark

The next longest lines on the edge are the quarter-inch markings. Since the half-inch mark is longer than these, it overlaps one of these three markings in between each of the primary inch marks.

If you start at the 1-inch mark and count the quarter-inch markings, including the half-inch mark, you'll discover you get to four when you finally get to the 2-inch mark. Thus, these marking divide 1 inch of length into four equal parts, each one-quarter inch long.

klein-tools-tape

This is the great tape measure I have that has the fractions marked on it if you need help. It's VERY EASY on the eyes. CLICK THE IMAGE NOW TO ORDER ONE.

1/8-Inch Mark

The same is true for the next two smaller markings on the tape measure. The next smaller line below the quarter-inch mark is for one-eighth, and the shortest line represents the one-sixteenth-inch mark.

Friendly Tape Measure With Fractions Marked

I realize this may be confusing, but fractions are the standard we use here in the USA. To make this easy for you, some tape measures along one side of the tape measure have the actual measurement called out by each line. I have a tape measuretape measure marks on my desk that has 1/8, 1/4, 3/8, 1/2, 5/8, 3/4, and 7/8 fractions right above each line! You may want to invest in this tool.

tape measure markings

If you can't remember fractions, some tapes call them out for you.

Point Of No Return

Some tape measures have markings that divide each inch into 32nds of an inch. You'll discover the markings are so fine and close together that it's tough to determine where you are. Most tapes that have this only do it for the first few inches on the tool.

16-Inch Spacing

As you extend the tape measure, you'll probably see the numbers 16, 32, 48, 64, 80, 96, etc. in red. The red indicates 16-inch-on-center spacing.

This is a common framing spacing for wall studs, floor joists and common roof rafters. If you decide to space framing at 24-inch centers, the red marks will be at every other foot marking on the tape measure.

Tape Measure Markings Mystery Black Diamond  

Many people wonder about the mystical small black diamond markings or black triangles found at 19 and 3/8 intervals on the tape measure. These are handy markings if you want to achieve equal spacing for five framing members per every 8 feet.

If you decide to use 16-inch-on center spacing, you'll end up with six framing members for every 8 feet. If you space things at 24-inch centers, you'll have four framing members for each 8 feet. Some carpenters like to have five framing members per every 8 feet so the sheathing over the framing is less spongy and stiffer.

Hook Slop

The hook end of your tape measure is supposed to wiggle a little bit. That's not a defect. The amount of movement should equal the thickness of the hook end of the tape measure.

This is done so you get an accurate measurement when you're trying to determine the exact measurement in between two fixed objects.

When you get the measurement pushing the tape hard in between the objects and then take the tape and pull it across the board, the movement of the hook will produce the correct measurement. If the hook doesn't move, you'll discover your cut piece will always be too short.

IMPORTANT USE TIPS:

The top tips for tape measures are simple. Keep them clean and free of debris. When retracting a tape measure slow it down so the hook doesn't come to an abrupt stop.

Check the hook end of the tape measure before working to ensure it's at a 90-degree angle to the actual metal tape. If you drop the tape and the hook gets bent, you'll discover you'll be getting inaccurate cuts if someone else is giving you measurements!

What happens if the hook isn't kept clean? Well, errors happen! Read about my issue in the August 9, 2009 Newsletter! Oops!

CLICK HERE to get FREE & FAST BIDS from local carpenters if you still can't figure out a tape measure.

Column 1065


The above is an affiliate link. I get a tiny commission if you purchase this item from Amazon.

Featured: January 29, 2017 AsktheBuilder Newsletter.

Mold and Mildew on Lumber

mold and mildew

The horizontal collar tie under the roof rafters is black with mold and mildew. Stain Solver oxygen bleach will remove it with ease. CLICK THE PHOTO now to order Stain Solver. © 2017 Tim Carter

Mold & Mildew on Lumber TIPS

DEAR TIM: I'm having a new room addition built and while inspecting the framing lumber I noticed black mildew and mold on different pieces of wood. One joist is totally black with it. Is the structural integrity of the wood compromised? Should the lumber be replaced? What causes this to happen as some of the lumber looks perfect? What's a sensible course of action at this point? Tracy K., Chicago, IL

DEAR TRACY: You're not alone. Many homeowners experience mold and mildew on their lumber as houses are built or room additions are constructed. The good news is the lumber is going to be fine and there's rarely any damage to the wood. If it's just surface mildew, it will clean off using a certified organic oxygen bleach like Stain Solver.

Wood rot can weaken wood, but it's easy to tell if wood is rotten. What's more, wood will not rot in the short time it takes to build a new home or room addition. It typically takes years for wood rot to advance.

CLICK HERE to get FREE & FAST BIDS from local cleaning companies that can remove mold and mildew.

Any Lumber Anytime

There are many reasons why the black mildew and mold appeared on the lumber. Understand that it can happen to just about any lumber any time.

Lumber that's treated with chemicals that contain copper or borates are less susceptible to mold and mildew growth because these elements and chemical compounds are natural biocides. But mold and mildew can, and does, grow on treated lumber.

Spores Everywhere

The mold and mildew spores are just about everywhere. They're on the wood surfaces or can be transported there by wind and rain. Once in place, all they need is water to start growing and flourishing.

Sugar aerosols broadcast by trees and bushes is food for mildew. Dust is also a food. It's nearly impossible to keep the lumber clean as you build. Some lumber provides plenty of food for the mold and mildew to grow rapidly.

Mildew Within 48 Hours

When you see the black mold cover wide areas of lumber, usually this happens because the wood got wet and stayed wet while it was being stored. If it's warm and humid, the growth of the mold and mildew can be rapid.

Mildew can start to grow in as little as 48 hours if conditions are favorable.

Construction Food & Drink

Spotty outbreaks can sometimes be traced to food or liquids that are food for mildew or mold. For instance, if you shake up a bottle of soda containing sugar or high fructose corn syrup and spray it randomly on the lumber, you'll probably see black spots appear in short order wherever the liquid contacted the lumber and dried.

CLICK HERE to get FREE & FAST BIDS from local cleaning companies that can remove mold and mildew.

Test For Rot

You can test for structural integrity yourself. First make sure the lumber is dry. Once the room addition is under roof, the wood should dry pretty rapidly unless you're in a very long damp spell.

Take an 8-penny nail with a sharp tip and see if you can push it into the wood with just your hand. If you meet immediate resistance, the wood is fine. If the nail, using hand pressure, penetrates deeper than one-quarter inch, then you could have wood rot.

Stain Solver Cleaner

Oxygen Bleach

Stain Solver is MADE in the USA with USA ingredients that are food-grade quality. CLICK THE IMAGE to order some NOW.

Cleaning the mildew and mold from the wood is a good idea. You don't want it covered up. Cleaning can be accomplished in several ways.

I recommend you use Stain Solver certified organic oxygen bleach mixed with a little bit of liquid dish soap

The Stain Solver is a pure powder Made in the USA with USA ingredients. It dissolves in warm or hot tap water with a little bit of stirring.

Once mixed and all the powder is dissolved, just pour the solution into a garden hand-pump sprayer and squirt it on all the lumber that's got mildew and mold on it.

Allow it to soak for about 15 minutes keeping the lumber wet with the solution the entire time.

Don't worry, the water is not going to harm the wood since it's able to dry rapidly.

Toxic Chlorine Bleach

Chlorine bleach is also very effective at cleaning up the mold and mildew. You can mix a 50-50 solution with regular chlorine bleach and water.

Some people don't do well with the fumes, so be careful. Wear old clothes as the chlorine bleach will ruin dyed fabrics. Wear goggles and gloves when using chlorine bleach or any chemical.

The other issue with chlorine bleach is that any solution that gets on, or near, trees, flowers, grass, bushes, etc. will kill it. Chlorine bleach is very toxic.

Don't Cover It

You do not want to cover up this contaminated wood. It needs to be cleaned before any insulation is installed. Never cover this stained wood with drywall or paneling. Anyone with asthma or other respiratory challenges could suffer from the hidden spores.

If you're building during a wet spell and the builder is trying to move the job along, never allow him to cover up the wood if it's still wet. Trapping water and moisture in wood will cause mold and mildew to grow.

Air Dry Is Fast

It doesn't take long for wood to air dry, especially once the roof is on and there are high-performance vapor barriers in place in crawlspaces and under concrete slabs. Don't be fooled by a builder that says the wood will dry out on it's own in the wall.

IMPORTANT TIP:  Don't allow a builder to apply a vapor barrier on wet lumber. This will trap moisture and mold and mildew will become a huge issue. A vapor barrier traps the moisture in the wall cavity.

CLICK HERE to get FREE & FAST BIDS from local cleaning companies that can remove mold and mildew.

Column 947

Bathroom Remodeling Sequence

Bathroom Remodeling

Bathroom remodeling Project © 2017 Tim Carter

Bathroom Remodeling Steps TIPS

DEAR TIM: I'm adding a bathroom in my house. The framing is complete and I am a little confused as to the order of the rest of the tasks. When do I install the plumbing pipes? Do I tile before or after the tub is installed? When are the vanity and the toilet installed? When do I drywall? Mark O., Chicago, IL

DEAR MARK: Adding a bathroom is tough enough, but the job can be even harder if you goof up the sequence of events from start to finish. Not only can you make things more difficult, there is a chance of ruining completed work that is already in place. As you might expect, there is a logical order that professionals follow to maximize profits and minimize the amount of time spent working.

CLICK HERE to get FREE & FAST BIDS from local bathroom remodeling contractors.

Overall Size

One of the first things that should be done is to determine the proper placement of the bathroom walls. This requires precise planning as many model building codes dictate minimum clearance requirements in and around toilets and bathroom sinks. I hope you have your walls in the right place, if not, you may have to start over.

Toilet Space

For example, a toilet must be centered in a space no less than 30 inches wide. The actual space can be larger, but in no instance can another fixture be closer than 15 inches from the centerline of the toilet.

The minimum distance from the front edge of the toilet bowl to the wall you face while resting on the toilet must be 18 inches or 24 inches depending upon your local code. This same minimum distance requirement applies to the front edge of the sink countertop as well.

Bathroom Remodeling

This is the toilet in my own 1/2 bath powder room. There's plenty of room because the distance between the two side walls is 54 inches. That leaves about 19 inches of space from the edge of the toilet bowl to either wall. © 2017 Tim Carter

Always check your local codes as you create your plans. Apply for your building permit as soon as your plans are complete.

Walls Before Plumbing

If the floor to this new bathroom is constructed with wood floors joists and a wood sub-floor, the walls should be constructed before plumbing drain lines are installed. The opposite is true if the bathroom will be located on a concrete floor.

Slabs and Plumbing

In this case, all below-floor-drain lines need to be installed first. Triple check the pipe placement before you pour the new concrete floor.

The best way to ensure the plumbing pipes are installed in the correct location is to stake out the bathroom wall plates and suspend them in the work area with wood stakes. Be sure this frame is in the right location so the actual walls will be right where the bottom plates of your frame are after the slab is poured.

I'd always drill the holes in these temporary wall plates for the plumbing drains and vent lines that would extend up through the slab after the concrete is dry.

This trick was taught to me by an old master plumber named Ralph Vilardo. It allows you to get the drain and vent pipes perfectly centered on the walls. 

The rough carpenters will hug you!

Keep in mind that some states and local governments only allow licensed plumbers to install drain and water supply pipes. Check your building department to see if you are permitted to do your own plumbing work.

Frame the Walls

The day after the concrete is poured, the walls can be framed. Keep in mind the location of the tub and shower faucet. The center line of the tub or shower should be the center of the space between two wall studs on this wall.

This allows you to install the faucet without cutting a wall stud. When all of the walls and ceiling studs are in place, install the remaining above grade plumbing drain lines and vent pipes.

CLICK HERE to get FREE & FAST BIDS from local bathroom remodeling contractors.

Tub and Shower

It's now time to install the tub or shower. After the tub is in place, keep it covered with heavy drop cloths to prevent scratches and nicks. With the tub in place, complete the installation of all of the water supply lines.

Heating Hardest

The next step is to rough in any heating and cooling ducts, heat piping, and ventilation piping for fans. Realize that HVAC ducts are big. This subcontractor has the hardest time making things work out in tight spaces. After he's done, then all the above rough plumbing pipes should be installed.

Electric Rough Last

Once this is complete, install all of the rough electrical wiring. Make sure that wall-mounted light fixtures don't interfere with medicine cabinets, mirrors, or side walls. This is a common mistake.

Wall sconce fixtures hang out beyond the small rough-in boxes. Be sure the final fixture doesn't cause a conflict with a mirror or swinging door.

Magic Floor Heat!

You've got a one-time chance to make your new bathroom floor toasty warm in the winter. Install an electric radiant floor mat on top of the subfloor.

radiant floor mat

This is the electric radiant floor mat that's heating my man cave ham radio shack. It's a great DIY project. CLICK the IMAGE NOW to order your own NuHeat Electric Floor Heat Mat.

I've got one in my man cave ham-radio shack and it heats the entire room. You'll never have cold feet from icy ceramic tile! 

It's easy to install this mat. Please watch the three videos of me installing the mat in my man cave:


Insulation

Insulate all exterior walls for energy savings and consider insulating all interior walls for sound control.

SECRET TIP: It's a great idea to pack insulation around the underside voids of the tub as well. This will keep bath water nice and warm for extended periods of time.

Cement or Waterproof Board

It's now time to install cement board on any walls around the tub that will be covered with ceramic tile. Consider installing moisture-resistant drywall on all walls. If you never want any problems with this drywall failing, then coat it with clear urethane - two coats - before it's finished.

clear water-based urethane

I've had excellent results with this clear water-based urethane. It dries FAST. CLICK THE IMAGE TO ORDER SOME NOW.

Normal Drywall

Regular drywall can be used for the ceiling. Finish and sand the drywall.

Watch this video to see a few drywall finishing tips. I have MANY OTHER drywall videos here at AsktheBuilder.com. Just type: drywall videos into the search engine here on any page to view them.


If you have a wood floor system, it's now time to install cement board on the floor to support the ceramic tile. You can skip this step if you installed the electric floor mat. You covered the floor mat with thinset to create the solid surface for the tile.

Ceramic Tile

The tile in the tub and shower area should be installed and finished first. Follow that with the floor tile. Tile the entire floor in case someone decides to install a pedestal sink.

Finish Carpentry

When the floor tile grout is dry, install the bathroom door and trim.

Paint Now

Consider painting the room at this point. It's easier to paint with no toilet or vanity cabinet and top in the way.

Install Fixtures

After the paint is dry, carefully install the toilet and sink. Cover the floor with drop cloths during this process to avoid hurting the new tile. Complete the job by installing mirrors, towel bars, and accessories.

CLICK HERE to get FREE & FAST BIDS from local bathroom remodeling contractors.

Column 287

Connecting a New Foundation to an Old One

connect new foundation to existing

Connect new foundation to existing: Those two pieces of vertical rebar help lock two different pours of concrete together. You start the foundation with a footer or footing. This footing will soon have a foundation wall on it directly over the keyway groove in the concrete. The clay soil beneath it is extremely stable. © 2017 Tim Carter

"You have numerous options with respect to making a physical connection between the two foundations. I've successfully installed steel pins that are epoxied into the old foundation."

Connect New Foundation to Existing Checklist

DEAR TIM: I'm building an addition on my home and realize I must connect the new foundation with the existing one. What's the best way to do this? Is there a way to waterproof the connection?

Will this connection become a hinge point in the future causing cracks in the walls? I am very concerned about how to make a connection between the structures that will stand the test of time. Paul M., Orono, MN

DEAR PAUL: I can remember many years ago having these same thoughts when I was building my first room addition. I couldn't figure out how the shallow crawlspace foundation would stay connected to the full basement foundation since they were at different elevations.

My geology professors would have frowned at me had they been at the job site. I was not thinking through how to connect the new foundation to the existing one.

Is a Foundation Wall a Beam?

Many people fail to realize that a typical foundation wall is, among other things, a beam. You begin to see this if you look at the vertical web in a steel I beam or even a simple wooden floor joist.

connect new foundation to existing

Note how the tall poured walls look just like the center web of an I-beam.  Copyright 2018 Tim Carter

Understanding this is essential. Steel I beams derive much of their strength by the thickness and height of the vertical web section of the I beam. It's important to realize steel I-beams gain a great amount of strength from the top and bottom flanges. The top flange is the flat part that ironworkers walk on as they erect the steel.

Can Taller Beams Span Farther?

Generally speaking the taller the vertical web, the farther the beam can span between supports. You can see this clearly if you pay attention to bridges that cross many of the interstate highways you might travel here in the USA.

Some of the bridges span 100, or more, feet between the poured concrete supports at each end of the bridge. The steel I-beams are often 3, 4 or 5 feet tall whereas the typical I-beam in a house basement might only be 8 inches tall.

A foundation wall is no different other than the fact its vertical height is ten or fifteen times greater than a typical residential I beam.

How Important is Soil Strength?

The soil strength is the most important thing of all. Strong soil will not allow the new foundation to drop below the existing one you're connecting to.

If you accept this principal, then it stands to reason the foundation will not flex up or down if the soil beneath this beam is solid.

This is perhaps the most important aspect of connecting the two foundations. The soil under a foundation of the existing house and the foundation must be strong.

If it is, then there's no reason the room addition foundation will sink or pivot next to the existing house.

CLICK HERE to get FREE & FAST BIDS from local SOIL engineers to ensure your foundation is fine.

What are Foundation Steps?

Foundation steps are parts of a continuous wall that are different heights. When you face the wall the top of the foundation appears to be a giant staircase. The photo above shows a side wall with two steps to the right of the highest part of the foundation.

Foundation steps are used when a house is built on a steep or shallow hillside.

When new homes are built, it's often a common practice to pour different parts of the foundation at different times and at different heights within the soil profile. The fact that you are installing the foundations years apart instead of days will make no difference.

I was able to tape three videos of a new foundation going in for a detached garage being constructed here in central New Hampshire just two houses away from my own home. This was NOT my job. I was just a spectator.

Can Footings Be Stepped?

Yes, a footing can be stepped. These are necessary to keep the footing below the frost level when a house is built on a hillside.

But the garage had a stepped footer. Meaning the footer was at different levels just like your addition will be with respect to your home.

WATCH THESE THREE VIDEOS TO SEE FOUNDATION / FOOTING STEPS:


Should the Foundation Contain Reinforcing Steel?

The masonry foundation or the slab should also contain structural steel. Dual horizontal steel bars 12 to 16 inches from the top and bottom of poured concrete foundations help to create a stiff concrete beam.

Concrete block foundations can incorporate steel truss fabric that is installed in every other row of the concrete block units. Filling the hollow cores of concrete block foundations with a pea-gravel concrete slurry also adds strength.

Concrete slabs can contain 1/2-inch diameter steel bars on two-foot centers in both directions to stiffen the slab substantially. A residential structural engineer can easily specify the best solution for your particular situation.

foundation footer

This is the footer under the laundry room portion of my home. Note the distinct soil profiles. My house is built on glacial till. In fact, both visible soil profiles may represent two separate glacial episodes! © 2017 Tim Carter

How Do You Connect a New Footing to an Existing One?

Use steel rods to connect a new footing to an existing one. Drill a hole into the existing footing the same diameter as the steel bar. The depth should be at least 4 inches. Hammer a 10-inch length of steel bar into the hole leaving at least 6 inches to extend into the new footing.

You have numerous options with respect to making a physical connection between the two foundations. I've successfully installed steel pins that are epoxied into the old foundation.

On other jobs, I've bolted a steel angle iron to the existing foundation. The concrete of the footing is poured on the flat part of the angle iron. You can see how it would help hold the footing to the existing foundation just as a shelf cleat hold a shelf in a closet or pantry

Is it Okay to Encapsulate the Steel in the Concrete?

These building components then become encapsulated by the masonry materials that are used to create the new room addition foundation. It's always best to hire a structural engineer to create a design for this connection.

This is especially true if you live in an area with expansive clay soils or an area that is subject to seismic movement.

CLICK HERE to get FREE & FAST BIDS from local STRUCTURAL engineers who'll help you.

Can the New Connection be Waterproof?

There are special waterproof connection materials that work well when connecting a poured concrete foundation to an existing one. These flexible waterproofing materials look like weatherstripping on steroids as they have small fins that project from the center of the main strip.

The base is epoxied and sealed to the existing foundation and the strip projects into the center of the foundation form. When the wet concrete surrounds the strip, you have a waterproof joint so long as the foundations do not pull apart from one another.

How do You Waterproof the New Foundation Connection?

I feel the best way to waterproof new foundations is to apply special waterproofing compounds to the exterior of the finished foundation. There are many different products and systems but all rely on excellent drainage around the foundation.

You need to make sure your drainage system can collect the subsurface water and transport it to a low spot on your property or into a sump pit where it can be pumped to a stormwater collection system.

Do Deep Piers Help in Weak Soil?

Yes, piers help hold up a foundation in weak soil.

Soil stability is everything when it comes to foundations. If the soil quality is suspect, you can ensure a stable foundation by installing piers under the foundation footer.

Piers can be made from concrete, steel or wood, but a common one is a simple vertical hole that extends into the soil until it finds bedrock or stable soil. This hole is then filled with concrete

Piers can be spaced at eight or ten-foot intervals and resemble table legs. The foundation, which is a beam, simply transfers its load down and through the individual piers instead of the unstable soil in between the piers.

CLICK HERE to get FREE & FAST BIDS from local STRUCTURAL engineers who'll help you.

Column 500

Washing Machine Venting Diagram

Washing Machine Drain Vent TIPS

Kevin's Shortcut Vent

Kevin Garretty emailed me about a vexing problem at his Beaufort, SC home. He included a proposed drawing of what he wanted to do.

Believe it or not, he was darn close to doing it the right way.

He's scratching his head about the correct way to vent a washing machine and needs a venting diagram.

Tim's a Master Plumber

For the record, I'm a master plumber among other things. I was a master plumber at age 28 in Hamilton County, Ohio. Ten years later I sat and passed the master test for the City of Cincinnati and got my masters license.

I loved doing the plumbing on all my jobs. I think it was the challenge of the 3-D aspect of creating the network of drain and vent pipes that attracted me to the trade.

Think about it. You have one pipe leave a house to the sewer or septic system and often only one vent pipe up on the roof.

But in between, those pipes bifurcate like crazy. A master plumber needs to know how to make it all work so no sewer gas ever enters the house.

Kevin's Drawing

Here's what Kevin cooked up in his head.

"Is it OK to vent washer drain line, before the hard trap in the wall?"

washing machine drain pipe

This is Kevin's drawing. NEVER install a washing machine drain pipe and vent like this. Look at MY drawing below.

Kevin, the answer is NO. 

Suction

In your scenario, if a fixture that's farther upstream discharges lots of water that rushes by the wye fitting where your washing machine drain pipe connects, the vacuum created by the water rushing past the washing machine branch Wye will siphon water from your trap.

Correct Venting Prevents Suction

If you put the vent line at the connection point of the washing machine branch arm like you see in my drawing, the vacuum pulls the needed air from the vent pipe before it tries to get it on the other side of the trap. It's looking for the path of LEAST RESISTANCE to get the needed air.

Toilets - BIG Problems!

In my diagram, I've shown a half-bathroom upstream from the washing machine. Imagine what happens when that toilet is flushed! 

The rushing water fills the pipe completely and pushes the air in the pipe ahead of it towards the sewer. That air MUST BE REPLACED and as the water goes past wye fittings, it creates a vacuum at that point.

Tim's Drawing

I've included the proper pipe sizes for the system. The dashed lines are vent lines and note the one vent line for the half bath is a full-sized 3-inch vent that goes up and through the roof.

The pipe that drains the lavatory sink is 3-inch in diameter because that drain line also acts as a vent for the toilet. The 3-inch pipe would never completely fill with water even if you filled the lavatory sink and pulled the stopper. This wet venting is permitted by most codes.

I've done it for years on many systems, even at my own home, and never had a suction issue if you flush the toilet and let a full sink of lavatory water drain at the same time.

Remember that vent lines MUST be sloped so they drain water towards the sewer. You never want standing water in a vent line.

Washing Machine Venting Diagram

Note the pipe sizes. It's very important that a washing machine has a 2-inch drain line up to where it connects to the main stack. Look at the interesting wet venting of the toilet! READ the column above to understand how it works. (C) Copyright 2017 Tim Carter - Master Plumber


Excess Grout Removal

Grout Removal TIPS

DEAR TIM: I was grouting ceramic tile when I had to leave the house for an emergency. When I could finally get back to work the next day, the grout was hard as a rock. I have extra tile, should I just remove the mess I have now and start over? Is there a way to remove the hardened grout without harming the tile? Dan A., Orlando, FL

DEAR DAN: First, I hope all of those associated with the emergency situation are okay and doing well. As for your ceramic tile, I would not just yet pronounce it DOA (dead on arrival).

Depending upon certain factors, including but not limited to, amount of excess grout, the amount of time the grout has been left to harden, the surface texture of the tile, and the amount of patience you have, you may be able to salvage the tile job. It most definitely is worth a try.

CLICK HERE to get FREE & FAST BIDS from local tile repair contractors.

excess grout removal

These tools will get up most of the grout paste left behind. The wood stick with sharp edges will prevent scratches as you try to pop off large pieces of grout. Vacuum up the dust as you work, so the grout grit does not scratch the glazed tile.

Use Right Tools

The best tool to use is an oak wood stick with sharp edges will prevent scratches as you try to pop off large pieces of grout.

The easiest place to get oak is a pallet slat. Visit an business that uses pallets for incoming and outgoing freight and they'll have a crap pallet around.

You just have to peel off one of the top boards and then saw it so it's the shape of a paint stirring stick.

Paint Sticks Work Too

If getting oak is too much work, and it can be, then just use a paint stirring stick.

Slowly scrape the excess grout with the stick edge. Cut into the grout with the corner of the stick.

Do NOT attack the grout like a bulldozer cuts into a hill of dirt. The stick will ride up over the grout.

IMPORTANT TIP: Brush away or vacuum up the grout grit and dust as you work. If you don't, the grout grit will scratch the glazed tile.

Floor grout contains fine pieces of silica sand and it's extremely abrasive. The sand will scratch tile fast and it's just about impossible to repair the tiny scratches.

48 Hours

The primary ingredient in many ceramic tile grouts is Portland cement. It takes days and often weeks for ceramic tile grout to reach full strength.

At this point in time, you're working against the clock. Every hour after the grout was installed, it gets much harder to remove it.

I've found that if you start to remove excess grout within 48 hours after it was installed, it's not too hard.

The longer you hesitate to remove the grout, the harder it becomes to remove. If, by chance, the grout was an epoxy grout, you're toast. It's virtually impossible to remove excess epoxy grout from tile surfaces without damaging the tile.

Step-By-Step Tips

The grout removal process requires just a few simple tools. You need some small pieces of wood that have very square-cut edges and several brand new nylon scouring pads.

scotch brite dobie pad

This is the BEST grout removal tool I've ever used in conjunction with a wood stick. These nylon pads do a fantastic job. CLICK THE IMAGE ABOVE NOW TO ORDER THEM.

The first thing to do is to work in a small area to see how successful the grout removal techniques will be. If you have rapid success and can get a few tiles clean within a few minutes, that's a very good sign.

No Metal Tools

Use the wood sticks to remove large clumps and layers of grout. Do NOT use metal scraping tools, putty knives, etc. The metal will permanently damage the glazed surface of the tile.

Don't allow contractors to use metal tools.

CLICK HERE to get FREE & FAST BIDS from local tile repair contractors.

Oak is Best - Soft Woods Dull

I prefer to use pieces of oak that are 1/4 to 3/8 of an inch thick, one-inch wide and perhaps six inches long. The oak hardwood holds its square-cut edge longer than a softwood like most paint stirring sticks.

Use a power saw to make sure all of the edges are square cut instead of slightly rounded. The crisp square edge aggressively cuts through the grout down to the surface of the ceramic tile.

Add Water

Before you begin to attack the grout-covered tile with the stick, pour a little water on it. The water acts as a lubricant and helps to prevent micro-scratches on the glazed tile surface. It should not require excessive pressure to get immediate results.

The trick to removing large grout deposits is to just cut into the grout with a corner of the grout stick. Don't try to push the entire square face of the oak stick into a large clump of grout.

Once the heavy deposits of grout are removed using the oak stick, rinse off all of the grout particles and grit from the surface of the tile.

New MicroFiber Sponge

New tools and products hit the market all the time. Farther down below you'll see traditional grout sponges that work really well for this job.

But right here is a newer sponge that combines a microfiber surface on one side that really helps you get rid of the DRIED grout haze on ceramic tile. CLICK HERE NOW to order one of these sponges.

grout sponge

Here's a fantastic newer sponge that will do a great job of cleaning dried grout haze. CLICK THE IMAGE NOW TO BUY ONE.

Scrub Away

Add more fresh water to the surface of the tile. Get the nylon scouring pad wet as well. Begin to scour the tile surface with the pad adding plenty of fresh water as you scrub. You should see dramatic results within seconds.

Check for Scratches!

You can test to see if all of the grout paste has been removed by doing a final rinse on the tile(s) you just worked on. Use a soft cotton cloth to dry the tile. You can also dry it quickly with a regular fan or a hair dryer.

Remove Haze

Wet tile can trick you. It often looks perfect but frequently after it dries you will see a slight grout haze upon it. Hold a piece of spare tile next to the clean and dry tile to see if it has been restored to its original condition.

Add New Grout

The biggest challenge of the job will be restoring the grout lines between the tiles. When tile grout is wet, it is very easy to make the grout lines uniform using a special grout sponge that has rounded edges.

grout sponges with rounded edges

These are wonderful grout sponges with rounded edges. I've used these for decades with amazing results. CLICK THE PHOTO IMAGE NOW TO ORDER THESE SPONGES.

Carving Hard Grout

The sponge tools the grout line smooth. But now, the grout in between the tiles is anything but uniform. Use coarse sandpaper to slightly round off a corner of one of the oak sticks so that it resembles a woodworker's chisel.

As you push and pull the stick back and forth along the grout lines, the rounded corner will cut a profile similar to what the sponge would have created. Once again, introduce some water to the grout to act as a lubricant.

Do not give up if you do not see immediate results. Try to be patient with the wood stick as it may be far easier to dress the grout this way than to remove the grout and start over. If you do decide to re-grout, try to make sure you do when you will not be called away from the house!

Secret Sugar Trick

I know this is going to sound crazy, but try it. Take one gallon of warm water and dissolve a cup of sugar into it. Take this sweet solution and pour it onto excess grout on a floor. If you have wall tile with too much grout, then soak paper towels in the solution and place them on the tile.

Keep the tile wet with the sugar water for at least two hours. After this dwell time is complete, use a new Dobie nylon scrub pad and scrub a small area. You should see instant results. It may take more than one application of sugar water to completely remove the grout film.

CLICK HERE to get FREE & FAST BIDS from local tile repair contractors.

Column 433