Solving Pocket Door Problems

"A high-quality pocket door frame and hardware kit will operate flawlessly for many years if installed properly."

Pocket Door Problem Checklist

When Did Pocket Doors Become Popular?

Pocket doors became very popular a few decades after the US Civil War. The popularity peaked between the late 1890s and the 1920s.

Who hasn't been inside one of those magnificent Victorian homes built 100 years ago that has dual-acting pocket doors between the living room and dining room? Those disappearing doors can instantly create privacy. If you want to watch a video about pocket door privacy, it would do you well to click or tap here.

The beauty of the pocket door system was known by our grandparents and their parents. They saw how the doors saved space. The pocket door concept freed up both floor and wall space. I don't know about you but I'd sure like to shake the hand of the inventor of pocket doors!

Can I Install Heavy Items on a Pocket Door Wall?

Yes, you can install heavy pictures and items on the pocket wall if you use pocket door plywood clips. These simple and affordable clips allow you to put pieces of 5/8-inch plywood in between the narrow pocket-door studs.

CLICK HERE to get FREE & FAST BIDS from local finish carpenters that specialize in pocket doors.

Related Links

Quick Start Guide to Installing Pocket Doors

How to Attach Shelves to a Pocket Door Wall - Interesting Challenge!

Why Do Some People Dislike Pocket Doors?

A certain number of people complain how the pocket doors rub going into and out of the pocket. The doors jump off the track.

CLICK or TAP HERE if you need me to HELP YOU over the phone to solve your pocket door problems.

It's tough or impossible to adjust the doors once they are trimmed out. Old pocket doors may be hard to operate or don't work at all.

All of these pocket door problems can cause a person or a friend to avoid using pocket doors. This distrust can often be blamed on poor hardware quality or poor installation practices.

Are There Problem-Free Pocket Doors?

Yes, a high-quality pocket door frame and hardware kit will be problem-free for many years if installed properly. I know. I've installed countless ones over the decades, even in my own home.

pocket door frame

This is a unique photo showing two converging pockets doors being installed. The frames are in and for some reason, the homeowner put in the doors at this stage. It's not necessary to do this. Look to the right and the vertical red line is on the edge of the first full wall stud at the end of the pocket on the right. The bottom and the middle of the red arrow cross over the two thin studs capped with steel. These create the pocket and you use short drywall screws to attach the drywall. Copyright 2017 LE Johnson Hardware, Inc.

What are the Best Pocket Doors?

The best pocket doors start with the best frames, track and trolleys. You don't see any of this once the pocket door is installed and the walls are finished.

Here's the only brand I'd ever install. They're simply that good. I've had LE Johnson pocket door frames/hardware on all my jobs and in my own home for years.

Note below in the photo how the trolleys have three wheels. This type of trolley ensures they never jump off the track.

pocket door frame

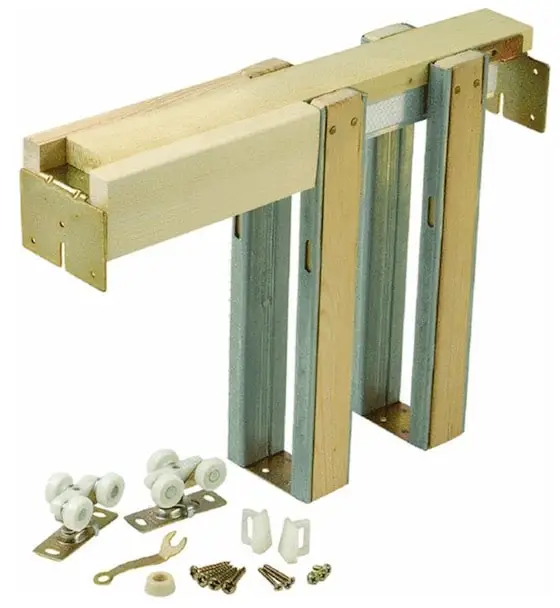
This is a miniature version of a LE Johnson pocket door. The vertical legs create the pocket. The track is hidden in the horizontal top member. The three-wheel trolleys are in the lower left. Copyright 2018 Tim Carter

Is it Hard to Get Old Pocket Doors to Work?

It can be very hard to get old pocket doors to operate smoothly. The design of the hardware is flawed and it's almost impossible to get parts.

Do you have an old set of pocket doors that you wish to revive? It may be tough to do it if you are looking for used parts.

If you're a purist and must stay with old parts, you can try to find them online. Many small independent hardware stores ply their wares on Amazon.com. CLICK HERE and start hunting!

Can I Install New Pocket Door Track and Trolleys with Old Doors?

Yes, you can restore old pocket doors and install new trouble-free hardware and trolleys.

If you can't find parts, don't get discouraged. The heart and soul of a pocket door system are actually the track above the doors and the rollers, or trolleys, that attach the door to this track. There is absolutely no reason whatsoever why you can't put a new track system in an old door pocket.

How Do You Install the New Track and Trolleys?

You have to remove the old track and trolleys to install the new ones. It's somewhat painful to tear into the wall, but it's worth it.

Getting it in will be a challenge and may require surgery on the wall, but this can be easily repaired. I urge you tackle this project with a positive attitude. It will be tough at first, but the outcome will be dramatic.

CLICK HERE to get FREE & FAST BIDS from local finish carpenters that specialize in pocket doors.

How Do I Solve Common Pocket Door Problems?

There are a few things you can try to solve common pocket door problems.

Problem: Does your door jump off the track and get stuck in the pocket?

Solution: Look at the wheels or rollers. If they're single-wheeled rollers, you have an inferior system. The best pocket door hardware has 3 or 4 wheel hangers that fit into a box-shaped track. It is impossible for this type of roller to jump off the track.

Problem: Can you easily remove the door after one side of the top split jamb is removed? If not, you can have big problems.

Solution: You can buy a pocket door hardware system that allows you to easily disconnect the door from the 3 or 4 wheeled hangers. Within moments the door will be in your hands, not in the pocket!

Problem: What happens if the track gets damaged? Can you easily remove it?

Solution: If your track does not have keyhole shaped slotted screw holes, you will be in for a treat. I guarantee you will be tearing into the wall to get at the track screws deep in the pocket. A track with keyhole-shaped screw holes eliminates this problem.

Problem: Does your door rub the split jamb when it is pulled in and out of the pocket?

Solution: Check to see if there is 3/16th-inch clearance between each side of the door and each jamb.

If you have this clearance and the door still rubs, the door may be warped and/or the entire pocket door assembly may be twisted. If this is the case, it will require major reconstructive surgery to solve the problem.

The problem with rubbing doors can sometimes be traced to the bottom door guides. An inexperienced carpenter may install these on the wrong side of the split jambs! They are supposed to be on the face of the jamb. This allows you to adjust them easily.

Do Pocket Doors Need to be Painted Before Installation?

Yes, you need to paint the pocket door on all sides, top, bottom, and edges before it's hung on the track.

Pocket doors require some tender loving care from the painter as they are being installed. Once installed you can't get to the top, bottom, or back vertical edge. These surfaces MUST be sealed to prevent warping. This can only be accomplished as the door is being worked on by the carpenter.

If you paint the door, it is simple. Just apply a primer coat to the entire door as soon as it arrives at the job site. Then have the painter apply a finish coat to the edges of the door before he hands it over to the carpenter.

If the door is to be stained, it will be a little more difficult. The painter will have to carefully apply a sealer to the top, bottom, and hidden vertical edge. If you get sealer on the face of the door, the stain will not penetrate properly. It will really look horrible. Coordinate this carefully!

CLICK HERE to get FREE & FAST BIDS from local finish carpenters that specialize in pocket doors.

Column B190

Deicing Salts And Concrete

deicing salts

Deicing salts has been spilled on concrete. See the dark stain? The stain is caused by water vapor from the air being attracted to the salt. The vapor is absorbed by the concrete. Do NOT use water to clean it. READ BELOW what to do. Copyright 2018 Tim Carter

Deicing Salts and Concrete Checklist

Deicing Salts - Does It Really Harm Concrete?

DEAR TIM: We just moved into our new house. Our builder has advised us not to use rock salt on our concrete sidewalks and driveway for snow and ice removal.

He told us that it will damage the concrete. I don't believe him, because our city uses it on our streets every winter. Does my builder know what he is talking about? S. D.

DEAR S. D.: Your builder's advice is somewhat accurate. Rock salt can be one of concrete's worst enemies if the concrete was not mixed, finished and cured properly. Avoid using it on your concrete sidewalks, driveways, and patios if they have not been installed correctly.

Related Links

Installing Concrete in Cold Weather

Efflorescence Salts and Concrete

Free & Fast Bids

CLICK HERE to get FREE & FAST BIDS from local concrete contractors who can seal your concrete.

deicing salts

Deicing salt can be used on asphalt or blacktop with no worries. If you shovel first and get off most the snow before spreading the salt, your driveway will look this great in just 24 hours. Copyright 2018 Tim Carter

Is All Concrete Harmed By Deicing Salt?

No. Lots of old concrete was installed correctly and deicing salt does not harm it.

I grew up in the Midwest in Cincinnati, Ohio. Cincinnati can get brutal below-zero temperatures in the winter. I can take you to places in downtown Cincinnati that have concrete sidewalks that have been in use for fifty or more years and the top surface never spalled or was damaged by years of rock salt used to melt snow and ice.

How Strong Is the Old Concrete?

I've never had the opportunity to core drill one of these old concrete surfaces, but if we could I'm willing to bet you that the concrete would test out at least 5,000 pounds per square inch (PSI) of compressive strength. You just need to add an extra bag of Portland cement per cubic yard to get this strength or greater.

Watch this video by a top chemist who explains what salt can do to concrete. Pay CLOSE ATTENTION to what he says starting at 3:00 into the video. You'll note that he mentions if the concrete is mixed and placed properly, it can withstand the pressure from the freezing and thawing cycles.

Why is New Concrete Damaged By Salt?

I can also take you to new homes where concrete driveways and sidewalks look horrible after two years of winter weather because the concrete was not mixed, installed, finished or cured properly.

Concrete is a magnificent material. As a paving material, it can be one of the longest lasting surfaces that you can use. However, its useful life can be significantly reduced if you do not recognize its weaknesses.

How is Concrete Weak When Stretched?

Concrete has high strength when it is compressed, or 'squeezed'. However, it is extremely weak when it is subjected to tension, or 'pulled'. Rock salt can take advantage of this weakness.

Stop - Purchase Deicing Salt eGuide NowGet a 24-page guide right now that answers all your questions about Deicing Salts. Will it RUIN your concrete? Did you know that salt can SERIOUSLY harm you? What about your expensive landscaping? You can have all these answers and more in less than a minute. Buy it NOW.

Does Concrete Absorb Water?

Believe it or not, while concrete appears to be a very dense material, it is in fact quite like a blotter. It can and does absorb water. You can actually see this happen on a hot summer day. Sprinkle some water on your sidewalk or driveway and look very closely. You can actually see the water penetrate the surface of the concrete.

deicing salts

This is what spalled concrete looks like. Note how rough it is and the top finish is gone. Copyright 2018 Tim Carter

When you spread rock salt on your concrete to melt snow and ice, the salt dissolves the snow and makes a salt water mush. The melting action of the salt allows water to enter the concrete. If the temperature then drops and the water freezes, the growing ice crystals can blast apart the concrete.

Does Salt Attract Water?

Salt is also hygroscopic. It attracts water. It can cause concrete to become more saturated with water than it would otherwise. The presence of this extra water in freezing conditions can spell trouble.

The volume of water increases by 9 percent when it freezes within the concrete matrix. The pressure of the growing ice crystals can cause the surface of the concrete to fail. It usually spalls off.

New Concrete = DANGER

Freshly poured concrete is most susceptible to damage. Concrete placed in the late fall needs at least 30 days of drying time. This young concrete is still highly saturated with water. The water within the concrete can freeze and cause the surface to pop off.

However, if enough cement was in the initial mixture and this cement was not diluted by the addition of water, the concrete will be able to resist the damaging forces of the freezing water.

CLICK HERE to get FREE & FAST BIDS from local concrete contractors who can seal your concrete.

What is the Best Concrete Strength Mix Recipe?

Always order concrete that will attain a minimum compressive strength of 4,000 pounds per square inch (PSI). Some parts of the USA call this a six-bag mix. In order to achieve a 4,000 PSI rating, a cubic yard of concrete would have six bags, or 564 pounds of Portland cement in it. A typical bag of Portland cement weights 94 pounds.

IMPORTANT TIP: Remember, this is a MINIMUM requirement. If you're pouring an outdoor slab, driveway, patio, sidewalk, etc. and you want it to look great for thirty, forty or fifty years, then order it with seven or eight bags of cement per cubic yard of concrete.

Portland cement is CHEAP. A bag of it retail at a big box store in 2017 only cost about $10.00. Ready-mix concrete plants pay much less than that for 94 pounds. In other words, would you pay $200 more for your concrete if you knew it would be extremely strong?

Should I Add Air To Concrete?

Be sure that is air entrained as well. These two things are a good defense against salt attack. Concrete which is ordered, placed, finished, and cured properly can resist decades of contact with rock salt. Concrete surface failures such as spalling can almost always be traced to workmanship errors.

Can Finishers Ruin The Concrete?

Yes, it's my belief that most concrete that is harmed by deicing salts happens because of workmanship errors.

The placement and finishing of the concrete is critical as well. The upper surface of concrete can be severely weakened by poor workmanship. Sometimes workers add water to concrete at the job site or use it as a finishing aid.

These practices dilute the amount of cement at the surface of the concrete. The cement is the ingredient in concrete that holds everything together. To resist the freeze/thaw action of water, you need to have strong concrete at or near the surface.

IMPORTANT TIP: This means water should NOT be added to the concrete at the job site. It means that the workers should NOT trowel in the bleed water that comes to the surface after the concrete has been bull floated.

Is Sand Best To Use on Snow and Ice?

There is an alternative to using rock salt. You can use sand. The sand will not melt the snow and ice, but it will provide you with traction.

Should I Seal Concrete With Siloxane?

Yes, you should seal your concrete in the early fall with a silane/siloxane clear penetrating sealer. You can also treat your concrete with clear coatings that minimize or eliminate the possibility of water being absorbed by your concrete. CLICK HERE to BUY a great silane siloxane water repellent.

deicing salts

This is a magnificent silane - siloxane water repellent that soaks into concrete. CLICK HERE TO ORDER IT.

These ingredients allow the clear coatings to breathe. Avoid using products that contain silicone or paraffin.

Should I BEWARE of Film Formers?

Some sealers can produce a surface film. A surface film may not allow the concrete to breathe.

I've walked on some film-forming sealers that are very slippery when wet. Only buy a sealer like the one above that SOAKS into the concrete.

Concrete soaks up water from the soil. This water passes through the concrete and eventually evaporates. However, if you trap this water at the surface with film forming sealants, you may cause spalling. Be careful!

CLICK HERE to get FREE & FAST BIDS from local concrete contractors who can seal your concrete.

Column 008


January 25, 2017 AsktheBuilder Newsletter

Can you believe we're almost finished with January 2017?

Holy potato!

Small Engine Reminder!!

Just after sending this to you, I'm going to go up to my shed and start my lawn mower and my walk-behind string trimmer.

I'll also briefly start my gas-powered pressure washer. You need water passing through it to cool it if you run it for more than 30 seconds.

Two weeks ago while cleaning out the garage, I started and ran my small generator and log splitter.

It's been three months since I've used the three engines sitting up in my shed and I want to get some fresh gasoline up into the carburetor. I've got fuel stabilizer in the gas tanks, but it's a great idea to run small engines every few months.

The engineers at Briggs & Stratton told me so.

Here's a column I wrote after meeting with them about 20 months ago. CLICK HERE to read it.

Magic Soft Close

In just eleven days, you're going to have some fun.

Early on the morning of the day the NFL has a Super game, (I'm not allowed to say the real name here because they punish people who use it to promote anything), there's going to be an email waiting for you in your Inbox.

Please open it and have some fun. I GUARANTEE you that you'll discover something you didn't know and you'll see photos that will bring you lots of happiness.

Email Training

I want to thank you for responding to my request to help train your email provider to not mark this newsletter as SPAM.

I got many responses. One that brought me lots of happiness was from Donna who lives in northern Iowa.

Here's what Donna sent:

"Hi Tim,

The first thing I do in the morning is check my e-mail to see if “ASK THE BUILDER” is waiting to greet me for the day.

Keep up the good work.

You are by far the BEST internet friend I have ever had.

I am 89 years young and I “get it”."

I'm so very lucky to have Donna, and you, as my virtual friends.

This is why I always try to do an in-person meet up when I travel. I've had the great pleasure to meet many subscribers for an eyeball conversation and they're always a fantastic time.

Let's hope I can swing through Iowa and meet you Donna!

And Another One

Hours after getting the message from Donna, I got one from Kathryn.

She said,

"Tim,

I don't always respond to "Ask the Builder" emails, but when I do, it's to say THANKS for the hard work and info!!!"

That brought a HUGE smile to my face because I immediately created an image in my head of those words put on one of "The World's Most Interesting Man" memes.

I immediately went to a website where you can create one and sent this back to Kathryn asking her if she could see it:

What happened next surprised me.

After I heard back from Kathryn, I told Kathy (my wife if you're a new subscriber) that I'm so blessed to have subscribers that truly treat me as a friend they can trust, gritch at, share a joke, or who-knows-what.

Kathryn didn't disappoint. Her follow-up response to the meme above followed within a short time:

"I can, and it did make me smile. I lost my 103-year-old, active, and in-charge grandmother on Saturday and just finished writing her obituary. I needed that!"

Gulp.

I, of course, sent my condolences and told her I was never able to get to know my two grandmothers.

My maternal grandmother passed away long before I was born, and my paternal grandmother was sent back to Heaven when I was a very small boy. I just have one faint memory of her lying in her sick bed.

Bottom Line: Thanks so much for being my friend - even if we can't see each other face-to-face.

Oh, I wanted to add that the meet ups go two ways. If you're passing near central New Hampshire on a journey, well then let's have a meet up!!!! We can go out for coffee, go on a hike and do outdoor radio or sit by the lake!

More and More Revised Columns

I was busy over the past two days. I know it sounds nuts, but it's lots of fun going back and revising all my columns.

There are some really good ones below. Here's a photo I shot about thirty years ago that's in one of the columns. WOW, it's been that long!!!

Once again, I URGE YOU to open each column and if nothing else, read the small list of bullet points at the top.

You'll discover something new for sure.

When you do have a problem in the future, you'll hopefully remember I have a solution.

The most recent revisions cover a variety of topics.

There are some AMAZING PRODUCT LINKS in most of the columns.

I share with you the EXACT PRODUCTS I'd use or have used with great success.

TIM REQUEST: If, after reading a column, you have something to add, a story, a tip, etc., PLEASE add it as a comment at the bottom of the column.

It doesn't do any good to just write your story / tip and email it back to me. Please share it with the world so many benefit.

Many of the below columns now have GREAT VIDEOS in them too. It's like one-stop shopping.

Have fun:

Water Heater Expansion Tanks

Solving Pocket Door Problems

How to Caulk Baseboards - Like a Pro!

Downspout Drain Line Secrets

Rain-Soaked Framing Lumber

Replace Vinyl Siding With Brick

Turbine Vents - The King of Ventilation

How to Remove and STOP Algae!

Understanding House Settling Cracks

Drywall Facing Paper Repair Secrets

P.S. Are you having any fun at all with these strange tips I'm sharing in different languages???? It's supposed to get you to think!

A pecande naponta frissíti a lelket és édesszájú.

Tim Carter
Founder - www.AsktheBuilder.com

Do It Right, Not Over!

Replace Vinyl Siding With Brick

brick veneer

You can install a veneer of brick, stone or other masonry on a house like this, but it's very labor intensive. Buy lottery tickets, lots of them. © 2017 Tim Carter

Replace Vinyl Siding With Brick TIPS

DEAR TIM: My husband and I purchased a house with a crawlspace in the country on 20 acres. I do not like the vinyl siding on the home and would love to replace it with brick. Is it possible to do this? Can I get a solid brick home instead of brick veneer? What is the difference between the two? Debbie F., Swansea, SC

DEAR DEBBIE: You and a boatload of other people may not believe this, but it may be very possible to strip off the vinyl siding and install brick on this house. In fact, I can't think of one obstacle in accomplishing what you want to do other than money.

Depending upon how this home was built, it may be easy or somewhat difficult to modify the foundation so the brick can be installed.

CLICK HERE to get FREE & FAST BIDS from local bricklayers who can install brick veneer.

Solid vs Veneer

Let's first discuss the difference between solid brick and brick veneer. Solid brick or masonry structures use the brick or masonry to support the loads within the walls and any roof loads that bear down on the brick walls. A solid brick or masonry wall in a residential house is often eight-inches thick and sometimes 12-inches thick. The inner layers of the masonry may be brick or they can be concrete masonry units typically called block.

Veneer Non-Structural

A brick veneer home uses one layer of brick that is non-structural. The brick are the first barrier to stop weather from getting inside the home. The roof load doesn't bear down on the brick nor does any weight of the walls just behind the brick transfer itself to the brick. The veneer is almost always just one brick thick.

Tons Of Weight

But just because the brick is only a thin skin, this doesn't mean it is not heavy. What's more, to keep the brick and mortar crack-free for many years, it needs to have a superb foundation underneath it.

Create New Foundation

If this home was built with a typical spread concrete footing that is 16 to 24-inches wide and has a concrete block or poured concrete foundation, the job will be relatively easy. To lay the brick, a four-inch wide concrete block wall needs to be laid next to the existing foundation.

This new foundation will transfer the load of the brick down to the footer.

Angle Iron Solution

It may be possible to thru-bolt a heavy-duty angle iron to the existing foundation to support the brick. This decision can only be made after a residential structural engineer visits your home.

CLICK HERE to get FREE & FAST BIDS from local bricklayers who can install brick veneer.

Slab Homes - UGH!

The job is a little more difficult if your home is built upon a concrete slab. If this is the case, a new spread footing will have to be poured below the frost level in your area and then a foundation wall that supports the brick must be built upon this new footer.

You may have a unique turn-down slab that will allow you to bolt an angle iron onto the vertical side of the slab, but once again, this should only be done under the direction of a structural engineer.

Brick LEAKS!

Be aware that the new brick veneer wall will leak all sorts of water when a driving rain beats against it. For this reason, the builder and mason must install a water barrier on the side wall of the house after you strip the vinyl siding away. This membrane must be installed so that no water can get behind any windows or doors.

Be sure to consult with your local building department before you start any work. There are many building code provisions with respect to installing brick veneer. In addition, there are extra steps a masonry craftsman will take to ensure your home stays bone dry.

Mold Issues

Tens of thousands of homes built with brick veneer have become victims of both mold and wood rot due to improperly installed brickwork. The industry has known for years that brick walls leak water and that water must be collected and re-channeled to the exterior of the house.

Flashings Mission Critical

The way this is accomplished is simple, but requires attention to detail by both the builder and the bricklayers. Special base flashings need to be installed on top of the foundation that lap up behind the water membrane on the walls. This base flashing must be sealed at all overlap joints, inside and outside corners. Weep holes or slots in between the brick on the first row of brick that rest upon the foundation allow water that streams down the back of the wall to escape to the outdoors. This same weep hole detail must be used above all doors and windows.

Flashings must also be placed under brick sills that are found under windows and doors. The vertical joints between these brick often allow vast amounts of water into the brickwork. The flashings collect the water and redirect it immediately to the exterior of the wall just under the sill brick.

CLICK HERE to get FREE & FAST BIDS from local bricklayers who can install brick veneer.

Editor's Note: CLICK HERE to read about Ralph's story on covering his house with brick veneer.

Column 595

Drywall Paper Repair Tips

drywall paper repair

The brown paper is the inner core of the layered paper that surrounds the gypsum core of common drywall. If you coat this paper now with joint compound you WILL GET BLISTERS. The torn paper area of the drywall has been trimmed and it's ready to be coated with a sealer (see below) and then repaired. © 2017 Tim Carter

Drywall Paper Repair TIPS

DEAR TIM: I was removing an ugly ceramic tile backsplash in my kitchen. Some of the drywall paper came off with the old glue. It looks horrible. A home center employee told me I have to put in new drywall. This can't be true. Is there a way to repair this so the wall is once again perfectly smooth? Surely you know secret ninja tricks that will save me! Shelly B., Siesta Key, FL

DEAR SHELLY: I'll never forget the first time that happened to me. I was removing large sheets of thin wood paneling that had been nailed and glued over unpainted drywall. Oh my goodness, what a mess I had. The second time it happened to me, I was stripping off wallpaper in a bathroom. The paper hanger didn't prime the drywall with the proper sealant to prevent the wallpaper glue from bonding to the drywall paper.

Home Center Advice  🙁

First, the advice you received from the home center employee is completely wrong. You don't have to replace the drywall.

I'm going to describe to you how to repair it. It's a shame that so much bad advice is dispensed each day inside those big box stores.

CLICK HERE to get FREE & FAST BIDS from local drywall repair contractors.

High-Tech Paper

The common drywall that's found in many homes is made with high-technology paper. You'd be surprised how thick the actual paper is.

You can see it if you look closely at a cross section of drywall after it's been cut or at the end of a piece before it's installed.

The side of the paper that faces into your room and the other side that touches the wet gypsum at the factory are made to resist the water that's in the finishing compounds and the wet gypsum.

But the center part of the paper will misbehave if water reaches it.

Inner Paper Swells

If you've ever tried to patch drywall where the facing paper is torn off exposing the core of the paper, you'll quickly discover that the water in the patching compound almost always causes bubbles and blisters to form. The more you pop them and recoat them, the faster they return.

Trim Rough Edges

The first step in making a blister-free repair is a razor knife. You use this tool to trim any partially peeled up paper around the edges of the damaged area. You must have crisp cut lines all around the damaged area with no peeling paper.

Seal the Paper

Once you've done this simple step, you should then coat the brown inner-core paper with an oil-based sealer that dries quickly. You can purchase spray cans of these primers, or you can brush on clear or white shellac. Just be sure that whatever sealer you use, it doesn't contain any water. You can even use left-over oil-based paints.

Shellac Clear

This is a time-tested sealer. Shellac is fantastic. It's great to hide water stains too. CLICK THE IMAGE TO ORDER THIS NOW.

Be sure when you apply this sealer, that you paint or spray over the edges of the damaged area onto the undamaged drywall paper. You want to seal the thin edges of the drywall paper too.

CLICK HERE to get FREE & FAST BIDS from local drywall repair contractors.

Repair Compound

Once the sealer has dried, you can then skim coat the area with regular drywall compound. The area that needs to be coated is probably less than one thirty-second of an inch, so it's not very thick.

To speed up the repair process, you might consider using the setting type joint compounds. These are powdered products that you mix with water.

Sheetrock setting type joint compound

This is a fast-setting joint compound you mix with water. I've used this brand for decades. It's an EXCELLENT material. CLICK THE IMAGE TO ORDER THIS NOW.

They come in various setting times. The shortest time is 20 minutes. Mix with COLD water if you want to slow down the set-up time a little bit.

WATCH THIS VIDEO about this amazing product:

Mix with hot water if you want to speed it up. NEVER add water (re-temper) this type of material if it starts to get hard in your mud pan or a bucket. It will lose strength if you do this.

This is why I try to only mix small amounts so it won't go to waste.

Drywall Repair Videos

Watch these two videos. The one shows you the consistency of the repair mud. You can mix the dry-setting compounds just like you see in the video making it like warm cake icing.


Paint In One Hour

If you use a fast-setting one, you can apply two coats of the compound in less than 30 minutes.

To get a silky smooth finish, be sure to use the topping compounds that come in the buckets. These products really do finish smoother.

Primer/Sealer Paint

The biggest mistake homeowners make after a repair like this is not applying the right paints after the repaired area is dry and sanded. If you don't paint it properly, even though the area is perfectly smooth, you'll still see the repaired area in certain light.

One ninja trick I've used for years is to use a special sealer primer paint over the freshly sanded area. Remove all dust before painting.

drywall primer 2 gallon bucket

This is an excellent drywall primer. It must say it on the label for it to be the right primer/sealer. CLICK THE IMAGE NOW TO BUY THIS GREAT PRIMER/SEALER.

The primer/sealer does two very important things. The sealer component of the paint actually seals the very porous repair compound preventing the next coat of paint from soaking in.

The primer aspect of the paint contains coarser pigment particles that help homogenize the texture, on a micro level, so the texture of the repaired area and the other drywall surrounding it match. Doing this makes the patched area disappear once the final coat of paint is applied.

CLICK HERE to get FREE & FAST BIDS from local drywall repair contractors.

Column 969

Rain Soaked Framing Lumber

Rain Soaked Framing Lumber

The carpenters building this new home are slobs. All sawdust, lumber scraps, etc. should be cleaned up each day in case it rains. © 2017 Tim Carter

Rain-Soaked Framing Lumber TIPS

DEAR TIM: My new home is under construction and the roof is not complete. Our area has received record rainfall for days and days. More rain is in the forecast. Is my house ruined? Will the wood rot? Should I be concerned about mold or any other problems? Is there anything a builder can do to minimize damage to lumber caused by rain and standing puddles on wood floors? Sara G., Trenton, NJ

DEAR SARA: I doubt that your house is ruined by the heavy and persistent rainfall. You'd be shocked how much abuse framing lumber and engineered lumber can take when Mother Nature turns on her faucet.

CLICK HERE to get FREE & FAST BIDS from local framing carpenters that will sweep up each day. Ask them.

Waterproof Glue

The glues used to bond layers of wood in exterior-grade plywood and the strands of wood in exterior-grade oriented strand board (OSB) are made to resist water. In fact, most are waterproof.

The actual solid lumber used by many builders for walls, floor joists and roof trusses is naturally resistant to rapid decay by water. It would take many months of being wet for the framing lumber to start to rot.

But these facts do not give you or your builder an unlimited license to allow water to saturate the lumber or stand in puddles on the flat floor surfaces for weeks or months on end. As soon as the moisture content in wood reaches in excess of 20%, decay and staining can begin.

Mold Before Rot

The greater likelihood is that you'll begin to see mold growth long before the wood starts to decay. Often there's an abundance of mold spores in the air at just about every construction site. These spores just need water to start their growth process and some molds can form in as little as 48 hours after getting wet.

My own home was rained upon several times as I built it. I distinctly remember the house getting soaked for several days before the sun came out. As soon as the rain stopped I used a large squeegee to get the standing water off the floor surfaces.

Clean Up Each Day

Because I kept the job site clean on a regular basis, there were no wood scraps or piles of absorbent sawdust that would trap moisture. Once the standing water was off the floors and the sun came out, the wood would dry rapidly with no mold growth, decay or warping.

CLICK HERE to get FREE & FAST BIDS from local framing carpenters that will sweep up each day. Ask them.

Stacked Lumber

The lumber on the job site that is at the greatest risk of mold growth or decay is that lumber which is stacked closely together. Often delivery trucks dump piles of lumber on the ground with just a thin 2x4 under the pile.

It's best to put stacks of lumber up on pallets to get air circulating under the lumber.

In many instances the pile of lumber is in direct contact with the soil. If water gets between pieces of lumber or sheets of plywood and/or OSB, it will not easily evaporate. For this reason, it is very important that lumber deliveries be scheduled so that the lumber is used by the carpenters within days, not weeks.

Rain Soaked Framing Lumber

It's winter, it rains and there's uncovered stacked wood all over the job site. This is a house-building train wreck. © 2017 Tim Carter

Air Circulation

Lumber that does sit on the job site should be off the ground at least four inches and be covered by a tarp that protects it from rainfall. The tarp should not be wrapped tightly around the stacked lumber. Water vapor from the ground can build up under the tarp and condense into liquid water.

Install the tarp much like a rain fly on a camping tent.

Waterproof Floor Sheathing

Builders can also take extra precautions to protect framing lumber. Water repellents can be applied to flat expanses of plywood or OSB subflooring. These liquid water-repellent products are easy to apply when no walls are erected on the flat subfloors.

Plywood and OSB that are treated in this manner will rarely swell and delaminate. Modern OSB can be purchased that has a waterproof coating or sealant. I'd get that if you can.

Borate Protection

Borax Powder

This is borax powder. You dissolve this in water and spray it onto framing lumber. It helps prevent rot and insect infestation! It's easy to use. CLICK THIS IMAGE TO ORDER IT NOW. IGNORE THE PART ABOUT EGGS. There are many many uses for borax.

Framing lumber such as 2x4s, 2x6s and floor joists can be sprayed with borate solutions.

The borate chemicals are not toxic to humans or other mammals, but they are highly toxic to many species of wood fungi that cause wood rot.

Termites and carpenter ants also dislike lumber treated with borates.

It's best to soak the lumber in borate solutions to get the full treatment, but spraying the borate on lumber that is in place will offer a fairly high level of protection until such time as the house can be roofed.

Clean With Stain Solver

Oxygen Bleach

Stain Solver is MADE in the USA with USA ingredients that are food-grade quality. CLICK THE IMAGE to order some NOW.

Mold growth on framing lumber is a common occurrence. The mold can be cleaned using non-toxic Stain Solver.

Stain Solver is a certified organic oxygen bleach made in the USA with USA ingredients.

You mix the pure powder with water, stir until dissolved and spray it on the mold-covered wood. I prefer to use a garden hand-pump sprayer.

Be sure you stir the Stain Solver so all the powder grit is dissolved before placing in the sprayer. Undissolved powder will clog the spray tip.

Serious Damage

Serious damage can happen to houses under construction that are exposed to long periods of wet weather. Light, dry snow and ice are not nearly as bad as standing water.

Cold weather slows the growth process of most organisms including wood fungi and most molds. But snow can be easily removed from the flat surfaces of homes under construction and this should be done as soon as possible after the storm has concluded. Once temperatures rise, the snow will melt and turn into liquid water.

CLICK HERE to get FREE & FAST BIDS from local framing carpenters that will sweep up each day. Ask them.

Column 593

Roof Turbine Vents

roof vent

This is my favorite roof vent and my FAVORITE brand. It's Made in the USA! These are cave-man simple to install. Watch my video below. SAME procedure for this vent as the bath fan flashing. CLICK THE IMAGE NOW TO BUY THIS TURBINE VENT.

Roof Turbine Vent TIPS

DEAR TIM: My home has two spinning turbine vents. I have been told by several people that it is a good idea to stuff insulation in these during the winter months so that warm air is not sucked out of my attic space. Is this good advice? Are these turbine vents really effective? I don't see many of them on my neighbors' roofs so I wonder if I should remove them. Kevin M., Canal Winchester, OH

DEAR KEVIN: Don't touch those vents! They are splendid ventilation devices. In fact, I installed these same vents over 25 years ago on the second home I owned. They were hardworking devices that Mother Nature paid to operate. In fact, the same vents are still in place on the home and each time the slightest breeze blows, they do a great job of pulling air from the attic space.

Turbines Work For FREE

A turbine vent is a passive ventilation device. The popular ridge and soffit ventilation systems and the traditional metal pot vents are also passive ventilation systems.

A turbine vent spins with the slightest breeze. As soon as it starts to spin, it vacuums air out of your attic. The faster it spins, the more air it exhausts.


I'd put three or four on a roof to really have a good chance at cooling an attic on a hot summer day.

In contrast, an active ventilation device might be an electric-powered whole-house fan or a powered roof ventilator. Passive vents work for free and in almost all instances are silent.

Never Block Vent Holes

The last thing you want to do is stuff insulation in the vents. Ventilating attic spaces in winter months is often more important than venting them in summer.

Water vapor from the inside of a home drifts up and into an attic space. It does this 365/7/24. #HassleIfNotVented

Condensation HAZARD

If this water vapor is not quickly exhausted to the exterior atmosphere, it can often condense upon the cold roof framing members and the underside of the roof sheathing. It can get so bad that water can drip from the underside of the roof and when the temperature gets low enough, frost can actually form up inside the attic. Moisture conditions such as this can lead to wood rot and mold growth.

Thousands of CFM per Hour

Depending upon the diameter of the vents and the wind speed outdoors, the turbines can expel vast quantities of humid air before it becomes a problem. A small 12-inch-diameter turbine vent with a constant wind speed of 5 miles per hour (mph) can remove 347 cubic feet of air per minute (cfm) from the attic space.

A single 14-inch-diameter turbine vent that is subjected to 15 mph winds can expel up to 1,342 cfm of air! If the winds are still, the vents still allow air to drift up and out of the attic space, although not nearly as much.

Easy DIY Install

Watch my video below. The video shows a bathroom exhaust fan hood, not a turbine vent. But the method of installing a turbine vent is IDENTICAL.

If your roof is low slope and you can get up on it with ease, you can do the installation and save HUNDREDS of dollars.

Don't Steal Heat

It is also a myth that turbine vents remove warm air from attic spaces in winter months. If the air temperature in your attic space is very warm while it is cold outdoors, I maintain that you might have inadequate insulation and/or you are up in your attic on a bright sunny day where the radiant energy of the sun is heating the attic space.

It's best to check attic temperatures at night after the sun has gone down.  If your attic is well insulated, the actual temperature of the air inside your attic should be very close to the actual outdoor temperature.

AC Leaks

However, it's possible for turbine vents to pull conditioned air from the inside of your home. Modern building principles and most model building codes mandate that you have soffit ventilation vents that act as intake air locations.

As air is pulled from the attic space by the turbine vent, ridge vent, or even an electric-powered fan, the same amount of air must be allowed to flow into the attic space where the roof passes over the exterior walls of the home.

If there is not enough soffit air coming in, then the vents may create a partial vacuum in the attic space. To relieve this pressure, the vacuum may pull air from the inside of your home. This is not a good idea.

Aluminum = No Rust

If you decide to add more turbine vents to your roof, be sure to buy ones that are aluminum. These will not rust. In addition, pay attention to the maximum roof pitch that will work with the turbines.

The turbines are adjustable so that the spinning part is level even though the roof is slanted. Not all turbines will fit all roof pitches. The maximum roof pitch is almost always printed on the box label.

Lubricate the Bearings

Finally, be sure the ball bearings are permanently lubricated and sealed. Nothing is more bothersome in the middle of a windy night than a squeaky roof turbine!

Column 442

Installing Downspout Drain Lines

Install Downspout Drain Lines | Splash blocks don't do much to channel water away from the foundation. © 2022 Tim Carter

Install Downspout Drain Line TIPS

Ethel had a flooding disaster similar to Rich's issues. Check out the May 21, 2020 Newsletter to read her story.

DEAR TIM: I need to bury downspout drainage pipes in my yard before the yard is seeded. Where is the best place to put them and how deep should they be buried? What type of pipe do you like? How far away from the house should the pipes extend? A friend suggested using pop-up valves to help water the lawn and plants. Are those a good idea? Rich T., Jackson, MS

DEAR RICH: Stormwater drainage from roofs is a topic sometimes ignored by builders and homeowners alike. I can't tell you how many houses I see where the downspouts empty onto a splash block at the base of the foundation.

CLICK HERE to get FREE & FAST BIDS from local landscapers who can install downspout drain lines.

Often these homeowners are plagued with water seepage into basements or crawlspaces and it's no wonder. Heavy rainfall on an average-sized roof can produce hundreds and thousands of gallons of water that spew from the different downspouts located around the house.

Read another column of mine about downspout drain lines that shows you how much water can come off a roof in as moderate rainfall. You'll be AMAZED!

Harvest Rainwater

I regularly visit the Southwestern part of our great nation and am somewhat astonished that stormwater is not collected and stored by homeowners that live in this arid area. Laws passed decades ago often prevent homeowners from harvesting and storing water that falls on their land. River systems that feed into the Colorado River are affected by this because the water in this drainage basin eventually flows to and through the Hoover Dam.

The water held back by this dam is used to irrigate crops grown for many people in the USA. The water also makes electricity that's sent to tens of millions in southern California and other parts of the Southwest. It's a complex situation.

If you're permitted to collect and store rainwater, this water can be easily collected and piped to above or below ground plastic barrels or tanks. If the storage is above-ground and placed at the highest part of the lot, drip irrigation piping can be extended from the water storage.

The stored rainwater can then be used to help irrigate plants that otherwise would have enjoyed the drink before the house was built.

A simple phone call to your local town office will allow you to discover if you're permitted to harvest rainwater.

Why No Harvesting

The issue with harvesting rainwater is that it lowers the cubic-feet-per-minute of flow in the major rivers. If you collect the rainwater and then use it to water plants, drink and then put back into the earth via your septic system, that water never makes it into the river and then down to the large dams.

Contracts negotiated decades ago count on the water making it to the dams. The entire water-rights issue on private land in the Western USA is very complex. It's far beyond the scope of this column.

Urban Storm Sewers

Before you proceed with any work, you should check with your local government to see if they have special stormwater rules and regulations. Sometimes you have to pipe this water to special underground storm sewers or above-ground channels. Some local governments or agencies have no rules or regulations.

Trenching Tools

I usually dig a trench about 12 to 14 inches deep for downspout drain lines. The fastest way is to rent a trenching machine from a local tool rental.

If you have hard clay soil, or rocky soil, you can use an electric hand-held demolition hammer tool to dig a trench.

This is a great demolition hammer tool to chip out rotten concrete. If you've got a bigger job that's going to last a few days, you should BUY one, keep it in good shape and then SELL it on Craigslist once done. This will be cheaper than renting one. BUY THIS GREAT POWER TOOL right here. I own one just like it.

These electric demolition tools can be outfitted with chisel tips to crack larger rocks or clay spade shovel tips to carve through dry or damp clay soil.

This is a miniature shovel that fits on the end of the Bosch demolition hammer. It carves through clay soil like a hot knife through cold butter. BUY THIS FANTASTIC ACCESSORY right here.

If the lot is fairly flat, the pipes will get deeper the farther they extend as you should create 1/8 inch of fall for every foot the pipes run. The pipes should never be buried running parallel in the non-compacted fill dirt that is placed against the foundation.

CLICK HERE to get FREE & FAST BIDS from local landscapers who can install downspout drain lines.

Over time this dirt or soil settles and it can cause piping to break, kink or develop reverse, or backwards, slope.

Downspout piping can cross the un-compacted fill at a 90-degree angle so that it is placed in undisturbed soil. But as the soil adjacent to the house settles over time, this small length of piping needs to be checked and lifted to ensure it drains.

The pipe in the lower left of the photo is crossing an un-compacted fill around the basement of my house. I allowed the fill to settle for months and watered it before installing the downspout drain lines. The pipe is 4-inch SDR-35 and it intersects the other pipe farther in the yard using a standard wye fitting. (C) Copyright 2017 Tim Carter

SDR-35 Pipe And Fittings

A smooth 4-inch-diameter plastic SDR-35 sewer pipe is the material I prefer to use. This pipe has a smooth interior and closely resembles the thick-walled plastic piping used for interior house drain and vent piping.

Fittings can be permanently welded to the pipe with PVC cement. These fittings come in all types including the all-important Wye fitting where one pipe connects to another.

standard wye fitting

This is a standard Wye fitting. Note the red arrows that show you the direction of water flow through the fitting. BUY THIS WYE FITTING HERE NOW.

If you don't want to use glue, you can buy rubber-gasketed fittings. These fittings have a rubber o-ring incorporated into each end of the fitting.

gasketed 45-degree SDR-35 fitting

This is a gasketed 45-degree SDR-35 fitting. Note the black gasket. You use lots of these. All underground bends need to be 45 degrees. If you need to make a 90-degree bend underground, you should use two 45 bends and put a 1-foot piece of pipe in between them. You do this so it's easier to get a drain-cleaning snake through the pipe if it ever gets clogged. BUY THIS FITTING HERE now.

You need to keep the pipe clean of all sand and dirt when you work with gasketed fittings. You also need to use a coarse file to taper the cut ends of any pipe. If you don't file the ends, you'll never slide the pipe into the rubber gasket. You also lubricate the pipe and gasket with liquid dish soap.

If you install either type as directed, tree roots that create clog nightmares will never be able to enter the piping system. I am not a huge fan of the corrugated flexible black piping for downspouts. It can crush easily and it is nearly impossible to clean with professional drain cleaning equipment.

All underground bends in downspout piping should be made with 45 degree or smaller angle fittings. Ninety-degree angles underground become obstacles in the event the piping has to be cleared by a professional drain cleaning company.

The downspout drain line had to make a bend. In the lower part of the photo, the pipe you see connects to a 45-degree fitting. - © 2017 Tim Carter

You can use a 90-degree angle at the base of the downspout where the underground piping begins, as a drain cleaner can usually insert his metal snake here with no difficulty.

Pipe Away From House

If you are allowed to drain your stormwater on your own lot, do so as far away from your home as possible. Try to pipe all water to a low point away from your home.

Don't drain more water to a point on your lot than would have ended up there naturally before your home was built. Simply keep in mind where the water is falling on the roof and where that water would drain if your house had never been built. If you pipe the water where it used to go, you should not harm any of your surrounding neighbors.

Pile Up Rocks

Where the downspout drain line terminates above ground, it's going to cause erosion because you're concentrating lots of water from your roof at this point. Create a large area of softball-sized rocks that the water will flow onto. This absorbs some of the energy and spreads out the water.

Inline popup valves do a good job of allowing rainwater to discharge onto your property, so long as you are allowed to drain the stormwater on your property. Try to strategically place them where they will do the most good for your vegetation.

Photographs & Videos

An invaluable tool that will come in handy in future years is a collection of photos and videos that are shot as the downspout piping is being installed. Videos are best because you can talk and describe what the camera is seeing. Upload these to cloud storage and pass them onto the future buyer of your home.

If you stand back and include parts of the house in the photos and place shovels or other objects in the photos for scale, these prints will help you locate the pipes in the future. Over time it is very easy to forget where hidden pipes pass in the ground.

My own photos saved me lots of work in the past. I had to install a small field drain in a side yard. The photos I had taken years before allowed me to locate within five minutes the drainpipe to which the new drain was to be connected. I could have dug for an hour and missed the pipe by inches without the aid of the photographs.

CLICK HERE to get FREE & FAST BIDS from local landscapers who can install downspout drain lines.

Column 517

Water Heaters – Expansion Tanks

Water Heater Expansion Tank TIPS:

This column was so popular, Tim shared it with all of his Newsletter Readers in the November 1, 2015 Newsletter.

Virtually, every modern plumbing code requires the installation of an expansion tank on hot water heater installations. The reason is simple.

Water expands when heated. This extra volume of water needs to go somewhere.

Back Out To The Main

Before the widespread usage of back flow preventers, check valves and pressure reducing valves, this expanded water simply pushed the cold water back into the city water main.

If your house has one of the above mentioned devices, you could have problems. These devices prohibit the flow of water from your house back into the public water system.

Without an expansion tank, the expanding water can cause your hot water heater to possibly fail because of the increased pressure. This pressure can cause serious life threatening problems as well, if you heat your water with natural gas or propane.

The water heater tank can collapse around the internal flue and cause carbon monoxide to enter your home. It's serious business.

CLICK HERE to get FREE & FAST BIDS from local plumbers who can install an expansion tank.

Expansion Tanks

Expansion tanks are really simple devices. They contain compressed air and a special rubber bladder.

When your water heater turns on, the water within your piping system begins to expand. This expanding water enters the expansion tank. Eventually, hot water is drawn from the system thru a faucet and the expansion tank releases the extra water into the piping system.

Different Sizes

Expansion tanks come in various sizes. The size you need depends upon two very important variables:

  • water heater capacity in gallons
  • water pressure of your water supply system

The capacity of your hot water heater is stamped on a label or a plate on the side of your hot water heater.

Water pressures within municipal water systems vary widely. I used to live in Cincinnati, Ohio. There the water main pressures could vary from 50 pounds per square inch (PSI) to over 200 PSI within a distance of a mile!

This same thing may be true in your city.

Well Water Pressure

People with cisterns or wells control their own system pressure thru the use of electric pumps. I now live in a rural area with a water well.

My well pump delivers 50 PSI. You can purchase booster pump systems to get the pressure higher. I'd not recommend an internal water pressure in a residential home above 75 PSI.

DIY Pressure Testing

It is easy to determine your incoming water pressure. CLICK HERE to buy  a little gauge that attaches to any faucet which has garden hose threads.

pressure gauge water heater

You can use this inexpensive pressure gauge at your own home. It attaches to any hose bib or a laundry sink faucet with hose threads. CLICK THE IMAGE NOW TO ORDER ONE.

Or if you like, you can call your local water department. They will possibly send a technician to your house. This person has very accurate gauges which will do the same thing.

Buying a Tank

CLICK HERE NOW to purchase with the proper sized expansion tank to suit your needs.

potable water expansion tank

This is a good expansion tank. You can see how they connect at the top to the plumbing water pipe. CLICK THE IMAGE NOW TO ORDER ONE.

Be sure to follow the directions that are packaged with the expansion tank. It only takes a few moments to read them. This will insure that your tank will function properly.

If you install a pressure reducing valve to control water hammer, be sure to buy one with a bypass feature. Without this, your water heater will begin to malfunction. You will see water dribble out of the pressure/temperature safety valve without a doubt.

The reason lies in the fact that heated water expands. Without a pressure reducing valve, this expanded water can easily go right back outside to the water main. Low quality or malfunctioning pressure reducing valves block this backwards flow of expanding water.

An inexpensive expansion tank installed on the cold water side of your hot water heater will solve this problem. The tank absorbs the expanding water and then releases it once hot water is drawn from the hot water heater. They are simple yet effective devices.

CLICK HERE to get FREE & FAST BIDS from local plumbers who can install an expansion tank.

Installing an Expansion Tank

The first thing you need to do is to size the expansion tank according to the size of your hot water heater. The tank manufacturers make this easy. All you have to do is to determine the capacity of your hot water heater.

This is always stamped on the side label of the hot water heater. You may have a 50 gallon or 80 gallon or whatever size hot water heater. Take this information to your plumbing supply house to get the right sized expansion tank.

A Simple Tee Fitting

The expansion tank installation requires you to install a simple tee fitting in your cold water supply line. I like to install the tee, when possible, on a horizontal run of pipe, not a vertical piece.

Out of this tee fitting you should extend a piece of pipe towards the floor. Many plumbers will just try to hang the tank up in the air.

This causes all sorts of stress on the pipe and fittings. Imagine holding out your arm with a half-filled two-liter bottle of soda. Your arm gets fatigued and so will the pipe.

It's better, in my opinion, to install the tank on the ground with a ball valve shutoff valve about a foot above the tank. Place the tank on some wood blocks.

b192 tank water heater expansion

You can see the yellow handle of the shutoff valve above the tank. Note the wood blocks. - © 2017 Tim Carter

Doing it this way allows you to easily change out the tank without cutting off the water supply to the rest of the house. At some point, you'll have to install a new tank as they can get waterlogged.

Be sure to ALWAYS read the instructions provided by the manufacturer.

The tanks simply have a threaded connection. You will install the opposite type threaded adapter to your tee fitting. Apply Teflon tape or pipe dope to the male threads and screw the tank onto the fitting. To get a tight fit, you may have to use a pipe wrench or a leather belt around the tank. Most tanks come with a place to attach a tightening wrench. Follow the instructions and this can be done in 1/2 hour or less!

CLICK HERE to get FREE & FAST BIDS from local plumbers who can install an expansion tank.

Column B192

Retaining Wall Repair Cost

crumbling retaining wall

Here's Lynn's 100-year-old wall. It looks very bad, but it can be repaired. The key is that it's not leaning. This story was covered in my January 22, 2017 AsktheBuilder Newsletter. © 2017 Tim Carter

Retaining Wall Repair Cost TIPS

DEAR TIM: The retaining wall at my older home is in sad shape. A contractor told me that if I don’t tear it down immediately and replace it, my house foundation that’s 6 feet away will collapse along with the retaining wall. I don’t know what to do and the repair cost I was quoted is many many thousands of dollars. Can my retaining wall be repaired and how much do you think the cost might be? How would you repair it if you feel it can be saved? Lynn C., Lexington, KY

DEAR LYNN: I’m so very glad you sent me multiple photos of the retaining wall. Based on your photos, I’m happy to tell you that there’s no danger to your home. It’s my feeling the contractor was trying to take advantage of you.

CLICK HERE to get FREE & FAST BIDS from local structural engineers

No Lean? Then Repair

While the wall looks to be in fairly bad shape, it’s still doing a great job of holding back the soil behind it. The first thing I noticed in your photos is the wall is not leaning at all towards your neighbor’s driveway. This is a good thing keeping in mind the wall is as old as your home putting it close to 100 years old!

Before we talk about how you’re going to repair the wall, let’s spend a moment discussing the contractor’s unethical conduct. By painting a picture in your mind of how you’ll have to repair your house foundation as well as the retaining wall, he was making you feel your savings account money would soon be scarce. I loathe contractors that try to scare homeowners.

Structural Engineer Consult

To verify if a contractor is telling the truth about retaining walls, foundation walls, bearing walls or other structural things in your home that terrify you, consult with a residential structural engineer.

An engineer doesn’t have a dog in the fight. This professional will come visit your home and render an opinion as to the structural soundness of whatever you ask him to look at. If a repair is needed, most engineers will develop a plan you can use to get competitive bids from contractors. What’s more, most engineers have a list of honest contractors they recommend.

Repair Specs

Here’s how I’d go about adding another thirty or forty years of useful life to your retaining wall for about $100 worth of material. It’s a pretty simple two-day job for two men. Since I’m not familiar with labor rates in your city, I can’t quote you what it might cost, but it’s not going to be much at all. If you have moderate DIY skills, you can do this job yourself.

All you need to make the repair is a bag or two of Portland cement, a bag of hydrated mason’s lime, some medium sand and rounded pea gravel. You’ll also need a few 6 and 9-inch pieces of 1/2-inch steel rebar, a hammer drill with a 1/2-inch bit and a 4-pound hammer.

hydrated lime

This is excellent hydrated lime. It's a fine white powder and it's going to look great on your home. CLICK THE IMAGE TO ORDER SOME RIGHT NOW.

Clean Wall First

Oxygen Bleach

Stain Solver is MADE in the USA with USA ingredients that are food-grade quality. CLICK THE IMAGE to order some NOW.

The first thing to do is clean the wall. Based on your photos, the wall is covered with algae and black mildew. You can pressure wash it or you can use a solution of Stain Solver oxygen bleach. The wall needs to be clean because the last step of the repair will be a thin coat of stucco that will really dress up the wall.

Stain Solver is non-toxic. Do not use chlorine bleach as it will kill all vegetation next to the wall.

Stain Solver is Made in the USA with USA ingredients. You mix the pure powder with hot tap water, stir until dissolved and then place it in a garden hand-pump sprayer.

Saturate the wall with the solution keeping it wet with the Stain Solver for 30 minutes. At the end of the wait period, just scrub it with additional water, rinse and let dry.

Once the wall is clean, remove any loose material in the deep holes. Just scrape away and try to get anything out that will move with hand pressure. The next step is to install the short pieces of steel in the deep holes to help bond the repair concrete to the old holding it in place.

CLICK HERE to get FREE & FAST BIDS from local handymen who can do a simple repair like this.

Install Pins

Using the hammer drill, you’ll drill down at an angle into the old concrete. Drill the holes at least 4 inches deep. Hammer in the short pieces of steel rebar so the end of each piece is at least 3/4 inch inside the outer face of the wall.

The large holes are filled with a stiff mix of pea-gravel concrete. I’d mix 3 measures of pea gravel, 2 measures of medium sand, 1.5 measure of Portland cement and 0.5 measure of the hydrated lime. The lime helps to make the mix very sticky and it also is a magic material that continues to grow crystals for years after it’s installed. Add just enough water so the mix resembles mashed potatoes.

Magic Cement Paint

Before you add the concrete mix to the deep holes, you need to mix up a batch of cement paint. Blend three measures of Portland cement to one measure of the lime. Add enough water until it resembles paint. Spritz the holes that need to be repaired with some water and immediately brush on the cement/lime paint mixture. Immediately cover this paint with the pea grave concrete so it’s flush with the existing face of the wall.

Stucco Coat

The last step is to put a thin 3/8-inch coat of stucco over the wall. Mix up a fresh batch of cement/lime paint. The stucco mix will be 5 measures of sand, 2 measures of Portland cement and 0.5 measure of the lime. Add just enough water so the mixed stucco resembles a moist applesauce.

Slightly dampen the wall, paint on the cement/lime paint and cover it with the stucco. Don’t let the cement/lime paint dry. You must cover it with the stucco within minutes of brushing it on. Use a wood float to give the stucco a nice swirl finish and sit back and enjoy your labors, or that of the contractor you hire.

IMPORTANT NOTE: In the photo above, the existing stucco coating has many hairline cracks. These cracks, and the other larger ones, will telegraph through the new stucco finish. But the cement/lime paint mixture will ensure the new cracks will be very tiny.

CLICK HERE to get FREE & FAST BIDS from local handymen who can do a simple repair like this.