Laminate Floor Over Concrete Mortar Bed

Laminate Flooring over Concrete Mortar

Here's Dave's foyer floor sans ceramic tile. The concrete mortar looks horrible, but it's an excellent base for laminate flooring. All it needs is a thin layer of pourable self-leveling compound. CLICK THE IMAGE TO ORDER SOME NOW. © 2017 Tim Carter

Laminate Floor Over Concrete TIPS

DEAR TIM: I’m renovating a 1969 ranch home that’s over a crawl space. I pulled up the existing foyer tile floor so I can put down an interlocking laminate or engineered flooring.  Much to my surprise I found a concrete mortar bed under the tile.  I'm assuming the mortar must be removed and I add more wood sub-flooring on top of the existing plywood subfloor. Is that a correct assumption? The mortar sits, on average, about 1 inch below the existing finished floors. What would you do at this point? How would you deal with this wretched concrete mess? Dave H., Charlotte, NC

DEAR DAVE: What’s that old saying? “One man’s trash is another man’s treasure.” Yeah, that’s it. My friend, you’ve been blessed is all I can say. I suggest you prance around your house singing Happy Days are Here Again.

That concrete mortar floor is an excellent base for your new laminate floor once you dress it up.

CLICK HERE to get FREE & FAST BIDS from local flooring contractors to install your laminate flooring.

True Sad Story

Allow me to share a story. A friend of mine purchased an older home in the town where I live. She and her boyfriend embarked on doing lots of remodeling to this tired, old one-bedroom home.

One of the last projects they tackled was installing a laminate floor. This woman knows that I have a little bit of knowledge about matters of home construction and remodeling, yet she didn’t call me up. I think it might have had something to do with offending her boyfriend’s skills. It’s too bad that as most people get older, their egos get more fragile, but that’s a story for another day.

I don’t know if they didn’t read and understand the laminate flooring instructions, were in a rush, were too tired at the end of the job or thought they knew better, but they made a grievous error.

Interlocking laminate flooring materials are very interesting products. I put down one in my man cave ham-radio shack about three years ago that looks like random-width v-groove distressed oak flooring. Everyone that’s seen it thinks that it’s real oak and that the floor is perhaps fifty, or more, years old. It looks that good.

But I read the installation instructions and they say the flooring must be installed on a solid floor that’s all in the same plane. This means the sub-flooring shouldn’t move or flex and that it must be smooth with no humps or low spots. If you don’t satisfy these basic requirements, the laminate flooring will snap, crackle and pop as you walk across it.

My friend made this mistake and her floor creaks and snaps as she walks across it. She called me a month after the install asking me if there was a way to repair it. I told her she might be able to inject a material, with great effort, under the floor in the worst spots, but that the best way was to disassemble the floor, get the subfloor in the same plane, and re-install the flooring. She chose not to do that.

CLICK HERE to get FREE & FAST BIDS from local flooring contractors to install your laminate flooring.

Step One Complete!

How does all this relate to you? Simple. That concrete mortar floor is nearly as solid as the Rock of Gibraltar. I’m pretty certain a month ago before you started the demolition when you walked across that tile foyer floor you felt like you were on bedrock. That satisfies the first requirement for a laminate floor. Your subfloor is solid with no flex.

The issue you have now is the concrete is not in the same plane. The concrete mortar is uneven, it’s gross and it’s well below the level of the existing floors in the adjacent rooms. That’s easy to fix with a self-leveling pourable floor compound.

Floor Leveling Compound

This is a powder you mix with water. You then pour it and it levels itself. It's magic. CLICK THE IMAGE NOW TO ORDER IT.

Radiant Floor Heat Pad? - Do It NOW!

You have a unique opportunity at this point to install an electric radiant heat mat should that floor need extra heat. If this were a bathroom you were working on, I’d insist on it. I have a mat like this in my man cave under my laminate flooring and it produces a luxurious heat. I used the NuHeat electric floor mat and it was an easy DIY project I finished in about four hours.

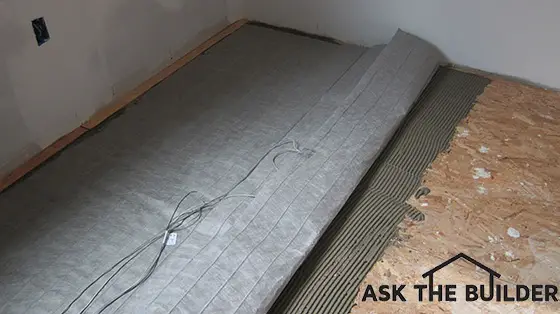
This is the electric radiant floor mat that's heating my man cave ham radio shack. It's a great DIY project. CLICK the IMAGE NOW to order your own NuHeat Electric Floor Heat Mat. © 2017 Tim Carter

Last year I had the opportunity to retrofit my master bathroom floor with radiant heating and my wife’s feet are toasty warm now n frigid winter mornings. The bathroom is also much warmer with the extra heat.

Self-Leveling Pourable Compound - It's DIY Friendly

Your task at this point is to add just enough self-leveling compound so the top of the laminate flooring will be flush with the adjacent rooms. Hopefully the original builder made all the floors flush with the tile, so this should be an easy task.

Read the instructions on the self-leveling floor compound. My guess is you’ll want to use a wet-dry vacuum to get all grit and dust up from the concrete mortar. Since the self-leveling compounds require water to mix them, it might be a good idea to spritz the concrete mortar with water just before covering it with the self-leveling mixture. This ensures you’ll get a great bond and the concrete mortar won’t suck too much water from the leveling compound too fast.

If that happens, the compound may not flow like it should giving you that smooth level surface. I suggest you experiment with a bag of the self-leveling compound to make sure you have a feel for how it works. Build a small rectangle frame out of 3/4-inch trim lumber that’s 2 feet by 4 feet. Set it on a sheet of 6 mil plastic on your garage floor. Mix up some compound and pour away. The plastic will keep it from bonding to your garage floor.

Once the compound sets up, you can break it apart with a hammer with ease. You'll be stunned how easy it is to work with.

Pay CLOSE ATTENTION to the amount of water the instructions say to add. If you add too much water, you can ruin the compound.

Laminate Floor Install Videos

VIDEO 1 of 3

VIDEO 2 of 3

VIDEO 3 of 3

CLICK HERE to get FREE & FAST BIDS from local flooring contractors to install your laminate flooring.

Column 1179

Gutter Guard Test Results

gutter guards micromesh

Not all gutter guards are like this one. This is the Holy Grail of gutter guards. Copyright 2018 Tim Carter

"You may want to know the exact brand of the gutter guard here at my house. I'm not sharing it because the company and I parted ways after I received many complaints from my followers. They were put off by the high price and the high-pressure sales tactics.  CLICK HERE to get great ones on Amazon. Have a roofer or handyman install them just like I show in this column.

The gutter guard was made using a fine stainless-steel mesh that resembled a woman's pantyhose. Furthermore, the weaving of the thin threads of stainless steel was so tight nothing could get through, not even ceramic roof granules."

Gutter Guard Test Results Checklist

  • Inferior gutter guards allow small debris into gutters
  • Small debris collects in gutter turning to organic muck
  • Watch gutter guard test videos below
  • Install micro-mesh guards at same slope as roof
  • CLICK HERE to Get Tim's FREE & FUNNY Newsletter!

Why Did You Test Gutter Guards?

Years ago, I started testing gutter guards on my own home. Not only was I having issues with leaves and tree debris in the winter, spring and summer, but I was getting regular emails from people just like you about the frustration you were having.

I sought out and tested just about every gutter guard I could find. Many of the brands and types are no longer made. There are many reasons for this, not the least of which is some were very poor in design.

Did you Test Home & Garden Show Displays?

My tests started at home-and-garden and national builder shows where I saw tiny working displays. In the booth would be a small roof with a gutter covered by that company's gutter guard.

While the salesman would talk to a potential customer or future dealer, I'd tear off tiny scraps of paper resembling pieces of leaves and watch them either get sucked down into the gutter or start to clog the wire-brush or similar gutter guard.

On more than one occasion the gutter guard company, once they saw what I was doing, asked me to leave and never come back. No pun intended!


Micromesh Gutter Guard

This is the best gutter guard I've ever tested. This is my own home in central New Hampshire. A stainless-steel micro mesh prevents any debris from getting into the gutter. Copyright 2017 Tim Carter ALL RIGHTS RESERVED COPYING PROHIBITED

Related Links

Gutter Covers 101

Ice Problems with Gutter Covers

Gutter Covers

Do Gutter Guards Work?

gutter guard debris

This gutter guard has been undergoing testing for ten months. So far it has done very well. Copyright 2108 Tim Carter

How Many Gutter Guards Failed the Test?

Once I started testing at my own home, I discovered just about every gutter guard failed.

They either allowed small debris into gutters and/or the actual gutter guard clogged with debris.

All of them did a great job of stopping full leaves from getting into gutters. But they couldn't stop:

  • small pieces of leaves
  • small twigs
  • evergreen tree needles
  • tree bark
  • etc.

Consider purchasing a micromesh product from Amazon.com and having your local handyman install them for you. CLICK the photo below for just one of the micromesh products I discovered on Amazon:

micromesh gutter guards

There are many micromesh gutter guard products. You can save LOTS of money putting them on yourself. CLICK ON THE IMAGE to see how low-cost they can be.

What is a Reverse Curve Gutter Guard?

A reverse curve gutter guard is one that directs water into the gutter using a curved piece of metal or plastic. The surface tension of the water causes the water to flow into the gutter while the debris floating on top of the water is supposed to go to the ground.

Many heavily advertised gutter guards have a reverse curve design.

The simple way to think about this is a waterfall. Water flows across the gutter guard and encounters a slit or some other narrow opening that is curved and bends down into the gutter.

The surface tension of the water provides the grip so the water flows into the gutter and doesn't overshoot to the ground.

Watch the following video to see an example of a reverse-curve gutter guard. It's the white plastic guard I hold in my hands. It's stained with mildew and mold from being on the roof during my testing.

Reverse Curve Gutter Guard Video

Here's a video just below I shot for the Cincinnati, OH ABC-TV affiliate, Channel 9 News. Very early in my testing, I made a video showcasing several gutter guards had already failed.

I had already discovered that with ALL OF the gutter guards I had tested up to this point, you STILL HAD TO CLEAN YOUR GUTTERS OR THE GUTTER GUARDS!

That pretty much defeats the purpose of the products because most sales literature and claims by salesmen were that you'd never have to do any gutter cleaning EVER AGAIN.

All three of the gutter guards you see in this video at the end of spring had FAILED COMPLETELY. Organic crap from my trees filled all the grooves, slots and mesh in the gutter guards.

Is Micromesh the Best Gutter Guard?

Yes, my independent testing has proven that micromesh is the best gutter guard.

I was at the national builders show one year and walked past a booth that had the unique gutter guard I had seen.

The gutter guard was made using a fine stainless-steel mesh that resembled a woman's pantyhose. Furthermore, the weaving of the thin threads of stainless steel was so tight nothing could get through, not even ceramic roof granules.

But the gutter guards allowed water to pass with no problems.

I knew instinctively these were the Holy Grail of gutter guards.

How Does a Micromesh Gutter Guard Work?

The surface tension of water pulls water through the fine stainless steel micromesh. It's simply magic.

When you first look at the micro mesh gutter guard, you think there's no way it can work. Since the mesh is so tight it seems water will flow over the mesh.

The magic is in physics. Water has surface tension and likes to grab onto things. This is why water beads up on a piece of glass.

This surface tension helps pull the water through the mesh.

I've stood on a ladder and watched the water streaming down my roof in a rainstorm and it gets swallowed by the mesh.

Even in the worst downpours, the mesh sucks the water into the gutter!

Are There Different Brands of Micromesh Gutter Guards?

There used to be just one or two micromesh gutter guards, but now there are many.

Being a syndicated newspaper columnist, I've written the Ask the Builder newspaper column since 1993. Furthermore, it wasn't hard for me to discover how many companies made this micro-mesh gutter guard.

I reached out to the two companies at the time that sold the product. Both of the companies sent their own crews to install the product.

Prior to them showing up, I cleaned the gutters on my garage making them look like new.

The two brands were:

  • MasterShield
  • GutterGlove

Did the Owner of GutterGlove Sell Mastershield Product?

Yes, the owner of GutterGlove started out as a dealer for MasterShield. Advance a few years and there are numerous micro mesh gutter guards that have worked their way around the different design patents.

IMPORTANT AUTHOR'S NOTE: Both of these companies sell through a dealer network. I've received numerous complaints from homeowners like you about high-pressure sales tactics, out-of-this-world estimates in the thousands of dollars, and very unprofessional salespeople coming to homes.

Because of this, I can no longer afford to tarnish my good name and reputation telling you which guard I used.  I don't want you to have a bad encounter or pay more than you have to.

I'm currently investigating other brands of stainless steel micro mesh gutter guards that you can install yourself or pay a local handyman to do for you saving you a vast amount of money.

How Did You Test the Micromesh Gutter Guard?

Here's a video I shot after the second company had stopped by to install their product. It was the perfect time to start the test because the giant maple and oak trees that overhang my garage were just starting to bud. Believe me, after years of testing I discovered that gutter guards all do a great job in the fall. It's spring when they fail.

What Happened Several Months Into the Test?

The video below is what my garage roof looked like after months of testing. It's very obvious that the way the gutter guard is installed makes a very big difference:

The one gutter guard performed better than the other. You can clearly see that.

You can't dispute the findings in the above video.

What is the Latest Update on Gutter Guards?

You may discover there are knock-off products out there. At the time I did my test, there were only two micro-mesh gutter guards available. Realize that most of the products have a design patent. It's fairly easy to defeat a design patent and this explains why you see all the competing brands in the marketplace.

Some products may have stronger utility patents. If you're like me, you don't much care about the intricacies of design or utility patents.  You don't care if one company is fighting another, or if one company stole the patents or is infringing on a patent. That's not your care or business.

All you should care about is:

  • is the micromesh stainless steel
  • is the gutter guard strong enough to last for decades
  • is the design such that it will not lift or blow away

As a result, this may seem like it makes it harder to select the best micro-mesh gutter guard. Hence you just need one that seems like it's made well and is priced competitively.

Author's Notes

P.S. I've left this column open to comments. You'll discover quite a few comments below that challenge what my tests showed. In many cases below, owners of gutter guard franchises that FAILED in my tests authored the comments. These comment authors have a dog in the fight and you just need to be aware of that.

In many cases, they may have invested tens of thousands of dollars to get the exclusive rights to the product they sell so they don't want to see their investment sour.

Whenever you see harsh comments about anything, try to look through the fog and ask yourself what their motivation is. If they're able to support their comment with cold, hard facts, then it's absolutely worthy of your attention. Most don't have any facts, simply opinions or half-truths. You know what a half-truth is, don't you? A half-truth is a WHOLE lie.

I shared with my readers of the April 26, 2015 AsktheBuilder Sunday Newsletter.

Tim Carter


Understanding House Settling Cracks

house settling cracks

House settling cracks were patched here. See all the white lines? The person who repaired the cracks made several critical mistakes. The stucco should have been washed first. The patching material should have been tested on the side or rear of the home for a perfect match. Copyright 2018 Tim Carter

House settling cracks come in all types and sizes. Settling cracks can often just be lumber shrinkage cracks in new homes. True settlement cracks tend to get larger over time.

Revised February 2018

House Settling Cracks TIPS

Shrinkage Cracks Most Likely Instead Of House Settling Cracks

Cracks happen for all sorts of reasons. But all too often people name every crack in their house as a settlement crack.

New homes are plagued with shrinkage cracks because the wood framing is shrinking as it looses water. If you feel you have a true settlement crack, the best person to call to get an opinion is a structural engineer.

CLICK HERE to get FREE & FAST BIDS from local structural engineers.

Related Links - VERY IMPORTANT!

Settlement or Shrinkage? Most Likely Shrinkage

How to Match Stucco Patches Perfectly

How To Match Mortar / Grout Colors In Minutes

Concrete Shrinks!

Shrinkage cracks can happen in concrete. For every ten feet of concrete that are poured, be it a wall or a slab, it will shrink 1/16th of an inch in about a year's time.

But people see a crack in a concrete wall and immediately think it's a settlement crack.

Different construction materials have different expansion and contraction coefficients.

House Settling Cracks Video

Watch this short video to see some common house settling cracks.

Some materials change shape and size as they absorb water and water vapor while materials immediately adjacent to them do not budge. An example of this is hardwood flooring. Wood is hygroscopic. That means it changes shape and size as it soaks up water and then releases it.

Mother Earth is a dynamic too, meaning soils can move. But this is somewhat rare unless you live on a steep hillside.

There are all sorts of soil-movement problems in parts of Greater Cincinnati, Ohio because of an unstable soil. It's found wherever you have the Kope or Lower Fairview formation.

You can use geologic maps like the one below to identify bad soils.

cincinnati geologic map

This is a copy of a United States Geologic Survey (USGS) geologic topographic map of the East End of Cincinnati, OH. The downtown area would be just to the left of what you see. The Kope and Lower Fairview formations are the light pink rock just above the magenta alluvium that's north of the Ohio River. (C) Copyright 2017 USGS and every US taxpayer that owns the maps. CLICK THE IMAGE TO BUY GEOLOGIC MAPS FOR YOUR AREA.

Understanding House Settling Cracks

If you have an understanding as to why cracks happen, then you can often work to make permanent repairs. There are some cracks that can't be easily repaired.

What's more, it is hard to totally disguise some cracks.

CLICK HERE to get FREE & FAST BIDS from local structural engineers.

Houses Have Hips And Knees

Large houses have joints within them.

These are places where the house relieves movement, just like the joints in our fingers, arms and legs. I often see cracks in modern homes where columns support beams. You can see cracks right where the contact point between these two structural members meet.

Hardwood floors often develop cracks. There are all sorts of reasons for that to happen, and almost always they can be traced to a humidity or moisture problem.

Soil Problems Cause House Settling Cracks

I routinely act as an expert witness in court cases involving poor quality construction. Recently, I finished a case that involved a house built on poor soil.

The builder built a house that was constructed over the top of a ravine that was filled in. Believe it or not, the excavation contractors bulldozed trees, limbs, and other vegetation into a small valley.

Then they placed soil on top of this. They rolled over the soil making it look like a great place to build.

Two years after the house was built, problems started to happen.

The foundation actually dropped several inches in numerous places and caused all sorts of havoc within the home and in its outside walls.

There were huge vertical cracks in the brickwork, the basement floor looked like an earthquake had struck and interior steel I-beams were twisted and compressed so much that they were crushing 2x4 plates. I was amazed at what can really happen when houses are built on poor soil.

Foundation Settlement Repair Video

Watch this short video to see one method to repair foundation settlement cracks.


Insurance Claims

The insurance company needs to be sent a copy of the letter to put them on notice of a possible claim. These letters need to be sent to both companies via certified mail with a return receipt being sent to you. Keep these very valuable receipts.

CLICK HERE to get FREE & FAST BIDS from local structural engineers.

Column B288

Rough-In Plumbing Diagram

riser diagram

Rough-In Plumbing Diagram | You'll need a master plumber to draw a riser diagram like this. CLICK or TAP HERE and I'll draw your rough-in plumbing diagram in just a day or two.

Rough-In Plumbing Diagram TIPS

Rough-In Plumbing Diagram - I Can Draw One For You - CLICK or TAP HERE!

Please watch this short video:

DEAR TIM: My city allows homeowners to install their own plumbing. But to get the permit I need to supply them with a rough-in plumbing diagram.

What is a plumbing diagram? Can I just do a bathroom plumbing diagram since all I am doing is adding a new bathroom to my home? Is it a good idea to include a bathroom plumbing vent diagram when I submit my paperwork to get my permit? Dave B., Cincinnati, OH

DEAR DAVE: You should count your blessings that you live in a community that allows you to do your own work. Some areas of the nation do not allow owners of single-family homes to do their own work. Plumbing permit help is my specialty because I've been installing plumbing for decades.

I became a master plumber before the age of 30 and used to do all the plumbing work on all my jobs. I loved running drain and vent pipe and especially heavy black iron for natural gas lines. I've tapped my fair share of sewers and lived to tell about it!

It's my opinion that certain homeowners can do better work than some of the plumbers I've seen in my years in the field. If you can install the piping correctly and it meets or exceeds the plumbing code, why shouldn't you be allowed to do the work?

CLICK HERE  to get FREE & FAST BIDS from local plumbers who will draw a rough-in drawing for you.

2D Drawing Shows All

A rough-in plumbing diagram is a simple isometric drawing that illustrates what your drainage and vent lines would look like if they were installed, but all of the other building materials in your house were magically removed. You would see the pipes in three dimensions, and be able to see all of the connections, the pipe sizes, fittings and vent piping.

Isometric Rough-In Plumbing Diagram

I'm a master plumber and I drew this in about ten minutes. It shows the fixtures in a bathroom that's being added to an existing home. The solid lines carry water and waste. The dashed lines only carry air and some condensation water. - © 2017 Tim Carter - Master Plumber  CLICK the DRAWING if you want to hire Tim to draw your rough-in plumbing diagram.

By drawing the lines that represent each pipe at certain angles, you can make a three-dimensional drawing on a flat piece of paper. Any artist can tell you this is simply a matter of perspective. Imagine looking at your house's plumbing system as you hover in the air and at an angle instead of just looking at your house from the front door. This is what a rough-in plumbing diagram looks like.

CLICK HERE  to get FREE & FAST BIDS from local plumbers who will draw a rough-in drawing for you.

Magic Triangle

You create the interesting 3D perspective in the 2D drawing by using a simple 30 - 60 - 90 triangle. These are very inexpensive and do a great job of showing the sloping and intersecting wye fittings as if you were able to see a real plumbing system without all the wood or steel framing in the way.

30-60-90 triangle

This is the infamous 30-60-90 triangle. Eventually they'll be collector's items with everyone switching to computer graphics! CLICK THE IMAGE NOW TO BUY ONE. VERY CHEAP

Solve Problems Early

A plumbing diagram is a really useful tool that can save you lots of money and headaches. The drawing communicates to the plumbing inspector that your system will meet the minimum standards of the code. When you apply for your permit, an inspector studies your rough-in plumbing diagram making sure the pipe sizes are correct and that you're using the correct fittings at the places where pipes connect to one another.

For example, let's imagine you think it's okay to install a fitting connecting two drain pipes together at a 90-degree angle, and this pipe is in the ground under a concrete slab. In almost every jurisdiction I know of, this is an illegal connection. You draw this and the plumbing inspector corrects this mistake before you install the pipe and have to rip it out to make the correct connection using two 45-degree bends to make the 90-degree turn.

You should just have to do a bathroom plumbing diagram for your job since you're remodeling. It would be unreasonable for you to have to make a drawing of your entire plumbing system, especially since it's hidden behind the walls.

You'll be expected to show how and where your new drains will connect to your existing plumbing system. This is very important as the new branch line you install must connect to an existing plumbing drain in the right location.

Vents are Dashed Lines

The diagram will absolutely have to include a bathroom plumbing vent diagram. Vent pipes on plumbing diagrams are drawn as dashed lines while pipes that carry water are drawn as solid lines.

Some pipes that are waste lines can be vent lines at the same time. It can get confusing. In the drawing I made above there's an example.

Isometric Rough-In Plumbing Diagram

This is a portion of the big diagram above. I made the lines red here to illustrate these two pipes are both drain and vent lines. Read the column copy for explanation. - © 2017 Tim Carter

Look at the slightly enlarged image I cut out of the overall diagram at the top of the page. I've made two lines red.

This section of piping is 3-inch in size and starts at the one end of the wye fitting where the toilet drain pipe also connects. The toilet drain pipe extends from the wye and terminates with the "T"-shaped symbol. The "T" represents the actual toilet flange.

Wet Venting

The red section of piping takes the water waste from the vanity that sits next to the toilet. Since the drain pipe is 3-inches in diameter, there's plenty of space for both water and air to exist if you were to fill the vanity sink with water and pull the drain plug while flushing the toilet at the exact same time. The rushing toilet water would not rob the vanity p-trap of air because it can get plenty of air in the 3-inch pipe.

Some plumbers and inspectors call this wet venting. In other words the toilet has a wet vent because water from the vanity flows through that small section of vent pipe. There are some inspectors that will not allow wet vents. I've never had a problem with one so long as you maintain the size of the vent pipe for the fixture being vented. In this case, the toiled drain is 3 inches so its wet vent needs to be 3 inches.

Once the wet vent terminates at the 3 x 1 1/2 tee fitting where the vanity drain connects, the vent for both the toilet and vanity can be 1 1/2 inches.

You'll need to show how and where your new vent pipe connects to an existing vent pipe or exits the roof as a new separate vent. If you're going to go through the roof with this new vent pipe, be sure it's sized correctly to prevent getting choked with ice. This can happen in your climate in periods of severe cold weather if the pipe exiting the roof is too small a diameter.

Plumbing Vent Video

Watch this video to see some plumbing drain lines, but more importantly, lots of plumbing vent lines.

Call Out Pipe Sizes

Be sure you call out the size of each pipe shown on your rough-in plumbing diagram. Show all changes of direction correctly. If you intend to use a fitting that turns a hard 90-degree angle, show that on your drawing. If you intend to use fittings that turn just 45 degrees, draw that acute angle on the paper. It's not that hard to make a plumbing diagram so long as you can visualize the pipes in your head before you install them.

Study Other Drawings

If you struggle to make your rough-in plumbing diagram, the first thing to do is ask your local plumbing inspector or the plumbing department if they have any sample plumbing diagrams you can study. Once you see how they're drawn, it will make complete sense to you. If they don't offer a free sample, consider purchasing a copy of your local plumbing code. Often the code books have great examples of the isometric rough-in plumbing diagrams.

Use Correct Symbols

When you see a sample rough-in diagram, you'll notice that certain simple symbols are used to indicate the fixtures you will eventually connect to the pipes. Be sure to use these symbols properly so the inspector reviewing your drawing doesn't think you will be connecting your toilet to your bathroom vanity pipe!

To make the drawing, you'll discover that a drafting 30-60-90 plastic triangle will be invaluable. The 30-degree angle side of the triangle is perfect to illustrate pipes that run horizontally with the code-required slope. CLICK HERE NOW to buy one of these dandy plastic triangles. Some computer software also allows you to draw lines at specific angles.

CLICK HERE  to get FREE & FAST BIDS from local plumbers who will draw a rough-in drawing for you.

Column 722

How To Connect Deck Railing Post to Deck

Deck Railing Connection TIPS

Deck Post Danger

Deck railing posts are the foundation of a deck railing system. They must be strong.

It's easy to connect deck railing posts to the floor joists of the deck.

No Lag Bolts!

Don't lag bolt a deck railing post to the outer band board that's nailed to the ends of the floor joists. The nails that pass through the band board into the ends of the floor joists have minimal holding power.

The reason why nails driven into the end of a stud or joist don't hold well is because the nail is parallel to the micro grow tubes that make up the tree. If you could look at the end of a deck joist with a high-powered microscope it would resemble what the end of a bundle of unwrapped drinking straws would look like.

CLICK HERE to get FREE & FAST BIDS from local deck builders in your city or town.

Use this Simpson Strong-Tie Connector

I completely rebuilt a deck on my own home recently. I didn't build the deck originally. 

To connect the new posts to the floor joists I used two Simpson Strong-Tie DTT2Z ZMAX galvanized 14-gauge 2x deck tension tie connectors at each post base where it passed next to the floor joists.

deck railing post connector

Here's the connector I used on my own deck posts. You need two per deck railing post. WATCH the VIDEO above to see how it goes in. CLICK THE IMAGE HERE NOW TO BUY THESE CONNECTORS.


CLICK HERE to get FREE & FAST BIDS from local deck builders in your city or town.

This important video warning was shared in Tim's May 16, 2014 AsktheBuilder Weekend Warrior Tip.

Undermount Kitchen Sinks

Undermount Kitchen Sink

Undermount Sink Installation | This is my own undermount kitchen sink at my own home. My wife loved this countertop and sink. We sold the house and moved to New Hampshire. It's harder to install the above sink than it is to install a wall-hung sink bracket. © 2021 Tim Carter

"I think it's reasonable for a person to wonder how in the world the sink will stay permanently attached to the countertop with this kind of weight regularly trying to pull the sink down into the base cabinet."

Undermount Kitchen Sink Checklist

DEAR TIM: Are undermount kitchen sinks a good idea? I have never had one, and am worried about leakage where the undermount sink contacts the underside of the countertop.

I want a granite undermount kitchen sink, but am worried the sink will pull away from the granite countertop. This would be a nightmare, especially if the sink was filled with water.

What undermount sink installation tips can you share that will allow me to buy one with complete confidence? Christy F., Flemington, NJ

DEAR CHRISTY: The first thing I can tell you is an undermount kitchen sink will give you a lifetime of leak-free performance if it is installed correctly. I have several undermount sinks in my own home, and they simply do not leak where the sink touches up against my granite countertops.

Related Links

Repair an Undermount Kitchen Sink With Ease

Stainless Steel Sinks Are Superb

It's important to note I felt the same way you did about undermount kitchen sinks. It was the plumber in me that made me a Doubting Thomas. After all, a standard double-bowl sink that has a disposer on one side and is completely filled with water weighs well over 100 pounds.

I think it's reasonable for a person to wonder how in the world the sink will stay permanently attached to the countertop with this kind of weight regularly trying to pull the sink down into the base cabinet.

CLICK HERE to Get FREE & FAST BIDS from local countertop installers.

How is the Undermount Kitchen Sink Attached?

High-strength epoxies, anchors and clips, and silicone caulk are used to attach the sink to the underside of the stone tops.

The undermount sinks are held in place with metal anchors that are glued to the underside of the stone with a two-part epoxy that cures rapidly and has incredible tensile strength once cured.

Furthermore, a bead of silicone caulk helps bond the sink to the stone to prevent water leaks between the sink and the underside of the countertop.

What is a Great Epoxy to Use?

PC-7 is a great epoxy that will not sag or drip when installing the anchors to the underside of a stone countertop. Remember, blow out all the dust from the holes before applying the epoxy.

PC Products Epoxy

I've used epoxies made by this company for both inside and outside projects. PC Products makes a superb epoxy right here in the USA! CLICK THE IMAGE TO ORDER SOME NOW.

Does the Stone Need to be Dust-Free?

Another key point is to make sure the underside of the stone countertop is dust-free. Dust will cause the epoxy bond to fail.

Any installer worth his salt will take a brush to remove stone dust from underneath the countertop. Dust in this location is a strong possibility because of the cut made to create the hole for your sink.

How is the Sink Cutout Created?

It must be remembered the granite countertop fabricator had to cut a special-shaped hole in the stone top to create the hole for your undermount sink. The undermount sinks come with a cutout template that's traced onto the stone.

Once the cut is made, the fabricator has to polish the rough stone edge.

What Generates the Thick Dust Under the Top?

Cutting out the hole for the sink and polishing the edge generates thick dust under the top.

The water that is used during the polishing process gets very small pieces of stone in it, and this slurry can roll to the underside of the countertop. Once the water component of the slurry evaporates, the stone grit or dust is left behind.

There's no real standard as to how much overhang the stone should be beyond the actual sidewalls of the sink. I always tried to have no less than 1/8 inch for an overhang and certainly no more than 1/4 inch.

CLICK HERE to Get FREE & FAST BIDS from local countertop installers.

Will Caulk Hold a Sink In Place?

No, caulk is not to be used as the adhesive to hold the sink to the stone. Caulk is just used to create a waterproof seal between the sink and the stone top.

Most undermount sinks come with very clear written installation instructions. Every set of instruction I have seen calls for a bead of clear silicone caulk to be placed around the flat lip of the undermount sink. This continuous bead of caulk acts as the waterproof seal between the sink and the countertop once the undermount sink is pressed permanently against the stone countertop.

Every month or so I get an email from a homeowner who's undermount sink has crashed down into their cabinet. Each autopsy report shows the idiot installer cut corners and just used caulk to hold the sink. They never bothered to use anchors and epoxy.

How Long Does it Take To Install the Sink?

Most professional installers can install an undermount kitchen sink in 30 minutes or less. The tools required are a 2x4 longer than the sink cutout is wide, one or two bar clamps, the special two-part epoxy and the caulk and caulk gun.

Once the installer knows the underside of the stone top is dust-free, he applies the silicone caulk to the sink lip. The sink is then pushed up against the underside of the stone top and centered under the polished cutout.

The 2x4 is then placed on top of the countertop spanning across the sink. One end of the bar clamp goes through the large drain hole in the sink and the other end goes on top of the 2x4. A double-bowled sink needs two clamps, one for each drain hole.

The clamps are partially tightened and the reveal of the sink is checked to make sure it is even around the entire cutout of the granite. The clamps are then fully tightened.

It's now time to mix the two-part epoxy and apply it to the small bolt posts that are glued next to the lip of the undermount sink. The installers are on their backs in the sink base looking up when they do this.

What are Different Undermount Kitchen Sink Anchors?

There are several types of anchors that can be used to mount an undermount sink. One type you have to drill holes for.

Another anchor has a wide round base at the bottom of the threaded stud. This base has holes in it that allow the epoxy to ooze through. These are very good if you make sure the underside of the stone / granite is dust-free. Here's a good example of this anchor. CLICK HERE to see all the different types of anchors.

Undermount Sink Anchor - Clip

This is a common undermount sink anchor and clip. You can see the round base of the threaded stud. Use this type with the PC Products epoxy above. CLICK THE IMAGE TO SEE MANY ANCHORS.

The epoxy sets rapidly, usually in ten minutes or so. After this wait period, the rest of the hardware that clamps the sink to the bolt posts is installed. It is good to wait at least one day before the plumber arrives to connect any drain piping or a heavy disposer to the undermount sink.

Before the drain piping is attached to the sink, it is wise to tighten the nuts that hold the clamps in place. Do not over tighten. Simply make sure they are snug. The adhesive properties of the silicone caulk in conjunction with the epoxy hold the sink permanently in place.

How Long Should the Epoxy Cure?

The epoxy should cure at least 24 hours before you apply tension forces to it.

The biggest mistake you or an installer can make is trying to rush the job. All too often an aggressive plumber, remodeler or homeowner will try to finish the entire job the same day.

They will wait six or seven hours thinking the epoxy is plenty hard, only to discover that the weight of a heavy disposer pulls the sink away from the countertop.

The bolt posts and nuts are not common items found at hardware stores or online. CLICK HERE to see a wide assortment of great undermount sink anchors.

Is There a No-Epoxy Method to Install a Sink?

There's another way to support an undermount sink and it doesn't involve using epoxy. The undermount sink is supported by a wire harness that's snugged up against the bottom of the sink using an ingenious drawbar.

It's called the Hercules Universal Sink Harness Kit. CLICK HERE to ORDER IT NOW.

Sink Harness Kit

Here are all the parts for the Hercules Universal Sink Harness Kit. You just need a simple screwdriver and a wrench to install it. EASY! CLICK THE IMAGE TO ORDER ONE NOW.

Hercules Universal Sink Harness Install VIDEO:

CLICK HERE to Get FREE & FAST BIDS from local countertop installers.

Column 662

Ice And Water Shield

Ice and Water Shield on Roof

This entire roof has been covered with an ice and water shield. It’s going to be leak-free for many years. © 2018 Tim Carter

"Ice and water shield is a far superior product compared to basic roofing felt paper."

Ice and Water Shield Checklist

DEAR TIM: Lately I’ve seen roofers install a strange product that looks like traditional felt paper, but it’s not. It has a peel-away backing paper, and this material sticks to the wood sheathing.

What is it? Why would you use this on a roof? Is it something that can be added to an existing roof in case I’m adding another layer of shingles? Connie G. Columbus, OH

Related Links

Ice Dams and Water Shield - DO NOT SHARE - Secret Info

Grace Ice and Water Shield® Benefits


DEAR CONNIE: Without being there, I’m willing to wager that you saw ice and water shield being installed. It’s an amazing roofing product that was introduced in the 1980’s and has quickly become the gold standard for creating leak-free roofs in all climates.

Free & Fast Bids

CLICK HERE to get FREE & FAST BIDS from local roofers who can install the BEST ice and water shield.

What Makes Ice and Water Shield Different?

Ice and water shield is different from felt paper because it's a rubberized membrane that sticks to itself and the wood roof sheathing. It creates a waterproof barrier to standing water if installed correctly.

Felt paper does not stick to anything.

Roofing ice and water shield may look like traditional felt paper, but it’s vastly different in performance. Ice and water shield is a far superior product compared to basic roofing felt paper.

What Does Felt Paper Do?

Traditional felt paper does a decent job at stopping most leaks where water gets under shingles, tiles, metal or slate. It does this by using gravity.

Gravity allows the water to flow over the tar paper down to the edge of the roof. As long as the water doesn't travel horizontally or along the shaft of a roofing nail, the water will not come in contact with the wood beneath the actual roofing material.

How is Felt Paper Installed?

Felt paper is installed so each higher row overlaps the row below. In a perfect world water can't get to the wood roof sheathing.

How Does Felt Paper Allow Leaks?

The overlapping seams of the felt paper can't protect against water that flows BACKWARDS up the roof.

But felt paper has problems where it overlaps the sheet below and where the nails penetrate the felt. If water backs up under the roof as happens with ice damming, water can flow up and under the lap joints of felt paper.

Are the Nail Holes in Felt Sealed?

No. The nail holes through felt paper are not sealed.

Where the nails used to attach the roofing materials penetrate felt paper, the actual hole created by the nail is not sealed where it passes through the felt paper.

Water can get under the head of the nail and seep down the shaft of the nail where it passes through the felt paper. When this happens, you get leaks into your home.

Ice and Water Shield

The roofer still needs to install a small strip of the ice and water shield at the lower edge of the roof. He'll do that after removing the 2x4 cleat that prevented him from falling to the ground. © 2017 Tim Carter

What Ingredients are In Ice and Water Shield?

Ice and water shield contains asphalt cement, a special stretchable membrane, and a fancy co-polymer called styrene butadene styrene (SBS).

The SBS component makes the product very sticky.

The ice and water shield roofing material is made with a rubberized asphalt mixture that solves these problems. Because the product has a very sticky backing, it not only adheres well to the wood roofing sheathing, but it also sticks well to the layer below when you overlap the pieces.

Does the Air Temperature Cause Problems During Installation?

Yes, the air temperature, as well as direct sunlight, causes problems when installing ice and water shield.

When the air temperature is above 60 F and the sun is shining on the ice and water shield product, it's extremely sticky. It acts just like contact cement and whatever the sticky side touches, it will not pull off.

You'll have an impossible time pulling it off of anything it touches.

Do Nails Seal with Ice and Water Shield?

Yes, the nail holes through certain brands of ice and water shield do seal. Be sure you get that guarantee in writing before you purchase a product.

When nails penetrate the ice and water shield on the roof, the rubberized nature of the material creates a gasket effect on the shaft of the nail. Leaks simply don’t happen. But not all ice and water shield products offer this!!

What Brand Offers the Nail Hole Guarantee?

The one I used on my own home has this feature and it really works. It's Grace Ice and Water Shield®.

Ice and Water Shield

I covered the ENTIRE roof of my New Hampshire house with Grace Ice and Water Shield. I never have to worry about a roof leak - EVER. CLICK THIS IMAGE NOW TO ORDER SOME AND HAVE IT DELIVERED TO YOUR HOME.

Do Other Roofing Products Go Over the Ice and Water Shield?

Ice and water shield products are hidden by the finished roofing materials. Not only does ice and water shield installation stop leaks caused by ice dams, but it also stops leaks created by fierce wind-driven rain.

Does Ice and Water Shield Protect Against Hurricanes?

Yes, ice and water shield will protect your home from leaks caused by hurricanes.

If you live in an area that’s frequented by hurricanes or severe thunderstorms that can drive rain sideways, then you need this material. These storms can easily push water under many finished roofing materials.

CLICK HERE to get FREE & FAST BIDS from local roofers who can install the BEST ice and water shield.

Can I Cover the Entire Roof?

You can cover the entire roof with the ice and water shield, but in many instances, it’s applied where leaks frequently happen. The problem is a leak can occur just about anyplace on a roof for any number of reasons.

How Far Up a Roof Should it Be Installed to Prevent Ice Dam Leaks?

To prevent leaks from ice dams, you may want the product to extend up from the edge of the roof at least 3 feet, but 6 feet is better. I put it over my entire roof because ice dams can form far up a roof.

If the roof has a low slope, you absolutely want to extend the barrier product up the roof quite a distance. I would also apply it in any valleys you may have where two roof planes intersect.

Do You Use It Around Skylights & Flashings?

Ice and water shield is perfect to use around skylights, chimneys, plumbing vents, ventilation caps, or anything that penetrates up through a roof. The roofer laps the material up onto the object and cuts it at corners or curves in a special way to create a leak-proof barrier. Traditional roof flashings then cover this sub-flashing made from the shield product.

Can I Apply It Over Existing Shingles?

No, you can’t apply it on top of the old shingles. You must apply this product as indicated by the manufacturer. Typically you’ll discover that you must apply the material directly to the wood roof sheathing that’s under the shingles and any old felt paper.

Is it Hard to Work With in Hot Weather?

Working with ice and water shield can be challenging, especially in warm or hot weather. In these conditions, the back of the material is very sticky. If you start to unroll it and you’re not aligned correctly, you can install it crooked. If you try to straighten it out, you’ll almost always get a wrinkle.

Be prepared for a slight learning curve when using the material for the first time. If you’re not astute at how it should be installed, by all means read all the tips from the manufacturer and watch any videos they may have about how to best handle the material.

If you’re working on a steep roof, you need to be very careful. Wear all required fall-protection equipment and watch out when stepping on the material if it’s damp, frosty or cold. It can be very slippery. Falling from a roof can really ruin your day. I know, as it’s happened to me on more than one occasion.

Ice and Water Shield VIDEOS:

CLICK HERE to get FREE & FAST BIDS from local roofers who can install the BEST ice and water shield.

Column 861

Credit Card Skimmer Video

Credit Card Skimmer - They are out there!


This is a video I put up to PROTECT my AsktheBuilder.com newsletter subscribers from credit card fraud.

Always check. This is not complete protection as the electronic skimmer can be placed inside the gas pump in less than 40 seconds.

January 13, 2017 AsktheBuilder Newsletter

It's Friday! If you're retired, that's inconsequential.

The rest of us know what it means!

I just looked at the extended weather (WX) forecast for central New Hampshire where I live. Holy Tomato! You'd think it was early March!

If the WX stays like this, the lake by my house will not freeze solid. Here's a photo I took earlier in the week.

The red line is the boundary between open water, above the line, and ice. In the past few days, some of the ice is melted. I'd say we have about 50 percent open water at this time.

In past years, the lake would freeze over completely by about now. Freezing depends not only on temperature, but wind.

I live on Lake Winnisquam, the third largest lake in NH, and it's got a significant amount of fetch. What's more, the lake is oriented north / south which means the wind really gets the water moving.

When the water is choppy, it's not going to freeze unless the temperature really gets below zero and stays there. The forecast temperatures are daytime highs of 40+ F with brilliant sun starting in a few days. Need I say more?

New Products to Share

If you're a new subscriber, you're in for a real treat. The same goes for you if you're in the group my buddy Dick Daniels is in.

Dick Daniels is a US Navy Captain, former fighter pilot from the Vietnam War. He's been a subscriber since 1997, maybe before. I've had the good fortune to meet Dick and his wife Sue on a few occasions over the years.

What a blessing it is to have subscribers like Dick and Sue and I hope to meet you one day. Always open each newsletter because when I travel, I try to set aside time for meet ups. For example, my son and I are thinking of doing a BBQ road trip this spring in the south, and each time we go to a restaurant we're going to have a meet up.

Here's the treat. One week ago today, I embarked on a massive project. I'm revising each and every column on AsktheBuilder.com.

You have no idea how many months this is going to take, but it's really worth it.

Here's what's in in for YOU:

  • Fresh content
  • New Product links
  • Bullet-point list at top of column for FAST TIPS
  • Links to Contractors in your city/town
  • New large-format photos when possible

I decided a few days ago to share a link with you to each revised column so you don't miss ANYTHING.

Remember, just about all the columns now have great LINKS to products I LOVE and USE at my own home. Don't guess if about a product, always see what I use.

A list of columns revised in the past 48 hours is just below and let me tell you, a few of the columns have amazing information you should scan.

Go ahead, click ALL of the links below.

LAST CALL - Asphalt Shingle WARRANTY Survey

If you've not yet taken my Asphalt Shingle Warranty Survey, this is your LAST CHANCE to be part of my Roofing Ripoff expose' book.

You'll be able to say you were one of the people that's in one of the colorful pieces of the pie charts!!!

If you take the survey, you're going to get a 20% discount on the .pdf version of the book. My sophisticated newsletter software has the ability to track who takes the survey. That's how I'll get you the secret promo code.

CLICK HERE to take the survey.

Revised Columns - CLICK THEM ALL!

Here's the most up-to-date list of the columns I've revised:

How to ID a Load Bearing Wall - GREAT VIDEO

How to Drill Into Stucco

How to Build a GREAT Gravel Driveway

Secret TIPS for Drilling Through Hard Steel - GREAT VIDEO

Plumbing Vent Pipe Tips - GREAT GREAT VIDEO!!

Bathroom Fan LEAKS Cold Air - TWO GREAT VIDEOS

Caulk Removal Secrets

Residential Steel Beams - GREAT PHOTO of GIANT BEAMS at my Cincy home

Acrylic, Fiberglass Tub Care and Maintenance

Cast Iron Tub Repair TIPS

That's enough for today. I'll have more for you on Sunday.

Tarlaíonn sonas nuair a dhiúltú duit diúltachas!

Tim Carter
Founder - www.AsktheBuilder.com

Do It Right, Not Over!

Cast Iron Tub Repair

Cast Iron Tub Repair TIPS

Repairing a chipped or scratched cast-iron tub is easy. The trick is to use the right products.

Most chips are small, ranging in size from the head of a pin to the size of a dime. If you have multiple chips, repair the smallest one first. 

I've had fantastic success using inexpensive clear rapid-set epoxy that I just paint the next day.

CLICK HERE to get FREE & FAST BIDS from local handymen that can repair your cast iron tub chip.

Clean the Tub

Oxygen Bleach

Stain Solver is MADE in the USA with USA ingredients that are food-grade quality. CLICK THE IMAGE to order some NOW.

If you want the repair to last for years, you need to apply the epoxy to a clean, dry surface. I've found that Stain Solver is the best cleaner. It's non-toxic and does a great job of removing soap scum, body oils, mildew, and other grime.

If the chips are on the bottom of the tub, just fill the tub with enough water to cover the chips and sprinkle in one cup of Stain Solver per two gallons of water that are in the tub.

Allow it to soak for three hours. At the end of the three hours, scrub the tub with a stiff brush, rinse and let dry.

CLICK HERE to get FREE & FAST BIDS from local handymen that can repair your cast iron tub chip.

Cast Iron Cleaning Tips

Cast iron fixtures are probably the easiest fixtures to care for, as they have the hardest finish of all plumbing fixtures. The porcelain glaze that is bonded to the iron achieves a hardness very near that of actual glass. We all know that glass, because of its hardness and smoothness is really quite easy to clean. Porcelain, when cleaned on a regular basis, will shine like new glass forever. However, many people simply wait too long to clean things as mentioned above.

For example, The Kohler Company publishes the following instructions for caring and cleaning of their cast iron products:

  • Do use only non-abrasive cleaners and a soft nylon brush to clean the slip resistant surface of tubs.
  • Do use cleaners with a Ph of between 3 and 8. (Ph is a measurement of how acidic or alkaline a cleaner is.) The following cleaners are recommended: Earth Rite All Purpose, Earth Rite Tub & Tile, Glass Plus, Green Windex, Pinesol Broad Spectrum, Sparkle, Top Job, and Enviro Care Neutral Disinfectant.
  • Do NOT use steel wool, wire brushes, metal scrapers, or abrasive sponge pads!!
  • Do NOT use buffing machines on the slip resistant surfaces on tubs.
  • Do NOT use high alkaline or strong acidic cleaners!
  • Do NOT use abrasive cleaners.

Repair Products

Here are a few products you can use to repair your cast-iron tub. If you go the route of the clear epoxy and paint, you'll need high-gloss paint mixed to match the color of your cast-iron tub. That's somewhat easy to do.

The trick when using the clear epoxy is to mix it up well and only put in enough so the epoxy is flush with the surrounding porcelain. The epoxy does NOT shrink as it dries. Work with great light and don't overfill the chip. Paint it the next day.

Loctite Quick Set Epoxy package

This is the clear rapid-set epoxy that I've used for years to repair many things, including cast iron. I LOVE this product. CLICK THE IMAGE ABOVE TO ORDER IT NOW.


CLICK HERE to get FREE & FAST BIDS from local handymen that can repair your cast iron tub chip.

porcelain touch-up glaze

This may be a great product if you need a one-step process. You have to find the right one that matches the color of your tub. CLICK HERE TO ORDER THIS NOW.