Diagonal Bracing for Walls

temporary diagonal wall brace

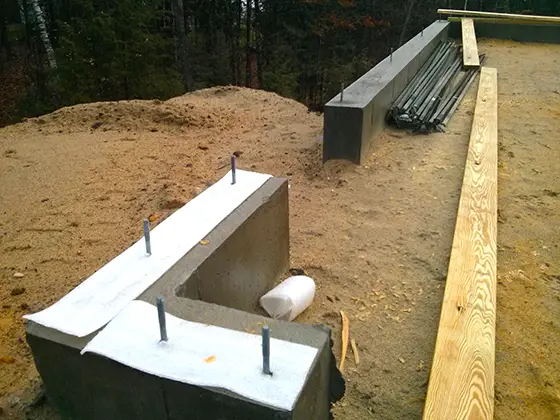
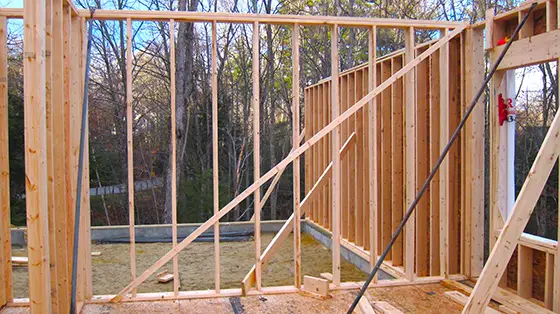
See that angled board nailed to the vertical wall studs? It’s a temporary diagonal wall brace used to stabilize the framing while the house is built. © 2016 Tim Carter Builder

DEAR TIM: Yesterday I stopped by my new house that’s under construction. I go there at the end of each day to take photos. I saw a strange board nailed across the wall studs that surely is a mistake. It ran at a diagonal from the bottom wall plate up the wall to one corner of the wall.

I don’t see how the builder is going to install drywall over this. What’s it for and is it important? I was tempted to remove it thinking that the carpenters made a mistake. Would you install this board as you build a new home? Dan V., Austin, TX

DEAR DAN: I want to congratulate you on checking on the progress of your new home each day. That’s a smart idea. By doing this, you can catch errors and omissions in the construction process. Taking photos, thousands of them, is also very smart. Even though you have no idea what you’re taking a photo of, still do it. These photos can be very handy down the road should someone need to look at how your home was put together.

Years ago, it was expensive to take lots of photos. Now it’s nearly free because storing the digital information in the cloud or on other memory media is so simple. I’d also recommend that you start taking video and talk about what you see as you have the camera aimed at something. Take closeup shots of critical elements like plumbing connections, structural supports and beams, etc.

Holy potato! I’m sure glad you didn’t remove that temporary diagonal wall brace. You could have caused a wall to collapse hurting or killing someone, including yourself. My suggestion is to never touch one thing on the job site when you go visit. Things are done by carpenters and other workers for a reason. Believe me, no one wants to do extra work so if you see something that looks unusual, it’s best to talk to the builder or job superintendent.

When a carpenter builds a wood-framed wall using regular lumber and nails, the wall may be able to support lots of weight on its own, but the wall is not stable unless it has some form of bracing.

What would you say if I told you that a house could collapse if a gust of wind hit it? My guess is you’d say that’s hogwash because you don’t regularly see houses flattened after each windstorm in your town. But a house could easily collapse without some form of diagonal bracing in walls.

Here’s an easy way to prove it. If you are so inclined, take a few 2x4s and build a simple wall that’s 4 feet tall. Nail the studs every 16 inches on center like a real wall. Stand the wall up, nail the bottom plate to the floor and then go to one end or the other of the wall.

I want you to start to push on the top plate of the wall at either end. You’ll discover it doesn’t take much effort at all to make the wall start to fold down on itself. The top wall plate will remain parallel with the bottom plate, but the wall studs will start to all tilt at once as the top plate travels to the ground with you pushing it forward.

Straighten the wall back up making all the studs plumb and then nail another stud on the face of the vertical wall studs that’s at a diagonal from one bottom corner of the wall to the upper corner of the wall at the opposite end.

Now try to push the top plate and see what happens. No matter how hard you push, the top plate will not budge. The diagonal brace you saw at your job site was a temporary brace to keep a wall from moving. When I built I’d do this on interior walls that connected with an exterior wall. This braced wall would help prevent the exterior wall from blowing over as the house is being built.

You probably noticed the exterior walls of your new home have wood sheathing on them. It’s probably oriented strand board (OSB) or it may be plywood in rare instances.

Just one sheet of this material at each corner of a wall will provide the same bracing as the single piece of wood you saw on the other wall so long as the OSB or plywood is fastened to the wall studs with the correct nails in a distinct nailing pattern. The nails must not be over driven into the OSB or plywood. It’s best if the head of the nail is flush with the wood.

Years ago, carpenters would put in the diagonal brace you saw by mortising it into the wall studs. This is very time consuming but it gave the walls enormous strength. Metal T-shaped diagonal bracing can be put in walls that accomplishes the same goal. The carpenters set their saw depth so it cuts a kerf in each wall stud to accommodate the metal brace. If you ever see one of these braces in a wall, never ever cut into it.

Pay attention to the way the exterior OSB sheathing is applied to your home. If you want to download a helpful guide showing you how it should be done, just go to the APA - Engineered Wood Association online library for lots of great information. Here’s the URL: http://www.apawood.org/resource-library

This popular column was featured in the January 14, 2014 AsktheBuilder Newsletter.

Column 1174

December 6, 2016 AsktheBuilder Newsletter

Last week you may remember I was off to Chicago for a quick insertion business trip. I flew there around noon last Thursday and was back at Midway airport the following day around 3:30 pm.

I had gone to my favorite big city to visit the True Value Hardware paint factory near Cary, IL.

HOLY POTATO!

I discovered that True Value Hardware is quite serious about making great paint and stains and they've been doing it for quite some time.

After Christmas, I'm going to share a paint with you that you'll not believe. I can tell you that I was so impressed with the test results that it made my head hurt.

Why did my head hurt? Simply because another national brand has beat on you and me for decades saying *they* have the best paint for your projects. You know when you hear something enough times, you tend to start to believe it.

When you see what I saw after the Christmas season ends, you're going to be shaken to the core. I'm convinced you're going to race to the closest True Value Hardware store to get this magic potion for your projects.

Yes, you can only get it at a True Value Hardware store!

But that's a good thing because for decades I've told you that I prefer to shop at small hardware stores rather than the behemoth box stores painted orange and blue.

While in Cary, IL, I also got to eat my first-ever serving of Italian beef at Portillo's! Yummy!

You may not know this, but I'm a trained and certified train conductor. I rode the Metra train - the UP-NW line - out of downtown Chicago towards Cary.

What FUN! Here's a photo of the train I was on.

To handle the tens of thousands of commuters streaming in and out of Chicago each day at rush hour, perhaps five or six trains are spaced out on the 40-mile line at any given time. For all I know, it can be ten!

The train two ahead of us hit a car at the grade crossing in Mt. Prospect. No one was killed, but it brought train traffic on all three Union Pacific rail lines to a grinding halt.

I got off my train as it sat at the Cumberland stop. Friends of mine who were going to True Value with me picked me up and we drove to the hotel.

I didn't see one smiling face on that train. It's quite the opposite on the train where I've been a conductor. Smiles abound on my train! Click Here to see why.

FREE Contractor Hiring Tips

I created this new page on my website I'm going to link to from now on in each newsletter.

It's got five simple Hacks that allow you to make sure you don't get SCREWED when hiring any contractor.

Under the last hack are some links you can use to get FREE BIDS from several contractors at the same time.

Yes, you just fill out a form and magically you get FREE quotes. Try it and let me know how it works out for you!

CLICK HERE for the Hiring Hacks!

Heating With Firewood

Many, many people here in New Hampshire heat with firewood. We have billions of trees here and they grow like weeds in the sandy continental glacial soil.

I had the pleasure of using a few weeks ago the MOST POWERFUL log splitter I've ever put my hands on.

Oh my was it wonderful to use. It had a bunch of very cool features that SAVED MY BACK.

CLICK HERE to behold the machine that had 35-tons of log-CRUNCHING power!

Doghouse Commercial

Christmas is just weeks away. It's a magical time of year for many, but for you it could be stressful.

That's why you need to watch TWO VIDEOS to put you in a good mood.

NOTICE TO ALL MEN: It's REQUIRED you watch these videos before you buy ANYTHING.

CLICK HERE and be prepared to laugh - especially if you're a woman.

Get FREE BIDS

Yesterday I had a phone conversation with a widow here in New Hampshire. She's about to embark on several major remodeling projects in her home.

I shared with her the Contractor Hiring Tips I gave you just a few moments ago.

She needs a great remodeling contractor to make sure her bath remodel, kitchen redo, second-story garage finish and several other things happen without a hitch.

I told her about a new service I offer using Home Advisors.

She's about to get FREE QUOTES from architects to draw the needed plans, then she'll use my links to get FREE BIDS from contractors to do the work.

No matter what job you need done around your home, be it plumbing, siding, roofing, handyman work, etc. you can get FREE BIDS from now on.

In the RIGHT COLUMN of this newsletter, you'll see the two graphic ads. I'll also be including another banner ad in the copy of the newsletter.

TRY the FREE SERVICE and let me know how it goes for you. I want to hear about any positive experiences and if you have any problems let me know.

CLICK HERE now to get a FREE BID on any job.

Shopping at Amazon.com

This time of year you can REALLY HELP me. Each issue of this newsletter I try my best to help save you time and money.

If you shop at Amazon.com for Christmas gifts - or at any time of year for that matter - you can help support this newsletter by always going to Amazon using one of my affiliate links.

It doesn't make any difference what you buy there once you click one of my links. You don't have to buy home improvement things.

For example, CLICK HERE to see a bunch of cool power tools.

When you shop at Amazon using a link I provide, I get a tiny fraction of the profit they make. It does NOT cause your price to be higher.

I added a helpful giant ad at the BOTTOM of every column on my website to make it easy for you. The ad often has products in it that are related to the TOPIC of the column.

For example, if I write a review about power tools, you might see an ad like this at the bottom of the review:

Please consider using my affiliate links and I thank you in advance!

That's enough for today. I'm sure you're busy. I'm leaving for an eight-day trip with my youngest daughter so I'll have another newsletter for you soon, but maybe not until I get back!

Remember, take a deep breath this time of year and think about all you have to be thankful for.

Tim Carter
Founder - www.AsktheBuilder.com

Do It Right, Not Over!

Doghouse Commercial

Doghouse Commercials


This is a video every man should watch - three times. I can tell you I made this mistake the second Christmas I was married to Kathy. I saw she didn't have a clothes hamper and I grew up with one. How could anyone survive without a clothes hamper I thought. What an IDIOT!

This video was made by JC Penny and it was brilliant.

It was so popular that they made a sequel to it a few years later.

Here's the sequel:

These were featured in Tim's February 14, 2019 AsktheBuilder Emergency Alert Newsletter!!

Installing Ice and Water Shield

Bruce asked me the following question:

"When water and ice is installed, should it be adhesive backed and should it be on the bare sheathing?"

At first I was going to give my standard response, but I thought this would be an excellent teaching moment. I say this because each day I get many similar emails about what to do when installing all sorts of things.

Before I share the answer I gave Bruce, let's think this through. I can help with a story about my late father-in-law. He was a brilliant man.

Just after getting married, I used to hike with him on a large tract of land he owned. One day, we were talking about making decisions and then what happens when something goes wrong.

"Often the secondary reaction creates a problem much worse than the primary one." It took me a while to fully understand what he was trying to say, but I eventually got it.

How does this apply to Bruce's situation? First and foremost, there's more than one different type of ice and water shield product that you apply under roofing! The instructions for each one may be different.

The information you may discover out on the Internet is rife with errors and mistakes. Many home improvement columns are written by people that have never worked full time at a paying customer's home.

The Secondary Reaction

Here's how my father-in-law's advice applies to Bruce. Bruce did the right thing asking for help. He came to AsktheBuilder.com for advice thinking that he was dealing with an expert. He lucked out because I do know lots about ice and water shield and even have testified about it as an expert witness in a case in Antigua where the wrong type was used on the Brazilian ambassador's home. But I digress.

So the PRIMARY reaction Bruce would get would be my answer. If he had landed on the website of some person who's never installed ice and water shield, all bets are off as to the quality of the advice he'd get.

The SECONDARY reaction is what happens if the advice is wrong. In the case of Bruce, he could have a leak months or years later that causes thousands of dollars in damage. An additional reaction is that he could VOID the warranty of the product because he *trusted* the advice he got and acted on it in good faith.

Big Mistake

You never want to put a product warranty in jeopardy. This is why you must read product installation instructions and understand them even if a contractor is doing the work. You need to know the work is being done correctly.

Is this hard? You bet it is. Do most people want the Easy Button answer? Absolutely.

Here's the answer I gave Bruce. When you have a question about how to install something, there's only ONE PLACE you should get the answer.

The company that made the product. PERIOD.

NEVER EVER trust a contractor or some other person's answer as being the end all and be all. You may ask me or someone else and we give the correct answer, but we do NOT BACK THE PRODUCT WARRANTY.

Only the manufacturer backs the warranty.

The Best Ice and Water Shield

The best products are adhesive backed and come with a puncture-proof guarantee. In other words, the nails used to attach the roofing do not puncture the product. The best ice and water shield products come with a SBS co-polymer in them that makes them very sticky so they bond permanently to the wood roof sheathing once the sun heats them up.


Sealing Air Leaks in House

DEAR TIM: I’m going to build a new home and want to make sure I seal all air leaks in my new house. The new home is close to where I live and I have the time and inclination to do some work on it myself. My current home leaks air around doors, windows, at electrical outlets and numerous other places. What would you do if you were building a new home? Are there ways to retrofit my existing home to seal existing air leaks? What’s the issue and why do houses leak air so bad? Nick M., Lexington, MA

DEAR NICK: Congrats on your new home! How lucky you are to be close to the project and be able to get some of that fresh sawdust aroma into your lungs! Any and all work you do on the job will add to your overall satisfaction that you’ll feel once the home is done and you’re moving in.

Let’s talk about your existing home first and why it’s leaking air. Once you understand this, I believe you’ll know exactly what to do with your new home. The sad thing is it’s very simple to stop a vast majority of air leaks in the average home during the construction process. I feel it doesn’t happen because most workers don’t know how to do it or the builder just doesn’t care to do what’s needed.

Air leaks start right on top of the foundation. While most foundations and concrete slabs look perfectly flat, they’re not. When the carpenters install joists and wood-framed walls on top of the cast concrete, concrete block or slab foundations tiny gaps that you can slide one or two pieces of paper under add up to a vortex of air flowing into a home.

If you’re building a new home, don’t forget to use a foam sill sealer that sits on top of the foundation and under the treated wood sill plate.© 2016 Tim Carter

If you’re building a new home, don’t forget to use a foam sill sealer that sits on top of the foundation and under the treated wood sill plate. © 2016 Tim Carter

These leaks can be stopped with a simple piece of foam that fits under any wood that contacts the foundation. If your existing home is lacking this vital piece of sealant, you’ll have to do your best to caulk any gaps you can see in a crawlspace or basement. For slab homes, you can often caulk or use expanding foam along the bottom of baseboard trim.

Wood joist systems that sit on top of the wood sill plate can leak air because the wood framing is not perfectly straight. These gaps need to be caulked.

Leaks around doors and windows, depending upon the age of your existing home, can be traced to any number of gaps. On very old frame homes that have sliding windows that go up and down there are giant cavities where the iron window weights go up and down. These leak air through the window rope pulleys and other gaps in the frame.

Caulking all gaps between the window and door frames, window and door trim and siding usually minimizes these leaks. You’ll stop air leaks around windows and doors on your new home by using newer membrane tapes that are applied over the nailing fin that’s an integral part of almost every new door and window frame.

Be sure the gaps between all door and window frames are sealed with special expanding foam meant for windows and doors. You do this after the doors and windows are installed and working properly. Using the wrong foam can cause doors and window frames to bulge!

Years ago the joints between individual pieces of wall sheathing were never sealed. That gap can also allow air into the wall cavities. Today you’ll be able to use the special flashing and air-sealant tapes to cover all the horizontal and vertical seams in your exterior wall sheathing. It’s impossible to fix these errors on old homes unless a major remodeling job calls for removing all existing siding thus exposing the old sheathing.

Once you have all the exterior sheathing seams taped and have all the nailing fins on the windows and doors sealed to the sheathing, you’ve pretty much made the exterior of the house immune from air leaks with respect to the walls. Now it’s time to pay attention to the attic.

Electricians and plumbers almost always drill holes through the top plates of walls to put cables and pipes up into an attic. These holes must be sealed. You can caulk around cables and pipes or use foam.

Be sure you check with your building inspector as some codes call for a special sealing material that’s fireproof. Hot gases from fires love to find these holes in basements and walls and use them as chimneys to transfer the fire to attics by drafting.

Sealing these gaps around the cables and pipes will stop just about all the air from leaking through electrical outlets and switches. But to stop all of it you need to caulk any and all holes where cables enter electrical boxes. It’s also a great idea to caulk around the gap between the drywall and the electrical box after the drywall is installed.

Existing house wall outlet leaks can be minimized by using foam gaskets under outlet and switch cover plates. I’d also caulk the gap between the drywall and the electrical box in an existing home. Be sure to vacuum any dust around this gap before applying the caulk.

The issue with air leaks through all these places is that no one specific location leaks lots of air. It’s the cumulative total amount of air passing inside that’s the issue.

Be sure you install a fresh-air intake vent to satisfy the air needs for your fuel-burning appliances, exhaust fans and a central vacuum cleaner that exhausts to the outdoors. You don’t want any backdrafting issues that might bring carbon monoxide into your super-tight home!

Column 1173

Rubi Diamond Viper 10 Inch Diamond Blade Review

I had the chance to test the Rubi Diamond Viper 10 Inch Diamond Blade several weeks ago.

It performed beyond my expectations.

If you've ever used a wet saw to cut ceramic tile, then you know it's not a big deal for most diamond wet-saw blades to cut a standard tile.

After all, most ceramic tile is just clay that's been fired in a kiln to become hard. The issue is that there are materials that are much harder than fired clay.

But before we get into that, I feel you need to know a little bit about tool reviews.

Here's the Rubi Viper blade. It can cut through just about anything you can think of. (C) Copyright 2016 Tim Carter

Here's the Rubi Viper blade. It can cut through just about anything you can think of. (C) Copyright 2016 Tim Carter

Know Your Reviewer

I hope you do realize that many of the current tool reviewers out there, and I'm talking late 2016, are individuals who have never worked on a real paying-customer job site, never have worked in construction as a full-time job, and most definitely do not have decades of real field experience.

Always be sure to visit the About Us page on a tool review website and look at the qualifications of the person writing the review before you put much faith in their opinion of the tool.

Some reviewers write a review without even using the tool. They open it up and take some photos or shoot a video in their workshop. I take the tool and USE IT to see how it performs. But I digress!

My Test

I've used wet diamond saw blades for over thirty-five years. The first diamond wet saw I had was a crude tool with a 5-inch blade.

My first experience watching a wet diamond saw blade came in college about forty-four years ago when I saw one being used in the geology department at the University of Cincinnati. A professor was cutting a rock sample in half. I was stunned a saw blade could cut a rock. Prior to this I had only seen saw blades cut wood.

I decided to cut different types of tile, a piece of thin granite and a full-sized granite rock. Yes, a real rock.

You can see the test in action watching this video:

These photos tell you just about all you need to know about the Rubi 10-inch Viper Diamond Saw Blade. For more information about technical specifications and FAQs, visit the Rubi blade website.

It's a handsome blade with the red finish. I don't think the color makes it cut any better, but you have to say it's attractive! (C) Copyright 2016 Tim Carter

It's a handsome blade with the red finish. I don't think the color makes it cut any better, but you have to say it's attractive! (C) Copyright 2016 Tim Carter

The Viper blade has a unique weave pattern that you don't see on all blades. It undoubtedly assists in keeping the diamond-encrusted metal surfaces cooler. Heat is the enemy of diamond wet-saw blades. (C) Copyright 2016 Tim Carter

The Viper blade has a unique weave pattern that you don't see on all blades. It undoubtedly assists in keeping the diamond-encrusted metal surfaces cooler. Heat is the enemy of diamond wet-saw blades. (C) Copyright 2016 Tim Carter

These holes also help reduce head buildup in the blade. (C) Copyright 2016 Tim Carter

These holes also help reduce head buildup in the blade. (C) Copyright 2016 Tim Carter

I'll be most interested in what your results are when you use this blade. Be sure to tell all in the comments below. (C) Copyright 2016 Tim Carter

I'll be most interested in what your results are when you use this blade. Be sure to tell all in the comments below. (C) Copyright 2016 Tim Carter

The blade fits most common saw arbors. (C) Copyright 2016 Tim Carter

The blade fits most common saw arbors. (C) Copyright 2016 Tim Carter

Rotational blade speed is very important. If you spin blades too fast, they can shatter. The last thing you need is metal shrapnel flying around the workshop or job site! Do NOT exceed the maximum RPMs - EVER! (C) Copyright 2016 Tim Carter

Rotational blade speed is very important. If you spin blades too fast, they can shatter. The last thing you need is metal shrapnel flying around the workshop or job site! Do NOT exceed the maximum RPMs - EVER! (C) Copyright 2016 Tim Carter


Contractor Hiring Guide

Do you want to avoid getting SCREWED when hiring a contractor?

Use the following SECRET tips below.

Hack #1 Write out exactly what you want done and what you expect to be done on a piece of paper. Give this to each of the contractors who comes to give you a bid. Don't assume the contractor will do what you think he should do.

Get FREE bids below.

Hack#2 Make as many product selections as possible before the contractors come to give bids. Allowances created by contractors for products can be low. Unethical contractors put LOW allowances in their bids as a trick to keep their bid prices low.

Hack#3 Be sure the contractor can prove he's got years of experience, at least ten, and can prove he knows what he's doing. Make him give you a copy of his Certificate of Insurance.

Hack #4 Do NOT pay any money in advance unless your job requires SPECIAL ORDER materials. Contractors don't pay their help in advance, they don't pay for regular materials in advance, so why should you pay them in advance? Only pay for work done that's satisfactory. Do NOT pay the last 15% of the job until ALL WORK is complete and to your satisfaction. No excuses ever.

Hack #5 Be sure you put everything the contractor says he'll do in the written contract. NEVER trust the spoken word. A professional contractor will NOT be offended if you ask her/him to put something in writing.

CLICK ANY LINK BELOW TO GET FREE FAST BIDS

CLICK HERE for any Handyman work. FREE & FAST BIDS from LOCAL handymen!


Basement Remodel Bath Remodel Electric Work
Furnace Repair/Install Hardwood Flooring Heat Pump
House Painting Insulation Kitchen Remodeling
Garage Remodeling Patio Enclosure Plumbing Work
Roofing / Asphalt Room Addition Sunroom Addition
Vinyl Siding Window Replacement DECK Work 


This column was SO GOOD that I shared with the 31,000 subscribers who read my December 6, 2016 AsktheBuilder Newsletter.

Mentioned in my past March 13, 2011 Newsletter.

November 30, 2016 AsktheBuilder Newsletter

This is going to be fairly short. I've got LOTS of new videos, some tool reviews, and a few new columns for you.

I'm headed to Chicago tomorrow for a super fast in-and-out business trip. Unfortunately, there's zero time for a meet up.

It will be an episode of planes, trains and automobiles for me.

I fly from NH to Midway (MDW), get on the Orange Line from Midway to the Loop, walk to the Tribune Tower to meet with my syndicate editor and managing editor, walk with my editor up to Wood Alley, go from there to Union Station to get the train out to Crystal Lake near Cary and then drive to dinner and the hotel. Whew!

All of that before 7 pm.

COOL Technology Gift Idea

Do you watch any of the Marvel TV series? It's all about superheroes.

Kathy and I are really enjoying DareDevil. Look into it.

If you could have a super power, what would it be?

Mine would be X-ray vision. It's so helpful when digging, doing demolition work, or planning remodeling work. Imagine being able to really see what's behind concrete, drywall or plaster!

You can do it with the WalabotDIY!!!

I tested the WalabotDIY at my own home. I put it to a tough test.

You can read about it by CLICKING HERE to look at my review and a bunch of photos.

CLICK HERE to go to the official Walabot site for the Cyber DEAL.

General Remodeling in Your Future?

Are you getting ready to do some major remodeling? It could be a kitchen, bathroom, basement remodel, deck, room addition, etc.

You need to hire a person like me! I was able to do all those things and more.

If you want to get started on the process, then go ahead and click the button below and let me know how it goes.


BerzOmatic Deal to EXPIRE IN HOURS!!!!

Watch this video and RACE to a Home Depot store!!!!

The DEAL ENDS TODAY at midnight.

WATCH THIS!!!! CLICK HERE!!!!

New Columns and Tool Reviews

Here's a list. There will be more soon.

STIHL Chainsaw Review

Milwaukee Demolition Gloves Review

Bosch Impact WRENCH Review - WOWZA - CLICK HERE!!!!

How To Seamless Gutters! WOO HOO!

Cracked Brick Bay Window

That's enough for today.

Go above and CLICK that GET FREE BIDS button and get started on getting bids NOW before Christmas so you can be ready to go January 1st!!!!!

Heck, here it is for you:


I'll be back on Sunday is my best guess.

Are you SHOPPING AT Amazon????

If so, see that ad above just under my daughter Meghan's photo?

CLICK IT and use my affiliate link PLEASE.

Tim Carter
Founder - www.AsktheBuilder.com

Do It Right, Not Over!

STIHL MS 251 C Chainsaw Review

Stihl MS251 Wood Boss

Here's the modern version of the saw I used all those years ago. This is the handsome MS 251 C. I'll say! (C) Copyright 2016 Tim Carter

Stihl MS 251 Chainsaw

What would you say if I told you the first chainsaw I ever used was a STIHL?

That might not impress you, but the year might. It was September of 1974, I had just gotten married and was back from my honeymoon.

It's now December of 2106 and my bride has never changed the front door locks on me. I'm a survivor, or should I say she is?!

Click here to read about my visit to the STIHL Editors Conference and see a photo of me carving their logo with a chainsaw!!

All those years ago, I was rehabbing a house in Mt. Adams, an up-and-coming residential district immediately adjacent to downtown Cincinnati, OH.

The saw was a work horse. Even though I was a strong young buck of 22, I got tired but the STIHL saw just wanted to keep on working.

I then started to use my father-in-law's STIHL 18-inch chainsaw to cut cherry trees on a huge tract of land he owned. Same story, different day. The saw never failed me and it wore me out!

Fast forward forty-two years, but before we do...

Know Your Reviewer

I hope you do realize that many of the current tool reviewers out there, and I'm talking late 2016, are individuals who have never been on a real job site, never have worked in construction as a full-time job, and most definitely do not have decades of real field experience.

Always be sure to visit the About Us page on a tool review website and look at the qualifications of the person writing the review before you put much faith in their opinion of the tool.

Some reviewers write a review without even using the tool. They open it up and take some photos or shoot a video in their workshop. I take the tool and USE IT to see how it performs. But I digress!

My Test

I've had years of experience using chainsaws, but recently had the honor of attending the first-ever STIHL Editors Conference.

There I got expert instruction on all the safety steps you need to perform to work SAFELY with a chainsaw. I urge you to read all instructions in the STIHL owners manual and watch any videos they produce about how to hold, stand and work with a chainsaw.

Be sure to always wear all protective gear including, but not limited to, chaps, heavy gloves, safety glasses, ear muffs, hard hat with visor, etc.

If you want all the technical specs on the saw I used in this review, CLICK HERE.

I decided to use the MS 251 C to cut down a dead tree on my lot. The trunk diameter was 20 inches or so about two feet above the soil, so this would be a great test.

The saw had no issues at all making the cuts. As you'd expect, the saw was perfectly balanced and very powerful.

I think it helps that STIHL makes their own chains. Not all chainsaw manufacturers do!!!

Starting the saw was a breeze because of the newer spring-loaded starting rope system.

You just pull the cord slowly almost all the way out and it loads a spring with potential energy. When you release the pull cord, the spring rotates the piston starting the engine. It's a delight to use!

I really loved the toolless fuel and oil caps. The saw I had before this one required you to use a large screwdriver or flat tool to twist open the fuel and oil caps. I hated using that bar and it gouged the caps. Those days are gone forever with the toolless caps.

Adjusting the chain tension is the same. There are no tools required as well. What a nice change!

I discovered at the conference that if you want the saw to start each and every time you need it, it's very important to keep the fuel tank filled when the saw is stored. The fuel needs to have stabilizer and use the best gasoline you can buy to make your mix.

Pay attention to the owners manual about the recommended octane rating of the gasoline. Many small engines LOVE to have higher octane gasoline, yet you may be one that always pushes the 87 octane button. Filling a gas can with 93 octane for your small engines may only cost you an extra dollar!

You can also purchase and use STIHL's premixed and stabilized fuel in handy cans.

Read the owners manual to discover the best gasoline to use. It's all about octane.

Here are some photos of the saw and a few of its features:

The distinctive orange color screams "QUALITY". (C) Copyright 2016 Tim Carter

The distinctive orange color screams "QUALITY". (C) Copyright 2016 Tim Carter

sawinlog2

Here's the bad boy cutting into the downed tree. (C) Copyright 2016 Tim Carter


You're looking at the toolless fuel filler. Flip that black lever up, twist and fill. (C) Copyright 2016 Tim Carter

You're looking at the toolless fuel filler. Flip that black lever up, twist and fill. (C) Copyright 2016 Tim Carter

This is where you put in the oil that lubricates the chain. The saw sips this oil and doesn't waste a drop. (C) Copyright 2016 Tim Carter

This is where you put in the oil that lubricates the chain. The saw sips this oil and doesn't waste a drop. (C) Copyright 2016 Tim Carter

Milwaukee Demolition Gloves Review

Milwaukee Demolition Gloves Review

I review tools and products as part of my AsktheBuilder.com website.

You might think there's not much to say when reviewing simple work or demolition gloves, right?

If you've worn work gloves for over forty years like I have, then you might know exactly what to look for in a glove.

I've worn many many pairs of work gloves in my four decades of hands-on, no pun intended, construction work. I've built new homes, room additions, done lots of demolition work and plenty of remodeling on existing homes.

I do know what I like and don't like about work gloves, so let's start there. But first, a little business about reviews.

Here are the Milwaukee Demolition Gloves. As you can see, I TEST them before I write about them. (C) Copyright 2016 Tim Carter

Here are the Milwaukee Demolition Gloves. As you can see, I TEST them before I write about them. CLICK THE IMAGE to BUY them. (C) Copyright 2016 Tim Carter


Know Your Reviewer

I hope you do realize that many of the current tool reviewers out there, and I'm talking late 2016, are individuals who have never been on a real job site, never have worked in construction as a full-time job, and most definitely do not have decades of real field experience.

Always be sure to visit the About Us page on a tool review website and look at the qualifications of the person writing the review before you put much faith in their opinion of the tool.

Some reviewers write a review without even using the tool. They open it up and take some photos or shoot a video in their workshop. I take the tool and USE IT to see how it performs. But I digress!

My Test

I tested these gloves over a period of two weeks. I had to do some cleanup around the back of my house moving framing lumber around that was leftover from building a new deck. This is the sort of material you might handle doing demolition.

I also wore the gloves taping a video showing how easy it was to use a BernzOmatic MAP-gas torch. This was an interesting test because you need dexterity to operate the torch. The gloves allowed me to safely use the torch, operate the controls and not put myself in danger of getting burned.

Finally, I had a massive project of cleaning up around my wood pile. I had many old pallets that had to be moved, some cut up for kindling wood, and just general handling of split wood, pallets with RUSTY nails! and cumbersome logs.

The gloves did well. Very well.

CLICK HERE to BUY the gloves.

My only complaint, and this is with just about all gloves like this, is that they're not waterproof. I long for a waterproof work or demolition glove that breathes. I'm going to hunt for a pair and test those next!

Your knuckles are protected by these nice rubber bumpers. CLICK THE PHOTO to BUY the gloves.(C) Copyright 2016 Tim Carter

Your knuckles are protected by these nice rubber bumpers. CLICK THE PHOTO to BUY the gloves.(C) Copyright 2016 Tim Carter

Here's more protection for the palm of your hand. Note the gripping rubber pimples. CLICK THE IMAGE to BUY the gloves. (C)Copyright 2016 Tim Carter

Here's more protection for the palm of your hand. Note the gripping rubber pimples. CLICK THE IMAGE to BUY the gloves. (C)Copyright 2016 Tim Carter

Use the hoop and loop straps to secure the gloves to your hands. I feel the glove size runs SMALL, so order the next size up you feel you need. CLICK THE PHOTO to BUY the gloves. (C)Copyright 2016 Tim Carter

Use the hoop and loop straps to secure the gloves to your hands. I feel the glove size runs SMALL, so order the next size up you feel you need. CLICK THE PHOTO to BUY the gloves. (C)Copyright 2016 Tim Carter

More rubber gripping texture pimples on the fingertips. A good feature indeed. CLICK THE PHOTO to BUY the gloves. (C) Copyright 2016 Tim Carter

More rubber gripping texture pimples on the fingertips. A good feature indeed. CLICK THE PHOTO to BUY the gloves. (C) Copyright 2016 Tim Carter