April 25, 2016 AsktheBuilder Newsletter

How has your past week been?

Mine's been insane. I'm leaving my house twelve hours from now for a much-needed vacation.

I'm flying west with my youngest daughter to visit my oldest daughter and son-in-law.

We'll be visiting three national parks in a little over six days!

I'm sorry, but there's absolutely no room in my schedule this trip for any meet ups. Perhaps next time.

If you're a NEW SUBSCRIBER, this is not a normal issue. I'm slammed trying to get out the door, so I just want to give some updates about things people have been asking about.

#1 Stain Solver SALE

We are producing ten tons of Stain Solver this week at the production facility. An hour ago, I was informed that the 2.2-pound size was completed today.

Stain Solver is a company Kathy and I own. It's a magical Certified organic multi-purpose cleaner. CLICK HERE to see all the things it can clean. Scroll down and then click the photo in the left column that interests you.

The other sizes, up to the 50-pound one, will be done by the end of Thursday.

I will send you an email on Friday and Sunday about the SALE with the special promo code.

The SALE will only last for a few days so BE PREPARED to order the instant you get my email.

#2 Roofing RIPOFF Book Update

I've been teasing you for months about my expose' book that tells you about the defective asphalt roof shingles debacle that's happening all across the USA and Canada.

The book has been FINISHED for weeks. I couldn't publish it until I had filed for a patent. You see, as I was writing the book, I stumbled across a discovery evidently no one else in the world has made before.

It turns out my invention will enable you to extend the life of new, or NEWER, asphalt shingles by decades.

Yes, if you just installed a new asphalt shingle roof in the past five years you'll WANT TO KNOW about my discovery.

The good news is I officially filed the patent application just after lunch this past Friday. It was a surreal feeling to have it done.

I never in my life ever thought I'd have a patent. This one is going to be a game changer and it will send shock waves through the roofing industry as well as the building and remodeling fields.

I believe I'll be able to release the book now no later than June 1st. Since you're a subscriber, you will be given a discount on the book the first week, so once again, WATCH FOR THAT. Be sure to open all future newsletters.

#3 Installing Shingles DVD

You may have been one that's pre-ordered my Shingle Installation DVD. It was due out months ago.

Once I get the Roofing RIPOFF book out the door the week after I get back, I'll be working on that DVD.

Here's the good news. That DVD has spawned an additional NEW DVD.

I have to build a small roof close to the ground to be able to create the Shingles DVD. That means I might as well create a DVD showing you how to:

  • frame a simple gable roof
  • frame a simple hip for a roof
  • frame a simple valley
  • frame an overhang with lookouts

If you've ever wanted to discover the secrets of roof framing, and it's not really that hard, you'll want to get this DVD.

Both DVDs will be professionally produced and come in a beautiful DVD case with artwork.

I'm not going to put the Roof Framing DVD on sale until the videos are COMPLETE. You'll know about this by the middle of June.

I still have the Shingles Installation DVD at the special PRE-ORDER price if you want to order it.

CLICK HERE for that. You can save $15 now by ordering it BEFORE I raise the price.

New Columns and Videos

Here's some new content at the website:

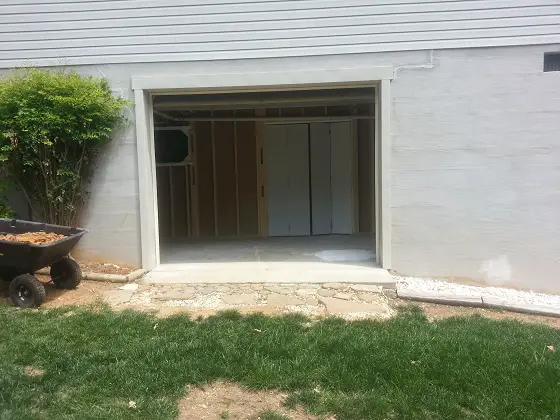
Install New French Doors - Secret Flashing Tips

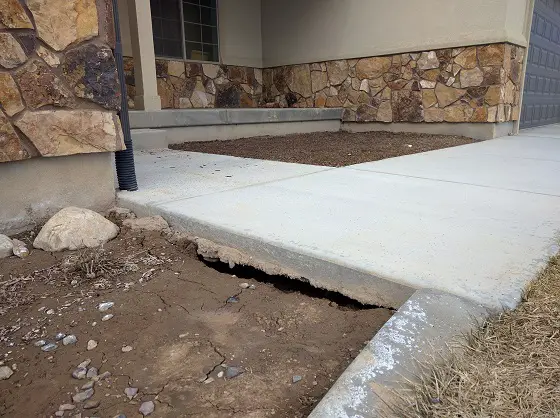
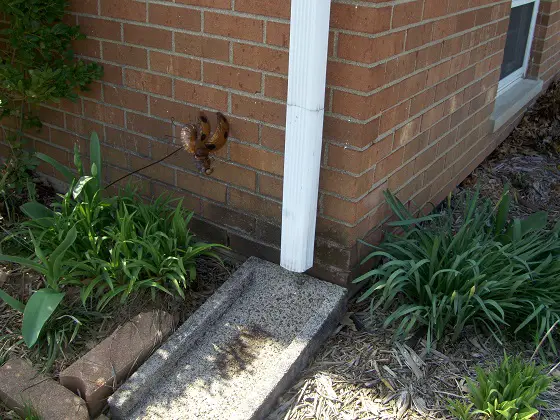
Downspout Drainage Best Practices

VIDEOS:

Bath Remodel - Part 3 Install Shower Drain

Bath Remodel - Install Gravel Under Drain

Bath Remodel - Install Spray Foam Insulation

Okay, I've got to go pack.

I'll have the Stain Solver SALE info to you by the end of the week.

Tim Carter
Founder - www.AsktheBuilder.com

Do It Right, Not Over!

Downspout Drainage Solutions

DEAR TIM: My home is less than two months old and I already have a problem with my downspout drainage. Where the sidewalk comes up to my front porch a black corrugated plastic pipe extends through the concrete. The soil under the sidewalk has now eroded and each time it rains I can see water bubble up from under the sidewalk. How can this be fixed and what can be done to prevent foundation damage? Is this poor construction or what do you think caused the problem? Stacie N., Eagle Mountain, UT

DEAR STACIE: Oh my goodness! From what I see in the great photo you sent, you’ve got a problem. Rest assured it can be fixed and the contractor should do it at no additional expense to you.

The downspout drain line under the sidewalk is leaking and causing erosion and possible foundation leakage. Photo Credit: Stacie Noall

The downspout drain line under the sidewalk is leaking and causing erosion and possible foundation leakage. Photo Credit: Stacie Noall

Every time I see contractors or homeowners use that flexible corrugated black plastic pipe for downspout drainage, I groan. In my opinion, it’s the least favorable pipe to use. Go back in time and look at old homes and you’ll see that contractors routinely used dense clay pipe for downspout drain lines.

Yes, this was in the day before plastic was invented, but the contractors knew that water should pass through substantial pipes and last generations, not weeks. The clay pipes had their own set of problems in that roots could get into the joints and clog the pipes and if the pipes were not installed perfectly with solid fill under them, they’d crack and collapse.

I’m a fan of plastic downspout drainage lines, but not the flimsy black corrugated plastic. For many years I used a stiff plastic pipe that was rated for sewer lines. It was called SDR-35. That designation may have changed, but while the plastic was not as heavy as schedule 40 PVC, it was somewhat close.

What I liked about this SDR-35 pipe is that the pipe came with self-sealing hubs that had built-in rubber gaskets. The end of one pipe would slide into the wider end of another one and the rubber gaskets provided a leak-proof connection that was also impervious to tree roots.

Don’t confuse this SDR-35 drain pipe with a cheap flimsy white plastic pipe I sometimes see at home centers and big box stores. To get this higher-quality downspout pipe you probably need to visit a plumbing supply house near you that sells products to plumbers.

You’ll be able to purchase fittings that make 90 and 45-degree bends and even other fittings that allow you to connect two pipes into one. These fittings can be glued to the pipe using standard PVC cement and primer. The finished fit is tight and will not leak nor allow roots to enter the pipe.

In your case my guess is the black plastic pipe may have collapsed and cracked very close to the foundation of your home because it was laid over the top of un-compacted fill material that was dumped in next to your home’s foundation. As the ground settled, it put stress on the pipe causing it to either collapse or crack. It’s very important for downspout drain lines to be placed in compacted fill or to be placed in undisturbed soil that’s beyond the hole that was cut into the ground for the foundation.

Here are a few tips to help make sure your downspout drain lines are installed properly and will last generations. The lines need to be installed very much like the plumbing drain lines in your home that might be under a basement slab. The pipes need to slope so they have about 1/4-inch of fall per horizontal foot of run.

If the pipes need to change direction under the soil, never use more than a 45-degree angle. If you need to create a 90-degree bend, then combine two 45-degree bends spaced perhaps a foot apart. Sharp 90-degree bends can be used where a pipe ends near the foundation wall to turn up to capture a metal downspout. The reason you want to use 45-degree bends in all the other locations is they make it easy for a metal drain-cleaning snake to pass through the pipe.

The downspout drain lines need to extend to the lowest part of your lot or at least 50 feet away from your home. You don’t want roof water to exit a downspout and just fall onto a splash block. This amount of water pooling next to your foundation can cause all sorts of foundation issues and leaks into a basement or crawlspace.

Splash blocks don't do much to channel water away from the foundation. © 2017 Roger Henthorn

Some cities or towns require you to connect the downspout drain lines to storm sewers. This is a great idea if they’re available. If not and you live on hilly terrain, you can prevent erosion from the water exiting the pipe by allowing it to flow over larger stone that are about the size of pineapples.

You may be tempted to harvest the rain water coming from the pipes for use in your garden or for some other purpose. Be aware that some states have laws that don’t allow you to do this. Check to make sure what you can or can’t do with the water that falls from the sky.

Finally, do yourself and the future owners of your home a favor. When the trenches are dug for your downspout drain lines take numerous photos of the open trenches with the pipes installed so everyone knows where the pipes are once buried. Print the photos or put them on a flash drive and put these in a labeled waterproof plastic bag stapled to the board next to your circuit breaker panel. You’ll never regret knowing where the pipes are!

Column 1142

French Door Installation Instructions

DEAR TIM: I’ve got a walkout basement garage door I want to convert to a gorgeous french door. I realize I need to shrink the size of the opening to create the correct rough opening for the new door. But that’s the extent of what I know. What other installation instructions can you give me so the door doesn’t leak and it lasts for generations? I’m doing this myself and need your expert guidance. Glenn K., Loudon, TN

DEAR GLENN: This is an ambitious, but doable, project assuming you have the correct tools. Looking at your great photo that you sent I can tell you that I only see two possible trouble areas that could stump the average serious DIYr.

This is an open garage door the owner want to switch out for a french door. It’s not that hard to do. Photo Credit: Glenn Kanak

This is an open garage door the owner want to switch out for a french door. It’s not that hard to do. Photo Credit: Glenn Kanak

You’re wise to already realize that water is your enemy. Just yesterday, I did a phone consult with one of my website visitors who had a serious wood rot problem because an exterior door was not installed properly and the threshold was rotting. The wet wood also had become a nesting spot for carpenter ants.

Fortunately you’ve got a concrete slab that will be under the door, but even with that you could have serious moisture problems. One thing I can tell you is to avoid any advice where someone tells you to rely on caulk. Caulk, in my opinion based on decades of experience, should never be the primary thing to rely on to stop water infiltration.

Your water problems are along the top and bottom of the entire opening. As I look at your photo, I see that the existing trim that surrounds the garage door is laying on top of your concrete block foundation. There’s exposed concrete block above the trim extending to the siding that covers your house walls.

You’re going to have to install a large piece of continuous flashing that will cover the block and slide up under the first course of the siding. This flashing will then be bent so it covers the top of the door trim and then bends downward again to cover the top one-half inch of the door trim. You can use a piece of aluminum roll stock if you want for this flashing. You might have to hire a siding contractor to use his metal-bending brake to make this custom piece of flashing in about ten minutes.

You also need to make a decision about where you’re going to place your wall framing in the oversized opening. My guess is that you’re going to want to line up the inside of the wall framing to any wall studs or furring strips that may be on the inside of the concrete block walls.

If you align the wall with the inside and you use 2x4s or 2x6s as your wall framing, you then have additional potential water issues where the exterior of this wall contacts the concrete block wall or the wood trim that appears to be covering the block. Once again, you can’t rely on caulk to seal this contact point for 20, 30, 50 or more years no matter what the warranty on the caulk tube reads.

You may need to rely on the siding contractor with the metal-bending brake to make additional custom pieces of metal that wrap around the offset created by the thicker concrete block and then eventually laps onto your new frame wall. This metal would have to have a hemmed edge where it laps onto your new framing to prevent water from seeping sideways.

A hemmed edge on metal is where the metal makes a 180-degree bend over onto itself, but it doesn’t touch itself. The overlap on the metal should be about one-half inch and the gap between the overlay should be about 1/8 inch. Water attempting to go sideways is stopped by the overlap and is directed to go down to the ground.

All of the flashings you install need to act like the siding on your home that is above the new door or the shingles on your roof. Note how each piece of siding or each shingle overlaps the one below. When gravity pulls water down across the roof and siding this method of overlapping prevents water from entering your home.

The primary, and first, flashing that needs to be installed is a giant one that will be under the entire wall you build. This flashing needs to create a pan that collects any, and all, water and redirects it to the outside over the outside edge of the concrete slab that extends from the basement out through the garage door opening.

I’d make this flashing out of sheet lead that you can buy online. The back edge of the lead must lap up about 3/4 inch onto the bottom plate of the treated wall plate you’ll use for the wall. This flashing must extend past the inside plate by the same distance that your new door extends past the inside face of the wall. This is usually 1/2 inch. This needs to happen so the flashing just touches the inside face of the door threshold.

This base flashing is the foundation to your entire door project. It will keep water from flowing into your basement. The side wall flashings drop down into this base flashing so any water they collect can be channeled to the ground outside the concrete block foundation.

Be sure you use a weather barrier fabric or traditional felt paper to cover the wall sheathing to protect it from wood rot. Think as you build so that you do everything possible to keep water from getting to any wood framing or under it.

Column 1141

DIY Shed AsktheBuilder Shed Floor Nailing Tips Video

Tim Carter shares some tips about nailing down a shed floor. It's important to keep the spacing of the nails about 8 inches on center. Carter prefers red chalk because it's more visible.

For more DIY Shed building tips and information and to purchase the actual plans for the shed in this video, click the following links:

SHED PLANNING: https://www.askthebuilder.com/how-to-plan-a-shed

SHEDS for STORAGE: https://www.askthebuilder.com/storage-sheds

GARDEN SHEDS: https://www.askthebuilder.com/garden-sheds

SHED RAMPS: https://www.askthebuilder.com/shed-ramps/

ACTUAL SHED PLANS: http://go.askthebuilder.com/plans

DIY Shed AsktheBuilder Shed Floor Plywood Layout Part 2 Video

Tim Carter shows of the finished shed floor plywood layout. Each row is staggered 4 feet from the row before. This adds to the overall strength of the floor system.

Be sure to provide the spacing between sheets of plywood for expansion and contraction if you're worried about it. In Carter's case, he use treated plywood and the shed will be dry because of the closed-cell foam insulation. This means the floor will not expand and contract like roof sheathing.

For more DIY Shed building tips and information and to purchase the actual plans for the shed in this video, click the following links:

SHED PLANNING

SHEDS for STORAGE

GARDEN SHEDS

SHED RAMPS

ACTUAL SHED PLANS

DIY Shed AsktheBuilder Shed Floor Plywood Layout Part 1 Video

Tim Carter shows how to layout the first piece of plywood for a DIY shed floor. It's vital that you have the floor joists square and that you chalk a crisp line that's the width of the plywood.

The first piece of plywood must be put along the chalk line with the corner of the plywood at the exact corner of where the floor joists meet. Each subsequent piece of plywood builds off the first one.

For more DIY Shed building tips and information and to purchase the actual plans for the shed in this video, click the following links:

SHED PLANNING: https://www.askthebuilder.com/how-to-plan-a-shed

SHEDS for STORAGE: https://www.askthebuilder.com/storage-sheds

GARDEN SHEDS: https://www.askthebuilder.com/garden-sheds

SHED RAMPS: https://www.askthebuilder.com/shed-ramps/

ACTUAL SHED PLANS: http://go.askthebuilder.com/plans

DIY Shed AsktheBuilder Leaky Shed Floor Video

Leaky Shed Floor Video

Tim Carter shows a very critical detail on the DIY shed floor so you don't end up with a leaky shed floor.

It's important to cut away part of the floor joists where the overhead garage door will be so driving rain does not leak under the door into the shed.

For more DIY Shed building tips and information and to purchase the actual plans for the shed in this video, click the following links:

SHED PLANNING: https://www.askthebuilder.com/how-to-plan-a-shed

SHEDS for STORAGE: https://www.askthebuilder.com/storage-sheds

GARDEN SHEDS: https://www.askthebuilder.com/garden-sheds

SHED RAMPS: https://www.askthebuilder.com/shed-ramps/

ACTUAL SHED PLANS: http://go.askthebuilder.com/plans

April 19, 2016 AsktheBuilder Newsletter

I've been more than a little busy. How about you?

What follows is a tip that could save your life or that of a loved one.

I'm getting deeper and deeper into my one hobby - amateur radio. Yesterday I had a brief conversation, we call it an exchange, with Gennady in St. Petersburg, Russia.

Two things may interest you. First, I was sending and receiving Morse code. Second, I was only using 5 watts of power. That's the power used to make your tiny night light glow in your bathroom or hallway.

Since summer is just about upon us, you're going to start to see more stories in the news about people that get lost in the wilderness and either die or are rescued days later just barely alive.

What if I told you that that you could have a small radio, about the size of a deck of cards, that costs less than $40 that you can use to get help?

This radio is ten times more powerful than your silly cell phone. Have you ever noticed your cell phone rarely works once you're away from the road?

This tiny radio WILL WORK, and work well if you can get up high on a hill. You can program it to connect to other radios where you're traveling.

To operate it, you just need a simple Technician's license that takes about 8 hours worth of studying.

You should give this serious consideration if you do plan to be in the wilderness.

If you want to discover how easy it is to use these radios, I suggest you contact your local amateur radio club. They will GLADLY help you.

Just go to Bing.com or Google and type in your city or town name followed with amateur radio club.

For example:

buffalo amateur radio club

.
CLICK HERE to see if you knew how to keep your outdoor shed from BLOWING across your yard during the next windstorm!!!
.


Speech Time - University of Cincinnati

I was invited to give a speech at the University of Cincinnati in five months. I'll be on campus on September 30, 2016.

You can count on me doing a meet up before or after my speech. I believe the speech will be open to the general public in case you want to attend. As I get more details I'll share them here.

Create a Finished Doorway in Concrete Block

Jeff Selvidio lives in Largo, FL and hired me to help him with a project at his home.

While this is somewhat rare, you may be faced with a similar problem and it might be a brick or rock wall.

CLICK HERE to read what I told Jeff to do so he could create a sleek drywall doorway opening in a concrete block wall.

Stain Solver SALE

We'll be having a sale on Stain Solver next week. This Friday we'll be starting a manufacturing run.

Stain Solver is blended and orders are filled at a facility in Chicago. We used to do it ourselves, but the business grew too much and it was better to have it outsourced.

The problem is we have to FORECAST what we might sell in each size for several months in advance. No matter what we try to do, we never get it right and we sell out of certain sizes faster than others.

The minimum manufacturing run is TEN TONS. So we can't just fill random containers as orders come in like we used to do a few years back.

Stain Solver is a Certified organic oxygen bleach that Kathy and I started to make and sell about twenty-three years ago.

It cleans just about anything water washable. CLICK HERE and look at some of the amazing before and after photos sent in by users just like you.

CLICK HERE for my all-time FAVORITE Before and After photo and story.

Bath Remodel Progress!

Well, the stud walls are up, the new Broan bath fan with Sensonic stereo speakers is installed, and I'm days away from installing the drywall!

Here are a few videos for you to watch to catch up to where I am.

Concrete Slab Removal Tips

Relocate Shower Drain Part One

Relocate Shower Drain Part Two

Install New Shower Drain Part One

Install New Shower Drain Part Two

That's enough for today.

I'll be back on Friday.

Tim Carter
Founder - www.AsktheBuilder.com

Do It Right, Not Over!

DIY Shed AsktheBuilder Foam Insulation Floor Joists Part 2 Video

Foam Insulation Floor Joists Part 2 Video

Tim Carter demonstrates how to slide closed-cell foam insulation in between floor joists. You want it snug, but not too snug.

If you cut it too tight, it will cause the floor joists to get out of alignment. A table saw is an excellent tool to cut the foam to the perfect width. Small bits of foam will cover your body and clothes.

For more DIY Shed building tips and information and to purchase the actual plans for the shed in this video, click the following links:

SHED PLANNING: https://www.askthebuilder.com/how-to-plan-a-shed

SHEDS for STORAGE: https://www.askthebuilder.com/storage-sheds

GARDEN SHEDS: https://www.askthebuilder.com/garden-sheds

SHED RAMPS: https://www.askthebuilder.com/shed-ramps/

ACTUAL SHED PLANS: http://go.askthebuilder.com/plans

DIY Shed AsktheBuilder Foam Insulation Floor Joists Part 1 Video

Tim Carter demonstrates how to install foam insulation in floor joists for a DIY shed. To prevent the foam from falling out, Carter cut custom support blocks using scrap pieces of treated plywood.

He then built a simple jig that slides over the top of the floor joists to use to ensure the blocks are installed at the correct height.

For more DIY Shed building tips and information and to purchase the actual plans for the shed in this video, click the following links:

SHED PLANNING: https://www.askthebuilder.com/how-to-plan-a-shed

SHEDS for STORAGE: https://www.askthebuilder.com/storage-sheds

GARDEN SHEDS: https://www.askthebuilder.com/garden-sheds

SHED RAMPS: https://www.askthebuilder.com/shed-ramps/

ACTUAL SHED PLANS: http://go.askthebuilder.com/plans