Tim Carter tests the Brother P-touch Home and Office Labeler. He found it works great for making labels for his tool boxes and parts bins. It can handle a variety of fonts and colors.
I've been sort of AWOL from your Inbox.
Life is nutso right now for me as I get ready to:
If you're a new subscriber, I've done expert witness testimony for years on civil cases between homeowners and builders.
I was hired by the owners of the building that houses the Brazilian Embassy in Antigua to testify on their behalf about serious flaws in their roof.
On May 14th, I fly to Antigua out of JFK in NYC, and I'll be back late afternoon on the 21st.
I'll do a newsletter while I'm down there and fill it with photos of this magical Caribbean island.
. |
CLICK HERE NOW to get a Certified Organic Deck Cleaner |
. |
mrBEAMS LED Spotlight Review
I did a product review of a pretty cool battery-powered exterior spotlight. You should probably read it. CLICK HERE.
Gutter Covers Column
Did you know I tested just about every gutter guard known to man and woman over a ten-year period?
What do you think my test results uncovered?
The answer is in a new column I just published today.
Go read about Gutter Covers.
When Should You Scrape?
How bad does a cabin or house have to be before you decide to scrape it and start over?
You may find this recent column fascinating as I walk you through what I think about in that situation.
CLICK HERE to be enlightened!
Check out the May 7, 2015 Newsletter Correction regarding the title to this story!!
NEW VIDEOS ! ! !
Over the next few days I intend to tape the following videos:
If all goes well, I'll be sharing all these before I leave for Antigua.
Be SURE you open all future editions of the newsletter so you don't miss them!
I'll have an issue for you on Sunday.
Tim Carter
Founder - www.AsktheBuilder.com
Do It Right, Not Over!
A week ago I installed two of the mrBEAMS 360 LED spotlights.
The ones I put in were white, but you can get them in dark brown too.
These exterior spotlights are:
These lights were a breeze to install. I had them up and working in just minutes.
When I first installed the batteries in my kitchen after unpacking them, I thought they were broken as the lights didn't activate.
I soon figured out that the on/off switch only works when daylight disappears and it's twilight or dark. This is a good feature to preserve the battery power.
I set the dip switches so both lights would be on the same network and sure enough, when you walked near one, both lights came on.
I was slightly flummoxed by the inferior instructions. The way they show to install the batteries is WRONG.
You can clearly see in the illustration all the positive terminals are UP. Photo credit: Tim Carter
The illustration clearly shows to put the positive terminal of the batteries UP. You have to put one of them down and you better get it right since the case is a triangle. It's not as easy as it appears. Realize the spring always goes on the negative side of the battery.
The light broadcast by the lights is not bad. With both of them on, it does produce plenty of light to illuminate my entire apron area in front of my garage doors so I can walk safely from my truck to my house. I'd say the square footage of the area is about 900 square feet.
I love the wireless capability so you can put these on different networks.
You can also have many of them and not turn on the connection mode at all. Leave the dip switches off and each light works independently. This might be a great way to illuminate a long walkway so long as you make sure you have the motion detection cones overlapping. That might take some adjustment.
DEAR TIM: I've inherited a family cabin at the western boundary of the gorgeous Allegheny National Forest. It's got major roof and foundation issues. Where should I start with repairs? I do plan to spend lots of time here and the interior is in as bad a shape as the exterior. Do you feel this building can be salvaged or should I just start over? How do you make the determination and what are all the things one should consider before deciding what is the best course of action? Brian G., Tionesta, PA
DEAR BRIAN: Oh my, based on your photo of the exterior I don't know if I want to see the interior. There's no doubt you've got a serious foundation defect, and the roof looks like something out of a child's book about a fairy tale house deep in a damp forest.
As you might imagine, I've rehabilitated and restored some buildings that were in sad shape. My first house had a gaping hole in the roof you could climb through and was quite outdated. However, its foundation and all the wood framing, siding and windows were in good shape.
Without even visiting this site, the photo tells me this camp house is beyond repair. It would make better sense to start over with a new camp house kit. Photo credit: Brian Garling
My gut is telling me that you're a perfect candidate for a new camp house kit. Many camps are very simple rectangular buildings that are easy to build and cost efficient because they are designed to have virtually no waste.
In my opinion, the way you approach a decision, like the one you're facing, is to step back and think about what's really important to you, your family and any guests that may stay at the camp.
Here are some questions I'd answer honestly:
When you're at the camp, do you want to spend each visit working on a Honey-Do list or would you rather go on a hike or relax in a hammock?
Are you interested in energy efficiency and minimal costs to heat the camp should you decide to use it year round?
Are you concerned about safety and creature comfort? What are your goals for potential resale or for future investment?
I think you can see where these questions are headed. You should be thinking of other things than just the repairs. The repair or rebuilding of this camp involves lifestyle issues.
Here's what my experience has taught me about massive restoration projects that you're facing. It often takes much more work to try to transform structures that have countless defects than it does to just work on top of a level, square sound foundation.
Think about the condition of the mechanical systems in this old haggard camp. The tilted walls have put all kinds of stress on electrical cables. I've seen house fires caused by this. These same stresses may have put strain on plumbing water and drain lines that are now ticking time bombs. Fuel lines could be stretched and hazardous.
My suggestion, assuming your local zoning laws permit this, is to tear down your existing building and invest in a new camp house kit home. I feel at the end of the day you'll save money doing this because you've got so many unknowns when it comes to what latent defects that are lurking in the walls, under the floors and under the roof.
With a new camp house, you'll get the utmost in safety, you'll have low utility bills and you'll have a splendid retreat that will bring a smile to your face each time you come to spend time in the forest.
I'm fortunate to live next door to people that have similar camp houses. I've seen the dread that some have who are constantly dealing with rotted wood, a never-ending list of tasks facing them and constant drain of money.
I've also got neighbors who's camps are new or newer and each weekend they come up and immediately jump into their kayaks or get out their fishing poles. Their camp houses are comfortable, cozy and look superb.
If you decide to scrape the existing camp and go with a new kit, be sure to make great decisions about the room sizes and what you want in the new structure. Think about 9-foot ceilings, generous overhangs and how your family might grow as time goes on. You want to make sure there's enough room for all when everyone sits down to enjoy a meal and people are not cramped up against the table or against a wall.
Be sure you keep in mind floor surfaces made to take abuse or not show dirt or wear. A camp is a camp, not a museum. Think about rustic materials that will look fantastic.
I also urge you to give serious consideration to radiant floor heating. It's so comfortable in the winter and you'll never regret having it. Think about low-maintenance everything because you want to enjoy your time you spend there. Stay focused on what you want to do when you're at the camp. Let that be your North Star as you make your final decision.
Column 1090
Ken Morris has lots of water puddles on his stamped concrete patio in Phoenix, AZ.
He thought of an idea on how to solve it, but I believe I have a much better solution.
Here's what he sent to me:
"My patio was poorly designed. You can see from the picture I get standing water and want to devise a channel drain system here.
The channel drain would be 24 feet long. Is this an issue because it seems like I would have to have a 6 inch drop from one end to the other? What would you do with the existing concrete/slate on top?"
That's some puddling. What a shame the installer of the stamped concrete didn't put in the proper slope to ensure this doesn't happen. Photo credit: Ken Morris
Ken, you're right, for a channel drain to work, it needs slope and fall.
I've got a better idea and it's easier to disguise.
I'd just drill 1 and 1/4-inch holes in the concrete down to the undoubtedly sand and gravel fill under the patio.
I'd fill these holes with rounded gravel that matches the color of the stamped concrete as close as possible.
The water will drain once you get down to the natural sand and gravel that makes up 99.99999 percent of Phoenix!
Sandra Schumacher lives up in the land of billions of barrels of oil better known as Bismarck, North Dakota. She's got a problem with here patio because it slopes towards her house. Allow her to explain.
Train season is here. Tomorrow, May 2nd, I'll be attending the annual FRA Rules refresher class.
If you're a newer subscriber, I got a once-in-a-lifetime part-time job last summer.
Yes, a real conductor on a real full-sized train.
CLICK HERE to see my magic hat and the bow tie that makes women swoon. Kathy just rolls her eyes and shakes her head. She thinks I'm delusional.
Maybe she's right! 🙂
My first trip this season is May 24th.
Congratulations to our winners! Fourteen people picked April 29, 2015, as the day all the snow and ice would be gone from my cul-de-sac.
Three winners were picked using the random number generator at random.org.
Come on down!
Your small bottles of Stain Solver will be shipped to you today!
Thanks for playing!
I just wrote a fast column for the Washington Post about the CORRECT way to clean a deck.
In that column I mention that the WORST thing you can use is chlorine bleach. The fancy name you might see on a product label is:
sodium hypochlorite
NEVER use that. It's toxic to trees, plants, grass, etc. It also accelerates the corrosion of all the important metal fasteners, bolts, joist hangers, etc. that hold your deck together!
The SECOND WORST thing you can use on your deck I talk about in the following video.
Watch this video that's a little corny.
BOTTOM LINE: Clean your deck with Certified organic Stain Solver Oxygen Bleach.
It's ON SALE now for just three more days.
Use the promo code:
125DECK
for a 12.5% discount and FREE SHIPPING! Minimum $40 purchase required.
I decided to just create a Sales Page at my site that has all my eBay listings.
If you're new to the newsletter, I moved my office in the past few weeks and I decided to PURGE lots of stuff I've accumulated. There are some amazing deals to be had.
Here's what's for sale now on the page and the auctions END on Sunday! Act Fast!
CLICK HERE to see what's for sale.
. |
CLEAN Your Deck with Certified Organic Oxygen Bleach |
. |
I've got some pretty good new questions and answers from homeowner just like you.
I hope you enjoy reading these short articles and discover something new about how to maintain your home or solve mysteries!
Kevin's NO-NO Washing Machine Vent Pipe - DRAWING!!
Kelsey's MUSTY Shower Smell Source
Cleaning DARK Stains on Stucco - Diesel Soot - Yes!
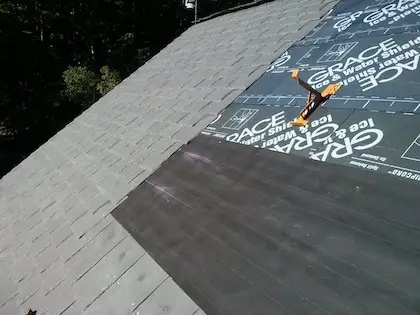
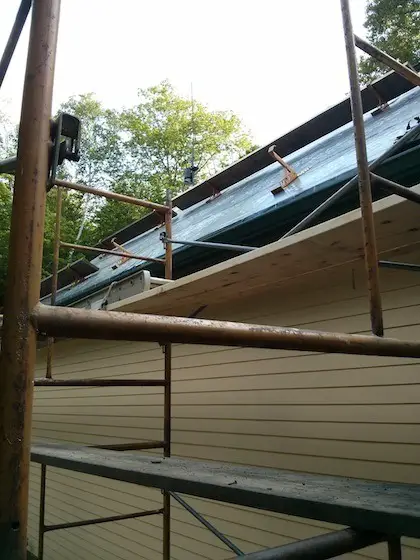
Garage Roof Repair and Restoration
That's enough for this issue.
Have a great weekend.
Tim Carter
Founder - www.AsktheBuilder.com
Do It Right, Not Over!
In April of 2015, I decided to move from my larger basement office up to my cozy man cave ham radio shack.
I had been putting it off for years, but many many possessions were just gathering dust.
Here's the reality. Why hold onto something you don't use anymore if you can SELL it and use that money to buy something you want?
BINGO. You get to enjoy stuff that I no longer want nor need.
This list CHANGES every few days. I have most of my ebay auctions scheduled to end on Sunday nights.
I'm ADDING stuff all the time to the list, so you should just come back here often.
CLICK the links below to see AMAZING photos of the things for sale. No need to put them up here.
Briggs & Stratton Navy Blue Logo Polo Shirt XL
Briggs & Stratton Gorgeous Green Logo Polo Shirt XL
Briggs & Stratton Tri-color LOGO Baseball Hat
Briggs & Stratton Black Logo Men's Vest
EcoDRAIN Heat Exchanger - Retails for $350+ HUGE DEAL
National Geographic Hiking Digital Barometer, Hygrometer, Thermometer Clock
One-of-a-kind WOODEN Cowboy Hat - JET logo
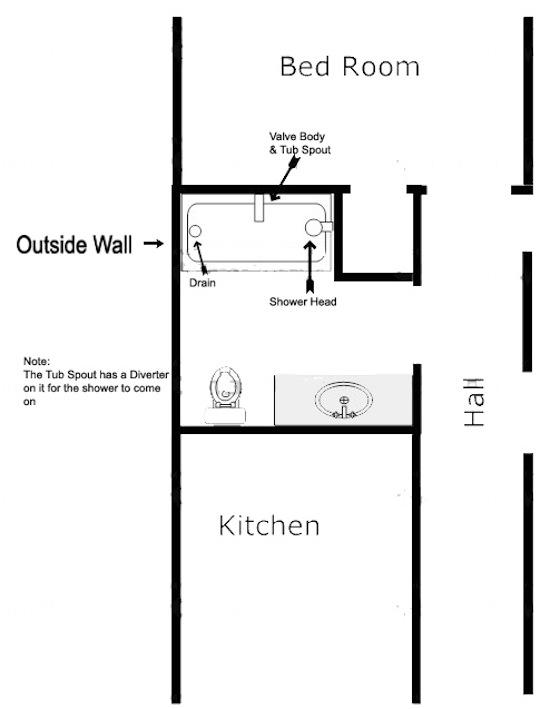
Kelsey Rogers has a musty smell when anyone takes a shower in her Chattanooga, Tennessee house. Here's the situation:
"For about the last two weeks in our home we have had a mysterious mildew/musty smell.
Usually the time we smell it is during or right after someone has taken a shower or bath. We can smell it in both bathrooms and in one bedroom which are coincidentally all on the same wall of the house.
We're lost as to what it could be. Is it the pipes, the walls? There's no evidence of anything happening other than the strong mildew smell. Please help! Thank you!"
I know exactly what the problem is.
Kelsey, you have biofilm, mold and mildew on the drain pipe(s) that exit your shower or tub.
The smell happens when you take showers because the water releases mold spores as it flows down to the sewer. The release of the spores is achieved by a pressurized gas and this gas is what smells.
To get rid of the odor, all you need to do is clean the side walls of the drain pipes with a bottle brush.
If you just have a standard floor drain in a shower, it's easy. Take off the metal grate, run water and use a bottle brush to get rid of all the black goo until the pipe walls and everything is clean.
If you have a standard waste and overflow in a tub, you need to take off the overflow cover and get the stopper out of the drain. Then you get a long bottle brush to go down the overflow tube until you get down to the trap. A short brush works to get the floor drain pipe clean.
I GUARANTEE the odor will go away once you do this. You can clean the p-trap really well using my Stain Solver Certified organic oxygen bleach.
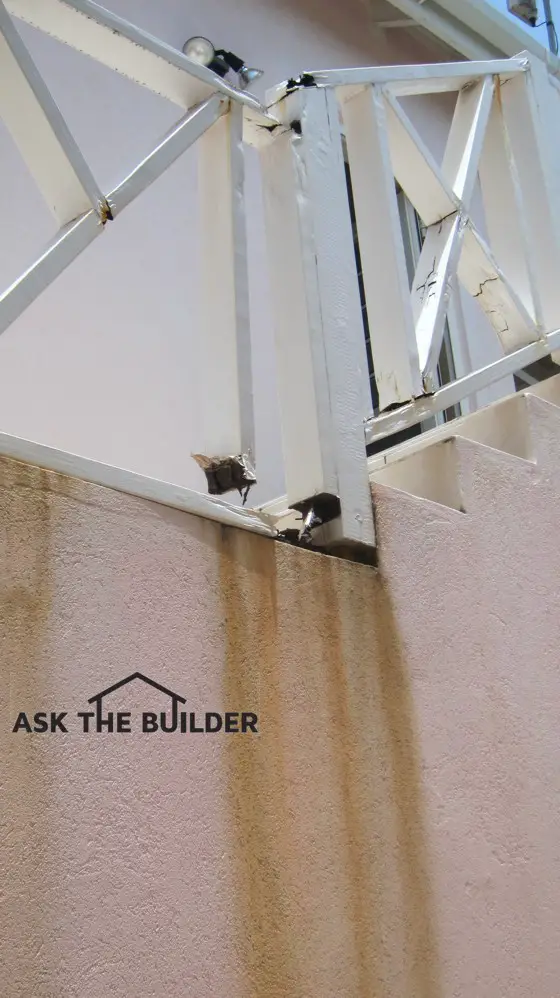
Faith James has a nice home in Dallas, Texas. But now there are some ugly dark stains coming down from the roof onto her stucco.
Here's what she sent me:
"Hi, Tim,
After snow and rain I noticed black streaks down the front of my stucco home, coming from either the roof or the gutters.
Please look at this photo I took:
You can see the staining starting up at the parapet ledge. Photo credit: Faith James
I have a roofer coming out to see which it is, but can you tell me how to clean this stain?
Sorry I can't get on top of the house to see where its coming from."
Guess what? I'm 99.999 percent sure I know the cause of the stains, Faith!
The biggest clue is you told me where you live - near a big city.
I'm quite confident if you were to pay to have a lab analyze the stain, much of it is just diesel engine soot.
I used to have the same problem on the painted siding of my home in Cincinnati, OH. Each year I'd have to wash off my house and I traced the black stains and grim to all the truck traffic on the nearby interstate highways and normal urban traffic of heavy trucks.
You can clean off the stains and restore the stucco to like-new appearance with my Certified organic Stain Solver oxygen bleach.
The Stain Solver is NON-TOXIC and it will not hurt any of your great landscaping like chlorine bleach will. Don't use chlorine bleach or ANY product that says it contains sodium hypochlorite.
It's a powder you mix with warm or hot water and you spray it on the stucco with a hand-pump garden sprayer.
You work in the shade and saturate the stucco with the solution for 15 minutes. You then lightly scrub it with a brush, rinse and it should look fantastic.
I sometimes add a squirt of liquid Dawn dish soap into the Stain Solver solution.
If you've ever had to cut through cast iron pipe, I have as I'm a master plumber among other things, then you know that traditional metal blades on reciprocating saws are just about useless.
The Diablo Game Changer carbide-tipped recip blade is simply amazing. It can cut through an 1 1/2-inch cast iron pipe in about 14 seconds where a traditional blade doesn't even dent it in 3 minutes!
I can't tell you how many traditional by-metal blades I've burned up trying to cut thick metal. You have to go SLOW to keep the heat buildup down.
Heat destroys metal-cutting blades. I've seen the teeth on traditional blades melt and shred.
I'm certain that won't happen with this Diablo blade.
You can cut stainless steel, high-strength alloys, etc. in no time.
This is a blade everyone needs in their toolbox for when you need to cut thick metal fast.
Subscribe to the FREE Ask the Builder newsletter to receive professional advice for your home. Complete the form below and each week you'll get:
Unsubscribe at any time. We respect your email privacy.