Chimney Top Construction Tips

DEAR TIM: My chimney needs some tender loving care. I had a few contractors come to assess the repairs, but none of them made me feel very comfortable. They all talked about how my chimney top, some called it a crown, was in bad shape. What they disagreed on was the method to repair it. Each contractor has a different solution. If you were going to repair or rebuild the top of your chimney, what would you do? Wanda M., Gig Harbor, WA

DEAR WANDA: I sympathize with you. The reason you're getting back all the different types of quotes for the work is because you let each contractor drive the bus. If you want really great quotes, you have to provide the contractors with exactly what you want done. The trouble is you don't know what you don't know.

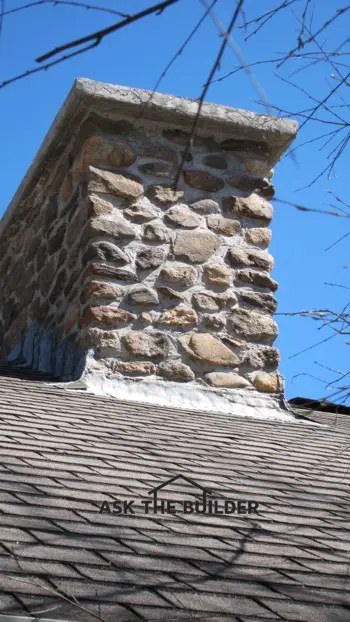
This stone chimney has a properly constructed top or crown. You can even see the drip groove under the overhang. Photo Credit: Tim Carter

The crown or top of your chimney is one of the most important elements of the chimney. The best analogy I can offer is to compare it to the roof of your home. Your roof is designed to keep the inside of your house dry. The top or crown of a chimney is supposed to keep the chimney dry.

Water that seeps into a chimney can cause all sorts of damage, especially if the chimney is exposed to cold weather. The water that soaks into the masonry can and does freeze. Water expands as it freezes, and this pressure works to break the bonds of all the mortar used to construct the chimney.

Many bricklayers build chimney crowns the wrong way. I've seen hundreds of chimney tops that are just made from the same mortar used to lay the brick or stone. In almost every cases I've seen no overhang, no reinforcing steel in the top and no flashing under the crown. It's very rare when you come across a chimney crown built the right way.

For starters, a chimney crown needs an overhang. Most roofs on houses overhang the outside wall. The reason for this is to minimize water flowing down the sides of the house. You don't want water flowing off the top of the chimney down the sides of the chimney. Granted, chimneys, by their very nature, are much more exposed to wind-blown rain than a house. But you might as well minimize the water if possible.

The chimney crown should be made using real concrete, not the mortar mix used for the brick or stone. The mortar mix rarely has any stones in it. The stones in concrete are what really give it its strength.

If the chimney has clay flue liners, the crown or top concrete material should never touch the flue liners. The flue liners get hot from the wood fires, furnaces, boilers, water heaters, etc. below, and they expand. This expansion can crack the top or crown.

The contractor needs to wrap the flue liners in thin foam about three-eighths of an inch thick to isolate the flue liners from the concrete mix. Once the crown is hard, they cut away some of the foam and caulk the gap with special masonry caulk.

Reinforcing steel or mesh needs to be placed in the concrete mix to help prevent large cracks from forming. The top of the crown needs to be sloped so it sheds water.

A groove needs to be made in the underside of the crown overhang all the way around the crown. This groove is a drip edge that stops water from rolling down the sides of the chimney. It should be at least one-quarter inch wide and at least three-eighths inch deep.

Last but not least a flashing should be placed on top of all the brick masonry that separates the chimney top or crown from the masonry used to build the chimney. This flashing is the last line of defense should water make it through the chimney crown.

The flashing can be made from asphaltic-rubberized membranes or metal that is soldered to make one solid piece. The flashing should extend past the face of the chimney on all four sides and be turned down at a 45-degree angle so water that runs off drips out past the face of the chimney.

The concrete used to make the chimney crown or top needs to be cured properly to gain maximum strength. This means it should be covered tightly with plastic for three or four days after it's poured. The mason can also spray on a clear curing compound should he not want to put on the plastic.

Once all the work is complete, it's a great idea to apply a silane-siloxane clear penetrating water repellent on the sides of the chimney as well as the chimney crown. This sealant will really help keep wind-driven rain from getting into the chimney.

You can watch an informative video that shows how to find a professional to repair a chimney at www.AsktheBuilder.com. Just type "chimney repair checklist" into the AsktheBuilder.com search engine.

Column 932
Loop Vent Video

Loop Vent Video

Hi, I'm Tim Carter and I want to talk a little about loop vents. What a loop vent is a plumbing vent and drain system that would be used in a kitchen island, or where a typical plumbing fixture isn't up against a wall so that the vent can't be run to the roof.

In those cases, you have to install a loop vent. The important part of the loop vent is the way it works and gets connected back to the plumbing system and how it gets air. You need to understand that, as the is the trouble. But you can install a loop vent like this that will meet code and work perfectly.

Some plumbers will tell you to forgot loop vents and just install a mechanical vent. However, any thing mechanical will eventually malfunction. That is a problem. A loop vent system uses gravity, physics and Mother Nature to work. So it won't malfunction.

If you want to know more about loop vents, click here to go to my AsktheBuilder.com Store. You know how that works. I am going to give you some information and in return you have to give me something back in the purchase price of the AsktheBuilder Answer How to Make a Plumbing Loop Vent document.

This document will provide you with plumbing diagrams of a loop vent, a FULL video showing you the entire loop vent setup and text describing the science as to how a loop vent works.

April 17, 2012 AsktheBuilder Newsletter & Tips

It was an epic day at the Boston Marathon. If you're a new subscriber, I'm a ham radio operator. Approximately 117 other ham operators, and I, worked the race providing mission-critical communications behind the scenes. It was record heat with a searing temperature of 87 F. Based on what I saw in an article on USA Today, yesterday was one degree hotter than in 2004.

The situation was so serious that the race organizers told anyone that was registered this year, they don't have to race. They can just come back next year. The organizers were terrified of mass casualties from runners that were not prepared for the heat.

Runners were dropping from exhaustion like leaves from a tree on a windy autumn day. I was the ham operator at First Aid Station 12 located at 1400 Commonwealth Avenue, in Newton, MA, at mile 18.3. My job was to shadow the station supervisor and call in for ambulances and provide him with any other information.

My next public service ham radio event is the NH Seacoast Bike Ride in May. It's a two-day event on May 19-20, 2012. My call sign, if you're a ham, is W3ATB.


Tip of the Week - Two 16d Sinker Nails Equals ...

If you're trying to anchor a treated 2x4 to a concrete floor, or say a treated 2x2 to a concrete wall for a shelf cleat, you don't need expensive anchors.

You can just use two 16d sinker nails and a hammer. You need to drill a 1/4-inch hole in the wood and into the concrete first.

Then you drive both nails side by side at the same time into the hole. Use nice, firm and square hammer strokes so you don't bend the nails.

You'll be stunned how well this works. If done properly and you have strong concrete, you'll need a crowbar to get the wood off the concrete!

Here's a video showing you how to do it.


Bathroom Remodeling Questions

Are you thinking of remodeling your bathroom, because you can't move? You're not alone.

I'm going to try to demystify the project so you can save lots of money. I can't begin to tell you the number of bathrooms I've remodeled. The last job was at my Cincinnati, OH house. Oh my, when I redid our master bathroom three years ago, it was a monster job. Every plumbing fixture was relocated to a totally different spot! I added a window. I relocated a closet and installed a sweet pocket door.

Please reply to this email with a list of questions you want answered so you can tackle your bathroom remodeling project with minimal help. I'm looking for very specific questions.

Try to avoid asking broad questions like this:

  • How do I install ceramic tile?

Instead, you might ask the parts of a process you don't understand:

  • What kind of glue is used to install ceramic tile?
  • What should the consistency of the wall grout be like?
  • Where do I install blocking for wall fixtures?
  • Where does the fan exhaust to?

You can ask as many questions as you like. I'll have the answers available soon!


Hail Damage

This past weekend, more people died in the mid-section of the USA because of severe weather. Springtime provides all the necessary ingredients for weather conditions that produce massive thunderstorms that create hail and tornadoes.

The AsktheBuilder.com team created a new page at the website with some dramatic photos of hail damage to a tile roof in Nichols Hill, Oklahoma. DaVinci Roofscapes was kind enough to provide the photos for this page.

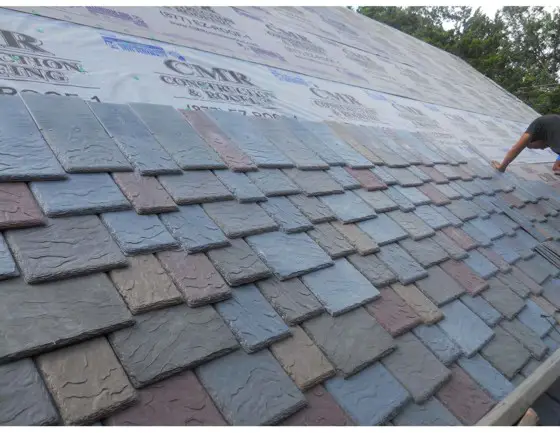
DaVinci Roofscapes manufactures a polymer roofing product that looks like real slate or shakes. It's pretty safe to say hail isn't going to break a DaVinci polymer product.

Lonnie, a subscriber from southern Colorado, contacted me about his asphalt shingle he had put on his house from Malarkey Roofing. It was a shingle that has the Class 4 Impact classification, the highest rating possible.

I have had GAF shingles on all my homes, and they have a Class 4 shingle as well. It's their Timberline ArmorShield II. Most of the major asphalt shingle manufacturers have a Class 4 shingle.

If you're getting ready to install a new roof in a part of the nation that regularly gets large hail, you might want to look into a tough roofing material that can take a beating from Mother Nature.


Burst Washing Machine Hoses Follow Up

Randall Perry, a subscriber, took notice of last week's mention about the burst washing machine hoses. Several other subscribers also contacted me. Many thanks to you!

He wanted me to mention that you could go one step further and install a special valve that automatically shuts off the water supply to the washing machine.

Good catch Randall! Thanks for bringing that up. There are any number of devices that will prevent flooding. Here's just one from WATTS.

Use any search engine and just type: washing machine auto shut-off valve


Before and After - Ground-Level Deck

Mike Rignola is an avid DIYer. I'd hire him in a New York minute if I needed help. Take a look at the superb ground-level deck he built so he could watch fish.

I'd LOVE to feature your Before and After photos. Submit them by clicking here.


New Feature - Cleaning Tip of the Week

Last week, I offered up a cleaning tip to Kathy C. in Pensacola, FL. She needed to know how to remove oak tree blossom stains from her white Honda Acura. I was flooded with requests from subscribers to start offering a tip each week. So be it! In case you missed it, here are the Before and After shots of Kathy's car.

Here's this week's cleaning tip. Are you spring cleaning ceramic tile floor grout? Most people get a migraine headache over the thought of that chore! It's easy! Just mix up some of my Stain Solver Oxygen Bleach with warm water, pour it on the grout lines, let it sit for 15 minutes, and lightly scrub, rinse and you're good to go. A five-pound pail of Stain Solver will be plenty to clean the floors in the average house.


Stain Solver in Your Store!

You could be one of my great customers that want Stain Solver to be put in your local hardware store. I can do it with your help! Let's start up here in the Northeast where I have a connection to a local chain. If you help me get it on the shelves in this chain, then we can march quickly across the nation!

If you live in these states: NY, MA, CT, RI, VT, NH or ME, I need your help now. PLEASE reply to this email and change the Subject Line to: Stain Solver in my Store

Then just tell me quickly why you want Stain Solver in your local hardware store.


Video of the Week - Urethane Paint Video

Watch this video and I'll give you a crash course on the glues in paint. The WeatherBeater ULTRA paint in this video was made by Sherwin Williams. Sears no longer carries paint, but Sherwin Williams makes Duration which is a urethane-resin paint.

Sincerely,
Tim Carter

Patio Paver Tips Video

Patio Paver Tips

Hi, I'm Tim Carter and I want to show you some concrete paver patio stones. You're going to like this.

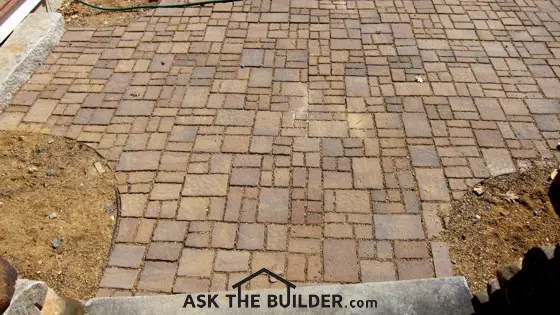
Check out this patio. This patio is still under-construction. These pavers are earth-tone in color and looks like random stones set into the patio. However, these stones are part of a pattern. Some of the stones have a groove in them so it appears that it is two - four separate stones once installed.

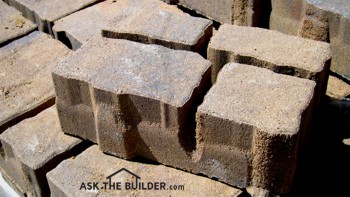
These combination stones have a hole in the center bottom. Why? Once installed you can see the stones that are in the grooves between the stones. The hole in the bottom allows water to drain off into the ground. In the winter, this will keep the concrete stones from busting.

The stones also have lugs on the sides. These lugs are spacing lugs. This allows you to lay the pavers next to each other and maintain the proper spacing.

One other thing, at the edges of the patio, you should install a retention strip. This will keep the stones on the outside of the patio from moving out of position.

Crushed gravel was placed under the pavers before the patio stones were laid. About 4-inches of gravel as placed and compacted for the patio base. It must be angular gravel with some sand in it so that the gravel locks in tightly. On top of this is some medium to coarse sand that is leveled off, then the patio stones are set into the sand. You need to use a plate compacter to run over the stones and drive them down into the sand.

Be beware that the color of the stones might lose some of its color pigment. The finish will dull down over the years.

Tips for Patio Pavers

DEAR TIM: This year a precast concrete paver patio is in my future. I'd like to know any tips you can share about this project. How much dirt do I need to remove? Do the pavers just go on the dirt? How do the pavers stay in place? What can I do to ensure the color of the pavers stays as good looking as the day they're installed? What else can you tell me about the colorized concrete pavers? Christina M., Southington, CT

DEAR CHRISTINA: I can't begin to tell you how many good times I've had with my family on my patios. I say patios, because at my last home, we had two. My wife's favorite was a smaller one nestled under a large maple tree that allowed her to look out across a 30-inch-tall serpentine brick wall I had built. Countless shade plants were at the base and on top of this wall that helped decorate the patio.

I say all this because there's so much you can get out of an outdoor patio if you plan ahead and really visualize what things might look like if you add some other features to the project. At the house before the one I'm describing, I had built a similar patio that had a smaller straight wall with a tiny waterfall and pond. The cascading water sound was so peaceful that I used to fall asleep on a recliner in that magical oasis. Those were the days!

Let's talk about the digging. You'll only need to take out about 5 inches of soil for the patio. That's the total thickness of the concrete paver stone, the bedding sand the stones rest in and the crushed gravel base beneath the sand.

The individual stones of this patio are fooling you. Three or four of each are actually part of a larger block of colored concrete. Photo Credit: Tim Carter

I highly recommend that the finished top surface of the patio is at least 1 inch higher than any surrounding soil or ground. You really want water to flow off the patio and never pond on it. In fact, you want to design the patio so that it has a very slight slope to it so that it does drain. My last large patio had about 2 inches of fall on it across 20 feet. When you sat or walked on that patio, you would swear it was dead level.

Let's talk just for a moment about your different choices. I know you're looking at precast colorized concrete pavers for your patio. You can use traditional clay paving brick as well as other natural stones. Highly uniform clay paving brick can be installed in the same manner as the precast concrete paving brick, but natural stone would require much more labor to get the random pieces to fit nicely, unless you were using high-grade granite cobblestones.

The individual paver stones stay in place because of friction with the bedding sand and the fact that they are in contact with the other stones that make up the patio. At the edge of the patio, it's a good idea to install metal or plastic retention material so the stones at the edge don't wander into the grass or garden.

The color of your precast concrete paver patio stones is going to change over time. They look fantastic when they're installed because the cement paste that coats the sand and gravel in the mix contains the colored earthtone pigments. But Mother Nature and any foot traffic you apply to the stones will wear off the top layer of colored pigment from the top of each stone. This happens slowly, and you really don't notice it.

But over a few years, you'll start to notice the dull color of the stones and sand that was used to make each stone. Save one or two of the original pavers in your garage and take them out on your patio in five years. That's when you'll really see the difference.

If you use traditional clay paving brick or a natural stone product, you'll not ever have a color fade issue. Clay bricks have the same color throughout the product. The same is true for granite, flagstone, slate or other natural stone that's used for patios.

One thing I do love about the concrete paver stones is how they interlock and how they can be removed, if necessary, to do repairs to the patio, sidewalk or driveway. It's not too hard to remove one or two stones to gain access to the soil beneath the surface.

What's more, if one or more of the pavers gets cracked or damaged by a stain, you can remove it and replace it. If the surrounding stones are faded, you'll need to age the new paver to match what's around it.

This is what the patio pavers look like before they're installed. The bumps on the sides are spacing lugs that ensure even spacing between the stones.

Another benefit of the interlocking pavers is they are DIY friendly. If you're going to install a square or rectangular patio, you may not need to cut one stone! You'll have the patio installed in hours if it's small or you have lots of help. Believe it or not, it's possible to have a completed patio from start to finish in one day.

You can watch an informative video that shows a concrete paver patio and individual paver stones at www.AsktheBuilder.com. Just type “paver patio tips video” into the AsktheBuilder.com search engine.

Column 931

Hail Demolishes Roof

Back in 2010, a hailstorm of epic proportions pummeled the roof of Dean Imel's house in Nichols Hill, Oklahoma. Dean exclaimed,

"This was the worst hail storm I'd ever seen," says Imel, who lives in Nichols Hills, Oklahoma. "The ground was completely dry, yet the force of the hail penetrated almost four inches into the soil. Our roof looked like someone had taken a Rototiller to it … the devastation was massive."

While there's no close up photo of the roof before the storm, You can imagine it from the picture taken at the back of the house where the pool is. You can see it would have been a great tile roof.

Look at the size of the hailstones.

Dean decided to never have a problem again. That's why he went for DaVinci Roofscapes® that's made from a polymer. It'll last for decades, looks like real slate and can stand the abuse of hail.

All photos supplied by Dean Imel.


If you want to submit pictures and the story behind your project, CLICK HERE to go to the Before & After Submission Page.

April 10, 2012 AsktheBuilder Newsletter & Tips

Last week, I had the pleasure of working on the land Kathy and I bought here in New Hampshire about six years ago. My friend Peter let me use his Kubota excavator for two days. An excavator is a machine that has tracks, a small bulldozer blade and the all-powerful toothed bucket that digs ditches.

It's a perfect machine for clawing rocks out of the ground. Here's a secret most people don't know. You can rent tiny versions of these machines to dig small holes and trenches at your own home. This could come in handy planting a large tree or some other project that requires lots of digging.

Here's a link to a very tiny one. Imagine how this could save your back on a job around your home!

The one I was operating was more like this one. It was bigger than this machine, had an enclosed cab and did have the thumb so you could grab onto the rocks.

The point is, just imagine what you can pick up with these great machines: large tree trunks, stumps, granite curbing, rocks, etc.

Just before Christmas last year, I hired a man to come in and clear out all the brush on the sides of the driveway. Hundreds of gorgeous rounded boulders were lying about, and some were partially buried. They ranged in size from a cantaloupe to a large riding lawn mower. The largest rock I dug out and moved was egg-shaped and measured 5 feet by 3 feet. It was a monster.

I moved the rocks to the tree line and used them to build some rustic rock walls. Some of the walls were actually on the property line, but most look like random walls stacked long-ago by one of the original land owners to create a pasture. This summer I've decided to go back for a week and dig out thousands more of these great rocks.

Just under the surface are thousands and thousands of these *eggs* that were tumbled smooth by the motion of the last continental glacier that covered New Hampshire just 12,000 years ago. Heck, it covered all of New England, much of the Midwest and extended all the way back to the North Pole.

These egg-shaped rocks are a prized commodity up here. Wall builders and landscapers covet the rounded boulders. Most of the rounded rocks have long since been used up. The boulders and rocks you do see being used now are angular and have a stark unweathered appearance.

Suffice it to say I had a great time up there working for two days - just me, the machine, diesel fumes and blue sky.

The largest rock I dug up

Here are some photos I took on Easter Sunday morning of the work I accomplished. I decided to go back to the land to see if the Easter Bunny had transformed any of the rocks into dark chocolate. Sadly, I was disappointed. These photos may inspire you to build a simple rock wall in your yard. It's not hard to do.

This week I'll be programming some frequencies into my ham radios. Why? I'm one of the 200 or so ham radio operators providing critical communications for the Boston Marathon on April 16th. That will be one long day. I'll probably have next week's newsletter out a day late so I can give you a full report on any action I witnessed at the marathon.


Annual Deck Cleaning Tip

Let's say you want to just clean your deck each spring, and the sealer on the deck is still in good shape. What should you do?

It's easy. Just try regular liquid dish soap and water. I'd mop it on, or apply the soapy solution with a hand pump sprayer. Scrub lightly, and rinse with water. You should be good to go.

Don't use my Stain Solver on your deck if the sealer appears to the naked eye to be in good shape. There's a very good chance some of the top layer of the sealer is sun damaged and barely holding on. My powerful oxygen bleach will remove the sealer creating a blotchy appearance, whereas regular dish soap won't budge the sun-damaged pigmented sealer.


Glass and Metal Countertops

Were you one of the winners of the Mega-Millions lottery last week? Did a rich aunt just go back to Heaven leaving you the cash she couldn't take with her? Are you a hedge fund manager? Or, do you love looking at really cool building products that are often way out of your financial reach? I'm like that. There are so many things I'd like to have but just can't afford them.

If you like window or monitor shopping as we now call it, then check out the metal, wood and glass countertops that Craft Art has. You better have a napkin or a bib handy. You may end up drooling.


Stain Solver Sale Ends at MIDNIGHT

Just as I thought, the Stain Solver Sale is going down in company history as a monster success. The annual spring sale ended , April 10, 2012, at midnight Eastern Standard Time.

A few of the sizes have sold out and are on backorder. We FULLY expect to ship out all orders by April 19th at the latest. We appreciate your patience!

You better order now if you want some at the sale price. If you want my new Deck Cleaning and Sealing Your Deck eBook at the same time, you want to order the Stain Solver from my AsktheBuilder.com cart.

Stain Solver cleans just about anything. Kathy C., from Pensacola, FL, used it to clean off offensive organic oak blossom stains from her pride and joy. Go read about it.


Tip of the Week - Change Your Washing Machine Hoses

Do you have black rubber hoses that feed water to your washing machine? Is your washing machine in some finished space? If so, these rubber hoses WILL burst one day. I urge you to install hoses that are wrapped in stainless-steel fabric. This metallic covering helps to prevent blowouts.

Millions of dollars of damage happen each year from washing machine hoses that burst. Every month I get at least one email from a subscriber talking about an accident.

Imagine the nightmare if you were gone all day when water started flowing in your absence? I know, you feel you're safe because you turn off the water supply to the machine when it's not in use. Remember, the hoses can burst while you're at home doing laundry and in another room where you can't hear the mini Niagara Falls.


Would You Review My Cleaning and Sealing Your Deck eBook?

Last week I launched my latest eBook, Cleaning and Sealing Your Deck. Perhaps you were one who purchased it. If you liked the content in the eBook, would you be willing to help me?

Could you please go to the page on Amazon.com and leave a positive review? You can leave a review at Amazon even if you purchased it at my shopping cart. It would be sincerely appreciated.


The Mac Virus ALERT Email

You may be one of my subscribers that got freaked out last week when I sent out the blast about the Mac virus. That's one of the benefits of being on my list. I try to watch your back, as you get this newsletter electronically. That means I want your computer healthy. I happen to have good friends who have their ears to the ground and get early warnings of viruses.

I got all sorts of replies, some frantic, most thanking me for being helpful, but the one from Ron B. made me laugh out loud. Ron obviously has a great sense of humor. Here's what he said about my ALERT: "You beat the Drudge Report on getting the news out. Clinton could have used Stain Solver!" Thanks, Ron B.

Here's what I'd like to share about that alert. I send those out as a public service. I'm not Ask the Mac or PC Guy. Nor am I AsktheGeekSquad. I'm AsktheBuilder. That means I can't offer any hand holding when it comes to your computer. All I do is tell you there could be a problem, and try to point you in the right direction should you need help.

I tried, in my blog post, to give you a place to go if you had issues. That's the best I can offer. Please understand that when I do these alerts in the future, it's in the spirit of me trying to help you, not frustrate you.


Video of the Week - Plumbing Vent Pipes 101

You may not know this, but I'm a master plumber. I love doing plumbing work. Many people are unaware of the importance of plumbing vent pipes and what purpose they serve. Watch this video to discover something new!


Q & A of the Week - Poured Concrete vs. Concrete Block Foundation Walls

DEAR TIM: What is the difference between concrete block and poured concrete foundation walls? Which one is better? The lot I am going to build upon has a seasonably high water table. Which of the wall systems would insure a dry basement? Diane J., Redwood Falls, MN

DEAR DIANE: I think it might have been easier to answer a question such as: Is a glorious sunrise more beautiful than a magnificent sunset? The truth of the matter is that both building materials - concrete block and poured concrete - can yield superior foundation walls so long as they are.....

Click here to read how to build strong foundation walls!

Sincerely,
Tim Carter

Lamp Post Pole Tips

DEAR TIM: The house I grew up in had a lamp post out by the street. I'd like to install one and wonder if it's too hard to do. What are my options when it comes to lamp posts, and how are they set into the ground? Will I need an electrician to provide power to the light post, or is that a DIY job? What happens if the electric cable has to pass under a finished driveway? What other things do I need to be worried about? Shawn D. Akron, OH

DEAR SHAWN: It's really funny, but I grew up in the city and lamp posts in front yards were pretty rare. I never gave it much thought until I moved to a rural area and realized how dark it is at night when you don't have all those municipal streetlights flooding the streets and driveway entrances with light. I've got a lamp post here at my house in the country, and it's a welcome sight driving down my pitch-black road on a cloudy night!

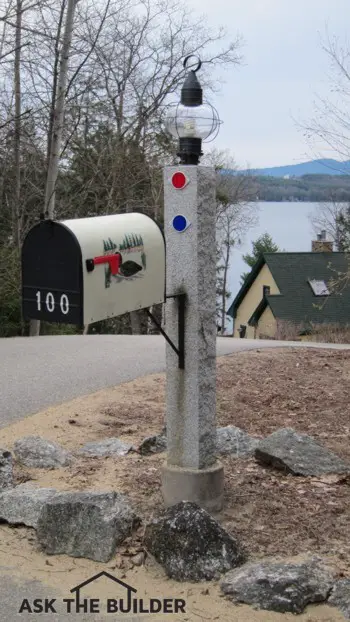
Here's a lamp post pole doing double duty with an attached mailbox. Photo Credit: Tim Carter

The degree of difficulty with respect to installing the actual post depends on the post you'll be using. If you decide to get a solid granite lamp post like I have, you'll need several friends or a small crane to install it. However, if you purchase a common steel or aluminum tube lamp post, it'll be a solo job that you can accomplish with little effort.

As with any digging, that chore can be easy or tough depending on the soil conditions where you live. If your soil is a modest clay, you might have no issues slicing through it if it's moist. A sandy soil is dreamy to dig as it offers little resistance. But you may be cursed with rocky soil, and have all sorts of issues with large rocks at your post location.

Perhaps the biggest issue, and hardest job, is digging the trench from the house to the lamp post if you want a conventional 120-volt power supply that you control from the house. The added benefit if you decide to provide power like this, is that you can have a handy power outlet at the base of the lamp post. This can be very convenient if, for some reason, you need electricity out by the post for something other than a light.

If you don't want to go to all the trouble to run a power line to the post, solar-powered lamp post lights are the way to go. This will be your least expensive option, and if you have friendly soil, you could have a working lamp post up in less than 30 minutes.

If you're not familiar with the National Electric Code, and all the nuances of working with electricity, I suggest you hire an electrician. You may be able to save money by doing the required trenching and drilling of holes to get the electric cable from the switch location to the lamp post. Be sure you're crystal clear on where the trench goes and how deep it must be.

Before you ever put a spade or shovel into the ground for this project be sure to call 811 or go to call811.com or callbeforeyoudig.com to have all underground utilities marked for you. It can take up to three days for a worker to come out and mark where danger lurks.

Digging on your own land or out in the public right of way near the street without knowing where buried utilities are can be expensive and deadly if you make a mistake. What's more, understand that the markings on the ground can be off just a little bit. Always dig slowly and carefully within 2 feet of any painted mark on the soil.

If you need to get a cable under a driveway or a sidewalk, there are any number of ways to do this. Once again, clay and sandy soils can be your friend here while rocky soils will give you fits.

Years ago when I was a young builder, the backhoe operator I used had a clever device he had made. It was a 14-foot long steel tube that had a flared cone tip much like a missile.

He would dig a trench perpendicular to the driveway or sidewalk deep enough so as to not be too close to the underside of the pavement. The tube would be placed in the trench and he would use the backhoe's powerful hydraulics to push the tube through the soil like a needle going through fabric. A simple hole on the other side of the driveway revealed the tip of the tube. The hole that was created was 6 inches in diameter which was plenty to insert a PVC conduit.

You can create your own tunnel under a driveway or sidewalk using a PVC pipe that has one end cut at a 45-degree angle much like the tip of a hypodermic needle. I prefer to use a smaller diameter 2-inch PVC pipe for this job. You use this in the same way as my backhoe operator, but you tap the square end of PVC pipe gently with a sledgehammer so it penetrates the soil about 3 inches.

The sharp end of the PVC pipe cuts into the soil as it's tapped by the hammer. Rotate the pipe to cut the soil. Pull the pipe out of the soil and remove the soil plug from inside the pipe. Repeat this operation until you've created a nice round tunnel under the sidewalk or driveway. This method has never failed me in the nice Midwest clay soils!

You can watch an informative video that shows a video on how to creatively tunnel under a sidewalk or a driveway at www.AsktheBuilder.com. Just click this link "underground wire tunnel video" or type that phrase into the AsktheBuilder.com search engine.

Column 930

Build a Deck for the Shed

Hey Tim,

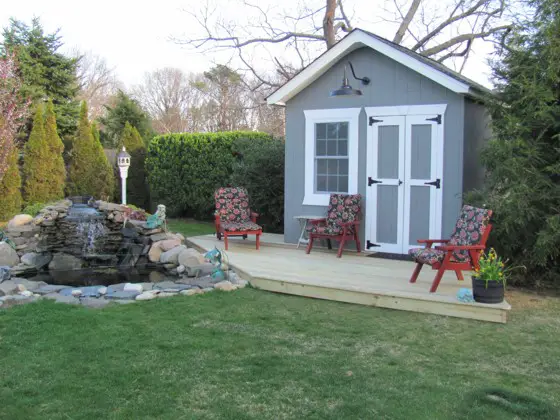
This was my weekend project before Easter. Building a deck for my shed next to my waterfalls/pond. It took me about 3 1/2 days to complete it by myself.

It is made out of pressure treated lumber 5/4 deck planks, and the framing is 2x6's. I used 12', 16', and 20' deck planks so I wouldn't have any but seams. It has some crazy angles to it, but you have to do what you have to do to make it work.

Now instead of sitting on a rock to watch my fish , I can sit in a chair.

Thanks for looking.

Mike Rignola

All photos by Mike Rignola.

Mike Rignola's Deck for his Shed

The shed before the deck

Mike Rignola's Deck for his Shed

The deck framing during construction

Mike Rignola's Deck for his Shed

The finished deck in front of the shed and next to the pond


If you want to submit pictures and the story behind your project, CLICK HERE to go to the Before & After Submission Page.

EB015 Cleaning & Sealing Deck Cover