Cutting a Roof Rafter

A simple framing square, circular saw and a tape measure

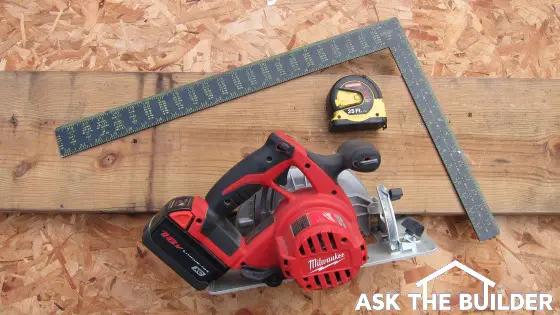
A simple framing square, circular saw and a tape measure are just about all you need to make perfect angled roof rafter cuts. PHOTO CREDIT: Tim Carter

DEAR TIM: I’ve got one last project before winter sets in. I want to build a small shed, but am not sure how to frame the standard gable roof. I can handle placing the framing square to make the plumb and heel cuts, but I’m confused on how to arrive at the exact length of the angled roof rafters. This is above my current pay grade. Is there a crash course you can teach on how to get the length of the rafter just right? Tommy T., Stowe, VT

DEAR TOMMY: I distinctly remember being in the same situation many years ago as a rookie carpenter. Roof framing was a vast mystery to me, but I was eager to learn and started reading all sorts of books about the subject. Soon I was able to frame very complex roofs and the cuts came out great. I did make a few bonehead mistakes, but I’m not going to let that happen with you on this simple shed roof.

The gable roof, in my opinion, is perhaps the easiest roof to frame outside of a flat roof. To frame a gable roof, all you really need is a framing square that has crisp dimension markings on it as well as all the tables that one normally sees printed on the body of the square.

To get your head around the math that’s involved, Let’s just think about a line drawing. After all, the top edges of the two roof rafters really are just two of the three lines in a triangle. The base of the triangle would be the straight line that connects the two sloped lines where they pass over the outside surface of the exterior walls. In other words, roof framing is just basic trigonometry.

Good framing squares already have done the tough math for you. If you have one of these framing squares, look at the body of the square. This is the part that’s almost always 2 inches wide and 24 inches long. On it you’ll see a table. Usually the first line of the table reads: Length of Common Rafters per Foot of Run. You may have to look at both sides of the square to see this table.

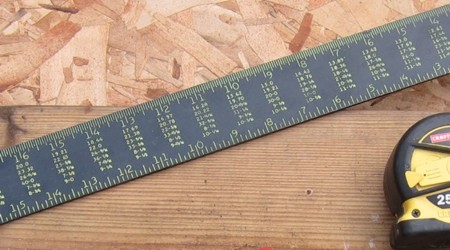
Note - there are all sorts of numbers, usually with decimal points, under the inch markings on the square. You should see the number 20.0 under 16 inches, the number 16.97 under 12 inches and 12.65 under the 4 inch mark. This tells you you’re looking at the correct line in the table.

These numbers with the decimal points, are the multipliers that will give you the exact length of the rafter along it’s sloped line. All you need to do is provide the “run." Run is HALF of the width of the shed across which the roof covers. If your shed is going to be 20 feet wide, then the run would be 10 feet. I always measure the total width to the outside face of the wall sheathing.

The only other thing you have to decide is the pitch of your roof. That’s what the inch markings on the body of the square represent. For sake of discussion, let’s say that you want a 4-12 pitch roof. Using the number from the table on the square, you would multiply 12.65 times 10 to get the length of the common rafter. I say this assuming your shed is going to be 20 feet wide.

Doing the math, you’ll see that the length of the rafter is 126.5 inches. Here’s where it can get a little confusing. This is the true mathematical length of the rafter assuming there is no ridge board. In other words, if you cut two of these rafters exactly the same and set them up on the wall plates, the plumb cut lines at the top would fit perfectly with no gap at all. The same would be true for the heel cut down where the rafter sits on the wall.

But in practice, there’s almost always a ridge board in common roof framing. It’s usually a 2x piece of lumber. If this is what you’re going to do, then you have to shorten the length of the rafter by HALF the thickness of the ridge board. It’s half because the ridge board is centered between the two rafters that touch the ridge board.

Now, understand that this doesn’t mean your rafter length is 3/4 inch shorter than the 126.50 inches. It’s close to that, but not exactly.

What I always do is make the accurate plumb cut line on the lumber as if there is no ridge board. This is the true length of the rafter. But then measure out from this plumb cut line perpendicular the 3/4 inch shortening dimension. Now draw a second parallel plumb cut line next to your first one. This line needs to be down the rafter making it shorter, not longer. I made that mistake many moons ago!

The plumb and heel cut lines are made conveniently by a framing square because a square is a 90-degree angle. The tongue of the square, which is almost always 16-inches long, is oriented 90 degrees to the body of the square.

Since the plumb cut is absolutely the vertical line of a right triangle and the heel cut is the base of a right triangle, you can see how the framing square creates these lines as you slide it up and down the rafter with it set at the proper pitch.

It’s caveman simple when you see it done. This is why it’s important to use the small brass stair gauges on a square so its orientation doesn’t vary as you slide it up and down the rafter.

For more information, read my How to Cut a Simple Common Roof Rafter column.

Column 904

September 27, 2011 AsktheBuilder Tips And Newsletter

What's in This Newsletter?

Latest News
Installing New Siding
Work Pants Discovery
New Toilet Fill Valve
Facebook Photos

NW TripI'm back in New Hampshire after nearly three weeks of travel. It was a business/pleasure/business trip that started in Philadelphia, then to Salt Lake City, up through Montana then to Banff and Jasper in Canada, over to Vancouver and Victoria in British Columbia and finally ending in Seattle. Can you see why that's probably too much travel at one time? I loaded some updated photos and funny videos with captions to the Picasa album I created for this trip. You've got to watch the videos. They will have you laughing for sure.

Installing New Siding

Mellodee from Kerrobert, Saskatchewan, Canada wrote to me:

"I want to re-side my house.  It currently has two layers of siding, one of vinyl and one of hardboard. The house is currently very warm and draft free. Do I need to remove both layers or can I reside over the hardboard?  If both layers are removed can the new siding be put over the framing with Tyvek wrap only or do I need to add a Styrofoam insulation for warmth. Part of the house is 2x4 and part 2x6. Look forward to your help."

Mellodee, I was just up near you right next to the Saskatchewan Glacier that's fed by the Columbia Icefield.

I would recommend removing the top layer of siding for sure. You do have a unique opportunity to help add more insulation if you want to strip the house down to the studs. In that case you can add a layer of foam sheathing that will greatly enhance the R-value of your wall system. That needs to be covered with a water membrane and air barrier similar to Tyvek.

However, you need to ensure the structural stability of the house as you work. This means at the corners you must have a sheet of plywood or oriented strand board that's nailed at 6-inch intervals on the edges and no more than 12-inch centers in the field of each panel.

You have to work in sections. Don't strip the entire house as it could collapse if there is a big windstorm. Talk to a seasoned remodeler, builder or structural engineer before you go crazy on this project.

Have a great understanding of window and door flashings as well so you don't have any rot down the road.

Work Pants Discovery

I had a clothing malfunction while traveling. It's a long story that involves having clothes in two suitcases, but switching to just one at the last minute.

Suffice it to say I packed two pairs of convertible pants that have zip-off lower pant legs in a suitcase that went with me to Philadelphia.

These pants convert to shorts in less than 60 seconds. But they didn't make into the bag I used to go out West. I discovered the mistake after arriving in Salt Lake City.

The only pants I had were the shorts I wore on the plane to Salt Lake City. Groan.

The next morning, a Sunday in Butte, MT, I found a Bob Ward's Sporting Goods store that was open. Thank goodness! The only pants I could get, and this was the last stop before Glacier National Park, were some Columbia Lander pants. I really wanted convertible pants, but oh well.

What a surprise! The Lander pants are perhaps the most comfortable hiking pants I've ever worn. I can see they'll make a fantastic work pants for projects around the house.

I love the extra security pocket with a zipper built into the right-side regular pocket. The small thigh pocket is *perfect* for my cell phone. It would work for sunglasses as well.

If you're tired of ill-fitting jeans that are uncomfortable, you simply have to give these pants a try. I LOVE mine. I'll be getting more for sure.


New Toilet Fill Valve

My guess is the Fluidmaster Toilet Fill Valve has been around for close to 30 years. I distinctly remember installing my first one on a repair job. It was so easy and they work so well for years.

For years, there's been little competition. Perhaps it was a patent issue. It appears there's a new kid on the block now.

I was sent a HydroClean HC660 Fill Valve that looks like it's a clone of the Fluidmaster. Handling it out of the box I can assure you it's easy to install, but I've not yet had a chance to test one.

One feature that looks very cool, and I wonder if it works, is the L-shaped water inlet tubing that scrubs the bottom of the toilet tank after each flush.

The manufacturer claims that it keeps the tank clean. I can see how that would work as the incoming water would stir up the sediment and cause it to be flushed into the toilet bowl those first seconds as the flapper valve is open.

This product is worthy of your attention. You should click this link and see for yourself. I hope to install mine in the next two weeks. Let me know what you think if you get one.


Facebook Photos

AsktheBuilder on FacebookAre you a fan of mine on Facebook? If not, you're missing a ton of FREE information at my fan page each week. Since the last newsletter, several of the photos I upload got some creative answers. It's fun guessing what the photos are.

I also told Hassan the best pipe to use for radiant in-floor heating.

I helped Lisa clean her dirty floor with Stain Solver.

I offered a possible solution to Elizabeth about her unreachable window.

And much, much more. You should really become an AsktheBuilder Fan on Facebook.


Flashing a Deck

deck flashing

Flashing a Deck | The correct flashing with the proper profile is seen overlaying the inferior deck flashing that was installed by a nonprofessional. PHOTO CREDIT: Tim Carter

DEAR TIM: I need to install a deck ledger board against a house with wood lap siding. Soon I'll be doing the same on a brick home. What's the proper way to install flashing so I don't get any leaks where the ledger board connects to the house? My online research indicates this could be a serious problem. Something tells me that it's very important to get this right. Tony P., Waltham, MA

DEAR TONY: Your research is spot on. Leaks at or around deck ledger boards are a serious issue. A couple of years ago, a new home was being constructed next door to me. I was stunned when I saw the builder nail a deck ledger board directly to the side of the house. Not only was no flashing installed, the builder nailed, instead of through bolting, the board directly to the oriented strand board sheathing with no water membrane behind it.

It's a shame that many young carpenters, builders and homeowners don't connect the dots about how the exterior finishing material on a home - be it wood, brick, stone, vinyl, etc. - needs to act just like shingles on a roof. Traditional asphalt shingles keep you dry inside because one shingle overlaps another as they march up the roof.

A deck ledger board needs to do the same thing. It needs to be just one more component in a waterproof assembly on the side of a home. The trouble is, it takes some skill to make this happen.

In the case of your wood siding, it's not too tough. What's more, there are new flexible membrane flashings that may make the job easier for you. I'm a little concerned about these new materials. I'm a fan of metal because I know it will work and is much tougher than the membranes. Some of the membranes are sensitive to ultraviolet light, and may break down if they are exposed to sunlight. Be sure you read the product label about exposure to direct sunlight.

Stop and think about how wood lap siding works to keep your walls dry. Each piece above the one below overlaps so that water can't get behind each piece of siding. You need to use flashings to provide this same overlapping effect where the deck ledger board connects to the house.

Once you've cut away the siding at the deck ledger location, you install a metal or membrane flashing that overlaps the siding below the ledger board. This needs to overlap the siding at least as much as the wood siding did before you cut it away.

What's more, the metal flashing needs to be bent so the bottom 3/8 inch of the flashing is bent at a 30-degree angle so it doesn't touch the siding. This little kick out allows water flowing over the flashing to turn to droplets that fall to the ground. If you don't do this and the bottom of the flashing is in direct contact with the siding, capillary attraction can pull the water up so it leaks behind the siding.

EB015 Cleaning & Sealing Deck eBoo CoverThis first piece of flashing needs to extend up at least 2 inches behind the deck ledger board. You then attach the ledger board to the wall using approved through bolts, not lag bolts. Drill the holes through the ledger board the exact same diameter as the shank of the bolt so it's a tight fit. Use a heavy rubber flat washer that will get sandwiched between the ledger board and the metal washer that's under the head of the bolt. Once the bolt is tightened, the rubber washer will produce a waterproof connection at each hole.

A secondary top flashing now needs to be installed over the top of the ledger board. This flashing needs to extend up at least 2 or 3 inches up under the siding above the deck. Keep in mind the bottom of the upper siding should be at least two inches above the flashing or the decking that's near the house. Never put horizontal siding in direct contact with any horizontal material.

This upper flashing must extend over the top of the ledger board, down the face of the ledger perhaps one-half inch and then kick out away from the front face of the ledger board. Bend the metal so it has the 30-degree angle so water turns to drops of the edge of the metal and is not pulled up by capillary attraction.

The top of the deck joists that connect to the ledger board has to have a minor fire cut put into the top corner of the joist where it connects to the ledger. This 45-degree cut does not weaken the joist at all and it prevents the joist from crushing the metal where you have bent it so it doesn't touch the ledger board. This first cut is mission critical.

This flashing method works for brick or stone homes as well. The only problem is that the upper flashing needs to be inserted into a mortar joint up on the brick above the ledger board. You'll have to use a chisel or a grinder to remove the mortar at least 3/4-inch deep.

I prefer to use 40-pound tin flashing for this work because it's easy to solder it when you need to install long lengths. You can't just overlap the metal and hope it won't leak. Where two pieces of flashing connect or overlap, you need to solder that joint to make one continuous piece of flashing.

Column 902

September 17, 2011 AsktheBuilder Tips And Newsletter

What's in This Newsletter?

Latest News
Seattle & Philadelphia Meet Ups
Sewer Smell from Floor Drain
Steel Garage Door in LA
Facebook Photos

Fall 2011 NW Road TripThe past week I've been on a journey of a lifetime. Forty-two years ago, I made my first trip away from Cincinnati, OH heading west. It was a road trip with two buddies.I'll never forget seeing the Rocky Mountains for the first time as we approached Denver. Then going through the Sierras and eventually the Grand Tetons on my way back home. It was eye candy to a budding first-year geology student.

But I always wanted to visit the Canadian Rockies as my wife Kathy was there while I was with my buddies. She said they were magnificent.

I decided I was going, but life got in the way. That is until this past week. Here are just a few photos of what I saw. If you can get out here, do it. Congratulations to the Canadian National Park System for preserving this natural beauty for all future generations.


Seattle and Philadelphia Meet Ups

I'll be in Seattle, WA on Tuesday with some time to kill around lunch time. Then I'll be in Philadelphia on Friday September 23rd around 3 pm with 4 hours to kill before flying back to New Hampshire.

If you're a new subscriber, a meet up is where you and I get together at a local coffee shop, restaurant, etc. to just chat and get to know one another. You can ask any question you want about Ask the Builder, how it works, questions about your home, etc. I'm always interested in discovering more about you!

If you want to hang out in either location, now is the time to pipe up. Reply to this email, but change the Subject Line to one of the two cities so I can get back with you ASAP. I'm staying at the Hyatt Olive Hotel in Seattle, so I'd like to meet close to there. In Philadelphia, I need a ride from the smaller commercial airport northeast of the city into town and then to PHL. If you can assist with that, it would be swell.


Sewer Smell from Floor Drain

Heather, from Redford Township in Michigan wrote to me:

"We have a smell coming from our floor drains in our basement. There is water in these drains.  We have had them snaked out and even replaced a floor drain. The smell is coming from the drain in the laundry room which is below our kitchen. Can we cement this drain in. Since we have 2 other drains. or does something else need to be done?"

Heather, we need to absolutely verify the odor is coming from that drain. One way is to take a think piece of plastic and tape it well over the drain. Be sure you use a fantastic tape that sticks to the concrete and the plastic has no holes in it.

Ventilate the space after you apply the plastic to remove any odor present. Go back in a few hours or the next day to see if there is an odor. If not, then there is a good chance the drain is the culprit.

I would then take off the plastic and remove the drain grate. Take it outdoors and clean it off.

Take a toilet brush and some of my Stain Solver Oxygen Bleach and clean the sides of the pipe riser that extends up from the buried P-trap under the floor.

I would mix up at least 5 gallons of oxygen bleach solution and pour a gallon into the drain making sure the sidewalls of the pipe get coated with the solution. As you scrub with the brush, dump plain clean water down the drain.

The source of the odor could very likely be a biofilm that's growing on the sides of the pipe. This film can be very gross and slimy. It absolutely will produce a strong odor.

Once the pipe, grate and trap is clean, the drain should be odor free. Don't hide this drain with concrete or stucco. That is very bad jujumagumbo.


Steel Garage Door in LA

I'm traveling with my very good friend Russ. He and I left Salt Lake City last Saturday and started driving north towards Jasper, Alberta, Canada. Then we turned southwest and are now heading to Seattle via Kamloops, Vancouver and Victoria, BC.

As you can imagine, there are hours and hours to fill with conversation. Russ asked me about new garage door for his detached garage located in the foothills of the mountains east of Los Angeles.

I told him I'd put in a durable and attractive steel Clopay overhead door. I've had great success with these doors.

But Russ asked me if it wasn't a better idea to install an insulated steel door that has two layers of steel with foam insulation between them.

He was stunned by my answer and we debated it at the end of breakfast today.

I've been to Russ's house many times and the garage bakes in the sun from late morning to late in the day. The door faces due west.

As you can imagine, the sun bakes the roof, the walls, etc. start to heat up. The roof shingles alone can heat up to close to 160 F. This heat transfers to the wood sheathing, the rafters and all items in the garage raising the temperature inside. Russ wants the garage to be as cool as possible.

I pointed out that an insulated garage door will slow down the transfer of heat. After all that's what insulation does - slows heat transfer.

What's more, the insulation inside the door, will also heat up. If you could insert a temperature probe into the door at the hottest point of the day, it would absolutely be well above the air temperature.

I told Russ to read my past column about Hot Garage Ventilation if he wants a cooler garage.


Facebook Photos

AsktheBuilder on FacebookAre you an AsktheBuilder FAN on Facebook? You should consider it. Why you ask?

Each week I answer questions on the Fan Page that you don't see other places. You get to discover all sorts of new things there that I don't put on AsktheBuilder.com.

Oh, and did I mention it's FREE? You can't beat that. Free Fun and Knowledge. Don't believe me, go click the link above and read many of the comments under the photos I upload.

I urge you to become an AsktheBuilder Fan on Facebook!

Soil and Water Erosion Solutions

DEAR TIM: I’ve got several places in my yard and along my driveway that erode during periods of heavy rain. I also have issues with the gravel road that I drive to get to my house. What can I do to stop or minimize erosion around my home? I feel like I never stop repairing the damage. It's really a headache. There has to be an effective way to deal with the water. Pamela W., Woonsocket, RI

DEAR PAMELA: My geology degree taught me long ago that water is the ultimate equalizer. Who would ever think that solid granite would succumb to a clear liquid that we drink and bath with? Water, when you swim in it, seems so soft and unassuming.

The soil erodes constantly along this steep driveway. It’s easy to prevent the erosion if you fill the crevice with the right material. PHOTO CREDIT:  Tim Carter

The soil erodes constantly along this steep driveway. It’s easy to prevent the erosion if you fill the crevice with the right material. PHOTO CREDIT: Tim Carter

But if you watch the news on television, hurricanes and tropical storms dump trillions of gallons of water onto the Earth in a period of a few hours. You'll quickly see that water is a wolf in sheep's clothing. When lots of water moves quickly down a stream, it possesses enormous energy and power.

Water is highly efficient at eroding the soil around your home because it's a perfect example of the simple formula many of us discovered when we took high school physics: Force equals mass times acceleration.

Put in terms you and I can understand, the force that water can exert on something is a function of its weight and how fast it's moving. You already know that water is fairly heavy, assuming you've carried a five-gallon bucket of it around. We can't control water's weight, but we can often control the speed that it travels.

What's more, we can look at the other side of the equation, the part about mass. We know that it doesn't take much water mass to move a small grain of sand, which is nothing more than a piece of rock. If you increase the size of the rock, it takes more water to move it.

To help visualize all of this, let's consider my own driveway. It's very steep at one part and I have chronic erosion on one side because a lot of water is concentrated to one side of the drive. The sand and 1-inch angular gravel is constantly washed out of the ground and deposited farther down the drive.

I'm going to solve this dilemma by putting in angular rock that's the size of a baseball. Based on the water flow I've seen in the heaviest rain, I'm quite sure this size material will resist the force of that amount of water. That's the trick - you need to match up the size of the rock to the force of the moving water.

It's also important to use angular stone or rock if you can source it. This material interlocks and it provides more friction when something tries to move it. Rounded gravel reacts like ball bearings. The rounded surface of a rock allows it to move far more easily if the water gets the rock moving.

Depending upon what your landscaping plan looks like and how you can integrate larger rocks into it, you can slow down the water in many cases by having it crash into larger rocks that are in the drainage channel where the water flows. The water expends some of its energy on the rocks instead of the soil in the channel. If you slow down the water, it has less force.

One of the worst things you can do is to create a smooth paved channel for the water to flow in or down. This causes the water to accelerate to its maximum speed depending on the steepness of the channel.

When it gets to the bottom of the channel, the water is looking for something to waste its energy on. If the channel ends in the grass or at some soil, the water will chew away at it. You can often see evidence of this where a drainage pipe exits a hillside. The water shooting out of the smooth pipe causes significant erosion unless there is something there to absorb all that energy.

Gravel roads or driveways often suffer significant erosion because they are shaped wrong. If the center of the drive or road is lower than the edges giving it a V shape, then the water rushes down the center and causes enormous erosion.

Road engineers discovered centuries ago that you solve this problem by creating roads and driveways with a crown in them. This means the driveway surface is not level side-to-side, but has the center higher than the edges.

The crown allows all the water to run to the sides or culvert area of the road. You don't have the volume of water from the entire road rushing down the center. More volume means more mass. More mass means more force. More force means more erosion.

The crown of a roadway or driveway doesn't have to be significant. You just need the water to want to travel, by gravity, to the edges. It's that easy.

Column 901

September 6, 2011 AsktheBuilder Tips And Newsletter

What's in This Newsletter?

Latest News
New Milwaukee Hand Tools
Help Make This Newsletter Better
Digging Under a Foundation
Tiling Over Carpet
Facebook Photo Mysteries


Last week, I had the pleasure of spending about 90 minutes with Tom Sizemore. He's a subscriber who hails from New Mexico and was in the midst of an epic driving trip from there to Maine.Tim and Tom (subscriber from New Mexico)
Tom knows that I do meet ups in different towns when I travel, but since he was going right through my town, he thought he'd do a reverse meet up. Great idea, and last year the same thing happened with the Davis family. Tom's truck is behind mine in the photo. Two sweet Ford trucks Made in the USA! Yes, I know GMC and Chevy's are good too. I'm not trying to start a truck war here.

Tom and I talked about a boatload of things, not the least of which was artillery. Tom is a proud member of the U.S. Marines and knows quite a bit about firing shells great distances.

My question, which he answered instantly, was distance or range. How in the world on the open ocean can a battleship determine how far away an enemy ship is? "Tim, it's all trigonometry. Simple," replied Tom. DUH! I knew I should have paid attention in that high school class.

Yes, I know that modern technology can create precision shots with long artillery pieces. I was interested in how it was done years ago.


New Milwaukee Hand Tools

About six weeks ago, I was at Milwaukee Tools Headquarters in none other but Milwaukee, WI. I saw some great new hand tools, but they wouldn't let us talk, video, photograph, etc. until September 1, 2011. That's the official birthday of the tools.

Here's what's in the lineup:

  • 6-in-1 Combination and Long-Nose Pliers
  • Pump Pliers with Reaming Feature
  • Tin Snips with 10X Life
  • 6-in-1 Linesman's Pliers
  • 6-in-1 Diagonal Cutting Pliers
  • All-Metal PEX Tubing Cutter

These are some rocking rugged hand tools and are sure to cause a disruption in the tool world.

Milwaukee has effectively raised the bar on many of these items. You know what they say, right? Competition is a good thing when you're a consumer. That's you and me!

Thanks Milwaukee! The hand tools are keepers.


Help Make This Newsletter Better

Would you do me a favor and take this FAST two-question survey?

I really value your input, and it will help make future AsktheBuilder.com newsletters better!

Thanks in advance!

Digging Under a Foundation

Last week, Ellen, the longest-serving AsktheBuilder employee, forwarded a question to me from a website visitor.

I felt it merited sharing.

The individual needed to put a new water line under an old brick foundation that did NOT have a footer. He was terrified of causing a foundation problem by digging under the brick to make a channel to install the pipe.

Little did he know there is no need to dig under the foundation an risk any type of structural failure. The width of the foundation was only 8 inches and there was no footer. Even if there was a footer, I demonstrate in a video a method that will work very well to solve the problem.


Tiling Over Carpet

Angelia from Florala, AL wrote to me:

"We have a 16x32 game room covered in old indoor/outdoor carpet directly glued to concrete(no pad). I have done many floor and wall tiling jobs. Would it be possible to tile over the carpet? There are no loose areas; it is glued very well! I am just trying to get out of the ordeal of scraping it off the floor. I appreciate you input and love you site!"

Angelia, I've got some bad news for you. You need to take up the carpet. Tile needs to be installed on a solid surface that has no give to it. The carpet is absolutely not solid. When you install tile on a soft surface or one that has give to it, the tile can crack when concentrated loads are placed on the tile.


Facebook Photo Mysteries

AsktheBuilder on FacebookAre you an AsktheBuilder FAN on Facebook? If not, you're missing out on some fun and games. You may also be missing out on some helpful FREE information. Each week I answer questions on the Fan Page that you don't see other places.

Last week, I posted two photos that got some correct guesses as to what they were. But the best part, in my opinion, are some of the hilarious comments others leave.

I urge you to become an AsktheBuilder Facebook Fan!

Kitchen Island Design Tips

DEAR TIM: For years I've wanted a kitchen island. After looking through many magazines and websites, my head is swimming with possibilities. Can you share any kitchen island design tips you've discovered in all your years dealing with them? How about a list of what works and what doesn't? I also need some help on the top for the island. What do you feel works best and why? If there's room, how about some installation tips? Donna P., Waltham, MA

DEAR DONNA: You make me out to be an old goat that's seen more kitchen islands than a lifeguard's seen swimmers on a summer weekend. The truth be told, I've seen and installed more islands than I care to remember.

This kitchen island is one of two in the same room and sports furniture-like touches to make it very distinctive. PHOTO CREDIT: Tim Carter

This kitchen island is one of two in the same room and sports furniture-like touches to make it very distinctive. PHOTO CREDIT: Tim Carter

I think the biggest mistake homeowners make when planning and designing an island is they think bigger is better. That's not the case. Some of the most functional kitchen islands are ones that are as small as 42-inches long. Small kitchen islands that are 2 feet wide by 4 feet long work really well.

The clearance around an island is usually what constrains the size. At the very least you want 36-inches of space between the edges of the island top and any other solid object like another countertop, appliances, or walls. Thirty-nine inches is better and 42-inches would be ideal.

Most islands are created using a standard kitchen cabinet that's 2-feet deep. I've seen tremendous innovation from semi-custom kitchen cabinet manufacturers when it comes to islands. With a little effort, you'll be able to design an island with features that make it look like a fine piece of furniture instead of a ho-hum base cabinet box with some matching plywood on the back.

Ball feet, inset doors, twisted rope columns, raised bars for sitting, etc. are all possible. If you choose the right cabinet company, custom islands that look like furniture will come completely assembled from the factory. I just installed one of these in my own home about six months ago. What used to take a day to assemble, I had done in 20 minutes and was moving on to the next cabinet.

One mistake I see made all the time is an island that resembles an aircraft carrier. I've seen islands that are 5-feet wide or more. You can't even reach the center with your arms to clean it. Remember, less is often better.

Think about what cooking and baking tasks you can relegate to the island. This can put a helper in another part of the kitchen without causing a log jam on a regular countertop. When you design with function in mind, all sorts of good things happen. Take a deep breath and think about what tasks you can relegate to the island and design for that purpose.

For example, you may decide to make the island the headquarters for baking and desserts. Think of putting your commercial mixer on a spring-loaded tray that folds up out of the island and lowers back down out of sight when not needed. Pullout drawers in the other cabinet can be loaded with all of the other accessories you need while preparing these specialty foods.

The back of a kitchen island is a perfect space if you have lots of cookbooks to store. This allows you to make the top deeper, 38 inches total tip to tip, in case you want more surface room to work.

Marble is the preferred surface for an island top for bakers. The cool stone is very friendly to rolling out dough. I'm partial to granite for its durability and the deep and varied colors that are available. Traditional plastic laminate will do a great job on an island if it's cared for.

Be sure to plan for electrical outlets in the island. I'd be sure to put one at each end. If you have the room, microwaves work great in kitchen islands, especially the ones that have a drawer design instead of a swinging door. We love ours here at the Carter Goat Farm.

Kitchen island installation varies in complexity. It all depends if the island comes pre-assembled from the factory. The common thread with all islands is they need to be secured to the floor so they don't slide across the floor when someone leans into it.

You can easily lock an island into position using blocks of wood that are screwed to the floor. If you locate these with extreme precision, you can often lift the island and drop it down on the blocking just like a tight-fitting box lid fits over the outer edges of a box.

This method can be used on any island, but must be used for the islands that look like furniture. You don't want to have unsightly screws that go through the sides of the island into the hidden blocking if you can avoid it.

Column 900

Septic Tank Pumping Tips

DEAR TIM: I've heard all kinds of advice about septic tank pumping and am more than flummoxed. Some of my neighbors have never done it and others say it needs to be done frequently. When should you pump a septic tank and why? What happens if you forget or don't do it when it needs to be done? The cost for septic tank pumping seems really high and I'm wondering if it's worth it. Carrie S. Hillsboro, OH

DEAR CARRIE: You're going to hate me, but there is no definitive answer as to the exact intervals of when a septic tank needs to be cleaned and pumped. Many professionals who do this work will tell you that it should be done every three years, but there are septic systems that probably should be pumped annually.

This is the access hole cover for a septic tank. Don't even think of removing it unless you're a professional septic tank cleaner. PHOTO CREDIT:  Tim Carter

This is the access hole cover for a septic tank. Don't even think of removing it unless you're a professional septic tank cleaner. PHOTO CREDIT: Tim Carter

Let's talk first about why septic systems need to be pumped. Waste water from your home contains solids. Some of these solids do break down in the tank and are devoured by bacteria in the tank. But think about it. When you wash dirty clothes, what happens to the small rock particles and dirt? They settle to the bottom of the tank.

Other solids that can't be digested and broken down start to accumulate on the bottom of the tank reducing the amount of water in the chambers of the tank. Furthermore, there's a layer of scum where floating material like grease and lightweight solids start to accumulate. These also, over time, reduce the amount of water in the tank. You need water in the tank to fuel the breakdown of the solids.

If you don't get sufficient breakdown of the solids in the tank, the small particles pass through the tank and are delivered to your leach field. The leach field is a critical part of the waste-water treatment system of a standard septic system. This field consists of perforated interconnected pipes into which the effluent from the septic system flows. Usually the pipes are surrounded by sand or very loamy soil.

As the nearly clear effluent from the septic system passes through the sand and soil, the remaining pathogens are removed and safe water remains. A septic system that's in good working order does not pollute the ground water nor the surrounding area.

However, if solids are transported from the tank to the leach field because they are not broken down in the septic tank, the leach field, over time, will fail. If this happens, you will create a serious pollution hazard, and you could create health issues for your family and surrounding families.

Regular pumping of a septic tank ensures you'll not ruin your leach field. Replacing a leach field is an expensive proposition that costs thousands of dollars. The price to pump a septic tank is usually just several hundred dollars. It's well worth the price.

The reason no one can give you a definitive time frame of when a septic tank should be pumped is really quite easy. It's all a function of how large the septic tank is and how many people are discharging waste into the tank each day.

Most towns, cities and counties that regulate the installation of septic systems require you to get a professional septic design or plan produced before the system is installed. The designer takes into consideration the size, or number of bedrooms, and the total occupancy of the house.

Using this data, they can size the actual tank. The trouble is, you may have purchased a home and have no idea if the current tank is sized properly for the number of people living in the home. If this is the case, I urge you to get a real professional out to your home that has years of experience with septic tanks. Frequently they can tell the size of the tank after it's pumped. Once they know that, they can tell you how often it needs to be cleaned and pumped.

I was very lucky when I bought my recent home. The previous homeowner had the original septic tank permit as well as several copies of the plan drawn by the septic designer.

The plan clearly shows the exact tank, the size and capacity in gallons of each chamber of the tank and even the type and model number of the pump I need in my system. Unfortunately, my leach field is higher in elevation than my tank, so the effluent from the tank must be pumped about 30 feet uphill to the leach field.

These plans are like gold. If you have them, keep them in a safe place. The permit is also very valuable. Some states now require the seller of the home prove the septic system was authorized when it was installed. Without the original permit in hand, you may spend hundreds or thousands of dollars proving your system was installed correctly.

Column 899