Thanks for submitting your tool/product form. We'll review it and be in touch with the shipping address.
Tim Carter
Thanks for submitting your tool/product form. We'll review it and be in touch with the shipping address.
Tim Carter
Latest News
Seattle & Philadelphia Meet Ups
Sewer Smell from Floor Drain
Steel Garage Door in LA
Facebook Photos
 The past week I've been on a journey of a lifetime. Forty-two years ago, I made my first trip away from Cincinnati, OH heading west. It was a road trip with two buddies.I'll never forget seeing the Rocky Mountains for the first time as we approached Denver. Then going through the Sierras and eventually the Grand Tetons on my way back home. It was eye candy to a budding first-year geology student.
But I always wanted to visit the Canadian Rockies as my wife Kathy was there while I was with my buddies. She said they were magnificent.
I decided I was going, but life got in the way. That is until this past week. Here are just a few photos of what I saw. If you can get out here, do it. Congratulations to the Canadian National Park System for preserving this natural beauty for all future generations.
I'll be in Seattle, WA on Tuesday with some time to kill around lunch time. Then I'll be in Philadelphia on Friday September 23rd around 3 pm with 4 hours to kill before flying back to New Hampshire.
If you're a new subscriber, a meet up is where you and I get together at a local coffee shop, restaurant, etc. to just chat and get to know one another. You can ask any question you want about Ask the Builder, how it works, questions about your home, etc. I'm always interested in discovering more about you!
If you want to hang out in either location, now is the time to pipe up. Reply to this email, but change the Subject Line to one of the two cities so I can get back with you ASAP. I'm staying at the Hyatt Olive Hotel in Seattle, so I'd like to meet close to there. In Philadelphia, I need a ride from the smaller commercial airport northeast of the city into town and then to PHL. If you can assist with that, it would be swell.
Heather, from Redford Township in Michigan wrote to me:
Heather, we need to absolutely verify the odor is coming from that drain. One way is to take a think piece of plastic and tape it well over the drain. Be sure you use a fantastic tape that sticks to the concrete and the plastic has no holes in it.
Ventilate the space after you apply the plastic to remove any odor present. Go back in a few hours or the next day to see if there is an odor. If not, then there is a good chance the drain is the culprit.
I would then take off the plastic and remove the drain grate. Take it outdoors and clean it off.
Take a toilet brush and some of my Stain Solver Oxygen Bleach and clean the sides of the pipe riser that extends up from the buried P-trap under the floor.
I would mix up at least 5 gallons of oxygen bleach solution and pour a gallon into the drain making sure the sidewalls of the pipe get coated with the solution. As you scrub with the brush, dump plain clean water down the drain.
The source of the odor could very likely be a biofilm that's growing on the sides of the pipe. This film can be very gross and slimy. It absolutely will produce a strong odor.
Once the pipe, grate and trap is clean, the drain should be odor free. Don't hide this drain with concrete or stucco. That is very bad jujumagumbo.
I'm traveling with my very good friend Russ. He and I left Salt Lake City last Saturday and started driving north towards Jasper, Alberta, Canada. Then we turned southwest and are now heading to Seattle via Kamloops, Vancouver and Victoria, BC.
As you can imagine, there are hours and hours to fill with conversation. Russ asked me about new garage door for his detached garage located in the foothills of the mountains east of Los Angeles.
I told him I'd put in a durable and attractive steel Clopay overhead door. I've had great success with these doors.
But Russ asked me if it wasn't a better idea to install an insulated steel door that has two layers of steel with foam insulation between them.
He was stunned by my answer and we debated it at the end of breakfast today.
I've been to Russ's house many times and the garage bakes in the sun from late morning to late in the day. The door faces due west.
As you can imagine, the sun bakes the roof, the walls, etc. start to heat up. The roof shingles alone can heat up to close to 160 F. This heat transfers to the wood sheathing, the rafters and all items in the garage raising the temperature inside. Russ wants the garage to be as cool as possible.
I pointed out that an insulated garage door will slow down the transfer of heat. After all that's what insulation does - slows heat transfer.
What's more, the insulation inside the door, will also heat up. If you could insert a temperature probe into the door at the hottest point of the day, it would absolutely be well above the air temperature.
I told Russ to read my past column about Hot Garage Ventilation if he wants a cooler garage.
![]() Are you an AsktheBuilder FAN on Facebook? You should consider it. Why you ask?
Are you an AsktheBuilder FAN on Facebook? You should consider it. Why you ask?
Each week I answer questions on the Fan Page that you don't see other places. You get to discover all sorts of new things there that I don't put on AsktheBuilder.com.
Oh, and did I mention it's FREE? You can't beat that. Free Fun and Knowledge. Don't believe me, go click the link above and read many of the comments under the photos I upload.
I urge you to become an AsktheBuilder Fan on Facebook!
DEAR TIM: I’ve got several places in my yard and along my driveway that erode during periods of heavy rain. I also have issues with the gravel road that I drive to get to my house. What can I do to stop or minimize erosion around my home? I feel like I never stop repairing the damage. It's really a headache. There has to be an effective way to deal with the water. Pamela W., Woonsocket, RI
DEAR PAMELA: My geology degree taught me long ago that water is the ultimate equalizer. Who would ever think that solid granite would succumb to a clear liquid that we drink and bath with? Water, when you swim in it, seems so soft and unassuming.

The soil erodes constantly along this steep driveway. It’s easy to prevent the erosion if you fill the crevice with the right material. PHOTO CREDIT: Tim Carter
But if you watch the news on television, hurricanes and tropical storms dump trillions of gallons of water onto the Earth in a period of a few hours. You'll quickly see that water is a wolf in sheep's clothing. When lots of water moves quickly down a stream, it possesses enormous energy and power.
Water is highly efficient at eroding the soil around your home because it's a perfect example of the simple formula many of us discovered when we took high school physics: Force equals mass times acceleration.
Put in terms you and I can understand, the force that water can exert on something is a function of its weight and how fast it's moving. You already know that water is fairly heavy, assuming you've carried a five-gallon bucket of it around. We can't control water's weight, but we can often control the speed that it travels.

What's more, we can look at the other side of the equation, the part about mass. We know that it doesn't take much water mass to move a small grain of sand, which is nothing more than a piece of rock. If you increase the size of the rock, it takes more water to move it.
To help visualize all of this, let's consider my own driveway. It's very steep at one part and I have chronic erosion on one side because a lot of water is concentrated to one side of the drive. The sand and 1-inch angular gravel is constantly washed out of the ground and deposited farther down the drive.
I'm going to solve this dilemma by putting in angular rock that's the size of a baseball. Based on the water flow I've seen in the heaviest rain, I'm quite sure this size material will resist the force of that amount of water. That's the trick - you need to match up the size of the rock to the force of the moving water.
It's also important to use angular stone or rock if you can source it. This material interlocks and it provides more friction when something tries to move it. Rounded gravel reacts like ball bearings. The rounded surface of a rock allows it to move far more easily if the water gets the rock moving.
Depending upon what your landscaping plan looks like and how you can integrate larger rocks into it, you can slow down the water in many cases by having it crash into larger rocks that are in the drainage channel where the water flows. The water expends some of its energy on the rocks instead of the soil in the channel. If you slow down the water, it has less force.
One of the worst things you can do is to create a smooth paved channel for the water to flow in or down. This causes the water to accelerate to its maximum speed depending on the steepness of the channel.
When it gets to the bottom of the channel, the water is looking for something to waste its energy on. If the channel ends in the grass or at some soil, the water will chew away at it. You can often see evidence of this where a drainage pipe exits a hillside. The water shooting out of the smooth pipe causes significant erosion unless there is something there to absorb all that energy.
Gravel roads or driveways often suffer significant erosion because they are shaped wrong. If the center of the drive or road is lower than the edges giving it a V shape, then the water rushes down the center and causes enormous erosion.
Road engineers discovered centuries ago that you solve this problem by creating roads and driveways with a crown in them. This means the driveway surface is not level side-to-side, but has the center higher than the edges.
The crown allows all the water to run to the sides or culvert area of the road. You don't have the volume of water from the entire road rushing down the center. More volume means more mass. More mass means more force. More force means more erosion.
The crown of a roadway or driveway doesn't have to be significant. You just need the water to want to travel, by gravity, to the edges. It's that easy.
Column 901
Latest News
New Milwaukee Hand Tools
Help Make This Newsletter Better
Digging Under a Foundation
Tiling Over Carpet
Facebook Photo Mysteries
Last week, I had the pleasure of spending about 90 minutes with Tom Sizemore. He's a subscriber who hails from New Mexico and was in the midst of an epic driving trip from there to Maine.
Tom knows that I do meet ups in different towns when I travel, but since he was going right through my town, he thought he'd do a reverse meet up. Great idea, and last year the same thing happened with the Davis family. Tom's truck is behind mine in the photo. Two sweet Ford trucks Made in the USA! Yes, I know GMC and Chevy's are good too. I'm not trying to start a truck war here.
Tom and I talked about a boatload of things, not the least of which was artillery. Tom is a proud member of the U.S. Marines and knows quite a bit about firing shells great distances.
My question, which he answered instantly, was distance or range. How in the world on the open ocean can a battleship determine how far away an enemy ship is? "Tim, it's all trigonometry. Simple," replied Tom. DUH! I knew I should have paid attention in that high school class.
Yes, I know that modern technology can create precision shots with long artillery pieces. I was interested in how it was done years ago.
About six weeks ago, I was at Milwaukee Tools Headquarters in none other but Milwaukee, WI. I saw some great new hand tools, but they wouldn't let us talk, video, photograph, etc. until September 1, 2011. That's the official birthday of the tools.
Here's what's in the lineup:
These are some rocking rugged hand tools and are sure to cause a disruption in the tool world.
Milwaukee has effectively raised the bar on many of these items. You know what they say, right? Competition is a good thing when you're a consumer. That's you and me!
Thanks Milwaukee! The hand tools are keepers.
Would you do me a favor and take this FAST two-question survey?
I really value your input, and it will help make future AsktheBuilder.com newsletters better!
Thanks in advance!
Last week, Ellen, the longest-serving AsktheBuilder employee, forwarded a question to me from a website visitor.
I felt it merited sharing.
The individual needed to put a new water line under an old brick foundation that did NOT have a footer. He was terrified of causing a foundation problem by digging under the brick to make a channel to install the pipe.
Little did he know there is no need to dig under the foundation an risk any type of structural failure. The width of the foundation was only 8 inches and there was no footer. Even if there was a footer, I demonstrate in a video a method that will work very well to solve the problem.
Angelia from Florala, AL wrote to me:
"We have a 16x32 game room covered in old indoor/outdoor carpet directly glued to concrete(no pad). I have done many floor and wall tiling jobs. Would it be possible to tile over the carpet? There are no loose areas; it is glued very well! I am just trying to get out of the ordeal of scraping it off the floor. I appreciate you input and love you site!"
Angelia, I've got some bad news for you. You need to take up the carpet. Tile needs to be installed on a solid surface that has no give to it. The carpet is absolutely not solid. When you install tile on a soft surface or one that has give to it, the tile can crack when concentrated loads are placed on the tile.
![]() Are you an AsktheBuilder FAN on Facebook? If not, you're missing out on some fun and games. You may also be missing out on some helpful FREE information. Each week I answer questions on the Fan Page that you don't see other places.
Are you an AsktheBuilder FAN on Facebook? If not, you're missing out on some fun and games. You may also be missing out on some helpful FREE information. Each week I answer questions on the Fan Page that you don't see other places.
Last week, I posted two photos that got some correct guesses as to what they were. But the best part, in my opinion, are some of the hilarious comments others leave.
I urge you to become an AsktheBuilder Facebook Fan!
DEAR TIM: For years I've wanted a kitchen island. After looking through many magazines and websites, my head is swimming with possibilities. Can you share any kitchen island design tips you've discovered in all your years dealing with them? How about a list of what works and what doesn't? I also need some help on the top for the island. What do you feel works best and why? If there's room, how about some installation tips? Donna P., Waltham, MA
DEAR DONNA: You make me out to be an old goat that's seen more kitchen islands than a lifeguard's seen swimmers on a summer weekend. The truth be told, I've seen and installed more islands than I care to remember.

This kitchen island is one of two in the same room and sports furniture-like touches to make it very distinctive. PHOTO CREDIT: Tim Carter
I think the biggest mistake homeowners make when planning and designing an island is they think bigger is better. That's not the case. Some of the most functional kitchen islands are ones that are as small as 42-inches long. Small kitchen islands that are 2 feet wide by 4 feet long work really well.
The clearance around an island is usually what constrains the size. At the very least you want 36-inches of space between the edges of the island top and any other solid object like another countertop, appliances, or walls. Thirty-nine inches is better and 42-inches would be ideal.
Most islands are created using a standard kitchen cabinet that's 2-feet deep. I've seen tremendous innovation from semi-custom kitchen cabinet manufacturers when it comes to islands. With a little effort, you'll be able to design an island with features that make it look like a fine piece of furniture instead of a ho-hum base cabinet box with some matching plywood on the back.
Ball feet, inset doors, twisted rope columns, raised bars for sitting, etc. are all possible. If you choose the right cabinet company, custom islands that look like furniture will come completely assembled from the factory. I just installed one of these in my own home about six months ago. What used to take a day to assemble, I had done in 20 minutes and was moving on to the next cabinet.
One mistake I see made all the time is an island that resembles an aircraft carrier. I've seen islands that are 5-feet wide or more. You can't even reach the center with your arms to clean it. Remember, less is often better.
Think about what cooking and baking tasks you can relegate to the island. This can put a helper in another part of the kitchen without causing a log jam on a regular countertop. When you design with function in mind, all sorts of good things happen. Take a deep breath and think about what tasks you can relegate to the island and design for that purpose.
For example, you may decide to make the island the headquarters for baking and desserts. Think of putting your commercial mixer on a spring-loaded tray that folds up out of the island and lowers back down out of sight when not needed. Pullout drawers in the other cabinet can be loaded with all of the other accessories you need while preparing these specialty foods.
The back of a kitchen island is a perfect space if you have lots of cookbooks to store. This allows you to make the top deeper, 38 inches total tip to tip, in case you want more surface room to work.
Marble is the preferred surface for an island top for bakers. The cool stone is very friendly to rolling out dough. I'm partial to granite for its durability and the deep and varied colors that are available. Traditional plastic laminate will do a great job on an island if it's cared for.
Be sure to plan for electrical outlets in the island. I'd be sure to put one at each end. If you have the room, microwaves work great in kitchen islands, especially the ones that have a drawer design instead of a swinging door. We love ours here at the Carter Goat Farm.
Kitchen island installation varies in complexity. It all depends if the island comes pre-assembled from the factory. The common thread with all islands is they need to be secured to the floor so they don't slide across the floor when someone leans into it.
You can easily lock an island into position using blocks of wood that are screwed to the floor. If you locate these with extreme precision, you can often lift the island and drop it down on the blocking just like a tight-fitting box lid fits over the outer edges of a box.
This method can be used on any island, but must be used for the islands that look like furniture. You don't want to have unsightly screws that go through the sides of the island into the hidden blocking if you can avoid it.
Column 900
DEAR TIM: I've heard all kinds of advice about septic tank pumping and am more than flummoxed. Some of my neighbors have never done it and others say it needs to be done frequently. When should you pump a septic tank and why? What happens if you forget or don't do it when it needs to be done? The cost for septic tank pumping seems really high and I'm wondering if it's worth it. Carrie S. Hillsboro, OH
DEAR CARRIE: You're going to hate me, but there is no definitive answer as to the exact intervals of when a septic tank needs to be cleaned and pumped. Many professionals who do this work will tell you that it should be done every three years, but there are septic systems that probably should be pumped annually.

This is the access hole cover for a septic tank. Don't even think of removing it unless you're a professional septic tank cleaner. PHOTO CREDIT: Tim Carter
Let's talk first about why septic systems need to be pumped. Waste water from your home contains solids. Some of these solids do break down in the tank and are devoured by bacteria in the tank. But think about it. When you wash dirty clothes, what happens to the small rock particles and dirt? They settle to the bottom of the tank.
Other solids that can't be digested and broken down start to accumulate on the bottom of the tank reducing the amount of water in the chambers of the tank. Furthermore, there's a layer of scum where floating material like grease and lightweight solids start to accumulate. These also, over time, reduce the amount of water in the tank. You need water in the tank to fuel the breakdown of the solids.
If you don't get sufficient breakdown of the solids in the tank, the small particles pass through the tank and are delivered to your leach field. The leach field is a critical part of the waste-water treatment system of a standard septic system. This field consists of perforated interconnected pipes into which the effluent from the septic system flows. Usually the pipes are surrounded by sand or very loamy soil.
As the nearly clear effluent from the septic system passes through the sand and soil, the remaining pathogens are removed and safe water remains. A septic system that's in good working order does not pollute the ground water nor the surrounding area.
However, if solids are transported from the tank to the leach field because they are not broken down in the septic tank, the leach field, over time, will fail. If this happens, you will create a serious pollution hazard, and you could create health issues for your family and surrounding families.
Regular pumping of a septic tank ensures you'll not ruin your leach field. Replacing a leach field is an expensive proposition that costs thousands of dollars. The price to pump a septic tank is usually just several hundred dollars. It's well worth the price.
The reason no one can give you a definitive time frame of when a septic tank should be pumped is really quite easy. It's all a function of how large the septic tank is and how many people are discharging waste into the tank each day.
Most towns, cities and counties that regulate the installation of septic systems require you to get a professional septic design or plan produced before the system is installed. The designer takes into consideration the size, or number of bedrooms, and the total occupancy of the house.
Using this data, they can size the actual tank. The trouble is, you may have purchased a home and have no idea if the current tank is sized properly for the number of people living in the home. If this is the case, I urge you to get a real professional out to your home that has years of experience with septic tanks. Frequently they can tell the size of the tank after it's pumped. Once they know that, they can tell you how often it needs to be cleaned and pumped.
I was very lucky when I bought my recent home. The previous homeowner had the original septic tank permit as well as several copies of the plan drawn by the septic designer.
The plan clearly shows the exact tank, the size and capacity in gallons of each chamber of the tank and even the type and model number of the pump I need in my system. Unfortunately, my leach field is higher in elevation than my tank, so the effluent from the tank must be pumped about 30 feet uphill to the leach field.
These plans are like gold. If you have them, keep them in a safe place. The permit is also very valuable. Some states now require the seller of the home prove the septic system was authorized when it was installed. Without the original permit in hand, you may spend hundreds or thousands of dollars proving your system was installed correctly.
Column 899
Thanks so much for completing the Newsletter Survey! Please watch the video below as well.
Here's the Promo Code as a gift for your input and time:
sale15off
(one word, no spaces)
This will allow you to get 15% off any item in the AsktheBuilder store. However, this discount only lasts until September 13, 2011. So act now.
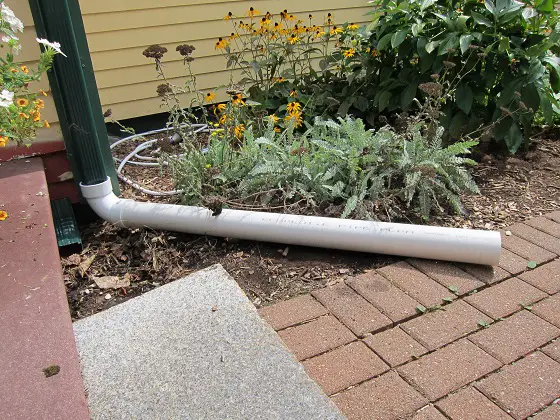
This downspout diverter was hastily placed to get the roof water onto the sidewalk where it will drain away from the house. It will later be replaced and piped underground. © 2017 Tim Carter
"Storms produce vast quantities of water on roofs. An average-sized ranch home that has a roof area close to 2,400 square feet will generate nearly 200 cubic feet of water, or 1,500 gallons, during a storm that dumps 1-inch of rain. That's a tremendous amount of water to concentrate around the foundation of your home."
DEAR TIM: The downspouts from my roof empty out right next to my home. I feel this contributes to my wet basement. I know it keeps my grass soggy. Friends tell me to just install the simple plastic downspout diverters or splash blocks and all will be well. I'm convinced those are pretty much useless. What about downspout extensions or pipes that will get the water at least 10 feet from my home? Is that sufficient? What's a really great long-term solution to dealing with lots of roof water? Irene H., Nags Head, NC
DEAR IRENE: You've got good reason to be concerned with rainwater that cascades down roof slopes. Houses equipped with gutters and downspouts concentrate this water in just a few locations where the downspouts terminate near the ground.
You're correct that the downspout splash blocks, or diverters as some people call them, are of little benefit. The only thing they do is absorb some of the downward energy of the water as it rushed down the downspout. Without the splash blocks, you'd have a large hole next to your home where soil used to be.
Storms produce vast quantities of water on roofs. An average-sized ranch home that has a roof area close to 2,400 square feet will generate nearly 200 cubic feet of water, or 1,500 gallons, during a storm that dumps 1-inch of rain. That's a tremendous amount of water to concentrate around the foundation of your home.
This water can absolutely cause significant leakage in basements and crawlspaces. It's always been my feeling that you should pipe roof water to the lowest spot on your property, into municipal stormwater systems, or if you can afford it, into a cistern or other collection vessel so the water can be reused for gardening or other household uses.
Note that some parts of the nation do not allow you to store this water because of water rights that were sold or leased many years ago. Someone downstream of you may have negotiated the rights to get the water that falls naturally out of the sky.
I've had nothing but success piping roof water underground in rigid PVC pipes. I tend to use a pipe that's made for sewer line work. It comes with slip joints that don't have to be glued. This pipe does not have the wall thickness of Schedule 40 PVC, but it's not the flimsy ABS plastic piping that you'll commonly see at the home centers. You can find this SDR-35 PVC pipe at quality plumbing supply houses or businesses that sell pipe to sewer contractors.
These buried downspout lines don't have to be too deep in the soil. Usually, they are no deeper than 16 inches, unless you have a flat lot. It's best to make sure they fall 1/4 inch per foot of run. This provides plenty of pitch so the water readily flows.
You'll want to use a 4-inch diameter pipe for your system. Be sure that any change of direction of the pipes while underground is done with 45-degree bends. The only place I would use a 90-degree bend is at the end of the pipe where it turns up to capture the end of the metal downspout.
To make other 90 degree bends in the piping system, use two 45-degree bends and put a 1-foot piece of straight pipe between them. This spacing will really help you or a drain-cleaning company if they ever have to put a drain-cleaning snake down the pipe to unclog it.
If you're in a bind and can't immediately bury the pipes, you can run them on top of the soil. These pipes look ugly, but they work. The trick is to get the water as far as possible from the house always making sure it's aimed at the lowest part of your land where it would naturally drain if your house was not there. It's never a good idea to pipe water to part of your land where the water would not naturally go.
If you're installing downspout drain lines in the soil, don't ever bury them immediately adjacent to your home if it was built within the past five to ten years. The soil that's put in around the foundation is almost never compacted. It can take years for it to completely self-compact.
If you install the lines in un-compacted soil, the pipes can bend, kink, or develop reverse drainage where the water doesn't flow. If you use the slip joints, in worst cases, the pipes can come apart at the joints.
In new construction, always put the buried pipes in undisturbed soil. When you cross over the soil around the house, keep it to a minimum. Give this section of pipe extra slope, up to an inch per foot of run, to compensate for future soil settlement.
Column 898
Let me share a true story about tolerance, patience, manners and karma. If you're thinking of coming to the Cayman Islands and are considering staying at the Grand Cayman Beach Suites hotel, then this is a must read.
Two days ago, my youngest daughter and I flew here from the Northeast on a dad/daughter vacation. Because of a number of reasons, family vacations simply couldn't happen as my kids were growing up. I wanted to take them to all sorts of nice places, but money, timing and the opportunity just didn't present themselves.
Kelly and I arrived here in the Cayman Islands after flying on two airplanes and getting up at 5 am. We were tired and hungry. Fortunately the cab ride from the airport to the hotel was short. I'm still not used to seeing cars on the wrong side of the road. We were anxious to get to our one-bedroom suite that had a view of the Caribbean Sea.
 When I got to the front desk to check in, the first person to greet me was Ms. Taneisna Campbell. She was very pleasant and looked up my reservation. The expression on her face changed slightly and she told me I had to speak with Ms. Tricia Miller, the manager, who was on the phone helping someone else.
After just a few minutes, Tricia hung up the phone and greeted me. "Mr. Carter, I'm afraid that I have to put you in a hotel down the street for just tonight. We're overbooked and the fine print on the online site you purchased from says this is a possibility," she explained.
Now stop and think about this for a moment. Overbooked? We are talking about the lowest spot on the graph of the Low Season here in the Cayman Islands. It's like a ghost town here now. Why would this hotel be overbooked? I'll give you a clue - this property used to be a former Hyatt hotel. You'll discover additional reasons as you read on.
Now, back to the lobby where I was just given some bad news. I've been standing back in the check-in line watching when a person in front of me receiving this bad news explodes. You'd think the world ended. The person goes ballistic.
I don't know about you, but I've discovered that screaming, yelling and threats are pretty much not going to get the desired result. Plus, in my case, I was in no mood to argue. I just wanted to get Kelly onto the warm beach sand. Think about it, the patience that hospitality workers must possess is enormous.
It was futile to complain. Tricia was being truthful and just doing her job. Besides, she was kind enough to offer a generous food and beverage allowance free of charge once we came back the next day. Kelly and I left the hotel in their private shuttle, and moments later were in the other hotel. It was a very pleasant property, and we survived.

Before leaving the lobby of the Cayman Island Beach Suites, Tricia handed me her business card and said, "Mr. Carter, please call me in the morning and we'll have our shuttle pick you up to bring you back." "Thanks, I'll do that," I said as I walked out the door.
The next morning we called and talked with Tricia. We decided to come back around Noon as there was plenty to do where we were. The crystal-clear sea water was just the same as it would be down the beach at the Grand Cayman Beach Suites. Kelly and I enjoyed an outdoor breakfast next to the beach and then relaxed.
During the phone conversation, Tricia mentioned that she upgraded us to a two-bedroom oceanfront suite for the rest of our stay apologizing for our trouble. I thanked her on the phone not fully realizing what she had done.
When we arrived at the Grand Cayman Beach Suites, checked in and got to our room, I was speechless. Never before in all my life had I stayed in such a nice room. It was magnificent and the view from the lattice-shaded balcony was beyond words. Watch the videos at the end of this article, and you'll see why you'll want to come here.
I can't say enough nice words about Tricia and the rest of the staff at this superb property. I'll never know why we were treated the way we were, but I highly suspect it was the absence of me groaning, moaning and complaining when we discovered that we couldn't stay here the first night.
In a way, I'm really glad we didn't. I thought the room we were in the first night was not bad, but now it doesn't even compare to what we have now.
If you're planning a trip to the Cayman Islands, there is only one place to stay in my opinion - right here at the Grand Cayman Beach Suites. Don't waste your time looking for another place. And if you can afford it, be sure to book room 8415. You'll not believe it when you see it.
UPDATE:
Kelly and I have now been here for three days and I want to share some other great news about this marvelous hotel.
First, they have a delightful tiki bar next to the swimming pool that has seats where you can dangle your feet in the water. Some pools have the seats lower so the top of the seat is in the water, but these are fine.
 I highly recommend the mango raspberry smoothie. If you can have it made by Dileep, do it. He's an employee that's been here for over a decade. Dileep hails from Sri Lanka and bleeds the Cayman Islands Beach Suites.
In fact, I suspect there's enormous competition each month for the Employee of the Month Award. I'll bet Dileep has a wall full of these plaques at his house. The general manager, Bill Powers, must have a hand-wringing fit each month when he has to pick the winner. Why? Because every team member I've run into here has been friendly, helpful and goes out of their way to assist.
Kelly and I also discovered that part of this property is the magnificent 18-hole golf course Britannia just a few minutes away. We ate lunch there yesterday and Dileep was kind enough to grab a couple of golf carts and drive us around several holes of the course.
We made it to the two signature holes down by the water. Oh my gosh I wish I had time to play a round, but that's not fair to Kelly. I decided I'll just have to come back and play another time. The course topography is so interesting. It's a target-golf course for sure. You'll love the colorful iguanas that make this course their home. They'll not bother you one bit.
Latest News
Atlas Roofing Giveaway
Patching a Hole in a Concrete Foundation
Preventing Blacktop Defects
Facebook Fun
This is my third day back from vacation. I had a splendid time with my youngest daughter. It's a long story, but it's nearly impossible to do family vacations with everyone, so I end up going with one or two of my kids to different places. Kelly and I went to the Cayman Islands and had a marvelous time. It's been on my bucket list for over 40 years. I never thought I was going to make it to the Caribbean. We got a room upgrade that exceeded my expectations.
I urge you to read about our stay at the Grand Cayman Beach Suites. I hope you had a great vacation this year.
 Times are tough right now and every penny counts. How would you like to win a NEW asphalt shingle roof installation worth $15,000? That's a lot of sweet moola, and right now it could make a difference in your life, that of a neighbor, friend, relative or co-worker.
Entering is easy. You have to take a photo of your dirty roof. I think the concept is cool. It's the Anti-Beauty Contest. You know how regular beauty contests work, right? Usually the most beautiful and talented woman wins. Well, Atlas Roofing is looking for the GRIMIEST, algae-stained roof. It could be yours! You never know. You absolutely want to enter. It's free and you just may win!
Atlas Roofing is sponsoring this very cool contest that runs from August 19, 2011 to October 15, 2011. But this contest is pretty unique. The winner is not who gets the most votes overall, but who gets the most votes on any given day. So it's sort of like voting in a regular election in some parts of the country where one gets to vote early and often! Any roof on a detached single-family home is eligible to enter - regardless of the condition of the roof.
This means you need to ENTER NOW and then start getting the word out to everyone you know using your email list, your Facebook account, your Twitter feed, etc. Your friends can vote each day, so as the contest runs and you gather more to vote for you, your totals for each day should climb. Or, you could be stealthy and assemble all your votes for one day right at the end of the contest and come in from nowhere to WIN the new roof. Tell me that wouldn't be cool. I wish I could enter, but I'm disqualified because I'm not eligible.
If you want to help your friends, relatives and co-workers to enter as well, just FORWARD this email to them. Tell them to read all you're reading here and to click the link below to read all the rules for the contest and to see how easy it is to win this great roof.
Remember, here's what you may win:
Atlas Signature Select Roof System Featuring the new line of Pristine Shingles with Scotchgard Protector and Lifetime Limited Warranty against Algae Streaks and Stains
Okay, get out your camera, be sure you take the best photo when the sun highlights how dirty and grimy your roof is.
Go here to enter the contest:
www.AtlasRoofing.com/Vote (This contest has ended.)
Remember, if you want others to Enter FORWARD this email. Don't copy and paste the link above.
P.S. Atlas Roofing paid a small fee to have me tell you about this great contest. I wish you the best of luck!
Ben from Cedar Rapids, IA wrote to me:
"I have a hole through my concrete foundation below grade and it needs to be filled in so it doesn't leak. The concrete guys left the void in the wrong spot. It should've been about 10 feet further to stay above grade. I have an 8-inch diameter hole that needs to be filled in. Any suggestions?"
Ben, this is pretty easy, but it's going to have to happen in stages. The first thing to do is to clean out the hole and remove all dust. Use water and some rags to do this.
Then I would get some concrete brick and put two in the hole lengthwise laying them with sanded hydraulic cement. Slightly dampen the hole first and spritz the concrete brick with water before laying them. Try to keep the brick recessed in from the face of the foundation about one-quarter inch on both sides.
Hydraulic cement is a special cement that expands as it cures. You MUST use this.
Fill any voids with the hydraulic cement mortar. You may have to chip some brick up to fill any large voids. Be sure to surround all the brick with the hydraulic cement mortar.
The next day, I would then mix up more of the hydraulic cement and use it to plaster over the brick making sure the mixture is flush with the foundation. Be sure to spritz the area slightly with water before applying the cement.
Use a damp sponge to blend the patching material in with the foundation. Tape a sheet of plastic over both sides immediately to help slowly cure the patch. Let the plastic set for at least two days. You want the patch to remain moist for a few days.
Remove the plastic and let the patch dry for a few days. I would then get a piece of Grace Ice and Water Shield roofing underlayment. You want a piece that's 2 feet square. This will go on the exterior of the foundation over the patch. Be sure the concrete is dry and dust free before applying it. Carefully backfill against it so the membrane is not damaged.
Kelly was part of another saga before we left. She hit a large pothole at the edge of the pavement and blew two tires and bent both rims. I was able to document and prove that our town had neglected the road, so they paid for the lion's share of the repair bill.
I'm telling you about this for two reasons. First, it may save you personal injury and damage to your cars. Second, it can help you make sure you don't have pavement issues with your driveway. You'll see how when you view the photos I took. See below for that link.
Many don't know there are laws in almost every state that make the government responsible for the repairs to cars and people AFTER they've been notified. It's up to us to report defects. That's sad but true. I understand how some potholes appear in bad weather overnight. But some defects are there for months with no repairs happening.
My town didn't have to pay, because there was no official notification given that the road was a danger.
The lesson here is that you need to notify your local town or city if you see a road defect. Don't assume they know about it. Use the Contact Form on their website or call the police department so a recording of your voice is made telling them of the problem.
You can also take photos and load them to the Internet. Then contact the town or city giving them the URL of the photos. Doing this got me a check for $800. That was well worth the 15 minutes it took to upload the photos to Picasa!
![]() If you're not a fan of AsktheBuilder on Facebook, you're missing out on some fun. At least twice a week, I try to stump you with photos that I upload.
If you're not a fan of AsktheBuilder on Facebook, you're missing out on some fun. At least twice a week, I try to stump you with photos that I upload.
What's more, you may be a fan with a question about your home. I try to answer EVERY question submitted on the fan page. I can't always do that promptly at my AsktheBuilder.com site. That's a benefit of being a FAN!
Become an AsktheBuilder Facebook Fan!
Subscribe to the FREE Ask the Builder newsletter to receive professional advice for your home. Complete the form below and each week you'll get:
Unsubscribe at any time. We respect your email privacy.