What's in This Newsletter?
Latest News
Christmas Gift Guide
Quick Window Cleaning Tips
Smudgy Granite Countertops
FAQ About Floor Grout Sealers
Facebook News
We're experiencing some magnificent Indian Summer weather right now here in New Hampshire. I'm going outdoors in about an hour for the rest of the day. It's sunny and a crazy 61 F as I type this. It could get to 64 F possibly. It feels like a spring day.
About 90 minutes ago, I was up the street taping a video featuring a Tiny Titan compact electric water heater. These are great devices if you need just a small amount of hot water. I'll be editing that video in the next few days and hope to have it for you very soon. It's so easy to install, you can't believe it. I mean caveman simple.
Christmas Gift Guide!

Thanks to my wonderful daughter Meghan, my Christmas Gift Guide is ready for you. It contains suggestions for tools of all sorts and all budgets.
Many, if not all, of the tools in the guide I own and use. I could have put in hundreds more, but that would just be too overwhelming.
Be sure to download and open it. You'll love some of the captions I wrote.
When you click to see more about each tool, I take you to Amazon.com. You can not only do comparison shopping there for similar tools, but everything under the sun is also at Amazon.com.
I'd appreciate it if you would do some/all of your shopping at the same time you go there after you click. I do get a very small commission if you buy, and that helps keep the content and videos at AsktheBuilder.com free for you!
You can also help me by forwarding the link to my Gift Guide to all you know. Relatives, friends, co-workers, etc. might appreciate the suggestions.
Thanks for your support, I really, really appreciate it.
Quick Window Cleaning Tip for Holidays
Are you having company over for the holidays? Are you TIRED of smeared and foggy glass windows and doors?
Would you like it if I showed you how EASY it is to get glass crystal clear like pros do? You're not going to believe how easy it is.
Watch this Window Cleaning video of mine.
Please read this Window Cleaning column at my website.
The simple tools you need to clean windows can be found at most hardware stores or on Amazon.com. If you open my Gift Guide and click to look at tools, search for the window cleaning tools while you're at it and put them in your shopping cart right away. Order now so the tools get to you in plenty of time.
Smudgy Granite Countertops
Alica from Farmington, Minnesota wrote to me:
"Hi Tim, We have black granite countertops in our home but they are always smudgy looking. I feel like I'm wiping them down constantly with dish soap and water to get rid of somebody's hand prints. I also use granite wipes to clean them off. But, they always seem to look plain messy to me. Am I doing something wrong? I've never had granite before so I'm not sure if the "smudginess" is normal. Thank you!"
Alica, your question is excellent, and I believe you gave me the needed clue to unravel your mystery. First, granite should not appear smudged unless there's a film on it or people in the house have greasy hands.
Most liquid dish soaps contain vegetable or animal fats. Isn't that crazy, as you use these products to get rid of oils from cooking and food preparation.
I believe the problem you're having is that there may be a slight film of soap left from when you clean.
Here's how to test if I'm right. Mix up some of the liquid soap and water as if you were going to wash dishes. Make sure the water is warm or hot.
Take a new dishrag and soak it in the solution. Wring it out and wipe down HALF of a smudged countertop. Really clean it.
Take a new dry dishrag and get it wet with clear water. Wipe down the part of the top you just cleaned. Rinse it three times. Rinse out the rag each time with clear water to ensure there is absolutely no soap residue on the granite.
Immediately take a clean bath towel or other soft cotton CLEAN rag and dry and buff the granite. It should look shiny, clean and be smudge free.
If not, there's some other product on the granite, perhaps too much sealer?
Please let me know how this works. I'm willing to bet the part you clean and dry will look spectacular.
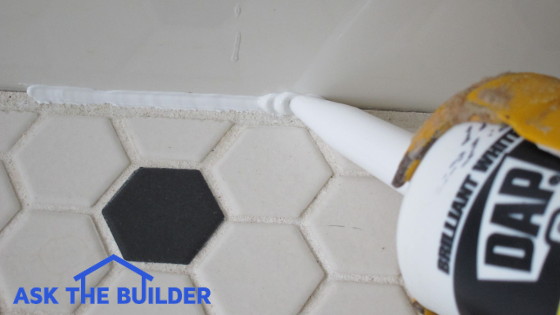
FAQ About Floor Grout Sealers
Thanksgiving, Christmas and New Years are just around the corner. I'm sure there's going to be an accident at your home with some food or drink. Read this to be prepared and to lower the stress around your home.
If I had a quarter for every time I was asked, "Should I seal the floor tile grout that was just installed?", I'd be able to fill lots of those orange coin wrappers!
Grout sealers are a wonderful product, but as with most products, there's often an unintended consequence when you use it.
In the case of grout sealers, they interfere with cleaners that try to deep clean stains that get behind and under sealed grout.
But you say, "Tim, the sealer STOPS the red wine, cranberry juice or grape juice from getting to the grout!"
"But what about where the grout ends and the tile stops? You know, that interface where there is a very tiny crack," I retort.
When the red wine, grease, grape juice, chocolate sauce, kid's spilled juice box gets UNDER the sealer and into the grout, what then? Let me tell you, it can be VERY hard to clean the stain.
This is why I'll NEVER seal my floor grout. I want to be able to easily clean it. I don't want a sealer in my way when I try to clean.
Watch the video at this page in my shopping cart to see how easy it is to clean grout that's NOT been sealed. The same product works for carpet, heirloom table clothes, upholstery, etc.
Facebook News!
 Do you use Facebook? I've got a Facebook Fan Page that really sees some action during the week.
There's LOTS of tips there that never make it into this newsletter.
Please go there now and LIKE me so you can start to get FREE tips from me when you login to your Facebook page.


 While in Chicago I made my first-ever trip to the historic Merchandise Mart. It's the largest commercial building in the world I was told.
 A very good friend of mine, Bryan, lives in San Francisco. He rents an apartment and last week he had a major plumbing disaster. Luckily he was home when it happened. Had he been gone or at work, oh my.