Here's a link to the DeWALT DCD785C2 20-Volt MAX Li-Ion Compact Hammerdrill/Driver Kit, 1.5 Ah on Amazon.com where you can purchase this item. It's an affiliate link. I get a tiny commission if you buy the tool.
Preventing Woodpecker Holes
DEAR TIM: Woodpeckers are systematically destroying some fence posts in my yard. I’m at my wits end trying to figure out how to stop them. Are there chemical sprays I can put on the wood that will repel them? What about decoys or something like a scarecrow? Do you know of anything that will work to stop them from making my fence look like a piece of Swiss cheese? Shirley S., Hamilton, OH
DEAR SHIRLEY: Oh I can absolutely feel your frustration. Woodpeckers used my past house to find their mates by pecking on my aluminum gutters at dawn. Who needs an alarm clock or rooster when you have these hard-headed birds heralding the start of another day?
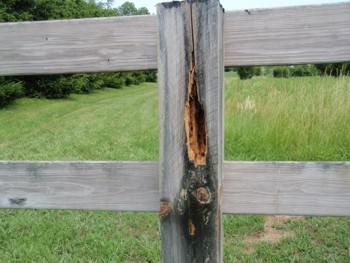
It's almost impossible to stop woodpeckers from creating holes like this. But there is a way to fool them. PHOTO CREDIT: Shirley Sendelbach
Add to that the fact they used to peck holes in several of the fascia boards around my house just as they’re doing to your fence posts. No matter how hard I tried, I couldn’t get them to stop.
They only stopped when they exhausted the food supply. You see, woodpeckers hammer at trees and other wood primarily for one reason: Food. Hidden just under the surface, woodpeckers can find all sorts of tasty insects including, but not limited to, carpenter ants, carpenter bee larvae, termites, bugs in general, etc.
I’m convinced that woodpeckers can hear or smell the insects. You don’t see woodpeckers in the wild randomly peck at wood that’s not infested with insects. I know as I live near the woods and I see woodpeckers all the time. They don’t bother wood that’s free of insects.
If this assumption is correct, then it becomes somewhat easy to prevent woodpecker holes. You keep the wood you have free from insects by preventing rot and decay. In the case of your fence posts, this means they need to be sealed regularly so that water can’t saturate the wood. Wet wood is very inviting to insects.
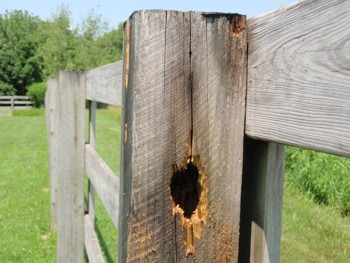
PHOTO CREDIT: Shirley Sendelbach
If I were you, I’d remove the damaged fence posts and replace them with wood that you’ve sealed with a semi-transparent water repellant. Be sure you allow the bottom and the top of the post to soak in liquid for an hour or so. This allows the end grain of the wood to soak up as much of the chemical as possible.
Don’t get rid of the damaged fence post. Move it away from the fence to some other part of your yard. Reinstall it in the ground and let the woodpeckers have at it. Make a humorous sign that says: "Woodpeckers and Insects Welcome" and hang this on the post.
The old post will satisfy the hard-coded survival DNA in the woodpeckers as they constantly forage for food. If woodpeckers are attacking your house, then you can try this same strategy using some old log you can find. Bring it home and put it up as a totem pole offering in your backyard. Hopefully the woodpeckers will be attracted to it assuming it’s full of tasty treats.
You may be groaning at the task of replacing your perforated fence post with a new one, especially if the old one is set in concrete. If that’s the case, this will be the last time you’ll struggle with this fence post location.
The trick is to set the new post with just soil or crushed gravel if you feel you need a masonry support collar. Crushed gravel will perform just as good as concrete. The advantage is that it’s so much easier to remove the gravel if you should ever have to replace the fence post in the future.
 If you decide to apply the water repellant to the entire wood fence, you should clean it first. Use oxygen bleach mixed with water for this task. The oxygen bleach will not harm any surrounding vegetation. It will return the wood to it’s original color so the new fence post matches all the other fencing.
The oxygen bleach will remove dirt, mold, algae and sun-damaged wood fibers that are now gray in color. Rinse the clean wood with fresh water and allow it to dry a day before applying the water repellant.
Search online and you’ll discover other ideas to repel woodpeckers. Some are unreasonable and may get you in trouble with your neighbors. Who want’s a neighbor banging pots and pans or letting off fireworks in an attempt to get rid of the birds?
You can try to create large silhouettes of birds of prey that eat woodpeckers. These may work for a while, but don’t underestimate the intelligence of the little devils. When they’re hungry, they’ll soon probably test to see if you handiwork is a real bird.
If you want to attempt to use insecticides to kill the food source, be sure the chemicals are approved and will not hurt the water supply in your area. The last thing you want is to pollute the water and start to grow a tail or a third eyeball.
Column 887
June 7, 2011 AsktheBuilder Tips And Newsletter
What's in This Newsletter?
Latest News
Wall-Mount Pocket Doors
DeWALT Editors Conference
ExpertToolTips.com
DIY Solar System and Magic Crystals
Replacement Parts
AsktheBuilder Facebook Fan Highlights
Summer's here in all it's glory. We're having some glorious weather here in New Hampshire. I hope the weather is superb where you are.A few days ago I had a very positive encounter with Officer Kimberly Shelley of the Burlington, VT police department. It's a very long story, but suffice it to say she made a phone call on my behalf to shake loose a security deposit that was not being returned to me by an unprofessional property manager.
I was told to call the police department after talking with another police officer, Lt. Rob Robillard. I've recently come to know Rob, and after hearing my story he was convinced the property manager was very likely committing fraud.
I bring all this up to simply point out that on many occasions great police work goes unnoticed. The moment that I get my hands on the deposit money, I'll be writing a letter to the police chief in Burlington, VT telling him about Officer Kimberly and how she worked with me on the phone to resolve the matter. The letter will include a scanned copy of the returned check. If you're the recipient of excellent police work, be sure to take the time to contact her/his chief so the officer gets the professional recognition she/he deserves.
Wall-Mount Pocket Doors
 Many people want to get rid of a traditional hinged door and replace it with a sleek pocket door.
But they are terrified of what's behind the wall. Or they don't have the skills to do the demolition, framing and redrywalling you typically have to do.
What if I told you that you could have a pocket door in place of a hinged door start to finish in several hours instead of days with NO DEMOLITION?
Yes, I knew you'd be interested. If you can operate a simple impact driver or a drill and a socket wrench, then you can have a sweet pocket door installed in hours at your home.
This product works GREAT on regular open archways where you now want privacy between two rooms that used to be open to one another. You can use this solution to add a door in hours where just an opening was before. It's easy to do.
Go to the link below to discover all sorts of color photos and ideas for your new wall-mounted pocket door:
DeWALT Editors Conference
Last week I attended the Stanley Black and Decker University.
It was a fantastic experience where I was immersed in the new 20-volt cordless tool line that's now here. The other editors and I also got to see many new hand tools that will now sport the DeWALT name.
DeWALT primarily targets the professional market, but their tools are perfectly suited for you if you're either a serious DIY'er or you desire to have a tool that will last for decades.
Understand that when you purchase a high-quality tool you get durability, precision, and ease of use. These all contribute to a job well done.
Soon I'll begin my own field testing of the tools I saw at the event. You'll be the first to know about each review as it get's posted to my websites. Websites you say? Read the next item.
ExpertToolTips.com
About six years ago, I created ExpertToolTips.com, but then got distracted. The intention was to create a website where I could share my 35 years worth of hands-on experience with tools.
The good news is that I've started to add more content to that website and intend to load more and more content to it as well as helpful eguides that show you secrets of using tools. I believe you're going to really like this tools website once it starts to get populated with content.
DIY Solar System and Magic Crystals
Over the weekend, I got an email from David Gates who lives in Duncannon, PA. He wrote:
"We received an email saying the average person can build their own solar system and sell back excess power to the power company using materials from a hardware! Any information and advice would be appreciated!"
The instant after reading it, I had a flashback to the Napoleon Dynamite movie from six years ago. If you saw it, do you remember the crude time machine that Napoleon and Kip tried? It was made from parts one could get at a hardware store and of course all it did was shock Napoleon and endanger his ability to procreate. The magic crystals he inserted in the romex connector did nothing to transport Napoleon back in time.
As the economy continues to crater and people become desperate for money, you're going to see many more scams like this. There are always going to be scams, and the worst ones happen when people are desperate.
The bottom line is that you can't build a solar electricity generation system, including the all-important PV panels and the inverter, by visiting your local hardware store. Don't fall for scams like this. Always check with me first.
Replacement Parts
Greg, from Las Vegas, also emailed me over the weekend trying to locate a replacement circuit board for a sauna. He did an exhaustive Google search and it shows the manufacturer is out of business. He's tried everything to get a part, but is having no luck.
The message here is that in this day and age, it's very possible that hi-tech replacement parts can be tough to find. Margins are thin, and companies that make products can disappear overnight.
You have to really think ahead when you buy things now. Make sure you think about parts and consider going with companies that have a great track record. You want them to be around when you need them.
AsktheBuilder Facebook Fan Highlights
Last week on the AsktheBuilder Facebook Fan Page, I shared my thoughts about how to protect yourself from tornadoes while in your home.
Peggy asked how to install return air ducting and I gave her some advice.
I also suggested a great past column to read if you want to try to reduce the heat in a garage or an attic.
There's lots going on at Facebook. You should really be a fan. Facebook is free and you get automatic updates of everything I do there once you LIKE me. It's easy.
Window Box Installation Tips
DEAR TIM: My wife wants me to install a window box or flower box, depending on what you call them. I’m pretty sure that if I’m successful, I’ll be installing a few more.
The boxes, when full of potting soil, plants and watered are pretty heavy. I’m very concerned that the box is going to fall and crash to the ground.
What have you found to work best when installing these decorative items. I sure need your help, as I don’t want to upset my bride. - Don B., Staten Island, NY
DEAR DON: Oh I’m quite aware of the wrath you might feel if your window box plummets to the earth scattering the plants and flowers.
Plants are Children - Beware!
My wife treats her plants like they are her children, and if I ever step on one or otherwise mistakenly cut one off with the weed trimmer, I’m in the dog house for quite some time.

Window boxes full of flowers can be used under windows or to add color to deck railings. They are sure to please. PHOTO CREDIT: Tim Carter
You do want to succeed at this task for any number of reasons. First and foremost is the safety of anyone who might walk under the window.
You sure don’t want a window flower box to detach from a wall and fall on someone’s head. It’s happened before and surely will happen again.
Free & Fast Bids
CLICK HERE to get FREE & FAST BIDS from local handymen that can install your flower boxes FAST!
There are several ways to support a flower box, the most common being metal brackets that are screwed to the wall. The challenge when using a bracket is to make sure the screws go into solid lumber. The only problem with this approach is that the placement of the brackets might not be centered under the flower box. Centering brackets on a masonry wall is easy, and it’s easy to anchor them for solid support. However, many houses have wood or vinyl siding with the wall studs undoubtedly off center.
This is why I usually don’t use brackets choosing to use hidden french cleats instead. A french cleat is a time-tested method to secure pictures, mirrors, mantles, and even a window box to a wall surface.
The french cleat is a two-piece connection system where the piece of wood or metal that’s attached to the window box interlocks with the mating piece that’s attached to the wall. The best part is that once installed the window box appears to be floating in mid-air with no visible means of support.

It’s easiest to use lumber to create a french cleat. I highly recommend using treated lumber in your case since the wood will be subjected to water. You don’t want the french cleat to rot over time and fail causing the window box to crash to the ground.
The french cleat can be made from 3/4-inch-thick material. You need a piece of lumber that’s about 3-inches wide and as long as the window box.
The magic happens when you cut the single piece of lumber into two pieces along its length. You need either a circular hand saw, or better yet, a table saw with the blade set at a 45 degree angle.
By splitting the piece of wood down the middle with the saw set at the angle, you create two pieces of lumber that look identical, but one actually interlocks with the other when mated together. This is what’s going to hold the window box to the wall.
CLICK HERE to get FREE & FAST BIDS from local handymen that can install your flower boxes FAST!
The piece of lumber that attaches to the window box is screwed to the window box so that the angled cut points to the ground and the long tip of the cut is not touching the back of the window box. The flat or square edge of this piece is usually flush with the top of the rear of the window box.
The other piece of lumber gets screwed to the wall of the house with the angled cut pointing up to the sky and the long point not touching the wall.
I’m sure you can see how when you bring the window box over to the wall and allow the two pieces of lumber to interlock that the box will be securely attached to the wall. The only tricky measuring you have to do is to calculate how far below the bottom of the window sill or window frame to attach the piece to the house.
Typically the top of the window box, once installed, is a inch or so below the window sill or the outer frame of the window. It’s easy to do the math to see where the bottom of the house piece needs to be in order for the box to be at the right height. If you started with a piece of lumber 3-inches wide, the square bottom of the house piece needs to be 4 inches below the bottom of the window sill or window frame.
The pieces of treated lumber that are screwed to the house as well as the window box need to be attached using galvanized or stainless-steel fasteners. These will not rust.
When you attach the one half of the cleat to the house wall, be sure it’s parallel with the bottom of the window sill or the window frame. You’ll be tempted to use a level for this task, but that could be a mistake. You don’t want the window box level if the bottom of the window itself is not level. It will look like you made a mistake after you’re done.
You may have to install one or two 3/4-inch blocks of wood on the lower rear corners of the window box to ensure the box doesn’t tip. The french cleat will hold the back of the window box away from the wall, so the blocks ensure that the top of the box is level front to back. These blocks will not be seen when you look straight on the box.
CLICK HERE to get FREE & FAST BIDS from local handymen that can install your flower boxes FAST!
Column 886
Paying for Construction Tools
DEAR TIM: My contractor submits bills for labor and materials and I reimburse him. However, I'm noticing items such as $50 "Diamond Blade" and other tools on the bills. Is it normal for the contractor or the homeowner to pay for a special tool or blade that he chooses to purchase to use for the project? What about replacement parts? I want to be fair, but I don’t wish to be cheated. How would you handle this situation? Kimberly McL., Calgary, Alberta, Canada
DEAR KIMBERLY: Let me start by saying that you, as a homeowner, should pay for construction tools and equipment that are completely consumed on your job. Some examples of that are pretty easy to identify. Labor, materials, and other supplies like fuel for machines, sandpaper, certain blades, etc. These things become part of your home and/or can’t be used at another location after the job is done because there is nothing left or they are unusable.
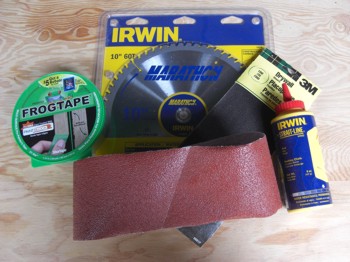
Blades, sandpaper, chalk, masking tape, etc. are tools that can get totally consumed on a job and should be paid for by the homeowner. PHOTO CREDIT: Tim Carter
However there is a massive gray area and I hope that the written contract you have with your contractor spells out what’s to happen in certain situations. Believe me, it’s easy for you to get taken advantage of in a labor and material or cost-plus deal like you describe.
If I was working for you, this is how I would have negotiated the contract. First, I would have a small multiplier, similar to a sales tax, that gets added to every bill I submit to you. This small percentage, say one percent, covers wear and tear on the tools I already own and will be using on your job. This would even include wear and tear on my truck that I drive to your job each day. All of these things eventually wear out and the cost needs to be spread out proportionately over all the jobs where they are used.
This financial arrangement takes care of preowned tools pretty nicely. The multiplier that’s used can seem like fuzzy math, because some tools have a much longer lifespan than others. A truck may last ten years or more where a circular saw that’s used each day for hours may give up the ghost after three years. You’ll have to trust the contractor is not charging you an excessive amount for the use of his tools.
When it comes to new construction tools that have to be purchased for your job, I would have said in my contract with you that either you get the tool at the end of the job, after all - you paid for it, or I can buy it from you at a slightly discounted price deducting the wear and tear that was placed on it during your job. If neither party wants the tool, it can be donated to a local charity that uses tools or it can be sold in the open marketplace. It’s easy to sell tools using free online classified ad websites.
You can sometimes skirt this issue entirely and rent the needed tool. Why buy a tool if it’s only needed one day? The problem is that tool rental costs can soar if a tool is needed for a long time. Then it makes sense to buy the tool, but the ownership of the tool needs to be spelled out before it’s purchased.
In your case, the $50 diamond blade gets a little tricky. The contractor may not have owned one, and indeed needed it for your job. However, the entire blade may not be used up after he’s finished with it. It could have lots of cutting time left on it. In this case, I would have offered to buy it from you at a discounted price. If not, I’d leave the blade at your home for you to decide what to do with it.
Replacement parts for construction tools are another fuzzy area. Let’s say that while the contractor is at your house, the motor on his electric concrete mixer gives up the ghost. The part may cost hundreds of dollars.
There is no way you should have to pay for the cost of the new motor as it was wearing out for years when it was used on other jobs. It’s reasonable for you to pay a small part of the part cost as the mixer, once up and running again, will be used for your benefit. I say this assuming the motor will last for several years after it leaves your job site.
I’ve got some advice for you in the future. Try to minimize the number of situations where you use a cost-plus system of paying for a job. They are fraught with uncertainty and can cause all sorts of anxiety about what the final bill will be. Whenever possible always work with a fixed-sum contract where the contractor agrees to one price no matter what happens.
There are times in certain jobs, where there are unknowns. For example, a contractor digging a basement may have a rock clause in case he hits bedrock and has to blast or use special equipment that digs slower. In roofing work, there may be a clause to pay for rotted wood under shingles that can’t be seen until the roof is stripped off.
The trick is to identify just those parts of the job where the uncertainty lies and work those on a cost-plus basis. Once that part of the job is complete, then the contractor is back on his fixed-sum contract.
This arrangement gives you much tighter control of the finances of a job. You should be able to sleep better and you’ll not care how many diamond blades or sheets of sandpaper a contractor buys. It’s up to him to be frugal with the amount of money that you agreed to in the contract.
Column 885
May 24, 2011 AsktheBuilder Tips And Newsletter
What's in This Newsletter?
Latest News
Replacing Bathtub Tile
Garage Design
SOG Knives
The Meghan Method
Latest News
Thank you so much for the advice on black fly repellent and itch relief. Avon and Procter and Gamble are going to love me as I'll have Skin so Soft slathered all over me and clothes made out of Bounce. NOTE TO P&G: Sell a spray bottle of the chemical you use in Bounce sheets. Duh!!
Last week I hosted a mini conference here in New Hampshire. Seven other website owners attended. Their sites are about selling books, baking, tech questions, business tips, etc. We got together to share ideas on how to make our websites better.
Within the first hour, all of us complained about how the results we see in the search engines are not that great lately. Have you noticed the same thing? I'm talking about any topic you search for, not necessarily home improvement.
For example, I've been doing some research for my own projects and I keep finding websites that have scraped some of my content showing up on page one of the search results. That's crazy.
If you're unhappy with the search results you see, I suggest you do something about it. I just discovered a new Search blog at Google where you can offer suggestions on how to make search better! Look in the right column where they ask for Feedback.
If you're tired of poor quality search results, I've got a suggestion. Create a list of sites that you trust, - I sure hope AsktheBuilder.com is one - and do your search there BEFORE you go to the major search engines.
Bookmark your favorite sites or add them in the Top Sites that some browsers show when you open a new tab.
Adopting this direct approach helps these sites. For example, AsktheBuilder.com needs your traffic so I can continue to give content away for free. Every site you trust needs your support.
If you don't find what you need at my site or the other trusted sites, then try your luck using a major search engine. That's what I've started to do.
There's a huge announcement at the end of the newsletter. Don't overlook it!
Replacing Bathtub Tile
Earl from Los Angeles wrote to me:
"I would like to replace the tile on the surround of my bathtub. The bottom row of tiles though is lower than the floor tile. Is it possible to replace the surround tile without damaging or replacing the floor tile around it?"
Earl, it is possible, but it's not easy. You can use the new multi-tools or even possibly a RotoZip tool with the correct attachment to be able to make a PRECISE scoring cut right where the wall tile meets the floor.
This should allow you to remove the wall tile without damaging the floor tile. But get this, you can also install tile over tile! There are adhesives made for this purpose. You get these at specialty tile stores that just sell tile, marble or other stone. I doubt you'll find these special products at a big box store.
Good luck!
Garage Design
This past week my son has been a great help in cleaning and organizing our garage. We've been building shelves that go on the side walls. Look at this past column to see the exact shelves we're building.
If you're garage is like the one I have now - I didn't build the house I'm living in right now - perhaps you get frustrated with your garage design.
I find that a vast majority of garages are too narrow. The space between your car and the side wall is often only 3 or 4 feet once the car is parked inside. This is problematic when you go to open a car door. We're having to build our shelves narrower than I want because our garage here is too darn narrow. Arrrgggghhhh!!
If you're building a new house or a new detached garage, then you absolutely need to read this past column of mine that will help you avoid a host of garage design problems.
SOG Knives

I recently tested three SOG knives. My son Tristan helped in the test. We both were really impressed with them. They were smart looking, sharp, and they had very comfortable handles.
My favorite was the SOGzilla.
My son loved the AutoClip. He said I can have it when I pry it from his cold, dead hands. I think I'll just wait till he's in the shower.
We both liked the Flash II - Partially Serrated blade and have agreed to share it. One week he gets it, then I get it.
If you're starting your Father's Day shopping early, the links above are affiliate links. It means I get a very tiny commission if you buy the items after clicking.
The Meghan Method

I've been waiting for a long time to make this announcement. If you've been lucky enough to be blessed with children, you know the pride I'm feeling right now.
For nearly three years, I saw my oldest daughter Meghan work almost non-stop on this revolutionary book about the never-before-revealed EASY methods behind DIY interior decorating.
Once she was deep into the project and the hard deadline was approaching, she worked for months at a time taking no days off. Talk about determination. As the hard deadline approached, she and her business partner Brent put in nearly a week's worth of 24-hour non-stop days. They were zombies at the end.
It was so worth it. The coffee-table deluxe full-color hardbound book hit the shelves at all the major bookstores in the last two weeks. There's no other decorating book like this. It's a step-by-step method showing you how to get the home of your dreams, NOT the dreams of a pricey decorator you hired.
It's got 34 easy-to-use worksheets and over 600 color photo examples of exactly how you get from the fuzzy visions in your head to a finished room that your friends and relatives will drool over - not to mention how much you'll enjoy living in the space!
Sure, you can go to a Barnes and Noble or to Amazon.com and buy a copy, but you'll not get the deal I'm about to outline for you.
If you purchase the book from Meghan's website, the price is LOWER than what you can get at Amazon.com after you submit a review. But it gets WAY BETTER.
Buy the book now using this Meghan Method link, and you're going to get:
An Autographed Copy - yes, I saw her come back from the warehouse with writer's cramp where she signed boxes and boxes of books. Make the mistake of ordering from Amazon and you'll NOT get this autographed copy.
My Bundle of Major Interior Remodeling Checklists FREE of charge. If you're going to remodel, Meghan's book will be the icing on the cake as you decorate each room. If you were to buy these from me separately one at a time, you'd spend $51. Buy Meghan's book now, and you get all these for free.
But it gets better.
If, within TWO weeks after you receive the book, you go to Amazon.com and leave a review, Meghan's going to credit you back 50 percent of your purchase price. To get the refund, all you have to do is email Meghan at [email protected] telling her to go look at your review at Amazon.com.
To get all of these things, you must act NOW. This offer is only open until this coming Sunday, May 29th at midnight Eastern Time.
I'll be sending you a reminder email on Sunday.
Pocket Door Hardware
DEAR TIM: My wife wants me to install a pocket door. I have to admit that I’m pretty intimidated by this project. I don’t want to make a mistake and install a door that rubs. What’s more, I’m terrified of what’s behind the wall. Are there any tricks to installing a pocket door that will be trouble-free for years? I really need your help to get me in the right mindset. Todd B., Grove City, OH
DEAR TODD: I've been where you are now. It's easy to get intimidated about a project that you've never done or done long ago. The best way to proceed is to do as much research as possible and plan for as many problems as you might think will rear their ugly heads as you move forward.

Surprise, surprise! When you go to install a pocket door in an existing home, you’re often met with challenges like these cable TV wires. PHOTO CREDIT: Tim Carter
The good news is that once it's time to install the actual pocket door hardware, you're long past the hard part. In new construction, this job is as straightforward as chewing gum. But in a remodel situation, you have to deal with walls that might be out of plumb, hidden utilities in the wall, and structural issues. All of these can be overcome, possibly with a little help from a professional if you're out of your comfort zone.
Let's talk about rubbing pocket doors. I had that problem years ago when bought what I thought was a fine pocket door frame. It was made from lumber and I just had to nail the entire contraption in place.
All went well for about nine months then I got a call from the homeowner. Sure enough the door was rubbing and scratching the paint. I traced the problem to a horizontal brace in the frame that warped inward pinching the door. I had to tear into the wall and replace that pesky piece of lumber.
Then another problem arose months later. The door kept jumping off the track. I was really upset at that door hardware.
I soon discovered you can purchase pocket-door frames that have warp-free metal studs and a track where it's impossible for the door to derail. I immediately switched to that hardware and have never had a problem in the past 25 years.
You shouldn't be terrified of what's behind the wall where your pocket door frame will nest. Virtually everything that might be a problem can be dealt with. It may not be easy to move electric cables, plumbing pipes, heating vents or pipes, or even a structural column that you uncover, but it can be done. It's all a matter of money and time.
If you're lucky enough to have your original house plans and they are detailed, you can get a handle on any structural issues. If there are nearby bathrooms under, next to or above the location where your wife wants this new fantastic door, you could have a drain stack or vent pipe in your way.
It's easy to patch plaster or drywall, so why not cut some inspection holes to see what's in the wall cavity where the frame needs to be? That should help you plan ahead before you really get started. If you move ahead, you'll be removing the entire plaster or drywall surface in this area, so it makes no difference about creating small holes at first.
To have a flawless finished pocket door, you need the best hardware and frame. I've already described that. Be sure the kit you pick has trolleys that have three wheels. These are the ones that can't jump the track.
It's really important that the frame for the door be installed in the same plane. This means that the wall can be out of plumb (not recommended), but that it can't be twisted like a pretzel. A wall that's twisted is problematic when you try to insert a non-twisted item like a large flat door.
You avoid twisted door frame rough in situations by making sure that the bottom and top plate are in straight lines and the wall studs extending between them are absolutely plumb.
Use a long straight edge to confirm this. Don't trust putting your 4-foot level on a wall stud. The stud can have a crown in it and the portion you have the level on may read level, but the top and bottom of the stud may be out of whack. All you have to do is make sure the wall studs at each end of the pocket-door rough-in opening are absolutely straight with no crown or bow in the studs.
The top of the frame that comes from the factory must also be installed absolutely level. This should not be hard to do. Use shims if you have to get it level.
Plan ahead for the thickness of the finished floor. You don't want a massive gap larger than 3/4 inch under the door. Even worse is discovering that the door needs to be cut off at the end of the project because you installed the frame too low. The high-quality pocket door frames come with pre-engineered metal wall studs that make it nearly impossible to install the frame too low.
Column 884
May 19, 2011 AsktheBuilder Tips And Newsletter
What's in This Newsletter?
Black Flies
Solar Attic Fans
Washington DC Meet Up
Preventing Caulk Tube Clogs
Quick Stain Solver Tip
Gravel for Driveways and Roads
Latest News
Have you ever had to deal with black flies? I'm not talking about the large black flies that pester you during a cookout. I'm speaking of the little demons, about the size of a grain of uncooked rice, that are the bane of the Northeast, Canada, Alaska, Minnesota, etc. It seems any place that has an abundance of lakes or fresh water has these fiends.
Last week, they finally made their annual spring arrival here in New Hampshire. I found myself working outdoors up on my land fixing a washout of a gravel roadway. Even though I sprayed myself with Deep Woods Off, the little creatures bit me in several places on my arms. It's the periodic itching that drives me nuts.
Do you have an effective incantation or secret potion that works to prevent the biting? I've asked local workers up here who have to deal with it daily and they just say suck it up. Excuse me while I scratch the back of my upper arm again. Arrggggggghhhh.
Solar Attic Fans
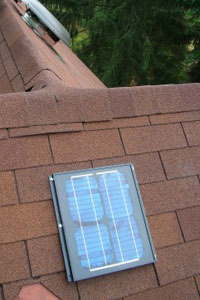 Ellen, the first employee at AsktheBuilder, handles all of the incoming email and questions we get at the website. She does a great job trying to help you. But occasionally you stump her and I need to jump in.
This morning she sent me an FYI email about a frustrated homeowner who had purchased several solar-powered attic fans. He had copied us on an email he sent to the manufacturer. Sadly he mentioned us in the email saying that I had nailed the fact the units were not effective. But this was AFTER he installed them and then went online to see WHY they were not working.
I mention this for several reasons. Try to resist the slick marketing claims made by new products. Slow down before you buy and try to go online and do some research to see if the products really do work.
Don't become a lab rat. These are the early adopters. You're first out of the chute so you'll not find anything online as to whether the new product works. It's too early.
Here's my past article that the man found after he had already wasted his money:
https://www.askthebuilder.com/solar-powered-attic-fan/
![]() Remember, if you're on Facebook, PLEASE leave a comment at the bottom of the column telling others what you discovered when reading my column. You'll see the Facebook comment widget at the bottom of the column. Thanks in advance!
Remember, if you're on Facebook, PLEASE leave a comment at the bottom of the column telling others what you discovered when reading my column. You'll see the Facebook comment widget at the bottom of the column. Thanks in advance!
Washington DC Meet Up
I'll be in Washington DC next Monday and Tuesday. I'll have four hours to kill on Tuesday, May 24, 2011. We can get together late afternoon and early evening before I fly back to New Hampshire. Do you want to get some liquid courage and nutrition (some feel they are one in the same) with me?
We had a meet up in January in DC, and it was well attended. Email me immediately if you're interested and let's get together to chat it up. Meet ups are fun. You can ask any question you want about any topic. It doesn't have to be about home improvement.
Preventing Caulk Tube Clogs
When you use a new caulk tube for the first time and don't use it all, the caulk in the spout will harden and clog the tube if you don't cut off the air.
There are any number of ways to accomplish this, and I've had fantastic success blending two methods together.
I carefully cut the spout 99 percent of the time so that it matches the diameter of either a 4d or 6d finish nail. After I'm done caulking, I squirt out a dab on a scrap piece of wood that the size of green pea, maybe a little bigger.
Then I insert the correct nail making sure that it fits snugly in the tip of the tube as it slides in.
I leave at least 1/4 inch of the nail exposed and then take the excess caulk and pack it around the nail where the end of the tube is to act as a secondary air seal.
When it's time to use the caulk again, I just use a pliers to pull out the nail.
Quick Stain Solver Tip For Wendy in Colorado
 I just got a question from Wendy who subscribes to this newsletter. She wanted to know if my Stain Solver could be used in modern front-loading washing machines. Her instructions say NOT to use powders. I've found this the case with many of the new washing machines.
My guess is that because the machines use such small amounts of water, they don't want you to put the powder on the clothes AFTER you have loaded the clothes into the machine. Doing this allows the concentrated powders to leave splotches of discoloring on your clothes because the powder couldn't dissolve and dissipate. That's my story and I'm sticking to it.
The solution to this problem is EASY. You can add powder, and my mighty Stain Solver, to the front loaders successfully.
All you need to do is add the powder FIRST and then pour in about a quart of warm water to get the powder to drop through the holes in the stainless steel drum. The warm water starts to dissolve the Stain Solver and gets it ready to work on your clothes once you load them and start the machine.
So Wendy, get out the Stain Solver and get your clothes really clean!
Gravel for Driveways and Roads

If you're getting ready to repair a gravel driveway or possibly enlarge one, you need to make sure you use the right product. This is mission critical if your driveway is on a hill.
All too often I see rookie homeowners use a gravel that's rounded. Using that is like driving on marbles. The rounded surfaces of the gravel provide little friction to all the other pieces and they move. Your tires won't bite into round gravel. They most often sink and you can get stuck easily.
Gravel for roadways, walkways or any surface where you want traction should be angular. The more angular the pieces are the better. They interlock with one another and it takes much effort to move them. The gravel works even better if there are fines in it. Fines are small crushed rock particles. These create even more friction between the different pieces of gravel.
Here's a past column of mine that pretty much sums up some of the top tips when building a gravel drive:
https://www.askthebuilder.com/build-a-gravel-driveway/
Remember, if you're on Facebook, PLEASE leave a comment at the bottom of the column telling others what you discovered when reading my column. You'll see the Facebook comment widget at the bottom of the column. Thanks in advance!
Sincerely,
Tim Carter
Test Ad
Cutting Pex Tubing Video
Cutting Pex Tubing
Hi, I'm Tim Carter, and today I want to show you a quick tip on how to properly cut Pex plumbing piping tubing. Very simple to do, but first let me tell you what not to do.
I know you will be tempted to use a circular saw or a miter box saw to make the cuts. But don't do it!! These saws will just tear up the pipe and in fact, the pipe might even explode while cutting it this way. That's no good.
Maybe you want to use is a hack saw. Well, you might be able to get halfway decent results, but what will probably happen is you will get ragged edges from the teeth on the blade.
Another option is a razor knife but this is a dangerous tool to use. It might slip and cut you. It will give you a really smooth edge if you have a sharp razor blade.
Finally, here's the tool that the piping manufacturer want you to use. It looks like a fancy pair of scissors or shears. It is made for both the 1/2 inch and 3/4 inch tubing. Watch how simple it is to cut the tubing with this tool.
Just take the Pex piping, put it in the shears and just easily squeeze the handle. It easily cuts through like butter. The advantage is it gives you a nice clean cut that is square to the length of the pipe. That is important for a great fit on the fittings. It's that simple.