What’s in This Issue?
Light-Bulb Warning Follow-up
Ice and Water Membranes
Happy Birthday, Larry
Wet / Dry Vac
Help Wanted
Google Maps Problem Reporting
Cold Climate
I do product reviews frequently. Please read my Disclosure Policy to understand the relationship between the companies that make the products or offer the services I review and me.
FOLLOW ME ON TWITTER
Friendly Question Reminder!
If you have a question for me, don't hit the Reply button just yet. Go immediately to my web site and type in the keywords about your problem into my Search engine. The search box is at the top of every page of my web site. You could have your answer in seconds if you do this! Please pay attention to all links you see at my web site. The exact products and services you often need are right in front of you, and you might be ignoring them.
Follow-up on Light-Bulb Warning
You may have been a subscriber that commented on the warning last week about installing the correct-sized incandescent light bulb in ceiling fixtures. That was great advice to consider using a compact fluorescent light bulb (CFL). The globe that covers the bulb was not allowing me to use a CFL as it was rubbing against the bulb. It's crazy it fit that tight. It must have been an older CFL bulb I had here at the house, as I'm certain that the newer CFLs are the same overall size of incandescent bulbs. I'll be getting one or two new CFLs and will compare sizes. However, have you had the same luck I have with those CFLs? I mean bad luck. They don't seem to last anywhere near the advertised bulb life.
Richard Olson got back with a great point about a part I glossed over. I mentioned that using a larger-watt bulb could cause a fire, but didn't really explain why. Richard reminded me about a change to the National Electric Code (NEC) back in the mid-1980's. The NEC officials were having issues with electrical fires caused by insulation on wires in ceiling boxes. The high heat generated by high-wattage light bulbs was causing the plastic insulation to degrade, and I believe in some cases, melt. With no or cracked insulation in place, arcing happens and then fire.
The plastic outer sheathing on Romex cable prior to the mid-1980s was rated at 60 degrees C. That got raised to 90 degrees C with the code revision in the mid-1980's. The cable that has the higher temperature rating is embossed with the letters NM-B. The older cable is embossed with just NM.
This means if you can see the embossing on the cable in your attic and you see just NM, then you must be extremely vigilant. The safest thing you can probably do is switch out all the bulbs in ceiling fixtures to the CFLs as they burn so much cooler.
Another update on this story is covered in the November 11, 2009 Newsletter.
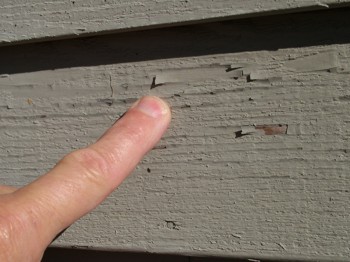
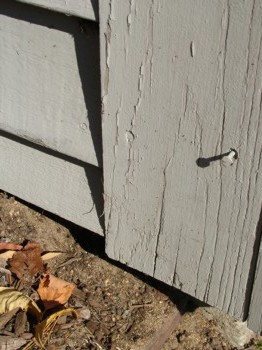
Ice and Water Membranes
Hours ago, I got this email from Stephen Coughlin who lives in Seattle, Washington - the land of much rain as he clearly stated in his subject line. Stephen asked:
Stephen, the bottom line is the roofer goofed up. There is no way the nails on the new shingles aligned properly with the old nails. Just as you suspect you have punctures in the membrane.
The way those membranes are designed is the membrane sticks well to the sides of the nail shaft producing the water-tight seal. Remove the nail and the hole may heal slightly, but not enough to block a hydrostatic head of water.
The best way to settle this is for you to contact the membrane manufacturer, talk to either the marketing manager or one of the scientists on staff and get it in writing that the membrane has been compromised. Show this letter or email to the roofer and see what happens. My guess is the roofer will run away from you.
Happy Birthday Larry!
On Sunday October 11th, I was in Burlington, VT to visit my son Tristan, who attends Champlain College. The visit coincided with an invitation to a very special birthday party. We drove south from Burlington into the countryside to Larry Eisinger's daughter's house to partake in the celebration of Larry's 90th birthday party. The name Larry Eisinger may not mean anything to you, but it means the world to me. Larry designed the banner that was stretched out on the wall of the front porch. He also made the pattern for the special cake. The baker made the cake look like Staten Island, New York.
If there was an actual Hall of Fame for Home-Improvement stars, Larry would be in it for sure. After returning from World War II where he served in the Air Corps, Larry got swept up into the publishing business. He was also an avid do-it-yourselfer building his own home with his wife Fran and his cousin Lance on Staten Island, NY. Larry was wise enough to chronicle this entire process with great photos and instructions turning it into a book that sold countless of copies. This was the beginning of a stellar writing, publishing and editing career.
I had the great fortune of meeting Larry perhaps 13 years ago at a Sears Editors Conference. This happened at an early stage of my writing career, and Larry began to mentor me. His advice was bulletproof, and saved me lots of time. Larry also became a father figure to me as I had to send my Dad back to Heaven at the young age of 24. Happy Birthday Larry! I can't wait until you turn 100!
Wet / Dry Vac
I just tested a wet-dry vacuum made by Vacmaster. It's their model VBV1210. This machine comes with a boatload of accessories and has a quick-release head that acts as a blower. This time of year it's perfect for blowing leaves. It can generate a 210 mph continuous blast of air which moves lots of leaves. The 12-gallon rugged plastic canister will handle lots of construction debris. I was really happy with its performance. Two hammers up from me.
Help Wanted
I just read a story at USAToday.com about the horrible suffering that's happening with respect to the millions of lost jobs. It's no secret that many companies are downsizing and laying off people. I'm in the opposite mode. AsktheBuilder.com is growing. I'm trying to find one or two excellent writers, who I'm convinced are out there. You may be the person or know someone that matches my needs.
The person I'm looking for MUST:
- be a very gifted writer able to mimic voice
- be a talented photographer
- have a minimum of 15 years day-to-day hands-on residential remodeling or new-construction experience
- be able to verify the construction/remodeling experience
- follow directions to the letter
Do you meet these requirements? Do you know someone who does? Email me your resume, two close-up photos you've taken of home-improvement products/projects and home-improvement writing samples no longer than 500 words each. Be sure you have the subject line read: Writer for Tim. If I feel you qualify, we'll go to the next level of the interview process. Be patient, as I'll be traveling the next three weeks.
Crazy Tip - Reporting Problems with Google Maps
I don't know about you, but I use Google Maps almost daily. Since I'm a subscriber on YouTube to the Google's channel, I get alerts when they post a new video. A few days ago, they posted one showing how you or I can report a problem with their map database. Here in New Hampshire, right by my own home there are at least three major errors. They actually show my driveway as a roadway that connects a tiny gravel road and the cul-de-sac that is at the top of my driveway. There are other nearby errors involving paper streets. These are streets that exist on government plat maps, but have never been built. If you know of errors, please take the time to report them. Watch this video to see how easy it is. There is now a tiny text link in the lower right corner of every Google Map.
Cold Climate People Listen Up
Do you live in a place where it gets cold? I mean below-freezing-pipes-burst cold. If so, get up and go outside and disconnect any hoses from your hose bibs. If you have a frost-proof hose bib, it can and will freeze up if a hose is attached. The bibs only work when the water in the spout can drain after it's turned off. You can't be sure the water has drained if you still have a hose attached to the faucet. What's more, even after you disconnect the hose, you can still have a problem from an air lock. Disconnect the hose, turn the faucet on, and then off. Watch to see that last 4 to 8 ounces of water dribble out of the end of the faucet.
AsktheBuilder.com