| Ask the Builder Checklists: New Home: Indoor Projects: Outdoor Projects: Major Additions: Mechanical Systems: More Ask the Builder EBooks: Miscellaneous: |
ROOM ADDITION CHECKLIST ! Instant Download PDF Document ! ! 100% Money-Back Guarantee !
 Room additions are a popular remodeling job. Unfortunately, with room addition plans there are far more nightmares than success stories. This Checklist maximizes your chances for a happy ending. Room additions are a popular remodeling job. Unfortunately, with room addition plans there are far more nightmares than success stories. This Checklist maximizes your chances for a happy ending.My Room Addition Checklist costs just $27. My Checklist can and will save you heartache and lots of money.
HOW WOULD YOU LIKE?
It is delivered to you the instant your credit is approved in the common PDF format that can be viewed with free Adobe Acrobat Reader software. Click the Adobe graphic just below to download the latest version of this free software. Most computers already have this software installed at the factory. You simply double click the Download URL link in the email that is sent to you and the Checklist automatically opens.
 |


LED Lights

Finished LED Birthday card.
I am so fortunate to have newsletter subscribers that contact me about things they are working on. Here is a fantastic heart-warming love story about this wonderful man who lives way off the beaten path in New Zealand. I hope one day to meet Graham!
Hello Tim,
You mentioned your Dremel in your newsletter and I thought that you might find this project story amusing.
All the Best,
Graham Green, New Zealand
As a complete newbie to hobby electronics, I'm still childishly delighted when something works but when it not merely works but works perfectly to plan; sublime. When it works perfectly and digs me out of a deep, dark hole then, just for good measure, makes someone else happy, now that's what I call the full result.
Here's the story. I'm a cook and handyman living in rural New Zealand about 50 miles from the nearest anything. I only get to go into town about once in six weeks, generally when something has gone wrong and I need some parts or materials. Where I live makes Walton's Mountain look like Las Vegas. Anyhow, there was an unexpectedly early snow at the beginning of May which brought down a small tree which had to be cleaned up.

Cooks - Seagal and Green.
Mr. Stihl the chainsaw and I were beavering away when a black thought entered my mind. Although I had already received a mail order birthday present for her indoors I had no birthday card, and with just five days to go, no prospect of getting her one either. I'm old enough and wise enough to know that the 'no card' option is a sure and certain shortcut to a Spectrum-is-Brown situation, so as I cut away at the tree a cunning plan hatched, so cunning as would be most pleasing to a professor of cunning at the University of Foxbridge. This ingenuity and daring would deliver a home made handicraft birthday card fabricated entirely from trash yet would not compromise my hard man of short order cookery image. I like to think of myself as a cook in the same way that Steven Seagal was a cook in the excellent movie Under Siege. See picture - spooky eh!
The key ingredients of this recipe were: one piece of tree, one broken cordless carpet sweeper, a handful of LEDs and a Dremel.
The tree bit was easy, I cut about a 2 inch thick segment from the upper trunk to form a round about 9 inches in diameter. For the next few nights, I stealthily cooked the round in the cafe oven - very slowly, 24 hours at 100 Celsius. Each day I hid it away from the prying eyes of her indoors, but I couldn't hide the smell. Everything smelt like the inside of a sauna. Whilst not unpleasant, it wasn't the right smell for a cafe. Still, needs must when the devil's at the wheel. I took the bark off with a soft grinding disc and belt sanded the face.
I found a suitable piece of clip art and mucked about with the size until I had a suitable template for carving. Using a carving tip on the Dremel at medium speed, I carved the outline of what I imagined might look a bit like a bunch of flowers. I had looked for something that would feature 8 flowers for reasons that will become clear later. I printed the clip art out and just taped the paper to the wood then just cut through the paper pattern into the wood.
I had a whole bunch of LEDs that I imported from Hong Kong (we have no duty on Chinese stuff here) about six months previously. From everything that I had read, I expected these LEDs to be just cheap and cheerful, I figured that I'd get a lot of failures and early dropouts but not a bit of it. I bought 300 of 5mm LEDs; water clear lens, RGB slow change 5,000 mcd, RGB flash 5,000 mcd, plain white 10,000 mcd and I haven't had a single one fail - at 12 cents NZ a piece including postage - I am made up. I used the RGB slow change ones that gradually cycle through their rainbow. They have a maximum forward voltage of 3.6V, 30mA which fits in very well with the electronics salvaged from the broken cordless carpet sweeper. The sweeper had broken before the battery had been recharged more than 50 times. When I took it apart there was one gear stripped and the pinion was shattered so no hope of reasonable repair (I've still got the motor and it has a lot of torque). The battery pack was a 7.2v NiCd or 6 'C' cells strapped together depending on how you look at it complete with a little charging circuit.
The maximum LED voltage (3.6 volts) divides nicely into the battery voltage so the LEDs are wired in 4 pairs. The battery pack voltage will sag quite quickly so the LEDs wind up running at just about a perfect voltage for quite some time. In fact, I subsequently found that the whole lot run on giving some light for over 5 days on a charge. These RGB slow change LEDs cycle through the primary colours and all the ones in between giving a pretty cool effect.
I treated the wood to some furniture oil and finally finished soldering the 'card' together about 2 a.m. - it worked first time and looked great. So I set it up and went to bed. Let's face it, a lovingly hand crafted card has just got to say more than a shop bought affair and indeed her indoors was tickled pink. So that's my rechargeable, recycled birthday card even the hook up wire is stripped out of old telephone cable (hence the odd colours). Everything is glued down with hot melt or screwed on. Total cost - about $2 plus 10 hours sneaking around.
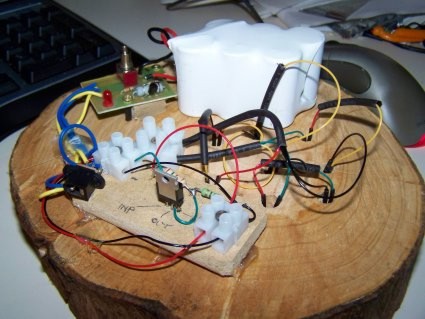
Back view of LED wiring project.
The picture also shows some additional circuitry that I added later to regulate the voltage as the battery sags. The wood still hasn't split after 2 months in the warm and dry, so I'm quite hopeful that the cooking process may have been successful. In any case, I had to do something because it was just too green to sand down.
All photos courtesy of Graham Green.
His story was featured in my July 15, 2008 Newsletter.
July 8, 2008 AsktheBuilder News
What's in This Issue
LAUNDRY-ROOM UPDATE
DREMEL ACCESSORY KIT
OVEN-RACK GRIME
AIR CONDITIONER TIPS
LATEST COLUMN AND VIDEOS
Laundry-Room Update
I finally finished my laundry-room remodeling job. It was a monumental task. I find working around my house to be therapeutic. Some friends of mine think my time is better spent hiring others to do the work so I can do something more productive. But the truth be told, I actually enjoy many aspects of the work.
The statistics show that a large portion of the public does not do-it-themselves. The last set of numbers I saw indicated that I was in a minority with only 22 percent of the general population in the DIY category.
The painting of this space consumed many hours. I have been systematically changing out the woodwork in my house. When I built it 22 years ago, I could not afford the woodwork my wife and I wanted. But over the years, I saved and little by little we have switched over to authentic custom-made Victorian woodwork in all the rooms.
When you do this, painting becomes a sizable task as you are dealing with bare wood. This means you almost always apply three coats of paint - a sealer/primer and two finish coats, and before that you have to spackle all of the nail holes and caulk all of the cracks to get professional results. Suffice it to say, I have had my fill of painting since this room and hallway had two closets, one window, two exterior doors, a pocket door, two archways and a decent amount of baseboard.
Kathy is happy as can be with the newly-decorated space, and especially likes the new sink. This laundry room - as crazy as this sounds - has three sinks within 10 feet of one another. The first sink is a fiberglass tub I mentioned last week. It is in this little alcove hallway that connects to our garage. Next to our washing machine in the laundry room proper, we have a 10-inch-deep stainless steel sink in a traditional sink-base cabinet that has been there for years. This is great for soaking clothes and rinsing the animal-food dishes.
But Kathy wanted a new set of base cabinets in some previously wasted space. I obliged, and the result was a third stainless-steel sink that was also 10-inches deep to be used exclusively for the animals. Some of the natives in the house didn't much like clothes being mixed with cat food. No matter that the sink was always clean!
This new Elkay sink is a little different. Most standard sinks are 22-inches from front to back. This one is only 19 inches. It's really a convenient size. You don't have to reach as far to get to the faucet, which is also an Elkay model with paddle handles, but the sink can handle large bowls and other things that would never fit in those tiny 15 x 15-inch bar sinks.
Dremel Accessory Kit
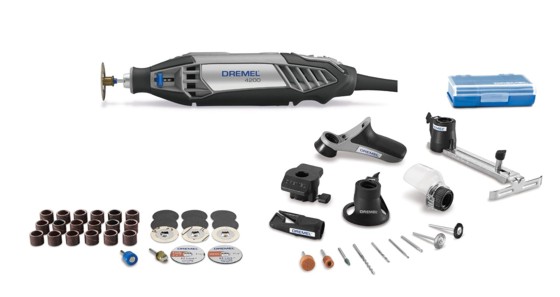
Not a week goes by that I don't get a press release or phone call from a company or public-relations company about a new tool. For example, next week the traveling Sears road show is coming to my office to show all the latest things Sears has to offer.
Recently I got a fancy accessories kit to test from Dremel. If you don't have a Dremel tool, you probably should. They are the closest thing you can get that will make you feel like a dentist. I have never checked, but the inventor of the Dremel tool must have been a dentist in a previous life as the Dremel tool reminds me of the drill/tool that dentists use.
The accessory kit I am about to test has 75 different parts. There are cutting and grinding wheels, carving and drill bits, cleaning and polishing wheels, etc. All sorts of extra pads, sanding discs and cut-off wheels are included. They all come in this fancy metal box that would be a proud addition to any workshop. You can find out more here:
Oven-Rack Grime
I try to share real-life events with you in my newsletter. When I tell you something I have done around my home, it is not a dream. But my latest job has me wishing I was taking a nap. Who wants to clean that baked-on caramelized grease on oven racks? Yuck!
Kathy wanted to clean the double oven, and my part was working on the chrome-plated oven racks while she turned the control knob to Clean. I discovered long ago that spraying oven cleaner on those can be a mistake. I discolored a set of racks in our last house and Kathy was pretty upset. She did not want that to happen with her new oven, so I decided to get out a bottle of my Stain Solver.
Quite by accident a few years ago, I discovered that my Stain Solver oxygen bleach got rid of that brown cooked-on grease you see on the sides of pots and pans. We have a set of pans that has a polished outer finish that you can't scour with an abrasive cleaner, so I decided to soak the pans overnight in my laundry tub with an ample amount of Stain Solver. The next morning the brown grease marks came off with just a little bit of effort. I would say about 90 percent of the grease came off with the first soaking and scrubbing.
Well I am pleased to say that the Stain Solver came through again! I soaked the oven racks overnight, and then scrubbed them with a Dobie Pad. These pads are a sponge wrapped in a nylon fabric that is great for scouring jobs. The nylon will not scratch polished metal. My oven racks look like the day we took the oven out of the shipping box.
I share this as it is but another cleaning chore made easier by oxygen bleach. The next thing I am going to tackle is the stainless-steel cover to my grill. It has that same brown grease staining.
If you are new to the newsletter, this may be the first time you have heard of oxygen bleach. All I can say is that it is just about the greenest cleaning product I know of, and it is color and fabric safe. You just add this powder to water. There are hundreds of things you can safely clean with Stain Solver.
I make this unique product here at AsktheBuilder.com and sell it at:
If you want to try some, use this promo code to get a 20-percent savings:
31july
It should be obvious that the promo code expires very soon (Expired July 31, 2008).
Air Conditioner Tips
Very high temperatures are forecast for many parts of the nation this week. Friends of mine in Southern California are going to melt. Air conditioners will be stressed.
Many people do not realize that air conditioners are carefully sized to match the needed cooling requirements. Think of them as shoes. A unit that is too small will not keep you comfortable. An AC unit that is oversize will short cycle, and you will be cold and clammy.
But many people are not aware that there is a temperature spread that is also considered in the sizing calculations. This means that you select the desired interior temperature and subtract that from a high temperature that is commonly experienced in your area.
However, when weather conditions bring temperatures that are 10 or 15 degrees above normal, your AC unit may not be able to keep you cool. It is not the fault of the equipment, it is Mother Nature. You can help make sure your AC unit is doing its best by ensuring your air filter is clean and the outdoor unit has plenty of air flowing through the coils.
Latest Column and Videos
Here is one of my latest columns loaded to the website:
Videos:
Ever wonder how a fireplace mantel might be attached to a wall?
Are you doing Exterior Painting? You better watch this one.
Index of past newsletters.
July 2, 2008 AsktheBuilder News
What's in This Issue
WHITE VINEGAR
ANGIE'S LIST
THUMB INJURY
MY CONGRESSIONAL TESTIMONY
CERAMIC TILE TIPS
LATEST COLUMNS AND VIDEOS
NEWSLETTER SPONSORSHIP
ADDITIONAL CONGRESSIONAL VIDEOS
White Vinegar
If you have had the opportunity to read many of my past columns, you know by now that I often try to weave into my stories the physics and chemistry of home improvement, remodeling and building. A simple example of this might be the destructive nature of chlorine bleach. In a nutshell, the active chemical in this bleach is the chlorine ion. Think of it as a high-powered laser-guided 1,000 pound bomb that blasts apart fabric and dye pigment molecules. This is why things cleaned with chlorine bleach fall apart and the color goes away. But I digress......
Last night I had to clean a fiberglass utility tub that is adjacent to my laundry room. This sink really gets abused with cleaning all the things you would never place in a kitchen sink. As I was scrubbing it, the dirt would not come off, and the surface felt gritty.
I thought to myself, "No way this could be hard water deposits." But the dirt was not coming off and my instinct told me it had to be hard water. Hard water deposits can be hundreds of layers thick, and each layer can have dirt in it that is then covered with the next layer of calcium carbonate. That is the primary hard-water deposit most of us have. These form each time the water dries on a surface. You see these water spots on the hood of your car, a pot or a glass that air dries.
Each time I used the sink the water dried on the sides leaving a new layer of rock. Rock you say? Limestone is calcium carbonate.
So if you are busy, distracted, lazy and fail to clean a sink (for years) that is used several times a week, you can have hundreds of ultra-thin layers of deposits each one with some dirt bound into it.
I had a one-gallon bottle of white vinegar next to me and decided to install the drain plug and pour some into the sink as the bottom of the sink had the worst build up. I knew that if the deposits were hard water, the vinegar would help soften them.
White vinegar is simply a weak acid. The hard water deposits are alkaline. Acids react with alkaline compounds and dissolve them into solution.
I came back 30 minutes later and the sink bottom looked like new after a quick scrubbing. To clean the vertical sides of the sink, I simply got some paper towels wet with the vinegar and applied them like wallpaper to the sides of the sink. Suffice it to say the sink looks like the day I installed it. White vinegar does a great job of dissolving hard-water deposits. You just have to be patient with it and let the objects soak for hours if possible.
Angie's List
There is a very cool cooperative service called Angie's List. It is where people like you share stories and recommendations about good contractors. Do you use this service, and what can you tell me about your experiences?
Thumb Injury
Two years ago I was holding a 2x4 that I was hand nailing. Somehow the dang hammer didn't hit the head of the nail square and jumped off striking the base of my thumb where it connects to my wrist. I almost passed out from the pain. I didn't break the bone, but I did damage a tendon that connects out to the end of my thumb.
I had a doctor look at it, and followed his advice to make it heal. The trouble is, it seems to have never completely healed. When I start to use my thumb and stress it, the injury flares up again.
Two days ago it got so painful, I went back to the hospital. There I discovered that this specific injury can became very debilitating if ignored.
I share this story with you in an effort to get you to have chronic pain looked at. Don't try to suck it up and be the tough person. That is usually what I do trying to be stoic. Well, had I done that with this injury, I may never again have golfed, kayaked, or done much of anything that requires you to grip something with your hand. Please visit your doctor when pain does not go away.
My Congressional Testimony
In the last newsletter, I shared that I had been invited to testify in front of a Subcommittee of the US House of Representatives Small Business Committee. My Congressional representative- Steve Chabot - is the Ranking member of this Committee.
In the invitation I was told that I could submit written testimony that would be entered into the permanent record. The purpose of this is to give the witness an opportunity to share all the points he wants to make. You can't assume you will have the time in the hearing to make all of your points. You can read my written testimony if you desire.
The invitation also was very clear saying that I would be expected to deliver an oral summary of my points that was to be no longer than five minutes. You can see that presentation in video format. But before I share that link, I want to set up the scene.
I am pretty embarrassed to say that I don't dress up much. The last suit I bought is at least 15-years old and is a tad tight. My oldest daughter Meghan took me to Romualdo, which is a custom men's shop in Maderia, a suburb of Cincinnati. She selected a navy blazer and a white shirt with French cuffs. For the occasion, my kid's - for the first time in my life - got me some gorgeous ties for Father's Day. I can't remember the last time I was so dressed up, and I must say I felt really good in the new threads! But let me tell you it is really hard to insert a right-side cuff link with a left bum thumb! I almost had to have the front-desk clerk do it for me.
The hearing lasted two hours, but the event is cut up into 19 videos that are on YouTube.com. I am in several of the videos, but #3 in the series is the one where I give my oral opening statement. The Subcommittee is chaired by Congressman Gonzalez, a Democrat from Texas. The ranking member of the Subcommittee is Congressman Westmoreland, a Republican from Georgia. They were the only two present as the hearing started.
My Congressman, Steve Chabot, wanted to personally introduce me, but was running late. Chairman Gonzalez was starting to introduce another witness when Chabot walked into the room. You can hear part of the exchange between the two Congressmen at the start of the video. It is hilarious, especially when you realize Chabot is a Republican and see how he forgets to give thanks to his ally Westmoreland:
Watch my oral statement in part #3.
If you look to the lower right of the video as it plays on YouTube, you will see a box that is titled "Related Videos". In that box you should see the other 18 videos that make up the hearing. Videos #1 and 2 are the opening statements of Gonzalez and Westmoreland. Videos #4, 5, 6 and 7 are the oral statements of the other witnesses. The question and answer part of the hearing takes place in videos 8 through 18. I am in video #8 and 18, as well as two or three others. Video 19 contains the closing statements of Gonzalez and Westmoreland. You have to watch video 19 to hear what Congressman Westmoreland says. I can see why the people in the 3rd District of Georgia elected this man. He is indeed honest.
I would appreciate it if you would rate my videos when you watch them. It is my understanding you can only rate them if you have a YouTube account. You can get a YouTube account for free and you do not have to upload a video. It takes seconds to create a YouTube account.
The additional videos are shown at the bottom of this newsletter.
Ceramic Tile Tips
I just finished installing new ceramic tile in a shower stall in my laundry room. It came out really swell. It was a very easy job as ceramic-tile installations go.
One of the things that made 95 percent of the tile go in with ease is I did not install the first row on top of the shower base *first*. The first tiles were the second row. I discovered long ago that bathtubs, shower bases, and just about any object that tile rests on is never in the same plane much less level. Tubs frequently are twisted like a helix.
I have a super high-quality level and used it to create a perfectly level line around the three walls. This line was made so that a full tile would fit under the second row and the highest point of the shower base. My base was nearly perfect, and there was only a variance of one-eighth inch.
I nailed strips of very straight lumber to the cement backerboard carefully on this line. The tiles that were installed rested on this lumber. The advantages of doing this ensured the tile would not slide down the wall under gravity, and all of the horizontal grout lines from the bottom to the top were guaranteed to line up perfectly.
Latest Columns and Videos
Here are two of my latest columns and videos loaded to the website:
Columns:
Videos:
Here is a video that has a mixture of fact and fiction. Enjoy!
How about a video of me driving at a tad over 139.79 mph?????
Tim Driving a Real NASCAR Car - No Kidding
Index of past newsletters.
Newsletter Sponsorships
I am really proud to say that this newsletter has grown in both reputation and size to attract companies that make great products and offer superb services.
In the past I really fell down getting the newsletter out because it was lots of work with no pay. It was easy for me to neglect you as I turned to other tasks that put food on my table.
You will see an ad next week, and if you have a company that wants to advertise, contact me. The rates are very affordable.
Additional Congressional Videos
Below are the additional videos Tim appeared in during his Testimony before the House Subcommittee.
Part #8
Part #10
Part #12
Part #14
Part #18
Part #19
Ceramic Tile Cutter
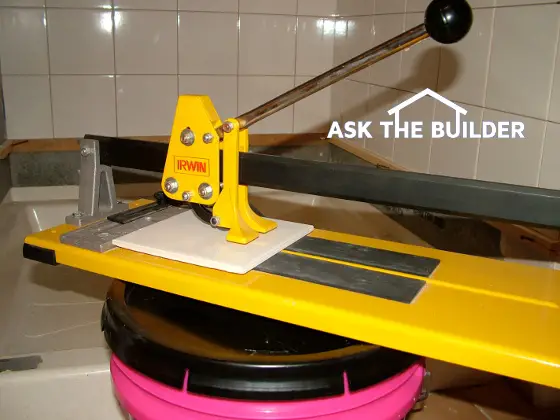
This ceramic tile cutter can make precision cuts on many types of small and large tile. CLICK THE PHOTO to see a wide variety of ceramic tile cutters at affordable prices. PHOTO CREDIT: Tim Carter
Ceramic Tile Cutter Checklist
- Simple cutters score and snap tile
- Porcelain tile is too hard to snap - it needs to be cut with a wet or dry diamond saw
- 1/2-inch pieces are about as small as you can snap
- Clean up snapped edge with a honing stone
Related Links
Cutting Ceramic Tile Quick Start Guide
Marvelous Ceramic Tile Wet Saw - A Dream to Use
DEAR TIM: I've never used a ceramic-tile cutter. Is cutting tile really possible with such a simple tool?
How can such a tool make straight cuts without shattering the tile? What tile-cutting tips can you offer when working with this tool? Is it faster cutting tile by hand, or should I just rent a tile-cutting saw? Steve K., Oak Park, IL
Can a Ceramic Tile Cutter Make Straight Cuts?
DEAR STEVE: You bet it is possible to make highly acceptable cuts with a ceramic-tile cutter. I've done it for many years, and there are tens of thousands of professional tile setters that use this tool each day.
Depending upon the tile being cut, you can make precision cuts with a regular tile cutter that rival cuts made on a wet diamond tile saw.
How Does a Tile Cutter Work?
A tile cutter is equipped with a sharp carbide or tungsten-steel wheel. A lever handle allows you to drag the wheel across the glazed finished surface of the tile.
The wheel scratches and cuts into the glazed finish creating a plane of weakness. When you press down on the handle of the tool, pressure is applied equally to the tile on each side of the cut line. This pressure snaps the tile along the scored line.

CLICK this image and listen to the second call on the podcast. I talked to Greg about what can be done with porcelain tile, including borders to offset certain spaces. Copyright 2018 Tim Carter
How Do You Make Tile?
Many common ceramic tiles are made from clay which is much softer than the ultra-thin glazed surface which has the hardness of glass. While ceramic tile is very strong when you compress or squeeze it, it has less than ten percent of this strength when you apply tension to it.
Bending or pulling is a tension force, and this is exactly what happens when you press down on the handle of the cutter. The tile begins to bend and cracks readily on the scored line. This is why you are often able to tear a piece of paper in a straight line after putting a hard crease in the paper. The crease creates a plane of weakness.
What Ceramic Tile Cutters Make the Best Cuts?
The tile cutters that cost a little more money tend to make better cuts. The extra money you spend will often allow you to get a tool that has better mechanical advantage, cuts perfectly square and is easier to use.
Can You Make Angled Cuts?
Look for ceramic-tile cutters that have rotating guides that allow you to make angle cuts from 0 to 45 degrees. Some tile cutters have attachments that allow you to make circle scribe cuts for faucet valve holes.
Do Tile Cutters Require Lubrication?
Be sure the tool is well lubricated as the cutting wheel needs to rotate freely and the sliding arm needs to move with ease.
Should I Practice Cutting Tile?
You should experiment by making cuts on some inexpensive ceramic tile. It's not hard to cut tile, but a few practice cuts will help you gain confidence.
Can You Snap Porcelain Tile With a Cutter?
Porcelain tile and thicker tile are considerably harder to cut. Porcelain tile has a high quartz content and it snaps unevenly as if you were trying to snap glass. Yes, thin glass will often snap along a clean line, but porcelain tile is a different beast and it's thicker than single or double-strength glass.
What Happens as Tile Gets Thicker?
As tile gets thicker, the thin scored line in the glazing is not enough to guarantee a perfectly straight snapped line in the tile. Porcelain tile often contains a higher amount of crystallized silica and as such it wants to break in an unpredictable conchoidal fracture. You can cut porcelain tile with this tool, but be prepared for more waste.
Can You Make Narrow Cuts with a Tile Cutter?
It is difficult to make narrow cuts on most ceramic tile with ceramic-tile cutters. My guess is you will learn that any successful cuts that are one-half inch or less in width are pure luck. It is best to use a wet diamond tile saw to make narrow cuts.
Does a Tile Cutter Cut Faster than a Wet Saw?
It is far faster to cut tile with a simple ceramic-tile cutter than a wet diamond saw. With practice, you can probably cut three or four tiles with a simple cutter in the same amount of time it takes to cut one tile using an expensive diamond wet saw.
Believe me, I have both tools, but the ceramic-tile diamond wet saw is used to cut thicker tiles, granite, marble, and other things you simply can't cut with a ceramic-tile cutter.
Can You Make L-Shaped Cuts on Tile?
Yes, you can make L-shaped or U-shaped cuts as you work with ceramic tile. On a L-shaped cut you can make the second cut with the ceramic-tile cutter, but the first cut will need to be made with a rod saw or a diamond wet saw. You can also use a nipping tool to help make these cuts. A nipping tool is similar to a pliers, but has carbide edges that bite away at the tile. They are handy tools.
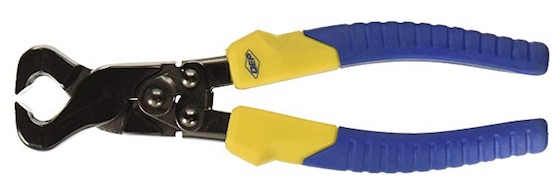
This is a tile nippers. You use it by nibbling away at the tile. Don't take big bites. CLICK THE IMAGE to have this tool in your hands in days.
As ceramic tile gets thicker, the resulting cut edge is rougher. You can use a sharpening stone to dress the cut edge so it is much smoother. This is as very important step if the cut edge will be visible. Some cut-tile edges are never visible. The first tile that butts into an inside corner and is then covered slightly by the second tile that makes the finished corner is an example.
Be sure to test new ceramic-tile cutters to ensure they do cut a square line. Most cutters will produce an acceptable line, but the larger a tile is, the more important it is the cut line is square.
If you plan to keep your ceramic-tile cutter for a long time, be sure to clean it after each use. Store it indoors if possible so that it does not rust.
Column 733
RRH Test Page
|
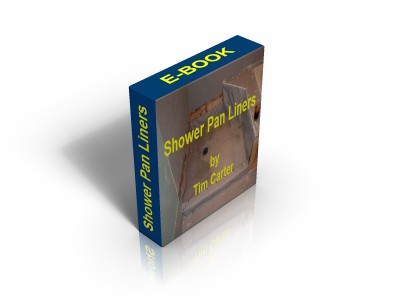
Shower Pan Liner eBook: |
||||||||||||||
| More Ask the Builder Products:eBooks: Crown Molding Shower Pan Cement Shower Pan Liner Driveways Building Stairs Cork Flooring Painting Cabinetry Miscellaneous: Ask the Builder New Home: Indoor Projects: Outdoor Projects: Major Additions: Mechanical Systems:
|
|
|
||||||||||||
|
||||||||||||||
| 5 reasons this is the only eBook you will ever need for Shower Pans: You love the look of a ceramic tile shower floor but are mystified as to how to make the floor leak-proof. Give me just 30 minutes of your time and I guarantee that my Shower Pan Liner eBook will teach you how to achieve professional results. You can install the membrane perfectly using my simple tips. |
||||||||||||||
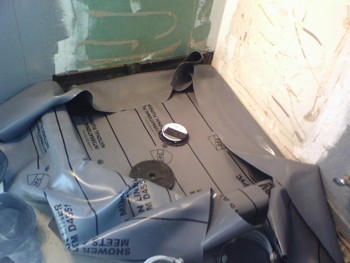 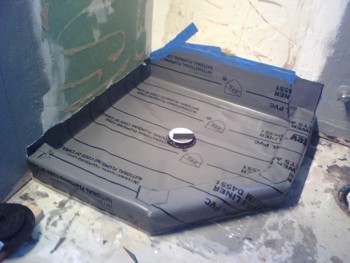 These pictures were taken by Clint Basham, Phoenix, AZ. These pictures were taken by Clint Basham, Phoenix, AZ.His comments regarding the eBook were: "Here are a few pictures of the project in progress. I'm really proud of it, it was an extremely difficult and time consuming project, but I learned a lot and the eBook made it all possible, without it I would have had a tough time figuring out the process." |
|
|||||||||||||
|
||||||||||||||
|
Discover The Secrets to Installing Perfect Shower Pan Liners: For only $19.95, the Shower Pan Liner eBook reveals all of the trade secrets you need to know for project success, regardless of your level of carpentry experience. This eBook shows you how to build shower pans by providing you with clear, concise tables and diagrams, photos with crisp line graphics that are one-of-a-kind, material lists, and step-by-step instructions. The project is outlined for you in the following chapters: |
||||||||||||||
|
Introduction Chapter One: Shower Pan Liner History Chapter Two: Getting Ready for the Liner Chapter Three: The Drain Assembly Chapter Four: Framing Tips Chapter Five: Installing the CPE Liner Chapter Six: Inside Corners Chapter Seven: The Curb
|
Here is a sample page to give you an idea of how colorful, crisp and helpful this eBook is:
|
|||||||||||||
|
||||||||||||||
|
|
This eBook is an instant download the moment your credit is approved. It comes to you in PDF format, that can be viewed with free Adobe Acrobat Reader software. |
|||||||||||||
|
Final Note: "Having the right knowledge is as important as having the right tools for any project. My Shower Pan Liner eBook is an opportunity to discover the invaluable tips that determine the success of your Shower project. We are so confident that you will enjoy and benefit from this eBook that we guarantee your satisfaction, with our no-hassle, no questions asked return policy. You have nothing to lose and everything to gain." Enjoy, Tim Carter |
||||||||||||||


How To Drywall

How to drywall like a pro? It's not easy no matter what they say on the cable TV shows. Your mud must be like warm cake icing and leave some under the tape. Copyright 2018 Tim Carter
"The first thing to realize is that working with drywall is hard, dusty work."
How To Drywall Checklist
- Best info is in the USG Gypsum Construction Handbook
- Use screws not nails
- Leave some mud under the tape
- Second coat has a slight center ridge
- Skim entire wall when done
DEAR TIM: I need to learn how to drywall in a hurry. A good friend needs me to show her how to hang drywall and how to finish drywall.
The trouble is I have just seen it done on some home-improvement TV shows. Is it really that hard to install drywall?
What are some of the secret tips you can share so that I will look like a pro in front of my friend? Brad F., Atlanta, GA
Related Links
How To Wallpaper on New Drywall
Drywall Paper Repair Tips - Secret - DO NOT SHARE!
DEAR BRAD: I sure hope you did not tell this woman that you know how to drywall like a pro. It takes years of practice to finish drywall like a pro, and months of practice to learn how to hang drywall.
The bad news is that you may not possess the needed hand-eye coordination required for this labor-intensive job.
Are There Different Drywall Hanging Techniques?
There are many techniques that will get you to the same end result when it comes to hanging and finishing drywall. You could interview ten different drywall professionals and come away with ten different methods.
Some of the advice you would get is excellent, but there is also the possibility you might get some bogus information that is not based on fact.

If you want the best advice as to the technical aspects of working with drywall, I feel the best place to start is a fantastic book called the Gypsum Construction Handbook published by the USG Corporation.
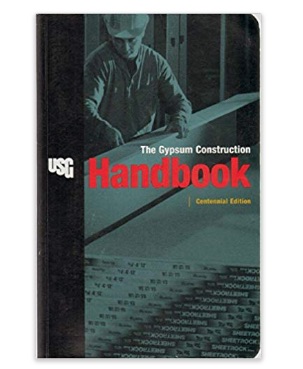
This is the Bible of hanging and finishing drywall. I recommend you buy this and read the section on drywall. CLICK THE IMAGE to have a copy delivered to your home.
This manual contains numerous specifications that tell you the accepted way to fasten drywall to metal or wood studs, the proper way to install accessory pieces of trim like corner bead and the do's and don'ts about finishing drywall.
Is Drywall Hanging & Finishing Hard Work?
The first thing to realize is that working with drywall is hard, dusty work. You'll be shocked at what just two sheets of one-half-inch drywall weigh.
Wait until you have to carry two sheets that are 4-feet wide by 12-feet long up a flight of steps. I'll share with you some of the most important things I've discovered after hanging and finishing drywall for over 35 years.
Should You Eliminate Seams If Possible?
Eliminating seams is the first tip. Some home centers only carry drywall in 8-foot lengths. If you visit a business that just sells drywall, you'll discover that you can get drywall in various thicknesses, various lengths, and sometimes even widths greater than 4 feet! If you can use 12-foot-long sheets to eliminate butt joints, do so whenever possible.
Should Drywall Run Perpendicular to the Studs?
Hang drywall so that the long edge is perpendicular to the run of the studs. In a room that has typical 8-foot ceilings, this means you'll have a seam on the walls all around the room 4 feet off the floor. Do the same for ceiling joists and roof trusses.
Should You Hang Ceilings First or Last?
Always hang ceilings first, and then butt the first pieces of wall drywall up tight to the ceiling.
How Do You Cut Drywall?
When cutting drywall, do not use a circular saw. Use a sharp razor knife and score the paper face.
Apply pressure on the backside of the cut line and the drywall should snap crisply. There will be a slightly ragged edge, so always cut the drywall one-quarter inch less than the actual length you need.
How Do You Prevent Blisters in the Tape?
Rookies will end up with blisters in the taped seams if they remove too much mud from under the tape. The drywall joint compound contains a water-based glue that bonds the tape to the drywall paper.
Can You Apply Too Much Joint Compound?
Yes, you can put so much joint compound on a seam it will look like a Hawaiian lava flow. The tapered seams along the edges of drywall only will accept a total of 1/8-inch of taping compound and finishing compound. Your job is to apply thin layers.
What Type of Joint Compound is Used to Tape Drywall?
When applying the tape on seams, be sure to use the compound that says it is for taping. It will state this clearly on the label. Don't use topping compound for taping.
What is Topping Compound?
Topping compound is made for the second and final coats only. If you want to minimize dust from sanding, look for the newer finishing compounds that are formulated to create less dust. I have used them, and the claims made by the manufacturer are true.
What is Skim Coating?
Skim coating is a final step where the entire surface area of all the drywall is coated with a very thin layer of topping compound. The compound is thinned down so it can be applied with a paint roller and a giant blade removes just about all that was applied. The compound fills tiny imperfections and it gives a gypsum texture to the paper.
Why is Skim Coating a Good Idea?
You may discover it takes less sanding if you skim coat the entire surface of all the sheets of drywall with a very thin coat of finishing compound. This coat can be applied with a paint roller and skimmed off with a large flat blade.
This skim coat also produces a uniform texture by filling in the paper face of the drywall sheets. If you skip this step, you will need to do a superb job of feathering all of the compound and sanding.
What Can I Do If My Finishing is Bad?
If you make a mess of finishing the drywall, you can always try to texture the ceilings and walls. There are an infinite amount of textures you can create using brushes, trowels, brooms, and pole sanders. If you decide to texture, then practice on a scrap piece of drywall until you achieve the desired look.
Should I Apply a Special Primer/Sealer?
When it comes time to paint, you should really use a special primer/sealer paint.
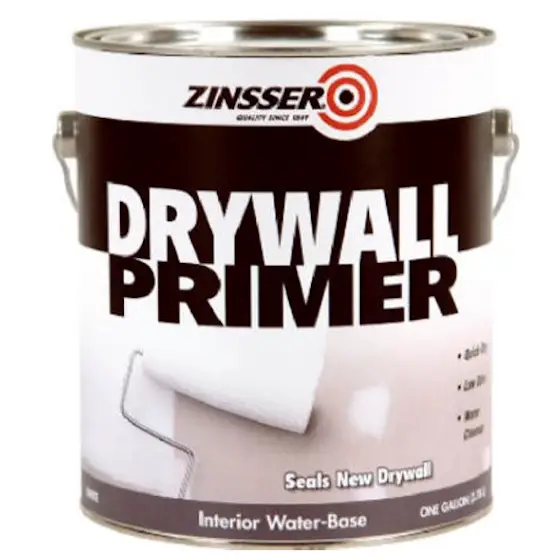
This is a special drywall primer that will make your new drywall look perfect. Don't skip this step. CLICK THE IMAGE to have this paint delivered to your home.
These inexpensive paints will even out both the texture and porosity of the drywall sheets. You will get really professional results by making this decision.
Column 732
Crown Molding eBook
|
Crown Molding eBook: Satisfaction Guaranteed! Save time, material and cost in minutes! |
||||||||||||||||||||||
|
Take this quick quiz to see how you score on the Crown Molding Installation Quiz |
||||||||||||||||||||||
|
||||||||||||||||||||||
|
||||||||||||||||||||||
|
Discover The Secrets to Cutting and Installing Perfect Crown Molding: Just seconds from now you can discover my secret tips for cutting and installing crown molding and the final steps of finely-crafted finishing details. In minutes, you will be making professional-looking miter cuts. This one-of-a-kind eBook will teach you everything you need to know for perfect crown molding installation! The cost for this invaluable tool is only $17.00. This eBook contains many gorgeous step-by-step color photos and covers the following topics: |
||||||||||||||||||||||
| Here is a sample page to give you an idea of how colorful, crisp and helpful this eBook is:  This eBook is loaded with step-by-step color photos! |
|
|||||||||||||||||||||
|
||||||||||||||||||||||
|
|
This eBook is an instant download the moment your credit is approved. It comes to you in PDF format, that can be viewed with free Adobe Acrobat Reader software. |
|||||||||||||||||||||
|
Final Note: "Having the right knowledge is as important as having the right tools for any project. My Crown Molding eBook is an opportunity to discover the invaluable tips that determine the success of your Crown project. We are so confident that you will enjoy and benefit from this eBook that we guarantee your satisfaction, with our no-hassle, no questions asked return policy. You have nothing to lose and everything to gain." Enjoy, Tim Carter |
||||||||||||||||||||||
Building Simple Stairs eBook
|
Building Simple Stairs eBook: |
|||||||||||||
| Ask the Builder Checklists: New Home: Indoor Projects: Outdoor Projects: Major Additions: Mechanical Systems: More Ask the Builder eBooks: Miscellaneous:
|
|
|
|||||||||||
|
|||||||||||||
|
5 reasons this is the only eBook you will ever need for Building Simple Stairs: |
|||||||||||||
 |
|
||||||||||||
|
|||||||||||||
|
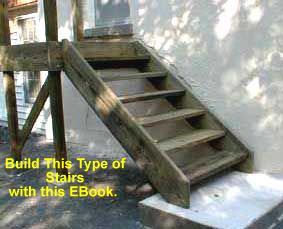
Discover The Secrets to Building Sturdy, Durable, Stairs: For only $17.00, the Building Simple Stairs eBook reveals all of the trade secrets you need to know for project success, regardless of your level of carpentry experience. This eBook shows you how to build simple open-riser stairs by providing you with clear, concise tables and diagrams, photos with crisp line graphics that are one-of-a-kind, material lists, and step-by-step instructions. The project is outlined for you in the following chapters: |
|||||||||||||
|
Table of Contents: Chapter 1: Planning and Stair Basics Chapter 2: Stringer Layout Chapter 3: First Riser and Bottom Seat Cut Chapter 4: Layout of all Treads and Risers Chapter 5: Top Vertical Stringer Cut Chapter 6: Second Stringer and Tread Width Chapter 7: Creating Tread Mortises and Final Assembly
|
Here is a sample page to give you an idea of how colorful, crisp and helpful this eBook is: 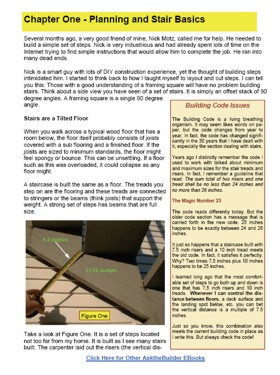 This eBook is loaded with step-by-step color photos! |
||||||||||||
|
|||||||||||||
|
|
This eBook is an instant download the moment your credit is approved. It comes to you in PDF format, that can be viewed with free Adobe Acrobat Reader software. |
||||||||||||
|
Final Note: "Having the right knowledge is as important as having the right tools for any project. Building Simple Stairs is an opportunity to discover the invaluable tips that determine the success of your Building Simple Stairs project. We are so confident that you will enjoy and benefit from this eBook that we guarantee your satisfaction, with our no-hassle, no questions asked return policy." Enjoy, Tim Carter |
|||||||||||||
June 17, 2008 AsktheBuilder News
What's in This Issue
HORRIBLE FLOODING
TESTIFYING IN FRONT OF A CONGRESSIONAL COMMITTEE
HONEST-AND-TRUE STAIN SOLVER STORY
NEWEST COLUMNS AND VIDEOS
Horrible Flooding
If you watch the national news, you surely are aware of the horrible historic flooding that is happening now in the heart of the Midwest. There are all sorts of heartbreaking stories about this, and you yourself may be a victim. If that is the case, I am truly sorry for your misfortune.
But here are some things you can take away from this event. If you have homeowner's insurance as I do, be aware that you have a better chance of flying to Mars flapping your ears than you will have of getting a check from your insurance company for flooding losses. Virtually every insurance company does NOT cover flood damage. If you want insurance for flood damage, get a policy from the Federal Government. Go here for more information:
Federal Flood Insurance Information
On a much smaller scale, if you have minor flooding on your own lot, a flooded crawl space or a chronic wet basement each time it rains, I can help you. You must read the customer review and see the photographs that Jim Sanders sent to me yesterday. He had all but given up hope, and his quality of life was suffering because of Mother Nature's whims. No more my friend. Jim has become another AsktheBuilder.com evangelist.
Go read this column, then look below it for Jim's comments and awesome photos he sent to me. If you suffer from flooding in your home, I believe I can take your pain away
 Jim Sander's Comments and Photos
Even though this column is about crawl spaces, the same Trench Drain device works for wet basements. I urge you to read ALL of the columns in my Drainage category to discover exactly how to install one of my Linear French Drains, and more importantly, why they work. When you do this you will get some insight into my college education. I believe you are in for one of those "I would have never guessed Tim has a degree in......"
Here is my Drainage category.
Testifying in Front of a Congressional Committee - Gulp!!!!!
 Yesterday I received a letter from the US Congress that started off:
"Dear Mr. Carter:
I am writing to invite you to testify at a hearing of the U.S. House of Representatives Committee on Small Business, Subcommittee on Regulation, Health Care and Trade, entitled "The Impact of Online Advertising on Small Firms". The hearing is scheduled for 10:00 a.m. Wednesday, June 25, 2008, and will take place in Room 1539 of the Longworth House Office Building."
It's the real deal. I am going to Washington DC to do this. Personally I feel it is an enormous honor, but I have to admit I am filled with apprehension. For years I have done expert testimony and been in countless depositions as well as testified under oath at trial. But golly, the US Congress!!!!
I desperately need your help, and I need it now - today or tonight. The rules of the Committee require that I submit my written testimony no later than next Monday. What written testimony you ask? Well, I have to write out my feelings about the impact of online advertising.
How can you help? There are forces at work that are trying to convince lawmakers that online ads are not all that great. I have the opposite opinion, and I have tons of proof - but would like more from you.
So tell me, are you a small business, or even a consumer who has been impacted by online advertising? If so, what has been the impact?
Have you benefitted from seeing an ad online that helped you in a time of need?
If you are a small business like me, how has online advertising helped your business? Has it allowed you to reach more customers than ever before? Would your business be as successful if online advertising didn't exist in its present form?
Here is what you might not know about online advertising. In many respects, it is contextual. What that means is the ads you see are often targeted to or match the content that is on the web page you are viewing. A simple example is one of my roofing columns. Let's say you are trying to figure out how to stop a leak in your roof. Please go to AsktheBuilder.com and see this column.
If you look at the Google ads in that column, you should notice that the ads deal only with roofing. Look closer and you may see names of *local* companies that you recognize. These are contextual ads become an aid not a nuisance because they directly relate to the problem you are trying to solve - your leaking roof. You don't want nor need to see car ads, tennis racket ads or ads for pumpkin pie. You need a roofer!
My contention is that this type of advertising is good because it helps you and I solve problems. You do realize there are only two primary reasons you and I get online, don't you? They both begin with the letter P - Pleasure and Problems.
The bottom line is I would love to include your story of how you have been helped by online advertising. Allow me to take your story to our lawmakers. Please hurry. I especially need to hear from you if you are a small business person or work in a small business. Tell me how online ads have changed your life and that of your family.
Time is of the essence.
Honest-and-True Stain Solver Story
Yesterday I was in my office late and the order phone rang. Something told me to pick it up even though it was after hours. On the phone was Marcella from Lancaster, Kentucky. She wanted to order my Stain Solver - the miracle oxygen bleach.
Marcella was a first-time buyer. Just days before some sheets of hers that were outdoors drying under a deck got stained from rainwater that dripped down through the boards. She tried everything to get out the wood stains, but nothing worked. A neighbor - who was one of my customers - gave her a small amount of Stain Solver in a plastic bag. Long story short, my Stain Solver made the sheets look like new.
You may think big deal, but what blew me away was the size of Marcella's order. I was thinking she would buy four pounds, maybe eight. Some might think she would get the twelve-pound size. Nope. Marcella bought the 50-pound size. Yowzaa! That's how impressed she was with what it did. I asked her what she planned to do with that much Stain Solver, and her reply was, "Tim, I plan to clean everything around my place now!"
I never cease to be amazed at the phone conversations I have with customers. Call late in the day and there is a darned good chance you will get me on the horn.
If you want to try any size of Stain Solver to get the same results as Marcella, then use this Promo Code now to get a 20 percent discount. You need to act fast as the code is only good for a few more days in June. (Expired on June 30, 2008.)
The promo code is:
june30 (expired on June 30)
Be sure you use lower case and no spaces when you enter it.
Newest Columns and Videos
Drilling Holes for PVC Pipe VIDEO
Cleaning A Roof with a Pressure Washer VIDEO
Index of past newsletters.