DEAR TIM: Light bulbs in my home are burning out more quickly than ever. After a few days, a new bulb will not work. Are new light bulbs not high quality any longer? When I go to buy new bulbs it is very confusing. There are so many choices, I don't know what energy-saving light bulbs to buy. Is there a real difference between all of the light bulbs I see at the stores? Diane T., Bellevue, WA
DEAR DIANE: I am convinced hundreds of thousands of light bulbs are buried alive in landfills and/or broken at recycling facilities. There is not a doubt in my mind the bulbs you think are bad are still actually good. They have failed because someone screwed them in too tightly into the socket.
If you look at the base of a traditional light bulb, you will see a droplet of solder. This solder connects to one end of the filament inside the bulb. The other end of the filament connects to the aluminum threads at the base of the bulb.
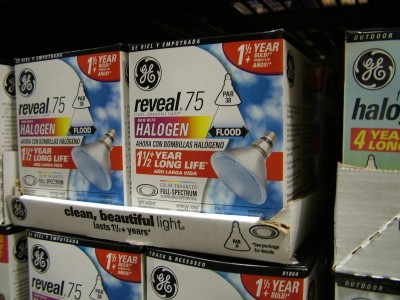
You can see why it might be easy to get confused when buying light bulbs. There are many different sizes, shapes and types of light bulbs. PHOTO CREDIT: Tim Carter
Inside the socket of the light fixture, you will see a brass tab. When the light fixture is new, this tab is bent upwards at about a 20-degree angle. You may have noticed in the past that as you screw in a new light bulb and the light is turned on, the light bulb comes on before the bulb is tight in the socket. This happens because the brass tab makes contact with the droplet of solder.
But some people twist light bulbs into sockets far too tightly. After doing this several times, the brass tab flattens at the bottom of the socket. The droplet of solder is not always consistent from the factory, and if there is the slightest air gap between the solder and the brass tab, electrical arcing occurs between the base of the bulb and the brass tab when the light switch is turned on.
As long as this tiny arc is present the light bulb will work. But the arcing can and does erode the solder. Once the gap between the solder and the brass tab gets too big, the electrical arc can't make the jump. As soon as this happens, the bulb acts as if it has burned out, when in fact, it is still good. If you were to remove the bulb, turn off the light and power to the circuit and use a needle-nose pliers to slowly pull the brass tab up at the 20-degree angle, you would discover the bulb would once again work as soon as you turned the power and switch back on, and reinserted the bulb into the socket.
I understand your confusion about purchasing light bulbs. There are so many choices. But the good news is that newer light bulbs have different technology that not only uses far less electricity, some light bulbs make you and all of the things in your house look fantastic.
One of the most interesting products are halogen light bulbs. These bulbs produce a vibrant white light that is created when the filament burns in the presence of halogen gas that is inside the bulb. These bulbs make colors look crisper, and the bulbs stay at nearly full brightness for their entire life.
If you want energy-saving light bulbs, then pay close attention to the fluorescent light bulbs at the retail store. You can buy small compact fluorescent bulbs that will use 75 percent less energy of a traditional light bulb. For example, if you now use a 100-watt regular light bulb, purchase a fluorescent light bulb that is rated right around 25 watts. Believe it or not, it will produce the same amount of light as the old-style light bulb.
You can also buy full-spectrum light bulbs that filter out the yellow light produced when the filament burns. This happens as the light passes through the glass of the light bulb. The rare-earth element neodymium is fused into the glass and acts as a highly effective yellow-light blocker. Because no yellow light escapes from the light bulb, colors of all the things in your home are crisper and vibrant. Reds will be redder, and skin tones will be more alive. My wife and I use all three of these new light bulbs in our home, and love how they make things look different, especially our lower electric bill!
Many people do not realize that the color of clothes, carpets, painted walls, paintings, any fabric, cabinets, countertops, etc. is directly affected by the lighting source. Professionals know this as color temperature and something called color rendition. Different light bulbs create light that is more heavily weighted towards a part of the color spectrum.
Some traditional light bulbs make things look more yellow, while others might produce a more bluish cast. You must be very careful when selecting products at stores. It is not uncommon for people to be disappointed once something is seen under different light at a house instead of inside a store. Always try to select colors under the exact same light you use at home.
Author's Comment:
I was fortunate enough to get feedback about this column from people who have additional knowledge about the topic. Read these comments:
"Read your article concerning light bulbs burning out prior to the expected life of bulb. As a former electric utility worker, I have experienced many customer complaints concerning this issue, usually in concert with TV picture malfunction (video tube type). These symptoms can be indicative of abnormally high service voltages. (Higher than the nominal 120-140v service.)
This dangerous condition may be caused by a loose connection(s) with the neutral conductor(s). Some years ago, use of aluminum conductors, without proper connections (usually aluminum to aluminum, or aluminum to copper), caused voltage problems both inside structures and with outside service connections. This situation can be a highly hazardous condition where substantial heat is eventually produced by poor and deteriorating electrical connection(s).
Where the above symptoms are present, a simple voltage test at appropriate points in the service panel, meter connections and or main service connection location can determine or eliminate these concerns. A phone call to the local electricity distribution company can usually bring satisfactory answers."
Jim Dushaw
Ashburn, VA
"Dear Tim,
Regarding your article that appeared in the October 7, 2007 issue of the Toledo Blade. You gave some very helpful advice to your readers regarding the longevity of incandescent lamps (and how to actually use them). Good for you.
At the end of the article, however, you suggested that readers use compact fluorescent lamps in lieu of incandescent.
The first concern I have is that your audience will go out and buy the screw-in type fluorescents that are readily available at Home Depot and Lowe's. Typically, these lamps are fitted with "mechanical" ballasts, usually the least expensive and lowest quality devices the manufacturer can purchase. Unfortunately, these ballasts also maximize Radio Frequency Interference (RFI). In our environment, this RFI may create problems with computers, radios, televisions, cellular telephones and the other electronic gadgetry that is so common in our households.
The alternative is to use fluorescent lamps with "electronic" ballasts. There is a cost involved here, too. In general, these lamps will not fit into screw-in luminaries: they have pin-type connections.
So the consumer is left with the choice of electronic noise or added expense.
While I am certainly no fan of incandescent lamps (typically 750 hours of life expectancy versus 15,000 or more from a fluorescent, and energy consumption increases of 66% or more for the same visual light output), I believe the consumer should understand the choices he/she is making.
And, at last, a simple quibble. Your article says the fluorescent lamps put out more light energy than the incandescent. That is not true: what is true is that the fluorescent light is in the visible range, so is much more useful to us. The great majority (80% or more) of the radiation of an incandescent lamp is in the infrared range, which we perceive as heat -- they worked great in our children's Easy Bake Oven.
Thanks for your columns."
David S. Kelly
Retired Chief of Lighting Systems Design
National Steel and Shipbuilding Company
San Diego, CA
"Yesterday's article in the
Washington Post
was very good, but would have been better if you had revealed the Dirty Secret in Federally-Mandated, Incandescent-Lamp-Life tests. This has been confirmed in a conversation with an ex-executive of G.E.
Federal "1,000 Hour Incandescent" tests are achieved by testing the lamps on a very heavy, marble bench so that all building vibrations are damped out. The test is also continuous -- no "Off - On" cycles which stress the filament due to changed-heat expansion & contraction.
In the home, significant vibration is everywhere: Cleaners hitting tables and bases, and most importantly, fumbling with the switch at the base of the lamp.
Long ago, manufacturers figured out how to sabotage in-home life. Simply remove three of the five traditional, filament supports. Since tungsten grows brittle with heat, the filament sways and breaks -- often in a few hundred hours.
The source mentioned above now markets all types of bulbs to building contractors and a few of us civilians. He thinks the only honestly constructed bulbs may be those Sylvania bulbs that are manufactured in Germany.
Sincerely,"
David L. Lee
Bachelor of Electrical Engineering, the Ohio State University
60 years Experience in Telecommunications Engineering & Marketing
Column 693