Exterior Painting Video

It is easy to paint a house. But if you want long lasting results, you have to prepare the house properly. Here are some of the tools for getting the house ready.

First, a large sponge. Most paints will state on the can that the surface should be clean and dry. You will have to wash down the house. Be careful of power washers, they can drive water deep into the wood.

You might have to scrap some areas of the house to remove loose paint. The paint scrapers are available in various widths. Get a couple of sizes for your project.

If you have some nail holes or cracks in the wood, you will need some putty knives to fill and smooth over the holes. Spackling compound is also needed to fill those holes. Read the label to make sure the spackling compound is an exterior type.

Caulk and a caulking gun will be used to fill in any cracks along side trim or door and window frames. A good caulk gun will give you more control over applying the acrylic caulk.

Finally, paint brushes. Some paint manufacturers have special paint brushes that are designed specifically for the type of paint.

The final decision is the paint itself. There is a polyurethane acrylic latex paint that holds great. Since paint is basically colored glue, the polyurethane adds to the stickiness. Buy the best paint you can.
Home Design Software Video

Plans are a very important part of the remodeling or new home building projects. There is very affordable software available that can be used for a variety of planning.

It will allow you to design a small garden shed all the way up to a mansion. It will do complete blueprints with interior and exterior elevations. It will show you 3D views of the plans.

As you are designing your project, the software will allow you to apply different textures, such as brick, stone, hardwood floors, tile, etc. It will also do landscaping.

The 3 dimensional views will allow you to see the finished project with various lighting configurations. You can do a cut-away view much like a child's doll house.

One more neat feature of this software package is once the plans are done, you can built a scale 3 dimensional model of the house or shed. Print out the pieces and glue them to foam board and you have a 3D model. This software package has all the features for planning your next project.

Water Heater Recirculating Pumps Video

Water Heater Recirculating Pump - Hot Water Instantly

Do you turn on the hot water for your shower or to wash your face and the hot water is not there for a while? Does that get you hot? Well, there is a solution. A water heater recirculating pump will get you in hot water when you want it.

CHECK OUT my Gravity Hot Water System column too!

With the built-in timing system, you can set the time you want the pump to activate and pump hot water into the plumbing system. Set if for that morning shower and when you return from work in the evening. In between, hot water is not pumped throughout the house.

CLICK or TAP HERE to get FREE BIDS from local plumbers who can install the pump for you.

recirculating pump

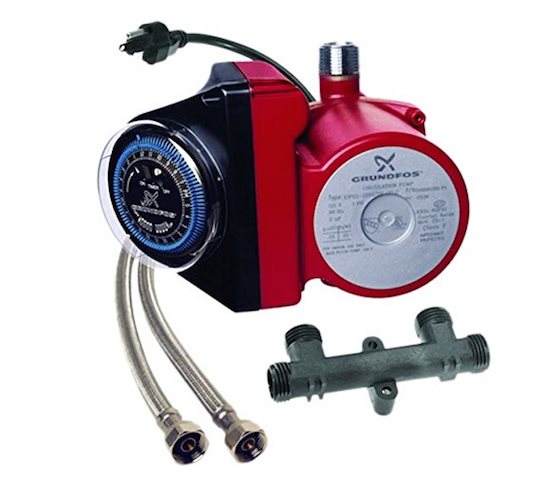
This is a reliable recirculating pump you can install on top of your water heater. The weird threaded fitting goes under the sink that's farthest away from the pump. CLICK on THE IMAGE NOW TO ORDER THIS PUMP.

Where Does the Pump Go?

This pump is installed in the hot water line leaving the water heater. A plumber or plumbing experience will be needed for this job.

Is a ByPass Valve Required?

Yes, the pump system includes a bypass valve. When hot water is needed, the valve sends it up into the pipes. If hot water is not required, the water returns to the water heater. Saves the hot water until you need it. The thermostatically controlled comfort valve, installed at the farthest fixture from the water heater, helps regulate the flow from the hot water line to the cold-water line.

Can I Install it Using Press Copper Fittings?

Yes, you can often rent a copper press tool so you don't have to solder anything. This makes it a true DIY installation. Watch this video to see how one works:

CLICK or TAP HERE to get FREE BIDS from local plumbers who can install the pump for you.

Shovels Video

Many times, people will use the wrong shovel when doing a job. If you use the wrong shovel, you could be making the job harder.

A round pointed shovel is ideal for digging into moist soil. The rounded edge slides through the dirt. A square point shovel does not work for digging. It is designed for shoveling loose dirt or moving sand and gravel.

There are various styles of shovels within the same family. For example, a garden spade is a flat nosed shovel, but it does not have the turned up or curved up sides. Standard square nose shovels have curled sides to help with the handling of the loose soil. The straight sides of the garden spade allow it to slice down into the soil like a razor.

A duckbill round point shovel looks completely different from the standard round nose shovel. The duckbill shovel is ideal for digging a nice narrow trench, that is fairly deep, if you are installing a drain line for a French drain.

Not ever spade is a made from the same material. There are some made from 18 gauge surgical stainless steel. It is rust proof and does a great job on those smaller projects.

Door Painting Video

If you want pro results when painting a four or six panel door, you can not just start painting. There are certain steps to follow for those professional results. There is a particular order to paint the door.

Start with the inside of the panels. Use a special primer on bare wood to properly seal the wood pores. This will even out the gloss of the finish coat. Be sure to get down into all the corners.

A four panel door has eleven major components - the raised panels, top style, middle rail, middle style, another rail, a bottom style and two outside rails. When painting the rails, allow some of the paint to overlap the style. But, immediately, brush the paint on the style parallel with the wood grain.

The final brush strokes should be on the end rails. Avoiding getting paint on the painted areas. Be sure all the brush strokes match the direction of the wood grain, and you will have a beautiful paint job.

PVC Fittings Video

PVC Fittings

Sometimes working with PVC fittings is not as easy as they show on tv. There are steps to take to ensure you get leakproof joints. Did you know that the fittings are tapered? The opening at the top of the fitting is larger in diameter than at the bottom. This is ensure a tight fit as the pipe is inserted into the fitting. But this can work to your disadvantage. If you glue two pieces together and do not hold them until the glue is set, they can slide apart. Resulting in a leaky joint.

PVC fittings have special marking on them. There is normally a number indicating the size of the pipe required, for example a 2, indicating 2" pipe is required. There is a mark line offset 45 degrees to the size number. This is a helpful guide when gluing the pieces together and rotating them into the correct position.

Before glueing the pieces together, be sure to clean the areas to be glued. PVC primer, as well as PVC cement, is needed for the joints. The primer will soften and remove the gloss off the PVC allowing the cement to stick better.

Once primed, apply the cement inside the socket and on the outside of the pipe. Press the pieces together and rotate them about 45 to 90 degrees. Then hold them for about five seconds. This will keep them from sliding apart.

Read the labels on the prime and cement. They contain strong solvents and should be used in a well ventilated area. The warning labels will provide the information you need. They are also flammable. So be careful.

Kitchen Sink Back Up Video

Do you have a sink that is clogged up or runs slow? There are a few things you can do to get that drain flowing again.

First try that old fashion plunger. With the common clog, it normally just needs that gentle push to send it on its way. To use a plunger, cover the drain hole and fill the sink about 1/3 full. With the plunger firmly seated, give it a few up and down strokes. Remove the plunger and see if the sink drains.

If that did not work, bail out the water from the sink. Then pour in some chloride bleach to cut through the clog. Give it a chance to work. If that still does not free up the drain, get a commercial clog remover.

The thicker drain cleaners tend to work better. Follow the directions on the bottle. If that does not work, get a foaming type drain cleaner. This type cleaner actually fills the entire pipe with foam and hopefully with remove the clog. Be sure to follow the directions and wait the proper amount of time for the foamer to work.

If you still have a clog after trying all these steps, it is time to call the pros.

Custom Wood Work Video

Do you have an older home and you are trying to find a match for some existing woodwork? Or building a new home or room addition and want that special look that is all you own? You need custom millwork.

Provide a drawing or sample of your custom wood profile and a specialty mill house will make a wood knife to match your pattern. They will put the knife on a shaper and cut your lumber. The result is woodwork made to your special design.

Just contact your local lumber yard and see if they do custom millwork. This is a little more expensive, but you can match the exact pattern you require.

Fix A Broken Door Knob Video

Fix A Broken Door Knob

Do you have a loose door knob? With just a few tools, you can tighten that door knob. You will need a small flat head screwdriver, a Phillips head screwdriver and a regular size flat head screwdriver.

On the inside of the door, there will be a small spring loaded metal piece under the door knob. Push in that piece with the small screwdriver. This will allow you to pop the knob off the door. Once this is removed, you can take off the chrome or brass trim plate. This will expose the screws that hold the door knob assembly together. Tighten these two screws, replace the trim plate and put the knob back on.

That is how simple it is to tighten up that loose door knob. A few screwdrivers and a few minutes and your door knob will be good as new.

2×4 Quality Tips Video

If your next remodeling project involves purchasing some 2x4 studs, here are a few tips on selecting these boards. There are certain things to look for when you buy lumber. First, remember that 2x4s are not 2" x 4". They measure 1-1/2" x 3-1/2". Next, check for crown and bow.

Crown is any curve or bend in the stud when viewing it down the edge. A bow is a curve when looking down the side. It is okay to purchase some studs that have are crowned or bowed. But, you will also need straight studs. Straight studs will be required when working around doorways and at corners. You want these locations to have straight pieces of lumber.

To check for the possibility of the lumber twisting, look at the end grain. You are looking for vertical grain, where the 2x4 was cut out of the center of the tree. These generally indicate the 2x4s that are the most stable.

Some 2x4s will have defects on the edge. This is called the wane. The missing area will not be a problem if these studs are used as packing studs, used along side the door frame studs.

You can purchase a variety of 2x4 studs. Get some that are straight and some with bends or defects. They will find a place in your project. Just choice wisely.