Everyone has to paint either the inside or outside of their house at some time. What is the best paint to buy? Here are some tips.
Look on the can for the words acrylic polymer and vinyl polymer. The best paint is 100% acrylic. Acrylic resins are very stretchable and resist the expansion and contraction of wood. This helps them last a long time.
The vinyl paints are ideal for items that get repainted very few years. It does not last quite as long.
There are some new paint that go on almost twice as thick as normal paint. They come with a lifetime warranty against peeling and blistering. That will be the next paint used on Tim's home.
The Tri-State area is lucky to have an abundance of old fashion hardware stores. They offer a variety of goods that you just can not find in other places. Have a problem with flies? This hardware store has fly paper in stock.
Many of these stores carry an assortment of old fashion tools, such as oil cans. Great for oiling your lawnmower. See you still need them.
You can find an assortment of corks in these stores. Perhaps you need to stop up a bottle or piece of tubing.
Wire - thin, copper, steel, stainless - is available at your local hardware store.
Nearly all these hardware stores have racks for hardware, such as stainless bolts, nuts and washers. They are available in machine screw type or wood screw. Stainless hardware is great for outdoor use when you do not want to worry about rust.
You can find a variety of items at your local hardware story and personal service. Shop one today!
In the spring and early summer, you can experience a lot of thunderstorms. With these storms comes the possibility of lightning. If the lightning strikes a nearby power line, a power surge can travel into your home through your electric meter. Inside the house, it goes on a search and destroy mission - looking for televisions, VCR's, microwaves, computers, laptops or any electronic device.
How can you stop these power spikes? First, install a whole house surge protection. These devices attach right next to your electric panel. They feature audible alarms and diagnostic lights to check if it is working.
Next, purchase point of use surge protections to use at each electronic device. Be sure to get one with a test light. Surge protectors wear out over time. Check them regularly to see if they are still functioning.
A surge protector that is five to 10 years old, may be worn out. Replace them often. An electrician should be used to install a whole house protector.
Ceramic tile is very popular in the Tri-State area. It is found in the bathroom, shower stalls and in the kitchen. The common complaint is how do you keep the grout clean?
Grout gets dirty because it has a very porous surface. Close up, it would look like a sponge. Lots of openings to trap dirt, scrum and soap. That is what the mildew eats and feeds on. So, how do you stop that from happening? You need to seal the grout.
Get some clear grout sealer. These sealers will fills in those holes and crevices to food and soap can not get trapped in the grout. Most sealers have a little application brush build right in.
After each shower, use a squeeze to remove any excess water off the tile and grout. Leave the shower door or shower curtain open to get good ventilation into the shower. This will allow the tile to dry as rapidly as possible.
Looking for a gift for your Mother or Wife? Why not consider a new fiberglass flower box? These can be installed under windows, sitting on patio walls or any place outside the house. These new fiberglass window flower boxes are light weight and low maintenance. They can be painted to match your decor.
The flower box includes stainless steel mounting brackets and hardware. No rust! There are drainage holes built into the box. Allows the excess water to run out of the box. Your flowers won't drown. Many have a bottom filter to replace the gravel you had to put down first in older flower boxes.
Fiberglass flower boxes are available at garden centers, or check the yellow pages. Or connect to the internet and search for fiberglass flower boxes in your favorite search engine.
When most people talk about power tools, they talk about circular saws and drills. But there is another powerful tool out there. It is the framing square!
What does it allow you to do? Lots of things. Most importantly, these allow you to cut roof rafters. This is needed for building a dog house, home roof, room addition or a garage.
How do they work? The framing square consists of two legs. The thinner leg is called the tongue. The fatter arm is the body of the square. The tongue is usually 16" long and the body 24".
Knowing the pitch of the roof you want to build, for example 4" of rise in 12" of run or 12" in 12", you use the framing square to make your marks. Holding the square on the lumber, the proper slope lines can be made on the piece.
Get a saw, a framing square and some scrap lumber and give it a try. In no time, you will be cutting roof rafters.
Is it too late for your deck? Has a pressure washer attacked it? A power washer can ruin your deck. Wood consists of two sections, spring wood and summer wood. Spring wood is the light colored wood in between the darker rings of grain. The spring wood is really soft and a pressure washer can tear this wood out of the lumber. This results in really grainy wood that needs a lot of sanding to get it back to a smooth surface.
What's the best way to clean a wood deck? One great alternative is oxygen bleach. Oxygen bleach is nontoxic and mixes with water. Once mixed, pour it on the deck and let it sit for 10 - 15 minutes. Then, lightly scrub it with a scrub brush on a pole. Finally, rinse it with a garden hose and the wood will look like new.
Using oxygen bleach, there is no erosion to the wood. Very safe. It is the only way to go. Stay away from those power washers.
Message from Tim:
Years ago while researching a column about cleaning decks, I discovered the wonders of Oxygen Bleach. It is perhaps the 'greenest' cleaner I know of as it uses oxygen ions to break apart stains, dirt and odor molecules. There are no harsh chemicals, and it works on just about anything that is water washable.
I decided to create my own special blend using ingredients made in the USA. In fact, the raw materials in the active ingredient are food-grade quality registered with the FDA. I call my product Stain Solver. I urge you to use it to help with cleaning your wood deck. You will be amazed at the results!
Does your project require you to constantly be changing drill bits? Try one of these new drill bit kits. A snap-lock drill kit features a quick change drill chuck. Mount the special chuck in your drill and you can then change drill bits or screw driver bits in a snap.
Also included is a combination drill bit that has a drill for drilling a pilot hole and a countersink bit. You drill the hole and countersink it all in one pass. After drilling the hole, just flip the bit around and the Phillips head screwdriver bit is on the other end. This one bit does the job of three bits.
Have you had problems drilling in screws and they fall over? A special screwdriver bit features a sliding collar that slides down over the screw holding it in place as you drive it.
If you want your next job to be a snap, just use the right tools.
When your project includes the addition or installation of wood siding, there are some steps to follow to ensure that your siding and the paint lasts a long time. First, be sure to primer and pre-paint the siding before it is put up. If a piece of siding has to be cut, prime the cut end before installing. That is where water can be sucked into the wood and cause the paint to fail.
If you make yourself a gage block, you will have evenly spaced siding. Cut the block to match the exposure of the siding. Hold it against the board just below the one you are installing. Set the new piece on the top of the spacer and it will be the correct distance each time.
One last tip, put a piece of metal flashing between the joint where two pieces of siding butt together. In case the siding ends separate, the flashing will keep water out.
Just follow these quick tips, and your siding installation project will go smoothly, last a long time and look great.
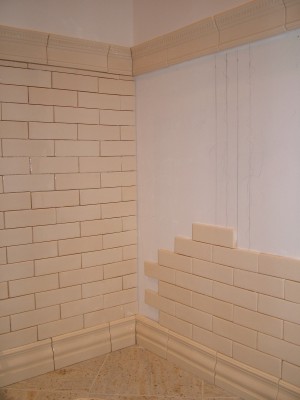
This is a unique ceramic tile pattern. This new tile mimics a pattern that is over one-hundred years old. It is no different than the running bond pattern found in brick walls. PHOTO CREDIT: Tim Carter
DEAR TIM: Regular ceramic tile patterns are uninspiring. My visits to home centers put me in a ho-hum mood. I want a distinctive bathroom ceramic tile that will add value to my home setting it apart from all others when I go to sell. What are some of the most unique ceramic tile patterns you have installed? Something tells me the most interesting patterns will be hard to install. What secret ceramic tile installation tips can you share? Cheryl H., Hazelcrest, IL
DEAR CHERYL: If you think ceramic tile patterns are boring now, you should have seen the somewhat limited supply of patterns just twenty years ago. Go back even further in time and the choice gets smaller. The 4 and 1/4-inch square tiles found in many homes, including an original bathroom in my own home, are giving way to all sorts of interesting shapes and finishes.
In my opinion, your disinterest can be traced to a poor assortment of tile patterns. I suggest you widen your search for distinct ceramic tile patterns and make sure it includes one or two specialty ceramic tile stores that sell nothing but tile, marble and possibly granite. If you have several larger stores like this near you, they will forever change your opinion about the selection of products you find at the average home center.
One of the most exciting things about tile patterns is the ability to recreate certain time periods. For example, different types of ceramic tile both with and without exquisite trim tiles have been made since the late 1800's. If you want a period Victorian ceramic tile, it can be found, even one with a crackled glaze. Crackled glazing has hundreds of random cracks in the thin glazing. Many people love this unique look and pattern. Tiles that resemble 1950's ceramic tile is also available.
Perhaps the most interesting ceramic tile pattern I have installed is one that looks like a brick wall. The tiles are rectangular in shape measuring 2-inches high by 6-inches long. But it gets better. This particular tile comes with a special base tile that looks like a wood baseboard. It doesn't stop there, as you can also order a special cap tile or cornice tile that is a great wall to top off the 2x6 tile when used as a wainscoting in a bathroom where you only want the tile to extend up the wall three or four feet.
You can make your own patterns as well if you have access to a wet diamond saw. Last year my oldest daughter asked me to make a unique geometric pattern from two different-colored granites. One was a jet-black granite with gold specks, and the other was a golden light-colored granite with various crystals in it. I used the saw to cut different rectangles, squares and triangles of all different sizes that fit together much like a jigsaw puzzle. The finished product was exactly what my daughter wanted, and it is installed on the large wall of her tub and shower area.
Some of these unique patterns can be hard to install, while others are no different than the most common ceramic tile. When you go shopping, ask the salespeople if the tiles come with self-spacing lugs on the edges of the tile. These little lugs are small bumps on each edge that create uniform grout lines when the tiles are butted tightly against one another. The line between the tiles often looks very narrow as you install each tile, but because the edge of the tiles is almost always a soft 90-degree angle, the grout line ends up about one eighth-inch wide.
While each ceramic tile seems fairly light, the accumulated weight of many tiles is very heavy. You can tell that when you lift a box of tile. As you install tile, it is best to work from the bottom row and stack tile as you go up the wall. If the first row of tile is not supported by a strip of wood temporarily screwed into the cement or waterproof-gypsum board, then the tiles may slowly start to slide down the wall. You will have a huge mess if this happens.
If you are using a decorative base tile and all of the rest of the tile stacks on top of that, then the tops of the base tile must be set in an absolutely level line. This may require you to trim off the bottom of tiles that are placed on a floor that is out of level.
Pay strict attention to the type of adhesive that must be used with the tile you buy. Some tiles can be installed with organic mastic that resembles thick cake icing. Other tiles should be installed using thinset which resembles bricklayer's mortar. Thinset comes in both gray and white, so use white thinset for light-colored tiles.
Always wait 24 hours after the last tile is installed before you begin to grout tile. The grout should be very firm, not runny. Grout that is properly mixed will be so stiff it will barely slump or droop. Grout mixed to this thick consistency and then troweled into the joints will cure very hard if minimal water is used to clean the grout joints.
Column 681
Expert Advice For Your Home
Subscribe to the FREE Ask the Builder newsletter to receive professional advice for your home. Complete the form below and each week you'll get:
DIY Tips
Tool Reviews
Project Guides
Product Discounts, Giveaways & more.
Unsubscribe at any time. We respect your email privacy.