DEAR TIM: I need a set of brick steps to take me down to a patio. I have no clue how to build brick steps, and wonder if I might be out of my element. Is it hard to build brick stairs like this, especially ones set in mortar? I have watched masons building brick steps, and it seems that if I take my time, I might be able to succeed. What are the basic things I need to know to survive this project? Pete J., Lexington, KY
DEAR PETE: Building brick steps is not a project I would recommend for a rookie. That doesn't mean I don't think you can do the job, it means that there are several skill sets required to get professional results, especially since you want to lay the brick in cement mortar.
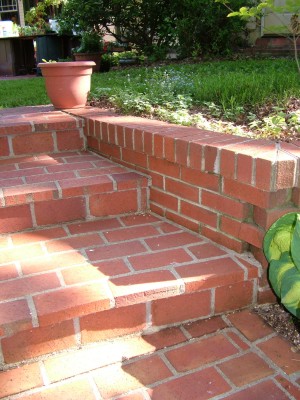
This set of brick steps has been exposed to nearly twenty years of weather. They look as good today as the day they were installed. PHOTO CREDIT: Tim Carter
You can do this project with interlocking concrete brick and no mortar if you fail. These brick interlock and are laid on a bed of compacted crushed rock and a thin layer of sand. Special outdoor adhesives can be used to connect the brick at the edge of a step to the brick below that create the vertical risers. I have seen these systems, but I don't feel they produce the look you desire.
There are two sets of nearly identical brick steps at my own home. I built them nearly twenty years ago, and they look as good today as the day I completed them. I used special 1.5-inch-thick paving brick that are designed to be laid horizontally on the ground. These paving brick were fired in the kiln at a high temperature for a significant amount of time. This is why ice, snow and countless freeze-thaw cycles have not deteriorated the brick.
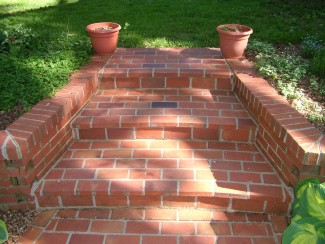
The best way to think of traditional set of brick steps is to think of two sets of steps. There is the set of brick stairs you see, and the one underneath the finished brick. Think of the finished brick as just a facing. If the first set of steps is built correctly, then the brick will cover these much like a pair of jeans covers your legs. If you are able to visualize this, you are going to be able to do this job.
I built the hidden set of steps using concrete block. These block plus the finished brick are very heavy, so to ensure the brick steps would never crack or crumble, I poured a concrete pad that acts as the foundation for the brick steps. This concrete pad was 6-inches thick and had one-half inch steel reinforcing bars spaced at one-foot centers placed in a grid pattern like a crossword puzzle. The steel was placed in the middle of the wet concrete. Take the time to make sure this concrete is poured on compacted ground, and the finished surface of the concrete is level.
The day after I poured the concrete, I started to use different sized concrete block and concrete brick to build the set of steps that had the same width, depth and tread height as the finished brick steps. Using this coarse masonry material allowed me to learn some of the tricks when working with mortar. It is imperative the first set of concrete block steps are level side to side and that the treads tilt forward so water runs down each step to the patio. I engineered in a tilt of one-eighth inch per foot of fall to each tread to achieve good drainage. You don't ever want water to pool on a stair tread.
 My finished steps have treads that are about 21.5 inches deep and the risers are 6-inches high. The dimensions worked out this way because I was using brick that measured 4-inches wide by 8-inches long by 1.5 inches thick, and I wanted to keep cuts to a minimum. The only cuts I had to make were the ones at the sides of each tread where the brick steps butted up to small brick retaining walls on either side of the steps. I urge you to make your steps work out so you keep cuts to a minimum.
The mortar I used to hold everything together was just a mixture of fine sand and Portland cement. Do not use traditional brick mortar as it is not really the correct material for installing brick flat on grade. Regular mortar works fine for walls, since water can readily shed to the ground. Portland cement is formulated to withstand ice and snow when mixed, installed and cured properly. I used a blend of three parts sand to one part Portland cement for my mortar.
The 6-inch riser height for each step was simple to create. I placed the brick on its narrow edge so the flat part of the brick created the riser face. The bottom edge of the brick was flush with the back brick of the tread below. The one-half-inch wide mortar joint between the top of the riser brick and the flat tread brick above adds up to 2 inches exactly. You can create a 6.5-inch-high riser if you add a visible mortar joint under the riser brick.
The 21.5-inch deep tread not only looks good, but it is safe and comfortable to walk on. In my opinion, whenever you build steps with risers less than 7.5 inches, you want a deep tread where you take an extra step before you go down to the next tread. The 21.5-inch depth gives you the needed room to take that extra stride.
Column 673