
These are four different nail guns. Two use compressed air, while the other two are powered by miniature combustion engines. PHOTO CREDIT: Tim Carter
DEAR TIM: I have seen nail guns used by construction workers, and wonder if they might not be a great investment. I have not used a nail gun before, and wonder if it is too much tool for me. Cordless nail guns are very appealing, but I wonder if I should consider a pneumatic nail gun or an electric nail gun. Surely you have used nail guns in your work. What are the pros and cons about these tools and can you offer any guidance before I pull the trigger and buy one? Jenni M., Tampa, FL
DEAR JENNI: I can't say enough great things about nail guns. I have used them for over 30 years, but not without incident. These powerful and productive tools have saved me weeks of labor over time, but they have also caused me some personal pain. Nail guns are indeed guns, and as the name implies, they can be dangerous if you do not follow all safety rules combined with a generous helping of common sense.
Nail guns are inherently dangerous because they drive both long and short nails into wood, even dense oak, in a fraction of a second with a single blow. Driving a regular nail with a hammer is also dangerous. On more than one occasion, I have been hit in the face with a regular nail that ricocheted off a wood surface when it was struck unevenly by a regular hammer. Several times the nail drew blood.
If you can grasp and pour a glass of milk from a full one-gallon container, then you have the strength to handle nail guns. The nail guns that fire long framing nails are heavier than smaller nail guns that drive thin finish nails into trim lumber. My guess is that you are thinking of using trim nail guns more frequently than framing nail guns.
You mentioned cordless nail guns, but I think you mean combustion or impulse nail guns. I own several of these, and they are the nail gun of choice for me. This type of nail gun is a self-contained tool. It does not require a pesky air hose or electric cord to power it. These gas nail guns use a fuel cell often filled with liquified petroleum gas and a spark plug powered by an internal battery. An internal piston, very similar to the ones in your car engine, pushes the nail into the wood when the nail gun safety and trigger are depressed simultaneously.
Nail guns save work because they can drive nails quickly and efficiently. You can adjust these tools so they drive the nails to different depths. When used to install asphalt roofing shingles, you want the nail head to be snug against the shingle but not driven too far to where it tears through the shingle. When driving nails into framing lumber or applying wood sheathing, you often want the top of the nail head flush with the wood surface. Different building codes dictate how far a nail should be driven.
When using a finish nail gun, you often want the nail countersunk, so you can fill and disguise the nail. All finish nail guns I have used do this instantly as the nail is driven by the tool. Ugly beauty marks created by hammer heads that strike the wood surface are things of the past when you switch to nail guns.
When pricing nail guns, think of the entire system. Add up the costs of all of the components needed. If you decide to by a pneumatic nail gun or multiple nail guns, be aware of the capacity of the air compressor. If you are just going to use smaller nail guns for projects and trim, a small air compressor will often work. But if you think you will be doing framing work with a larger nailer, a large compressor may be necessary, and one fueled with gasoline instead of electric. The nail-gun manufacturer often has great guidelines that help you select the proper-sized air compressor.
I used pneumatic nail guns for many years. The air compressors and hoses that supplied the air to the guns were a necessary evil. But 13 years ago, I switched to combustion nail guns. I love these tools and have never missed the pesky air hoses or the noise of the compressor as it recharged itself with more high-pressure air.
Construction workers and serious do-it-yourselfers are injured daily by nail guns. I was injured by a pneumatic nail gun one day working in my own basement while building a frame wall. The nail gun I was using kicked back after driving a nail. The top of the nail gun hit me above the my right eye. The impact knocked me off the step ladder, broke my glasses, stunned me and produced a deep cut that required four stitches to close. Suffice it to say I earned a new level of respect of how a person can be injured by the recoil power of this tool.
A co-worker once drove a nail through the center of a bone of his big toe one day at one of my projects. He was guilty of not wearing steel-toed boots and working too fast. We had to cut out a section of the floor and take it with him to the hospital as he had nailed his foot to the flooring.
But set all of this horror aside and buy yourself some nail guns. When used properly, they are real time savers and the work they do is superb. Most nails are coated with an adhesive that actually holds better than a traditional nail. The heat caused by driving the nail melts the glue along the shaft and the glue sets inside the wood.
Column 678


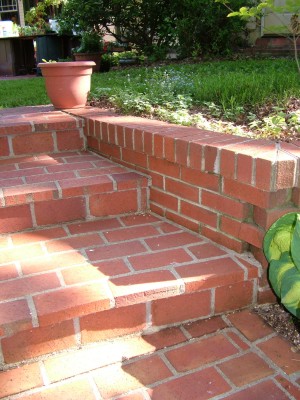
 My finished steps have treads that are about 21.5 inches deep and the risers are 6-inches high. The dimensions worked out this way because I was using brick that measured 4-inches wide by 8-inches long by 1.5 inches thick, and I wanted to keep cuts to a minimum. The only cuts I had to make were the ones at the sides of each tread where the brick steps butted up to small brick retaining walls on either side of the steps. I urge you to make your steps work out so you keep cuts to a minimum.
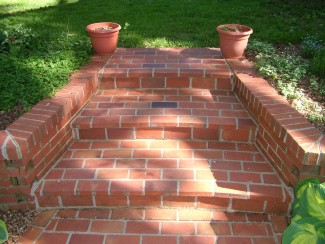