DEAR TIM: My kitchen pantry has traditional 24-inch-deep shelves. I think a pantry drawer, or set of pantry drawers, would make finding things easier. Pantry organization is in my top-10 things to do this spring, so tell me what you think is the best way to incorporate storage drawers into my existing kitchen pantry closet. What do I need and how hard is it to get the job done? If I feel it is too complicated, who would I call to do the job? Courtney M., Menominee, MI
DEAR COURTNEY: Shelves that are 24 inches deep work great for sweaters, pants and large boxes, but they are death on a jagged stick for small cans of soup, boxes of cereal, jars of juice and boxes of pasta. Things get hidden behind one another and it is impossible to see what you have in stock. Deep pantry shelves might work great for bulky items like rolls of paper towels and toilet paper, but small items work better when placed on narrow 6 or 9 inch deep shelving.
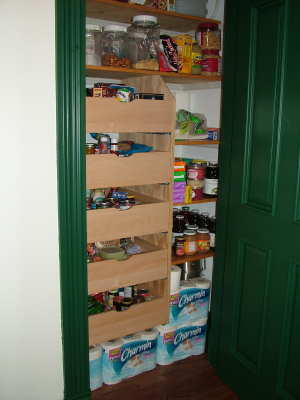
These pantry drawers pull out easily, allow easy access to foodstuffs and are great pantry organizers. PHOTO CREDIT: Tim Carter
I love your idea about using a pantry drawer--or even a stack of pantry drawers--to solve your current crisis. Pull-out drawers in cabinets and closets are one of the best pantry organization inventions I have ever seen. One wonders why it took so long for people to use drawers in places where we have stationary shelving, when you think how handy a chest of drawers is in a bedroom or a set of drawers is in a kitchen base cabinet. It makes perfect sense to use drawers in a pantry.
There are any number of ways to include pantry drawers in your kitchen. I can't say that one way is better than another. What I can say is that if you intend to store cans of food, jars of juice and other things like that, the drawers and drawer-glide hardware should be of very high quality. Each drawer full of cans or juice could easily weigh 40 or more pounds, so you don't want the drawers to fall apart or the system to come crashing down on yourself or a small child.
I recently constructed a set of pantry drawers in several hours using one sheet of plywood I purchased from a lumber yard. I ordered drawer-glide hardware and drawers from a regular kitchen-cabinet company. Many kitchen-cabinet manufacturers offer sliding drawers in their cabinets. It is often possible to purchase the drawers and the hardware, but not the cabinets they often put them in.
If you went to a kitchen-cabinet showroom and looked at a kitchen pantry cabinet or a standard base cabinet that has pull-out drawers, you will quickly see how the drawer hardware is just screwed to the sides of the cabinet. The hardware is spaced precisely to securely hold the drawer, and the hardware is installed level side-to-side as well as front-to-back inside the cabinet.
You can mimic the sides of the cabinet with two sheets of plywood inside your pantry. All you have to do is make sure the pieces of plywood are plumb, parallel and square with one another. You can use some of the existing shelving inside your kitchen pantry to stabilize the new vertical pieces of plywood that will be used to support the pantry-drawer hardware glides.
One or two existing horizontal shelves will need to be removed to make room for the new pantry drawer or drawers. Fit the vertical pieces of plywood tightly between the floor and one of the remaining upper shelves. If you screw through the horizontal shelf into the top of the pieces of vertical plywood, you will create a nesting box for the pantry drawers. Small L-shaped brackets can be used to secure the vertical plywood to the floor.
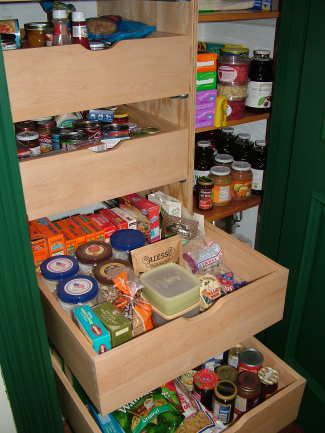
PHOTO CREDIT: Tim Carter
If all of this seems too complicated, you need to hire a seasoned handyman who is also a great finish carpenter. This person can assemble what you need in a matter of hours. Be sure that you work out the spacing between the drawers so you can easily fit tall items in them. But be careful there is not too much space between drawers, as then you will be wasting valuable pantry organization space.
Not all plywood will work for supporting pantry drawers. It is important for the plywood to be least 3/4 inch thick and the pieces straight with no twisting. Plywood that has five or more "plys"--or layers of wood--offers good stability. The more plys in the sheet, the stronger and straighter it will usually be.
Use a framing square to ensure the vertical plywood pieces are square to the back wall of the pantry. It is extremely important that the vertical pieces of plywood are parallel. If they are not, the pantry drawers will bind or they may become unstable if there is too much space between the sheets of plywood that support the drawer hardware.
One carpentry trick is to secure the top of the two pieces of plywood to the upper shelf and then install the lowest drawer to align the vertical pieces of plywood. Then install an intermediate drawer to ensure all of the drawers are working perfectly. Once they are, then secure the bottom of the plywood pieces to the floor using the L-brackets.
Column 666