A wood rasp allows you to make cuts in wood or plastic or non-ferrous material. It is rounded on one side and flat on the other. Each side has both fine and coarse teeth.
A special Phillips screw drill bit has a countersink drill bit built right into it. You can drill the countersink, then drive the screw without changing the bit in the drill chuck.
Ever drop a nail, screw or other metal part down behind an object and you can't reach it? Carry a telescoping magnetic pick-up tool. Extend it out to full length and reach down to retrieve that fastener.
Tim carries a mini tubing cutter. It is small in size but still able to cut the copper tubing located in a small area. If the full size tubing cutter won't fit, try this mini cutter.
A plumb bob is powered by Mother Nature. It does not get out of adjustment like bubble levels or laser levels. The plumb bob gives that vertical line every time.
Try these tools in your toolbelt or tool box. Very helpful.
Automatic fire sprinklers can be installed in a new home or your existing home. Smoke detectors are good, but fire sprinklers, along with the a smoke detector, are better. These sprinklers can protect you and your family from fires, which can be extremely destructive.
A fire can strike at any time and without notice. House fires are very destructive and dangerous. What can you do to protect my home? Smoke detectors are a good start, but they don't do anything if you are not at home.
A home sprinkler system can be installed during the construction of a new home or added to your existing house. If the temperature in the room reaches the level to activate the sprinkler head, the glass vial breaks and the water starts to flow. Unlike the movies, only the sprinkler head in the area of the fire will activate. Not all of them at once. Typically, a fire can be extinguished with a hundred gallons of water. A lot less than the fire department will pump into your house. This will cut back on water damage to the house.
New fire sprinkler heads recess into your ceiling. All that is seen is the round flat cap. The sprinkler components are located above the ceiling. If a fire occurs, the spring load sprinkler head will pop out of the ceiling and start spraying water. The sprinkler heads simply get soldered into the copper water lines.
The Water Quality Association is a great resource for information concerning overall water quality. They have developed standards for certifying water treatment equipment and the individuals who service and install such equipment. They will provide you with a bountiful supply of literature. All you need to do is write and request it.
Water Quality Association 4151 Naperville Road Lisle, Illinois 60532 708-505-0160 www.wqa.org
The following is a listing of manufacturers of water softeners who manufacture certified equipment. You need to check with each manufacturer to see that the particular model you are interested in purchasing has, in fact, been certified. If in doubt, contact the Water Quality Association. They publish a full listing of model numbers which do indeed pass all the tests.
American Water Products, Inc.
American Water Technologies
Aqua Systems AquaFine Water, Inc.
Atlantic Filter Corporation
Autotrol Corporation
Bartley/Lindsay Company
Bruner Corporation
Classic Water Systems, Inc.
Clear Water Corporation
Culligan International
Ecodyne Water Systems, Inc.
EcoWater Systems, Inc.
Erie Manufacturing Company
Fleck Controls, Inc.
Flint & Walling, Inc. DBA Star Water Systems
Hague Quality Water International
Hellenbrand Water Conditioning, Inc.
Ioinics, Incorporated
Kinetico Incorporated
Mid America Water Treatment
Northstar Water Conditioning
RainSoft Water Conditioning Co.
Saxton Manufacturing Company
Sears, Roebuck and Company
Soft Water, Incorporated
Springsoft International, Inc.
Sta-Rite Industries, Inc.
Superior Water Systems Inc.
Water Group Canada, Ltd.
Water Resources International
Water Services Corporation DBA Mermaid Water Soft Inc.
So, how easy is it to purchase these great high efficiency filters? Well, probably not as easy as you might like it to be. Most hardware stores don't carry these filters because of their traditional high markup margins. As such, for you to locate these filters (trust me, they are readily available in your town, you just need to find them), you will need to look in the yellow pages under Air Cleaning & Purifying Equipment. Under this, or a similar heading, you will find commercial filter distributors. These companies will have filters that will fit your residential equipment. Simply call them, and take an old spun glass filter with you to compare size.
The following listing is just a partial listing of filter manufacturers. Call the ones that have 800 numbers and ask for information and name and address of the closest distributor in your area. They will be happy to assist you.
Air Kontrol, Inc. P.O. Box 40033 Memphis, Tennessee 38174-0033 800-647-6192
Aircon Filter Mfg. Co., Inc. 437 - 441 Green Street Philadelphia, Pennsylvania 19123 800-833-3019
Airguard Industries, Inc. 3907 Bishop Lane Louisville, Kentucky 40232 866-247-4827
Camfil-Farr Company 2201 Park Place El Sengundo, California 90285 800-333-7320
Duststop Air Filters 165 Tresca Road Jacksonville, Florida 32225-6550 904-725-1001
Eco - Air Products, Inc. 9455 Cabot Drive San Diego, California 92126-0340 619-271-8111
Manufacturers of Cast Iron, Acrylic, & Fiberglass Tub / Showers
Cast iron and china plumbing fixtures were the only choices you had 50 years ago. Choices were limited, as well as shapes and designs. However, within the past years, the plumbing fixture market has exploded with new products manufactured using new materials. Manufacturers now offer many styles, sizes and shapes. Contact some of these manufactures to see what is avialable for your project.
American Standard 1 Centennial Avenue Piscataway, New Jersey 08855 800-821-7700 cast iron, AMERICAST, acrylic units
Aqua Glass Corp. P.O. Box 412 Adamsville, Tennessee 38310 800-238-3940 acrylic and gel coat products
Bath-Tec, Inc. P.O. Box 1118 Ennis, Texas 75120 800-526-3301 acrylic tubs and whirlpools
Briggs 4350 W. Cypress Street Tampa, Florida 33607 813-874-0627 cast iron & acrylic products
Clarke Products, Inc. 1202 Ave. J East Grand Prairie, Texas 75050 800-426-8964 acrylic tubs & showers
Fiberglass Systems 4545 Enterprise Boise, Idaho 83705 800-727-9907 gel coat bathtubs & showers
Jacuzzi Whirlpool Bath 2121 N. California Blvd. Ste. 475 Walnut Creek, California 94596 800-678-6889 acrylic tub and shower systems
Jason International, Inc. 8328 MacArthur Drive North Little Rock, Arkansas 72118 800-255-5766 acrylic tub and showers
Consider calling these quarries and associations. Request the fine color literature that many of them offer.; Many of them have spectacular granites which vary in color and crystal pattern. Some of them are unbelievable. The Building Stone Institute also has helpful literature to show you the many uses of marble and granite.
The Marble Institute of America has excellent literature as well covering the care of marble. Marble care is specific to the type of marble you have. No one product works well for all marbles.; They will help you select the right product for your marble. Your investment of $5 -10 in phone calls will reward you with a bounty of helpful literature.
Bates Bros. Seam - Face Granite Co. 882 Pleasant Street Weymouth, MA 02189 781-337-1150
New England Stone LLC 285 Smith Street North Kingstown, RI 02852-7730 401-294-1200 www.nestone.com
Consider calling these manufacturers. They all have excellent product literature which they send to you free of charge. The literature often includes entire product lines. This enables you to match faucets and handles in each room. The photography is excellent and should help you to narrow your choices before visiting a plumbing showroom. Good luck on your next project!
American Standard 1 Centennial Avenue Piscataway, New Jersey 08855 800-223-0068
Artistic Brass 55 E. 111th Street Indianapolis, Indiana 46280 317-848-0798
Briggs 4350 W. Cypress Street Tampa, Florida 33607 800-888-4458
Central Brass 2950 E. 55th Street Cleveland, Ohio 44127 800-321-8630
The Chicago Faucet Company 2100 Clearwater Drive Des Plaines, Illinois 60018 708-803-5000
Delta Faucet Company 55 E. 111th Street Indianapolis, Indiana 46280 800-345-DELTA
Dornbracht 1201 West Loop North, Suite 170 Houston, Texas 77055 713-688-1862
Cork flooring has been available for almost 100 years. However, for some reason, it has never gained widespread popularity. Architects have been aware of its superior qualities for years. Frank Lloyd Wright used it in his "Falling Water" house. Cork flooring has been walked on for years at the Mayo Clinic. It can be seen and walked on in historic Williamsburg, the Federal Court Building, the National Archives Building, and countless libraries and churches throughout the world. Many residential homes have it as well. In fact, a close friend of mine has had cork flooring in his kitchen for 40 years.
Resilient floors are ones that have a spring or bounce to them. Cork flooring has fantastic resilient qualities. They are comfortable to walk or stand on because of this quality. Cork flooring, because 50% of the material is comprised of air, is probably the ultimate resilient flooring material. Cork derives this fantastic quality because its structure is cellular. Virtually every other wood floor product's structure consists of fibers. The reason for the difference stems from the fact that cork flooring is produced from the bark of the cork oak tree. Other wood flooring products are produced from the actual wood of different trees.
Cork flooring is probably the most environmentally friendly wood flooring product available. The cork oak tree, which is limited to the western areas of the Mediterranean, reaches maturity after 25 years of growth. At that time, during the summer months, the trees naturally dehydrate. The bark loosens from the trees and can be easily removed without damage to the tree! After nine years, the bark regenerates completely and can again be harvested.
Sound waves are naturally absorbed by cork. This is the reason it is used in many libraries, churches and museums. These qualities can be very beneficial in a residential home. You can put cork flooring in an entertainment room, family room, kitchen or any other room that normally has high levels or activity.
Cork is available in 12" x 12" tiles, planks and cork planks that have real wood veneers applied to them. Some manufacturers have 12" x 12" tiles that have a 26 mil thick clear PVC vinyl wearlayer. These tiles carry a lifetime warranty when used for residential purposes! Cork flooring can be purchased refinished in either wax or urethane as well. Or, if you choose, it can be finished on site to your specific wants and desires.
Author's Note: If you want a cork floor of your own and want to see how easy it is to install, you should consider buying my Cork Flooring eBook. It has wonderful step-by-step color photos and easy to follow directions. I guarantee your satisfaction!
Installation Ideas - Suggested Applications
Cork flooring is an excellent material for kitchens, bathrooms, hallways, family rooms, entry halls, etc. It can withstand heavy traffic. Because of it's excellent sound deadening properties, it is the flooring of choice in noisy areas. When finished with urethane, or purchased with a factory applied vinyl wearlayer, it will not be easily damaged by ordinary spills in kitchens and bathrooms.
Note: As with any wood flooring products, allowing any liquid to remain on the surface for extended periods of time can damage the flooring. Cork flooring can be damaged by excessive use of water or pooling of water on the floor. Simply use common sense and you will be okay.
Cork Flooring Installation, Care and Maintenance
Cork flooring can generally be installed in any area you would normally install hardwood flooring. However, virtually every manufacturer cautions against installing cork in below grade applications (basements). Often, these areas can be subject to flooding from stopped up sewers or heavy rains. Also, older houses may have untreated basement slabs and foundation walls that allow massive quantities of water vapor into the basement. This water vapor can cause the cork to swell.
Cork flooring is applied with adhesives. If you decide to purchase a refinished cork flooring material, it is absolutely critical that the subflooring is perfectly smooth. If the subfloor is not smooth, you may experience slight raised edges where the tiles abut one another. Once again, exercise common sense. As in anything, the finished product is only as good as the foundation upon which it rests. Your subflooring is the foundation for your cork flooring.
Prior to installation, it is a good idea to allow the cork flooring to get used to its surroundings. Trades people refer to this as acclimatizing. Unpack the cork from its boxes, and remove any plastic wrap. This allows the cork to expand or contract in response to the temperature and humidity levels in the house. Never install cork on a freshly poured concrete slab! Moisture in the slab cannot exceed 2%. The manufacturers will tell you how to test for this. If your house has been newly plastered, drywalled or painted, you should also wait until the indoor relative humidity drops below 65%. Humidity levels of 40 - 55 percent are ideal.
As it is being installed, and after the installation is complete, cork must be rolled with heavy (100 lb.) rollers. These rollers help insure a good bond with the adhesive and help to make the edges smooth. Use of rollers is a must!!!!
After installation, do not wash the floor for at least 5 days. Never flood the flooring with mop water. As with any polished flooring material, do not allow dust, dirt or grit to accumulate. These will scratch the finish. Vacuum or dust mop daily to remove dust and dirt. When you decide to clean the floor, use very mild detergents and a damp mop only.
Depending upon the type of finish you have chosen, each manufacturer has recommendations which you should follow. Vinyl finishes, urethanes and waxes all require different recoating procedures. The manufacturers will provide you with specific instructions.
Regardless of which finish you choose, I'm confident that you will enjoy your cork floor! Contact me if you do have a success story to share with others.
Cork Flooring Manufacturers
Environmental Flooring Products, Inc. PO Box 125 2211 Lithonia Industrial Blvd. Lithonia, GA 30058 800-533-CORK (2675)
Expanko Cork Co. Inc. 1129 W. Lincoln Highway Coatesville, PA 19320 800-345-6202
Dodge - Regupol Inc. PO Box 989 715 Fountain Ave. Lancaster, PA 17608-0989 717-295-3400
WE Cork Inc. 16 Kingston Road, Unit #6 Exeter, NH 03833 800-666-CORK (2675)
I recommend that you call these manufacturers and ask for their product literature. They will be happy to send it to you. Some of the literature includes small samples of the cork flooring. Be sure to request names of local distributors in your area. Often the literature contains excellent photographs, installation guidelines, pricing and care instructions.
"Flashings are the weak link in a roofing system. It's important to realize they should be made from the finest materials that have a life-span that equals or exceeds the life of the roofing materials."
Metal Roof Flashings Checklist
Flashings are the source of most leaks
Installation requires skills and experience
Copper and other metals that can be soldered are best
Do not rely on caulk - Sun's UV rays damage it
Metal Roof Flashing - Ones that Solder are Best
Homeowners are continually perplexed and frustrated by roof leaks. My years of experience in the field has taught me that 90 percent of roof leaks happen at flashing points. These are simply places where a roof meets up with something that isn't a roof. When I try to explain this to the average homeowner, their eyes tend to glaze over.
It finally clicked in my head one day that the problem lies in the fact that 80 percent or more of homeowners are terrified of heights. They haven't been up on roofs and as such can't easily visualize what a flashing is or how it is incorporated into a roofing system.
Metal roof flashings are hundreds of years old. Roofers of old discovered how to keep buildings dry.
I have seen photographs of some of the cathedrals in Europe. Some of the photos clearly show the 600-year-old roofs with their flashing systems in place. Some brilliant roofer many years ago figured out how to lace metal pieces into different layers of shingles to create a barrier against water.
How Simple is Flashing Technology?
The concept is simple. It is also very effective. I suspect that there was a certain degree of trial and error, but before long the roofer saw that you simply had to overlap shingles, slate, and metal flashings.
Are Flashings the Weak Link in a Roof?
Flashings are the weak link in a roofing system. It's important to realize they should be made from the finest materials that have a life-span that equals or exceeds the life of the roofing materials. I have done re-roofing jobs where the tin flashings had been painted periodically.
They were basically as good as when they were installed 70 years ago. Remember, when you purchase flashing materials, the labor to install them is virtually the same. If it costs $100 - 200 to get premium materials such as 40 lb. tin or copper, then by all means upgrade!
Is it Okay to Patch Flashings Using Roofing Cement and Caulk?
Roofing cement and caulk are not long-lasting roofing materials. If you can't repair a flashing correctly, then you can use roofing cement and caulk as a temporary patch. Once the weather breaks, you need to substitute proper metal flashing work.
I've seen an alarming increase in the use of roofing cement and caulk on roofs and flashings. These materials - especially roofing cement - are not acceptable.
First of all, many roofing cements are not ultraviolet light (UV) stable. This means they are intended to be sandwiched between two roofing materials hidden from sunlight. Exposing roofing cement to high energy UV light will cause it to break down rapidly.
Caulk, rarely if ever, will last more than 3 - 5 years in the harsh environment of a roof. There can be wide fluctuations of temperature that create wide swings of expansion and contraction of materials. The caulk can separate from the roofing materials and metal flashings. If this happens, a leak is guaranteed.
What Tools are Required to Install Flashings?
The wide variety of common roof flashings can be installed with some very simple tools. A tin snips, a simple hand brake, and a propane torch will allow you to do many tasks. If you have long lengths of sill flashing to do, it would really help if you rented a metal brake that siding installers use. A brake is a tool that allows you to make crisp creases in metal - just like when you fold a piece of paper.
What is a Step Flashing?
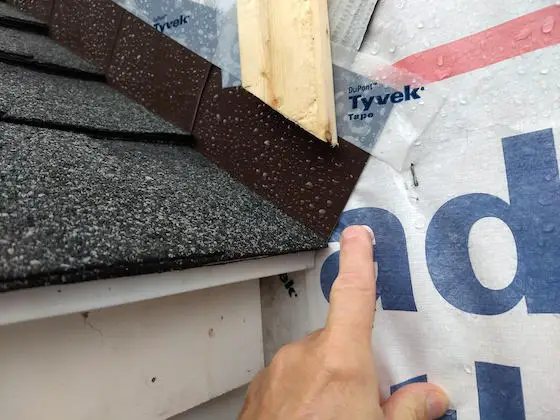
The simplest flashing to install is a step flashing. This flashing is used when a roof butts sideways into a wall, chimney, or other object as the roof rises. As a shingle stops at the wall you can see that water would readily get into the crack, no matter how tight you cut the shingle.
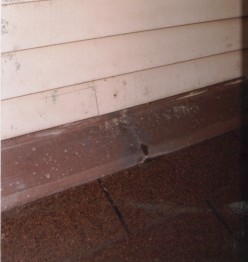
The brown bent aluminum is step flashing. The aluminum extends under the shingle and goes up the roof under the next flashing about 2 to 3 inches. The roofer made a SERIOUS ERROR where my finger is pointing. There should be an additional piece of flashing that's called a kick-out flashing. The lower end is bent and soldered and directs the water out to the front face of the exterior siding or stucco. Copyright 2018 Tim Carter
A step flashing rests on top of the uppermost 7 inches of the shingle This assumes you are using a 12 inch high shingle that requires a 5 inch exposure.
The flashing itself is a 5 by 7 inch piece of flat metal. I like to use 40 lb. tin pieces that come precut to 5 x 7 inches. You can bend these by hand so that the crease goes down the middle of the 7 inch axis. This way 2.5 inches of metal rises up along the wall and the other 2.5 inches covers the end of the shingle. You can also purchase 20 lb. tin, but this has half as much tin coating. Go for the good stuff - 40 lb. tin.
How Are Step Flashings Nailed?
To keep the flashing in place, I always install a nail right at the top of the flashing. I don't like to nail the flashing to the wall as this makes it nearly impossible to remove it years from now when the siding is in place.
When you install the next row of shingles, something magical happens. You completely hide the piece of flashing on the row below! This is OK. When you install the next piece of flashing just like the one below, you will readily see that the second step flashing overlaps the one below by 2 inches - even though there is a shingle between the two pieces of metal.
What Prevents Leaks into a Home?
This overlap is what prevents water from entering your house. Remember, shingles and metal flashing rely entirely on gravity to keep your house dry. You can easily create a leak around flashing if you take a hose and squirt water UP the roof under the shingles and flashing.
But in the real world, this doesn't happen except in the fiercest wind driven rain storms. If you have wicked rainstorms in your area, you may want to cut custom flashings that create more than a two inch overlap.
Where Do You Solder Metal Roof Flashings?
Flashings need to be soldered where they turn corners. This happens at the four corners of a skylight, a chimney, or when a dog house dormer projects from a roof. The lower two corners of the dormer will have flashings that run along the front of the dormer and then turn to proceed up the roof.
Professional roofers use a soldering iron that looks like a plumb bob on an iron rod. They heat the plumb bob portion over charcoal or a propane flame. The stored heat in the iron then heats the metal flashing just enough to melt stick solder.
What Metals Will Accept Solder?
Tin, lead, or copper flashing readily accept solder if you wipe the mill oil from them and use liquid red ruby flux. If you don't have a soldering iron, you can use a torch but you must be very careful. Keep a bucket of water handy for fires that you WILL start!
Photo 1: Plumbing Vent
Virtually every house has one of these poking through the roof - a plumbing vent. The flashing actually is a rectangular piece of metal. In this photo #1, 60 percent of the metal is hidden by overlapping shingles. I have seen homeowners and rookie roofers who simply install the entire flashing on top of the shingles!
The reason the flashing works is the fact that at least half of it is hidden. Water flowing down the roof goes over the shingles and then over the flashing. If the top of the flashing was exposed, water would eventually get under it and leak into your home.
Note how you see no tar or caulk in this photo. This flashing has been in place 12 years with not one single leak.
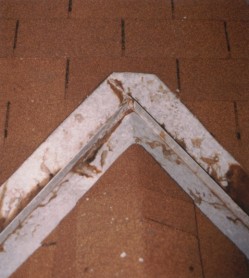
Photo 2: Soldered Valley Flashings
This photo #2 illustrates two soldered valley flashings that intersect. Often roofers will not solder the intersection. They just beat the metal flashing down and overlap the pieces. The ridge cap shingles that are at the bottom of the photo are then extend over the metal to seal the lack of solder.
The stains you see in the photo are not rust. Believe it or not they are stains from oak leaves!
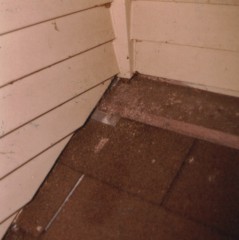
Photo 3: Shed Roof Flashing
This photo #3 illustrates a shed roof that stops at a second story wall. As the roof abuts the wall on the left, there are inter-laced pieces of metal step flashing hidden under the shingles.
You can see a glimpse of one of these flashings in the groove of the second shingle from the top. Note the light line in the photo.
At the second story wall, note the metal flashing that covers the top 3 inches of the shingle. The shingle actually runs up under the flashing to the wall. The metal flashing is installed before the wood siding. It is bent so it extends up 4 inches behind the wood siding. The wood siding actually acts as the counter flashing for this "sill" flashing.
At the inside corner, where the two walls meet, there is a final step flashing that has been cut, bent and soldered. The solder joint runs up the inside corner and is hidden by the thick corner board. Note how the wood siding does not touch the shingles. You should keep the wood off the roof at least 1/2 inch.
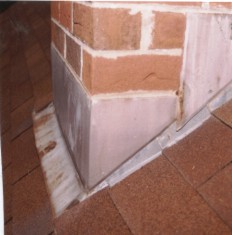
Photo 4: Chimney Flashings
Chimney flashings - a huge source of leaks! This photo #4 shows the side view of a chimney base counter-flashing. You can also clearly see the step flashings that overlap one another under each row of shingles.
Note how water can't get in. It flows over the brick, down the counter flashing over the step flashing and finally onto the shingles. The overlap orientation is the key!
Photo 5: Simple Sill Flashing
This is a simple sill flashing where a shed roof terminates at a second story wall. The center of the photo #5 is actually a soldered joint where two flashings overlap one another.
The shingles extend up under the flashing to the wall. The flashing has a crease in it to keep it flat.
Using a water based urethane product and wood filler, the wood refinishing of the desk can be done in about six hours. The water based urethane stain is fast drying and has a low odor. Lightly sand the desk and remove the dust. Wood filler is used to cover up and fill any nail holes.
Be sure to stir the urethane. Do not shake it as this will put bubbles into the stain. Brush on the urethane and allow it to dry for about an hour. After drying, additional coats can be applied. Three to four coats makes for a great finish. The paint brushes used with the urethane can be cleaned up with warm soapy water.
Try this method the next time you have a quick finishing project.
Expert Advice For Your Home
Subscribe to the FREE Ask the Builder newsletter to receive professional advice for your home. Complete the form below and each week you'll get:
DIY Tips
Tool Reviews
Project Guides
Product Discounts, Giveaways & more.
Unsubscribe at any time. We respect your email privacy.