Exterior Door Insulation Video

The new exterior has been hung and it is time to insulate it. The gap between the door jamb and the framing has to be filled. Tim uses fiberglass insulation on the inside of the door and spray foam insulation on the exterior. The spray foam insulation should be one that is flexible. So will prevent the insulation from squeezing the door as the foam expands. If it would squeeze to much, it could affect the operation of the door. Only fill the gap about half way. As the urethane insulation cures, it will fill in the rest of the gap.

Once the spray foam has cured, seal the gap between the door jamb and the sheathing. The sticky flashing tape, used under the door, can be used to seal this gap. Only bring it out about a 1/4" onto the door frame. This will be covered by the trim around the door. This will keep any water from getting behind the door trim and into the house. If the spray foam expanding out past the edging, use a razor knife to cut it flush with the door jamb. You may have to fix the flashing tape if too much foam oozes out.

Now it is time to install the fiberglass insulation on the inside of the door. Rip some fiberglass insulation into strips that are slightly longer then the gap to be filled. Push it into place with a wood shim, but not pack it too tight! If desired, you can tape over the fiberglass filled gap with masking tape to block any additional air from coming in.

Replace the wood trim around the door and your exterior door project is ready for use.

This is the third of three videos relating to Exterior Door Removal, Installation and Insulation. Below are the links to the other videos in this series.


Click here to watch the Exterior Door Removal Video


Click here to watch the Exterior Door Installation Video

Exterior Door Installation Video

During one of Tim's FREE ON-DEMAND RADIO SHOWS, he recalled this video. Click here to read why he recalled this particular video.

Now that the old exterior door has been removed, it is now to install the new door. Follow these steps to make the job easy. First, be sure to check that the door will be at the right height to match the interior finished flooring. Be sure it is not installed on the subfloor level. Install a piece of plywood, if required, to raise the door to the finished floor height.

A flashing is required to keep water off the piece of wood the door will sit on and the floor joints. We want to keep the water outside. Use a self-adhesive waterproof flashing to cover the area under the door. Don't forget to seal the corners where the walls meet the floor. Be sure the last piece of flashing tape hangs over the exterior edge of the wood. If it is flush, water can get under the flashing. By overlapping the exterior of the door mount, water will run off and not into the house.

Once the flashing is installed, check the door opening for level. The sill have to be level so the door frame will fit properly and the door will operate smoothly. Set the door in place to check the fit. Helpers will be needed to tilt the door back and up into place. You can use some shims to hold the door temporarily in place. Check the reveal on the inside of the door and check the opening and closing of the door.

If the door is hung properly, start nailing it into position, checking the reveal as you nail it. The installation instructions should indicate how and where to place the nails and the shims. Be sure to follow the manufacturer's directions. Place the shims in the proper locations and nail the door in place.

Once all the shims are in place and the door securely nailed, it is time to insulate the opening and put the trim back up. View the last video of this series for insulation tips.

This is the second of three videos relating to Exterior Door Removal, Installation and Insulation. Below are the links to the other videos in this series.


Click here to watch the Exterior Door Removal Video


Click here to watch the Exterior Door Insulation Video

Gutter Guard Video

Gutter Guard Video

Important Author’s Note Update: Since this column was written, I have discovered at least two other gutter guards that sport the micro-mesh filtration screen. Testing of these Micro-mesh guards began early Spring of 2008. The results of the test are in! After 10-years of testing various types, a winner has been declared! Click for the gutter guard I installed on my house - Gutter Guard Test Results.

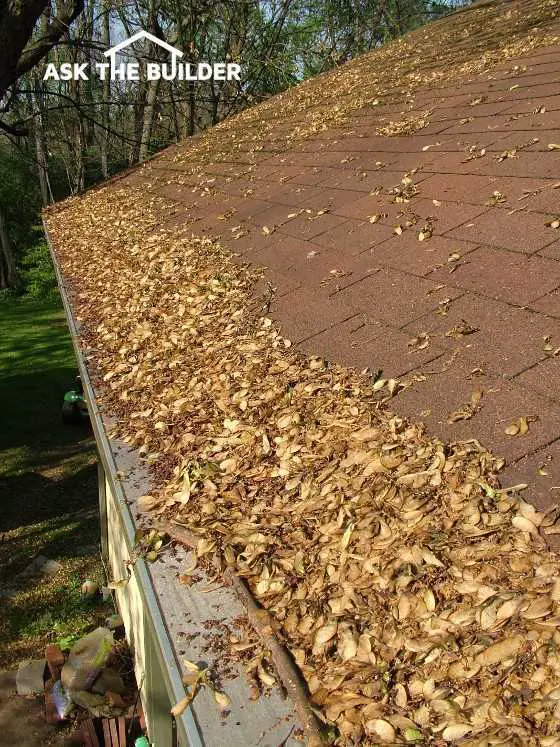
Springtime is the time to clean your gutters after a winter of leaves, broken branches, pine needles and those tree helicopters. Besides clogging your gutter, some of these items will clog your gutter guards. Look for gutter guards that are easy to install and easy to remove.

Gutter Guard

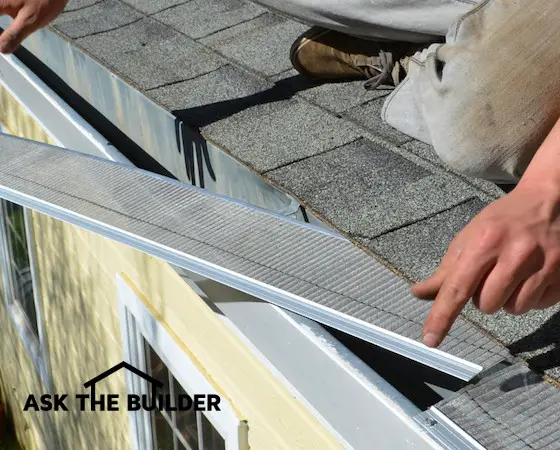
This gutter guard has been undergoing testing for ten months. So far it has done very well. PHOTO CREDIT: Tim Carter

Some gutter guards have solid tops making them hard to work with. Others have small openings with will trap small leaves, twigs and acorns.

The latest plastic gutter guard is flexible, so it is easy to remove and reinstall. Gutter guards are also available in aluminum. Be sure to purchase one with the features you require.

Free & Fast Bids

CLICK HERE for FREE & FAST BIDS from local companies that can install micromesh gutter guards.

Consider purchasing a micromesh product from Amazon.com and having your local handyman install them for you. CLICK the photo below for just one of the micromesh products I discovered on Amazon:

Micromesh Gutter Guard

There are many micromesh gutter guard products. You can save LOTS of money putting them on yourself. CLICK ON THE IMAGE to see how low-cost they can be.

Soldering Copper Pipe with Ball Valves Video


If your remodeling job requires that a water pipe be shut off or relocated, don't just cap it off. Solder a ball valve into the line. This will allow you shut the water off and reconnect the sink easily without having to shut off all the water. You will have to remove a short section of the copper pipe to make room for the valve. This is normally about 1-1/4".

Cut the pipe, clean both ends and the inside of the fitting, flux it and solder it in place. Then you will be ready to keep moving forward on the kitchen remodeling project.

Once the pipe is cool to touch, take a rag or a paper towel and wipe the area soldered to get all the flux off. If you don't, the flux will corrode the copper pipe over time and cause a leak.

Wet Dry Vac Video

Shop vacs can be used to clean up messes, soak up water, clean out the car and for rough construction projects if you are creating a lot of saw dust. If you are the one guy in the neighborhood that has to have the fanciest model, check this one out.

Instead of the standard on/off switch, this one has a four position switch. It has the standard on switch, plus a secondary on switch. This one powers a receptacle that is hooked to another tool that might be the source of the dust. This ensures that both the power tool and the vac are turned on at the same time.

The third switch position is for a self-cleaning mechanism for the filters. That is pretty incredible.

How many times have you been pulling vac around by its hose and it has come disconnected? This model has a twist lock suction hose. You can pull it around and it will not come disconnected from the hose.

This particular shop-vac comes with all the attachments - crevice tool, different wands, and even a squeegee tool. Everything you need to clean up that mess in style.

Metal Peg Board Video

Metal Peg Board

These steel modular panels have holes like regular pegboard, but it uses these new fantastic pegboard hooks that interlock into vertical slots. So, when you put a tool on or take it off, the hooks do not come off. These are great pegboard accessories.

These steel peg board panels come in different sizes and they attach directly to your wall. The panels are about 1/2 inch thick and come with their own mounting screws.

Are you a sports fan that likes to show your team's colors? This new pegboard storage system comes in a full range of colors. So you can decorate your tool storage area in your favorite color.

This is an amazing system to get your tool area under control. Get this system and be able to find your tools quickly for your next project.

Clogged Drain Video

Clogged Drain

Clogged drains can be easy to clear if the drainpipes are designed properly. If you need to make a 90-degree bend, don't just do it with a standard elbow. It may be too hard to get a snake down past this hard bend. Instead, use a gentle bend elbow. The bend is larger to make it plumbing snake friendly.

Another option is to use two 45-degree elbows with a short section of pipe in between. The further apart the two elbows, the easier for the snake to get through.

To help with clogs in the future, when installing the drains, use a Y fitting and a 45-degree elbow. The Y fitting has the first part of the turn and the 45 degree elbow completes the turn. On the straight section of the Y, insert the clean-out fitting. Now you have access to the drain without having to disassemble any connections. Remove the clean out plug and you can gain access to the clogged drain.

Floor Squeaks Video

Have a floor squeak that is driving you crazy? The floor squeak normally happens when the flooring is not held tightly against the floor joist. As you step on the loose board, it slides up and down on the nail. That is what causes the squeak. If the subfloor is exposed, screw it to the floor joists. Screws won't back out as easily as nails.

Locate a floor joist by driving a nail into the subflooring until you feel the nail hit the joist. Mark that spot, then find the other edge. Once both sides are found, draw a line the length of the floor. Then you can screw the subflooring down along the floor joist. Use 1-5/8" coarse thread drywall screws for the job, spaced about 4" on centers along the joist.

Cordless Circular Saws Video

Tim Carter discusses the advantages of the cordless circular saws. They are lighter and don't have to have an electrical outlet available. Cordless saws are available in a variety of voltage options. Tim has both an 18 or 24 volt models. The higher the number, the more power the saw will have.

The cordless circular saw blade is normally smaller then their corded model. However, the 6-1/2" diameter saw blade is still big enough for cutting through those 2x4's and 2x6's.

They make great gifts. Or maybe yet, buy one for yourself. Cordless tools are the cutting edge.

Reference: March 25, 2011 Newsletter.

Wainscoting Video

Install the bottom rail, making sure it is level. Then, start installing the wainscoting panels and stiles. Start in the middle of the wall and work out to the ends. Once that is done, the top rail locks all these pieces together. Lastly, put on the cap molding and you are ready to finish your beautiful wall. Some companies offer the wainscotting prefinished in various natural wood finishes.

Installation is simple and easy. The finished project will be stable, solid and enhance any room.