Painting Ceramic Tile

floor tile matching

Many of the floor tiles in this photo don’t match the circled one. The homeowner thought they’d all match. Photo Credit: Sandy Mayor

"Painting a ceramic tile floor is fast and it can last. The key is to use the right paint and once cured, coat it with three layers of clear water-based urethane."

DEAR TIM: I am thinking about painting ceramic tile in my home. This tile is in several rooms both on the floor and walls.

Our budget does not allow replacement at this time. Is ceramic tile painting a reasonable project, or will it end in disaster?

What do I need to know about painting ceramic tiles that will make me look like a hero in front of my husband, the man who thinks this is a folly of an idea? Sharon D., Carrollton, TX

Painting Ceramic Tile Floor - One Color or Stencils


Related Links

Eliminate Grout Lines Before Painting - Good Idea?

How to Repair Chipped Tile Before Painting

DEAR SHARON: Oh, you're going to be astonished by the praise and compliments that will be showered upon you by your friends and neighbors once they discover how you transformed your home by painting the ceramic tile.

The best part is that the cost of the job will be less than what you and your Doubting-Thomas husband will spend at a fine restaurant for a dinner for two. He is going to be ordering some crow followed by a large helping of humble pie.

What Ceramic Tile Can be Painted?

You can paint any ceramic tile that will not be subject to lots of water on a routine basis. This means floor tile, wall tile, and countertop tile can all be painted. You can even do decorative painting on ceramic tile.

The only tile I would never paint is that ceramic tile within a shower or above a bathtub. The high levels of moisture in these areas cause most paints to peel from the ceramic tile in a short amount of time.

Free & Fast Bids

CLICK HERE to get FREE & FAST BIDS from local painters who can paint your tile next week.

Should I Deep Clean Tile Before Painting?

Yes, the ceramic tile needs to be deep cleaned before painting. Paint is just colored glue and it sticks best to clean surfaces.

The first step in the process is to deep clean the ceramic tile and grout. You must remove all dirt, oil, wax, grease, mold, etc.

What is the Best Ceramic Tile Cleaner?

Certified organic oxygen bleach is the best ceramic tile cleaner.

I would start the process using Stain Solver certified organic oxygen bleach.

This product will deep clean all grease and dirt from the tile and the grout. You must have clean tile for the paint to stick to the glossy tile.

The cleaner you get the tile, the better chance you have of overall success. Keep in mind that paints of any type are simply glues that have color in them.

Glues prefer to stick to surfaces that are squeaky clean. They stick even better if the surface is slightly rough.

You can rough up the tile after using Stain Solver by doing a follow-up cleaning with a mild abrasive cleaner like Soft Scrub.

Cleaning Ceramic Tile Video

Watch this video to see how easy it is to clean ceramic floor tile.

What Paints  Stick Well to Ceramic Tile?

Oil-based paints stick very well to ceramic tile. They are harder and harder to find.

I've had fantastic results over the years painting ceramic tile with oil-based paint. It is getting harder to find this paint because of environmental issues, but rest assured, it really sticks to things once it is dried and has cured.

Water-based paints can peel readily from glazed ceramic tile surfaces. You may have great success with epoxy paints, but test these in a small area as they might be hard to use the first time.

Newer urethane-resin water-based paints are your best alternative if you can't locate oil-based paint. Urethane resin is often found in outdoor porch paint.


CLICK HERE to get FREE & FAST BIDS from local painters who can paint your tile next week.

ceramic tile paint

Here's a great urethane-fortified paint. That's why on the label it says it's for porches and floors! It's tough enough to walk on so you know it will perform really well on your vinyl siding where no one can walk except squirrels. CLICK THE IMAGE NOW TO have this paint delivered to your home.

What is the Best Paint Sheen to Use?

Use a semi-gloss or high gloss paint for the job. If the paint is thick or hard to brush or roll, use a little paint thinner to slightly dilute the paint. Always follow the directions on the paint-can label with respect to the maximum amount of thinner you can add.

Use masking tape to protect surfaces next to the ceramic tile. Use tapes that have less-aggressive acrylic adhesives so when they are removed, they do not damage the surface that was taped.

Can You Stencil Patterns on Ceramic Tile?

Yes, you can paint stencil patterns on ceramic tile.

Decorative painting on ceramic tile is easy. You have unlimited design options on any ceramic tile surface. Keep in mind that if you grow tired of the design, you can paint over it

Stenciling over the finish paint will allow you to create borders on walls, floors or countertops. You can have scads of fun with stencils or even two-tone paint designs.

Stencil Steps

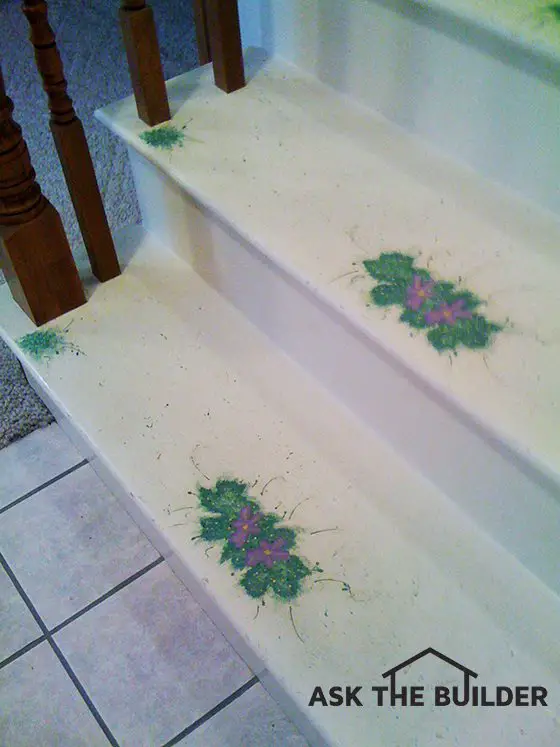
These steps are painted and have a great stencil pattern on each tread. There are highlights as well on the ends of each tread. ©2017 Tim Carter

Let your mind run wild, and experiment on a small section of ceramic tile. If you don't like what you see, start over.

How Do You Protect the Paint on the Tile?

Once the finish paint has dried for two or three days, coat it with two coats of clear water-based urethane. This urethane is very sticky and will adhere to the fresh oil paint.

Avoid using oil-based urethane as many of them have a tendency to develop a golden patina over time. You may find the amber color of this patina to be objectionable. The water-based urethanes stay clear forever.

The urethane is an integral part of the paint job. Most urethanes are very hard and resist water and foot traffic or abuse from plates, glasses, and cookware on countertops.

It's a known fact that urethanes do a fantastic job of protecting hardwood floor finishes for years. They do the same for painted surfaces. This is especially true for painted ceramic tile floors. The urethane finish will protect the colorful paint and provide you with years of beauty. There are thousands of basketball courts that are living proof that painted floors can handle abuse and still look good with minimal care.

Should I Repair Chips Before Painting Tile?

Be sure to repair any chips in the tile before you paint. Quick-drying epoxies are an excellent material to use for this purpose. Caulk all cracks as well. Be sure the caulk cures for several days before you paint it. Some water-based caulk will shrink if you squirt them into wide or deep cracks. Use caulking backer rod, if necessary, to fill deep cracks. Generally speaking, a bead of caulk should only be as deep as the caulk bead is wide.

Can I use Multiple Paint Colors or Tones?

Yes, consider using multiple colors when painting your ceramic tile. Creating geometric patterns by painting separate tiles different colors can yield stunning results.

You can also paint stripes or borders with ease. On large ceramic tile floors, a border can be designed that compliments the placement of a large area rug that is used in the center of a room or a runner carpet in a hallway.

Author's Note: We've received other questions with similar problems or questions. Here's one from E.J. Vincent of California regarding her ceramic tile painting project.

"I want to paint my own design onto ceramic tile, like the ones you would buy at Home Depot. Is there a special ceramic tile paint and sealer I need to use? The ceramic tiles will be incorporated in with the same unpainted tiles on the kitchen cabinet top and backsplash."

CLICK HERE to get FREE & FAST BIDS from local painters who can paint your tile next week.

Column 651

Fireplace Mantels

DEAR TIM: I need a fireplace mantel for a remodeling project at my home. As I look at different wood fireplace mantels, I get more confused. A trip to a local salvage company allowed me to see antique fireplace mantels, but some required too much work. My husband wants a stone fireplace mantel, but I don't think it will look right. Can you help clear up some of the confusion about different mantels for us? Jill P., Lampe, MO

DEAR JILL: It sure is easy to get overwhelmed when it comes to fireplace mantels. There are hundreds, if not thousands of different styles. When you then factor in the different types of materials used to make the mantels, the permutation possibilities go off the charts. I can see why you might be confused just thinking about wood mantels, especially when you have to consider the different common wood species like cherry, oak, walnut, pine, poplar and hickory.

This fireplace mantel is well over 100 years old. It was salvaged from a house that was about to be torn down. PHOTO CREDIT: Tim Carter

This fireplace mantel is well over 100 years old. It was salvaged from a house that was about to be torn down. PHOTO CREDIT: Tim Carter

There are any number of things you should consider before you make your final fireplace mantel decision. I am quite sure a professional interior designer would consider the overall theme of the room. It would look more than a little odd, in my opinion, to have a rough-timber beam as a fireplace mantel in a room that oozes French Provincial architecture. Use a rough beam in a log home or rustic-decor room.

You also need to decide if the fireplace mantel will be just the horizontal shelf above the actual fireplace or will it be part of a fireplace surround. Many stunning fireplace mantel designs are actual surrounds where two legs made of any number of materials connect to the horizontal aspect of the fireplace mantel.

Restoring an antique fireplace mantel may be worth it. My wife and I have a gorgeous solid-walnut antique fireplace mantel in our family room. The salvage company we purchased it from had it stripped and refinished for us. The cost of the mantel was far below the cost of a new one that had one quarter of the character.

If you decide to use an antique fireplace mantel, be sure it will pass the modern building codes. The building code usually is concerned with the proximity of combustible material to the left, right and just above the firebox opening.

Depending upon your budget and how urgent the need is for the new mantel, you might explore an option many people fail to consider. If you have a woodcarvers guild in your area, you may be able to get a one-of-a-kind custom fireplace mantel built for you.

A past customer of mine did this on one of my jobs, and the look was stunning. The woodcarver came up with a grapevine design that represented the family trees of my customer and his wife. I have to admit this mantel was the most gorgeous one I have ever installed in all my years of building.

As for your husband's desire for a stone fireplace mantel, it comes back to whether that look will fit in the room or clash with the finished design. There are many different types of stone, and you may find one that has the color range and texture to compliment what you are doing in that room. It may help to have an artist do a watercolor rendering of that wall elevation to help you decide.

Be sure you pay lots of attention to the scale of the new fireplace mantel. They need to match both the fireplace opening and the overall size of the room, including ceiling height. Rooms with tall ceilings may be able to support an overmantel. These were very common in older homes that had ceilings of ten feet or more. An overmantel is basically a mantel set on top of the horizontal shelf of the bottom mantel. The upper mantel often has a mirror or painting in the center area.

As you shop for fireplace mantels, pay attention to the way they are mounted to the wall. You want to make sure you buy one that allows you to hide all fasteners so the finished product looks as if it was glued to the wall. There are any number of ways to secure a fireplace mantel to a wall, but know what you need to do before you buy one and lug it home.

Now is the time to think about electricity above or next to your mantel. Since you are doing a remodel job, you have an opportunity to extend electricity to the mantel area. Installing an electrical outlet that is discreetly hidden, but meets all aspects of the National Electric Code, allows you to have powered holiday decorations on your mantel without a dangerous and dangling extension cord.

If you have sentimental items that will be displayed on your mantel, be sure they will fit on the horizontal mantel shelf. Not all mantel shelves are the same depth. If you know of mantels in other homes that really appeal to you, take photographs of them or measurements so you can get one that matches closely.

Column 650

3 Way Switch Video

Safety tip:

Turn off the power or circuit breaker feeding the wiring you are working on. Avoid electrocution.

Three-way switches allow you to control a light or lights from two different locations. The 3-way switch has three screws plus the ground screw. That is one more than the standard light switch. The black screw is an important one. If the wired are connected to the wrong screw, the 3-way circuit will not work.

In this example, the power comes into the first 3-way switch through a yellow wire. From that switch, there is an older white wire that happens to be 12-gauge wire, that is a little thicker than the other wires, that goes to the other switch. From the second switch, there is a yellow wire that goes to the light fixture. That is the basic wiring for this circuit.

Modern codes now require the outer covering on cables to be different colors so inspectors can see quickly what gauge wire is being used on a job. I happened to have an older partial roll of 12/3 wg cable in my basement that was made before the outer covering was required to be yellow.

Normal electrical wiring consists on of three wires - black, white and bare (ground). Wire for a 3-way circuit requires four wires - black, white, ground and red. The incoming power wire (yellow in this example) has the three wires. Between the switches, there is a white cable with the four colored wires. The white from the yellow and white cables get connected to each other with a wire nut. The sends the neutral directly to the light bulb. The black wires and the red wire connect to the switches.

The two ground wires are connected together and then connected to the grounding screw on the first switch.

The black wire from the circuit breaker panel gets attached to the black screw on the 3-way switch. The black and red wires from the white cable running between the switches get connected to either of the two brass screws on the switch.

On the other end, the two white wires are wire nutted together. One of the black wires gets attached to the brass screw. The red wire, running between the switches, gets connected to the other brass screw. The black screw has the black (common) wire that runs up to the light through the yellow cable. The two grounds are connected together and then to the green ground screw on the switch.

To summarize, the black screw gets either the wire from the electrical panel or the wire going to the light. The brass screws get the travelers hooked to them. Those were the black and red in this example. Be safe.

Roof Flashing for Bathroom Fans Video

Roof Flashing for Bathroom Fans

First, if you are not comfortable working on the roof, do not attempt this project. Falls resulting in injuries or death are possible.

From inside the attic, locate the hole where the vent will go through the roof. It must be located between two roof joists. Once located, drive a large nail up through the roof from the attic.

Once back on the roof, you can locate the center of the hole from the nail. There should not be any chimneys, other vents or other objects within two feet of the center of the hole.

CLICK HERE to get FREE & FAST BIDS from local companies that will come install the fan flashing for you in no time.

Mark the hole on the shingles with any marker you can see on the roof shingles. Make the hole slightly larger then the diameter of the vent tube.

Use a reciprocating saw to make the cut in the roof. You can cut right through the shingles at the same time you are cutting the roof sheathing.

Shingles are overlapped so the rain will run off the roof. The upper shingle is always on top of the lower one with part of the lower shingle underneath the one above it.

The flashing on the bathroom fan vent works like a shingle. If it just laid on the roof, the flashing with be above all the shingles and the roof will leak. The top edge of the flashing has to go under some shingles.

To do this, some nails have to be removed from the shingles. The nails should be located directly above the slit in the shingle. Lift the shingle and located the nail. Use the flashing to determine which shingles are affected.

Use a flat pry bar to remove the nail(s). If the part of the vent is not round, some of the shingles will have to be cut to match the vent. Put the flashing in the hole and outline the flashing edges.

Cut the shingles so they are about 1/2" inside the edge of the flashing markings. A razor knife can be used to cut the shingles.

Once cut, slide the upper part of the bathroom fan vent flashing under the shingles at the top. The vent flashing will sit on top of the shingles on the down roof side. Nail the roof flashing in position.

Apply caulk over any nail head that is not under a shingle. This will keep that nail hole from leaking.

Done properly, your roof vent will not leak.

Related Column: Ducted Bathroom Fan

CLICK HERE to get FREE & FAST BIDS from local companies that will come install the fan flashing for you in no time.

New Sponsor Data

Congratulations!

You Rule the World!

Thanks for Making us some

$ $ $ SWEET MOOLA $ $ $ !


Enter Saleman's Name:
Salesman's Email Address:
New Sponsor Company Name:
Sponsor's Address:
Sponsor's Contact Name:
Sponsor's Contact's Email Address:
Total Contract Amount:
Length of Contract:
Category Where Ad Appears (if multiple ads, use large text box below for all data) :
Insert Data for MULTIPLE Ads for One Sponsor:
Text for Linked Company Name in Text or Graphic Ad:
URL for Linked Company Name:
25 Words of Text for Ad:
Small Display URL for Ad begins with www:
URL for Small Display Company-Name URL:
Upload Sponsor's Graphic Image:
URL for Graphic Image:
Upload Sponsor's BANNER Image File:
URL for BANNER Image:
Comments, Notes, or Other Things Roger Needs to Know:

Exterior Door Removal Video

Before installing a new exterior door, you have to remove the old door. The first step to remove an exterior door is removing the door trim from inside the house. This will allow you to see what is around the door. After the trim has been removed and before you take out the old door, stop and take some measurements of the door opening. Then, check to be sure the new door is the proper size. Image the nightmare if you have removed the old door to find the new exterior door is the wrong size! If the new door will fit the opening in the frame, take down the old door.

On the outside of the door, remove the two side trim pieces from around the door. Do not remove the top trim, as there is an integral flashing that goes up behind the siding. The new door can be installed under this flashing be tilting it backwards and bringing up toward that weather flashing.

Use a razor knife to cut any caulking around the door trim. This will prevent the siding from being ripped away when the trim is removed. If some siding tries to come with the trim, use a small 2x4 block and tap the siding to break the seal.

Make your job easier by removing the door itself from the frame. Put out the door hinges and remove the door. This makes the remaining frame and sidelights, if present, a whole lot lighter. With the door gone, it is time to remove the remaining door jamb.

A word if caution. Does you door have an alarm switch embedded in the door jamb? If so, you may have to remove some drywall on the inside to get to the alarm switch. You can cut the wires to the switch and rewire it after the door installation.

Use a sawzall to cut the nails that are holding up the door jamb. Be sure to get a saw blade that will cut both wood and metal. The door frame will be ready to be taken out. You might need a hammer to help it along.

This is the first of three videos relating to Exterior Door Removal, Installation and Insulation. Below are the links to the other videos in this series.


Click here to watch the Exterior Door Installation Video


Click here to watch the Exterior Door Insulation Video

Wood Conditioner Video

Wood Conditioner - Use One Before Staining Wood

Some woods, like oak, are easy to stain. The wood cells are very closed and the stain is not soaked into the wood. A soft wood, such as white pine is very porous and will soak up too much of the stain and the grain of the wood will not show through. You need to close up the wood pores in a soft wood which is what a wood conditioner does. The pre-stain conditioner will close the wood pores. These conditioners are similar to thinned down varnishes or urethanes. They have resins in them that partially fill some of the pores in the soft woods so only a small amount of stain is absorbed by the wood.

They go on clear and only takes 15 minutes to dry.

After the wood conditioner is dry, go ahead and stain the wood. The wood stain will not soak in too much in soft woods. The wood grain will show through the stain beautifully. If you did not use the conditioner, the wood stain would be very dark and there would be little or no wood grain showing. The pre-stain wood conditioners are a must on soft woods.

Do a Test First

It's BEST to do a test on some scraps of wood before you actually stain your wood. Do exactly what you see me do in the video so you get a feel of how the wood conditioner protects your wood from absorbing too much dark stain.

Marie from Oak Harbor, WA, emailed asking about mixing stains. Read her story in the March 23, 2011 Newsletter. This was the I didn't Know That!! article in the October 22, 2013 Newsletter.

Sink Installation

Click the image to watch the sink installation video.

A different window will open and the video will play immediately. If this does not happen, you are probably surfing with Internet Explorer as your browser and you have the Block Popups command activated in your preferences.

This is why I surf the Internet using Mozilla Firefox as my browser. It has built-in intelligence that allows popups to open that you activate with a click. There is a difference you know, as some websites throw popups in our faces without our wishes. In this case, I am forcing you to click to activate the popup.

If you want your web surfing to be enjoyable, consider using Firefox as your browser. The software is free and you can get it by clicking here .


Bathroom Cabinets

DEAR TIM: The bathroom cabinets I saw at the home center are not going to work for me. I have dreamed up a clever L-shaped design for my new bathroom, and I need bathroom vanity cabinets that are crazy sizes. Is it possible to buy these as well as bathroom wall cabinets? What else can I do to make my bathroom appear as it is indeed one-of-a-kind? I want to splurge, so don't hold back on any of your ideas. Connie B., West Salem, WI

DEAR CONNIE: I get really frustrated when people ask for me to do a brain dump of all of my ideas, but am only given precious few words to do so. Books have been written about bathroom remodeling, cabinets and design possibilities, so I have my work cut out for me.

First, you absolutely can purchase any custom-sized cabinet you need. You can get special widths as well as depths. The depth of the cabinet is very important, especially in an L-shaped design. Smaller bathrooms don't always have the width to allow standard-sized cabinets to be used in this configuration. You will probably discover you need to use a cabinet or several cabinets that are only 15 inches deep.

These semi-custom bathroom cabinets were ordered to fit precisely into the tight space. The upper cubby shelves were made on-site from stained wood provided by the cabinet company. PHOTO CREDIT: Tim Carter

These semi-custom bathroom cabinets were ordered to fit precisely into the tight space. The upper cubby shelves were made on-site from stained wood provided by the cabinet company. PHOTO CREDIT: Tim Carter

Be aware that bathroom cabinets are also available in kitchen-cabinet heights. A 34.5-inch-tall cabinet allows you to have a 36-inch-high finished counter height if you use granite or some other material that is 1.5 inches thick. Many people have come to appreciate higher bathroom cabinets and tops.

Several high-end cabinet manufacturers produce a wide variety of accent trim pieces that allow you to make the cabinets look like furniture. Imagine an accent piece of wood that resembles a twisted rope. You can have that trim piece applied to the cabinets to hide the seams between two separate cabinets. This look can be stunning.

Consider custom shelving that rests on the countertop on either side of the sink. This shelving can act as a giant frame around a tall mirror that makes the bathroom seem 30% larger than it actually is. Some bathroom cabinet manufacturers will make this shelving for you, while others will supply you with the needed material that has been stained and finished to match the cabinetry. A good finish carpenter should be able to assemble simple shelves in one day or less.

Consider natural stone for the countertop and the floor. You can buy granite tile squares that compliment the color and texture of the cabinets you select. Don't hesitate to look at painted cabinets as well as natural wood cabinets. Painted cabinets that have a slight accent glaze can really go a long way to help you achieve your ultra-custom look.

This deluxe faucet is from the ShowHouse series by Moen. Its polished-nickel finish is stunning. The faucet actually swivels to make cleaning the sink easy. PHOTO CREDIT: Tim Carter

This deluxe faucet is from the ShowHouse series by Moen. Its polished-nickel finish is stunning. The faucet actually swivels to make cleaning the sink easy. PHOTO CREDIT: Tim Carter

Pay attention to detail when it comes to your bathroom plumbing fixtures. There are high-quality faucets available in traditional or sleek contemporary designs. I personally love the new polished nickel finishes. The color of the polished nickel finish is regal. I think you should also be aware that certain faucet manufactures offer a complete line of trim fixtures that match the faucets. You can get towel bars, toilet-paper holders, shelves, etc. all in the exact same design and finish.

Don't forget about your walls and ceiling. All too often people seem to overlook wallpaper. Wallpaper, in my opinion, can create a mood and feeling that adds to the elegance created with the cabinets, countertops and flooring. Be sure to use a new non-woven wallpaper. These wallpapers do not expand when the adhesive contacts the paper. This feature allows you to easily remove the wallpaper from the wall and reattach it if there is ever a need to do a plumbing or electrical repair behind the wall.

Consider a wallpaper mural for the ceiling, if it fits into your overall look. Modern adhesives will allow the mural to stay attached to the ceiling, especially if you use the proper-sized ventilation fan to remove moist air created during bathing or showering.

I love the bathroom exhaust fans that are located in the attic space away from the bathroom. They are extremely quiet and vacuum copious amounts of air from the bathroom through insulated flexible piping. This air must be piped through the roof or sidewall of your home. Do not allow it to escape into the attic space.

Create a unique design using different-colored granite or tile on the floor or even the shower wall. Use these wide-open spaces as a place to express the look and feel you want. Modern ceramic-tile wet saws allow a craftsman to easily cut pieces of tile or natural stone into any number of sizes and shapes. If you do not have a creative bent, think about hiring a designer to transform the floor or wall into a masterpiece. I guarantee you it will get compliments from anyone who sees it. But if no one does, you get to enjoy it all by yourself!

Column 648

Heating Installation

DEAR TIM: Do you think I can do my own heating installation? The price of heating systems with installation takes my breath away. My central heating installation job doesn't appear to look that difficult. All I need to do is switch out the furnace and reconnect the black-iron gas line. What am I missing? Gordon N., Perry, IA

DEAR GORDON: I am at a significant disadvantage since I don't know you personally, but because you had to ask me about your skill level, I am 100 percent convinced you can't successfully complete the heating installation job. The task is so complex, especially if you purchase state-of-the-art high-efficiency equipment, that many high-quality furnace manufacturers will not sell you their products. They only want trained professionals to install these highly-complex machines.

This new high-efficiency gas furnace took several days to install. Each step took skill, an assortment of special tools and years of experience. PHOTO CREDIT: Tim Carter

This new high-efficiency gas furnace took several days to install. Each step took skill, an assortment of special tools and years of experience. PHOTO CREDIT: Tim Carter

The reason you are suffering from sticker shock on the installed price is simple. Heating installation is hard work, it is dirty, it requires a variety of great skills and a boatload of specialized tools. You couldn't have picked a more complicated task in your home, unless of course, there is a central air conditioner that is also part of the system. Heating and cooling systems are by far the most complex mechanical systems found in the average residential home. And much like automobiles, they are getting more complex each year as internal computers and circuit boards operate these machines.

This past summer, I witnessed this job on a very personal level. Both of my gas furnaces were replaced with super high-efficiency furnaces that have gas modulating valves. I knew I could not do this job myself, so I hired my heating and air conditioning installer to do it. This person happens to be my best friend, and he allowed me to assist him on several parts of the job.

The removal of the old furnaces was miserable, dirty work. Rust, dirt and grime were everywhere. Rather than lift the old, heavy furnaces up from the basement, we disassembled them in the furnace room. It took hours to get the mess cleaned up, and all of the parts out to the driveway.

My new furnaces are smaller than the 20-year-old ones we replaced. This may not seem like a big deal, but it makes a huge difference with respect to the extended plenum metal ductwork that sits on top of a standard updraft furnace. That ordinary-looking metal box is often anything but ordinary. They are almost always custom-made by a sheet-metal fabricator. You may have to have a new extended plenum made, and even then, you may have difficulty making the transition between it and the ductwork it connects to.

Sizing the new furnace might also be an issue. Keep in mind that furnaces come in different sizes, and you need to ensure the new furnace has a heat output that is slightly greater than the heat loss of your home. Professionals know how to do the necessary calculations to determine both heat loss and heat gain.

The exhaust and incoming combustion-air piping can also be very complicated. The length of the piping runs, the amount of turns and the slope are all very important. You must follow manufacturers' recommendations to the letter, or your furnace may not work correctly. What's more, if you install the exhaust piping incorrectly, you may create a life-safety hazard as exhaust gases can contain deadly carbon monoxide.

You may not think connecting a black-iron pipe gas line is hard, but if you do not have access to tools that allow you to thread pipe, you may be in for a surprise. If you have not been trained properly to thread pipe, you can ruin the threading dies quickly or thread the pipe incorrectly. I know it looks simple, but it is not.

Heating installation contractors are worth every penny, so long as you deal with a real professional. The heating and cooling system in a home creates an artificial environment, one that you want to be comfortable. The real pros will give you a dollar's worth of value for every dollar you spend.

There is a possibility your existing heating system has some flaws. Perhaps one room is hotter or colder than you desire. There may be defects in the original ductwork design that a professional can fix with some ease. Be sure to bring these defects to the attention of any professional that might be bidding your job.

Be aware that modern high-efficiency gas furnaces produce ample amounts of condensate water. This water needs to be directed to a floor drain or be pumped to a sink. The condensate water is a byproduct of the combustion of the natural gas or propane. The condensate is also acidic, so don't drink it, give it to pets or use it to water plants.

Column 647