DEAR TIM: Soaring energy costs have me thinking about solar energy for my new home. Have there been significant advancements in technology with respect to solar energy and residential applications? What kind of systems can be installed and are they really cost-effective? Would you consider solar energy if you were building a new home? If so, what kind of system? Are there any negative issues with respect to solar energy? Pamela D., Montgomery, AL
DEAR PAMELA: The time for solar energy has arrived. In my opinion, solar energy is absolutely the belle of the ball when it comes to long-term solutions that solve many of the energy needs of the typical residential home. There is not a doubt in my mind that solar energy systems in a vast majority of future homes will be as common as balloons at a child's birthday party.
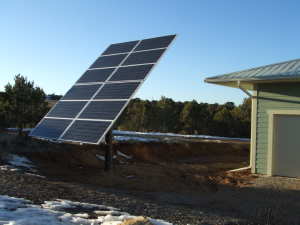
This large solar panel produces enough electric power on sunny days to supply nearly all of the electrical needs inside this large home in Colorado. PHOTO CREDIT: Kit Cassingham
Solar energy makes sense for a number of reasons. First of all, the sun' output of energy is constant or nearly so each and every day. Clouds can block sunlight, and the change of seasons creates a varying amount of available sunlight on any given day. But you and I can count on the sun. Natural resources like oil, coal, and natural gas are being used faster than they can be created by natural geologic processes. When you start to factor in the consumption rate of these finite resources with respect to a growing world population, you see why solar energy starts to make sense.
But these issues aside, when the sun is shining on south-facing lots in the northern hemisphere, massive amounts of energy can be captured and harnessed for use by you and your family. In fact, you might capture excess energy that can be sent backwards through the power lines to neighboring houses. I have friends in Colorado who do this with their solar energy system on a routine basis.
On sunny days, their electric meter actually spins backwards indicating they are selling electricity to the local utility company. This appears as a credit on their monthly bill against electric they purchase from the grid when the sun can't create enough electricity for their needs. Because they live in an area where there is abundant sunshine, their electric bill is sometimes zero or a very small amount of money.
There have been significant advancements in solar energy technology. In my opinion, the biggest effect has been the consistent lower-cost of the equipment. The cost of photovoltaic cells and panels continues to drop like a rock falling from the sky. These lower costs translate to faster payback periods which increase the likelihood of a positive return on investment while you still own the house. Photovoltaic panels and cells transform sunlight into electricity by a natural process common to certain crystals.
There are two primary residential active-solar energy systems. The photovoltaic systems create electricity that you use in real time. If extra electricity is produced, it is stored in batteries. If the batteries get fully charged, you can then send the electricity back downstream into the electric company power grid with their permission.
The second solar energy system is one that captures the radiant heat from the sun. You can use this heat to raise the temperature of air or water in your home. The solar energy water heating systems can be open or closed looped. An open loop system takes the actual water that will be used, and sends it to the solar heating device. This system works best in areas where freezing temperatures are not experienced. An open loop system could easily freeze up in the dead of winter on a bitter cold night.
The closed-loop systems contain a liquid in the piping system that will not freeze. This liquid is heated by the sun, and the heat is transferred to the domestic water supply lines via a simplistic heat exchanger. I intend to use one of these closed loop systems in a new home I am planning to build in New Hampshire. I also intend to install a photovoltaic system to help lower my dependence on the existing electrical grid.
Smart architecture can also help capture solar energy. Passive solar energy practices allow you to capture the strong solar rays that can heat up interior surfaces in your home during daylight hours. Dark natural stone flooring or other dense materials that can absorb the solar heat work very well. As the sun sets, these heat sinks then slowly release the stored energy back into your home. Mother Nature gives freely her solar energy, so be sure not to waste that which comes your way.
In my opinion, the biggest negative issues with solar energy are the financial ones. You need to take the time and do the math to see when you will get paid back in full the extra money the solar energy systems cost. They are more expensive than conventional heating systems, that is a fact.
But the good news is that the federal and state governments are helping reduce the initial financial pain via healthy tax credits. These tax credits vary, and they expire at different times. Be very careful about trusting the advice of a solar-energy salesperson when it comes to these tax credits. Get information directly from the Internal Revenue Service and your local state government. Obtain the facts in writing, and keep the circulars along with all receipts in a file. If you ever get audited, these documents will help you if the auditor happens to question your deduction.
Some solar energy systems need periodic maintenance. The solar panels may have to be cleaned regularly to ensure peak performance. The tilt of certain panels may have to be adjusted several times a year to get the maximum benefit from the sun's rays since the sun tracks across the sky at different angles from summer to winter and then back again. You may also have to check batteries and perform maintenance on these to ensure you have power when the sun is not shining.
Column 628