10 Purchasing Guidelines When Shopping for Vinyl Windows
Certification
This is the most important point. Your windows MUST carry the ANSI-AAMA 101-93 certification. If they don't they are also rans. You must have proof from the manufacturer that this is so. All that pass will have a letter of certification. Don't believe VERBAL promises from salespeople!
Installers
Who will install your windows? Company employees or sub-contractors? Sub-contractors can have a different attitude. Speed = more $. Bad ones have no insurance. No matter who installs the windows, get a copy of the paid in advance Workman's Compensation Premium or Certificate!
"Tonight Only" or Immediate Discounts
If your salesperson says that he is "...authorized to give you this 'significant' discount - but only if you sign tonight...", WATCH OUT! This is a high pressure close technique. It is a danger signal that the price of the windows is over inflated.
Broken Glass
What happens if a window breaks in 5 years? If you buy a window where you have to get a new vinyl sash WITH the new glass, this can be trouble. The window company may go out of business. The vinyl may not match in color!
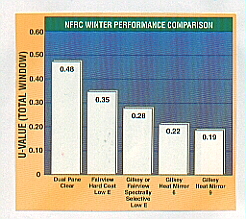
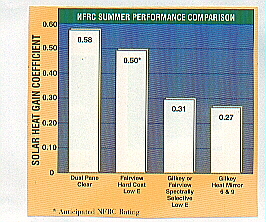
Energy Performance
This is an over used term. The bottom line here is: What is the OVERALL R- factor of the window? The frame may be great but the glass poor. Or the glass may be the best soft coat Low-E available, but the weather-stripping is useless. Ask and obtain specific air infiltration numbers!
Guaranteed Utility Bill Savings
Does the sales presentation come with a utility bill savings guarantee? If so, read it carefully and compare prices. The savings guarantee may not be that much when you really do the computation. In fact, you and all other people who buy those windows are paying for this pledge with higher window pricing........
Low-E Glass
This is an absolute must. Low E glass will save you vast sums of money compared to regular glass. Look for soft coat Low-E glass or one with Low-E films between the glass panes.
Warm Edge Technology
This is a fancy new term. All it really means is the spacer between the pieces of glass transmits cold slower to the inside piece of glass. Aluminum is old technology. Ask about the new coated steel and other warm edge spacers.
Condensation Guarantees
If you get a guarantee against condensation, WATCH OUT! There is a great chance that your new windows WILL fog! If you get new high quality windows, I guarantee that your indoor humidity WILL soar! This can cause some condensation.
Written Contracts / Deposits
Everything that you are buying and are promised MUST be in writing. Watch out for excessive deposits. A 25% deposit for custom ordered windows at the contract signing is not unreasonable. Another check for 25% more is OK when they are delivered. DON'T pay the remaining 50% until you are completely satisfied! Put this pay schedule in the contract.
Column B196