AsktheBuilder mp3 Radio Show May 7 2005

Each title below is a direct link to a downloadable mp3 file. Just click the title if you want to listen. Right click if you want to download into your computer to save and play at a later date.

The Copyright to all radio segments is owned by Tim Carter. I would love to know what you think of these radio segments.  Do you like them? Do they help you? Have they saved you money and/or time?  Let me know by sending me an email: [email protected]


Open and Drywall Blisters

Concrete Foundation Facts

Mark - Pre-Fab Home Company Closed in Cincinnati, OH - Are There Others?

Paul - Concrete Driveway Spalling

Paul - Nail Pop Under Linoleum

Removing Concrete Bleed Water

Warning About New Treated Lumber

Removing Musty Basement Smell

Dominick - Concrete Repair

Fixing Cracked Wood Siding

Patios of Brick – Concrete or Clay

2865 Minto Ave Cincinnati

Brick Patios | This is the first house I owned! It's at 2865 Minto Avenue in Cincinnati, OH. The house is in marvelous shape. I took this photo in October of 2019 when I was back there visiting dear friends. See those windows on the second-floor dormer? My helpers and I created a chute that extended down and out from the window on the right. I remember dumping all the plaster from the second-floor rooms into it and from there it slid down into Tony Albanese's 1-ton dump truck in the driveway. I installed those concrete steps up from the sidewalk and they're still in amazing condition 44 years later!

Brick Patios and Walkways - The First Attempt Failed

Kathy, my lovely wife, and I bought our first home in April of 1975.  It needed a tremendous amount of work. When I first walked upstairs and into the master bedroom, there was an 18-inch skylight you could see out to the sky. Yes, a gaping hole in the roof!

It was an FHA repo located at 2865 Minto Avenue in Cincinnati, Ohio. The previous owners had defaulted on the mortgage. We bought it at an auction for $8,500. I spent the summer of 1975 with three helpers transforming it into a wonderful first home.

We fixed it up and sold it for $35,000 within ten months. I reinvested the profits from the house into a much larger house in Pleasant Ridge located at 6270 Robison Road.

Amateur Scientist

By that time, I was consumed with learning about building, rehabilitation, and remodeling. I was doing various experiments with techniques and materials. Yes, experiments. That's what most rookies and homeowners do with building and remodeling projects, they experiment. It's important to realize I was just 22 years old when I purchased that house on Minto Avenue. I was filled with enthusiasm, but was empty on experience!

You see, most people try to do a job and hope for good results just like a chemistry experiment. Anyway, I decided to experiment and put in a brick paver sidewalk at the second home on Robison Road.

Paver brick is not flagstone, but the installation of both materials is nearly identical. Continue reading this article and you'll discover how to install flagstone. You can also read about flagstone installation here.

What Brick Did you Use?

One day while picking up supplies at a brickyard I saw these neat, thin red clay paving bricks. They measured 4 inches wide by 8 inches long by 1.5 inches thick.

patio brick pavers mortar

This patio was built with traditional clay brick pavers that are 4 x 8 x 1.5 inches thick. This is the exact same brick and look I did with my brick paver sidewalk at my second home on Robison Road. PHOTO CREDIT: Tim Carter

I asked what they were used for. The yard manager said that people used them for patios and walkways. Ah ha! Just what I needed.

Now, mind you, this was before those fancy-dancy interlocking concrete brick paving materials. I came home and told Kathy I had found a great product. In fact, I showed her a sample brick. She loved it. I had decided that setting the brick on a smooth bed of sand would make for a great surface.

How Did You Install the Paver Brick?

I dug the lawn up and carefully installed the sand. I put in about 4 inches of medium sand. I then used a straight edge to make the top surface as smooth as glass.

Each brick was placed up against an adjacent brick. It was a good-looking job - that is, for a while. Before long, weeds began to grow between the joints. The neighborhood ants colonized my walkway as well. The first explorers found out how easy it was to mine the sand for ant farms. One year later I started over.

How Did You Install the Brick the Second Time?

My brick paver experiment started in the summer of 1977 with the sand disaster. I then corrected it the summer of 1978. I took out the brick, salvaged them and dug up the sand setting some aside to use in my second installation. The rest I wheelbarrowed to the backyard.

I then poured a 5-inch thick concrete walkway with 1/2-inch steel rebar in the center of the concrete. The top of the concrete was 2 inches below where I wanted the top of the brick sidewalk.

I then mixed up Portland cement and the sand to use as a mortar to lock the paving brick to the concrete. I left a 1/2-inch space around each brick to add more mortar using a mortar bag much like a baker uses an icing bag to decorate a cake. It was a labor of love.

Do the Paving Brick Come in Different Thicknesses?

Yes, you can get different thickness paving brick. Be sure to read this column about exterior brick durability before you make your final decision. If you're thinking of a brick patio, you must first decide on your material before you begin work. There are two primary materials: standard clay brick or fine-grained concrete brick. The clay paving bricks are available most often in rectangular sizes approximately 4x8 inches. They can be purchased in two standard thicknesses: 1 1/2 inch and 2 3/8 inch.

Do Paving Brick Fade?

I'm partial to clay paving bricks because the color never fades. The color of the brick is solid throughout the entire brick. This is not the case with concrete paving bricks.

The concrete paving bricks are available in a range of shapes and sizes. Often they are available in five or more colors. These bricks are usually only available in one thickness - 2 3/8 inch. They're an excellent example of the new mortarless technology that has blossomed in the past 15 to 20 years.

My only issue with these concrete bricks is color fade. Pressure washing concrete paving bricks will destroy them in short order. The high-pressure stream of water erodes the thin coat of pigmented cement paste from the sand and gravel aggregate. Look at this photo of what happens when you pressure wash concrete paving bricks:

faded and new paving brick

Here's a great example of faded concrete paving brick next to brand new ones that have not yet lost the colored cement paste off the sand and gravel. Copyright 2017 Tim Carter

Robert emailed about plans for a new brick patio. CLICK HERE to read his emails and my answer.

Column B409

Old Brick Patio Ideas – My Mother-in-Law Patio

red clay paving brick up close

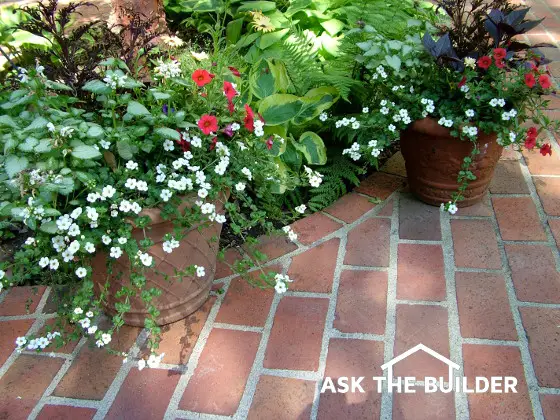
Old Brick Patio Ideas | This is a close-up shot of the actual solid clay red paving brick I used on my mother-in-law's patio. Note how the width of two of the brick equals the length of one brick. This relationship allows you to create all sorts of interesting patterns. She wanted this cross-hatched pattern. Copyright 2022 Tim Carter

Old Brick Patio Ideas - Copy What I Did

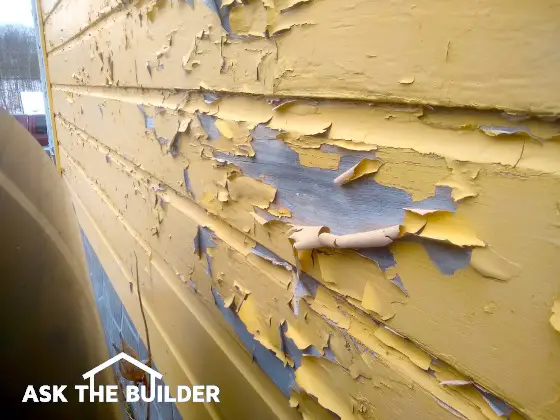
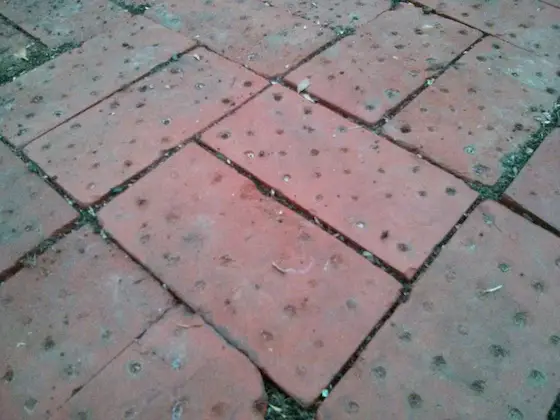
The best old brick patio ideas are ones that come from your mother-in-law. At least that's what I discovered! She told me to use solid red clay paving brick for starters. Whatever you do, don't fall for the pigmented precast concrete brick that has a thin coat of red cement paste. This paste contains red dry-shake concrete pigment and wears off with normal wear and pressure washing. Look at these concrete paving bricks that were ruined by pressure washing. See the small stones that aren't red?

faded and new paving brick

Here's a great example of faded concrete paving brick next to brand new ones that have not yet lost the colored cement paste off the sand and gravel. Copyright 2022 Tim Carter

How Many Ways Can You Install Paving Brick?

The Brick Industry Association will tell you that there are four installation methods available to you. In reality, there are only two that would ever be used by 99.999 percent of homeowners in America. The two that are used are the flexible base and the rigid base.

The Flexible Base System

The flexible base system is a combination of crushed rock, maybe gravel and coarse sand. Guess what? You can only use mortarless brick with this system. Mortarless interlocking brick are what you see in the photo just above. They're almost always made from concrete.

Oooops! I used thin, 1.5-inches thick, brick in my failed 1978 experiment with my inadequate (no crushed rock!) flexible base. This brick was meant to be installed with mortar, but I was so young, I didn't realize this at the time.

The rigid base system used with paving brick employs a concrete slab beneath the paving brick. This slab can be a steel reinforced slab or one with no steel. I prefer a steel reinforced slab. Both types of brick can be used on a rigid base. Do you see why you have to make up your mind before getting out the shovels?

What is the Best Way to Install a Brick Patio?

The best way to install a brick patio is to follow my detailed step-by-step instructions. You can find them in this amazing download PDF product:

PC1450 PDF cover page

This is the cover page for my detailed step-by-step instructions. You can get professional results but not spend thousands of dollars. The PDF contains photos, illustrations, video links, best-tools links, step-by-step instructions, and lots of secret tips.

The following is a very high-level description of what you need to do. I share HOW to DO IT in this amazing PDF file.

To begin your patio you must know where you are going to finish. Does that make sense? What I mean is that you need to establish a finish height and then work backwards. This allows you to establish the top of the dirt upon which you will place the first wheelbarrow of crushed rock or concrete.

A flexible base system requires a minimum of four inches of crushed rock as a base material. However, you can skip this step if you simply blend coarse sand with Portland cement. I share time-tested sand/cement system in my download PDF file. I built my first patio using this method and it looked superb 45 years later. Look for yourself:

clay paving brick patio in amberley village

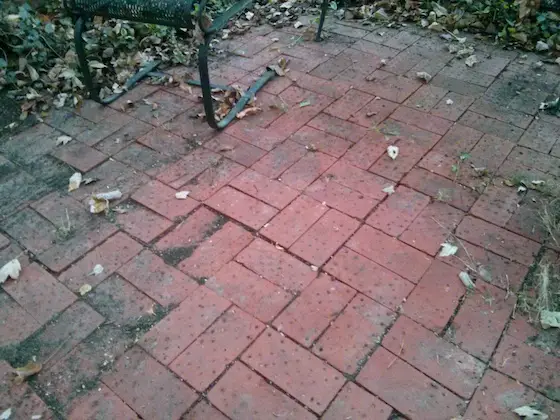
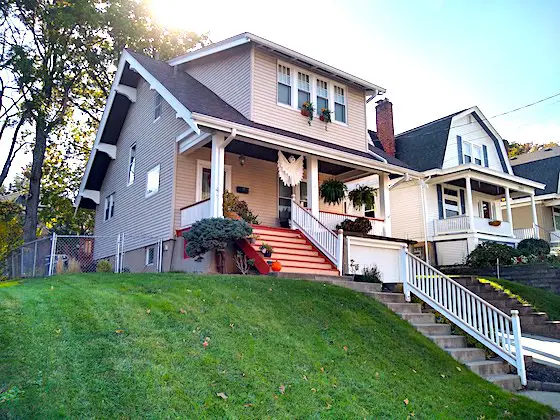
This is the patio I built for my mother-in-law! Yes, it's just a small section. This photo was taken 45 years after I installed the brick. It still was in excellent condition except for the light coat of algae. The algae can be cleaned using certified organic Stain Solver oxygen bleach.

Some interlocking brick manufacturers may suggest six inches of gravel. Once this is in place, you need to smooth it and compact it. Compaction is best achieved using a mechanical plate-type vibratory compactor. It operates much like a walk-behind lawn mower. The only difference is that you sshaakkkke a lot while operating it!

Once the gravel base is in place, you top it with 1 1/2 inches of coarse sand. The sand is not compacted just yet. You smooth it off to the exact profile and the slope you wish the final patio to be. Once this is complete, you simply set the concrete bricks onto the sand. The interlocking bricks just mesh together. Undoubtedly you will have to make cuts where the bricks round corners or intersect border bricks. Saws, cutters, and chisels will accomplish all cutting tasks.

Now that we have gotten this far we can see how much dirt we had to dig. Let's see, we had six inches of gravel, 1 1/2 inches of sand and a brick that is 2 3/8 inch. That adds up to just about 10 inches! That's a lot of digging.

How Can I Dig Less Dirt?

So you don't like to dig? Well, maybe the rigid base system is the way to go for you. It requires 20 percent less digging if you use the standard clay paving brick. However, the placement of the concrete, brick and mortar between the brick requires more labor and skill.

To further complicate things, the look is often different. Using a clay paving brick with a rigid base, you can create a patio that has the look of a brick wall. You actually have mortar joints between each brick. The mortar can be colored or standard gray. The choice can be complicated, no doubt!

The Rigid Base System

This system is what I have used. My current house has thousands of clay paving bricks laid in a thin (1/2 inch) layer of Portland cement mortar. A 1/2 inch mortar joint is between each brick as well. The look is stunning. The deep tones of red clay brick match my country Victorian home quite well. Of course, Kathy picked the colors. I can't match socks much less house colors.

patio brick pavers mortar

This is the rigid-base system. This patio was built with traditional clay brick pavers. They could have been set in sand, but laying them in mortar on top of 5 inches of steel-reinforced concrete creates a traditional look and feel. You can get detailed step-by-step instructions here sharing exactly how I built the above patio! PHOTO CREDIT: Tim Carter Copyright 2022

To begin my rigid base system I installed a four-inch-thick steel-reinforced concrete slab. I installed the concrete on top of two inches of pea gravel. This gravel allows water to escape from beneath the slab. Water under concrete in the wintertime can cause serious frost heaving! The gravel is not always necessary. If you use it, you need to make sure you connect a drain pipe to the gravel so any water drains by gravity to a low spot on your property. 

The concrete was poured at 4,000 PSI which allows it to resist damage from cold Cincinnati winters. The 1/2 inch steel bars are placed on two-foot centers in both directions. The steel is placed above the dirt so that it ends up right in the middle of the concrete slab.

Once again, you need to figure out your total system thickness to determine how deep you must dig. In my case, I needed to excavate eight inches of soil. Don't forget to slope your patio! Make sure that water drains away from your house. A slight slope of 1/8 inch every foot is undetectable as you walk across the patio.

Column B409

Concrete and Flagstone Patio Tips

Concrete & Flagstone Tips

If you decide to try to build a brick patio like mine, you do not have to worry about the concrete finish. All that is important is that there are no high spots. Take your time and wiggle a board side to side across the forms you have built to create the shape of the patio. Low spots can easily be filled with more mortar. High spots will create a hump in the patio, unless you know how to sand a brick!

Flagstones are somewhat easy to lay. I prefer to install the border first. Remember to sort through the flagstones you have purchased. You are looking for the thickest pieces of flagstone. Ideally you should try to get a batch of flagstone that has fairly consistent thickness, but this is not always possible. The thickest piece of flagstone sets the tone for the amount of mortar that will be under each successive piece of flagstone that is installed. If you make a mistake and install a thinner piece of flagstone as your first piece, you will end up having a hump or a series of humps in your patio as you continue to install the stone.

Use a small torpedo level to make sure that the flagstones are not tilted. Lay out the stone to create the border. Do your cuts before you mix mortar. A rock hammer and chisel are used to score and cut flagstone. Have the manager at the stone yard demonstrate the easy way to cut and shape flagstone. It is not hard - it just requires a little practice. Chips that are generated from the cutting process can be used as filler in the mortar when you start to lay thinner pieces of flagstone. These thin pieces typically use up lots of mortar. The mortar for the brick laying is mixed as one part cement to three parts sand. When you place the flagstone into the mortar, tap the stone lightly to get it into position. If you have to tap more than three or four times, you have too much mortar under the stone. Too much mortar will also cause the mortar to ooze up in between the stones. This is not good as the intent is to grout the flagstone after they are all set. Once the border is complete, let the stones sit for 24 to 48 hours if possible. This will allow the mortar to get very hard. We need the stones to be set in place before we proceed.

Using a taut string line stretched between the border stone, you fill in the field. This is tons of fun. Just lay full stones that have been shaped to fit next to other stones. Use small stones to fill in gaps between large stones. You don't always have to try to chip a stone to make a huge jigsaw puzzle. If you want to fill in some of these larger "holes" between stones at the end of the project, that's OK. Don't forget to scrape out excess mortar that oozes out from under large stones from where the cuts go. If it dries and gets hard you will have problems.

Once the cut pieces are laid it is time to finish the grout. This is where you fill the spaces between the stones. This task is performed using a grout bag similar to what bakers use to decorate cakes. You mix up a soupy combination of one part sand to one part cement. The mixture should flow out of the bag with little or no squeezing.

It is important that no little rocks are in the mix. They will clog the nozzle. Over fill each joint by 1/4 inch. After a short period of time you will be able to scrape off the excess mortar without smearing the brick. Use a small triangular brick trowel for this job. The hard work will be worth it! It's best to do a small test pad to see if you are up to the task of doing an entire patio. Try it and see!

Column B409

Patio Sizing Tips

Tips on Sizing an Outdoor Patio

The Plan

Should I tell you how many times I have seen patios that are too small? I did not think you would be interested. Chances are you have seen the same thing. A patio with just enough room to fit a table and chairs or a cramped patio with a grill sitting off in the grass. The sad thing is that small, ineffective patios can be avoided with just a little bit of planning.

Use Your Existing Rooms

If you are thinking of building a patio, start your planning by walking into your living, dining or family room. Do those rooms currently seat the number of people that you plan to seat on the patio? Is there enough room between existing pieces of furniture in these rooms? If so, you are off to a good start. I hate to spend time reinventing the wheel!

Tape Measure and Graph Paper

A simple plan is better than no plan. You can make a simple plan by using standard 1/4 inch graph paper. This paper usually has light blue lines that are spaced at 1/4 inch intervals both horizontally and vertically on a piece of paper. Art supply stores sometimes carry this paper in large sheets (11 x 17 inches). The pre-drawn lines allow you to draw the plan more easily to scale. Make a quick drawing of what you think you want. Use a scale of 1/4 inch on paper equaling one real foot in your back yard.

Assuming you have chosen a patio size similar to one of the existing rooms in your house, measure the size of the room using your tape measure. Translate those measurements to the paper. You should remember to keep the drawing in scale. In addition, don't forget to add two to three feet behind furniture! This is a common mistake. Surely you do not want your patio furniture right at the edge of the brick!

Checking the Drawing for Fun & Function

Now we must check to see if the plan will work. Measure the size of your patio furniture or what you intend to buy. Make scale cut outs of these objects and color them. For example, most common chairs measure about two feet wide and deep. So, cut out a piece of paper that is 1/2 inch on each side. Do this for all the furniture. Place the colored cut outs on the patio plan. Do they fit? Is there plenty of space between the colored pieces of paper to walk? Are the pieces at the edge of the patio boundary? You say everything is fine? GREAT! I knew you could do it. Frank Lloyd Wright would be proud, that's for sure!

Read Steve C's question on sizing a new patio in this Concrete Patio column.

Column B409

Hepa Filter & Hepa Vacuum Manufacturers

HEPA Vacuum Manufacturers

I don't really advocate the use of vacuum cleaners to pick up lead dust, although I am told it is safe. Conventional filters are absolutely a no-no as the lead dust can pass right through those and be blasted back into the air via the vacuum exhaust port.

To stop lead dust inside a vacuum, you need a special filter known as a HEPA filter. HEPA is an acronym for high performance particulate air. These filters are expensive but they can trap very, very small particles that are invisible to the eye. Lead particles are trapped for sure by these filters.

Most of the ordinary wet / dry vacuum companies make a vacuum cleaner that can be equipped with such a filter. I own a Ridgid brand wet / dry vacuum that can handle such a HEPA filter. I am reasonably confident that the following vacuum manufacturers have certain models that can be equipped with a HEPA filter. Make sure the model you buy can accept such a filter before you complete your purchase. I would not do it based on literature claims. I would want to see the actual HEPA filter and see if indeed it fits the vacuum cleaner.

Here are the vacuum manufacturers:

  • Clarke Industries
    800-253-0367

  • Dayton Electric Mfg. Co.
    847-647-0124

  • Fein Power Tools
    800-441-9878

  • Ridgid Tool Co.
    888-4-RIDGID

  • Shop-Vac
    717-326-0502

Companion Articles:  Lead Paint Problems, Beware of Lead Paint, Lead Poisoning Danger - Lead Paint, Free Lead Poisoning Hazard Information

Column B278

Free Lead Poisoning Hazard Information

Do you want some helpful government literature? If so, there is a ton of it available for free. The following list is just a partial listing of some stuff you can get. I built this list from a helpful EPA web page . You can order 15 of the documents online right from there. If you don't have Web access, then order by mail. Call 800-424-LEAD for complete mailing instructions. Here is what they will tell you to do:

  • If you would like documents sent to you via U.S. Mail, please provide your name, address, and daytime phone number.
  • Make a list of what publications you want.
  • Please limit your document request to 15 individual documents.
  • Some NLIC documents may be available from the EPA Fax-on-Demand system. Call 1-800-424-LEAD for more information.

Partial Lead Hazard Document Listing:

  • 003 EPA Fact Sheet: Learn About Lead
  • 400 EPA Reducing Lead Hazard When Remodeling Your Home
  • 402 EPA Lead Exposure Associated With Renovation and Remodeling Activities
  • 418 EPA Testing Your Home for Lead in Paint, Dust, and Soil
  • 011 CDC/ATSDR Lead in Your Drinking Water
  • 017 EPA Lead in Your Home: A Parent's Reference Guide
  • 019 EPA Lead Poisoning and Your Children
  • 021 EPA Identifying Lead Hazards in Your Home
  • 024 EPA Report on the National Survey of Lead-Based Paint in Housing
  • 029 NLIC National Lead Information Center List of Documents available by FAX on Demand
  • 319 EPA Fact Sheet: Disclosure of Lead-Based Paint Hazards in Homes
  • 322 EPA EPA and HUD Notification and Disclosure Rule
  • 323 EPA/HUD Lead; Requirements for Disclosure of Known Lead-Based Paint
  • 325 EPA/HUD Real Estate Disclosure Forms (Sale / Lease)
  • 420 EPA A Field Test of Lead-Based Paint Testing Technologies: Summary
  • 426 AECLP EPA's National Guidelines for Lead Hazards in Dust and Soil
  • 440 EPA Residential Sampling for Lead; Protocols for Dust and Soil
  • 443 EPA Sampling House Dust for Lead; Basic Concepts and Literature Review
  • 471 EPA Summary and Assessment of Published Information on Determining Lead Exposures and Mitigating Lead Hazards Associated with Dust and Soil in Residential Carpets, Furniture, and Forced Air Ducts
  • 500 OSHA Lead Exposure in Construction - Interim Ruling
  • 601 HUD Guidelines for the Evaluation and Control of Lead Based Paint Hazards in Housing; Chapter 7 - Inspection

Companion Articles:  Lead Paint Problems, Beware of Lead Paint, Lead Poisoning Danger - Lead Paint, Hepa Filter & Hepa Vacuum Manufacturers

Column B278

Lead Poisoning Danger – Lead Paint

peeling paint on brick

Lead Paint Danger | This peeling paint might be a SERIOUS health hazard. If it's an older home, shed, or garage, it could contain LEAD! Copyright 2021 Tim Carter

A Dog Almost Dies - Chewing Painted Woodwork

One of the last jobs I did before I began my new media career was a large kitchen addition and remodeling job for my neighbor. They had a great dog that was kept in a basement room while we worked each day. The dog was fairly excitable and began to gnaw at the painted woodwork adjacent to the door of the room. Within a couple of weeks the dog was getting sick.

The neighbor mentioned the dog's illness to me and asked me what I thought. I immediately said, "I think the dog has lead poisoning." The neighbor thought I was nuts. I mentioned, "Look where the dog has been chewing on the woodwork. That is old paint that contains lead."

Well, it turns out I was right. They whisked the dog off to the vet and got blood work done. The dog's lead count was practically off the scale.

To this day, the dog has never been the same. That proves to me that lead absolutely can cause irreversible damage to the central nervous system.

CLICK or TAP HERE to get FREE BIDS from local LEAD-ABATEMENT CONTRACTORS.

Lead + Vinegar = Sweetness

For some reason, the USA was slow to outlaw or restrict the use of lead in consumer products. A very long time ago it was discovered that if you mixed lead with vinegar that it created lead acetate. This is actually a sweetener. So, lead was used as a sweetener in wine for many years. In 1427 the use of lead as an ingredient in wine was outlawed in France and Spain. That was almost 600 years ago!

Lead has been used in paint for over 200 years. But, France began to restrict the use of lead in paint in 1840. The Germans did the same in 1870 and they were followed by the Australians in 1922. It wasn't until 1978 that the USA decided to act.

How Great is Lead Poisoning Danger?

The current estimate of residential housing units in the USA that have a significant amount of lead-based paint either inside, outside or both is nearly 57 million houses or living units. That is a huge amount of lead paint! It also represents a significant danger to those who do not know about lead hazards.

Is Scraping, Sanding, or Chipping Lead Paint Dangerous?

Yes! Do NOT scrape, sand, or chip lead paint.

If you see someone sanding, chipping or scraping old paint, tell them to stop and read up on the dangers involved with working with this material. If you have relatives who live in old houses, be sure they clean dust around windows and doors with wet paper towels. Lead dust is a real hazard, especially to small children!

Companion Articles:  Lead Paint Problems, Beware of Lead Paint, Free Lead Poisoning Hazard Information, Hepa Filter & Hepa Vacuum Manufacturers, Peeling Exterior House Paint

Column B278

Beware of Lead Paint

If you are or know of a school teacher who is trying to get their Master's or Doctorate degree and they need a neat subject for their dissertation, I have one! Here is what they need to study. Let's look at the incidence of kids with learning disabilities. Let's compare the number of kids per thousand who have all sorts of disabilities and see the age of the houses they live in. Compare the number of kids with learning disabilities in suburban areas built prior to 1978 and inner city areas to those suburbs built in the 1980's and beyond.

I'll bet dollars to doughnuts that the statistics will shock all of us. In other words, I would be willing to bet that many of the learning disabilities are related to mild and severe cases of lead poisoning. My guess is that you will not find a statistically high number of kids with learning disabilities in houses built after 1978. This is the year that lead based paints were banned for residential use in the USA.

Exterior Hazard Too!

Don't forget that the exterior of many an old home is covered with paint. Much of this old paint contains vast amounts of lead. It is very risky to sand exterior painted surfaces as you prep an old house for a new paint job. Lead dust can enter an open window or drop down and poison the soil below. If a garden is nearby, the lead might be introduced to the garden soil by erosion or the wind.

If a painter is going to scrape old lead paint, make sure they spread drop cloths that capture all of the scrapings. Dispose of the paint chips off site. You really need to think before you work with any old painted surfaces.

Column B278

Sandpaper Facts

It seems there is some confusion out there about sandpapers and the properties of the different abrasives. After this column ran, I received two letters from people who said I had my information all backwards. Both of these people had worked with abrasives for years and thought they would set me straight.

Unfortunately, I had to send them the research materials I had from some of the top abrasive / sandpaper manufacturers in the world. I hate dishing up humble pie, but I had to in this case.

The reason I am bringing it up is to tell you that each and every day I find workers who unknowingly are either spreading inaccurate information or are possibly using the wrong tool for the job. This can impact you if you decide to hire a worker who thinks they know what they are doing simply because they have been doing it for 15 or 20 years. The sad fact may be that they have been doing it wrong for that length of time and never realized it!

Some Other Facts

Just after the column ran in a Kentucky newspaper I received a phone call from a reader who worked in a factory. She sanded fiberglass products each day and often saw the words "Open" and "Closed" on the back of the sanding sheets. She asked me what that meant. I told her it was an excellent question.

The abrasive particles in sandpaper can be distributed onto the paper in one of two ways. You can completely cover the paper with grit or you can apply it so that there is space between the grit particles.

Open coat sandpaper has space between the particles. The paper surface often only has 40 to 70 percent coverage of grit in open faced sandpapers. This property is really necessary when you work with raw wood as this space prevents the sandpaper from clogging with dust.

Closed coat papers have no place for the dust to go. For this reason, they are ideal when working with metals that produce an ultra-fine dust.

Backwards Labeling

When you go to buy grit, you might get confused. The coarse papers have small numbers like 40 or 60 and the fine sandpapers have large numbers like 180, 220 or 240. You can even get industrial papers that have numbers as high as 1,600!

The numbering system makes sense when you think of how the grit particles are separated to make the sandpaper. The numbers correspond to the number of holes per square inch in the mesh in the separating sieves used to filter the grit as it is crushed. If you want to get 220 holes per square inch, this means they have to be small. See how it works?

Companion Articles: Sandpaper Selection, Sandpaper Comparison, Foam Pads for Sanding, Abrasives & Specialty Sandpaper

Column B281