If you purchase a surface mount or pendant type fixture that has a decorative glass light shade that you especially like, it might be a very good idea to purchase a spare shade. We have this type of fixture in our kitchen. Every time I wash the shades I get apprehensive thinking for sure that I am going to drop or chip one. I am nervous because I don't own any extra shades! Don't make the mistake I did.
Ceiling Fans
Ceiling fans are very useful in kitchens. They can keep the cook comfortable and they do double duty as drying aids when you mop the floor and wash the dishes.
If you incorporate a ceiling fan you must make sure the tips of the fan blades are at least 6 inches to one foot away from the edges of any recessed lights. If a fan blade cuts across the path of a recessed light, you produce a stroboscopic effect that is very annoying.
As you can see, kitchen lighting requires lots of planning if you want it done right. It isn't hard to do, it just takes a little time and a little thought. Keep reading to see a simple, yet informative lighting plan. Create a similar one for your kitchen and you will be ahead of the game.
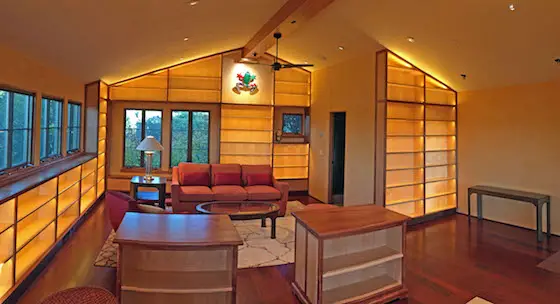
This photo is the other end of the room. I can't begin to describe how magnificent these bookcases are. I hope you enjoy these photos. (C) Copyright 2017 Jay Helms
Indirect Lighting
I have installed indirect lighting in many of my jobs in the past. It is always a breathtaking sight when the lights are turned on in the early evening or at night to softly illuminate the room. If you have not seen this effect, you don't know what you are missing. The soft glow of the lights casts a mood in the room that you just won't believe.
Indirect lighting works best if you can make it continuous around the entire room. Some people cut corners by just putting it on top of cabinets. The trouble with this is that unless the cabinets circle the room - and most don't - you end up with dark spots in the room. It really looks cheap. Don't cut corners with lighting. You will regret it, trust me on this one.
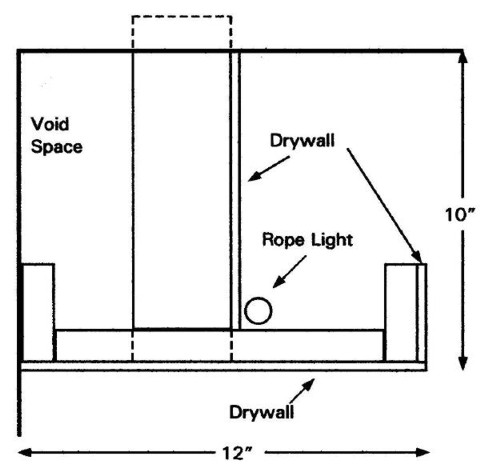
The soffit system that works best for indirect lighting is an open-faced soffit that looks like the letter J in cross section. The small diameter rope light is well hidden in the 3-inch high by 4.5-inch-wide channel created using the drawing I show later in this bulletin. The hardest part of the entire job is finishing the drywall in this tight spot. It can be done.
Indirect Rope Lighting
Perhaps you have seen rope lighting used at a restaurant or some other commercial building. It is often used on staircases to illuminate treads, risers and stringers. It is also used for outlining objects with a soft border of light. It happens to be the perfect source of light if you want a soft glow of indirect light in any room.
In kitchens, it works well on top of cabinets, under tall wall cabinets and inside open-faced soffits. This wonderful product is fairly inexpensive, and it is modular. You buy it in 18-inch-long segments that interconnect with one another. The maximum length of one run is 150 feet.
I was only able to locate one manufacturer. There may be more out there. Simply visit a specialty lighting fixture store to find them.
W.A.C. Lighting Co.
Open Soffit Cross Section
So you want to build an open soffit above your cabinets to hide the rope light? If your job is a new construction one, it is not hard. If it is an existing home, it is actually easier to a large degree with respect to fire stopping requirements.
The following cross section will give you an idea of how simple it is to build. I use 2x4's for all framing members. I also build the ladder sections on the ground and then just secure them in the air with the blocking.
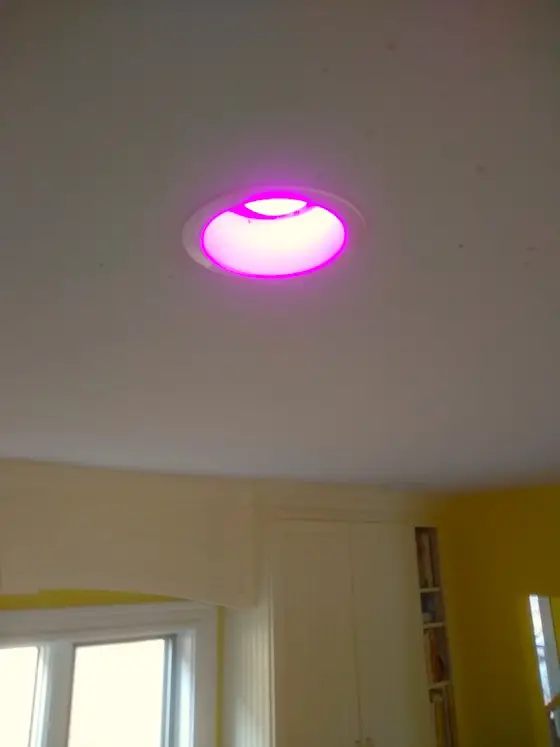
Magenta is one of my favorite colors. This recessed light has the ability to change colors.
Recessed Lighting
Not long ago, I installed some delightful mini-recessed lights in my family room. My wife and I wanted to spotlight a seating area where we have a table and chair set that we use to play board and card games. Regular recessed fixtures were simply too overpowering for this area.
I visited a specialty lighting showroom and looked at my other options. They had a nice selection of downsized recessed fixtures. The biggest problem was whether they would provide enough light. I solved that easily. I purchased a fixture, a 50-watt bulb for it, and a trim.
I took these components home and temporarily wired them up so that the light would work. I then held the light up in the ceiling to see the level of light it produced. I intended to place four of them in a diamond shape all within four feet of each other. I could instantly tell they were going to be perfect. There is no substitute for realism. When in doubt about the capability of a light fixture, try to do this type of testing or at least reproduce the amount of bulb wattage in the space to see how dull or bright the finished light may be.
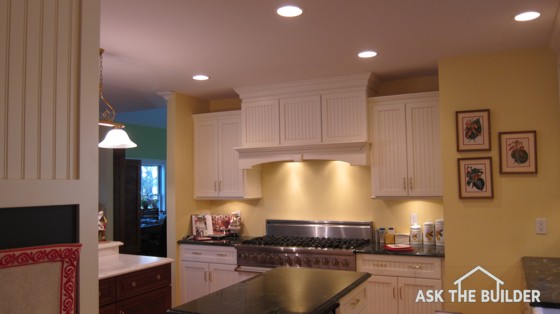
There are three levels of light in this kitchen, four if you count the bright lights under the stove hood! Photo credit: Tim Carter
Task Lighting in Kitchens
Well over 90 percent of work in kitchens is performed at countertops, islands or similar work surfaces. The last thing you want at these locations is poor lighting or shadows. In addition, most people do not want a kitchen ceiling loaded with surface light fixtures. Recessed lights solve both problems.
My kitchen measures 17 feet by 20 feet. I have 11 recessed fixtures each with a 75-watt bulb in them. Add to this the pendant fixture above my island that has three 75-watt bulbs and you have lots of light. It actually calculates out to 3.08 watts per square foot. Feel free to use this as a guideline in your own kitchen if you want a high volume of light. Be sure to switch the lights so that you can turn certain ones on at different times so you have different levels of light.
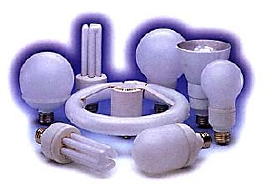
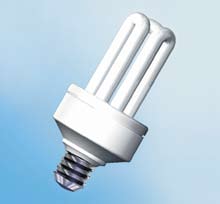
Just about every bulb manufacturer that makes regular incandescent or regular tube type fluorescent bulbs makes the trendy and energy efficient compact fluorescent bulbs. Names like General Electric, Panasonic, Sylvania, Westinghouse and Phillips should ring a bell with you.
The photo is just a small sampling of different bulbs that will save you lots of money. If you have lots of recessed fixtures in your house, the one bulb in the two o'clock position in the photo above will be of interest you. I have two of these now and am getting ready to order 30 more. They really work well and they are saving me huge money.
Photo courtesy of Sylvania.
Do you want to find all of these CFL bulbs and more? Forget about going to a home center, a hardware store or a grocery store. The BEST place to find light bulbs is at a specialty store that sells light fixtures. I go to a place in Cincinnati called Becker's. They sell light fixtures and have every bulb both CFL and incandescent you could ever imagine. I'll bet you have a similar store or two in your city or town.
When I was writing this column, my wife Kathy asked me if I could get a CFL bulb for the table lamps in the family room. These lamps have 3-way-switches that allow the bulb to glow with different levels of intensity. The answer is: "Yes!"
Remember the yellow bug bulbs you would put on porch lights to reduce the amount of moths and other night bugs? You can get yellow CFLs.
Do you have lots of recessed light fixtures? I do. I think I have over 50 of them in my house. They burn lots of energy. You can buy special reflector CFLs that capture all of the light and reflect it down out of the recessed fixture. They work very well.
Bulb Temperature
An interesting side benefit of CFLs is the reduced operating temperature. Many a house fire has been started where a high wattage incandescent bulb was placed in a ceiling fixture. The high temperatures can actually melt the insulation on some older wire. Once this happens it is only a matter of time before electrical arcing starts a fire. CFLs burn at significantly lower temperatures. The fire hazard is low or non-existent. If you have an older closet with a bare bulb fixture, change it out immediately with a CFL. Exposed incandescent bulbs have also started fires where clothes or boxes have fallen against them.
Easy Access
You may find some CFLs at home centers, hardware stores or even grocery stores. But if you want the best selection visit an electrical supply house or better yet, a specialty store that sells light fixtures. Stores like this need to supply bulbs with the fixtures and trust me, they have so many different bulbs you will not believe your eyes. I am talking hundreds and hundreds of different bulbs. Just one of the CFL manufacturers has a minimum of 100 different size/type CFLs! I guarantee you will find what you need.
In a previous column, I wrote about real ways to lower your utility bills. I get frustrated on a regular basis when I see other columns or magazine articles about all of these fantastic ways to save money. The problem with most of these articles is that they don't calculate the 'Return on Investment.'
What is the Return on Investment?
For example, just this past Saturday, I got a call on my radio show from a person who wants to tear into the plaster ceiling in his basement to add insulation so that the band board around his house would be warmer. He was hoping to raise the temperature in a bathroom. My reply was simple. Take the square foot area of the exterior walls and attic ceiling area of the house. Divide this number into the monthly or annual cost of heating and cooling the entire structure. Determine the percentage of the square foot area that represents the band board. My guess is that it would be less than three percent. When you do the math you might find out that it takes 50 years to get a payback! It might be better to not spend the money on the improvement and keep it in the bank. Use the interest to pay for the heat loss.
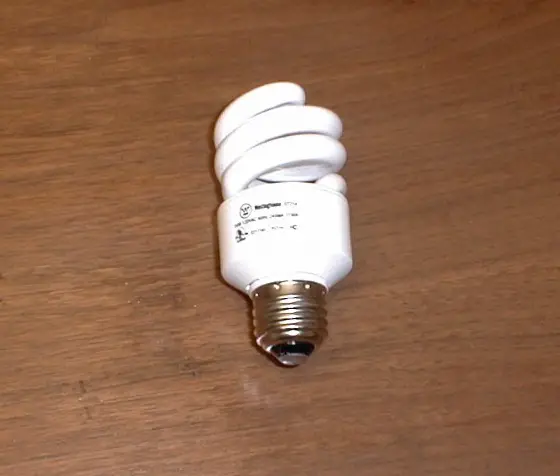
Compact fluorescent bulbs are four times more energy efficient than incandescent bulbs and provide the same light level. PHOTO CREDIT: U.S. Dept. of Energy
Well, guess what? You CAN save money and save it in a Big Way if you begin to buy compact fluorescent light bulbs (CFLs).
Significant Savings
If you buy just one CFL bulb and use it heavily, I doubt you will see a difference on your electric bill. But change over all of your bulbs and I guarantee you will see a difference. Over time the difference will not only pay for the bulbs but it will also keep money in your pocket instead of being distributed as dividends to the stockholders who own the utility company!
How would you like a booklet that contains a series of size selection and allowable load tables for choosing Southern Pine headers and beams? The Southern Pine Council has this booklet available FREE on their website for download in PDF format. Go to their Publications Depot and look under Southern Pine Use Guide.
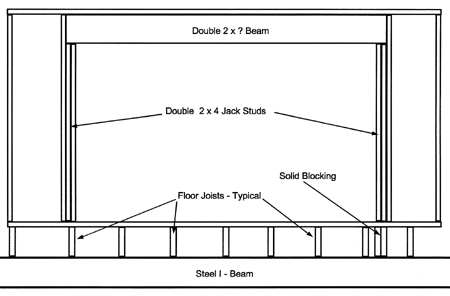
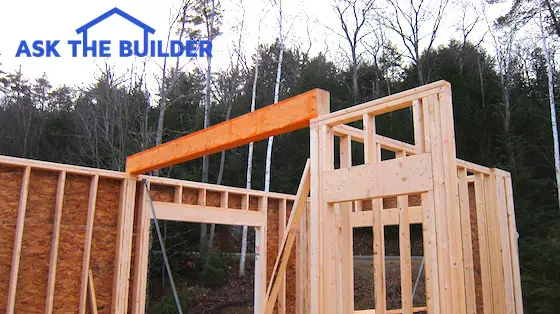
Beam and Column Illustration
Following is a very simple cross section showing how you insert a wooden beam into a frame wall. The wood beam is supported by two 2x4s on each end. These are typically called jack studs and are nailed directly to a king stud that runs from the bottom plate continuous to the top plate. Note how the column on the right side of the wall does not fall on top of a floor joist below. In that situation wood blocking is added between the steel I- beam below and the subfloor under the column on the right. Most beams under six foot total span only require a single 2x4 for support at each end. Beams over six feet need two 2x4s at each end. Always verify this requirement with your inspector!
Electronic Sensing Device
You are thinking of remodeling ... What lurks behind that plaster wall? Wouldn't it be nice if you had the X-ray vision of Superman? Well, you don't - but you can have the next best thing.
The Zircon Company has a full line of sensors and scanners, some for the homeowner and others for the seasoned pro. Check out the scanner page on their website! One product has a very cool LCD screen and an audible tone that alerts you to studs, joists, pipes, electric wires, etc.
The tool can scan through 1.5 inches of plaster and can find metal up to three inches deep. It operates on a simple nine volt battery. This is a well made tool. It can save you from an expensive plumbing or electrical repair!
Beams are not too hard to install, however it usually requires a minimum of two people to accomplish the task safely. Even a six foot long double 2x12 beam can be heavy. Here are some things I have learned over the years:
Get the Rough In Right
Beams are usually the top element of an opening. If you don't take the time to get the rough-in measurement right, you could be replacing your first attempt with a second, larger beam! All too often a rookie cuts the beam the same as the rough opening. At a bare minimum the beam should be three inches longer. Beams over six feet usually must be six inches longer than the rough opening width.
Build Wood Beams in Place
If you are using traditional 2 x material for the beam, why not install the pieces one at a time? If you assemble the beam on the floor it may be too heavy to lift. Simply secure the beam to the king studs until you can nail all members together in place.
Steel is the Strongest
If you have a long span and limited headroom for a beam, then consider steel. You can use a single steel plate sandwiched between two wooden 2 x ? . The steel company will provide holes in the steel plate that allow you to bolt the entire assembly together. A structural engineer will specify the steel plate for you. You can also buy four inch wide junior I beams that can often fit into a typical 2x4 wall!
Hidden Beams
How would you like a smooth ceiling in between two rooms? I have it in my kitchen and breakfast area. I also have a beam that is in the same plane as the floor joists! You can do this and use joist hangers to hang the floor joists from the beam. Remember, the beam doesn't always have to be under the floor joists!
Size and Scope-Out Your Material
Be careful when building built-up wood beams. Try to select lumber that is sized the same. Joists can vary in height by as much as 1/4 inch. This can cause concentrated loads on the wood columns at each end as one aspect of the beam transfers all of the load onto the wood columns.
Also look for crowns or humps in the beams. Make sure all of the wood members have a similar crown and that the crowns all have their humps pointed towards the sky. This curvature is similar to a standard archway.
Don't Guess the Size!
Beams need to be sized by professionals. Every week I get at least one email from someone wanting to know what size beam to use in an opening. A structural engineer will do this for you. The actual calculation often takes less than a half hour. I know because I have seen a good friend of mine, Bob Becker P.E., do it on several occasions!
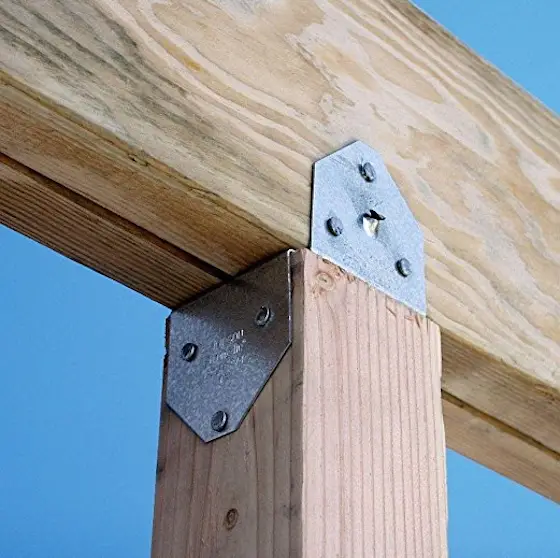
Here's a post cap connector. Simpson makes them in all different sizes to connect different posts to different width beams.
Simple headers in walls often employ nails driven through the king studs that run up along side each end of a beam. This is a good method. However, a beam that simply sits on top of a column is a weak structural location. You can purchase very nifty metal post to beam connectors for just about any configuration. Many home centers or lumber yards stock these connectors.
Two companies that make them are:
Simpson Strong Tie Company
USP Structural Connectors
I urge you to look at both of these websites. You will be amazed at the different connectors available.
In the case of steel, I always suggest that you hire a welder to come out and weld steel beams to the steel columns beneath. This often costs less than $200 and can ensure that you have a long lasting connection.
If you live in an area prone to earthquakes, be sure to find out exactly how all beam/column connections should be done to prevent failure when the earth shakes, rattles and rolls!
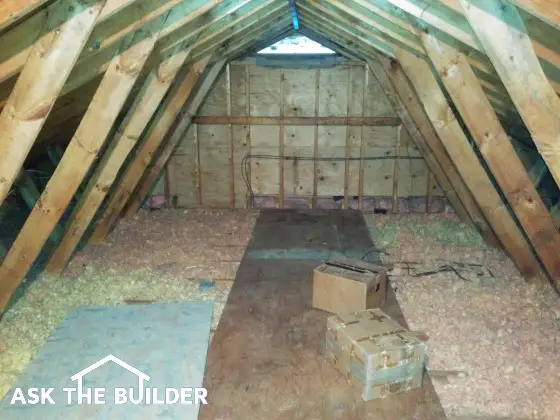
Plywood Attic Platforms - see the plywood being used as a walkway in this attic?
Hello Tim,
I have a house with a 2x4 roof truss system. I plan on adding more insulation in the attic area. Can I walk on the existing 2x4's without causing damage to the ceiling?
Roy
- - -
Hello Roy,
You absolutely can walk on the edges of the bottom chord of each truss. But I feel you should cut a piece or two of 3/4 inch plywood that is 16 inches wide by 4 feet long to use as small platforms to work from. If you work without these, you may stumble and pop through to your family below.
Column BQA
Expert Advice For Your Home
Subscribe to the FREE Ask the Builder newsletter to receive professional advice for your home. Complete the form below and each week you'll get:
DIY Tips
Tool Reviews
Project Guides
Product Discounts, Giveaways & more.
Unsubscribe at any time. We respect your email privacy.