Finding Compact Fluorescent Light Bulbs

Compact Fluorescent Light Bulb

Finding Compact Fluorescent Light Bulbs

A Bulb for Every Fixture

When I was writing this column, my wife Kathy asked me if I could get a CFL bulb for the table lamps in the family room. These lamps have 3-way-switches that allow the bulb to glow with different levels of intensity. The answer is: "Yes!"

Remember the yellow bug bulbs you would put on porch lights to reduce the amount of moths and other night bugs? You can get yellow CFLs.

Do you have lots of recessed light fixtures? I do. I think I have over 50 of them in my house. They burn lots of energy. You can buy special reflector CFLs that capture all of the light and reflect it down out of the recessed fixture. They work very well.

Bulb Temperature

An interesting side benefit of CFLs is the reduced operating temperature. Many a house fire has been started where a high wattage incandescent bulb was placed in a ceiling fixture. The high temperatures can actually melt the insulation on some older wire. Once this happens it is only a matter of time before electrical arcing starts a fire. CFLs burn at significantly lower temperatures. The fire hazard is low or non-existent. If you have an older closet with a bare bulb fixture, change it out immediately with a CFL. Exposed incandescent bulbs have also started fires where clothes or boxes have fallen against them.

Easy Access

You may find some CFLs at home centers, hardware stores or even grocery stores. But if you want the best selection visit an electrical supply house or better yet, a specialty store that sells light fixtures. Stores like this need to supply bulbs with the fixtures and trust me, they have so many different bulbs you will not believe your eyes. I am talking hundreds and hundreds of different bulbs. Just one of the CFL manufacturers has a minimum of 100 different size/type CFLs! I guarantee you will find what you need.

Column B393

Save with Compact Fluorescent Light Bulbs

Compact Fluorescent Light Bulb

Save with Compact Fluorescent Light Bulbs

In a previous column, I wrote about real ways to lower your utility bills. I get frustrated on a regular basis when I see other columns or magazine articles about all of these fantastic ways to save money. The problem with most of these articles is that they don't calculate the 'Return on Investment.'

What is the Return on Investment?

For example, just this past Saturday, I got a call on my radio show from a person who wants to tear into the plaster ceiling in his basement to add insulation so that the band board around his house would be warmer. He was hoping to raise the temperature in a bathroom. My reply was simple. Take the square foot area of the exterior walls and attic ceiling area of the house. Divide this number into the monthly or annual cost of heating and cooling the entire structure. Determine the percentage of the square foot area that represents the band board. My guess is that it would be less than three percent. When you do the math you might find out that it takes 50 years to get a payback! It might be better to not spend the money on the improvement and keep it in the bank. Use the interest to pay for the heat loss.

Compact fluorescent bulbs are four times more energy efficient than incandescent bulbs and provide the same light level. PHOTO CREDIT: U.S. Dept. of Energy

Compact fluorescent bulbs are four times more energy efficient than incandescent bulbs and provide the same light level. PHOTO CREDIT: U.S. Dept. of Energy

Well, guess what? You CAN save money and save it in a Big Way if you begin to buy compact fluorescent light bulbs (CFLs).

Significant Savings

If you buy just one CFL bulb and use it heavily, I doubt you will see a difference on your electric bill. But change over all of your bulbs and I guarantee you will see a difference. Over time the difference will not only pay for the bulbs but it will also keep money in your pocket instead of being distributed as dividends to the stockholders who own the utility company!

Read Joanne's question on CFLs - CLICK HERE.

Column B393

Headers, Beams and Wall Sensors

Learn More About Headers and Beams!

How would you like a booklet that contains a series of size selection and allowable load tables for choosing Southern Pine headers and beams? The Southern Pine Council has this booklet available FREE on their website for download in PDF format. Go to their Publications Depot and look under Southern Pine Use Guide.

Beam and Column Illustration

Following is a very simple cross section showing how you insert a wooden beam into a frame wall. The wood beam is supported by two 2x4s on each end. These are typically called jack studs and are nailed directly to a king stud that runs from the bottom plate continuous to the top plate. Note how the column on the right side of the wall does not fall on top of a floor joist below. In that situation wood blocking is added between the steel I- beam below and the subfloor under the column on the right. Most beams under six foot total span only require a single 2x4 for support at each end. Beams over six feet need two 2x4s at each end. Always verify this requirement with your inspector!

simple cross section showing how you insert a wooden beam into a frame wall

Electronic Sensing Device

You are thinking of remodeling ... What lurks behind that plaster wall? Wouldn't it be nice if you had the X-ray vision of Superman? Well, you don't - but you can have the next best thing.

The Zircon Company has a full line of sensors and scanners, some for the homeowner and others for the seasoned pro. Check out the scanner page on their website! One product has a very cool LCD screen and an audible tone that alerts you to studs, joists, pipes, electric wires, etc.

The tool can scan through 1.5 inches of plaster and can find metal up to three inches deep. It operates on a simple nine volt battery. This is a well made tool. It can save you from an expensive plumbing or electrical repair!

Related Articles:  Removing a Load Bearing Wall, Column & Beam ConstructionColumn to Beam ConnectionBeam Installation

Column B224

Beam Installation

Beam Installation Tips

beam column construction triple laminated beam

Here's a great shot of a triple laminated beam. The columns supporting it are solid wood 2x6's. You can see them packed together on the far wall and the corner where the two exterior walls meet. What we can't see in the photo is if the carpenter put extra blocking under the exterior bottom wall plate, so the load is transferred to the poured, or cast, concrete foundation wall. The floor joists for the second floor will hang off this beam using galvanized joist hangers. This photo also shows three other beams in the exterior walls. They're made from 2x10s and pieces of OSB. They're over each window or door opening in the photo. © 2017 Tim Carter

Beams are not too hard to install, however it usually requires a minimum of two people to accomplish the task safely. Even a six foot long double 2x12 beam can be heavy. Here are some things I have learned over the years:

Get the Rough In Right

Beams are usually the top element of an opening. If you don't take the time to get the rough-in measurement right, you could be replacing your first attempt with a second, larger beam! All too often a rookie cuts the beam the same as the rough opening. At a bare minimum the beam should be three inches longer. Beams over six feet usually must be six inches longer than the rough opening width.

Build Wood Beams in Place

If you are using traditional 2 x material for the beam, why not install the pieces one at a time? If you assemble the beam on the floor it may be too heavy to lift. Simply secure the beam to the king studs until you can nail all members together in place.

Steel is the Strongest

If you have a long span and limited headroom for a beam, then consider steel. You can use a single steel plate sandwiched between two wooden 2 x ? . The steel company will provide holes in the steel plate that allow you to bolt the entire assembly together. A structural engineer will specify the steel plate for you. You can also buy four inch wide junior I beams that can often fit into a typical 2x4 wall!

Hidden Beams

How would you like a smooth ceiling in between two rooms? I have it in my kitchen and breakfast area. I also have a beam that is in the same plane as the floor joists! You can do this and use joist hangers to hang the floor joists from the beam. Remember, the beam doesn't always have to be under the floor joists!

Size and Scope-Out Your Material

Be careful when building built-up wood beams. Try to select lumber that is sized the same. Joists can vary in height by as much as 1/4 inch. This can cause concentrated loads on the wood columns at each end as one aspect of the beam transfers all of the load onto the wood columns.

Also look for crowns or humps in the beams. Make sure all of the wood members have a similar crown and that the crowns all have their humps pointed towards the sky. This curvature is similar to a standard archway.

Don't Guess the Size!

Beams need to be sized by professionals. Every week I get at least one email from someone wanting to know what size beam to use in an opening. A structural engineer will do this for you. The actual calculation often takes less than a half hour. I know because I have seen a good friend of mine, Bob Becker P.E., do it on several occasions!

CLICK or TAP HERE to get FREE QUOTES from local structural engineers that can size your beams properly.

Related Articles:  Removing a Load Bearing Wall, Column & Beam ConstructionColumn to Beam ConnectionHeaders, Beams and Wall Sensors

Column B224

Column to Beam Connection

Connecting Beams to Columns

post cap connector Simpson

Here's a post cap connector. Simpson makes them in all different sizes to connect different posts to different width beams.

Simple headers in walls often employ nails driven through the king studs that run up along side each end of a beam. This is a good method. However, a beam that simply sits on top of a column is a weak structural location. You can purchase very nifty metal post to beam connectors for just about any configuration. Many home centers or lumber yards stock these connectors.

Two companies that make them are:

  • Simpson Strong Tie Company
  • USP Structural Connectors

I urge you to look at both of these websites. You will be amazed at the different connectors available.

In the case of steel, I always suggest that you hire a welder to come out and weld steel beams to the steel columns beneath. This often costs less than $200 and can ensure that you have a long lasting connection.

If you live in an area prone to earthquakes, be sure to find out exactly how all beam/column connections should be done to prevent failure when the earth shakes, rattles and rolls!

Related Articles:  Removing a Load Bearing Wall, Column & Beam ConstructionBeam InstallationHeaders, Beams and Wall Sensors

Column B224

Plywood Attic Platforms

attic roof framing blown insulation gable end vent

Plywood Attic Platforms - see the plywood being used as a walkway in this attic?

Hello Tim,

I have a house with a 2x4 roof truss system. I plan on adding more insulation in the attic area. Can I walk on the existing 2x4's without causing damage to the ceiling?

Roy

- - -

Hello Roy,

You absolutely can walk on the edges of the bottom chord of each truss. But I feel you should cut a piece or two of 3/4 inch plywood that is 16 inches wide by 4 feet long to use as small platforms to work from. If you work without these, you may stumble and pop through to your family below.

Column BQA

Rubber Roofing

rubber roofing

This dark gray material is a rubber roof. If you look closely you can read the tire company name that made it. PHOTO BY: Tim Carter

DEAR TIM: I just had a rubber membrane roof put on. Half my roof was stripped and plywood and insulation board were put down. The other half of the roof was scheduled to be worked on two days later. Before leaving my house, the contractor put a tarp down to protect the unfinished work.

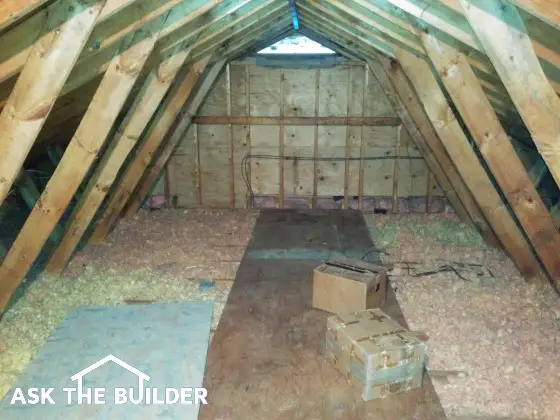
That night the wind blew away a big piece of the tarp and the insulation board and plywood got rained on. The next day it was windy and overcast. When the contractor proceeded with his work, he said everything was dry as a bone and he put the rubber membrane on top of the insulation board and plywood. The amount of rain was enough that the water came into my kitchen. It had rained most of the night when the tarp had blown off.

The roof is now finished, but I know that some of the plywood and insulation board had gotten wet. The roofer used his tools to pry up the pieces of plywood to allow the space under the roof to dry. However soon after this was done the rubber membrane was applied. Do I have any reason for concern? Rachel A., Norfolk, VA

DEAR RACHEL: Believe it or not, rain-soaked roof sheathing can dry pretty quickly if exposed to some breezy wind conditions and even moderate sunlight. I have seen dew-saturated plywood dry within 45 minutes in the right conditions. My experience tells me the roof sheathing was probably just fine as the work continued.

But the insulation under the plywood should be the concern. It could take days to dry. Now that the roof is covered with a rubber membrane that completely stops the movement of liquid water and virtually all water vapor, I would have a heightened level of concern if I were you.

How can you tell if insulation is wet?

The first thing to do is try to open up the ceiling in the kitchen to inspect the hidden cavity. See if the insulation is wet. If you discover moisture, take videos of the wet material and take plenty of photos to document the damage. I also suggest you do this in the presence of a disinterested friend or neighbor who will be able to sign a sworn affidavit at some future time. I am afraid to tell you that the entire ceiling needs to be opened up so the ruined insulation can be removed and the framing allowed to dry.

I would then call the roofing company and see what they will do to assist you to repair any damage, even if you just have to patch a small inspection hole. If you meet a little resistance from the roofer, ask for a certificate of insurance.


Avoid repairing roof leaks yourself! Find a professional using my Roofing Replacement / Repair Checklist. I offer a 100% Money Back Guarantee.


What is a Certificate of Insurance?

Actually, you should have had this important document in your possession before you accepted their bid. A certificate of insurance proves that a roofing company has a valid liability insurance policy. Obtaining this proof is very important anytime you hire a contractor to work on your home. Never feel ashamed or embarrassed to ask for this document. Remember, it is your home and you want to know that damage to it will be paid for in the event of an accident or poor workmanship practices such as improper attachment of a tarp.

While the roofer had great intentions covering your unfinished roof with a tarp, Mother Nature thought he was building a sailboat. Tarps that are not expertly secured can become giant sails in a gusty rainstorm. If the wind gets a purchase under one corner of the tarp, it can tear loose in short order. Imagine what would have happened if it rained for days and you lost all of the ceilings in your home? Believe me, this has happened to many people.

CLICK or TAP HERE to get FREE QUOTES from local roofing companies that can address your roofing issues.

If the roofer gives you any trouble whatsoever, you should write a detailed letter to the roofing company telling them you have grave concerns about trapped moisture under the roof. Include a truthful time line of all of the events. Just state the facts. Do not editorialize or state things you think happened. Just state exactly what you know to be fact.

Write down the facts!

Reference the amount of rainfall and all facts including the loss of the temporary covering. Show photos of ceiling damage and the one you sent me. The roofer obviously was concerned about moisture under the wood since he is making an effort to get air under the wood by using his tools to lift up the edges of the plywood.

The letter you write to the roofer or any other contractor is part of the paper trail that is vitally important should the situation enter the legal arena. Attorneys, judges and juries love to see written correspondence.

If you want fantastic protection of your rights, the letter needs to contain a very important sentence at the end. I would write something like this:

If you disagree with any of the facts or the timing of the events that I have referenced above, please respond to me in writing within 10 business days. Be sure to include documentation that supports your statements and clearly shows that what I have presented above is in error.

The insurance company needs to be sent a copy of the letter to put them on notice of a possible claim. These letters need to be sent to both companies via certified mail with a return receipt being sent to you. Keep these very valuable receipts.

Column 568

Tips for Installing Insulation

Be sure to read the special Author's Note at the end of this column. It provides updated information on this topic.

Insulation Installation Tips

Insulation is a fairly easy material to work with. You do not need expensive tools or equipment for normal installations. A tape measure, utility knife, straight edge, insulation knife and a stapler are usually all you will need. It is also a good idea to protect your body. So, use lightweight work gloves, a long sleeved loose fitting shirt, goggles or protective glasses, and a dust mask.

Fiberglass insulation expands when it is opened. They compress the material at the factory. When opened, it may expand 500 to 1,000 percent! So, don't open the material until you are ready.

When installing insulation in cavities that contain wires, it is a good idea to partially split the insulation where it crosses the wire. The idea is to encapsulate the wire with insulation. If you (or the installer) do not do this, there will be a void space behind the insulation! The insulation will not be able to expand fully. I have seen installers fail to split the insulation on many jobs that I have visited. Don't let it happen on your job!

Insulation must be placed around all windows and doors to fill the gap between the frame and the rough opening. The entire gap should be filled, however, be sure it is not packed too tightly! It may bulge the frame and you lose insulating value when insulation is too tightly packed.


Learn even more secrets for successfully installing insulation with my Insulation Installation Checklist. I offer a 100% Money Back Guarantee.


Always use baffles when installing blown-in attic insulation. The air from the soffits or eaves must be able to pass over the insulation in the narrow area where the roof passes over the exterior walls!

Don't install a vapor barrier on ceilings!!!!!! Let the water vapor into the attic area and out of the house!

Author's Note:

Routinely I am blessed to hear from professionals and industry experts who share in-depth and updated information about a topic. You'll absolutely want to read the letter I received from the President of NAIMA (North American Insulation Manufacturers Association). It really helps clarify some of the points I just touched on in the insulation columns.

Column B54

R Value and Insulation Manufacturers, Associations

Insulation R-Value Recommendations

The U.S. Department of Energy has recently upgraded insulation R-value recommendations.These recommendations were the result of studies of energy costs for both heating and cooling by zip code. The United States, as a result of this study, was divided into eight zones. There is a wide range of R-values for ceilings. These R-values range from R-49 in the coldest locations to R-30 in the warmest parts of our nation. All areas of the nation require a minimum R-19 for exterior walls and floors over unheated crawl spaces.

Owens Corning has an extensive web site geared to consumers with information on insulation. Go to "Insulating At a Glance" and check out the wealth of information.

Insulation Manufacturers & Associations

  • ADO Products
    Fiberglass
  • Ark-Seal Inc. International
    Blown-in-Blanket System
  • Certainteed Corporation Insulation Group
    Fiberglass Batts & Blown-in
  • Guardian Fiberglass, Inc.
    Blow-in fiberglass
  • Owens-Corning
    Fiberglass Batts and Blown-in
  • Cellulose Insulation Manufacturers Association
  • North American Insulation Manufacturers

Column B54

Fiberglass – Newest Improvements

Be sure to read the special Author's Note at the end of this column. It provides updated information on this topic.

New Technology For Fiberglass

As I mentioned in a previous article, insulation manufacturers are responding with new products. Two exciting technologies have emerged in response to some of the problems that installers have experienced in using existing materials.

When installing fiberglass batts in standard width wall, floor or ceiling stud (joist) bays, you generally have no problems. However, wires, pipes and irregular framed areas make for big problems. Fiberglass batts depend upon a tight fit to achieve desired R-values. This is tough to do around pipes and wires.

This problem led to the development of blow-in-blanket fiberglass insulation. The loose fiberglass is treated with an adhesive and blown behind a tightly stretched plastic membrane. This allows the fiberglass to fill every void and plug all holes. Plus, it's guaranteed not to settle!

Manufacturers are also producing fiberglass batt insulation which is wrapped entirely in plastic. This minimizes airborne fiberglass particles which recently are thought to be a possible carcinogen.

Another advantage is comfort of installation. Fiberglass can and does irritate your skin. I never looked forward to installing it. The new plastic wrapped batts are a plus!

You can also purchase high density fiberglass batts. These products offer a higher R-value per inch because they have more fiberglass fibers per cubic inch. This means that there are more small air pockets available to slow down heat loss or heat transfer.

The new products are exciting!

Author's Note:

Routinely I am blessed to hear from professionals and industry experts who share in-depth and updated information about a topic. You'll absolutely want to read the letter I received from the President of NAIMA (North American Insulation Manufacturers Association). It really helps clarify some of the points I just touched on in the insulation columns.

Column B54