Stucco Makes a Strong Home

Stucco Homes

I just got back from a five-day trip spent in the Rocky Mountains of Montana. I think it is fascinating to travel as you learn new things and the experience helps put things into perspective in your daily life. For example, driving south through the Gallatin River canyon from the town of Bozeman towards Big Sky, Montana, you can't help but get a feel for the permanence of rock. The Rocky Mountains have been around a long time and are still standing tall because of the rock they are made from.

The concept of building with rock and man-made rock is nothing new. The age-old fable of the Three Little Pigs is based upon the longevity of stone or masonry building materials as compared to wood or even straw.

Travel to Europe and you will see that much of their residential construction is based in stone, brick and stucco. They learned long ago that cement stucco, a man-made rock material, is both durable and attractive. The truth be told, Europeans used up much, if not all of their forests hundreds of years ago and were forced to find a different building material other than wood.

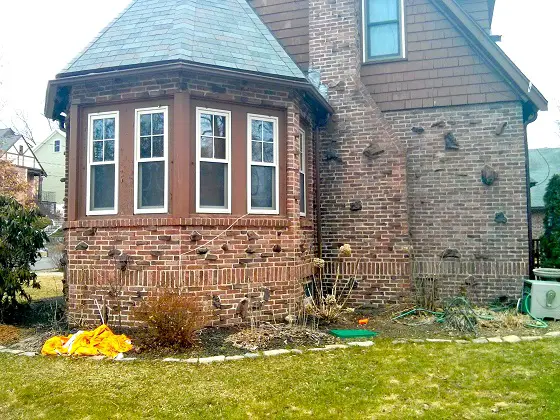
But you might be getting ready to make choices for your own new home. You don't have to travel to Montana, Colorado or even Europe to get some great ideas. Your trip might only have to last an hour or two as you drive around some of the older well-established neighborhoods of Chicago. I am confident when you do, you will discover quite a few cement stucco homes as well as others that use stucco on a part of the exterior.

Cement stucco is an amazing material for a number of reasons. For one, it is a man-made rock material that is incredibly strong. A well-built stucco home can easily last hundreds of years. I realize that might not mean much to you, but stucco can add both value and character to your new home.

Permanent pigments can be added to cement stucco as it is mixed so that it never needs to be painted. The stucco mason can build several test panels to show you what the cured colored stucco looks like when it is totally dry. You can whitewash stucco to create a cottage look. Whitewashing is simple to do and the look is unlike anything you have seen in a long time. You can simply leave stucco natural and let it achieve a patina over time.

Used with modern windows and doors, a stucco home can block those howling winter winds that try to suck heated air from your home. The stucco finish is a fantastic wind barrier, yet it easily transmits any water vapor that can cause mold to grow in other wall systems that do not readily allow water to migrate to the atmosphere.

If you hire a talented builder as well as a talented stucco mason, you will have an infinite amount of stucco textures and patterns from which to choose. There are classic stucco styles and as you drive around the neighborhoods scouting for stucco, be sure to take photographs of stucco textures you love. Often if you knock on the door of the home and tell the owners what you are doing, they will allow you to take close-up shots of their houses. Your interest in their home often creates pride in the homeowner.

Keep in mind that stucco can be painted if you so choose, but this takes a maintenance-free material and turns it into one that requires periodic maintenance. If you decide to paint, it is critical that the new stucco cures for a period of time. It can take three months or more for the stucco to release most or all of the moisture it contains. If you paint before the stucco is fully cured, the new paint job can peel in short order. The safest route may be to wait 6 or even 9 months to paint. Be sure to use the recommended primers as called for by the top coat paint manufacturer.

Column NH054

House Plans and Contracts

Today, I delivered 3.5 grueling hours of intense testimony during a deposition. I was issued a subpoena to come forth as a factual witness in a civil lawsuit between a builder and a neighbor of mine. Testimony given in a deposition has the same power as that given in an actual courtroom. I was sworn to tell the truth, more importantly the whole truth, and all of the questions and my answers were transcribed by an official court reporter.

So what does this have to do with your new home you might ask? It has everything to do with it. The disagreements between the parties in this lawsuit are many and most, if not all, of them can be traced back to a poorly worded contract, plans that had minimum detail, and expectations on the part of the homeowner that may not be realistic in the eyes of many consumers.

How important are detailed blueprints?

All too often I discover that people create an image in their mind of what they want their new home to look like. That is fine. It is exciting to dream about something new that gives great pleasure and especially something that might actually go up in value over time. But the challenge for many people, including some draftspeople and architects, is to verbalize or communicate those wishes, dreams and thoughts into a language the builder and subcontractors understand.

house blueprints with marker and scissors

The actual plans for your new home are the cornerstone to the foundation of the relationship between you, your builder, his suppliers and subcontractors. It becomes your voice when you can't be at the jobsite to talk over the screeching of saws and the pounding of hammers.


How would you like me to build your new home? It's probably impossible for me to fit your job into my schedule, but I will gladly share hundreds of my tricks and building secrets with you and your builder. Check out my New House Specifications.


Excellent plans, ones that include numerous detailed drawings of specific elements of the home, spreadsheet formatted schedules that contain each aspect of how a room is to be finished, which exact plumbing fixtures go where, what appliances are being installed, etc. can actually speak clearly for the entire length of the job. Believe it or not, it is entirely possible for a builder to receive a set of plans and specifications that are so detailed, they never have to ask one question of the architect or homeowner. The finished product turns out exactly as the homeowner desired, assuming, of course, the homeowner understood the plans.

What should be in the contract?

Once you have great plans and written specifications, you need a good contract. I am not an attorney but I can tell you that all sorts of things need to be addressed. For example, specific events need to happen for monies to be paid. A good contract talks about what happens if a change order is issued. Good contracts also spell out dispute resolution choices. Keep in mind that the plans and specifications need to be dated and the contract should refer to these with respect to the work that will be done. Consult with several good attorneys and find one that can show you a copy of a contract you understand and one that covers many of your concerns.

Try to address quality expectations up front. To the best of your ability produce photographs or cite things that both you, the builder and other parties can actually see that represent the quality you are looking for. It is okay for you to expect perfection, but clearly define what perfection means to you and be prepared to pay for it.

I talked about perfection today in my deposition. My discussion included a reference to a double standard. I felt it was very unrealistic for a person who makes mistakes in his or her work and still grabs a paycheck at the end of the work week to expect total perfection from another person.

Poor workmanship and perfection are never to be confused. Many instances of defects in new construction are poor workmanship and those errors must be corrected by the builder. Some flaws that people point out may not be workmanship defects but actual flaws in the material. For example, you may look at the face of a top model from five feet away and think she is gorgeous. But ask her if you can use a 10 power magnifying lens to look at the skin on her face. If you blink for a moment as you adjust the lens from her skin, you might think you are looking at the surface of the moon. Always keep in mind what you are looking at.

Column NH053

Waterproofing Tile Shower and Tub

overhead view bathtub tile grout

Here's the amazing sunken tub with the mosaic tile. You have no idea how hard it is to build one of these that looks this good! Copyright 2017 Tim Carter

Your new home may have a ceramic or even cultured marble tub or shower surround. When done right, they can look splendid for years. Surely you have seen a well-built ceramic tile or marble tub and shower that has stood the test of time as you have walked through an older home. For that tile and marble to last, the builders and installers made sure water did not seep behind the finish materials to cause wood rot.

What are some tips to keep the water in the tub or shower?

Your builder and his subcontractors can do the same thing in your new home. Fortunately, we have materials today that make this task not only easy, but the results are bulletproof. When done right, you can rest assured all water will eventually stay in the tub and shower where it belongs.

Virtually every tub and shower pan, even shower pans made with membranes, have a lip that folds up at the edge of the fixture. This lip is hidden by the substrate that is under the finished wall material. The purpose of the lip is to redirect water back towards the center of the fixture. A roofer would look at this lip and immediately recognize it as a flashing not much different from the ones he uses to redirect water back onto shingles so it can continue down the roof.

Need help with your bathroom remodeling? CLICK or TAP HERE to get FREE quotes from local companies that can handle your remodeling project.

What is the best location for installing a water resistant membrane?

The best defense your builder can employ is the application of a water resistant membrane on the stud walls that lap down over, not behind, this lip. This membrane can be simple asphalt-saturated felt paper, newer waterproof underlayment membranes or traditional plastic sheeting. If any water gets past the tile, grout and the cement board or water resistant gypsum board under the tile, it is blocked and redirected to the tub or shower by these thin, yet powerful fabrics.

The best part is that it takes perhaps three or five minutes to install these membranes. Often the material is scrap that might be lying around the jobsite. What better way to lower the input into landfills and to permanently waterproof one small part of your new home?

What is cement board and should you use it around tubs?

The next step to stopping water from even getting to this membrane is to take a few simple steps while installing the substrate on the walls. I prefer to use cement board under ceramic tile and cultured marble for many reasons. First and foremost, it is 100 percent waterproof. If the cement board gets wet and stays wet for years for some reason, it will not fall apart. You can't say that about many of the gypsum-based products that are currently on the market.

bathroom project shower tile walls backer board

During the remodeling. The cement backer board is visible on the right.

As this cement board is installed, I feel it is a good idea to pay attention to where the material contacts the tub or shower and where it touches up against another piece of cement board. For example, I try to create a crisp one-quarter inch gap between the cement board and the top of the tub or shower fixture. I also try to create these same, or slightly smaller gaps in the corners where one piece of cement board intersects another. Gaps are also created if there are horizontal seams where cement board is stacked upon one another.

How do you fill the gaps around the cement board?

Once the cement board is securely fastened to the walls, these gaps are filled with 100 percent silicone caulk. I suggest you leave several small gaps, perhaps one-half inch long, in the caulking bead at the top of the tub. Do this on every wall. These gaps are drainage holes that allow water to get back towards the tub or shower in the event water somehow gets to the membrane behind the cement board.

These steps are easy to do and should not add any significant cost to your new home. Even if it does cost an extra $50, it is well worth the price. Imagine how costly it might be to rebuild the shower 10 or 15 years from now. I can tell you, it will be 20 or even 30 times the cost to make these small modifications now.

Column NH053

Fence

There are four types of fences visible in this picture - chain link, picket, split rail and a privacy fence in the distance. PHOTO CREDIT: Roger Henthorn

There are four types of fences visible in this picture - chain link, picket, split rail and a privacy fence in the distance. PHOTO CREDIT: Roger Henthorn

There is an old saying that talks about how good fences make good or great neighbors. This is so true as a fence that is placed where it should be clearly defines and outlines the property the fence is surrounding. I have a fence along part of my north property line and believe me, it has come in handy on more than one occasion. Fortunately, my neighbor loves the fence and both she and my wife use this graceful wood fence as a backdrop for plants.

Where do you start when deciding on a fence?

If you decide you want a fence, the first thing you must do is some research. Start with your local zoning officials to see if fences are permitted and if so, what if any requirements there are with respect to height, type, style and position. The zoning restrictions concerning fences in my town and its suburbs are as plentiful as ticket scalpers at a Cubs game. You should also check your deed or other paperwork you received at your closing. You just might find other neighborhood or sub-division restrictions regarding fences.

Once you have been cleared for construction, you now need to verify where your property line is. If you don't have accurate property pins in place from a recent survey, I suggest you invest in a survey. The price of the survey is well worth it, especially if you take great care to mark and preserve the corner pins the surveyor will drive into the ground. These markers can be used to settle property line disputes in the future and they will be very helpful when you go to sell your home.

wrough iron fence & kids

Once you know what you can legally build and where to place the actual fence, it is time to select a material. There are countless materials and styles. You may want chain link, wrought iron, vinyl or wood fencing. My wife and I settled on a Victorian wood fence style that goes very well with our Queen Anne Victorian home. Cedar and traditional treated lumber were the woods I chose to use. I could just as easily have gone with redwood and even locust as they both contain great built-in preservatives to combat wood rot.

CLICK or TAP HERE to get FREE quotes from local fencing companies that can install your new fence.

How should you prepare treated lumber before installing the fence?

If you are going to use treated lumber for the posts and horizontal rails of your fence as I did and you are going to paint your fence, I suggest you get the lumber months ahead of time and stack it in your garage so it can air dry. Be sure to use small sticks between the layers so that air can circulate around each piece. Store the lumber flat and do not let the sun hit it. Often treated lumber has excessive amounts of moisture in it from the treating process. If this moisture is covered by paint, peeling and blistering of the fresh new paint in a few weeks or months is a real possibility.

Should you paint the fence pieces before installation?

If you really desire your paint job to stand the test of time, you should precut all or many of the actual pieces of wood that will be used to build the fence. I did this when I built my fence. I then pre-painted each piece of wood on all sides, surfaces and edges making sure to use the correct primer for the paint as called for by the top or finish coat paint manufacturer. If I were rebuilding my fence today, I would use an exterior paint that contains both urethane and acrylic resins. This paint has the best holding power and will last possibly 10 - 15 years without failure.

The nails, screws and bolts you use to secure all of the wood to one another is very important. Use only the highest double hot-dipped galvanized or stainless steel fasteners. These will not rust. If you use inferior fasteners, not only can the fence fall apart over time, but your paint job might start to develop unsightly rust spots in short order.

Before you start the actual construction of the fence, be sure you determine if there are any buried wires, pipes, cables, gas lines, etc. where you will be digging. Striking a high-voltage electric line with a sharp post hole digger can be a religious experience, if you know what I mean.

Column NH051

Costly Design Errors

garage layout

Can you see the mistake made by the architect in this photo? Look at the short stub foundation wall on the right then the height of the doorway from the garage to the house. (C) Copyright 2017 Tim Carter

I'll bet you have been to a party at a the house of a friend, neighbor or relative and noticed one or more builder blunders. Perhaps it was when you drove into the driveway and opened your car door only to find you were stepping in wet grass. Maybe you were in the first floor bathroom and wondered why you had to reach way behind you to get toilet paper. There are hundreds of places a builder or a subcontractor can make a mistake, but let them happen on other new homes not yours.

Where should you locate your air conditioning units?

Let's start with a few common exterior mistakes that can often be easily avoided. If you are going to have air conditioning in your home, think about where the outdoor compressors will be. Try to locate them on the east or north side of your home for maximum efficiency, but avoid placing them near bedrooms or other rooms where you will spend lots of time. New air conditioning units are being made so they produce minimal noise, but they are by no means silent.

How wide should a driveway be?

Driveways must be wide enough to allow you to easily exit and enter a car and still be on the driveway. A single lane drive should be no less than 12 feet wide and a double-wide driveway should really be 22 feet wide. These widths will handle beefy SUVs with ease and minimize door dings if two cars are parked adjacent to one another.

If you don't want your guests to cower in the rain waiting for you to answer the front door, be sure a front porch or covered entrance is included. Clever architects can provide this protection no matter what the architectural style of your new home will be.

Is the shower head too low?

Do a quick walk through inspection of your existing home. Make a list of things that bother you in each room. My guess is that you might wonder if the plumber who worked on your home was only 5 foot 2 inches tall. All too often, shower heads are installed too low and people squat and bend over when a relaxing shower was on the agenda. Toilet paper holders can be placed just about anywhere in easy reach so long as solid blocking is placed in the framing before drywall is installed.

How many electrical outlets is enough?

Don't forget to pay attention to simple things such as electrical outlets. Do you wish you had more in given rooms? Would you like to have outlets directly behind end tables that are placed next to beds and couches? You bet it is possible. What about a nice outlet or two right on top of a fireplace mantle? It can and should be done. You might also want a floor outlet or two in home offices that will have a desk out in the room instead of against a wall. Imagine how you might like a strategically placed floor outlet to power a coffee table that is lighted.

Traffic patterns in rooms and the house as a whole need to be studied. Pathways within rooms can gobble up valuable floor space. You can sketch these connecting walkways on your plans and see how well scale cutouts of your furniture will fit without extending into the traffic pattern.

Your builder may have great intentions and build your home to code, but the floor systems may be spongy or bouncy after you move in. This boo-boo can be avoided if you specify stiff floors that meet the 1/480 deflection design standard instead of the minimum standard of 1/360 in most building codes.

What is the best width for a hallway or stairway?

Think about hallway and stairway widths. Once again the building code minimum width of 36 inches is often chosen by builders. Avoid this at just about any cost and try to make sure staircases are 42 inches or more in width. You will never regret having a 48 inch or wider hallway.

attic truss design creating roof room

This is an attic space in a new home. Most builders would have used standard trusses and wasted all this space. (C) Copyright 2019 Tim Carter

How can you get extra space in the attic?

Often, the biggest builder blunder is overhead and out of sight. All too often regular common trusses are used over living spaces and garages. In certain places your builder may be able to install cool attic trusses or lower-headroom storage trusses that allow you to either create a full-sized room in the future or safely store some possessions on trusses that have been rated for this purpose. Last but not least, ask your builder to install a real staircase to these bonus spaces, not one of those light-duty folding staircases.

The other videos in the series (video 1 shown above) are available by clicking on the links below.

Video 2 - Contract & Specifications

Video 3 - Paying Contractors

Video 4 - Avoid Change Orders

Column NH050

The Walk Through Inspection

Walk Through Inspection tools

The Walk Through Inspection

Before you close the deal on your new home, you should perform a walk through inspection. This is not much different from inspecting anything you might buy. You smell and squeeze fruit at the grocery, you walk around a new car in the dealership lot to look for blemishes in the finish, so why not go over your new home with a fine-toothed comb to see if you are getting what you bargained for?

How long will a walk-through inspection take?

The biggest problem is that many people underestimate the amount of time an inspection such as this might take. It can and should take hours, depending upon the size of the home and the number of appliances, doors, and other mechanical things that must be checked to see if they work properly.

Rushing through a walk through inspection can cost you tens of thousands of dollars. The written report that results from the inspection represents an extremely important benchmark. Not only does the report indicate things that are defective or not completed, but it also should state all of the things that are in perfect or good condition at the time of the inspection. Don't forget that this walk through inspection is one of several. You will probably do another one six months after you have been living in the house, and a final one just before your one-year anniversary.

The signature of the builder or his representative as well as your signature will stifle or stop any and all arguments at a later date. Neither party will be able to say, "Well, that crack in the floor was there before you moved in." Can you imagine trying to prove whether or not a foundation wall was cracked, or a floor didn't squeak during the initial walk through inspection?

How important is the walk through inspection?

Do not underestimate the power of a thorough inspection report, especially if defects start to happen after you have moved in to the new home. Imagine, if the first report showed the foundation to be crack-free at the first walk through before your move-in day. Then six months later, you have three cracks in the foundation and one year later, one of these cracks is one-half inch wide. Your written, signed reports clearly show a defect that is getting worse by the day.

The actual inspection process is not too complicated. Certain things are obvious. Run water in all sinks, tubs and showers. See if the valves deliver a proper flow of water. After this, flush all of the toilets. Make sure the flush is complete and you hear no gurgling sounds from nearby sink and tub drains. If you do, the plumber may have forgotten to remove test caps from the roof plumbing vent pipes.

Do all doors open and close easily? Do the keys open and close all locksets? Do deadbolt locks work with ease? Are the tops and bottoms of all wood doors painted and sealed? You will need a small compact mirror to do this part of the inspection. Do all lights work? What about all appliances? Is your new refrigerator making ice? Do all burners work on your stove? What about the oven timer?

Do all window locks work? Do all windows open and close with the same amount of ease? What about the garage door opener? Does it work well? Is it adjusted correctly as the owner's manual indicates? Do the remote controls for the garage door work well out into the driveway?


Don't try to do your own walk through inspection unless you are armed to the teeth with my 100% Satisfaction Guaranteed Walk Through Inspection Checklist!


What about all of the inspection labels from the various building inspectors? Where are they? Will you remember to get them or ask for the Certificate of Occupancy from the final building inspection? Can you imagine the hundreds of other things to look at as you walk through your new home?

Finally, if you think this will be overwhelming, consider hiring a professional home inspector. They do these inspections on a routine basis. If you do find defects, make sure they are corrected to your satisfaction before the actual closing. If this is not possible, be sure you talk to the bank or lending institution and arrange to hold money in escrow. This money can be released to the builder at a later date once the defects have been cured.

CLICK or TAP HERE to get FREE quotes from local inspection companies.

Column NH049

Home Building Costs

House under construction

Home Building Costs. Photo Credit: Tim Carter

Those of you who are headed down the pathway of custom building, be aware it can be slippery and financially dangerous. There are all sorts of briers and brambles that can slow you and your builder down as the job moves towards completion. Delays cost money, hidden upcharges, burst budgets, etc. all can contribute to a bitter building experience.

Detailed plans need to be done early in the planning stage

But wait, you can build a new home, enjoy the experience and be left with some change in your pockets. The key to having a smile on your face from the planning stage until move-in day is do your homework early in the process.

What is the biggest common denominator is building overruns?

When I perform autopsies on building experiences that have crashed and burned, the most common denominator is rush to action. All too often homeowners and builders alike want to get the job moving even though many decisions have been pushed aside. For example, who cares what kind of light fixture is going to hang next to the mirror in the bathroom? You have months to decide that, right? Wrong.

To get a firm and iron-clad grip around the true cost of your new home, you and your builder must know exactly what your house will look like when complete. But to do this, you must cooperate by making hundreds of decisions and product choices before the plans are completed.

The need to do this should be apparent in these following examples. Let's say you don't give much thought to your front door lock. A set of door hardware is a set of door hardware you think. Well, what happens if you finally decide to install a top-of-the line full-mortise lockset that costs hundreds of dollars and requires a skilled carpenter hours of labor to carefully install it? Imagine what the upcharge is going to be when you discover your builder has figured a standard tubular model that installs in less than an hour. The extra cost to you might be $400.00 or $600.00 for this one item.

How can you prevent delays in construction?

What happens when you go out to choose light fixtures five weeks before you need them? Imagine your displeasure when you are told the ones you like are special order and will be at the jobsite in ten weeks. Waiting to make decisions can significantly limit the available choices.

The other budget breaking scenario is the rough-in nightmare. If you haven't decided upon the exact light fixtures for your bathroom at the time the electrician is roughing in the wiring, the electrician mounts a box at a given location hoping it will work. When the fixture finally is installed and is either too close or too far away from the mirror, hangs too low, etc. and the box behind the finished wall surface must be moved, who do you think pays for this mistake? Yes, you do.

But the trouble is, many people are unaware of these potential financial booby traps. Many builders don't always discuss them. But rest assured there are builders who understand the problems and they will try to get you to select all things before they break ground.

sample blueprint

sample blueprint

How do you make sure each bid is quoting on the same items?

There is another huge advantage in making all of your selections before you put your job out to bid. If you tell all builders exactly what cabinets, countertops, wallpaper, locksets, etc. you want, then the bids coming back will be a true apples to apples comparison. House plans and specifications that contain lots of allowances (because decisions have been delayed) create bidding confusion.

How do you avoid overcharges?

The other hidden trap in bidding with allowances comes after you sign the contract. Once you finally decide upon a particular faucet, wallpaper, even simple woodwork, the builder can say that it is going to cost more to install what you picked out. He may say that he only figured installing a simple faucet, not one that is more complex. In all fairness, he may be right.

If you do have all product selections made before the bids are submitted and the builder comes back later asking for more money because something is harder to do than anticipated, you can say, "Look it says right here in the specifications this is what I wanted. You knew the job was dangerous when you took it."

Column NH047

Home Exterior Custom Options

brick and rock house

Home Exterior Custom Options | Here’s a very unique and tasteful use of brick and rock on the exterior of a house. Photo Credit: Tim Carter

People who have the opportunity to provide lots of input on options that might be able to be included on the exterior of their new home should speak up early and often during the design phase of the home. Over the years, I have compiled a list of things I think work well on the exterior of a home. Many of these items are just things I have observed and used on older homes but seem to be ignored on a widespread basis by many of today's builders.

What are the advantages of overhangs?

Overhangs are a functional architectural element that seem to be disappearing. Production builders know they add cost to a home, but buyers know they add character and help shield the walls and widows of a house from all but the extremes of weather. The generous overhangs on my home allow me to keep my windows open during rain showers. These same overhangs help keep second floor rooms cooler, because they act as effective awnings. Only early and late afternoon direct sunlight can sneak into the rooms.

Can a foundation be too deep into the ground?

Raised foundations seem to be a thing of the past. Virtually every new home I see today has its foundation too deep into the ground. This defect can cause enormous drainage problems and possible building code violations. It is also the source of a common complaint of homeowners who wonder why garden hose bibs are 4 inches off the soil line. In many situations, a foundation can extend two feet out of the ground and a builder can still provide a walk-in entrance by creating wide gently sloping ramps for sidewalks, drives and patios.

These sloped yard features are often dream canvases for landscape designers. They allow the landscaper to create layers of plantings that naturally show themselves off.

Use plastic conduit pipes for future outdoor electrical needs

Plan ahead for future electrical projects. You may not know exactly what you want but you may know something is going to happen. Place two or three-inch diameter plastic conduit pipes in strategic locations under driveways, patios, sidewalks and heavily landscaped areas. Map the locations of these tunnels so you can easily get both high and low voltage wires to where you need them in a hurry. These same blank pipes will work well for irrigation piping and radio fences for pets.

How do you get soft water to wash your car?

Many people love to hand wash their own cars. But the hard water found in many municipalities can leave water spots on cars. If your plumber invests perhaps 30 minutes of extra time, a special hose bib can be installed near your driveway apron that connects back to your water softener. Using soft water to rinse a car eliminates water spotting.

Try to incorporate a porch or generous overhang at your front door. This structure provides needed shade for those doors that face south or west. Without this protection from the sun and elements, gorgeous front doors tend to require more frequent episodes of painstaking maintenance. Harsh ultraviolet rays from the sun can quickly degrade finishes on natural wood doors and those that try to mimic wood.

These porch enclosures are also appreciated by guests who visit your home during inclement weather. If you have a clever builder or architect they can incorporate into the design a weatherproof hidden storage area for parcels delivered while you are away. All delivery people will use it if you simply instruct them of its presence.

Use roof turbines to cool your attic

Go retro on your roof. Many older homes used spinning turbine vents to keep attic temperatures down so second floor rooms might be cooler at night. These same turbine vents are still available and they still work well to lower attic temperatures. They save money because they help lower the amount of time your air conditioner will have to run to keep your home comfortable.

roof vent turbine vent

CLICK this IMAGE to get the turbine vents that I put on all my jobs. Great great quality and Made in the USA! Image credit: Lomanco

Column NH046

Lighting Options

Kitchen make over

Lighting Options in the kitchen

I love to watch people walk through new model homes, especially ones that have been professionally decorated. The potential home buyers Oooo and Ahhh over the striking wall colors, window treatments, furnishings and floor coverings, but rarely do I hear them say anything about the lighting. What many of these people do not realize is the things they are drooling over often look good because they are showcased with excellent lighting both natural and artificial.

Which direction should your house face?

Talk to a top-flight architect with 10 or more years experience and they should be able to give you plenty of examples of how to leverage natural light in certain rooms to produce certain effects. The really great architects know how to position a house to extract sunlight for certain rooms at specific times of the year.

As the sun increases its arc in the sky from winter to summer here in the northern hemisphere, all sorts of opportunities open up to get light into rooms. This can be done with windows placed at strategic heights or through clever placement of skylights with flared light shafts.

How can you get natural light to an interior room?

Mirrors can also be employed to bounce natural light from room to room. This takes an enormous amount of talent and the interior architecture of the home must lend itself to the presence of large expanses of glass. If mirrors are not to your liking, you can get natural light from one room to the next using large archways or pass-through openings where the top half of a wall is open to the adjacent room.

built in bookcases full room dramatic lighting

There is special indirect lighting about the bookcases, and plenty of natural lighting in this room. © 2017 Jay Helms

What about indirect lighting?

The lighting possibilities with artificial lighting are probably infinite. There are thousands of different light fixtures that have hundreds of different applications. One of the most underused lighting techniques in residential housing in my opinion, is indirect lighting. I love indirect lighting as it is not harsh and it can be used as one of several different layers of light in a room or space.

A friend of mine took my advice and incorporated indirect lighting in a small kitchen remodeling job. As it turned out, this one aspect of the total job got the most compliments from friends who would visit for an evening party. As the natural light stopped pouring in the windows, the kitchen ceiling was transformed into a warm yellow-orange canopy. The incandescent bulbs producing the light were hidden in a trayed ceiling detail I had drawn for him.

kitchen with 3 levels of lights

There are three levels of light in this kitchen, four if you count the bright lights under the stove hood! Photo credit: Tim Carter

Combining recessed lighting with traditional surface mount fixtures allows you to light certain parts of a room. My own kitchen is lit in this fashion. We have a hanging fixture over our center island that has three 75 watt bulbs in it. This one fixture produce ample light in our 17 x 20 foot kitchen. But when we need additional task lighting or desire to have the kitchen as bright as day, I flip one switch that powers 10 recessed lights. This adds another 750 watts of light and makes the kitchen a bright and inviting space.

If you want to maximize the lighting possibilities in your new home, I suggest you spend an afternoon with a lighting professional. You can often find these trained pros in stores that just sell lighting fixtures. Take your floor plans with you and let them show you any number of options for lighting in each and every room.

CLICK or TAP HERE to get FREE quotes from local lighting professionals that can brighten up your house.

Hopefully you will have some extra money in your budget for outdoor landscaping lighting. You don't have to do the entire house at one time and you may start by just highlighting a few important features. If you do have larger wants than your budget and plan to add lights in the future, discuss this with the professional so you get the correct lighting center to power the lights.

Column NH045

Painting

roller painting yellow wall

Painting

Anyone can paint you might think. The truth is you are right. I would agree that anyone who can fog a mirror and is able to move their arms and hold a brush can apply finishes. They may not do it very well, but they can do it.

Talk with a seasoned and experienced painting professional and you will quickly discover there are many techniques and special materials that professionals use on a daily basis to create satin smooth walls and gorgeous wood trim that radiates all of the natural warmth that Mother Nature intended for it to have.

Using a light before painting

Great painters have a keen knowledge of light and what it does. Light rays radiate in a straight line from their source and can bounce off of reflective objects such as mirrors and high-gloss surfaces such as counter tops, glass and polished floors. Walls that look smooth as silk in daylight might begin to look like the surface of the moon at night when artificial light washes over a wall or a ceiling. Light rays striking walls and ceilings at a low angle highlight bumps and depressions in a wall.

Before you or your builder paints a wall or ceiling, use a hand-held lamp or light and place it close to the surface. The harsh light streaking nearly parallel across the surface should reveal each and every imperfection. Use a wide thin-bladed scraper to knock off any small nibs or particles that might be encapsulated in previous coats of paint or simply stuck to the surface. Use a fine pencil to gently circle any depressions or other imperfections. Once the inspection is complete, use spackling compound or other patching material to cure the defects.

Should you use a primer on new drywall?

New drywall or plaster, as well as repaired surfaces, need to be primed with a special primer-sealer paint. These products contain special resins that seal surfaces so the porosity is uniform. They also contain larger pigment particles that help to even out the texture of the surface. When you apply the second coat of finish paint, you truly end up with a uniform surface that shows up well under any light.


Do your walls need painting? Find the most professional painters by using my Interior Painting & Staining Checklist. I offer a 100% Money Back Guarantee.


If you are going to paint woodwork or walls with a semi or high-gloss paint, eliminating surface imperfections is even more critical. The gloss surfaces of the dried paint accentuate surface imperfections. This once again is a light issue as the light rays striking a glossy surface will reflect away in different directions when they hit imperfections. This is why dimples and door dings in automobile car door surfaces show up so easily.

How can you extend paint drying time?

Because the chemistry of many paints is different, they dry at different rates. Paints that dry or flash quickly, can create headaches as your eyes can see brush strokes or overlap marks left by even the best brushes and paint rollers. This problem can be minimized if the paint manufacturer allows you to add an extender liquid to the paint. These products retard the drying time allowing you to always maintain a wet edge unless you are working in a region with extremely low humidity.

It is important to realize that the variance in quality of wall and woodwork paints is as wide as mouth of the Mississippi River. Be aware that your builder's painting subcontractor might be applying a low-quality paint in an effort to save money or produce a more competitive bid. This may not be in your best interests as low-quality paints do not wear well, they are nearly impossible to clean and they may peel at a later date.

If at all possible, visit several paints stores and discover what the top product is in each paint line. Make a list of these paints and submit them to your builder when you are working together to determine the cost of your new home. Ask if one of the high-quality paints can be used on your job. Make sure the language in your contract clearly states which paint is to be used on all interior and exterior surfaces. As your home is painted, stop by frequently and make sure you see those paint cans open and being used.

Column NH044