Custom Moldings and Doors Make the House


custom woodwork with mill profile cutter blades

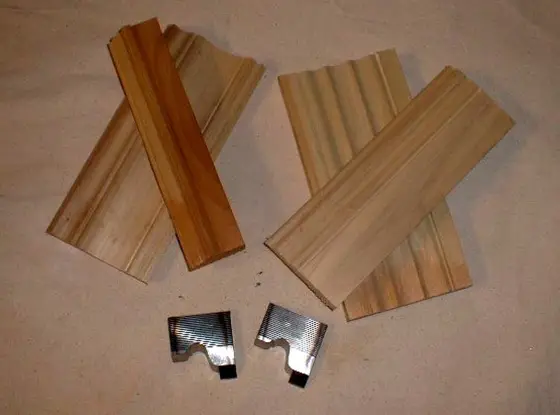
Custom Molding and Doors Make the House | You can get them and the price is so worth it. Those shiny pieces of steel are sharp knives that create the curvy profile on custom molding and trim.

Custom Molding - You Have No Idea How Important It Is

My guess is you've spent more than one or two weekends touring new model homes in various subdivisions. Many savvy builders hire professional interior designers to furnish the model homes so they sizzle more than a hamburger on a hot grill at a weekend picnic. But on move-in day at your new home, you walk into an antiseptic atmosphere as you look at bare painted walls and ceilings.

What makes a house into a custom home?

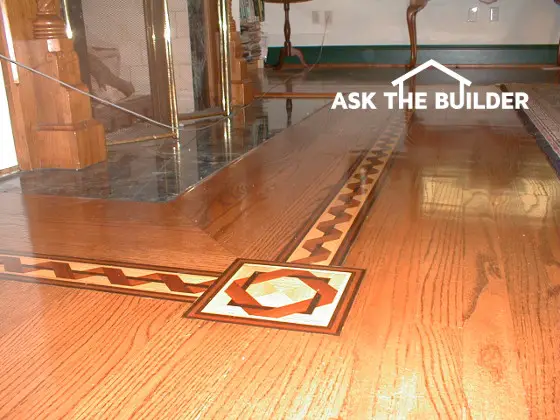
Custom molding and doors transform a plain-vanilla house into a custom home.

Stop and think for a moment. Have you ever been inside an older custom home - say one that is 100 or 125 years old? Aside from the tall ceilings, there usually were only two other things that made the interior of that house different from your new home.

The old house had smooth plaster walls and ceilings that look identical to your home's smooth drywall surfaces. The old home had hardwood floors just like your new home.

The only differences you can typically find are the woodwork and trim and the interior doors.

CLICK or TAP HERE to get FREE BIDS from local carpenters that can get you custom molding.

Do Carpenters Care About the Doors They Hang?

The finish carpenters who will work in your home don't care for the most part what type of doors they hang. Cutting a miter on a piece of trim to a large degree is the same no matter what the size and profile of the trim happens to be. You can make the inside of your home truly a custom home with a little bit of planning and some added cash. The end result will be dramatic and will put your friends' and neighbors' heads on a swivel when they tour your finished home.

Related Link

Real Custom Woodwork - It's All About Knives

Can you order special customer doors?

Did you know you can order custom solid poplar doors with solid poplar frames for nearly the same price as you might pay for a solid door at a lumber yard or home center. These poplar doors come in styles that you might have never seen before. Sure, you have seen 6 panel doors everywhere. You may have even seen some four panel doors at a particular model home. But have you ever seen a five panel door - one where the panels are turned sideways and stacked on top of one another? The look is very distinctive.

Tim, Where Did you Buy Your Custom Doors?

I purchased the custom doors for my last home from Brycon Wood Products in Canada. If you get yours from there, be sure to tell them "Hello!" and that you discovered them through me.

Can You Get Old Door Locksets?

The hardware for the doors can also add an extra touch. Solid brass hinges with traditional ball tops and bottoms to the hinge pins are readily available. If you want a more Victorian style these same hinges can be outfitted with pointed chimney tips on the ends of the hinge pins. Do you like locks that operate with old-fashioned skeleton keys? Your builder can install these full-mortise locksets. They add tremendous amounts of character to a new home.

kitchen pantry door close up

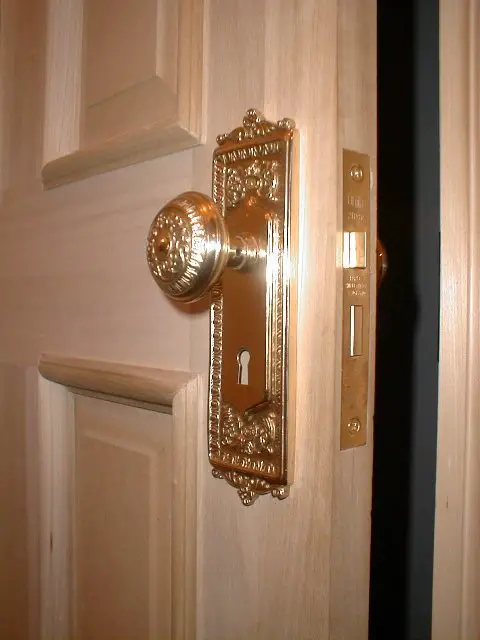
This is new hardware that looks like old. The latch is mortised into the door. You lock it with a skeleton key! CLICK or TAP HERE or the photo to order one.

How do you find custom wood trim?

You find custom molding and wood trim at a mill that makes them for you.

The wood moldings that frame doors and windows can be made from any wood species with any profile you can dream of. Forget about using those plain vanilla moldings that may be on the builder's selection chart. Visit one or two traditional lumber yards in your area and see what is really possible. In my city, one of these old lumber yards prides itself on the hundreds, yes I said hundreds, of different molding profiles it stocks. And if you don't see what you want, no problem, they will have your one-of-a-kind molding milled for you.

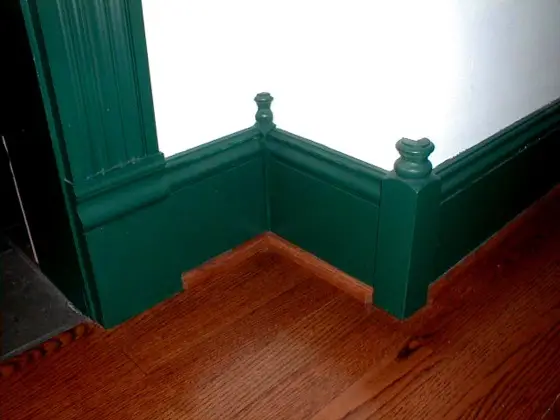
The moldings around windows and doors add depth and character. They allow you to make a statement that will stand the test of time. I liken custom wood moldings to mascara or lip gloss on a woman's face. These wonderful highlights can draw attention to things you might otherwise ignore.

Talk with your builder. Ask him what he thinks will work. Who knows where the discussion may lead. Depending upon his depth of experience you may end up with wainscoting, crown moldings, chair rails and cool decorative wall shelves. All of these subtle additions work together to set your new home well apart from the others in the cul-de-sac.

Column NH022

New Construction Inspections

Walk Through Inspection tools

New Construction Inspections

Just yesterday, I performed an inspection on a brand new home. A Realtor had called me on behalf of her client. Just two days before that a professional home inspector - not to be confused with the city or county building inspector - had looked at the home and suggested that they get a second opinion.

Once at the site, the buyer asked me to point out any and all defects in the brick as well as any other things on the exterior that caught my eye. Within the course of ten minutes, I discovered 15 defects and I had only looked at the front of the home and one side! The realtor and the buyer grew more and more despondent. The realtor saw a commission check dissolving into thin air and the buyer saw the house of his dreams crumble with each word I spoke.

Will an inspector catch all the construction defects?

Finally, in a distinct and angry voice the buyer said to me, "How can all of these defects get past the building inspector? How can builders get away with this type of sub-standard workmanship?" It took me twenty minutes to answer just those two questions. The buyer couldn't believe that there was soil that actually tilted back towards the home. He couldn't believe that the top of the foundation was covered with dirt and mulch in various locations. The lack of flashings under door and window sills and above them as well astounded the buyer.

The first thing I told the buyer was that not all builders build this way. In every city and town there are some dedicated people who treat building as a vocation and a craft. They take immense pride in their work and will not tolerate much less than perfection. I then discussed the economic pressures of building market homes. A builder that constructs twenty houses a year and discovers a way to shave $10,000 in expenses from each one takes $200K directly to the bottom line or his bank account. Never forget Glenn Frey's lyric from Smuggler's Blues, "The lure of easy money has a very strong appeal."

CLICK or TAP HERE to get FREE quotes from local inspection companies.

Does a building permit include on-site inspections?

I then started to discuss the plight of the average city or government building inspector. Although his department is paid a fee when you are issued a building permit, that fee should not be confused with an on-site inspection service where a government representative monitors the construction all day every day. That is unrealistic. If you want that level of service, the cost of the average home might balloon an extra $20,000. Many city or government building inspectors only visit the jobsite 3 or 4 times. There are separate inspectors for plumbing and electric work in certain cities, but not always.

How you make sure your new home is constructed properly?

So just how does the average consumer protect themselves? What can you do to get a new home that will stand the test of time? It is a somewhat complicated process, but it is indeed possible. The first thing you need to do is understand the rules before you throw a skin into the game. In my opinion, here are three of the most important rules of the new home building game:

Rule #1: The Building Code, although a fine document, is a set of MINIMUM standards. A house that just passes code is like a child who comes home with a 70 percent grade on a test.

Rule #2: Great builders are often well hidden. Rarely do they advertise. They don't need to as they almost always have a six-month backlog of work.

Rule #3: Well-constructed homes start with extremely detailed plans and specifications. The plans and specifications are the sole tools you use to communicate everything you want in your home. Never rely on verbal instructions of any type.

How do you find a great builder?

There are perhaps 25 - 50 rules in the game. The one about finding the great builder is simple. If you want a pro, go to where they buy their materials. You might discover a traditional full-service lumber company in your city or town. Stop by there on a weekday around 10:00 a.m. Ask to speak with the general manager or the person who does material take-offs from plans that builders bring to the lumber company.

These two people know the builders who only construct 3 or 4 homes a year. They know the builders who take enormous pride in their work. You can also contact two or three residential architects. These professionals also know the top builders as they need them to build the houses the architects draw. Put on your Columbo trench coat and invest the time to find the pro who's next masterpiece will be your new home.

Column NH021

Building Lot Size – It’s All About Zoning

survey map

Building Lot Size | This is a typical plot plan survey document. You can see the property lines surrounding this building lot size. The pins at all the corners and bends as well as the distances along the property lines are shown by the black dots with the circles around them.  The circles with the black and white targets are test pits dug for septic systems. You can see the symbols as well for marshy lowlands. BEWARE of lots with wetlands! Don't even look at a lot unless you have this in your hands and you can read all the print on the document. Copyright 2020 Tim Carter

Building Lot Size - It's All About Zoning

All too often I discover people focusing their attention on the sticks and bricks of their new home. It makes all the sense in the world to do this. After all, you are going to live in the house and want it to be as perfect as possible. But the land or lot upon which the house will be built is far more important than you might think.

Why is Compass Direction Important?

Compass direction is important because you want to orient your home so it benefits from solar heating and light in the winter months. You also might want to make sure your rear deck is in the shade if you sit out on it in the afternoon. Or, you may want to broil like a lobster in the hot part of the day so you want to be in direct sunlight. Everyone has different desires.

If you build a wonderful home on a poorly situated lot, you may have all sorts of misery down the road. Paint a room the wrong color and that can be changed in an afternoon. But what can you really do to stop acres of water that cascade from ground upslope from your lot? How easy is it to adjust where the sun rises and sets? Actually you can control these things by making important observations when looking for a building lot.

What are the Most Important Things When Picking a Building Lot?

Drainage, compass orientation, trees, location of public utilities, etc. are all very important things to look at when you start to shop for a building lot. Ask anyone who suffers sitting on a west-facing deck and they will tell you they made a mistake. How many people do you know who have swamps in their backyard after every rainfall? Imagine your surprise when a large track hoe shows up in your side yard one year to replace a broken subdivision sewer line? It can and does happen every week somewhere in the USA.

Should you avoid a lot in a valley?

Think twice before you buy a lot in a low spot or valley in the subdivision. There is a good chance the storm and sanitary sewers run in or near the natural low spots of the subdivision. Storms can and do cause backups into these systems. If you are on high ground, you can avoid flooding nightmares.

Use a compass to help select your lot.

hiking compass

This is a great compass to have while looking at lots. As of 2020, it was priced at $16.99. CLICK or TAP HERE or  THE PHOTO now to have it delivered to your home.

If you have an inexpensive compass with you as you scout lots, use it to determine which direction your house will face. Perhaps you want to have morning sun stream into a breakfast area or adjacent sitting room. Perhaps you want to avoid harsh afternoon sun from baking your family room, patio or deck. But on the other hand if you intend to have a swimming pool, you may want afternoon sun to bath the pool area so you can work on that tan all day long. Use the compass to insure you will buy a lot that will work best for your lifestyle.

Consider prevailing wind direction in your lot selection.

Prevailing wind direction may also come into play. You may want to orient your home so the side that has the fewest windows and doors faces north. Even the best windows and doors leak some air so maximize your indoor comfort by orienting your house so these cold blasts do not blow your money into the account of the local utility company.

The prevailing winds in summer months may be different and these can bring vicious sheets of rain that will try to infiltrate any crack or crevice. But on the other hand these same summer winds may be a delight if they blow directly through your screened-in porch. Simply be aware that prevailing winds can and do exist and they can offer both misery and delight.

vinyl siding on new construction

The front of this house faces west. The left side is the garage and faces north. This is the perfect orientation for a house on Mt. Desert Island in Maine because you want minimal exposure to harsh north winds in the winter.  Copyright 2020 Tim Carter

Make sure your house plan works on the lot.

Be careful not to fall in love with a certain house plan before you purchase your lot. Some plans work much better than others on certain lots. If you desire a walkout basement for example, then you need a lot that provides enough fall to make it possible. But a lot with too much fall has you falling off a cliff when you walk through the basement sliding glass door.

Don't try to estimate the slope with your eye. Be sure to consult with the builder and architect and make sure they use a transit or some other instrument to calculate the actual slope where your house will sit.

Finally be sure to investigate all local zoning and subdivision rules and regulations. Certain possessions you own may not be permitted to be stored on your new lot. You may not even be allowed to build an outdoor storage shed. Fences may not even be allowed; if fences are allowed, their height and style may be severely restricted. Spend lots of time studying your lot. It will pay huge dividends.

Column NH020

Select Proper Material for Quiet Plumbing

Cast iron pipe & fittings

Select Proper Material for Quiet Plumbing

If you grew up in an older home, you may not realize that plumbing piping can be quite noisy. I am talking both drain lines as well as water supply lines. Plumbing system noise flies so low that it easily sneaks under the radar screen during the planning and design phase of a new home. The first time noise is detected, often immediately after moving in, it is too late to initiate an easy fix. If you want quiet plumbing, you need to solve the problem as the pipes are being installed.

Why do older homes have quieter plumbing?

One reason why older homes seem to have quieter plumbing is simply the way in which the homes were built. Thick plaster walls are much denser than a one-half inch thick layer of drywall. You don't have to switch from drywall to plaster to have whisper-quiet water and drain lines. The solution is to look at the different material selections for both water supply piping and drain lines.

Let's talk about drain lines first. My guess is that your builder and his plumber are going to use common plastic drain lines inside your new home. I have no trouble with this material so long as it is only used for 50 percent of the plumbing drain line system that is exposed above the concrete basement or slab floor.

What are the components of a residential plumbing drainage system?

There are two halves to a residential plumbing drainage system. One half of the drain piping carries water to the sewage system and the other half supplies air from the roof into the actual drain lines. Each time you flush a toilet or run water in a sink, the water that flows down the pipes pushes air in front of it. This air needs to be replaced or otherwise dangerous vacuums can be created within the piping system. Gurgling water within fixtures is a telltale sign that vacuums are present. These temporary vacuums can suck water from nearby fixture traps as they try to find the needed replacement air. Dry fixture traps allow sewer gas and possibly vermin to enter your home. No one wants this in a brand-new home.

Why is cast iron piping quieter?

If your plumber uses new easy-to-work-with cast iron piping for the one-half of the system that only carries water, you will rarely hear any water flowing across ceilings or cascading down walls. Cast iron piping is denser than plastic and the water that crashes and tumbles down the piping on its way to the sewer has a tough time vibrating dense cast iron. Keep in mind, that sound or noise is produced when something vibrates. You will pay perhaps $200 more per bathroom for this noise-free material, but it is well worth it.

CLICK or TAP HERE to get FREE quotes from local plumbing companies who can help with your plumbing issues.

Water supply piping can also be very noisy. High localized water pressures combined with thin and undersized piping materials are often the cause of whistling and rushing water as faucets and fixtures are used. Faucets themselves can be noisy and they are much harder, if not impossible, to fix. But the water supply piping in your new home is an element that your plumber and builder can control.

What size copper tubing be used for water supply lines?

Many typical residential homes use copper water supply lines. The copper tubing not only comes in different diameters but it also comes in different thicknesses. You want to super size both to insure that you or someone else can continue to sleep while others in the house get up and get ready for the day ahead. How many times have you been escorted out of dreamland by that annoying sound of water running through water pipes? Perhaps many if you live in a typical new home.

What copper tubing has thicker walls?

Be sure your plumber uses type L copper tubing. Most plumbers will use type M copper for water supply lines. The L grade is slightly more expensive but its thicker pipe walls help to dampen vibrations that lead to noise. Larger pipe diameters also are highly effective at stopping noise. If the water pressure in two piping systems is identical, the system that has the larger pipe diameters will be quieter.

Each faucet or valve in your home has a given flow rate when it is fully open. Large diameter pipes can deliver the necessary water to satisfy the flow rate but they do so with lower velocity. Slower moving water within water lines means less turbulence. The turbulence of the water as is rushes through a pipe is what causes the vibrations that lead to sound and noise.

The primary incoming water supply line should be one inch in diameter. Keep it this size until it goes past the water heater and up to the first major bathroom group. All other water supply lines should be 3/4 inch in diameter as they snake through the house delivering water to different fixtures. Your plumber can use one half inch diameter pipe off of the 3/4 inch lines as he delivers water to each individual faucet or fixture. Do not use a one-half inch diameter line to serve more than one fixture if you want whisper-quiet water supply lines.

Column NH019

Settlement Cracks or Shrinkage

cracked concrete slab

Settlement Cracks or Not? | This nasty wide crack in a basement concrete slab is not a settlement crack. It's a shrinkage crack.

Settlement Cracks - Very Rarely is it Settlement

I can't tell you how many thousands of times I have heard a new homeowner complain about settlement cracks. They seem to think the cracks that often develop early in the life of a new home occur because the entire house is sinking into the ground.

In certain cases, this absolutely can happen. Several years ago, I testified as an expert witness in a legal proceeding where a house had been built over uncompacted fill dirt that was placed over trees and other organic debris. The cracks that were tearing the house into several parts were indeed settlement cracks.

What is a shrinkage crack?

But 99 times out of 100, the cracks that you might see in a foundation wall, a concrete slab or in floors, walls, ceilings, ceramic tile grout, etc. are shrinkage cracks. Water is an ingredient of many building materials. It can be a natural ingredient as in the case of wood, or it can be added in the manufacturing process much like milk is added to a powder when making pancake batter. When this water evaporates from the material, the loss in volume can create a tension or tearing force within the building material.

CLICK or TAP HERE to get FREE BIDS from local handymen that can patch concrete shrinkage cracks.

How do you prevent settlement cracks?

To prevent real settlement cracks in your new home, you need to be somewhat proactive. In almost all areas of the nation, building inspectors are responsible for doing a visual inspection of the soil just before the foundation footer is poured. A trained inspector can often see or smell soil that may not be strong enough to support the weight of the new home.

But in the case I testified in, the fill soil brought into the building site looked fine. It appeared to be compacted sufficiently. But underneath the thin layer of good-looking soil trouble was lurking. Building inspectors are not expected to do extensive laboratory soil testing. They, as well as you, can request it if the soil seems suspect.

How Do You Repair Concrete Cracks?

CLICK or TAP HERE to discover the best product to use to repair concrete cracks. I use it all the time.

What can a topographic map tell me?

Before you buy a lot, ask to see the before and after topographic maps of the subdivision. If you study these maps you can see if the lot you are thinking of buying is one that contains fill dirt or one where dirt was removed to fill in an adjacent lot or two. Buying a lot that contains no fill dirt is the first step to prevent settlement cracks. It is no guarantee, but at least you remove poorly compacted fill dirt from the equation.

geology topo map

This is a topographic map and a geology map all in one. You can also get soil maps. Watch that video just below. Each color on the map represents a different rock formation.

Your local county agricultural agent may also have a free soil map for the asking. These invaluable tools often classify countless soil characteristics. One of them happens to be average strength. The soil map legend will help you identify weak soils and ones that are well suited to build upon. You do not have to have a degree in geology to understand these maps. They are frequently very user-friendly.

What is a foundation footing?

Once you are sure you are building upon a satisfactory soil, you need to make sure the footing and foundation will not budge under the weight of the home. The footing is perhaps the most fundamental aspect of a home foundation. It's a structural element not much different than a beam or a column. The footing is that part of a house or building that contacts the ground. Everything is built up from a footing.

What Does a Footing Do?

A footing's job is disperse the weight of the entire structure over a wide area. It's no different than the hard rubber pads you place under sofa or piano legs to minimize the imprint they might otherwise make on a hardwood or carpeted floor. If you simply poured a narrow foundation wall on most soils without the support of a footing, the foundation wall would sink into the soil like a jungle explorer in quicksand.

Is Footing Design Critical?

Footing design is critical. Local building codes may state a minimum width and thickness, but more is obviously better. A ten-inch-thick footer that is 24 or 28 inches wide is superb in most cases.

Should Reinforcing Steel Be in Footings?

The footing must contain a minimum of two continuous steel rods that are surrounded by the wet concrete.

Reinforcing Steel in Footings

This is typical reinforcing steel in a footing. It will be raised up before the concrete truck arrives.

I prefer to use bars that are at least 5/8 inch in diameter, although 1/2-inch rods suffice. The steel should be placed in the lower third of the footing. If the footing is 10-inches thick, then be sure there are 3 inches of concrete UNDER the steel rods.

Keep in mind that the concrete used to pour the footing is available in different strengths. It costs just a little bit more money to add strength. Specify 3,000 pounds per square inch(psi) at a bare minimum. If you can afford 3,500 psi concrete for the footing, order or specify it.

How thick should the foundation walls be?

Poured or cast-concrete foundation walls should be at least 8-inches thick and some taller longer walls should be no less than 10-inches thick.

Your foundation walls act as giant beams when they are placed on the footer. If you are planning for a full basement, they also do double duty as retaining walls. To prevent cracks, be sure you use similar strength concrete as in the footers. The foundation walls must also get thicker as the walls get taller. Eight inch thick walls are fine where they may only have 5 or 6 feet of fill dirt up against them, but if you have more, I would specify a ten inch thick wall.

Is Steel Reinforcing Important in Foundation Walls?

Steel reinforcing is also important in foundation walls. Typically, a builder might place two rows of steel in the lower and upper portion of the wall. If you want bulletproof concrete walls that will stand the test of time, give serious consideration to extra horizontal steel as well as vertical steel bars that lock into the footer and continue up into the top of the foundation wall. Vertical steel bars help prevent horizontal cracks in the foundation walls.

Is it possible to help prevent foundation cracks once the house is built?

Yes. You can prevent foundation cracks by keeping the clay soil damp all year. You can install simple vertical watering holes to deep water the soil using a hand auger and filling the holes with rounded pea gravel.

Watch this video.

Column NH017

Solid Masonry Construction – Standard in Old Homes

brick and rock house

Solid Masonry Construction | Here’s a very unique and tasteful use of brick and rock on the exterior of a house. The tips below are SO GOOD that I shared this column with the 31,000 subscribers who got my December 2, 2020 FREE newsletter. Photo Credit: Tim Carter

Solid Masonry Construction - The Way It Was Done in 1900

Solid masonry construction was the standard way to build in the late 1800s and early 1900s. Brick homes were more substantial and frame homes were considered maintenance nightmares because they had to be painted.

Just today, I was asked a question by John and Terry from Chicago. They're building a unique new home that blends old building methods with modern techniques.

Although the exterior of the home is brick, what is behind the brick facade in different places might surprise you. Their new home is a blend of solid masonry construction and brick veneer. John and Terry, though, wanted to know if they are making a mistake with respect to the solid masonry aspect of the construction.

What is solid masonry construction?

Solid masonry construction in the residential marketplace is, in many regions, a disappearing building technique. Fifty years ago, it was a very common practice to have exterior walls that were either solid concrete block or a combination of four inch thick concrete block that had an exterior face of split stone, brick or even stucco. This method of construction was a holdover from 80 to 100 years ago when many brick buildings were built two or three wythes or thicknesses of brick.

Was Plaster Applied Directly to the Brick?

The interior plaster was often applied directly to the masonry walls in old homes and buildings. Fifty years ago, it was common for carpenters to nail furring strips to the masonry. Drywall or plaster was then attached to the wood strips.

The 8-inch, or greater, thickness of the walls was necessary to support the structure and roof above. Carpenters were part of the building team and often worked side by side with the masons so floor joists could be fit into the structure as it was being built.

Is solid masonry a good insulator against winter cold?

Solid masonry is a bad insulator against cold. Modern building methods allow contractors to insert thick closed-cell foam inside solid masonry to help conserve energy.

But solid masonry was popular when heating fuels were cheap and before air conditioning was in widespread use. Solid masonry is a poor insulator and anyone who lives in an older solid masonry building will readily tell you how cold the exterior walls can get in the dead of winter.

Is Masonry More Expensive Than Wood Frame?

Building a traditional masonry wall is often more costly than building a wood framed wall system. It often takes more time to build a masonry wall than to do the same thing with wood studs. If you compare traditional wood framed walls to traditional solid masonry walls both of the same finished thickness, you will readily discover a wood framed wall offers more insulation.

As construction practices begin to shift, so do the products used in the systems. Brick and concrete block have remained fairly consistent over time, but other building materials have changed radically. For example, standardized windows and doors have, for the most part, transitioned to a wood framed wall standard. The common extension jambs for both windows and doors favor a wall framed with 2x4s or one with 2x6s. You can get windows and doors for solid masonry construction, but the jambs and installation details will be different than if your builder was working with wood walls.

How can solid masonry walls be insulated?

Solid masonry walls can indeed be insulated. There are any number of ways to achieve high insulating values. The outer layer of masonry can be separated from the inner layer by a 2.5 inch space where two-inch thick closed cell foam sheets can be installed.

This foam, when combined with additional insulation on the inside of the wall, can create a very energy-efficient structure. But keep in mind that the cost to achieve this system will undoubtedly be higher than stuffing a 2x4 or 2x6 wall stud cavity with fiberglass, cellulose or even spray-foam insulation. You can also rapidly nail one-half inch thick closed cell foam to the exterior wood frame walls to add even more insulation to this wall system.

The bottom line is simply that the widespread use of solid masonry construction had its day in the sun. It still works well in parts of the USA where weather is moderate and solid masonry is favored for all sorts of reasons. For example, wood-consuming termites are so ferocious in the South and Southeast that solid masonry is one of the only acceptable building materials. Unrelenting summer heat in the Southwest makes solid masonry a darling because it mimics the adobe structures native Americans lived in to stay cool. But for many of us, wood framing has become the standard.

Will Solid Masonry Stand the Test of Time?

Solid masonry will stand the test of time as evidenced by many buildings that are well over one hundred years old. But building a home this way may set you back more money than you care to spend to build this type of legacy. Unfortunately, as with many things, the decision is controlled by money. If you have the money for solid masonry and wish to spend it, then do so with my blessing!

Column NH016

Negligent and Arrogant Builders

What happens when a builder makes a mistake?

A frustrated homeowner from Indiana recently wrote to me asking for help. After reading his letter, I felt you might find yourself in a similar situation when building your new home. It turns out the Indiana man had a builder who didn't install the right vents in an exterior wall of the home. When the mistake was brought to the attention of the builder by the homeowner, the builder simply shrugged it off and said no one will notice and the substitute vents will work just as well as the ones that should have been installed.

Will suing a contractor work in all cases?

The trouble is the someone who did notice happened to be the same person who pays the bills. The story continued to unfold with the builder refusing to rectify the mistake. The homeowner proceeded to talk with his attorney to find out if legal pressure could be used to have the right vents installed. The legal advice was a bitter tasting pill: The cost of litigating the matter was ten to twenty times the cost of the repair. To make matters worse, there was no guarantee that a legal solution would be 100 percent favorable to the homeowner.

Watch some more of my videos on Finding the Best Contractor. Just click or tap here.

At first blush, this might scare the beejeebers out of you causing you to back out of the new home market. The thought of dealing with an autocratic builder who shrugs off mistakes is most disconcerting. In reality, it would be a nightmare to deal with. The good news is you don't have to deal with people like this and you can insert several provisions in your contract with your builder that give you an option or two in the event your builder makes a mistake he wishes to walk away from.

Should you get a detailed cost estimate of the project?

The first thing you must do is request a highly detailed cost estimate with your bid from each builder. This breakdown might easily contain 150 line items, perhaps more. It is vitally important that the detailed cost breakdown becomes an addendum to the contract between you and the builder. This detailed pricing allows you to attach costs to different aspects of your job and can help initiate discussions as to how much things might cost if they need to be redone. More importantly, the line items allow you to make sure you only pay a given amount for work that is complete and totally satisfactory.


How would you like me to build your new home? It's probably impossible for me to fit your job into my schedule, but I will gladly share hundreds of my tricks and building secrets with you and your builder. Check out my New House Specifications.


How do you protect yourself in the contract?

Your contract needs to contain language that allows you to withhold money for work that is not complete and/or work that does not pass inspection and/or work that simply is wrong or poorly done. The contract should contain language that also gives the builder a specific time to begin the repair work. If the contractor walks off the job or drags his feet with respect to initiating the repair, the contract should contain language that permits you to obtain quotes from other builders or tradespeople who will step in and take care of the problem. The cost of the repair is paid for by you but deducted from the amount you owe the original builder.

All of these clauses need to be written by a competent attorney who deals in contract law in the state where your home is being built. You must also talk with the building department before you sign the contract. The local building ordinances may create a sticky situation with respect to who is responsible for work being done on your new home. If your initial builder takes out the building permit and ignores you, find out if there is a way to transfer the building permit to you or a second builder who may have to take over the job. No doubt this will be unpleasant, but failure to look into this probability may cause an enormous headache and legal problem if your initial builder holds hostage the building permit and your final Certificate of Occupancy.

Perhaps the best advice is to find a builder who doesn't treat you like a castoff. I can't emphasize how important it is to actually talk with three or more of the builder's past customers. Ask about disputes. Drill down and find out why they happened and how they were resolved. Ask if the builder ran towards the problem or ran away. You want to hire a builder that sprints to the solution of each and every problem.

Column NH015

Foundation Tricks for Waterproof Homes

stepped foundation wall

Here's a foundation footing that's making a transition from one level to another. It's poured continuously for extra strength. Photo Credit: Tim Carter

If you are a curious sort of person, you might explore construction sites from time to time. I used to do this as often as possible, when I first jumped into the building trade. I loved to see how things were being built. It usually didn't take long to see trends or methods from one jobsite to another that were similar. The same is true today. The only problem is what you see is not necessarily always the best way to proceed with a given task.

Should the top of a poured foundation wall be flat?

Let's talk about a simple detail of new home construction that your builder may do on your new home. I am talking about the mundane top of your poured concrete foundation. Inspect an average residential concrete foundation that is either eight or ten inches thick and the top of that foundation will almost always be totally flat. You may think this is a good thing as who would want one that might be sloped or some other odd shape?

If your new home is one covered with vinyl, wood or some other siding product, I would agree with you. Flat foundations are a good thing. The reason for this is fairly straightforward if you stop back at the jobsite a day or two after the rough carpenters have started to frame your home.

Should the first floor exterior wall be flush with the outside face of the foundation?

Look at how the wood subfloor system connects to the poured concrete foundation. You should quickly notice that the wood subfloor and/or the first floor exterior wall surfaces are flush with the outside face of the concrete foundation. This construction detail is done on purpose so the finished exterior siding that is nailed to the wood walls can lap over the poured concrete one and one half inches or more.

This overlap creates an excellent watertight barrier as rainwater streams down the exterior siding. Without the overlap, capillary attraction can cause the streaming water to cling to the underside of the siding and subsequently find its way to the top of the foundation. If this happens, the water can find its way into your home.

Is a flat foundation a good choice for a brick or stone wall?

But if you are building a home that has a brick, stone or some other facade that needs the support of the foundation, a perfectly flat foundation may not be a wise choice. Masonry materials such as brick, and stone can and do allow water into the wall system. This has been a known fact by the construction industry for years. High quality builders use a series of flashings and water barriers to collect this water and redirect it to the exterior of the structure. But since Mother Nature's gravity force pulls water down, a simple and clever foundation design can be implemented that makes it very difficult for this water to penetrate inside your home.

concrete foundation forms

Note the metal cross straps that hold the vertical forms in place against the pressure of the wet concrete. Copyright 2018 Tim Carter


Prevent a wet basements by using this Basement Waterproofing Checklist to hire a great professional. I offer a 100% Money Back Guarantee.


The subcontractor that pours the concrete foundation can insert a simple box inside the forms before the concrete is poured. This box can be six, eight or even ten inches high and just four inches deep. The top of the box is set so it is level with the top of the foundation. The box is attached to the concrete form that faces the outside of your home.

After the concrete pour is complete and the subcontractor strips off the forms, you discover that the box created a step or ledge in the top of the foundation. Instead of the first course of brick or stone starting at the same level as the wood floor and wall system, it actually starts below the top of the foundation. The top of this ledge is lower than the rest of the foundation.

It should be obvious why this ledge helps your brick or stone home. Any water that flows behind the brick flows down to the top of this ledge. For water to back up and run over the top of the foundation into your home, it will have to rise to the full height of the ledge. This is very unlikely if the builder and masonry subcontractor have inserted all of the necessary flashings, water membranes and water weep holes.

The foundation subcontractor will charge a little more money to produce this ledge, but it provides years of peace of mind. Be sure to ask your potential builder all about brick and stone ledges. If he says, "Huhhhh?", it might be time to continue your hunt for a more knowledgeable builder.

Column NH014

Ceramic Tile Tips


subway tile in tub shower

Ceramic tile tips are like candy at Halloween. Your job is to only consume good ones as you'll discover below.

Ceramic Tile Tips - Be Sure You Get Expert Ones

You're here because you either haven't installed tile before or you tried and it didn't go so well. Hah! I remember my first ceramic tile experiment. That's what I called it!

Ceramic wall tile seems to find its way into many new homes. There are many reasons why this building product maintains its popularity. It's beautiful, it's durable and it often becomes the centerpiece of a room with respect to interior decor. Choose wisely and the ceramic surfaces will garner countless compliments from all who visit your home.

What is Ceramic Tile?

Ceramic tile is clay that's been chemically transformed by high temperatures in a kiln. Before firing, the clay is soft and pliable. The high temperatures of the kiln change the mineralogy of the clay transforming the soft putty material to hard stone. It's very similar to what happens with concrete, although concrete doesn't need to be put into a kiln no get hard.

Ceramic tile is simply pottery. It is a clay product that is fired in a kiln. The extreme heat in the kiln changes the crystal structure of the clay making it very hard and brittle.

CLICK or TAP HERE to get FREE BIDS from local tile installers. I'm talking really good ones.

How Does Tile Get the Shiny Finish?

Prior to entering the kiln, the clay surfaces are painted with a glaze. The heat of the kiln transforms the glaze into an ultra-thin layer of glass.

Most glazes are harder than steel which is why you can't scratch the surface of most ceramic tile with an ordinary knife and fork.

How Can I Avoid Cracked Tile?

You avoid cracked tile by making sure there are never any hollow spots under a tile. You also need to make sure the floor under the tile is rigid and will not flex. You can install tile on wood floors, but the wood must be very thick.

The hard tiles have tremendous strength when you squeeze them between your fingers. But if you bend the tiles subjecting them to tension or stretching forces, the tiles crack readily. Tension forces within a new house are commonplace. The lumber used to build new homes is usually fairly dry and stable when it is delivered to the jobsite. But rain, humidity and water liberated from other building materials such as drywall compound, paint, etc. can cause lumber to swell.

Will Tile Shrink If Installed on Wet Lumber?

If your tile subcontractor installs ceramic tile on lumber that has gorged itself on this diet of water vapor, the tile can start to crack as the lumber shrinks. This shrinking happens over time after you move in to your new home. In fact, these cracks that appear in walls, ceilings, tile and tile grout are often called settlement cracks when in fact they are almost always shrinkage cracks.


If you're putting ceramic tile in your new home, check out my Ceramic Tile Installation Checklist to learn exactly what you should know about the process. Avoid making costly mistakes with the help of this document. I offer a 100% Money Back Guarantee.


Can You Prevent Cracks in Tile?

You can prevent some cracking but it is very difficult to stop all cracks. In a perfect world, a builder could stop construction after the house was framed and had a roof on it. The lumber could then dry out. But this is not realistic. The cost of money and the ever-present deadlines put pressure on builders to build faster not slower.

How Can I Make a Wall Flat For Tile?

You can make a wall flat by using light-gauge steel studs. You can also use normal wood framing, but be sure the 2x material is cut from the center of the tree. Look at this photo for an example:

straight stud old lumber - new lumber growth rings

The piece of lumber on the top was harvested from the forest in 2013. Note how you can see it was cut from the center of the tree. You can see the sapling center ring. The one on the bottom was taken from the slopes of the Rocky Mountains just after the end of the Civil War or War of Northern Aggression. Photo Credit: Tim Carter

In critical areas, it's possible to take wood framing out of the equation. A builder can frame wall with steel studs or special engineered lumber that resists swelling and the wicked twisting and warping that can happen when ordinary lumber dries out. Using these special materials also helps to produce perfectly flat wall surfaces that tile subcontractors crave. Perfectly smooth wall surfaces make for ideal finished walls. The reason is simple: Highly glazed tiles reflect all light. If one tile is bent a slightly different angle than the one next to it, it stands out like a sore thumb.

What is the Best Wall Material Under Tile?

The best material to install tile over is one that's strong and waterproof. Cement board or other waterproof smooth products are excellent.

It's also vitally important that the tile be installed on a substrate that will indeed stand the test of time. Many years ago tile subcontractors installed their tile directly on concrete mortar. This labor-intensive process has been simplified as your builder and tile subcontractor can readily buy sheets of one-half-inch thick concrete. Using special galvanized screws, they attach this flat substrate to the wall studs. The thin sheets of concrete board are strong, durable, and waterproof.

How Do You Avoid Cracked Grout?

To avoid cracks in grout it is very important that the tile subcontractor mix the grout properly. It should not be too wet. The grout, when mixed, should resemble thick but creamy icing. Watch this informative series of videos showing how to install floor grout.

Once the grout is troweled over the tile, the excess needs to be removed. If the contractor uses a sponge that has too much water, this excess water can soak into the wet grout and weaken it. Within a short amount of time, the grout can crack and sometimes fall out.

Want more Ceramic Wall Tile Tips - click here.

Column NH013

Custom Woodwork – It’s Affordable

custom woodwork for base boards

How to Make Custom Baseboard |This is all custom baseboard and woodwork. Look at the fancy inside and outside corner pieces.

How to Make Custom Baseboard - You Just Need a Knife

Have you ever walked through a distinctive older home? Perhaps you grew up in one. Undoubtedly it had hardwood floors, smooth plaster walls, larger windows and a smooth plaster ceiling. It's my guess you have walked through new model homes that have all of these same amenities but something just isn't quite right. The new house just doesn't look like the old home. The difference is just skin deep. In almost all cases, the new home builder failed to mimic the woodwork that you see in those fine older homes.

Is custom woodwork affordable?

Custom woodwork is affordable if you run hundreds of feet of it. You have to spread out the setup fee and the cost of grinding the custom knife over lots of trim  for it to make sense.

Were you told by your builder or architect that you could get custom woodwork for your home? Or, as in many cases, were you told it is prohibitively expensive? In either case, you were quite possibly shortchanged. Not only can you copy the style and profiles found in older homes, but it can also be done with little or no pain to your pocketbook. Perhaps the most surprising thing is that you can actually draw your own pattern for any door or window casing, baseboard or toestripping.

How is custom woodwork made?

Door and window casings, baseboards and other wood moldings are created very easily. They start off as regular rectangular pieces of wood not much different than a stock 1 x 4 or 1 x 6. This wood is fed into a machine that has a high-speed rotating knife that cuts the profile into the stock piece of lumber. The knife has a special shape that is a mirror image of the finished profile you see on the finished wood trim. Creating a custom knife takes very little time and this tool can be used to cut thousands of linear feet of wood without being re-sharpened.

Why is the Woodwork at the Home Centers Cheap?

The woodwork at home centers is usually cheap because it's finger-jointed crap.

hardwood floor inlay farmcrest fireplace

How to Make Custom Baseboard | That green stripe on the wall is custom baseboard. This hardwood floor, with decorative inlay, is also customer work.  It was in my own home I built. The installer I hired used a straightedge and shingles to make the hardwood perfect. © 2020 Tim Carter

The cost issue is a moot point for the most part. Don't be fooled by many of the moldings you see at lumberyards or home centers. They may be imposters. Often these moldings are made from scrap lumber that has been joined together to make long pieces of trim. Some of these are even cover with a paper-thin layer of wood veneer to simulate a solid piece of wood. These moldings are often cheaper than custom solid-wood molding, but always keep in mind you are not comparing apples with apples.

Is the extra cost for custom woodwork worth it?

The cost per linear foot to create custom solid-wood trim is often just a little bit more than what you might pay for humdrum molding you see in all of the other houses in the sub-division. Keep in mind that the custom woodwork in a home makes an enormous statement. Think of it as the gleaming necklace or bracelet or earrings a woman wears. Women are beautiful without jewelry, but the accent jewelry produces simply enhances their beauty.

Why is Scale Important?

The scale of woodwork is also very important. If your new home will have 9 or even 10-foot ceilings, the trim must be larger than normal so that it looks good to the eye. A smaller trim with a dashing profile will appear skimpy in a room with tall ceilings.

If you or your architect is in doubt about how to achieve the proper size, don't experiment. The easy thing to do is to visit older homes and find one that has woodwork that looks and feels right. Get out your measuring tape and mark down the sizes. To visit older homes, pay attention to open houses hosted by Realtors in the older sections of your city.

Where Do You Find Custom Baseboard or Trim?

The wonderful custom woodwork in my own home was readily available. Just about every major city has several discreet woodworking mills and businesses that take rough lumber and turn it into things of beauty. Within moments of doing a search on the Internet using Woodwork or Custom Woodwork followed by your city. You should discover any number of local companies that can make any trim you need from just about any lumber species you desire.

How Can I Save Money Making Custom Baseboard and Trim?

If you intend to paint the woodwork in your new home, you can save substantial money by ordering your new woodwork as paint grade material. This type of lumber is very affordable as it often has slightly irregular grain coloration that detracts from the wood when stained. But since paint can mask these defects, it makes sense to use this lower grade for your home.

Should I Order Extra Baseboard and Casing?

Be sure you order extra trim for your home. Accidents can happen and you do not want to be 8 or 10 feet short when trimming out the last room of your home. Once you or your builder calculates the total linear footage required, be sure to take the time to see how the custom trim compares in pricing with the stock trims your might have chosen. You'll probably be shocked to learn it only costs several hundred dollars to get a personalized and unique look for your fabulous new home!

Column NH012