Adding Closet Storage Space

DEAR TIM: Several rooms in my house need closet space. The rooms are large enough such that carving out a corner will not greatly reduce the efficiency of the floor plan. What is involved in framing the closet? What is the optimal size for the closet? Do you think bi-pass or bi-fold doors work best? Is this a realistic project for a beginner? Kara F., Seymour, IN

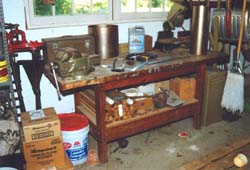
DEAR KARA: Constructing a closet in an existing room is a perfect project for a beginner. You need minimal tools and just about 15 to 20 hours of actual time to complete the job. Here is a list of some of the necessary tools you will need: circular saw, miter box and saw, plumb bob, framing square, hammer, drill, level, drywall finishing tools, painting tools, etc.

The overall size of the closet is up to you. If it will not be a walk-in closet, I would make the finished interior depth no more than two feet. This distance will accommodate any and all clothes that will be stored on hangers. The width of the closet is up to you. Try to plan the space in such a way that any leftover existing wall space will create a cozy alcove that will be perfect for a desk, chest of drawers, or window seat.

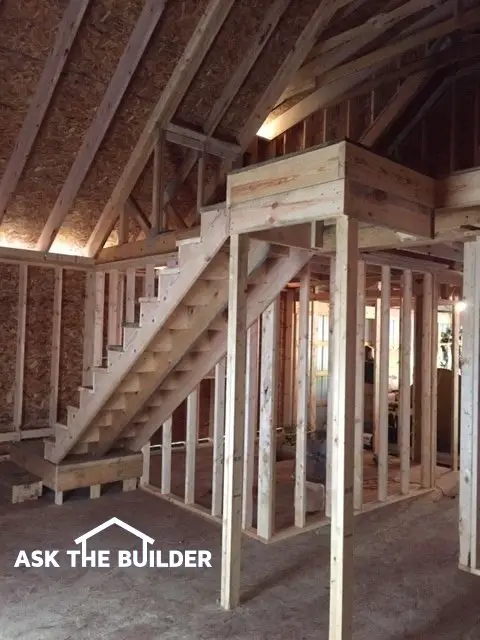
Before you begin to construct the closet walls you should decide whether or not you want the walls to extend to the ceiling. Some of the coolest closets I have built have walls that are just seven foot tall. These partial height walls allow you create an open platform on top of the closet for trophy display, models, stuffed animals, or just plain space for seasonal clothes that can be placed in colorful plastic storage boxes.

If you decide to build your closet with partial walls, you can frame the walls on the ground and simply tilt them into place. Make the closet door as wide as possible. This prevents problems trying to reach items in the far corners of the closet once it is completed. The rough opening for most closet doors is two inches wider and higher than the actual door size.

If your closet walls will extend to the existing ceiling you should install the bottom wall plates first. Align the long wall plate so that it is 24 and one half inches away from and parallel to the existing room wall. Install your sidewall(s) plate that forms the side(s) of the closet. Use a framing square to make sure the sidewall(s) returns to the back wall forming a 90 degree
angle.

Install the top wall plates next. You locate these by using the plumb bob. Drop it from the ceiling until the bob floats just above the outside surface of the bottom plates. Move the bob to several locations along the edges of the bottom plates so that you can create dots on the ceiling that represent the top plate locations.

Cut wall studs to length for the walls. You will need a stud at all corners and at 16 inch intervals until the new walls end at the existing walls. A wall stud needs to be at the end of each wall plate. Use your level to make sure the studs are plumb. Once you are certain the walls are sturdy, the rough opening for the door is correct, and the depth and width are accurate you can install and finish the drywall and trim lumber.

I prefer to use mirrored bi-fold doors for closets. These doors open to allow easy access to the contents of the closet. Most of these come with easy installation instructions. If you choose to use mirrored doors, you must purchase them before you begin the project. The installation instructions will outline the proper rough-in dimensions. Remember, it is impossible to trim a mirrored door!

Forget about using the old plank and pole method for closet storage. Look at the many open and solid panel storage systems that are available. These can be purchased to fit just about any sized closet and will maximize the amount of storage space you have created.

Related Articles: Closet Organizers, Shoe Storage, Two Closet Plans - Materials, Two Closet Plans - Build

Painted Floors

DEAR TIM: I know this sounds crazy but I want to paint my floor. It is an older linoleum floor in very good condition. Is it possible to paint this floor and have it look good for a number of years? Do I need special paint? What else do I need to accomplish this? My dad used to paint our outside porch floor with great results. Do you have any paint design ideas? Paula D., Ludington, MI

DEAR PAULA: Shucks, it isn't a crazy idea - it is a brilliant one! Painting floors is a very economical way to refresh the look of a room. It is one of the few flooring jobs that is do-it-yourself friendly. Painting linoleum is not a bad idea at all. In fact, you can paint just about any flooring material except for carpet. If you or a friend are artistically inclined, you will have a floor that is the talk of the neighborhood.

Painted floors are everywhere. If you watch basketball on television or go to school gymnasiums, you know exactly what I mean. Professional and school teams have their logos painted in the center of the court. The boundary lines are painted as well. You will often hear announcers mention a foul that happened, "in the paint." These floors are subject to immense abuse as the players use them during practice and for games. Since I doubt that you intend to play basketball inside your home, your painted floors will look superb for many years.!

Porch floor paints have been around for years. As you mentioned, they are very durable. When used outside, these paints are subject to much greater wear and tear than they would ever see inside a climate controlled home. Most, if not all, outdoor porch paints are oil based. You don't have to restrict yourself to porch floor paints, as any high gloss oil based paint will work as you create a masterpiece of a floor.

The second step to success - the one very few know about - is coating the paint with multiple coats of a non-yellowing urethane. The urethane protects the painted finish just as it protects the beautiful stains and natural wood grain of hardwood floors or the natural beauty of cork flooring. Without this all-important urethane coating, you would rapidly scuff and scar the beautiful painted surface.

The painting process starts as you would any paint job. Surface preparation is key. The floor must be free of wax and be completely cleaned with soap and water. Rinse the floor with clear water to remove all traces of soap and dirt. If the floor has any type of gloss, you should sand it with medium sandpaper. The sanding process produces more surface area and small grooves that maximize paint adhesion. Be sure to vacuum the sanding dust before you paint.

It is a good idea to use an oil based primer. Feel free to tint the primer if you decide to use darker colors. Apply the finish coat of paint as soon as the primer instructions allow you to do so.

Pollution laws have been passed that have changed the way oil paints are made. The laws restrict the amounts of volatile organic compounds. In the past, some oil paints would dry rapidly and you could urethane the next day. Because of the changes in paint chemistry, some deep colors like purple and green often require a minimum of 48 hours drying time. If you coat the fresh paint with urethane too quickly, the paint may remain soft. To insure a good bond between the freshly painted floor and the protective urethane, you need to let the paint harden (cure) and then lightly sand it with fine sandpaper. Do not use steel wool if you intend to use water based urethane. You could end up with minute rust flecks in your floor.

I think the coolest painted floors are the ones that have geometric designs in them or are stenciled. You can also introduce multiple colors by painting a border in the room. I have seen vines or floral patterns that flow from wallpaper onto hardwood floors. Want to have some fun? Let your kids paint the floor of their playroom. Supervise them closely so their enjoyment doesn't spread to the hallway!

Becky sent an email about painting her floors. CLICK HERE to read her email.

Deadbolt Locks – Electronic Locks

DEAR TIM: There have been some recent burglaries in my neighborhood. I talked with the police and they recommend that I have top quality deadbolt locks installed in my home. What should I know when I purchase deadbolt locks? Should a professional install these devices? Ben C., Sublimity, OR

DEAR BEN: Dead bolt locks are a good starting point in your efforts to protect your home and the possessions inside. I also suggest that you meet with your local police department's crime prevention officer. Perhaps they will do a safety audit on your home as a public service.

Deadbolt locks are separate from the locking mechanism found in most door knobs. A deadbolt is often activated by turning a separate knob or using a key. When you operate a deadbolt a solid steel latch - often one inch long - exits the edge of the door and passes into the door jamb. These locks - as you might expect - come in many different styles and levels of quality. Keep in mind that the best deadbolt lock will not stop a determined burglar, but will in almost all cases thwart an amateur.

For many years deadbolt locks didn't seem to keep pace with innovation. That has changed dramatically in recent years. You can get electronic keyless entry deadbolt locks, ones that contain motion detectors that illuminate the keyhole for dark locations, and ones that have a lifetime tarnish-free polished brass finish.

The keyless entry deadbolts are very slick and come in handy if you come home with armfuls of groceries or packages. They feature both audible and visual signals that tell you if the dead bolt is completely locked. The computer chip inside the lock can also be set to automatically lock the door after a child or forgetful mate leaves the house without locking the door. This deadbolt also is equipped with the latest rolling code technology. This means that shrewd burglars who try to grab the radio signal are wasting their time. The next time your deadbolt operates, it will randomly select a new entry code from 4 billion possibilities.

A simpler deadbolt that might interest you is one that guides your key into the slot with a soft light beam. The beam is created when you are within 5 feet of the lock. Once inside the lock has a small red indicator light that tells you whether or not the deadbolt has been locked.

You will need to decide whether you want to install single or double cylinder deadbolts. A single cylinder lock uses a key on the outside and a simple twist knob on the inside to operate the deadbolt feature. Double cylinder designs use a key on both sides of the door. A double cylinder lock might be mandatory if your door or door sidelights contain glass. Burglars routinely break the glass and then reach inside to operate the knob on a single cylinder deadbolt.

Keep in mind, though, that double cylinder deadbolts can prevent rapid exits from your home in the event of a fire or some other emergency. What's more, a double cylinder lock on an egress(exit) door is against code in many locations. Be sure to check with your building authorities before you go to the trouble of purchasing and installing one.

All too often people feel that if they install a high quality deadbolt they will be safe and secure. A swift kick of a door can cause the actual door to break or the door frame to split. In either case, the door can often be opened with the deadbolt lock still in the locked position.

If you want peace of mind and trouble free deadbolt locks, I suggest you have a professional install your new locks. This person can evaluate your existing doors and door frames. He/she will also make sure that high security strike plates, and heavy duty screws that attach to the rough lumber door frame are used to install your new deadbolt locks. Smooth as silk lock operation is no accident. A skilled or experienced lock installer is required if you want your deadbolt locks to open and close effortlessly.

Author's Notes:

January, 1999

I received several helpful e-mails after this column ran. One locksmith shared a great tip. He suggests that you consider installing the deadbolt lock about 60 inches off the floor. At this height it doesn't take the direct force of a kick delivered by an intruder.

Another person shared an experience with a poor quality deadbolt. It turns out that the lock was easily defeated by a group of neighborhood rookie burglars.

Finally, another person indicated that it really pays to take the time to align the strike plate so that the door is tight once the bolt is fully engaged. A sloppy fit allows an intruder to rattle the door.


A Sturdy but Simple Garage Workbench

DEAR TIM: I am tired of working on projects on my hands and knees in my garage. I really need a sturdy workbench. Surely you have one. Can I build a simple one in an afternoon? If so, what are the most useful dimensions and materials to use? Cathy B., Toledo, OH

DEAR CATHY: Garage and basement floors are not the best work surfaces by any means. There is no substitute for a solid workbench. I prefer to build them so they look and feel rough. That way you don't feel bad denting them with a hammer, nicking them with a saw, or by drilling a hole into them. This is exactly why I always put a small dent in my brand new vehicles. I get rid of that "new" feeling in a hurry! You can build a sturdy workbench, but I feel it will be a long afternoon.

You are looking at my garage workbench. It is so strong, I think it could possibly support 2,000 pounds or more. The shelf below helps make it very stable.

You are looking at my garage workbench. It is so strong, I think it could possibly support 2,000 pounds or more. The shelf below helps make it very stable.

My garage workbench measures 33 inches high, 29 inches deep, and 72 inches long. There is a modest three inch overhang on the front and back. The left and right overhang is 9 inches. The frame upon which the top sits is made from 2x4 leg stock and 2x4 top and bottom braces. Be sure to purchase 2x4s that are as straight as possible. Warped, bowed or twisted material will create problems during assembly. All wood pieces are connected using screws or bolts. Nails have a tendency to loosen over time.

You start building the workbench by building two identical 2x4 frames. These stabilize the legs of the workbench. Each frame has two 54 inch long 2x4 pieces and two 20 inch pieces. The 20 inch long pieces fit in between the 54 inch pieces so that the final outside dimensions of each frame are 54 inches long and 23 inches deep and three and one half inches high.

The workbench only needs 4 legs. You can use 2x4s or 4x4s, whichever you prefer. Each leg is 31 and one half inches long. The legs are attached to the inside corner of one of the frames. Lay a frame on your garage floor and assemble the legs so they stick up into the air. Use three inch long screws or one quarter inch lag bolts to attach the legs. Use a minimum of 4 screws or bolts at each corner - two to a side. Once all four legs are attached, lay the other assembled frame on the garage floor. Have someone help you lift the first frame with the legs attached. Rotate the legs 180 degrees and set the legs inside the second frame.

Slide the second frame up the legs 11 and one quarter inches. Attach this frame exactly as you did the first one to the legs. This frame keeps the legs from spreading and will also act as a handy shelf once you install a piece of 3/4 inch plywood on it. You will need to notch the corners of the plywood so they fit around the legs. It is an easy task and you can get accurate measurements once you have attached the frame to the legs. Your workbench base is now complete.

The top is simple to build. Begin with a piece of 3/4 inch plywood that measures 70 and one half inches long and 27 and one half inches wide. Center this on the workbench base and attach it using L brackets and temporary short screws.

The finishing touch of the workbench top is standard 3/4 inch thick tongue and groove hardwood flooring. Purchase #1 common flooring for economy. Cut the hardwood so it fits flush on all sides of the plywood. Use regular flooring nails to blind nail the hardwood through the tongues. Cut the tongues off the last four pieces to create a 2 inch wide trim band that is applied to the edges of the top. This band hides the plywood and the ends of the hardwood strips on each side edge. Glue and screw these band pieces to the hardwood for a nice fit and finish. Remove the temporary screws from the L brackets and replace them with one and one quarter inch long screws.

Author's Notes:

February, 1999

Wow, did I get mail as a result of this column. Everyone wanted the hard copy plans for the workbench. I also got some great letters from people who built the workbench. Here is one I felt you should see, as the writer included a great feature in his workbench you should know about. I'll let Ron tell you all about it,

"....I did four coats of polyurethane, with a full two days of drying between coats and a light sanding. It looks great.

One other thing that I did was to put a tape measure on the tabletop before coating it. I wanted to find one that was self sticking and was finally able to find it at a sewing/craft store.

On the front of the table, I put the tape measure from left to right and about 4 inches in. I ran one both directions. So that no matter which end of the table I'm working from, I have a correct tape. I also put a tape measure on the endcaps, once again before coating with urethane...."

Ron in North Carolina

Related Articles:  Materials List & Illustrations, Build Simple, Safe & Sturdy Workbench

Column 245

Hardwood Inlays

hardwood floor fancy inlay

Hardwood floor inlay located in the The Wiedemann Hill Mansion. PHOTO CREDIT: Roger R Henthorn

Hardwood Inlays

DEAR TIM: It is time to refinish our hardwood floors. Is there something I can have done that will enhance the look of the hardwood?

I have seen floors in old homes that mix different woods to create patterns, but I am sure this can only be done when the floor is installed. What are my options to make my hardwood floor come alive? Brad G., Shinnston, WV

DEAR BRAD: You bet there is something you can do to make your hardwood floor look vastly different than any in your neighborhood. You have several options. Some are very simple and somewhat inexpensive, while others are breathtaking and will set you back quite a few paychecks. In almost all cases, the work required to make the change will probably have to be performed by a professional.

AsktheBuilder Podcast

CLICK this image and listen to the first call on the podcast. I talked to Jill about how to repair wood kitchen flooring, and possibly installing an inlay border as an option. Copyright 2018 Tim Carter


Installing a new hardwood floor? Use my Hardwood Flooring Installation / Refinishing Checklist to avoid costly mistakes. I offer a 100% Money Back Guarantee.


hardwood inlay

Here is the inlay in my own family room. I wish you could stop by and see it in person. The look is simply magnificent.

The inlaid work you have seen in older homes is still available. The craft's roots penetrate deeply back to the Roman Empire. Precision cutting, shaping and assembly of different colored and grained wood veneers into scenes, images and designs was actually called marquetry. The craft nearly disappeared during the Dark Ages, but fortunately it survived into the Renaissance.

One hundred years ago, labor was inexpensive. Inlaid floors were somewhat common. As labor costs rose, this building art form was only an option for the wealthy. Modern computer aided machinery has now lowered the cost so that many people can incorporate inlaid features into new and existing hardwood floors.

Perhaps the most striking feature you can add to a room is an inlaid border. These products come in multiple designs that will suit any style home. What would you think of a dramatic inlaid compass or navigational medallion in the center of your entrance hall? How about a floral, pheasant or deer head inlaid pattern? Some companies will actually take a photograph or sketch from you and create your own personal inlaid pattern or scene!

The inlaid borders and medallions are made using splendid, unique lumbers. Your selection might include wenge, jatoba, Bolivian rosewood or purple heart. They can also contain cherry, walnut, quartersawn white oak and white ash. The combination of these wood species makes for a most dramatic appearance. If you are installing a new hardwood floor, you can actually install strips of one or more of these various woods to create an inexpensive border in a room.

hardwood inlay

This is just one example of how intricate wood inlays can be. The choices are as plentiful as hand-held signs at a political rally.

To minimize costs many of the inlaid products are commonly only 5/16ths of an inch thick. This is the usable thickness of the wood that is above the tongue in a standard 3/4 inch thick tongue and groove hardwood floor. If you want to add an inlaid border or medallion to an existing floor, the installer simply uses a precision router with a special bit and a template to create a perfect channel to accept the inlaid material. Strong glues are used to bond the inlaid product to the existing flooring. After the glue dries, the installer lightly sands the entire floor and coats it with multiple applications of clear urethane. New floor installations can use thicker inlaid products or install them the same as an existing floor.

If you can't afford or do not like the inlaid materials, you can try to stain selected pieces of your existing flooring a different color to create a pattern or border. If you sand and partially seal the floor before you stain, you can apply the stain across the grain of strip wood flooring without it bleeding or smearing. Creating a border or pattern in this manner is labor intensive and requires lots of hand-eye coordination. You may want to price out a simple inlaid product before you try to create your own.

My wife and I are having an inlaid border installed in our family room. We will use it to highlight the fireplace hearth. One pattern we like costs $20 per lineal foot installed and finished. Another one has a design that matches the rope twisting on our mantel and staircase newel post. Its installed price is $40 per foot. We are digging deeper into our savings to go with the rope twist border. My family will enjoy it. I hope the subsequent owners of our house will too.

Related Articles:  Hardwood Floor Inlays, Hardwood Inlay Manufacturers

This article was the Mystery Link in the May 31, 2015 AsktheBuilder Sunday Newsletter.

Column 247

Some Simple Shelving For Your House

garage storage shelves

The best shelving system I have found requires minimal skills, materials and tools, but yields shelves so strong that I can climb them like a ladder.

DEAR TIM: I need your help. My husband and I seem to accumulate too much stuff. We need a simple storage shelving system for our basement and garage. Surely you know a way to build a strong set of shelves using standard lumber and a few simple tools. I would love to surprise my husband. Is this a project I can do by myself? Ellen R. Waukesha, WI

DEAR ELLEN: It sounds like you have the same disease as I - packratitis. I have found that early treatment of the symptoms relieves a tremendous amount of pain. All too often people deposit items on the floor. This practice creates clutter, is dangerous, and opens the opportunity for items to be damaged by water or footfalls. Simple stacked vertical shelving creates lots of horizontal storage space while using a minimum amount of floor space.


The best shelving system I have found requires minimal skills, materials and tools, but yields shelves so strong that I can climb them like a ladder. I am confident that you can assemble my system by yourself in less than two hours.

My shelving system incorporates 2x2 lumber for the back wall support cleats, one half inch thick standard CDX plywood shelves, 2x3 lumber for front shelf support beams and vertical 2x4s that support the front shelf beams.

Gather a four and a two foot level, a circular saw, a screw gun or drill with a Phillips head bit, a hammer, and possibly a hammer drill with a quarter inch diameter bit. To construct 5 shelves that are 16 inches deep by 8 feet long and 7 foot 8 inches tall you will need the following supplies: two pieces of 4x8 by one half inch thick CDX plywood, two 2x4's 8 feet long, five 2x3's 8 feet long, five 2x2's 8 feet long, twenty 3 inch long coarse thread drywall screws, sixty 1 and 5/8 inch long coarse thread drywall screws and 3 lbs of 16d sinker nails.

Using the circular saw, rip the plywood lengthwise in pieces that are 15 and 7/8 inches wide by 8 feet long. If you cut them exactly 16 inches wide, the final leftover piece will be about 3/8 inch too narrow. The 2x2's and the 2x3's do not need to be cut. The 2x4's are cut after assembly begins.

You begin assembly by attaching the 2x2 back wall cleats first. If you have regular wood walls, simply nail them to the wall studs. I like the top of the first cleat to be 24 inches off the floor. Each successive cleat is 16 inches higher than the one below. All cleats must be level and the edges of each cleat must be perfectly plumb. If you need to attach the back wall cleats to a masonry wall, drill a one quarter inch diameter hole through the 2x2 and then continue 2 inches deep into the masonry surface using the hammer drill. Take two 16d sinker nails and drive them at the same time into the hole of the 2x2. If you use a 20 ounce hammer and solid hammer blows, the nails will bite aggressively into the concrete or concrete block wall.

Take a 2x3 and place its 1.5 inch wide edge on the floor. Place a cut piece of plywood on top of the 2x3 so the plywood edge is flush with the vertical face of the 2x3. Attach the plywood to the 2x3 using 5 of the short screws. The 2x3 acts as a miniature I-beam at the front of the shelf. Follow these same steps with all of the other shelves.

Take a partially assembled shelf and place the back edge of the plywood on top of a 2x2 back wall cleat. Use 5 additional short screws to attach the plywood to the cleat in the same manner as you did with the 2x3. The shelf will flop slightly until the 2x3's are attached to the vertical corner 2x4's.

Cut the two 2x4's to match the height of the highest back wall cleat. If the floor is not level, make sure you add or subtract the difference. Keep in mind that the vertical 2x4's will be 16 inches away from the back wall when you check for level. The vertical 2x4's are placed on the side of the front corners of the shelf system. Using the two 3 inch long screws at each connection point, you screw through the vertical 2x4's into the horizontal 2x3's. Use the two foot level to help you level each shelf as you attach the 2x3 beam to the 2x4 corner posts.

Stripping Wallpaper – Now it is Easy!

©2017 Tim Carter

DEAR TIM: I have a big mess on my hands. I started to strip some wallpaper. Progress is very slow. To add insult to injury, the paper facing of the drywall has peeled off in some areas as I removed the wallpaper. What can I do to make the removal job go faster? How can the damaged drywall be repaired? Dorothy M., Ft. Pierce, FL

DEAR DOROTHY: Years ago when I was in college, I worked for a man who hired me to strip real wallpaper from old buildings. It was fairly easy work.

A water-vinegar solution would readily soak into the actual paper and soften the old wallpaper paste. Once the paper was saturated with water, you could practically scrape it using your fingernail. Scraping tools worked better and they rarely gouged the hard plaster walls.

New vinyl coated papers, foil wall coverings, and other types of painted coverings make it tough to strip wallpaper. The coatings on top of the paper work well to make them washable, but they block water from softening the old paste.

Drywall surfaces are tender. Even the most talented and careful person can gouge and score drywall using a traditional putty knife or wallpaper scraper. Fortunately, there are new products, methods and tools that make wallpaper removal an easy job.

CLICK HERE to get FREE & FAST BIDS from local wallpaper removal experts in case you've got cold feet.

The key to removing coated papers from drywall lies in piercing the surface of the paper with thousands of tiny holes so that new fast acting enzyme solutions can break down the wallpaper adhesives.

Just A Few Tools

Let's get started with the tools. Fortunately, you don't need many tools to wallpaper.

Here's a list that will get you going on this job:

  • retractable razor knife with snap-off blades
  • 4.5 or 6-inch drywall taping knife
  • smoothing brush or plastic smoother
  • 4-foot level
  • grout sponge
  • measuring tape
  • paint roller & pan
  • paint brush

Click the Image Below to get all, or some, of the tools now:

Wallpaper Tools List

CLICK HERE to get all the tools I recommend in one place. It's easy and fast.

You can purchase nifty tools at most wallpaper or hardware stores that fit into the palm of your hand. These tools have small spiked wheels in the center of the tool that rotate like casters on the bottom of an office chair.

You randomly glide the tool over the wallpaper using moderate force and the tiny wheels make holes that prick the paper, but not the drywall. The more passes you make, the more holes that are created.

Once the paper has been punctured, you apply a liquid or gel like enzyme-based solution that passes through the tiny holes and works quickly to break down the adhesive bonds of the wallpaper glue.

These solutions can often soften old glue in 20 to 30 minutes. The non-toxic enzyme based products clean up easily with soap and water.

If you are patient and allow the soaking solutions to do their job, the paper will often readily pull away from the drywall or plaster in large sheets. If you need to scrape the paper, you can use a new scraping tool that has a preset blade angle.

CLICK HERE to get FREE & FAST BIDS from local wallpaper removal experts in case you've got cold feet.

The moderately sharp blade attacks the paper from a very low angle. This enables you to remove large amounts of softened paper with minimal or no wall surface damage. Once the wallpaper has been removed, you need to clean all residual glue from the surfaces with soap and water.

To repair the areas where the top layer of drywall paper has been removed, you will need some white shellac and regular drywall topping compound. Paint the damaged area of the drywall with the white shellac and let it dry.

The shellac blocks water from penetrating into the base layers of drywall paper. Without this protection, the water in the drywall topping compound will often cause bubbles to form in this absorbent paper.

You will probably need to apply two or three thin layers of topping compound. Be sure to apply the compound 3 inches beyond the edge of the damaged area. This allows you to feather the patching compound and more easily disguise the repair.

Once this compound has dried, sand it lightly. Prime this new compound with a primer/sealer before you paint or re-wallpaper the drywall.

If you really want to get the facts on wallpaper, removal techniques, the facts on primers, sealers, sizing, adhesives, and installation you need to obtain The Complete Guide to Wallpapering.

Written by a second generation paperhanger, this book is invaluable. This book tells you everything you could ever imagine about wallpapering. It is the best book on wallpapering I have ever seen!

Related Articles:  Drywall RepairWallpaper Removal

CLICK HERE to get FREE & FAST BIDS from local wallpaper removal experts in case you've got cold feet.

Column 250

Deicing Salt and Concrete

Deicing Salts

There is a one-half inch thick layer of ice on my front sidewalk paving brick. I sprinkled some magnesium chloride pellets on it and they started to work within seconds. You can still see a few of them up at the surface.

DEAR TIM: Ice and snow cause big problems where I live. My sidewalks, driveway and concrete and wood steps get slippery. Is it safe to use deicing salts on concrete, asphalt and wood surfaces? I have been told that deicing salts can cause severe damage to concrete. Are there safer salts that work differently than others? What about using fertilizer as a deicer and traction aid? Jenny L., Lewiston, ME

DEAR JENNY: Deicing salts can cause severe damage to concrete that has not been formulated, mixed, installed and finished properly. That is a fact. The good news is that it is easy to install concrete so that deicing salts can be used with confidence knowing that little or no damage will occur over the years. If you come to my city, I can show you city sidewalks and roadways that have had repeated treatments of deicing salts for years. These strong concrete surfaces have experienced none of the spalling or surface erosion that you have heard about.

The damage to concrete most people fear is actually caused by the freezing and thawing of water that soaks into the upper surface of the concrete. The use of deicing salts increases the amount of freeze-thaw cycles that a concrete sidewalk or driveway experiences. The volume of water increases by 9 percent when it freezes. This expansion creates internal pressures that can blast apart weak concrete.

Concrete that contains small air bubbles (air entrained), a minimum of 564 pounds of cement (6 bag mix) per cubic yard and a minimum amount of water when mixed (4 inch slump) can resist repeated episodes of ice expansion within the concrete. In addition, the concrete must be moist cured at or above 50 F for a minimum of seven days, produce a 28 day strength of 4,000 pounds per square inch and have a minimum drying time of 30 days before it is subjected to the first freeze-thaw cycle. These practices are commonly followed by experienced, professional concrete masons.

Deicing salts rarely cause problems on wood surfaces and asphalt. What little damage they may cause is far outweighed by the benefits of preventing personal injury as a result of a fall on some ice.

There are four primary deicing salts. All have different characteristics. The most common deicing salt is regular rock salt or sodium chloride. It is widely available and can melt snow and ice until the temperature drops to between 16 and 20 F. Below these temperatures the rock salt stops melting snow and ice. Rock salt also releases the highest amount of chloride ions when it dissolves. Chloride can pollute streams, rivers and lakes. The chloride also causes metal to corrode.

Stop - Purchase Deicing Salt eGuide NowGet a 24-page guide right now that answers all your questions about Deicing Salts. Will it RUIN your concrete? Did you know that salt can SERIOUSLY harm you? What about your expensive landscaping? You can have all these answers and more in less than a minute. Buy it NOW.

Calcium chloride is another deicing salt. Many people have seen these small rounded white pellets. It can continue to melt snow and ice as temperatures fall well below 0 F. It can cause skin irritation if your hands are moist when using it. Concentrations of calcium chloride can chemically attack concrete.

Potassium chloride is a deicing salt that available in some markets. It is not a skin irritant and does not harm vegetation. It only melts ice when the air temperature is above 15 F, but when combined with other chemicals it can melt ice at lower temperatures.

The newest deicing salt is magnesium chloride. It continues to melt snow and ice until the temperature reaches -13 F. In the photo, the air temperature was 0 F. The magnesium chloride melted through a 1/2 inch thick layer of ice in just 10 minutes. This salt releases about 40 percent less chlorides into the environment than either rock salt or calcium chloride. It is also less damaging to concrete surfaces of questionable or unknown quality. Magnesium chloride is less toxic to plants, trees and shrubs (see Author's Note at the bottom of this column). It also does not leave a powder residue when tracked into your home.

Avoid the use of fertilizers as deicing and traction agents. Those that contain ammonium nitrate and ammonium sulfate can rapidly disintegrate concrete. Don't take a chance if you don't know what is in the fertilizer. If you don't have salts available use sand to stop you from slipping and sliding.


Author's Note: In 2001, the USDA published an article entitled "Magnesium Chloride as a De-Icing Agent" that stated magnesium chloride led to "corrosion of steel and aluminum poles and pole hardware." Although used as an effective deicer, updated evidence after the publishing of this article on AsktheBuilder.com shows it can lead to harm of electric utilities. The article can be read here.

Also, a February 2003, Board of Montana Flathead County Commissioners minutes document called "Magnesium Chloride on Roads" on Corrosion-Doctors.org attests to magnesium chloride's corrosiveness on aluminum and steel. In a corrosion comparison done by Colorado D.O.T. and the University of Colorado, it was found that "road salt is more corrosive to the metals than mag chloride on a one time exposure." However, magnesium chloride corrodes over longer periods of time, and Greg Fulton, president of the Colorado Motor Carriers Association, said it corroded aluminum on his vehicles as well as led to wiring failure. This document can be read here.

Related Articles:  Deicing FactsGuidelines for Strong ConcreteMagnesium Chloride & Deicing Salt Companies

Column 251

New Home Building Budget

stairs platform rough framing

New Home Building Budget - It's Easy to Blow It Up

DEAR TIM: I am scratching my head about my new home project. I am trying to determine a realistic building budget, how to stay within that budget and how much house I can afford. How do I know how much I am allowed to spend on different fixtures and items within the house? Are there industry guidelines that I can follow? Mike M., Simi Valley, CA

DEAR MIKE: Wow! This is a common problem that befuddles many a homeowner. There is actually a straightforward solution, although it will take a few phone calls or possibly some field trips. If you did so-so in grade school math, it will really be a breeze.

You should absolutely use my New Home Construction Estimator to help you get close to the actual finished price of your new home. GO HERE to order it.

The first thing you need to do is to create your own building budget. This is the amount of money you can afford to spend on your new home. Often the best way to do this is to visit a bank or other lending institution. They can pre-qualify you with respect to just how much money you can borrow in today's lending environment. Add to this loan amount the equity in your existing home and you have a not-to-exceed number. The equity in your existing home is the amount of money you will have left over after you pay off your existing mortgage and pay any sales commission.

building budget

As crazy as this sounds, I would not use this number as my building budget. Surprises, cost overruns, and price increases can create financial hardships during a building project. I suggest you create a 10 to 20-percent slush fund to cover these contingencies. This means that you should multiply your not-to-exceed number by 0.80 to arrive at your CONTRACT SUM.

Remember, you'll have to add the cost overrun items to your contract sum to get to your FINAL COST.

Here's an example of the math.

Pre-approved loan amount: $500,000

Equity in your existing home: $250,000

TOTAL AMOUNT you can afford: $750,000

$750,000 x 20-percent slush fund = $150,000

$750,000 minus slush fund = $600,000

Your contract with your builder should NOT EXCEED $600,000 for you to stay within your budget. If you only have a 12.5% cost overrun, then you'll have a nice amount of dry powder once you move into your new home. I'd take $40,000 of the $75,000 you have left over and send it to the lender with your first loan payment. Over the life of the loan, this addition of principal early on will save you vast amounts of interest on the loan.

Determine Square-Foot Building Costs

With your budget in place, you can now call Realtors or visit new home builders to see if the amount of money you have available will "buy" the necessary space you need. If you fall short for some reason, you may have to purchase an existing home. Pre-owned homes almost always provide more space/square footage for the dollar.

Allowances are Budget-Busting TRAPS

If you are still in the building game, most builders provide allowances for fixtures and other items that you need to select. Examples of these are carpeting, cabinets, counter tops, faucets, hardware, etc. The problem is that sometimes these allowances are too low or people spend too much on one item and there is not enough left in the overall budget to fund the remaining purchases.

One method of determining realistic amounts for different allowances is to break the cost of the entire house down into its separate parts. Each aspect of building a new home can be represented as a fraction or percentage of the total cost. Lenders know this as do the appraisers that verify construction loan payments. As work progresses on your new home, they assign a value to each completed component.

Get the Secret Checklist

These appraisers work from a checklist that tells them what things are worth on a typical new home. For example, the footings and a full basement foundation may equal 15 percent of the total structure cost. Kitchen cabinets in your market may represent approximately 2 percent. All of the electrical fixtures could amount to 1 percent of the total cost of the home. Your bank's appraiser may supply you with a percentage breakdown list if you ask them for it. You can also get cost breakdown figures from different national construction cost books that are updated annually.

My New Home Construction Estimator has all the items you need to consider when building a new home. Purchase it now.

Using the list and your actual building budget, begin to do the math to see what you can spend in the different areas or to see if the builder has assigned allowances that are realistic. You may discover that his allowances are low for some reason. Remember that the percentage figure includes both labor and material for any given category. Labor to install many allowance-type items can consume up to 30 percent of the total cost you arrive at. Be sure to keep this in mind as you start to make product selections.

If you are like me you have dreamed of owning a home away from home. Imagine when the weekend comes, hanging out in a hammock at your own lakefront cottage, boating, antiquing in a charming little town, or whiling away an afternoon on your ocean-view porch. If you have imagined these things you need Better Homes and Gardens Second Home.

This inspiring volume will help you turn your second-home fantasy into the real thing. This book will take you through tours of gorgeous homes to see how other people have created their own great escapes. There are expert tips on everything from real estate shopping to building, remodeling, and decorating. There are hundreds of spectacular color photographs of beautiful homes and great locations. As for me, I'll keep dreaming ... until those lottery numbers come through or some forgotten relative leaves me an unexpected inheritance, the book will have to suffice.

Column 252

Waterproof Ceramic Tile Floors

Waterproof Ceramic Tile Floors

You must have the right drain assembly and the right membrane to have a lifetime of no leaks.

DEAR TIM: I built a shower stall on a concrete slab floor. Even though I caulked the seam between the walls and floor I get constant leakage on the other side of the shower. What did I do wrong? I need to figure this out before I install the wheelchair accessible shower upstairs. Robert D., Passiac, NJ

DEAR ROBERT: I'm not going to sugarcoat it. You really screwed up the basement shower. I'm afraid you are going to have to start over. The bad thing is that you probably will not be able to salvage much of the tile. Think of it as a tuition payment to the school of hard knocks!

Many people think that ceramic tile installations themselves are fairly watertight. They are far from that. Water can readily pass through tiny shrinkage cracks in the grout and around the contact point between the tile, grout and the shower drain. Leak proof tile showers incorporate special hidden membranes that are beneath the tile and a thin cement setting bed. You made your mistake thinking that the concrete slab would direct water to the drain. It simply doesn't work that way.

Years ago before the plastics industry was born, plumbers used thin sheets or lead for shower membranes or pans. They would skillfully form the lead into the bottom of the shower area and extend it up the shower walls approximately 9 to 12 inches. All seams would be soldered to make the pan leakproof. The lead connected to a special drain fitting that allowed water that seeped past the tile to go into the drain piping instead of your house.


I have written a cool eBook about Shower Pan Liners that shows you exactly how to install a shower pan liner. The book contains many step-by-step color photos and easy-to-follow instructions. Click here to see what other homeowners such as you have to say about it!


Lead shower pans over time do develop leaks. Corrosion happens for any number of reasons and tiny pinhole leaks cause water to spot ceilings and walls. When this happens or in the case of a new shower installation, it is time to call in the replacements. The premier shower pan membrane used today is a flexible plastic made from chlorinated polyethylene (CPE). I have used it countless times and have it in my own showers. I have never had a leak with this product.

You can buy other polyvinyl chloride (PVC) pan membranes but they tend to be stiffer and harder to work with. The PVC membranes have a memory and try to go back to their original shape when you try to bend them around wood corners. The CPE products are flexible and have no memory. They naturally conform to irregularities in wood framing and are very easy to work with. If it is necessary to seam pieces together, you use a special solvent that welds them together into one leak-proof piece.

Special clamping ring drains must be used with shower pan membranes. (See photo above.) These plumbing fittings have adjustable finished drains that allow you to adapt them to a wide variety of cement setting beds and tile thicknesses. The CPE or PVC membranes attach to the drain in the same manner that a rubber washer is sandwiched between a nut and a bolt. Once the clamping portion of the drain is tightened, all water that collects in the pan is directed to hidden weep holes within the drain fitting.

To prevent future leaks, you need to make sure the sub-floor beneath the liner slopes to the drain. If the liner is placed on a wood sub-floor, make sure all nail heads are recessed and there are no large splinters that could puncture the membrane. Small washed gravel needs to be placed over the weep holes as well. If you fail to do this, the cement base that supports the tile can clog these vital pathways that lead to the drain.

The floor and shower area for your wheelchair shower needs a special CPE liner that has fibers molded into it. These fibers allow thinset adhesive to be used directly over the membrane instead of a thick cement base. The thinset adhesive is like brick mortar and it readily adheres to the membrane's fibrous texture. If you follow the manufacturer's installation instructions, both of your showers will be leak free for years.

Related Articles:  Shower Pan CPE Membranes, Shower Membrane Installation

Column 253