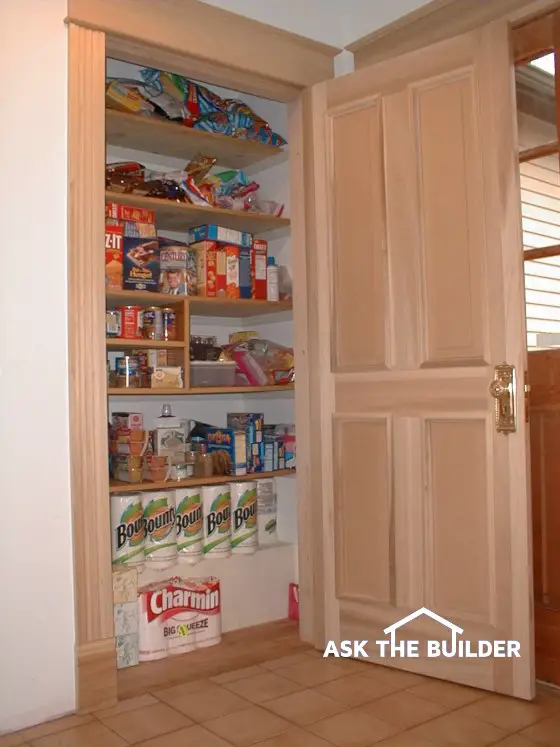
Leaking Shower Pan – Membrane Failure

Leaking Shower Pan

DEAR TIM: A pesky leak recently developed just below the master bedroom bathroom in our eight year old home. We have traced the problem to our custom sized ceramic tile master bath shower stall. My son likes to plug up the drain with a bucket to make a shallow one inch deep pool. The water level is 2 inches below the curb. It doesn't seem to leak during a normal shower. While trying to caulk grout seams I discovered that the drywall behind the bottom row of tiles has turned to mush. How serious is the problem and what is the fix? Jackie F., Lexington, KY

DEAR JACKIE: The problem is very serious. The extent of the damage will become evident as soon as you perform a full autopsy on the shower stall walls and quite possibly the ceramic tile shower floor. In all likelihood, I think you will discover that the special waterproof membrane beneath the shower floor has a hole in it, was installed wrong, or has separated from the drain pipe.

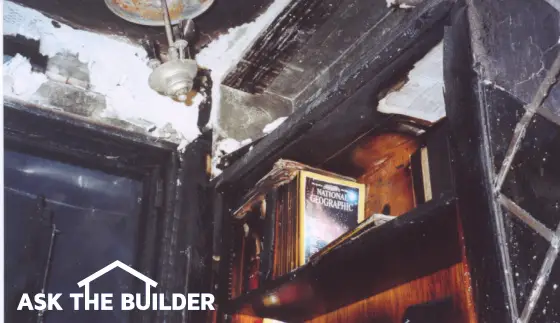
Start the examination by removing tile from the lower portions of the walls. Use a 3 inch wide putty knife with a thin flexible blade. The tiles will pop off very easily. As you go up higher on the walls, it will become more difficult to remove tiles. I think you will discover that the wall damage will extend upwards at least two feet or more. The wall tile problem happened because the original installer did not use cement board or some other product that will absolutely not disintegrate when exposed to constant moisture.

Regular drywall and moisture resistant drywall that has a light green paper simply are not long term backing material for ceramic tile shower or bathtub installations. Water passes through ceramic tile grout and gets these products wet. Over time, the paper facing on water resistant drywall starts to fall apart and the untreated gypsum core in standard drywall simply fails. Cement board is a far better product and it will never fail even if immersed in water 24 hours a day.

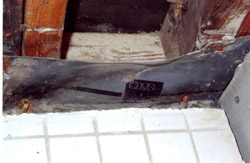
Once the drywall is off the walls, you should see the top edge of the waterproof membrane that is beneath the ceramic tile shower floor. Ideally, this membrane should extend at least 2 inches above the highest point of the curb. It should maintain this height around all of the walls. This method of construction allows the curb to become the spillway in the event your son allowed too much water to build up within the shower.

With the drywall out of the way, it is now time to recreate the leak. Plug up the drain and use a garden hose to fill the shower floor with water. Use a flashlight to inspect behind the walls to see where and when water bypasses the waterproof membrane. When water starts to leak below and you can't see anything on the side walls, this means the problem is hidden beneath the ceramic floor tile. If this is the case, it is time to take out the ceramic floor and the cement base beneath it. Once you have gone this far, simply start over and install a new membrane liner.


I have written a cool eBook about Shower Pan Liners that shows you exactly how to install a shower pan liner. The book contains many step-by-step color photos and easy-to-follow instructions. Click here to see what other homeowners such as you have to say about it!


If the leak is in the membrane above the floor, you may be able to patch it. You can weld a patch using solvents and identical membrane material. Cut a small piece off the top edge of the membrane and take it to a ceramic tile store or a plumbing supply house. They should be able to match the material with ease. Do a test patch on the back side of the membrane to make sure you have the right material and solvent.

Once you have patched the leak, let it sit for 24 hours. Plug the drain again and fill the shower floor to just below the curb. Let the water sit for several hours and see if your patch holds. Be sure all of the wood studs and sub flooring is dry and in good condition before you close up the walls with new cement board and tile.

Column 342

Door and Window Trim Installation Tricks

door trim gap

The gap in this mitered joint is unacceptable. The carpenter needed an immediate eye exam or an attitude adjustment.

Door and Window Trim Installation Tricks

DEAR TIM: I would like to install some new and different wood door and window trim. Do I need fancy tools to accomplish this? Can you share some simple tricks that will allow me to get very tight miters where two pieces of wood meet one another? What is the best way to fasten the wood trim to the walls? Cristi S., New Castle, PA

DEAR CRISTI: This is a great project to tackle. It requires a certain amount of coordination and patience, but my guess is that you have ample amounts of both. You do not need fancy and expensive tools to do the job but I must tell you that you will possibly get better and faster results if you do use them. If I could come and help you, rest assured that I would bring my 12-inch power compound miter saw, my impulse finish nail gun that shoots and countersinks finish nails with a simple squeeze of the trigger, and other miscellaneous handy tools!

If you want to use great tools and can't afford to buy them there is a very good chance you can rent them. If you have all of your work planned and all of the materials at the jobsite before you start, you can maximize the time you spend using the rented tools. The trick is to spend a few minutes practicing your miter cuts with scrap lumber or inexpensive trim that may be in the scratch and dent bin at the lumber yard. Once you have the hang of the saw, then it is time to work.

Most rookie trim carpenters have trouble with interior trim miters for several reasons. The trim stock that comes from the lumber mills is designed to lay flat in a single plane on the wall. The trouble is, most walls are not perfectly smooth and rarely are they in the same plane. For example, the window or door jamb may project just a sixteenth of an inch from the wall surface. This causes the trim molding to tilt slightly. This can cause enormous fit problems at the corners when each piece of trim is tilting a different direction!

There are all sorts of ways to solve this problem. One way is to slide thin tiny shims behind the trim at the corners so you fool it into thinking it is lying flat. The shims can be trimmed flush with the back edge of the trim and then any remaining gap between the trim and the wall surface can be caulked. This method works great for trim and wall surfaces that are painted.

But wood trim that is stained and coated with a clear finish is much less forgiving. In these instances you may need to actually carve away some of the wood on the inside face of the mitered trim joint. Once two pieces of wood trim are butted together you can't see this face. Use a sharp razor knife to whittle away the wood core at the mitered cut. Be careful that you do not cut yourself or cut into the front profiled face of the wood. The greatest amount of wood is taken away from the bottom of the trim where it touches the wall. Whittle a little away from both trim pieces that are meeting at the miter and constantly check for fit. It is always best to experiment with two one foot long pieces at just one corner to see how well this method works. Once you feel confident that you know how to adjust the pieces for fit, then start with a full sized piece of trim.

To build even more confidence, trim out the inside of a closet door first. Make your rookie mistakes where no one will see them. Do the most prominent windows and doors in your house only after you have gotten lots of practice or mastered using the tools.

When nailing by hand, you will use regular finish nails. Often a 6 penny nail will be of sufficient length to penetrate the trim and plaster or drywall and then bury itself at least 3/4 inch into solid wood framing. Stop hammering the nail when the head is about 1/8 inch away from the surface of the wood trim. At this point you will need to use a nail set to countersink the nail into the trim. Nail sets come in different diameters and the tip of the tool should always be slightly less that the diameter of the nail head. My impressive impulse nailer will fire and countersink eight nails in the time it takes you to drive and countersink one by hand. As you might imagine, I have fallen in love with that tool!

Column 343

Mold

! ! IMPORTANT - Read Author's Notes Below ! !

DEAR TIM: We recently purchased a seven year old home that has a full unfinished basement. The walls have studs, insulation and a vapor barrier but no drywall yet. We are thinking of installing drywall but the rear wall has lots of mold growing on the insulation and vapor barrier. What is causing this to happen? How can we stop the growth? How can the mold be removed? Tim and Peggy W., Eagan, MN

DEAR TIM and PEGGY: You are lucky you discovered this mold before you installed the drywall. Anytime you see mold growing on a surface inside your home consider it to be a brilliant red flashing light signaling that you could have a serious problem or might have one in your immediate future. A wise person takes immediate action to fix mold problems because certain molds can cause serious health problems and in rare instances death.

tile mold

This is typical mold in a shower. There is no excuse for this. The homeowner simply needs to clean the shower every two weeks and keep the shower door open so the space can dry quickly.

Mold is around us 24 hours a day in the form of airborne spores and spores that have settled onto every surface inside a home. These spores are similar to plant seeds. Think of them as time bombs waiting to go off. In almost all instances they already have two of three of the necessary ingredients to grow and thrive. The temperature inside of most homes, crawlspaces and attics is almost always sufficient to support mold growth. The surfaces that the mold spores rest upon are in almost all instances a food and nutritional source. Mold will thrive on drywall paper, wood, certain paints, fabrics, dust, paper, carpet, etc. Soaps and other body care products that often create a film inside tubs and showers are a smörgåsbord for mold. Mold can easily grow inside a cold refrigerator.

The third ingredient that triggers the mold spore time bombs is water. Surfaces that become wet from plumbing leaks, roof leaks, condensation, pet urine, etc. can sprout mold growth in several days or less. If the surfaces stay wet for extended periods of time, the mold can grow at an astounding rate. Relative humidity levels of 50 percent or greater can supply enough moisture in the air that condensation can start to happen at temperatures close to the actual surface temperature of the object. Water vapor from your basement space probably turned into condensation when it came into contact with the cold insulation and vapor barrier on that rear wall.

Common molds that cause health problems in adults and children often fall into two main categories. Penicillium and Aspergillus are two common indoor molds. Cladosporium and Alternaria are common outdoor molds that get brought indoors. Innocent pieces of slightly damp firewood can contain vast amounts of mold. Once thrown onto the fire, mold spores can be pumped into the house by indoor air currents that circulate in and around the fireplace. Seemingly harmless cut and live Christmas trees can be loaded with outdoor mold spores. Damp mulch in garden beds can liberate millions of spores and these can enter open windows. Forget about stopping mold spores from getting into your home. It is virtually impossible

The key to stopping or halting mold is to cut off its supply of water. Vent dryers outdoors. Install high quality fans that remove water vapor from baths and kitchens. Cover crawlspace dirt with high performance vapor barriers. Fix plumbing and roof leaks immediately. Stop water infiltration into basements and crawl spaces by installing hidden linear French drains around your home. These simple trenches filled with perforated pipe and gravel can intercept and redirect water away from your home. Install excellent ridge and soffit ventilation systems. Seal leaks in brick homes caused by wind driven rains with high performance breathable silane and siloxane water repellents. You can stop your mold growth by lowering the relative humidity in your basement or by raising the indoor temperature.

Cleaning mold is fairly simple. A solution of 4 parts water and 1 part chlorine bleach can be used to remove mold from tile, concrete, grout and other surfaces that are not harmed by the harsh chlorine. Fabrics, carpet, painted walls, wood, clothing, etc. can be cleaned using non-toxic oxygen bleach. Oxygen bleach is a powder that is mixed with water. It is readily sold on the Internet and on cable television. Some national club membership stores carry it as well. It is best to buy it in its pure form. Many companies that sell oxygen bleach add fillers to the product. Find one that is 100 percent pure oxygen bleach.

Author's Notes - August, 2004

Today I received a very helpful email from Ms. Sue McGregor-Hunter, the Executive Director of the Peterborough Green-Up in Canada about some new information about mold clean up. Sue wrote:

"... In our research from agencies such as the EPA, we have found that bleach is no longer recommended as a cleaning agent. Yes, bleach "kills" the mold but dead mold is a toxic as live mold. The homeowner has to completely remove it, if they are to suffer no ill health effects. It is recommended that they clean with a unscented detergent (so that the scent does not mask the smell of the mold - one of the clues to the homeowner that mold is still present) and then use a HEPA vacuum to thoroughly clean. They must repeat the process until it is completely gone. Not quite as simple but more effective for health effects ...."

Sue McGregor-Hunter
Executive Director
Peterborough Green-Up
360 George Street North
Unit 42
Peterborough, Ontario
K9H 7E7

Thanks for this heads up! TC

Column 344

Understanding Your Insurance Coverage Before Disaster Strikes!

kitchen fire

The fire never made it into the kitchen. You are looking at classic smoke, heat and water damage. Water damage happens when all of the steam from the water used to fight the fire starts to condense on the ceilings and walls.

Insurance Coverage

DEAR TIM: How do I know if my home owners insurance policy will actually cover the true cost to rebuild or repair my home after a fire or other disaster? Is it possible that there could not be enough money in the policy and that I would have to take money from savings to rebuild my home? How can I tell if I have enough insurance to rebuild my home as it stands now? Terry F., Daytona Beach, FL.

DEAR TERRY: It is said that timing is everything. Just one month ago my neighbor's house caught on fire. They were not home but an alarm system summoned the fire department. Even though the house was less than a mile from the firehouse and the response of the fire department was immediate, it appears the house sustained close to $350,000 in damage. The fire was contained to just one room and two hallways, but the smoke and heat damage was enormous. The fire was so hot that it melted the asphalt in the tar paper under the tile roof!

Aside from losing many of their one of a kind possessions, it appears they might be under insured for the loss. Their home has very unique plaster work, woodwork, leaded glass windows and other custom finishes. They had a fairly standard homeowners insurance policy, but it appears that the cost of construction and remodeling in my area has possibly outpaced the loss coverage. They may have to take out a loan or dip into savings to restore the home to pre-fire conditions. You bet it is possible that the same could happen to you.

Most homeowners insurance policies have a standard feature called an inflation guard endorsement. This feature causes your coverage to automatically increase each year. Most high quality insurance companies use sophisticated computer software to track residential construction and remodeling costs. They do it by postal zip code. One region of the nation may have flat or static construction costs while another part of the nation may experience cost increases of 5 or 6 percent per year. Be sure that your insurance company tracks costs using this method. An experienced insurance agent knows about such matters.

The trouble is that this method of costing and indexing only works if the correct number was used for the replacement cost of the home when the policy was written. It is not uncommon for a homeowner or an inexperienced insurance agent to use the real estate market value of a home when completing an insurance policy application. This is a mistake. What an existing home sells for does not necessarily equal the cost to rebuild the home after a fire, tornado, hurricane or flood!

To determine if you have enough insurance coverage in the event of a loss, there are several things you can do. If you have a top notch insurance agent and they represent a top company, they have questionnaires that you can fill out that allow you to accurately describe your house and its finishes and fixtures to the insurance company. Many of these actually have photographs so you can compare your home to the different types the insurance companies track. Once complete you submit the form and the insurance company calculates what they think it would cost to replace or rebuild the home. Some companies will actually send out an estimator to physically inspect your home and calculate a replacement cost.

fire damaged bookcase

The fire consumed the room to the left. Flames were eating away at this bookcase. The top of the leaded glass doors melted.

You can actually arrive at a very close replacement cost on your own. Visit new model homes in your area. Select houses that are as close in size, style, and finish to yours as possible. This is somewhat hard to do if you live in an older home but keep in mind that the craftspeople who build new homes in your area will likely be the same ones who rebuild your existing home should something happen. Calculate the square footage of finished living space in the new model home. Ask the developer or realtor what the lot cost. Deduct the cost of the lot and the real estate sales commission from the asking price of the model home. Divide this number by the square footage total. The result should be a fairly accurate cost per square foot to replace your home. Multiply this cost per square foot by the number of square feet of finished living area in your home to determine your home's replacement cost.

Column 345

Vaulted Ceiling Building

Vaulted Ceiling Building

DEAR TIM: I recently removed the drywall ceiling in several rooms of my home. As I looked up through the ceiling joists to the roof above I was amazed at how great the room would look with a vaulted ceiling. The problem is that there is simply not enough space in the roof rafters for adequate insulation. How can I get the vaulted ceiling I want and keep my heating and cooling costs at a minimum? Is there anything else I should consider while doing this project? Robert J., Long Branch, NJ

DEAR ROBERT: This is a project I have done on more than one occasion. Isn't it amazing how a flat ceiling can cleverly disguise the interesting architectural features of a sloped roof? Once this job is complete you, your family and your friends are going to be intoxicated by the dramatic look and feel of the room.

Vaulted CeilingThe first thing to do is to put on the brakes before you go any farther. Those innocent looking horizontal ceiling joists are very likely critical structural components. If you cut these out to create the vaulted look your roof may start to sag and possibly collapse. The first person you need to contact is an seasoned rough carpenter or a residential structural engineer. A structural engineer can do a quick field visit to your home and produce a small drawing and instructions that will allow you to move forward without compromising the roof structure. I should also mention that you have entered the realm of the building department and building permit process.

If you were building a new home the architect or designer would most likely use a very cool truss called a scissors truss. This truss is constructed using the exterior roof slope that is desired by you or the architect. Beneath these truss components the fabricator then builds the vaulted ceiling that is usually half the slope of the exterior roof. This truss design provides ample room to fit batt or blown insulation. You or a good rough carpenter can do the same thing beneath your existing roof.

If this method is too costly or labor intensive and/or you feel the interior vaulted slope will be too gentle, then you can add lumber to the bottom of the existing roof rafters to make them deep enough to accommodate the necessary insulation and a two inch air space between the top of the insulation and the bottom of the roof sheathing. This air space is absolutely critical. Do not pack the space between the roof rafters and the roof sheathing with insulation. Air must be allowed to float over the insulation as it travels from soffit vents to a continuous roof ridge vent.

There are several things you should consider while you do this project. The first thing that pops into my mind is skylights. Not only are you over halfway there with respect to installation, now is a perfect time to install a flared light tunnel. Most skylight tunnels are straight and provide decent light. But flared light shafts allow abundant natural light to stream into your remodeled space.

I would also think about recessed or hidden sound system speakers. If this new space is going to house a television with a combined stereo setup, then now is the time to install the speakers and all of the necessary low voltage wiring. Expect to pay at least $600 or more for four to six speakers, the wiring and volume controls.

If the demolition that takes place allows you to easily gain access to other hidden or hard to get to attic areas, now might be the time to install a blank conduit or two that extends to or near the electrical panel of your home. The day is soon approaching where houses that are wired for today's and future technology will be more attractive to buyers. I would do whatever is feasible to install new CAT 5 low voltage wires to as many locations as possible while you have your home in this temporary state of disarray.

Column 348

Tips for Dream Homes

stocked pantry

You would think a spacious and well-designed pantry is in every home. Think again!

Tips for Dream Homes

DEAR TIM: My husband and I are about to build our dream home. We want to get it right and are afraid some design mistakes will pop up after we move in. Is it possible to build the perfect house? Surely you discovered some must-have design features that worked well in the houses you built. Will you share a few? Veronica B., Lansing, MI

DEAR VERONICA: Building the perfect home is possible, but only if you can do it twice! I have gotten very close to building the perfect home for certain clients but eventually they find one or two things they would do differently if given the chance. If you are really serious about building the perfect home you should consider building what you think will work and live in it for three years. Within that time period you will discover the pesky flaws and can start to build the final product. But, very few people can afford to do this, so let's try to get it right the first time.

Some of the most bothersome problems are the easiest to fix. Hallways in many houses are almost always too small. Frequently architects or designers stick with the building code minimum width of three feet. In my experience, hallways work best when they are a minimum of four feet six inches wide. Stairways are the same. Try to make them as wide as possible.

Doorways into rooms tend to be problem areas. The minimum width a door should be for rooms that contain furniture is two feet eight inches. Do not overlook the benefits of pocket doors. They can be used in many situations and they free up nine square feet of room space in almost all instances. Be sure to use a pocket door frame that has metal stud channels. These frames will not warp over time. Be sure the electrician places wall switches on an extra block of 2 by 4 material so that wide door casings can be used to trim doors.

Your foundation, crawl space or foundation slab are also very important. Houses with full foundations should have foundation walls that are at least nine feet eight inches tall. This allows finished basement rooms to have full height eight foot ceilings. Crawl spaces should be at least three feet tall for easy access. If you are building on a slab, make sure the slab is at least six inches thick and contains 5/8 inch thick reinforcing steel bars placed two feet on center in both directions. This steel will help to hold the slab together so that shrinkage cracks do not widen or offset. This can produce problems with finished flooring materials.

Bathrooms are very important. The space created for the toilet should be at least 36 inches wide.If you can provide 40 inches, do so. The minimum width of the bathroom seems to work best if you make it six feet wide. Make the bathroom as spacious as possible.

Try to include a large pantry within the kitchen, not in an adjacent hallway. An efficient kitchen pantry is a must.

Try to design the laundry room as a separate room if at all possible. Do not succumb to the temptation of using it as a hallway from the garage to the main portion of the house. Who wants to walk over dirty piles of clothes on the floor while carrying groceries? Be sure that there is a pantry in the laundry room or plan for plenty of wall space for storage cabinets.

Create an alcove or nook for the home office computer and desk setup. Many people just plan to place it in a room. The trouble is most people are not neat and the desk looks like a disaster zone. If the desk and computer are in an alcove flanked by pocket or bi-fold doors, you can hide the mess in a matter of seconds just before guests arrive.

The space over the garage needs to have full attic trusses or at the very least affordable storage trusses. Plan for a real disappearing staircase for safe access to this supreme storage space. Finally, have the electrician install numerous strategically placed exterior outlets in the front and rear of your home for your festive holiday lights. When nightfall approaches you can walk to your front or rear door and flick a switch like I do to broadcast the cheer. Good luck on your new home!

Column 349

Laminate Countertops – Repaired

laminated countertop repair

Laminate Countertops - Repaired

DEAR TIM: We have a spot in our laminated countertop where a hot pot severely damaged the laminate. Rather than buy a new top I would like to remove the burned area and inlay tile into the countertop. The tile would be a great place to set pesky hot pots and pans. Have you done anything like this before? How do I waterproof the exposed particle board that is under the laminate? Are there pitfalls I should avoid? Ken Taylor, Phoenix, AZ

DEAR KEN: Laminate countertops can take large amounts of abuse but as you have discovered they are indeed sensitive to heat. I think your recycling idea is splendid. In fact, if you are highly motivated you can change the look of any other countertops by adding tile accents or borders. I have installed tile inlays in countertops on several occasions and the results can be magnificent. The key to success is attention to detail during the entire process. The good news is that you can do this job in less than 6 hours if you have all of the tools and materials at hand.

Spend some time selecting the right tile. Obviously, you want something that will compliment your current top color and the decorating theme in your kitchen. Consider a tile that has a dull glazed finish. Tile with a high gloss glaze will more readily show scratches over time. Try to select a tile that is set with a one quarter inch grout joint instead of the thin grout line that you find in common bath wall tile. This larger grout line allows you to be slightly less precise when you create the recessed area for the tile. If you use a tile that has a 1/16th or so grout line, your layout and cutout work must be perfect. Select a tile that allows you to use full pieces to cover the burned area.

Once you have the tile, lay it out on the countertop making sure the spacing between the tiles is uniform. Use a framing square to keep the layout perfectly square. Check that the tile is parallel with the front, back and sides of the top. The cutout lines need to be marked so that a grout line surrounds the inlay. This grout line should be identical in width to the lines within the layout. Keep in mind that the router that creates the recessed area can get only so close to the front and back edge of the countertop!

Before you create the recessed area, I feel it is a good idea to reinforce the top. The removal of the plastic laminate and part of the substrate can weaken the top. A simple way to reinforce the top is to attach a scrap piece of plywood to the underside of the top directly below the inlay. The piece of plywood should overlap the cutout by at least 4 inches on all sides if possible. Use construction adhesive that comes in a caulking tube for this job. Use a brace or shims to hold this plywood in place for at least 24 hours. If shims are used, there is no need to remove them.

The recessed area is created using a router with a 1/4 inch bit. Do not try to create perfectly square corners with a chisel in each of the four corners. There is a good chance the plastic laminate will crack. The small diameter router bit creates a perfect stress-free corner. You can glue thin strips of wood to the top with a hot glue gun that act as a guide and keep the router from wandering past your marked lines. The strips of wood can be removed easily and the hot glue will not harm the laminate. The depth of the cutout should be 1/16th inch greater than the thickness of the tile. This allows just enough room for the tile adhesive.

Once the recessed area is created, you should waterproof the exposed particle board. I like to use water based polyurethane because it dries rapidly. You can apply three coats of urethane within two hours. Be sure to coat the vertical edges of the cutout well. Once the final coat of urethane is dry you can immediately proceed with the tile installation. After the tile has set up and will not move with moderate pressure, you can carefully grout it using a sanded grout. Let the grout cure for 5 days before applying a sealer.

Column 350

Hardwood Flooring and Cabinetry Installation

hardwood flooring cabinery installation

Cabinetry Installation and Hardwood Flooring

DEAR TIM: I have decided to use solid 3/4 inch thick hardwood flooring in my new kitchen. The flooring contractor wants to install the wood before the cabinets are installed. My builder prefers to install the cabinets first and then the floor. He also says it is cheaper. Which is the better way? Are urethane finishes applied at the job site adequate or should I consider using factory applied urethane? How long should a urethane finish last in a kitchen? Carl S., Cleveland, TN

DEAR CARL: Your builder must be a baseball fan. He is way out in left field on this one. Installing hardwood flooring around cabinets can be done but I couldn't think of a harder way to do the job. If you ask the flooring contractor for a quote to install the flooring after the cabinets are installed I think you will be shocked to find out it might be more expensive!


Installing a new hardwood floor? Use my Hardwood Flooring Installation / Refinishing Checklist to avoid costly mistakes. I offer a 100% Money Back Guarantee.


The hardwood flooring installation can proceed much faster when the cabinets are not in place. Aside from the normal doorways and wall offsets there is nothing to cut around. The flooring that is hidden under cabinets gives you or a future homeowner lots of options should they wish to change the cabinet layout. Keep in mind that the flooring contractor is just going to install the hardwood and not apply any finish. The finishing will happen after all cabinets and tops are in place. This prevents scratches or imperfections in the finish.

AsktheBuilder Podcast

CLICK this image and listen to the first call on the podcast. I talked to Jill about how to repair wood kitchen flooring, and possibly installing an inlay border as an option. Copyright 2018 Tim Carter

Several things happen if you install flooring after the cabinets are in place. Built-in appliances can become trapped for life. These appliances come with leveling legs. When the legs are adjusted so that the appliance is at its minimum height, it may not slide out of its opening because it is blocked by the flooring. What happens if you need a new dishwasher or ice maker?

When cabinets are in place the flooring installer needs to exercise extreme caution while working. There is a great chance of scratching a cabinet or two. Some pieces of hardwood flooring that go under the cabinet toe kicks are impossible to nail and must be glued in place. The installation is slow and tedious.


For detailed information about what you should do for your next kitchen remodel project, use my Kitchen Remodeling Checklist. I offer a 100% Money Back Guarantee.


If you look at the raw cost numbers you might think you are saving money. Most kitchens have approximately twenty five linear feet of cabinets. Base cabinets extend approximately twenty inches out from the wall before they end at the toe kick area. A kitchen with this cabinetry would produce a forty one and one half square foot savings of hardwood flooring. The average cost savings might be $291.00. Keep in mind that your builder might not actually save this much money. Because of the hassle of working around the cabinets, the flooring contractor may actually charge more.

There are big differences in urethane. Talk to the flooring contractor and ask him what has given him the best results. No matter which type you choose to use, I would install a minimum of 4 coats in a kitchen. Factory applied urethane limits you to using a pre-finished floor. Installing a pre-finished floor before cabinets and tops is a recipe for disaster. No matter how careful the finish carpenters are, there is a very good chance that the flooring will get scratched. This is why I always use job site applied urethane after the cabinets are in place. It is a superb idea to install two coats of urethane under the cabinets and built-in appliances before they are installed.

Remember that you walk on the urethane finish and not the hardwood. The biggest mistake people make is that they let the urethane wear through in spots. This often requires that the entire floor needs to be sanded and refinished. The better option is to apply a fresh coat of urethane every 18 months. A professional can do this in less than four hours or you can purchase kits that allow you to re-coat the floor in a single day.

Column 351

Modifying a Model Home Plan to Save Money

Modifying a Model Home Plan to Save Money

Modifying a Model Home Plan to Save Money

DEAR TIM: My wife and I are working with a builder to modify a model home plan in an effort to lower the price as much as possible. The first thing we did was eliminate unnecessary upgrades. Our thought is to upgrade the house after we move in trying to do the upgrades ourselves. We don't want to be penny wise and pound foolish. What is the best strategy? Where can you save money on a new home? How much can we expect to save overall by downgrading the interior and exterior finishes? Tim Oritz, Pinehurst, NC

DEAR TIM: Before you spend too much time trying to figure out where to pinch pennies, you need to do one simple math problem. Based upon my experience in both building and bidding substitute products, I have found that the most you can lower the price of a home is five to seven percent. Multiply the current base price of the model home by six percent. Subtract this amount from the base price. If the calculation shows that you still are over budget, you simply need to shrink the size of the project to lower the price significantly.

I have no problem with people who want to do things themselves. When I work on my own home I actually don't think of it as work. It tends to be creative energy that flows through my hands and arms. Like most people, I find it to be a very gratifying feeling to see a completed job well done. But don't fall into the trap of thinking you can do all things well. Many tasks that craftspeople do while building homes look easy but they are not. What's more, to get professional results you often need some fancy tools that you may not possess.

Time also becomes a factor. Try to keep in mind that you will not be as productive at interior carpentry as a craftsperson who does it on a daily basis. A project that you think will take one day might take a weekend. A weekend project may take two when you suddenly realize you need to go to a soccer game or the weather doesn't co-operate. Large projects can easily stretch over several months.

Try to save money on things that can be changed easily. If you have plumbing skills, consider entry level faucets at each sink. As long as the plumber installs ball type shut off valves below each sink, you can count on being able to easily cut off the water supply to these fixtures in the future. Interior doors can be switched out at a future date if you possess moderate carpentry skills. These two jobs requires few specialized tools.

You can possibly save quite a bit of money in your flooring. Vinyl tile flooring is very affordable and some new styles are very attractive. Interior door knobs might be another cost savings item. Some very affordable ones are available. Asphalt shingles with the least amount of warranty will often perform well. You may be able to save some money here. If your local zoning or association laws permit it, consider an asphalt driveway instead of poured concrete.


How would you like me to build your new home? It's probably impossible for me to fit your job into my schedule, but I will gladly share hundreds of my tricks and building secrets with you and your builder. Check out my New House Specifications.


It is important to know where not to cut corners. Do not eliminate air infiltration and water barriers on the exterior of your home. These can not be added easily in the future. Never downgrade your heating and air conditioning system. If you do, you will seriously compromise your comfort. Do not install low quality windows or doors. These items are the weakest link in your defenses against extreme outdoor temperatures and wind. Always try to buy windows and doors that are certified by independent testing associations.

Be careful about cutting corners with inferior substitute products. For example, do not use low quality paints. You or your painter may actually have to apply more paint to get adequate coverage. This means you might spend more on materials and labor. This same thing is true with built-in appliances. The front end savings may seem attractive but if you have to replace a poor performing dishwasher or oven in three to five years, you might not think you saved much at all.

Column 352

Installing Automatic Ice Maker

shutoff valve for ice maker

In my opinion, the best way to install an ice maker supply line is to treat it like any other fixture branch. Install a standard tee fitting and a ball valve that will allow you to shut off the water supply to the ice maker without disrupting water to any other fixture in the house.

DEAR TIM: My new refrigerator has an automatic ice maker. I need to run a water line to it. The salesperson at the appliance store sold me a kit that clamps onto a regular water pipe. Is this acceptable? Also, I have heard that hot water freezes faster than cold water. Should I connect the line to a hot water line? What is the best way to protect the floor beneath the refrigerator in case a leak happens? Paul S., Louisville, KY

DEAR PAUL: I'll never forget the first week I had an automatic ice maker. I thought I had died and gone to heaven. The slow tightrope walks from the sink to the freezer while balancing flimsy ice cube trays will be a dim memory in just a few days my friend. To insure trouble free performance for the life of the refrigerator, there are a few important things you should do when installing an automatic ice maker.

The first thing I would do is take the clamp-on valve kit back to the store. Many plumbing codes and inspectors frown on those devices. Some refrigerator manufacturers also state in their installation instructions not to use them. It is not uncommon for those tiny valves to deliver inadequate water supply to the ice maker. This causes all sorts of problems and headaches.

In my opinion the best way to install an ice maker supply line is to treat it like any other fixture branch. Install a standard tee fitting and a ball valve that will allow you to shut off the water supply to the ice maker without disrupting water to any other fixture in the house. Ball valves are superior shut off valves. They have a stainless steel ball inside the valve body that has a one half inch hole drilled through its center. When you rotate the valve handle 90 degrees to the full open position, the water flows through the valve unobstructed. There are no washers to replace. The best part is that they only cost on average $1.75 more than a traditional valve!

Most water supply lines in a typical home are one half inch in size. The ice makers typically require a small soft copper water supply tube whose outer diameter is only one quarter inch. You can buy a brass reducing fitting that will solder onto the one half inch pipe leaving the ball valve and uses either a compression or flare fitting to adapt the smaller one quarter inch tubing to the one half inch pipe. These fittings are readily available at plumbing supply stores, hardware stores, or home centers.

I have also heard that hot water freezes faster than cold water. But I have always doubted it to be true. So I ran a controlled experiment on your behalf. I filled three identical glasses with three ounces of water. One glass had cold tap water, the other had room temperature water and the final glass had steaming hot tap water. Guess what? The cold tap water and the room temperature water froze at virtually the same time. The hot water was very cold but not yet frozen.


I received an email from Matt, the Orion Hunter, and he showed me where I made a mistake in my crude experiment:

"This is correct. However, I wanted to point out that this urban legend is indeed derived from fact. If one were to boil water and let it cool back to room temperature, and then put it in the freezer at the same time as room-temp water fresh from the tap, the boiled water would indeed freeze first. This is because in the process of boiling, you are evolving a lot of air out of the water. So, the boiled water, which has less air in it, freezes faster."


It is really a moot point. Even if you do connect the ice maker supply line to a hot water line, the hot water would never make it to the cube tray. The volume of water inside the coiled length of one quarter inch tubing behind or under the refrigerator has been at room temperature for hours. This water is often a sufficient volume to fill the tray. Even if hot water was better, just as it got to the refrigerator the automatic ice maker valve would stop the water flow.

However, according to an EPA report (EPA 810-F-93-001), it is recommended that only cold tap water be used for drinking, cooking and making baby formula. The report indicates that hot water is likely to contain higher levels of lead from the plumbing in your house.

Prevention of water leaks beneath a refrigerator is important. Many a floor has been ruined by a slow water line drip. If possible, see if the connection at the refrigerator can be converted to a one quarter inch flare fitting. Flare connections are much more leak resistant than the commonly used compression type fitting that contains the small brass o-ring. If you can't use a flare fitting you must carefully install the one quarter inch tubing and inspect the refrigerator every 10 minutes or so after it has been rolled back into position. If no leak is present within an hour or two, you should be in the clear.

Be sure to completely flush out the quarter inch tubing before you connect it to the refrigerator. I would have someone turn on the ball valve to its full open position while you hold the quarter inch tube in a five gallon bucket. This high velocity water running through the small tube will remove copper pipe burrs, solder flux, small bits of solder and any other foreign material. Failure to do this critical step can damage the ice maker and cause all sorts of taste problems with your ice cubes.

Column 353