Pumpkin Carving Saw - Use a Flippin' Sawzall!
Thanks to my youngest daughter for this idea. Why didn't I think of this years ago? DUH!!!!

Use a reciprocating saw to carve a pumpkin faster than you can say, "Trick or Treat!"
Thanks to my youngest daughter for this idea. Why didn't I think of this years ago? DUH!!!!
Use a reciprocating saw to carve a pumpkin faster than you can say, "Trick or Treat!"
Watch this video.
If you have questions, I can answer them on the phone for you. CLICK or TAP HERE to set up the call.
Hello there! Guess what? Right here at the top of each issue is where I extend a warm welcome to you, imagining it’s our first time together face-to-face. Maybe one day that will happen at one of my meet-ups but for now it’s got to be virtual.
You, though, could be a trusty subscriber. We’ve been together on great days and not-so-good days. Do you remember the column I shared with you about the best way to clean paint brushes so you don’t ruin them? I have some paint brushes that are twenty years old and they're still in fantastic shape having been cleaned countless times. CLICK or TAP HERE to discover my cleaning secrets.

Two days ago, I clicked out of a ZOOM video call I did with an airline pilot. It turns out he’s risked his life for me and other US citizens, possibly you, by giving twenty years to the US Navy before transitioning to flying Boeing 737s.
He hired me to do a phone consult as he wanted to sue a builder who’d constructed a three-seasons porch on his home. The porch is rotting away. I had to deliver a massive dose of tough love.
He had read my past column about what’s involved in suing builders - CLICK or TAP HERE to read it - but he still had questions. I was finally able to get him to understand that his money would be far better spent trying to start over rebuilding the room with a design that was immune to rot.
At the end of the call, I asked him what he did for a living and that’s when he revealed he was an airline pilot. I thanked him for keeping us SAFE when we fly in those giant aluminum tubes.
I then shared how I had once landed on and been catapulted off an aircraft carrier. He was intrigued by that, especially since I was not in the military! CLICK or TAP HERE to read how I scored that rare experience.

Now back to my frustration with this call. I continue to see this deeply disturbing trend of consumers, you may be one, who place far too much trust in builders.
You MUST STOP DOING THIS. If you’re going to invest a lot of money in a project of any type, you yourself NEED TO RESEARCH how the work must be done correctly.
Once you know this, THEN you can start to interview contractors asking them probing questions determining the depth of their ignorance. Yes, I meant that. CLICK or TAP HERE to understand WHY many of us are ignorant.
If you don’t want to invest all those hours, you can schedule a simple recorded 30-minute call with me. You don’t have to take notes. I’ll go over all the key issues concerning the job. You can download the recording and listen to it forever.
If the pilot had invested in one of these calls BEFORE he hired the builder, he would have saved about $50,000. I estimate it’s going to cost that much to rebuild his three-seasons porch.
Some complex jobs may require more than 30 minutes, but don’t worry about this now. CLICK or TAP HERE if you want to schedule a recorded call.
At the end of the call with the airline pilot, he thanked me for being out there championing the cause for consumers.
I mentioned it can be a lonely place because not all of my peers are willing to tell the whole truth about every subject. Speaking of the truth, you do know that a half-truth is a whole lie. Never forget that.
Last week I gave you an example of how I tell the cold hard truth. I BEGGED you to read a review I did about a new tool. Did you read that review?
The reason I wanted you to read it, even though you had no intention of buying it, was to prove that I often have to share the bad news about a new product so you don’t waste your money. And that's the TRUTH.
CLICK or TAP HERE to read that review.
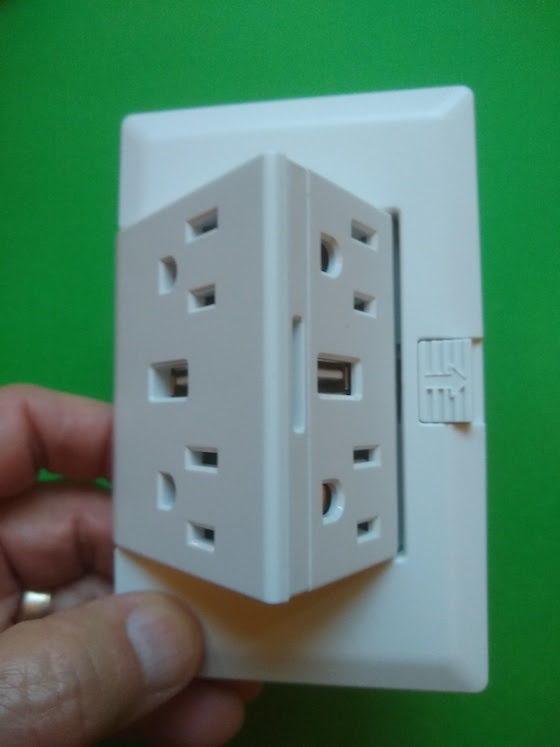
Please look at this photo. Would you want one of these in your home?
Do you think it’s easy to install? Seriously, how hard can it be to just remove an ordinary duplex outlet replacing it with this?
Now I want you to ONCE AGAIN, read a review.
PLEASE CLICK or TAP HERE. You’ll not regret it.
Earlier this week, I uploaded a new column to my website.
It’s about the ubiquitous cap shingles you might have on the top of your roof. You should scan this column. CLICK or TAP HERE to do it.
Have you ever wondered how to create cap shingles? As I was loading the column, I went to YouTube to try to find a video showing you how it’s done.
I was looking for a video that cut to the chase, not some 45-minute documentary. All you need to see is how to make the six cuts on a 3-tab shingle. I couldn’t locate a pithy video.

So I grabbed my video camera and 30 minutes later I had the video shot.
CLICK or TAP HERE to watch it. Scroll down to see the video. It’s over in a flash. Don't blink!
That’s enough for a leaf peeping Sunday.
Tim Carter
Founder - www.AsktheBuilder.com
FANTASTIC Cleaner - www.StainSolver.com
SOTA Activator! - www.W3ATB.com
Do It Right, Not Over!
P.S. What about high-pressure sales tactics? Do you want to know how to PREVENT getting SCREWED? CLICK or TAP HERE now.
theOUTlet | You get four receptacles in a one-gang box. But...
I had a chance to study a new quadplex outlet called theOUTlet. Most electrical outlets in your home are duplex outlets meaning you can plug in two things at the same time. TheOUTlet comes in two varieties - one with and one without USB charging slots.
The inventors of theOUTLET decided they'd add two extra outlets that rotate into view as soon as you slide a small button. This is similar to how the creepy clown pops out of a jack-in-the-box.
I felt I was qualified to render an honest opinion about this new device because I've wired homes, I've installed thousands of outlets and switches, and I've made up all sorts of joints in standard electric boxes jamming those wires into the box before finally trying to get a standard outlet or switch to fit in front of these bent wires.
As soon as I opened the box and saw how big the actual device was I shook my head. The housing that holds the pivoting four outlets is huge. It takes up a vast amount of space in a standard one-gang electric box.
The inventors claim you need a box that has a minimum of 18 cubic inches of space to make this work. I went and bought one and can't see how it's possible to do this if the box you intend to use theOUTlet contains 12-gauge wires and is one that's somewhere in the middle of a daisy-chained circuit. Even with a house wired with 14-gauge wire, it's going to take deft skills to install this device.
Daisy-chaining means one wire comes into a box and a different one leaves the box to extend the current to the next box in the circuit. Think of how a freight train is connected together. All the cars are daisy-chained between the locomotive and the caboose.
The wires need to be long enough to extend to the outside of the box to give you enough room to connect them to the device. Once that's done, you then need to figure out a way to bend the wires to compress into the void space behind theOUTlet. I'm not saying this is impossible, but I'm here to tell you it's going to be extremely challenging. Look at the photos below.
It's important to realize many of the electric boxes in your own home don't have 18 cubic inches of space. Smaller capacity single-gang boxes are quite common. This means before you invest in theOUTlet, you better take apart the outlet you intend to switch out to see if it will even fit. Look at the photos below to help you out.
I also wasn't a fan of the snap-on cover plate. I had a very difficult time trying to remove it by hand with the device in my hand where I could grasp all sides of it. You'll never be able to do this when it's on the wall. When you do remove it, the slider control pops off and goes flying through the air.
You then have to consider what four things are you going to plug into this device. Will the combined wattage of the things pop the circuit breaker at your panel? Yes, this same thing could happen if you plugged in the four things at two separate outlets on the same circuit.
I just feel that the average person might think that a fancy device like this might provide unlimited electricity - as if you put it in a bathroom and then plugged in a hairdryer, a curling iron, a personal beauty mirror, and a coffee warming tray.
Finally, there's the price. If you get the one with the two USB charging slots, you'll part with $50. You can purchase a standard duplex replacement outlet right now with two USB slots for $11. CLICK or TAP HERE to see it.
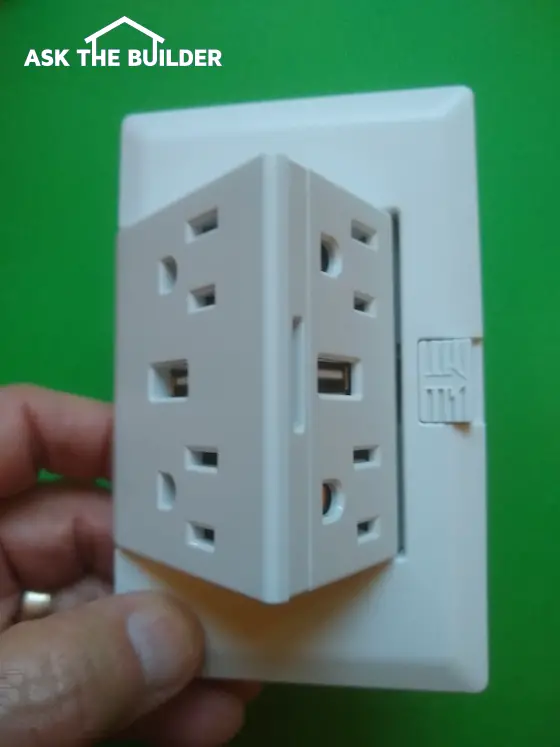
Look at these photos and you'll get an idea of the challenges of installing theOUTlet.
The width of the device takes up just about all the width of a single-gang electric box.
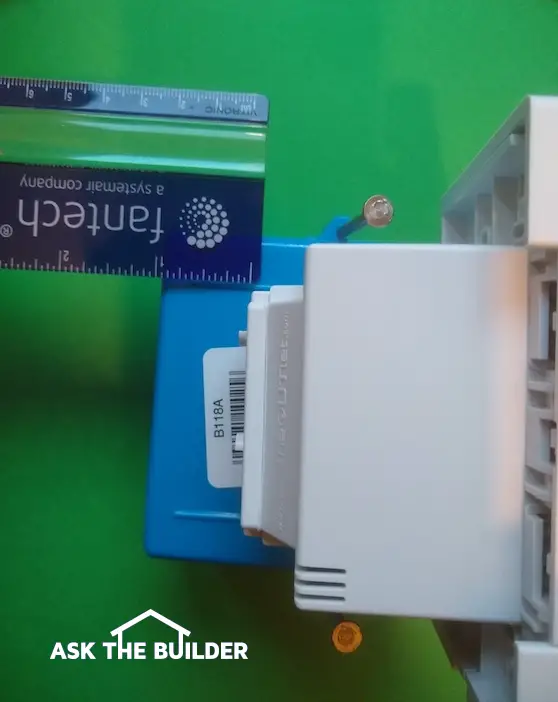
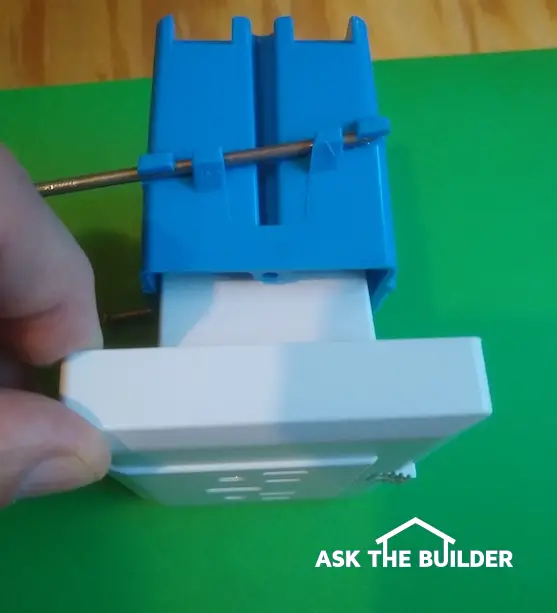
The blue thing under the device is a standard 18-cubic-inch single gang box. There is not much space to jam wires and wait until you see how much space is taken up where wires enter the box at the top and bottom.
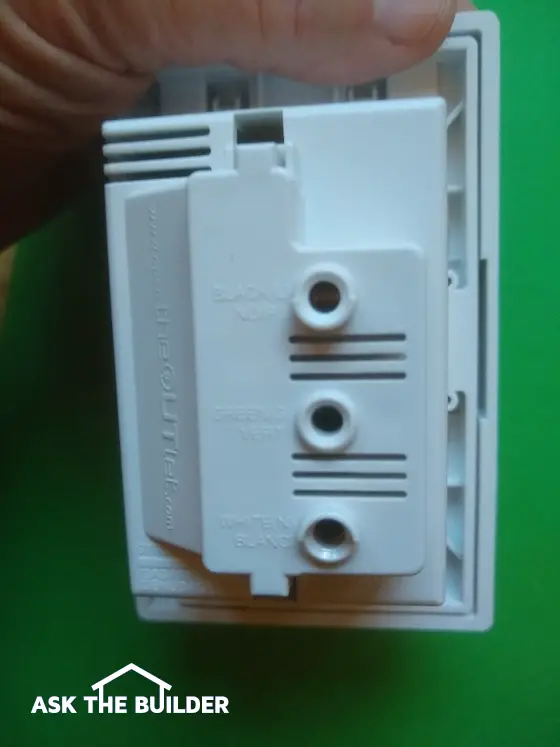
This is the back of the device. You insert your wires into the holes. 12-gauge wire is stiff! Think about having to stuff the wires back into the box where you can't get your fingers to manipulate them.

This is the slot on the bottom of theOUTlet. You'd put a screwdriver in here carefully and then pull back to pop off the cover plate. Close your eyes as the slider will go flying.
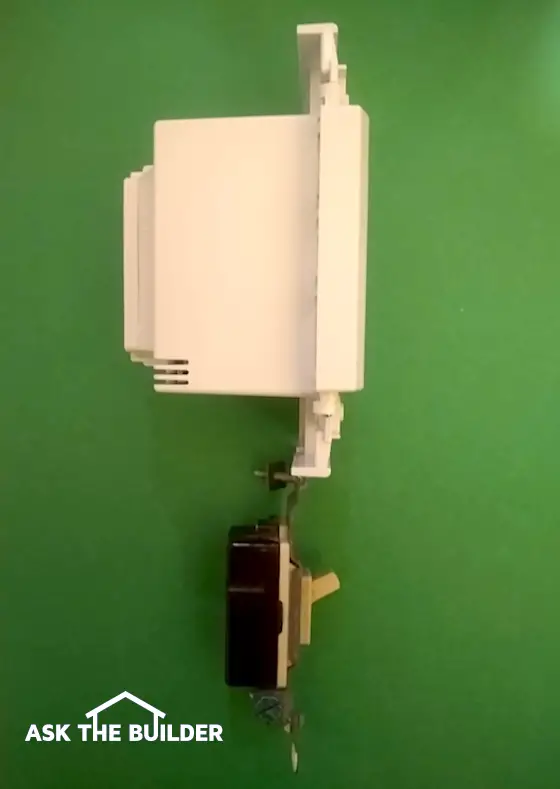
Here's a great comparison shot. You're looking at a normal single-pole switch that would fit in a box. The depth of the dark-brown plastic body is almost identical to that of a normal duplex outlet. See how much space in the electric box you lose because of the giant white box on theOUTlet?
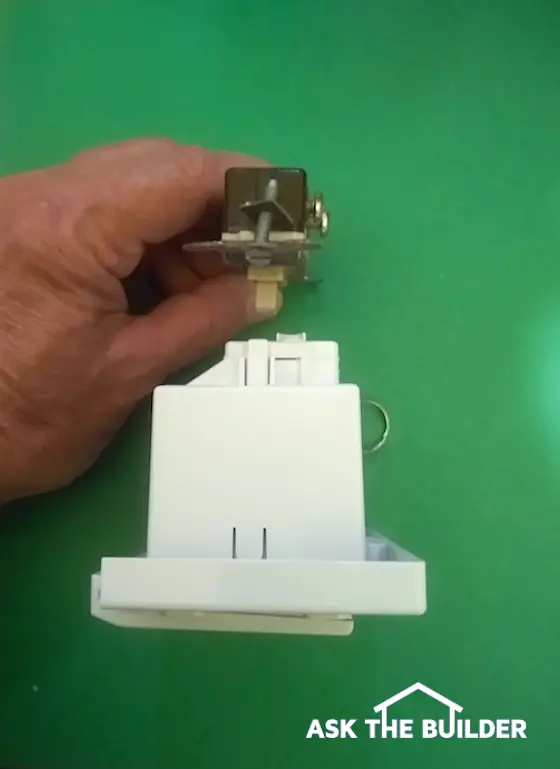
Here's the same normal single-pole switch. It's not as wide as a normal duplex outlet, but it's close. Once again, just realize that the only space you have to fold wires is behind theOUTlet and you can't get your fingers or a tool in there to help manipulate the wires.

See all those wires bundled together inside the box with wire nuts? You might encounter this in the wall box you want to install your new theOUTlet. I'm here to tell you that you'll NEVER get it to work in many electric boxes in your home. If I'm wrong, HOORAY for you!
Do you have tiny tiny fingers? Then you'll love my Tactica M250 review.
Tim Carter shows you how to cut three cap shingles from one standard three-tab shingle.
Be sure to use a sharp razor knife and go SLOWER than I went so you don't cut yourself.
CLICK or TAP HERE to get the absolute BEST razor knife to cut the cap shingles.
Let's do it!

Moving a Front Door Sideways | Wouldn’t you love to know what the architect was thinking when she/he put the door off-center in this opening? Everything else about the house is balanced and centered! Copyright 2020 Tim Carter
QUESTION: Tim, I need your help and advice. I bought a foreclosed house for a really great price. The entrance hall is two stories high and features a large front door with a semi-circular window above it. But for some reason, the architect off-centered the door and window in the porch alcove. My contractor says the door and window can’t be relocated and even if so, it would be prohibitively expensive. The facing brick in this alcove is already removed, so I don’t understand why it can’t be done. What say you? Have you ever done something like this? How long would it take to remove the door and window, create the new opening, and reinstall the door and window? Vicky M. Orient, NY
I don’t know about you, but I was intrigued by Vicky’s question. She sent it along with a great photo using my Ask Tim page. Once I peered at her photo, I was perplexed why the contractor said the door and window couldn’t be moved. Perhaps he was having a bad day, has never done this task before, or he didn’t have the skills and courage to do it. The tall opening may have intimidated him.
The good news for you, should you want to do a similar project, is that the door can be relocated. Fortunately, it’s a simplistic structural modification. Believe me, creating some openings can be very challenging and complex, but not Vicky’s job.
CLICK or TAP HERE to get FREE BIDS from local carpenters who can move your door.
Here’s an example of a tough job. I remember years ago building a room addition on a large five-bedroom home that had solid masonry exterior walls. The architect had called for a new seven-foot-wide opening from the existing kitchen out into the new room addition. GULP!
I was able to install the two giant steel angle irons the engineer called for one at a time, and support all the masonry and roof load over this opening with no failure. That’s not to say I wasn’t nervous. Believe me, we were working diligently to get it done. I had planned every aspect of the task, and within four hours, both angle irons were in place and we toasted our success.
Vicky’s task is so much easier. On a scale of 1 to 10 for difficulty, with 10 being the toughest job, I’d personally rate it a 2. The hardest part of the job, in my opinion, is to build a temporary inner support wall that would support any roof load that might be resting above the window and door. You just need to build this wall so you have room to work and the required room to shift the door and window is actually available outside on the front porch stoop. It’s caveman simple.
Every contractor looks at a job differently. This particular job is well suited for a three-man crew. The working space is tight and you don’t want folks bumping into one another.
The first step is to protect the interior of the house from dust and debris. Plastic dust barriers need to be installed, and drop cloths need to be put down to protect the floor. Next up is framing the temporary wall. While this is happening, one of the workers can be outside starting to remove any nails from the door and window nailing flanges. You need to leave one or two nails in place so they don’t fall out until you’re ready to remove them.
Remove the door first and get it out of the way so it’s protected. Once the door and window are removed, it’s time to get any of the old framing out of the way. Assuming the correct-sized headers were used to frame the wall, these can be salvaged for reuse saving time and money.
With the headers out of the way, it’s time to install the new full-length king studs that run from the bottom to the top wall plates in one piece. Be sure these are perfectly straight with no twist or crown. The jack studs are up next. These support the headers and within a few minutes the new opening is framed and complete. I would expect all of the above work to have happened within four hours at the most. It’s important to realize that I would have come to the job with all the materials and equipment I needed so there’s no running to get anything.
It's now time to install the new flashing pan or flashing under the door. Once that’s done, you can install the window first. I wouldn’t want to have the door in place and risk damaging it while installing the window. That’s the voice of experience talking!
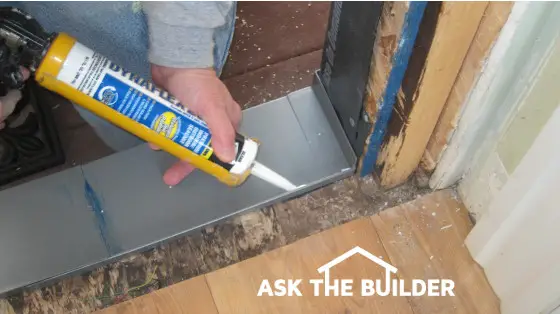
This is the type of flashing you should install. CLICK or TAP HERE to get the one I used.
The door would be installed last, and then the wall covered with an air and water barrier according to the manufacturer’s written installation instructions. By this time seven or eight hours would have passed and it would be time for the bricklayers to get started the next morning.
There are lots of videos on YouTube showing much of what I described above. I feel it’s always a good idea for you to watch videos like this before you contact a contractor for any quotes. Get a feel for what’s possible and how long things take. Don’t forget if you create a free YouTube account, you can always post a comment to the creator of the video asking how long something took if he didn’t mention it in the video.
Column 1374
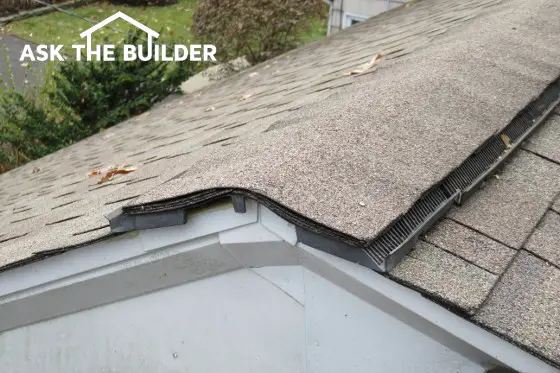
Roof Cap Shingles - The shingles at the peak of a roof are called cap shingles. (C) Copyright 2020 Tim Carter
"I did extensive research into why asphalt shingles are failing so fast. I interviewed a top executive and respected asphalt shingle expert who revealed the deep dark secrets of why your shingles look like crap in as little as eight years."
DEAR TIM: I was inspecting my asphalt shingle roof the other day. At the top of the roof where the peak is, I noticed some defects. My shingles are only six years old so I was shocked to see deterioration. The shingles covering the peak of the roof don’t look like all the other shingles on my roof. The color is the same, but they have a strange shape. How can I replace the defective ones without damaging adjacent shingles? What’s causing the shingles to go bad so fast? Sheila P., Waynesville, OH
DEAR SHELIA: Congratulations on doing that roof inspection by yourself. Not many have the nerve to get up and walk on roofs. Just last week I was up on my friend’s steep roof helping to remove a tree that had fallen on his home. The only mistake I made was wearing nice work boots that have a fairly stiff sole. My sneakers that have a more flexible sole would have given me much better traction on the asphalt shingles.
Seven months ago, I published a small book that speaks to what you discovered. It’s called Roofing Ripoff. I was inspired to produce the book after my own 30-year-warranty asphalt shingle roof began to fall apart in just ten years!

I did extensive research into why asphalt shingles are failing so fast. I interviewed a top executive and respected asphalt shingle expert who revealed the deep dark secrets of why your shingles look like crap in as little as eight years. The evidence points to too much air being blown into the liquid asphalt as the shingles are being made. This extra oxygen pre-ages the shingles. I cover this in great detail in my short easy-to-read Roofing Ripoff book.
The shingles at the peak of your roof are commonly called cap shingles. If your shingles are standard three-tab shingles, the caps are made by cutting one shingle into three separate parts. It’s very simple to do and if you’re lucky enough to have some spare shingles left over in your garage or shed, you can make replacement caps in just minutes.
A standard three-tab shingle can create three cap shingles. Watch this video:
Dimensional or architectural shingles have special cap shingles. You buy bundles of the cap shingles at the same time as you purchase the regular shingles. Both types of cap shingles are applied in the same way.
CLICK or TAP HERE to get FREE BIDS from local roofers to repair cap shingles.
The overall size of most cap shingles is 12 x 12 inches. The shingles overlap one another at the ridge like feathers on a bird. This overlap creates a watertight covering.
The cap shingles often are installed on top of a continuous ridge vent. The vent manufacturers make their products to match the size of the cap shingles so the caps cover the vent material leaving a 3/4-inch shadow line up at the ridge.
A standard pry bar is required to replace a cap shingle. You also need some warmer weather. If it’s cold outside, there’s a good chance you’ll crack good cap shingles as you try to install new ones.
You need to gently pry up the overlapping cap shingle next to the cap you want to replace. Back about one inch you’ll see a roofing nail. Slide the pry bar under the nail head and gently pry the nail from the wood roof deck.
Often you need to go to the second overlapping shingle and pull up those nails to as they may be passing through the top edge of the cap you’re trying to replace.
Roofers frequently use nails that are too short when installing cap shingles. You’ll discover in a hurry there’s lots of roofing material up at the ridge. You’ll need nails that are at least 2 inches long to secure the caps. It’s not uncommon to use 2.5-inch-long nails!
If it’s cold and you must do the work, try to work in the sun as even on a cold day the shingles can soak up enough heat from the sun to make them pliable. But don’t be surprised if you crack failing brittle shingles working in temperatures below 45 F.
Yes, I have a secret tip. Your best bet may be to patch any bad cap shingles with roofing cement for now. Who cares what it looks like for a few months?
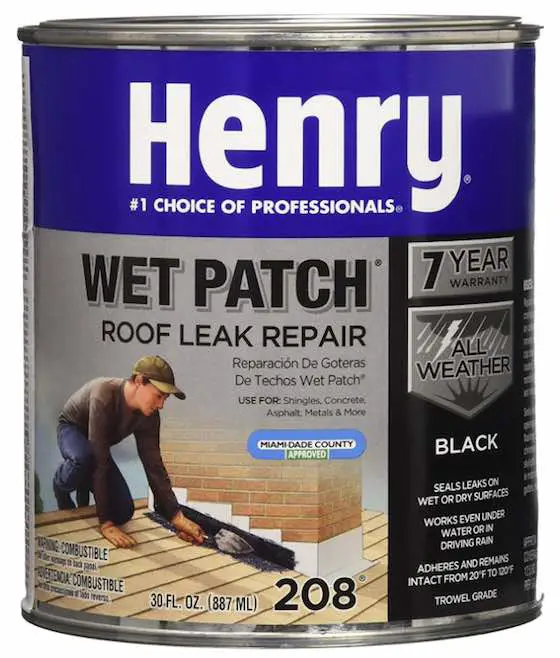
Use this roofing cement to patch cracks in cap shingles. CLICK or TAP HERE to have it delivered to your home.
Here's a secret tip on how to make the repair invisible. If you have gutters, you’ll probably discover tens of thousands of colored granules from your shingles in the gutters. Collect some, wash and dry them.
Dab on the gooey roofing cement over the bad areas and immediately cover the sticky cement with the granules to disguise the black blobs. This will work until the air temperature is about 75 F and you can get up and do the job properly.
The colored granules also protect the roofing cement from the damaging ultraviolet rays from the sun. Without protection, the cement will fail in as little as two years.
This column covered in the December 12, 2017 Newsletter.
Column 1226
Greetings! You very likely are a newbie subscriber. This place of honor is where I welcome you to your first issue. Thanks for subscribing!
On the other hand, this could be your second issue or your 500th one! Riddle me this. The person in charge at your house, yes, you know who she is, has requested you remove the wall between the kitchen and dining room to create a more open floor plan.
Is it a bearing wall? How do you determine this? CLICK or TAP HERE and watch a short video for some clues!
Please peer at this photo:
Did you really look CLOSELY at the photo?
Now, try to predict how I felt about this tool. Think about the name!!! Look above at the title once more and then look at the photo.
CLICK or TAP HERE and see if your mystic powers are strong! Did you guess wisely?
I've seen a very significant increase in orders for the color plumbing isometric drawings I create. You almost always need one to obtain a plumbing permit.
Several DIYrs have asked me to also draw for them the non-required building drain layout. Think of the building drain as the set of horizontal pipes running under your slab or in the crawlspace. Typically you can't see these once the concrete is poured or the sub-floor is installed.
Here's a small cutaway shot of part of one of the new building drain layout drawings I've done recently.
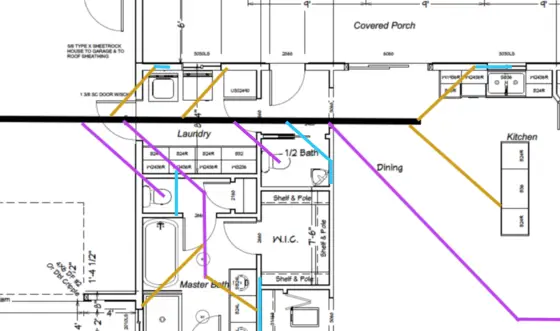
The thick BLACK line is a 4-inch pipe. The purple lines represent 3-inch pipes, the gold lines are 2-inch pipes, and the blue lines are 1.5-inch pipes.
When you change directions with a horizontal pipe in a plumbing system, it's best to do it with a 45-degree bend. If you need to turn 90 degrees, then you put two 45s together and space them apart a foot or so if possible.
You want to avoid putting 90-degree-angle fittings in a building drain because a drain-cleaning snake has a tough time navigating them.
You can put 90-degree fittings under a slab at the base of vertical stacks, but be sure they're sweep 90s. A sweep fitting has a greater radius than a normal 90-degree fitting. The same is true for the 90 under the toilet. Be sure it's a sweep 90.
CLICK or TAP HERE if you want me to draw your building drain layout!
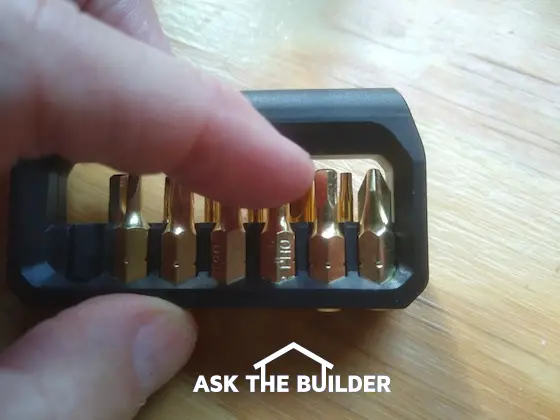
I reviewed another small tool this past week. I wasn't impressed with the name, but then again it's got to be hard to come up with a name for this:
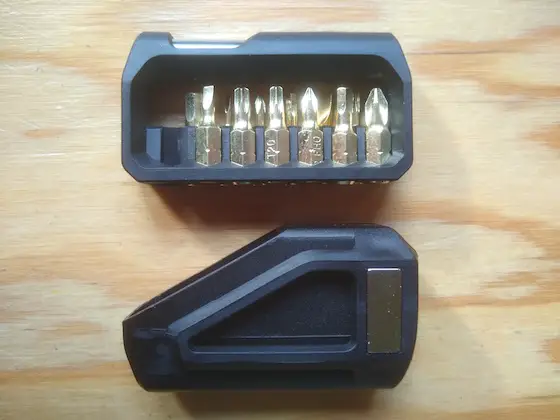
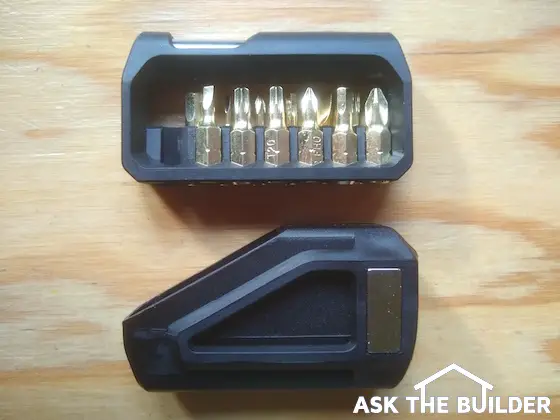
If you're a gun person, this tool might be your thing. That's a magazine containing common bits and the bit holder is in a barrel at the top of the magazine. The holster is the object on the bottom.
CLICK or TAP HERE to discover much more and tell me how fast it's going to take you to order one of these with the gold-plated bits!
It's VERY IMPORTANT You READ my SHORT review of this tool, EVEN IF YOU DON'T WANT ONE!!!
I read each night before traveling to Sleepyville. I'm attracted to history books, and about four nights ago Google Play offered up a book about the Great Hurricane of 1938. I have a deep interest in that storm living here in New Hampshire. Not only was it a monster storm, but it raced up the Atlantic Ocean coastline like a cheetah chasing its lunch.
It was advertised for $2.99 and the author was not familiar to me. I thought, "Well, I'll try a free sample to see if it's any good or not, and then buy it if it is." Some books are so poorly written, they hurt my brain which is why I often opt for the free sample if I don't know the author.
This one wasn't bad. It was quite good. I must have worked my way through twenty, or more, pages before I got tired. I turned off the tablet and drifted off to sleep as if I was in the attic of a house that became a boat because the storm surge and 150 mph winds ripped it off the rest of the house. Yes, this happened to quite a few houses in GH38.
The next night I went to buy it and it was now $9.99.
Hmmmmm... Was it a one-day sale or does Google track how much you read of the sample and the MORE YOU READ the HIGHER the PRICE GOES?
Do you know the answer? Has this happened to you? Let me know.
I shared a column with you last week about my clear etched drinking glasses.
One of the things I LOVE about this newsletter is you may be one who routinely responds with great additional information. That happened once again!
If you don't want to have etched glass of any kind when you use your dishwasher, then you MUST GO READ what Brad shared. CLICK or TAP HERE to do just that.
Is it a good idea to install ceramic tile over a crack like this:
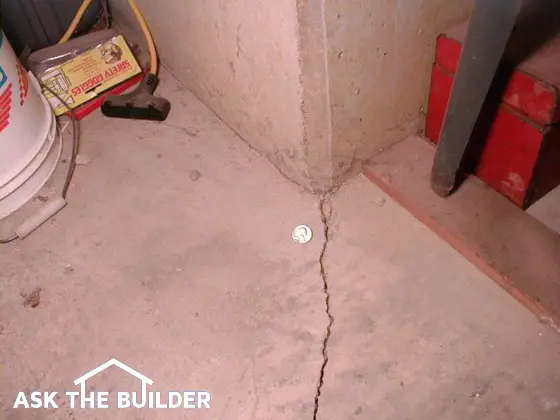
Let's say you have to do it and you're on a limited budget.
Do you think there are methods and products to deal with installing tile over concrete and cracked concrete? CLICK or TAP HERE and tell me what you think of the idea I came up with to help Sarah.
That's quite enough for a Sunday! Next Saturday, I'll be in Maine all day with four other radio professionals. We're doing an 80 and 40-meter NVIS test. Want to know what that is and why? Would you like to see race cars go 100+ mph down curvy gravel roads? WATCH THE VIDEO HERE: CLICK or TAP HERE.
Tim Carter
Founder - www.AsktheBuilder.com
BEST DARN CLEANER - www.StainSolver.com
NVIS MAN! - www.W3ATB.com
Do It Right, Not Over!
P.S. Your honey has asked you to remove finish nails from trim lumber. She wants to salvage and reuse it. How can you remove the nails WITHOUT DAMAGING the good side of the trim lumber?
I thought you'd never ask! CLICK or TAP HERE to see me with dishwater blonde hair!
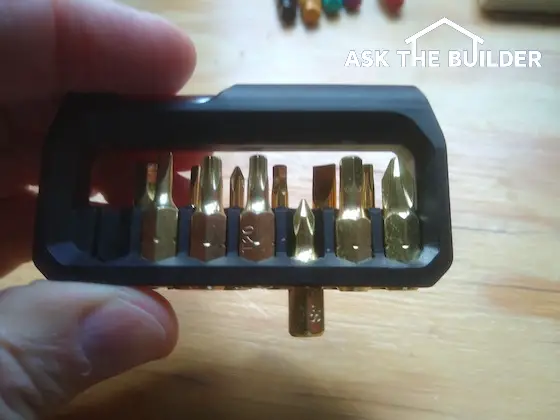
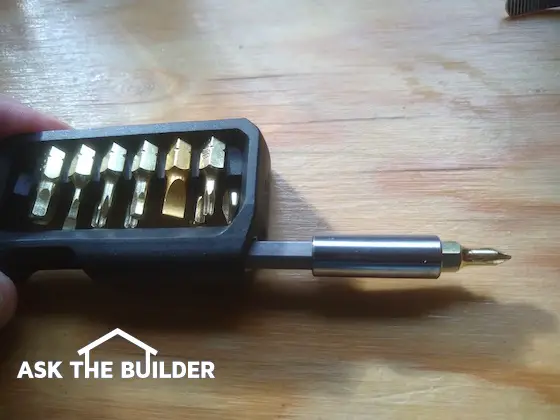
Tactica M250 | Here's the Tactica M250 after it's taken out of the holster that can fit on your belt.
This could be my shortest tool review ever. I got the magazine out of the holster and BOOM - #FAILURE.
The slots the bits fit into were so tight, it was impossible for me to get the bits out of the magazine.
Not only could I not fit my finger into the small gap, but when I forced it in there the tips of the sharp bits hurt my finger so much I couldn't even begin to push them out.
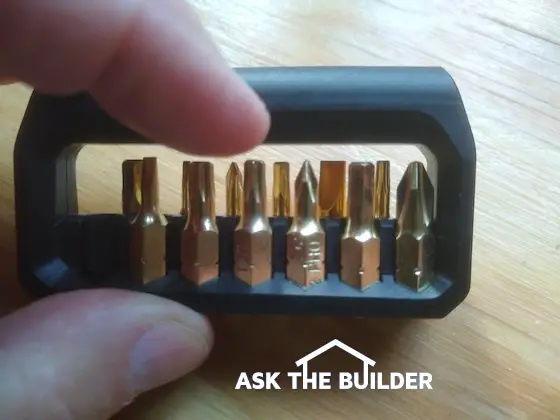
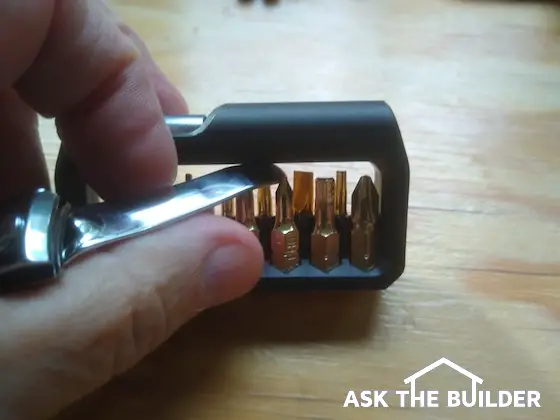
I was only able to get the bits out of the magazine using my fingernail clippers. There was so much tension that when the bit finally came out, it shot across the room ten feet away!
The photos should tell the tale. Note the tiny gap between the top of the bits and the magazine. No way I could get my finger in there.
Love tool reviews? Look at my Gerber Prybrid Utility knife review.
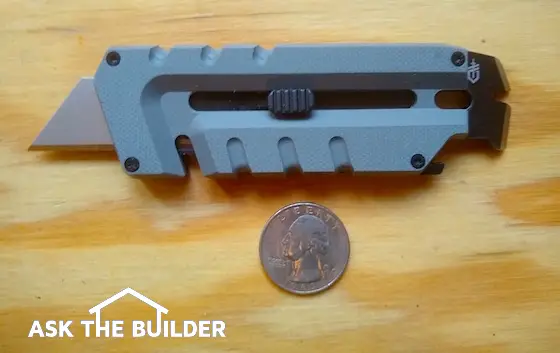
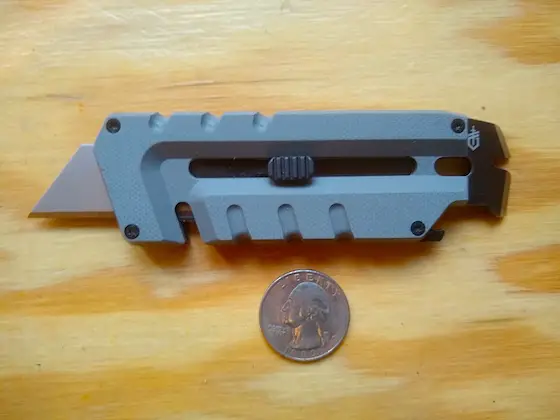
Gerber Prybrid Utility | It may look attractive, but it's a trick! That said, you may actually love the way it feels in your hand. Not me!
The Gerber Prybrid Utility fit in my hand like I was holding a ragged piece of Meredith Porphyritic Granite or a prickly piece of cactus.
Look at its boxy shape with the hardened edges. It was so uncomfortable in my hand. But to you, it may feel like a two-day-old velveteen chick.
I understand why it happened because Gerber went down the multi-tool path. They claim it's eight tools in one. Strangely they don't list its primary purpose first. Here's how they list the features on their website:
Tools are like handguns. A very good friend of mine is a retired ATF Senior Special Agent and he coached me when I purchased my first handgun. "Tim, the gun has to feel good in your hand. Trust me, not all handguns feel the same. There are huge differences. Don't purchase a gun that feels bad."
He was so right! I discovered long ago that most utility knives felt so-so in my hand. But you made do with what was available.
However, about eight years ago, I came across a unique Stanley utility knife, the QuickSlide, that has since become my favorite utility knife of all time because it feels perfect in my hand.
In my opinion, the Stanley QuickSlide is the right shape, it's the right thickness, and it's the right length. What's more, it's designed to do one thing: be a utility knife.
When you decided you're going to do lots of things at once, you're probably not very good at any one thing. That's what happened with the Gerber Prybrid Utility in my opinion.
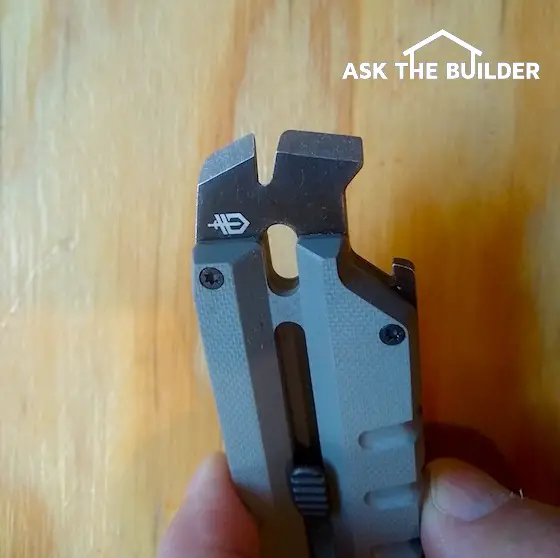
This is why they named the tool the Prybrid. This is the mini pry bar end. It may work well to pry things up in a house made for a mouse. Those two tips also are the flathead screwdrivers and the notch is the nail puller. No way you're going to be pulling out a 16d nail with this tool.
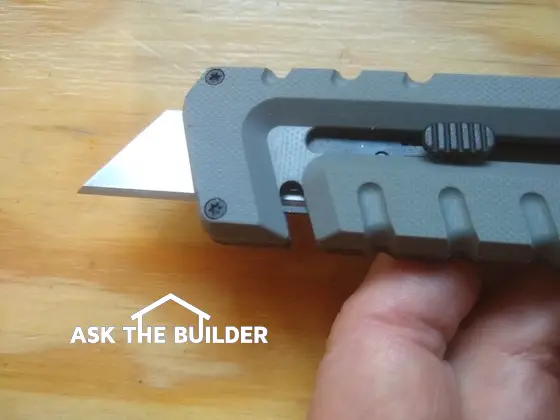
This is what the tool was designed to do, I think. Cut things. You can see the cord-cutting notch near my finger.
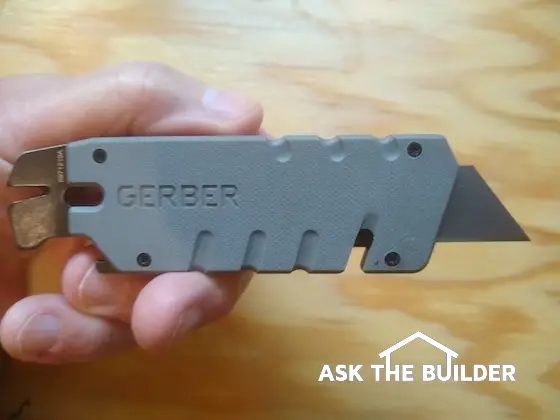
Here's the back of the tool. It's definitely got a boxy shape.

This is the photo you've been waiting for. Look at the difference in design. My favorite utility knife of all time - I'm talking 40+ years of using one - is in the center. It's the Stanley Quickslide. I BEG YOU TO GO BUY THREE OF THEM NOW BEFORE THEY STOP MAKING THEM. The yellow Stanley utility knife at the bottom is not bad, but it's fatter and just doesn't fit as good as the Quickslide. But guess what? You may think it feels GREAT! Your mileage may vary indeed!

BUY THIS ONE NOW! CLICK on the photo.
Do you get hungry cutting things? Me too! Look at my SHARP Steam Countertop Oven SSC0586DS review.
Subscribe to the FREE Ask the Builder newsletter to receive professional advice for your home. Complete the form below and each week you'll get:
Unsubscribe at any time. We respect your email privacy.