What Causes Etched Glasses in Dishwashers

drinking glass - no longer clear

What Causes Etched Glasses | This drinking glass of mine used to be crystal clear. Cascade dishwashing gel ruined it. This column was SO GOOD that I shared with the 31,000 subscribers who read my October 4, 2020 newsletter. Copyright 2020 Tim Carter

Author Update: Don't skip over the last paragraph below from Brad Booth.

What Causes Etched Glasses - It's Chelants & Cascade

QUESTION: Tim, please help me. I remember reading in past columns that you’re a master plumber and have some sort of science degree.

My husband and I are at odds as to what’s slowly ruining all of my wonderful clear glasses and heat-treated glass items in my kitchen. Each time I remove them from my dishwasher, they look worse. My husband states it’s just hard water.

I tried soaking some of the ruined things in hot white vinegar and there was no change. It’s got to be something else, but I can’t figure it out. Can you shed light on this? Sandra P., Las Vegas, NV

Are you suffering like Sandra? I am! The clear drinking glasses in my own home are slowly getting ruined just as Sandra described. Sandra’s correct that I’ve got lots of experience with dishwashers being a master plumber since age 29 and having worked in a commercial kitchen operating a powerful chili parlor dishwasher for over 12 years. A five-hour physical chemistry class was a requirement for my geology degree.

etched drinking glass next to a new clear one

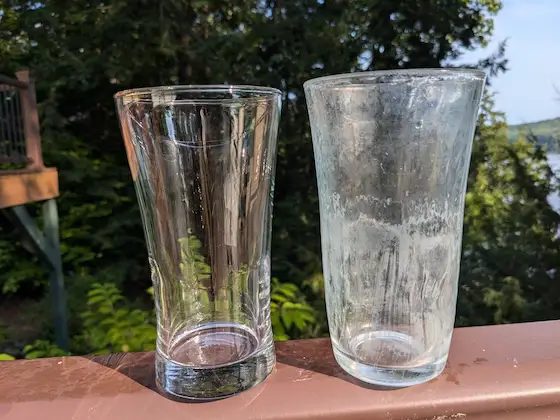
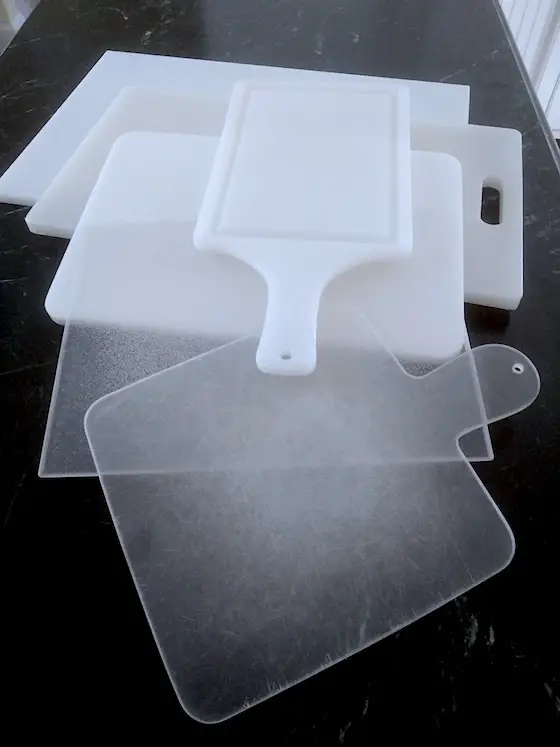
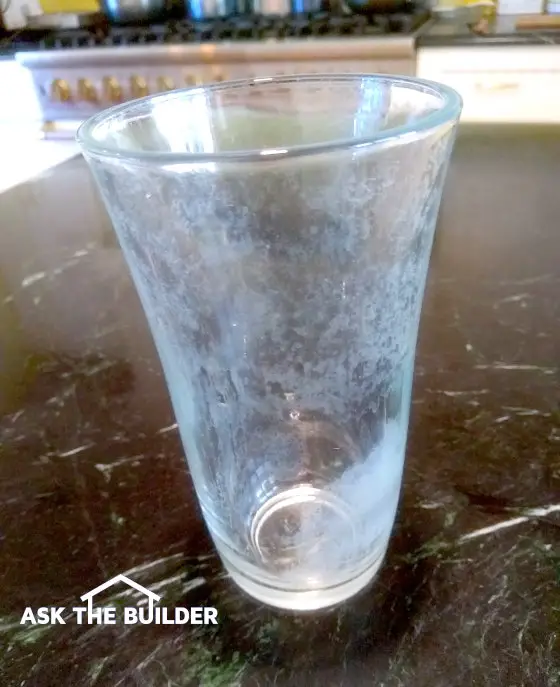
The glass on the left is brand new. The one on the right is etched beyond repair. Proctor & Gamble's Cascade dishwashing soap is to blame. Photo credit: Tim Carter Copyright 2024

Is the Cause Hard Water?

Many years ago, I was first introduced to this strange conundrum by my mother-in-law. I was a brash young man and she showed me one of her ruined small drinking glasses. She asked me if I knew what was going on. “Sure, it’s just hard water deposits. Let me take it home and restore it.” I tried soaking it in white vinegar, a mild acid that has no trouble dissolving hard-water mineral deposits. There was no change. I then got out my toxic bottle of muriatic acid and tried it full strength. There was no change. I was flummoxed.

As time passed, I deduced the issue had to be with the actual dishwashing detergents - be they powders, gels, or pods. In all my years of washing glasses by hand, they never suffered from etching, so whatever was happening was happening inside the steel box with the thrashing water spray.

Automatic Dishwashing Soap Etches Glass

Last month I finally had it. I reached out to what I believe is the largest USA manufacturer of automatic dishwashing soap, Procter & Gamble (P&G). They make the Cascade product I use. Since I’m a member of the working media, they were kind enough to accommodate my press inquiry.

A senior scientist from P&G explained that a perfect glass-etching storm can happen inside a dishwasher if you have these four things: soft water, low soil load, high temperatures, and chelating agents. She went on to say, “Chelating agents, or chelants, are a major part of auto-dishwashing formulations because they form soluble complexes with calcium and other metal ions, enabling them to remove food soils and limescale, soften water, and boost hygienic cleaning action.” When you soften water as I do at my home, you remove the calcium from the water. Uh oh!

To prevent glass etching, she suggested not rinsing dishes and glasses, wash in shorter cycles, not using the pots-and-pans or sanitizing settings, and using a dishwashing product that contains zinc.

The bottom line, in my opinion, is that if you want your clear glass to remain clear, you better do what I had to do as a kid. Wash them all by hand with normal liquid dishwashing soap. Your other option is to just keep buying new glasses after they get etched should you not want to wash them by hand.

AUTHOR UPDATE: Brad Booth lives in Columbus, Ohio. After reading the above column he sent:

"I just read the problem about glasses clouding in the dishwasher by Sandra P., Las Vegas. Cascade IS THE PROBLEM! I had the same problem with glasses, even coating my dishwasher filter using Cascade. Switched to Finish Powerball nine years ago and NO problem anymore! I've had no clouding of glass at any setting, temperature, or heat dry! Also, the screen filter no longer gets coated and clogged with white substance! Try any product except Cascade and see if that helps you."

Here's the Finish Powerball product. You can bet I'll be trying it:

Finnish Powerball diswasher soap

CLICK or TAP HERE to have this delivered to your home. I DOUBT you'll find this at your grocery store.

Dishwasher Detergent Warning! Is your detergent harming your dishwasher? CLICK HERE to see what happened to my dishwasher.

Column 1371

Certificate of Occupancy NH

"The building code is not a set of recommendations. It’s a pass/fail document. Something either meets code or it doesn’t. There’s no gray area."

Certificate of Occupancy NH - Don't Issue Until All is OK

QUESTION 2: Tim, I’m at my wit's end. My builder thinks my new house is finished but there are numerous defects. He had the building inspector through and this government official issued a certificate of occupancy (CO). The builder says this is proof everything is okay. I know there are numerous items that are against the building code and I hired an engineering firm to produce a report to verify this. How would you settle this scrum? Meredith S., Windham, NH

Oh my, Meredith’s plight is oh so common! I receive identical emergency requests from homeowners all across the USA on my AsktheBuilder.com website each week. The problem is growing and it’s very troubling.

I’ve done expert witness work in situations like this for the past twenty years. The last case I was on had me crawling over the roof of the Brazilian ambassador’s house on the Caribbean island of Antigua. It was a mess!

As I see it, there are two problems in Meredith’s case. Let’s assume she’s correctly identified numerous code issues. If that’s the case, the building inspector that issued the certificate of occupancy has made a mistake. The building code is not a set of recommendations. It’s a pass/fail document. Something either meets code or it doesn’t. There’s no gray area.

The way I prevailed in all my past cases was to ignore quality issues for the most part and just stick with code violations. I’d go page-by-page through the code and any section that had a measurement requirement, I’d go measure that item in the house. I’d then take a photograph or two to prove that the item didn’t meet code.

What Are Examples of These Measurements?

Here are examples of parts of the building code that require measurement standards be met:

  • stair risers and treads - look for the minimum deviation in riser heights - check the top and bottom riser
  • handrail height
  • deck railing post connection method and strength - see below video
  • hallway width - often hallways are 1 inch less than the code requires
  • stair/step landing size
  • amount of foundation showing between soil, siding, or brick
  • amount of fall of the exterior soil away from the house in the first ten feet of horizontal run

There are quite a few other places in the building code that provide minimum and maximum measurements. Be sure every part of your home or project complies.

Does an Expert Need to Do This Measuring?

You don’t have to hire an expert to do this. You can read the code and take measurements. Be sure to take photographs of the flaws. It's best to assemble all of the flaws you discover in a simple spreadsheet you can share with the head building inspector. the columns might have headers such as:

  • Descriptive Code Section Heading
  • Actual Code Section Number
  • Phrase describing the flaw
  • Amount of measurement deviation
  • URL of photos - upload photos to the cloud allowing you to link to them

CLICK or TAP HERE to see an example of construction photos in the cloud.

How Can I Resolve This With the Building Department?

You need to create the list of known building code defects and document them as stated above. Schedule a meeting with the head building inspector and point out all the flaws. Demand that the CO be rescinded and not re-issued until such time as a follow-up inspection verifies everything in the house meets code.

Column 1371

September 13, 2020 AsktheBuilder Newsletter

I know, you’re a seasoned subscriber and you might be miffed that I devote this top spot to welcome new subscribers. Rest assured; I appreciate your loyalty! But if you’re a new subscriber in the past six days, welcome! I hope I can save you scads of money and time with tips you’ll find here.

Do you remember the video I recorded after I went on my virtual trip to Paris, France? I dove into their culture and came up out of the water with the strangest tip! CLICK or TAP HERE and watch this short video to see what it was, Oui’ oui’!

Repair a Shallow Blacktop Pothole

Several days ago, I recorded a new video for you. If you’ve got puddling on your blacktop, you should fill in the spots before they become giant holes.
Blacktop Epoxy Repair - Shallow Hole Repair

CLICK or TAP HERE to watch how I do it using a fantastic exterior epoxy and magic stones and sand.

An Uncomfortable Conversation

Frank and Kim Carmichael have me on their Happenings radio show as a guest usually once a month. I simply love being on the show because I never know what they’ll ask me.
Happenings Q&A Radio Show

Sometimes we don’t even talk about home improvement! I was on a few days ago and Kim was trying to figure out how to avoid having uncomfortable conversations with contractors who come over to quote a job.

She said, “Tim, if I mention that you or some other source said to do a job a certain way, I know the contractor will get offended and the conversation’s going to go off the rails. How can I be sure the job is going to be done the right way?

Kim’s right. Many of the contractors I know have fragile egos and if you challenge them with suggestions, methods, and products they might l recoil. It can be very ugly indeed.

I shared with Kim how I’d do it. As is often the case, it requires more work on your part, but it’s worth it unless you have more money than Jeff Bezos. Most of us don’t.

Step 1. Select ALL the fixtures and materials you’re going to use before you call a contractor.

Step 2. Get the installation instructions for the items and read them. Note the important steps or warnings.

Step 3. When you meet the contractor, show him or her photos of what you’ve selected and begin to ask questions that probe how the contractor plans to install the items. You want to see if he knows what he’s doing.

Here’s an example. You might have picked out a new front door. The instructions clearly call out for a specific flashing pan under the door to prevent wood rot. CLICK or TAP HERE to see one.

door flashing pan

So you might ask, “Can you tell me what you do to prevent wood rot under the door?

If the contractor doesn’t mention using a flashing pan, then you might say, “I watched a video online that showed using this flashing pan. What do you think of them? Have you used them before?

These are simple non-aggressive questions and any PRO contractor will not be offended.

The best contractor will answer that he’s used flashing pans and he might even ask you what you want him to do. If he does, you simply say, “Well, I’d like you to install the new door exactly as the written installation instructions say to do it.

This is not hard, and after all, it’s your money.

Burrowing

Trisha, from Hartford, WI, reached out to me. She asked:

I have an animal that burrowed under the sidewalk that is attached to my front porch. It's small, probably a chipmunk. Should I use polyurethane 2-part spray foam or use hydraulic cement to fill the void? There is no damage and no cracks to the sidewalk but I'd like to fill it before it becomes a problem.

My answer was:

Neither! Just mix up a slurry of sand and get it to flow into the hole as best you can. The two products you mention are overkill and a waste of money.

Now, that said, let’s imagine you WANT to burrow under a sidewalk to extend an electric line. Here’s how I do it:

cut pvc pipe

CLICK or TAP HERE to see how I use that huge hypodermic PVC needle. Be sure to SCROLL DOWN and watch the video of me using the needle. There’s NO BLOOD involved.

Roof Maxx Review

I wanted to re-share my review of a product you may see advertised on TV - Roof Maxx.

CLICK or TAP HERE and be sure to spend some time combing through the comments.

Gutter Guard Truth

I’ve been seeing a significant number of ads on TV at night for a gutter guard product. Ads like that cost vast sums of money and you pay for the ads when you buy the product.

micromesh gutter guard

I’ve done exhaustive testing over the years about which gutter guard design is the best. I have ones on my home here in NH that perform very well.

CLICK or TAP HERE and be SURE TO WATCH ALL THE VIDEOS on the page.

That’s more than enough for you to munch on for a Sunday.

Tim Carter
Founder - www.AsktheBuilder.com
SUPER Cleaner - www.StainSolver.com
NH Champ Skeeter Hunt - www.W3ATB.com

Do It Right, Not Over!

P.S. Have you ever seen a color photograph that is then rendered in black and white? Modern photo software will do this for you.

CLICK or TAP HERE and discover WHY YOU SHOULD BE DOING THIS with INTERIOR WALL PAINT!

Fill Driveway Holes

blacktop patch - perfect match

Fill Driveway Holes | Can you believe how the blacktop patch to the left is almost a perfect match? The blacktop defect was too shallow to fill with a normal patching compound. Copyright 2020 Tim Carter

Fill Driveway Holes - Use Exterior Epoxy, Stones & Sand

QUESTION: Tim, I read a previous column of yours where you talked about how to fill driveway holes in a concrete surface using sand and Portland cement. You talked about installing concrete overlay. My issue is I have a few shallow puddles in my blacktop driveway and I know this ponding water will eventually create a far more serious issue. The normal patching products sold in bags will not work as the depression is too shallow. I tried using it once and it all peeled up. How do you recommend creating a patch that stays put and matches as closely as possible the rest of the blacktop? I’m 78 years old and quite sure I can follow your directions. Katie D., Laurel, MD

You may have the same problem as Katie. I know I do! There are three places in my blacktop driveway that have sunken. I didn’t build the house I currently live in. One of the areas is where the underground electric and cable TV wire passes under the drive. I’m quite sure the contractor didn’t compact the fill in the trench and/or he used the wrong material.

Two other locations are probably poor fill as well. Two years ago, I removed all the crumbling blacktop in one of these areas and did fill it with 1.5 inches of the cold-patch blacktop that Katie tried with no success. I’ve since had a little more settlement in this area and quite a bit of the cold patch has eroded. In other words, my driveway is the poster child for the problem that Katie and you might be facing.

Why Is Epoxy a Great Thing to Fill Driveway Holes?

Several years ago, I became aware of a fantastic exterior epoxy that’s made to repair concrete and asphalt defects. It can also be used to fill cracks larger than 3/8 inch in concrete slabs. I’ve tested it in my harsh New Hampshire climate and it’s unfazed by bitter cold temperatures. It’s also performed well when the sun has raised the temperature of the blacktop so high you can’t walk on it with bare feet. In other words, this epoxy is worthy of your attention.

CLICK or TAP HERE to get FREE QUOTES from local handymen that can do this repair for you.

If you were to just use the epoxy to fill driveway holes, you’d end up with a medium-gray monolithic patch. That’s the color you get when you blend the white epoxy component with the black component. Your blacktop, if it’s like mine, is actually a mosaic of different stones, sand, and the black asphalt cement you see holding the stones and sand together. I decided it was really easy to match this look with a minimal amount of effort.

pc masonry epoxy

This is the EXACT epoxy I used for my driveway repair. It's going to be there for years. CLICK on the IMAGE to order some now.

Why Should I Read the Epoxy Instructions?

The first step in the process is to stop and read the instructions on the label of the epoxy. Pay attention to the temperature range when you can install it. I decided to wait until the daytime temperatures were in the mid-70s F and I worked in the shade.

How Thick is the Epoxy?

The epoxy components have the consistency of very thick peanut butter. I used a stiff bent 3-inch scraping tool to blend them together on a large thin piece of plywood. I discovered wide side-to-side strokes did an excellent job of thoroughly mixing the epoxy. Don’t try to scoop and turn it over in a large pile as it’s just too sticky to do this.

Where Do I Get the Stones and Sand?

It’s important to realize that before I even unpacked the epoxy, I gathered up some stones and sand from the edges of my driveway. These things used to be part of my blacktop. Each winter the NH ice plucks some from my drive. If you don’t have any stones and sand, just take a closeup photo of your blacktop and go to a nearby gravel pit to get matching stones. Trust me, you’ll never regret taking the time to do this.

black sand

This is great sand to use to sprinkle between the stones. It will simulate the asphalt cement in your actual blacktop. CLICK on the IMAGE now to order it.

How Thin Can the Epoxy Be?

What I love about this epoxy-repair method is the epoxy can be feathered to just 1/16th-inch thickness. This allows you to make a repair that absolutely gets rid of any puddling. In my case, the thickest part of my depression was about 5/8-inch.

What Prep Work is Required?

To achieve a permanent bond, you must get rid of any dust from the blacktop as well as any other loose stones. I employed my hand-held leaf blower, garden hose, and a push broom to do this. I basically washed and rinsed the blacktop and allowed it to thoroughly dry.

I mixed up equal amounts of the epoxy ending up with about a half-gallon of material. Using the scraper, I transferred the sticky goo from the plywood to the center of the depression and worked my way to the edges. I was careful to not put the epoxy outside of the depression. I also made sure the epoxy was about 1/4 inch lower than the other flat portions of the blacktop outside of the depression. The stones and sand would be used to make up the difference.

The epoxy I used has a very long open time. You have plenty of time to work with it after mixing. Looking at the mosaic of stones in my existing blacktop, I started to place larger stones in a random pattern throughout the epoxy. I then scattered smaller pebbles around the larger stones. I was careful to use the smallest pebbles at the edge of the patch.

Do You Compact the Stones and Sand?

After all the stones were placed, I then scattered dry sand over everything. I wanted the sand to hide the epoxy. I used a scrap piece of 2x4 to pack the stones and sand into the epoxy and to make sure the new repair was flush with the surrounding blacktop.

I wish now I had purchased black sand, but when you view my patch from a distance only a perfectionist would complain about the light-colored sand.

I created a video for you to watch to see the epoxy I used and how I did the job. Check out the video below.

Column 1370

September 6, 2020 AsktheBuilder Newsletter

Greetings and salutations! Are you one of the nearly 100 new subscribers in the past seven days? Welcome! I reserve this top spot in the newsletter to honor your presence.

You, though, might have been with me so long that you remember the mind-blowing column and illustration I created that caused your jaw to drop. Come on, I know you remember!! It was the one about lumber shrinkage. CLICK or TAP HERE to discover a question you can use to win a bet or a game of Trivial Pursuit!

Where Was I?

I like to take photos. I was a member of my high school yearbook photography team spending hours in the darkroom producing contact sheets and final black-and-white photos. I also volunteered to work in the largest darkroom at the University of Cincinnati as a geology undergrad.

I'm going to try to share an interesting photo as often as possible of things and places that cross my path. Here's one I shot this past Wednesday. There's a clue in the photo, if you strain your eyes, that will allow you to pinpoint where I was. I'm looking for you to share with me the exact name of the beach.

I'll let you know the answer in the next newsletter. Watch for it next week to see if you were spot on.
rusty chain on beach

Oxymoron ALERT

You may have been one who teed up and took a swing at me last week about the clever oxymoron I included in the insurance alert piece.

Peaceful protestors don’t loot and commit arson for goodness sake!

Robert’s Stinky Hats

About ten days ago Robert, a contractor subscriber to this newsletter, reached out to me with a STAIN SOLVER success story. You’ll love this one:

“I'm sure you get lots of messages touting wonder and amazement over your Stain Solver. I was just so amazed I had to share my story. I'm a contractor in central Illinois, often working on projects that are not air-conditioned. I keep a hat for such occasions to catch my sweat.

A month or so ago, I noticed my hat smelled quite badly, and upon wearing it, my head smelled bad. I wondered how to clean it, talking to my wife and mother-in-law. They suggested a dishwasher with a plastic cage to help the hat keep its shape.

Well, I remembered an email you sent about the lady who cleaned her son's baseball cap, and I decided to give it a shot. (CLICK or TAP HERE to see the photos of the hat Robert is talking about) I mixed up a gallon of warm water with STAIN SOLVER per the directions, grabbed my hat, dropped it in, and the fizzing started.

I used a plastic spoon to agitate for a minute or so, and then rinsed it out. My hat was clean and good as new. The water was unbelievably gross. I couldn't believe how dark and dirty the water was. Now my hat looks clean and smells clean again. I went ahead and washed about a dozen hats. Thank you, Tim.”

If it were me, I would have allowed the hat to soak for about 30 minutes. It seems Robert had it in the solution a much shorter time but he was still happy with the results.

CLICK or TAP HERE now to order your STAIN SOLVER now.

STain Solver Oxygen Bleach

Revive Cedar Chests or Closets

Ron emailed me last week. He wrote, “I have a storage room with cedar walls. How can I get the cedar smell back?

Well, all Ron had to do was type the following two words into the search engine at AsktheBuilder.com to discover his answer:

cedar smell

Look:
cedar smell search results

CLICK or TAP HERE to discover how easy it is to make the cedar aroma so strong and pleasant that you’ll want to stay in the closet or cedar chest all day!

STOP Getting Lost

Have you ever had an issue with Google Maps where you enter in an address, navigate to it, and then discover you’re not exactly where you’re supposed to be?

Did you know you can HELP IMPROVE Google Maps? They have a very responsive team that works on your suggestions.

Just last week, Google Maps was off by about 500 feet for an address on a main road here in NH. I submitted a correction and they’re working on fixing it so others will navigate to the correct driveway.

Look at these two screenshots to see how to start the process. The FIRST text link you need to click is Send feedback. It’s in the lower RIGHT CORNER of Google Maps:
Send Feedback to Google Maps

After you click that link, a new window opens giving you choices of what to do. Select the one that best fits your correction or suggestion and follow the easy step-by-step directions:
Google Maps Feedback Choices

How To Create Mold In Your Home FAST

Elliot emailed me last week. Here’s what he wrote:

“In a recent article of yours about exhausting moist air from bathrooms you mentioned that if you were in a snowy area you may have to extend the pipe up higher. Why not use that warm moist air in the wintertime to make your home feel more comfortable? Perhaps consider using a small fan to blow the air out of the bathroom into the rest of the home.”

CLICK or TAP HERE to see why you MUST NOT do what Elliot suggests.

Random Question(s) Feature

I’m thinking of creating a new feature in the newsletter called, Random Question. Let’s see how it goes.

Scenario: An orchestra is playing a song. The musicians all have sheet music in front of them on their music stands. You can see this exact scenario in the opening 15 seconds of this video. CLICK or TAP HERE. Just about all of them have to use two hands to play their instruments, especially the violin players.

How in the heck do they turn pages and NOT stop playing? They’re all playing the same notes and if what they’re playing spans several pages, how is it the music doesn’t stop? What keeps them from turning to the wrong page? Why don’t we hear sheet music hitting the floor?

Fear - It’s Paralyzing

Did you know that the emotion of fear automatically blocks the part of your brain that performs critical thinking and reasoning?

I’m sure you’ve experienced this before. It’s happened to me and I can confirm that when fear has overtaken you, your ability to think clearly is severely impaired.

It’s one reason why basic training in all military branches tries to squelch fear to show recruits that they can survive any situation.

Cleaning Cutting Boards

This morning I decided to clean and purify my kitchen cutting boards. Do you have ones like these?
Cutting boards

CLICK or TAP HERE to see how I did it. I also have a #HACK to get out deep tomato sauce stains.

Bill's HAPPY Email - Over the Top!

Several days ago, I received an email from Bill just before dinner. It had been a tough day for me and Bill put a smile on my face wider than the airplane hanger door for a B-52 bomber!

CLICK or TAP HERE and look just below the bullet list to read Bill's message.

That’s probably enough for a Sunday.

Tim Carter
Founder - www.AsktheBuilder.com
CERTIFIED ORGANIC - www.STAINSOLVER.com
Dihs and Dahs - www.W3ATB.com

Do It Right, Not Over!

P.S. Planning on sealing concrete before winter? CLICK or TAP HERE to see what sealer I feel is best.

Fiskars Pro Isocore Mauls

fiskars wood splitting mauls

Fiskars Pro Isocore Mauls | Here are two mauls that will last generations. CLICK or TAP HERE or the photo to have them in your hands in days.

Fiskars Pro Isocore Mauls - Split Tough Wood Fast

I tested the two Fiskars Pro Isocore Mauls and had great success. Within minutes, the small 2.5-pound maul became my favorite.

It's so nice to have a small maul the size of a hatchet that creates small kindling faster than kids eat ice cream on a hot summer day.

CLICK or TAP HERE to just order them now because I know you'll be SATISFIED as I was.

Fiskars 6 Pound Maul

You can see why this 6-pound maul splits wood FAST. Look at the aggressive angle. CLICK or TAP HERE to order it now.

Fiskars 2.5 Pound Maul

This is such a wonderful small maul. It's a perfect weight and produces nice small kindling FAST. CLICK or TAP HERE now to have it in your hands in just two or three days.

Fiskars 2.5 Pound Maul

Here's the small maul side-by-side with a typical hatchet. You can see why it will do so much better splitting small pieces of logs into excellent kindling to get a FAST fire going. CLICK or TAP HERE to order the small maul. You'll LOVE it.

Do the Mauls Come with Saftey Caps?

Yes, both mauls come with a cover to protect the semi-sharp end.

Do the Mauls Have a Great Guarantee?

Yes, I believe there's a lifetime warranty on the mauls - the heads won't fly off into the ether or the woods.

What Didn't You Like About the Mauls?

I found that sleeping with them was uncomfortable. I liked them so much I wanted them with me at all times, but I just don't like cold steel against my feet at night.


August 29, 2020 AsktheBuilder Newsletter

Bad form!” Nice try! You almost slithered past me while I was distracted. Next time, try using some PAM on a piece of plastic - you’ll make far less noise. I know, you’re a little shy and you’re one of my newest subscribers, right? I always love to greet new subscribers and this is where I do it each week. Thanks for signing up!

Remember when Captain Hook (Dustin Hoffman) said that line in the movie Hook - the remake of Peter Pan? What a great accent he used! CLICK or TAP HERE to hear Hoffman say “Bad form!”, and then watch a few very short clips of this magical movie. It’s going to warm your heart, I GUARANTEE it.

You might be one of my loyal subscribers. If you could greet one of our newest family members, I’ll bet you might show them this epic video where I share the absolute BEST plumbing vent pipe roof flashing. For the love of God, don’t install one of the piece-of-c* * * ones made from aluminum and rubber! It’s guaranteed to fall apart in just a few years. CLICK or TAP HERE to see the flashing that’s on my roof.

Are You a Plumbing Inspector?

Are you a plumbing inspector or do you work closely with one? If so, can you please reach out to me ASAP? Just reply to this newsletter.

Insurance Review - ALERT

There’s lots of unrest happening in the USA right now. Your business or home could be near where this is happening. My STAIN SOLVER factory and fulfillment center are at risk.

I called my insurance agent the other day and asked if I was covered for looting and any fires that might be set by the peaceful protesters during the disturbances.

The answer was, “Tim, it clearly states on your EXCLUSIONS page, that you would NOT BE COVERED. Losses generated by riots are NOT COVERED.

Yikes! I urge you to get out your homeowner’s or business policy and read your EXCLUSIONS page. If you’re not covered, create a contingency plan to protect yourself and your possessions. If you have questions, call your insurance agent soon.

Construction Damage and Dirt

A few days ago, Debbie shared a story about how the contractors building her new home almost ruined a very expensive cast-iron bathtub. Look at it:
dirty bathtub

Homeowners like Debbie send me photos quite frequently showing how some contractors imitate P I G S when working on their new homes or remodeling jobs. That said, my father-in-law grew up on a farm and he often told me that pigs make the best pets. It’s possible a few pigs have given all the others a bad rap.

Back when I was building, I dedicated a few old painting tarps to the task of protecting bathtubs. You can’t be too careful with cast iron tubs, acrylic tubs, showers, and any other plumbing fixture that needs to be installed before lots of other finishes.

It drove me CRAZY when I’d see my drywall finisher standing in a tub with his aluminum stilts on!

CLICK or TAP HERE to see what Debbie, (not the contractors!), used to make the tub look like new.

My Prediction Comes True

Each year as hurricane season ramps up, I issue urgent warnings about you becoming more self-sufficient. Natural disasters pound public utility and safety resources thinner than a piece of gold leaf.

Here’s a headline I saw at an online news source this morning:
Hurricane Laura Power Outages

Can you survive without power for two weeks or more? If the answer is “No”, then what is your contingency plan?

Identifying Energy Vampires

How would you like to have an easy-to-use tool that fits into your hand and allows you to discover where vast amounts of sweet moola are leaking out of your home into the ether?

infrared photo of front door

CLICK or TAP HERE and be prepared to be absolutely amazed. There are some eye-opening infrared photos on that page.

I NEED Your Help, Again

Are you thinking of doing work around your home or do you have an interest in getting a home warranty?

I’m trying to gauge your experience when local professionals give you a FREE quotation on a job. I need the input from homeowners like you because I would have a jaded view, for sure, being a contractor. I’d love to hear your story and you might be helping someone else by sharing it!

That said, if you need FREE quotes for bathroom remodeling, gutter guards, or a home warranty, please go to the following pages, fill out the form, and then GET BACK TO ME once you’ve gone through the entire process. I want to hear the GOOD, the BAD, and the NOT-SO-PRETTY.

Bathroom Remodeling FREE Quotes

Gutter Guards FREE Quotes (DEMAND micromesh!!!!)

Home Warranty Information and FREE Quotes

Small Splitting Maul - Will it Work?

I was able to test a small splitting maul that resembles a hatchet last week. Like so many other things, I’ve been waiting for this small tool my entire life! Do you have any idea how hard it is to split small kindling wood with a giant maul? And a traditional hatchet just doesn’t work well for this task.

Fiskars 2.5 Pound Maul

CLICK or TAP HERE to see my positive and negative comments about this dandy little maul and its bigger 6-pound brother.

Don’s Dilemma

Don lives in Toledo, Ohio. That’s about three hours up the road from where I lived in Cincinnati. It’s just west of the most spectacular continental glacial grooves on the planet. I was near Don’s house just ten months ago and shot this photo while I was alone at the State Park pondering how just 13,000 years before I’d have been buried under 3000 feet of ice!

Did you know there were four periods of massive continental glaciation in the past 2,000,000 years? Four times the enormous thick ice sheets were created and then melted with just a few campfires burning.

I was mystified by this as a young geology student. As the years clicked by and I accumulated more critical-thinking skills, I became even more impressed by Mother Nature’s power to do all this on her own with no assistance. As you’re about to see, there appears to be a shortage of critical-thinking skills out in the general public.
glacier grooves near Toledo, OH

Anyway, Don’s sent me this pithy email:

“I boiled in linseed oil with my red Behr deck stain. Now the deck stain is peeling off with green spots that did not stick to the wood. I sanded off the spots but I’m not sure what to do next to stop the peeling.”

Do you grasp what Don did? He apparently, if I understand his email to me, put on a white lab jacket, perhaps donned (pun intended) some safety glasses, MAYBE got out a fire extinguisher and proceeded to put some BEHR deck stain on his stove, heated it up to BOILING, and then added linseed oil.

ARE YOU KIDDING ME?

What’s happened to good old common sense and critical-thinking skills?

For the love of Pete, you should NEVER EVER try to do what Don did. NEVER play amateur chemist in or outside your home!

NEVER mix anything with anything else unless you KNOW FOR A FACT what the result will be.

For example, NEVER mix chlorine bleach with vinegar. It creates TOXIC chlorine gas.

NEVER mix chlorine bleach and ammonia - once again, you create TOXIC chlorine gas

NEVER mix chlorine bleach with rubbing alcohol. You create chloroform which is also TOXIC.

NEVER mix hydrogen peroxide with vinegar. You create peracetic/peroxyacetic ACID which is highly corrosive.

I could go on and on and on about what shouldn’t be mixed with one another. Before you mix ANYTHING, contact the manufacturer of the things you want to mix and get their okay.

Here’s what my advice to Don is:

  • Go buy a lottery ticket or two to see if some of your lucky magic is leftover.
  • Get out a belt sander and remove the peeling mess.
  • NEVER AGAIN DO SOMETHING LIKE THIS HOPING that what you’re doing is going to work.

That’s quite enough for a Sunday. Whew, that was one long newsletter! Did you like it? Let me know!

Remember, get back to me after you’ve filled out the bath, gutter guard, and home-warranty forms and heard back from the contractors. I want to know if you’re treated with respect and if you have a great feeling about the experience.

Tim Carter
Founder - www.AsktheBuilder.com
BEST CLEANER in the World - www.StainSolver.com
Morse is Auditory - www.W3ATB.com

Do It Right, Not Over!

P.S. A few years back I was the home improvement expert for the ABC-TV affiliate in Cincinnati, OH. I used to have some fun with the garden expert in collaborative videos. I actually got hurt doing this video and did a good job of masking the pain! CLICK or TAP HERE to see if you can guess what happened.

Bad Form Hook

Bad Form Hook - Dustin Hoffman and Robin Williams

Here's a very short clip of Dustin Hoffman playing Captain Hook in the movie Hook saying, "Bad form!"

You may want to watch a few of the other trailer clips to remind you of the magic in this wonderful remake movie starting Hoffman and the late comic Robin Williams, RIP.

Klein TI 250 Thermal Imager Review

klein ti 250 hot fiberglass door

Klein TI 250 Thermal Imager | This is an IR photo of my fiberglass front door. Yeeouch! HOT!

Klein TI 250 Thermal Imager Review - Small, Powerful & Handy

I had the opportunity to test the Klein TI 250 Thermal Imager over the past few weeks.

I love this dandy little thermal imager because:

  • it's small - just 3 x 3 x 1 inch!
  • it's easy to use
  • it takes photos
  • it's adjustable

This was not my first rodeo testing a thermal imaging camera. You might want to read my FLIR IR camera review too.

CLICK or TAP HERE to see the current low price for the Klein TI 250 thermal imager.

Why Did You Like It?

This Klein IT 250 reminds me of the old Instamatic cameras. You just take it out, turn it on, and BOOM you have a reading. Some other IR cameras require you to download an app and then you plug in the camera to your smartphone.

This IT 250 just works on its own. It's simple and elegant.

Do You Need to Buy a Micro-SD Card?

Yes, you have to buy a separate micro-SD card. I was really disappointed by this because small low-capacity micro-SD cards can be bought in volume for pennies. CLICK or TAP HERE to verify this - these are 2020 RETAIL prices! It's so frustrating to offer a feature on a product, but then say, "Sorry, you need to buy something else to make that feature work."

I asked Klein about this and they said the contractors they beta-tested the IT 250 with didn't think they'd use the take-a-photo feature of the thermal imager? So what? If you can put in a 25-cent card in the box, why not do it?

What are the TI 250 Specifications?

klein ti 250 specifications

What Do the Thermal Images Look Like?

Check out these photos:

klein ti 250 hot roof

This is a picture of my Davinci Roofscapes roof. It's pretty hot on an August day!

klein ti 250 hot fiberglass door

This is an IR photo of my fiberglass front door. Yeeouch! HOT!

klein ti 250 hot computer monitor

This is my iMac computer. Think how hot it is inside the case!

klein ti 250 hot garage door

This is my HAAS wood-grained aluminum garage door. It's a dark brown. So the sun heats it up.

klein ti 250 hot blacktop asphalt

Blacktop and asphalt can get hot. Be careful with toddlers' tender bare feet!

klein ti 250 hot fiber cement siding

This is a cream yellow fiber cement siding in the sun. It can get hot too.