Post-it Flex Write Surface

post it flex write

Post-it® Flex Write Surface | Here's a very small sample of the magic film you apply to a wall. This is the teaser sample sent by the company so you could play with it. See below for the GIANT sizes you can buy. Alakazam! - instant white board - permanent markers wipe off with WATER! CLICK or TAP HERE or the photo to buy it now.

Post-it® Flex Write Surface - Permanent Markers Wipe Off

I tested the Post-it® Flex Write Surface product and it works. It works really well.

You know that permanent markers can ruin a traditional whiteboard - and yes, there is a toxic chemical you can use to restore one should you make a mistake and not use a dry-erase marker.

I'm not a big fan of clear toxic chemicals that can soak into your skin, are you?

The Post-it® Flex Write Surface is a thin film with a self-adhesive backing. You can apply it to any painted wall. BOOM! You have a whiteboard in seconds in any room!

It's perfect for home use and office use. A very good friend who was a school teacher mentioned it would be ideal for school science-fair projects!

Post-it® Flex Write Surface:

  • comes in a variety of different sizes up to 4 x 8 sheet and a roll 50-feet long x 4 high - cut and customize it to fit any size - CLICK or TAP HERE to order a giant roll.
  • has self-adhesive back surface
  • applies to a painted wall in seconds
  • remove from the wall with no damage
  • MAGIC! - permanent markers wipe off with water
  • NO GHOSTING!
post it flex write surface

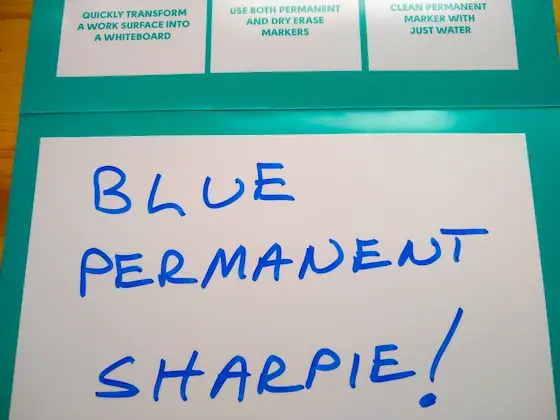
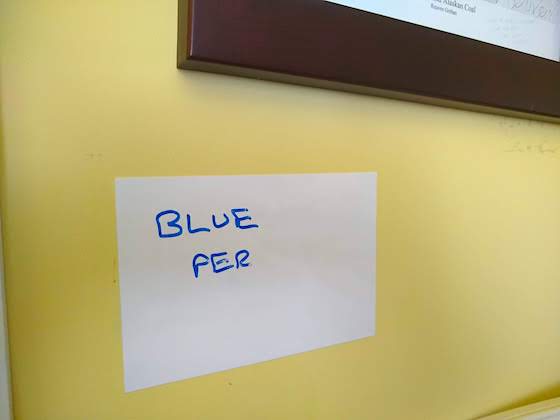
This was done with a Sharpie. You know that once it touches something, the mark doesn't go away.

post it flex write

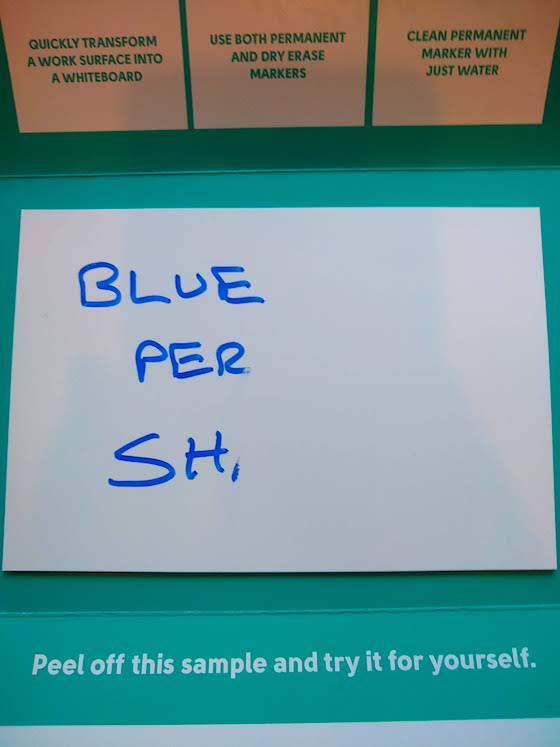
I waited for 30 minutes to ensure the marker was dry. I tried rubbing it with my finger. It was PERMANENT - or so I thought. Then I wet a clean paper towel and wiped off the marker with NO EFFORT. It's magic! CLICK or TAP HERE to buy this amazing product now.

post it flex write

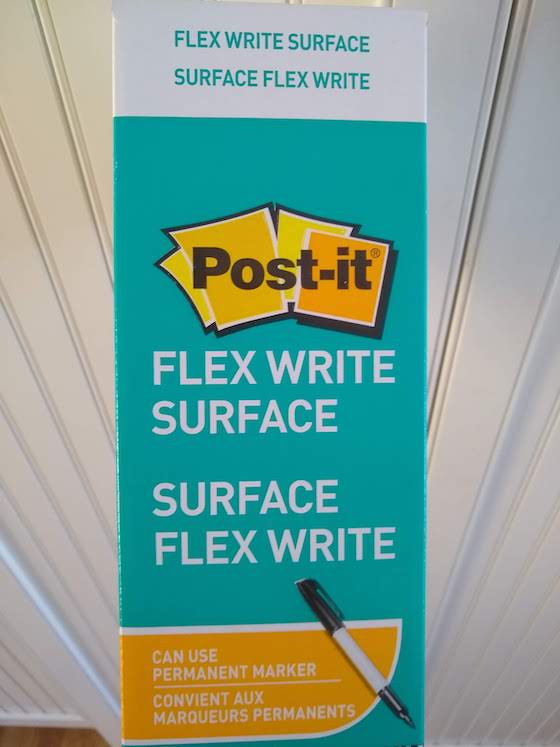
The Post-it® Flex Write Surface comes in a roll. You can buy it in different sizes. CLICK or TAP HERE to buy the size you need.

post it flex write

Here's an old white board made for my kids by my father-in-law. They ruined it one day using permanent markers. HAH! I'm going to apply a new sheet of Post-it® Flex Write Surface and it's going to look like new! CLICK or TAP HERE to order yours now.


Prevent Cut Electric & Cable Lines and Roofing Nails

plastic pipes in trenches

Those gray plastic pipes in the trenches will soon have electric and cable-TV cables in them. The pipes help prevent future cut lines. The photo should be saved and taped to the electric panel cover! (C) Copyright 2020 Tim Carter

Prevent Cut Electric & Cable Lines

QUESTION #1: Tim, what are your thoughts on burying electric and cable-TV lines? I can buy approved cable and wire that’s rated for direct burial saving the cost of installing it in conduit. What’s been your experience with underground utilities like this? What would you do and why? Glenn A., Columbia, SC

Glenn’s questions are excellent. You may wonder the same thing if you’re building a new home or you might have a remodeling project planned at your home. Heck, it could be just a simple project of adding a new post lamp out on your back patio.

I didn’t build the home I currently live in. It has lots of underground buried cable. Just this past spring, all of a sudden one of my circuit breakers started tripping indicating a dead short. Had I been testing the electric monitoring system I’m now using, I would have been alerted to the dangerous arcing weeks before the breaker started tripping. But that’s a story for another day.

I traced the cause of the dead short to a small place where a buried cable passed through a plastic conduit that was installed under my driveway. The cable was rated for direct burial, but the annual frost heave in the soil here in New Hampshire had caused the cable to rub on the sharp cut edge at the end of the conduit. Eventually the up and down movement severed the insulation and the bare wires shorted out in the soil.

Had the cable been buried in conduit all the way from the house up to the post lamp at the end of my drive, I would not have had to waste a day replacing the cable and installing 70 feet of new conduit. I was shaking my head the entire time digging the new trench thinking, “How could the electrician or builder think saving $30 was a good idea?” That’s all the conduit would have cost when the house was built.

I’m a huge fan of putting all underground cables and wires inside conduit. I’m an even bigger fan of putting these in trenches deeper than the National Electrical Code minimum depth. Take this one step further, I’m a monster fan of taking photos of the open trenches after the conduit is installed and visible. Shoot photos from many angles showing future homeowners where the conduits and cables are buried. I print out these photos, put them in a waterproof plastic bag and tape the bag to the electric panel for safekeeping.

If you’re not a fan of using conduit, you may change your mind when that gardener in your family pierces a buried cable while digging a hole for that new bush or tree. With that in mind, it’s a really good idea to think about where landscaping might be in your yard. You may want to route underground cables and wires away from these digging zones of death. I’ve seen aggressive diggers cut through conduit thinking they were chopping a rock or a root.

Roofing Nails

QUESTION #2: It’s time for a new roof on my house. I’m going to install asphalt shingles. I decided to read the installation instructions before talking with roofers. Galvanized roofing nails are required. Are there different types of galvanized nails and is one better than the other? Is there anything I can do to make sure this is the last asphalt shingle roof I install? Maria P., Kalamazoo, MI

There’s a really good chance you might be in Maria’s shoes soon as more homeowners like you are replacing their asphalt roofs faster than they should have to. I was one myself as my own asphalt shingle roof that was supposed to last 30 years started to fail in just nine years or so.

I was so upset at this I wrote a book about why asphalt shingles disintegrated much faster than the shingles I used to install decades ago. My book, Roofing Ripoff, is an easy read and not one shingle manufacturer disputes the claims in the book. That tells you right away that what I say in the book is truth. But I digress.

roofing ripoff

Here's my Roofing Ripoff book. It's an easy one-hour read. You'll save $5,000 reading it. GUARANTEED. CLICK or TAP HERE to read the first three chapters for free.

There are big differences in galvanized nails. The best ones are hot-dipped galvanized nails. Better yet are ones that are double dipped. In this process, regular steel roofing nails are dropped into a vat of molten zinc. The nails are immediately heated up by the searing molten zinc and this creates a steel/zinc alloy. The zinc coating is relatively thick and it protects the nails from rusting.

The other methods of galvanizing nails are mechanical and chemical. These two methods also attach zinc to the steel nail, but the coating can be quite thin. Chemical galvanizing happens when the steel nails are put into a vat containing a zinc-based chemical solution. Electricity is sent into the vat and the zinc is pulled out of the solution and bonds to the steel nails.

Mechanical galvanizing happens when steel nails are tumbled in a large drum with zinc dust, glass beads, and a chemical. The zinc dust is hammered onto the steel nails. My own asphalt shingle roof had nails that had one of these two galvanizing processes and many of them had rusted after just ten years.

When I was doing research for my Roofing Ripoff book, I was the first person in the world to discover that copper ions bond with sun-damaged asphalt molecules. When the copper locks onto the asphalt the asphalt molecules are unable to bond to nearby ones. This keeps the asphalt supple for many many years preventing the shingles from curling and losing ceramic granules.

I recommend applying a thin 12-inch-wide copper strip up at the top of the roof that’s blind nailed on new roof installations. The ultraviolet rays of the sun split off copper ions and these are washed down the roof with each rainfall where they grab onto the asphalt. Install this affordable thin copper rolls on each side of your roof and it’s quite possible your new asphalt shingles can last forty, or more, years like they used to. Check out my Roofing Ripoff book for photos and more details.

Column 1340

February 9, 2020 AsktheBuilder Newsletter

Is this your first real newsletter issue? I'm so glad you're here. I've got quite a few prizes in store for you. If you'd like a chance at winning a $50 Amazon Gift Card, be sure to play my annual Treasure Hunt game below. The game ends in just three weeks. Play now or I'll have you walking the plank, matey!

You might have done one or more rodeos with me here. This issue looks to be like that broncing Brahman bull we rode about two months ago. Remember that rocking newsletter?

Joe's Patio Door Woes

Please peer at this photo:

patio door hinge types

That's a hinge, right? What do you think's going on?

Can you surmise Joe's plight?

CLICK or TAP HERE to see if you were close. I'm very curious as to what you'd do if you were in Joe's shoes. Believe me, Joe always wears clean socks, so there's nothing to worry about.

Guessing Game

Study this photo and think about what it might be:
cabinet mold

This is not an easy thing to figure out, you know!

Here's a clue: What goes up into the air when you boil water? Take that image one step further. Is there water in certain things you cook or fry?

CLICK or TAP HERE and tell me if you guessed wisely. You're NOT going to believe the before/after photos.

There's a prize waiting for you once you land on that page. The prize will DISAPPEAR from the page in just a few days!!!!!


CLICK or TAP HERE NOW to get FREE quotes for ANY job around your home from LOCAL REPUTABLE contractors, not wandering contractors trolling for their next victim!

Apron and Farmer's Sink Photos/Videos

I'd like you to look at this photo for a second and try to conjure up WHAT I was up to a week ago:
Tim's message to future remodelers

Do you like opening prizes on Christmas morning, on your birthday, or on special-occasion days? Beneath the wrapping paper is something, but you don't yet know what it is.

It could be a kit to build something or it might be some stunning jewelry in your favorite color. What? ... I have to PUT TOGETHER my own present?

When I was still building and remodeling each day, I was blessed to discover prizes wrapped up and hidden inside walls and other mysterious void spaces in homes.

A carpenter might have signed his work. A builder, remodeler, or other subcontractor might have left a beer, soda, or medicine bottle in a wall. Old newspapers were sometimes stuffed into cracks or voids.

It was a delight to discover these things in houses. Looking at the advertisements in a newspaper or magazine that's 50 or 75-years old is eye-opening. Yes, you could buy a gallon of milk for ten cents. New houses sold for, are you sitting down, $7,000 - what you might now pay for a deluxe appliance.

I strive to create wonderful time capsules in all my jobs to pay forward the joy I had peeking into the past. CLICK or TAP HERE to watch a short video of some things I've discovered in walls and what I include in my time capsules.

Never forget that future remodelers LOVE knowing when something was installed. That's why I sign and date my work.

CLICK or TAP HERE to see what I signed last weekend. There are STUNNING PHOTOS there as well as two videos.

Dig for Treasure, Matey!

My LE Johnson Hardware Annual Treasure Hunt started last Sunday!

Annual Treasure Hunt

Five players who answer the silly questions in Step Three of the game are going to each win a $50 Amazon Gift Card.

That could be YOU!!! What can you do with $50 of FREE sweet moola?

CLICK or TAP HERE NOW and spend five or ten minutes looking at STUNNING PHOTOS of how LE Johnson hardware can transform your home into the next cover shot on a Better Homes and Gardens magazine cover.

BE SURE to WATCH me in the VIDEO on the Treasure Hunt page!

I'd say that's enough for a Sunday, what say you?

Tim Carter
Founder - www.AsktheBuilder.com
GET CLEAN USING OXYGEN - www.StainSolver.com
Invisible Happiness Waves - www.W3ATB.com

Do It Right, Not Over!

P.S. Do you know what the MINIMUM size is for a deck or patio if you plan to have a table on it for four people? Come on, tell the truth for goodness sake. What size do you think I'd make it? CLICK or TAP HERE to see if you were right!

P.P.S. Did you see the recent news? That silly 'i before e' grammar rule was recently disproved by science!

Apron Sink Photos

apron sink front

Apron Sink Photos | This is the apron sink in my own home. It's vitreous china and has a stunning apron design. CLICK or TAP HERE or the photo to purchase an apron sink now. I also helped install an apron and scullery sink at my daughter's new home.

Apron Sink Photos - Not For a Beginner DIYr

Here are some photos and videos I've created for you to give you an idea of what apron sinks are and how difficult they can be to install. All of them are quite heavy.

CLICK or TAP HERE NOW to get FREE QUOTES from local remodeling plumbers who can install an apron sink for you.

apron sink photos

This is the inside of my apron sink. It's a dual-bowl one. Note the bowls are not equal in size. You need to really pay attention when you drill the holes for the faucet so the spout gets water into the smaller sink! CLICK or TAP HERE or the photo to purchase an apron sink.

My Daughter's Scullery Apron Sink

The following are photos of my daughter's scullery apron sink being installed in her new home.

CLICK or TAP HERE NOW to get FREE QUOTES from local remodeling plumbers who can install an apron sink for you.

apron sink framing

This apron sink is going to fit between two cabinets. I had to build a saddle to support the sink. Do you want to buy an apron or farmer's sink? CLICK or TAP HERE or the photo to get one in days.

apron sink drain hole

A hole needed to be cut to provide access for the basket strainer under the sink. This allows you to tighten the compression nut on the top of the tailpiece. Oh, did you know I've been a master plumber since age 29? Do you have questions about installing an apron sink? CLICK or TAP HERE to arrange a personal phone call where I can help you!

apron sink installation

Just before you install the apron sink, you need to sign the work. Future remodelers LOVE to discover these rare pieces of information. Yes, it's time for the Reign of Terror to begin to get the job done!

apron sink install

It took two people to get it this far. Once some of the weight is on the platform, one man or woman can slide it into place. That assumes you got the width of the opening right, silly! CLICK or TAP HERE or the photo to purchase this Kohler apron sink.

apron sink kohler

This is what an apron sink looks like before the countertop is templated and installed. CLICK or TAP HERE or the photo to have your own apron sink.


apron sink install

I think you understand what you're looking at. CLICK the PHOTO now for magic to happen.

CLICK or TAP HERE NOW to get FREE QUOTES from local remodeling plumbers who can install an apron sink for you.

Patio Door Hinge Types

patio door hinge types

Patio Door Hinge Types | This is a very odd patio door hinge. Note how it has an uneven thickness to the two hinge halves.

Patio Door Hinge Types - There are Many

Joe S. from Osage Beach, MO reached out to me about his odd patio door hinge. His story appeared in the February 9, 2020 AsktheBuilder Newsletter.

Here's what he wrote:

"I have an odd sized hinge that is for my patio doors.  They need replacing and since I've never seen them before I would really appreciate your help.  What are they and where in the world would I find them to purchase.

They appear to be adjustable and 3 of the 6 have failed.  One side of the hinge is half inch thick and the other side is the usual thickness.  The doors don’t close properly.  Have you ever seen these before?"

My advice to Joe was to:

  • look at all surfaces on the hinge for any identification logos or printing that may shed light on who made the hinge
  • look at the edges of the patio doors and frames for identification markings as to who made the actual door
  • visit local exterior replacement door businesses taking the hinge with you. Ask for the manager or anyone who's at least 50 years old who has seen hundreds of different patio doors over their career. 

CLICK or TAP HERE to get FREE BIDS from local patio door companies to get your doors working perfectly.

What advice would you have given Joe? Add it in the comments below.

Your Takeaway: Let's say you're building your dream home and intend to live it in for decades. Perhaps you should buy some extra hinges for those doors that seem to have odd-shaped ones like Joe has so you don't find yourself in a conundrum.

Kitchen or Scullery Apron Sink Tutorial

apron sink

This is an apron sink I’m installing in the scullery of my daughter’s new home. I also put a slightly different one in her kitchen island. (C) Copyright 2020 Tim Carter

DEAR TIM: I’m almost certain I want an apron sink in my new kitchen. You’ve got one last chance to talk me out of it. Have you installed one? Do you own one? What are the pros and cons of an apron sink? Are there special things you have to do to install one? I can sometimes be a person more concerned about looks than how something functions, so if you feel I’ll regret my decision, I need to know now. I trust what you have to say after reading your column week in and week out. Thanks. Lori T., Riverside, CA

Are you like Lori? I hope so! I hope before you make a big decision about a major fixture that you really do all your due diligence. Lori has asked all the right questions about apron or farmer’s sinks.

It’s important to realize I’ve been a master plumber since age 29. Over the years, I’ve installed my fair share of apron or farmer’s sinks. They’re really not that hard to install and it helps to have fine carpentry skills to make the install go perfectly. Another key point is that I have an apron sink in my own kitchen! What’s more, I just installed two of them in my daughter’s new custom home, one in her kitchen and the second one in her scullery.

I’ve always loved doing plumbing work and an apron sink connects to your household plumbing sink just as a normal one might. You might not give a second thought about the water and food particles that leave your kitchen sink, but they travel through a network of pipes that must be sized correctly and vented properly. While on the subject of vents, be sure your plumber installs a traditional loop vent if your apron sink will be in an island. Mechanical vents can fail and allow foul sewer gas into your nice new kitchen.

In my opinion, there are many many more pros than cons when it comes to apron sinks. Let’s talk about looks first, then functionality. There are many different designs when it comes to these sinks. The apron sink almost always projects past the front face of the kitchen sink base cabinet. This extra relief helps draw your eye to the sink, especially if the sink is a different color than the cabinetry.

One of the positive aspects of an apron sink is if you drip water down the front of the sink, it doesn’t harm the sink. With a normal sink, the water might flow onto the wood cabinet below. Some apron sinks have gorgeous designs that are part of the front of the sink, so this helps add character and beauty to the kitchen. Keep in mind you can get both single and double-bowl apron sinks. My own sink is a double-bowl design with one sink much larger than the smaller veggie-rinse sink on the right side of my sink.

The only negative thing I can think of is that it’s not always easy to replace an apron sink should it need to be done. Your countertop will overhang the top edge of the sink. This means if you need to remove the sink, it needs to slide out of the opening. This is not too easy to accomplish. What’s more, sink the cutout in the sink base cabinet is very exact, you need to replace the old sink with one that has the exact same measurements.

Let’s say you decide to go with a traditional over-the-counter drop in kitchen sink. These are quite easy to replace. A talented craftsman might be able to take out an existing sink and replace it with a new one in a couple of hours if everything goes according to plan. Most of these sinks all are about the same size so the cut out in the countertop will work with many sinks.

Apron sinks require a platform to sit on inside the base cabinet. In my daughter’s case, she had custom cabinets made and the cabinet maker was able to create the perfect platform inside the cabinet and do the required cutout on the face of the cabinet going off dimensions provided by the sink manufacturer. Her sink fit perfectly into the cabinet. I only had to make a simple circle cut in the platform for the drain hole.

Standard kitchen sink base cabinets can be used with apron sinks and you just have to build your own platform. A simple piece of 3/4-inch-thick A/C fir plywood will provide plenty of support and a 1x2 cleat screwed into each side of the cabinet will support the platform. Just be sure that the top of the apron sink sits 1/8 inch below the top of the cabinets so you can put a bead of caulk between the countertop and the top of the sink.

Keep in mind the platform for the sink doesn’t extend all the way to the back of the cabinet. Keep it away from the back of the cabinet about 5 inches so you can have access to the underside of the countertop. You’ll need this to be able to install the sink faucet.

Be prepared to shim the underside of the apron sink, especially if it’s a cast iron one. The sinks are not always cast perfectly and when sitting on the platform they may rock back and forth a little bit. You’ll need to shim the sink so it doesn’t move.

I have a few videos showing how apron sinks are installed and some dramatic photos of the support platform of my daughter’s scullery sink on my AsktheBuilder website. If you’re thinking of having one of these wonderful sinks in your kitchen, I urge you to take a look at the photos and videos. Simply type: “apron sink photos” in my search engine and you’ll find all you’re looking for.

Column 1339

February 2, 2020 AsktheBuilder Newsletter Treasure Hunt Game

Today is the biggest event of the year for AsktheBuilder.com. I look forward to this newsletter issue ALL YEAR!

It's time for the annual LE Johnson Treasure Hunt Game.
Annual Treasure Hunt

I know, I know! I promised you the nutty video this past Thursday.

You probably want to watch it first. You mean this one? CLICK or TAP HERE or my nose and be prepared to laugh.

captain tim carter

Tim, what is the Treasure Hunt Game?

My Treasure Hunt game is a fun, simple game where you'll look at several stunning photos and then answer five easy questions!

Think Where's Waldo.

What's in it for ME? Why should I play?

Here's why you should play:

  1. the stunning LE Johnson photos will inspire you and you could win a $50 Amazon Gift Card
  2. you'll have fun in five minutes of Treasure Hunting fun!
  3. playing the game ensures this newsletter will continue to show up in your inbox

Tim, I don't want to play the game BUT I sure want to see all the new gorgeous photos of the LE Johnson interior doors. Where are those links?

I put all the links to the stunning room photos just below. You'll see the most gorgeous doors, some with glass, and interior decorating ideas that will take your breath away.

How do I play the game, Tim?

It's EASY!

  1. select one of the clue images
  2. look at all the photos and find the photo where the clue image is located
  3. answer five easy questions to have a chance at winning one of FIVE $50 Amazon gift cards

REMEMBER, you can go back and look at the photos as often as needed to help you answer the questions.

Will it Take Much Time to Play?

Five or ten minutes start to finish - Pirate's Pledge!

Will I get any SPAM or unwanted emails from LE Johnson?

NO! You'll not get any SPAM. I NEVER share any of your personal information with anyone. The only thing you'll get is lots of laughs and maybe, just maybe, a $50 Amazon gift card!

Tim, I want to play the Treasure Hunt game. It sounds like FUN! How do I get started?

I thought you'd never ask! CLICK or TAP HERE to play the 2020 Treasure Hunt game!

Thanks so much for playing. This newsletter, each and every issue all year long, is made possible by LE Johnson. In my opinion, they make the absolute BEST moving-door hardware in the USA.

I've used this hardware for decades in my own home, my daughter's new home, and in countless jobs of mine. It's NEVER FAILED me.

Captain Tim Carter
SS Ask the Builder

Here are the links to the stunning interior door photos from LE Johnson:

Walk-the-Plank Cove

Rum Runners Den

Skull Rock Graves

Lucy's Forsaken Lagoon

Deadman's Hill

Buckaneer Bounty Paper Towels

Feather Thee Jib Before the Wind

Walk the Plank or Ponder

Swab the Deck or Dust

Old Salt Sailing Cologne or Indecent Perfume

Captain Kidd's Secret Treasure Map!

Pirate's Pillage and Plunder

Crow's Nest Chowder and Crackers

Grog Island Brew

Hornswaggle Harbor Loot

Swab the Deck Danger

Davy Jones Locker Key

Mutiny Madness Mayhem


January 30, 2020 AsktheBuilder Spoiler – Treasure Hunt

The 2020 AsktheBuilder.com Treasure Hunt begins this Sunday, February 2, 2020. Think about that date! It could be a lucky sign for you! Look at all those twos.

02/02/2020

You're not going to believe how much fun it is to play the Treasure Hunt. Not only will you have FUN, but you might also win one of the $50 Amazon Gift Cards I'm giving away.

Annual Treasure Hunt

This year I've created a special video for you.

You've NEVER EVER seen me before in all of my hundreds of videos like you'll see me on Sunday.

For my new video to make sense to you on Sunday, I need you to watch a short 30-second video now that provided the inspiration for my video.

FAIR WARNING: Please go to the bathroom before you watch the video on this page.

Preview SECRET LINKS!

You may be one who's asked me for a peek at the secret photos of the stunning LE Johnson pocket doors that are part of the Treasure Hunt. You want more time to study them before the game begins.

I've NEVER before shared a few of the secret photos early but I'm going to do it this time to see if it helps you.

Let me know if this gives you an advantage.

CLICK or TAP HERE to watch the video and to gain early access to the secret links.

Remember, watch your email early Sunday Morning!

Captain Tim Carter
SS Ask the Builder

Do It Right, Not Over!

P.S. If you have a powder monkey, be sure that little guy is available to help you with the Treasure Hunt. You'll never regret it.

Infrared Photos

infrared photos

Infrared Photos | Use an infrared camera to spot problems. These are the heating supply pipes in my daughter's new home. Can you tell how many zones of the seven are calling for heat? Can you see which are the outgoing supply pipes with hotter water than the return pipes coming back to get reheated? Can you see why having one of these infrared cameras is such a good idea? CLICK or TAP HERE to purchase the infrared camera I have!

Infrared Photos - Use Them to Help Save You Money

Infrared photos can help you discover problems at your home before they become giant nightmares.

I own a FLIR ONE PRO infrared camera that plugs into my smartphone. I can take unlimited photos using my phone.

You don't own a smartphone?

CLICK or TAP HERE to purchase a fantastic stand-alone infrared camera.

flir one pro

This is my FLIR ONE Pro. Note how small it is. It plugs right into my smartphone and the FREE FLIR app allows you to capture infrared images. It's MAGIC. CLICK or TAP HERE or the photo if you want to order one now and have it in your hands in hours.

Check out some of my favorite infrared photos below. CLICK or TAP ANY of the photos below should you want to purchase your own FLIR ONE Pro camera that will connect to your smartphone. Just be sure you get the right one to match your phone's operating system and the USB charging port.

heated bath floor

This is my master bathroom floor. You can see why I NEVER have cold feet! The floor is 82.2 F and the hot water flows through Uponor hePEX tubing. You can also see the brighter yellow Uponor Aluminum heat transfer plates that the tubing snaps into.

This is one of my two cats. Nala's fur registers 76 F. You can see the heat coming out of the bottom of the under-counter refrigerator behind her. Just to her right is the bottom of the main refrigerator and you can see the heat pouring out of it.

This is my giant family room with a vaulted ceiling. Can you see how the insulation contractor really goofed up at the base of the vaulted ceiling? Those blue and magenta areas are missing insulation or it's compressed. Look at how cold the bottom of the exterior french door is.

infrared photo baseboard heat

This is the baseboard heater in my mud room next to the garage. Hot water flows through the device and keeps that room warm. Note the water temperature is down to 83.1 F by the time it gets to here. This heater is linked to other ones on the first floor in a series. After the water passes through this heater, it goes back to the boiler to get reheated. The water entering the first heater in the series is around 120 F.

This is a window in my living room. The outside temperature at the time I shot this photo was about 37 F. I aimed the crosshairs at the center of the double-pane glass and you can see it's 66.6 F. As it gets COLDER outside, the temperature of the glass will go DOWN. If it gets below zero outside, the temperature of the glass could get below the dew point of the air inside. If that happens, you'll see liquid condensation start to form on the glass.

infrared roof

This is a photo of my Davinci Roofscapes synthetic slate roof. The photo was taken on a cool summer morning before the sun has yet to hit the shingles. Note the temperature is 64.2 F. This south-facing roof will get a broadside shot of infrared from the sun in less than an hour and the temperature of the surface will climb to around 163 F. That's HOT!

infrared blacktop photo

I aimed the FLIR ONE at my blacktop that's been in the sun for hours on a summer day. You can see it's 127.3 F. Not quite hot enough to cook eggs!

infrared fiberglass door photo

This is my Therma-Tru fiberglass front door. It's in full sun on a blistering hot summer day. The door faces south and has a small overhang to protect it. Note how the door is 160.4 F. No wonder paint peels and blisters on doors like this especially those protected by a glass storm door!

composite deck infrared photo

This photo is part of set. See the one below it. You're looking at two scrap pieces of decking supported about 19 inches up off my Trex Transcend deck on a hot summer day. The crosshair of the FLIR ONE are aimed at a piece of 1-inch-thick Trex Transcend trim board. It's dark brown. Note the 151.8 F temperature. I wanted it suspended in the air so it would simulate being put on floor joists.

infrared treated lumber photo

Here's the second photo of the set. The camera is now aimed at a piece of scrap treated lumber 2x4. Note how it's much cooler than the composite material. It registers 126.5 F. That's just about hot enough to scald bare feet!

infrared Trex Transcend composite decking photo

This is my Trex Transcend deck. The color of the Trex is a medium brown - Tiki Torch. It's a very hot summer day here in New Hampshire and you can see you don't want to walk on this deck with bare feet! 147.1 F. Yeeeeouch!

Noritz combi boiler

This is the Noritz combi boiler I installed in my daughter's new home. Note how you can tell which is the exhaust pipe and which one is bringing in cold combustion air into the propane-fueled boiler. You can also see the hot primary loop sending water to the seven different heating zones in the house. CLICK or TAP HERE or the photo to purchase the wonderful infrared camera that captured this image.

bug

infrared camera

The wretched insulators did not split the batt and carefully fill the voids behind the electrical box. Idiots.

infrared camera

How hot is hot tea? Lookie lookie. 170 F CLICK or TAP HERE to purchase a FLIR infrared camera.

Use an Infrared and Other Cameras to Spot Problems

Infrared photo exterior door

This is an infrared photo of an exterior door at my own home. You can clearly see small air leaks (darker blue spots) where cold air is leaking around the weatherstripping. (C) Copyright 2020 Tim Carter

DEAR TIM: I’ve seen odd-looking photos taken with infrared (IR) cameras. They seem to me to be more of a novelty than a useful tool. Do you own one and how do you use it to help you around your home? What was the most shocking thing you discovered while using an infrared camera? Can you get one that attaches to a smartphone? Do you have a collection of photos you can share? Mandy P., Montgomery, AL

I don’t know about you, but I love questions like the ones Mandy poses. Just a few weeks ago, I started a new series where I wanted to share with you how advances in technology in all aspects of residential construction are helping you, but sometimes hurting you.

This week, I’m happy to announce that an affiliated area of technology, photography, has made vast improvements to help you spot all sorts of problems around your home. Let’s get started.

I was very interested in photography in high school and college decades ago. It’s important to realize I had my own darkroom and I helped run the largest darkroom on the University of Cincinnati campus. Yes, those were the days of real film and black and white photos were still quite the rage - believe it or not.

Before I share all the good news and the ways that infrared cameras can help you, let me just briefly touch on digital photography. You and I now live in the world of pixels instead of the days of small silver salts on cellulose acetate film! Each year new technology is making digital photography far better than the best old-fashioned large-format photos. There’s not a doubt in my mind that our digital spy satellites high in the sky have such advanced technology they can read the print of the open book in your hands while you’re out on your deck. But I digress.

Because you don’t have to pay for film or get it developed, you should take advantage of this to take hundreds, or thousands, of digital photographs of any project you’re doing. Take multiple photos of each step.

Why? Every week I do phone consults where people have huge problems with their homes. Each time I get to see detailed photos of the job in progress, I can see exactly why they have the problem. The clarity and high resolution of modern smartphone cameras is remarkable. I can zoom in and see very small details.

Keep in mind that you can store thousands of photos online for free. Depending what service you use, your photos automatically get transferred off your phone and stored on secure cloud servers. It’s a painless process you should be doing with all your photos.

Let’s switch to infrared, the subject Mandy wants to know about. I’ve been taking infrared photos for about five years and love this technology. You can buy dedicated infrared cameras just like a normal point-and-shoot camera, or you can buy a sleek tiny infrared camera that plugs into the charging slot of your smartphone. I have a smartphone infrared camera.

I’ve used my infrared camera to take all sorts of interesting photos. I discovered exactly why I got second-degree burns on my hands while installing my new roof five years ago. The synthetic-slate shingles I used heat up to about 160 degrees F in the mid-day sun! If you don’t work fast and keep moving with fresh shingles, you can get a burn in just two seconds or less touching a hot shingle!

I didn’t build the house I live in right now and I’ve used my IR camera to discover where the builder and his subs did a less-than-satisfactory job of installing insulation. The infrared camera shows you in just an instant where insulation is compacted or missing. It shows up as dark blue or violet on my camera.

I’ve also used it to locate air leaks in interior walls of all places! Down in my basement, I have an electrical outlet on an interior wall that leaks cold air. I noticed this by accident by scanning this wall with my infrared camera! No doubt the insulating contractor didn’t squirt expanding foam in the holes the electric cable passes through on the wall studs or the top wall plate.

You can also use an infrared camera to spot dangerous electrical arcing in your home. Electrical arcing that’s not yet started a fire will heat up where the arcing is occurring whether it be a screw on an outlet or switch, a lose connection at a circuit breaker in your panel, or even loose wires inside a wire nut. Purchasing an infrared camera for just this purpose may more than pay for itself in your peace of mind.

You can also use an infrared camera to help you spot possible water leaks that you don’t yet see in your home. Wet areas from hidden condensation or just damp areas behind walls or ceilings often show up on the camera as blue or violet because evaporating water by its very nature creates a cooling effect.

I do have a collection of infrared photos on my AsktheBuilder.com website as you might expect. All you have to do is type: “infrared photos” into the search engine there to view them.

Column 1338