OV LED Headlamp Review

ov led headlamp

I've got the OV LED headlamp on. It's pretty slick. It's light and the light is bright as you'll see just below.  Ignore the somewhat messy office. CLICK MY NOSE to order this headlamp now. Only $15 at the time of the review! Copyright 2018 Tim Carter

OV LED Headlamp Review

I don't often get excited about new products. I think it's because I see so many. I featured this new headlamp in my October 27, 2018 AsktheBuilder Newsletter.

It's important to realize the moment I saw the OV LED headlamp I was quite interested to see how it would work.

You can see the OV LED Headlamp works well! This is on low!!!! It's blinding if you have to stare at it. But since you'll be working, it's not going to bother you unless you're installing mirrors in the dark. CLICK THE BRIGHT LIGHT NOW to have one delivered to your home. Only $15 at the time this review was created.

ov led headlamp

This is a close up of the light emitting diodes (LEDs) that create the light. No bulbs to replace! WOOT! CLICK my THUMB to have one of these headlamps in your hands in days.

You're looking at the strip of LEDs that create the light. You can barely feel this is on your head. I loved that as other headlamps are HEAVY. CLICK the LEDs now and have this on your head in days.

ov led headlamp

The OV LED headlamp requires three AAA batteries. They DO NOT come with the headlamp. Order those separate. Get some rechargeable ones. CLICK THE BATTERIES now to have everything delivered to your home.

This is the tiny box that holds the AAA batteries. The black elastic ring of material slides over the box to keep it from dangling around. CLICK MY FINGERTIPS now to have this headlamp on your head in days.

The gray switch on the left is how you switch between the two brightness settings. The small battery case also has a primary on/off switch that needs to be in the ON position for the LEDs to light up. CLICK the ON/OFF button now to have brightness in your life in three days.

CLICK HERE to order the OV LED Headlamp now. At the time of the review, it was only $15. It's a STEAL at that price.


New Build Home Timeline Part 2

stumped building lot

Here's a small panorama shot of the cleared and stumped lot. Copyright 2018 Tim Carter

New Build Home Timeline Series - Part 2

This is part two of a new build home timeline series following my own daughter and son-in-law. They are building a new home on Mt. Desert Island in Downeast Maine.

At the bottom of the page, you'll discover a link to the next part of the series.

Related Links

Lot Clearing Tips - FREE ADVICE

Land Clearing Challenges - PLEASE SHARE to friends to save $$$$

New Build Home Timeline Part Two - Lot Clearing Continued

Week Two - October 21, 2018

Week two of the project saw further progress on the lot clearing. It's important to realize the lot and the septic tank leach field had to be cleared and all stumps removed.

cut logs excavator

The giant orange excavator is here to claw the stumps out of the ground. It's parked just about where the driveway will connect to the road. Copyright 2108 Tim Carter

cleared building lot

The stumps have been dug out. The small bulldozer is there to do a fast rough grade so the house can be staked out. Copyright 2018 Tim Carter

stumps removed and slash

This is the view looking from the road across the rough driveway cut. On the right side of the photo in the shade is a giant pile of slash - tree branches - that will be removed next week. Copyright 2018 Tim Carter

CLICK HERE for Week Three - October 28, 2018.

New Build Home Timeline Series

cleared building lot

New Build Home Timeline - This is very early in the building timeline. This is my daughter's cleared building lot. It's time to stake out the foundation so the foundation hole can be dug. Copyright 2018 Tim Carter

New Build Home Timeline Series

This is a giant new build home timeline series following my own daughter and son-in-law. They are building a new home on Mt. Desert Island (MDI) in Downeast Maine.

This page is part one of the series. At the bottom of each page, you'll discover a link to the next part of the series.

Related Link

Buying a New Home Building Lot - FREE CHECKLIST

New Build Home Timeline Part One - Lot Clearing

This is the actual plot plan of the building lot. My daughter and her husband purchased lot #389,763.87 down in the southeast corner of MDI. I think this will help you understand the project. The lot is just under one acre in size.

Do me a favor and don't try to find their lot. I say this assuming you're some sort of ax murderer. You can just relieve your murder frustrations on me here in NH. I live in a yurt on 90 acres on Old Bristol Road. You've got skills, find that piece of land. I always have my nunchucks with me so be careful!

Week One - October 14, 2018

On October 15, 2018 the contractor began cutting trees to clear the space for the house. The lot was covered with hundreds of small, medium and large trees as you can see in the photo taken in January of 2018.

wooded building lot

This is what the lot looked like before any trees were cut down. Believe me, there were lots of trees. Copyright 2018 Tim Carter

It took one week to just cut the trees down and stack the logs by the road. A large area had to be cleared as well for the septic leach field.

log building lot

The following photo shows the lot as you'd see it looking back to the street. Note my daughter's black car behind the logs.

cleared building lot

My daughter was standing in what will be the backyard looking towards the street. Copyright 2018 Tim Carter

CLICK HERE for Week Two - October 21, 2018


Caulking Doesn’t Have to Be Hard and Building Lot Tips

caulking mess

This caulk mess could have been avoided with a grout sponge and pride. (C) Copyright 2018 Tim Carter

Caulking Doesn’t Have to Be Hard

QUESTION #1: Tim, my husband caulked a few things in the bathroom and made an enormous mess. The caulk is smeared and there are gaps. Can it be repaired? He had the best of intentions but didn’t seem to be concerned about the final appearance. How does one get a perfect bead of smooth caulk with no excess and no smearing? Angie C., Mt. Desert, ME

Have you seen smeared caulk like Angie now has in her bathroom? I see it all the time, especially when I travel. Frequently I want to take photographs of the botched workmanship in the restrooms in airports and interstate highway rest stops, but I dare not get out my camera as I fear being arrested as a creeper!

The good news is that crappy caulk jobs can be repaired with relative ease. You can purchase a variety of caulk-removal solvents that soften most caulks. With the caulk softened, you can scrape the goo away without damaging the nearby surfaces and finishes.

Be sure you read the label of the solvent to ensure it’s safe to use on the things the caulk is touching. If in doubt, do a small test in an out-of-the-way area to ensure the solvent doesn’t dull the finish, remove color, or otherwise damage the fixtures, flooring, or trim.

Creating a smooth professional caulk joint is extremely simple. The process starts with an excellent caulk gun. Cheap caulk guns provide little control over the amount of caulk that oozes from the tube as you squeeze the handle. Better caulk guns, that cost just a little more, give you great control as the push rod that presses the back of the caulk tube only advances a small amount as you squeeze the handle of the gun.

You also need to cut the tip of the caulk tube so the hole at the end of the tube is no bigger than 1/8 inch. The goal is to lay down a bead of caulk that is just enough to fill the gap allowing no excess to be removed. This technique only comes with lots of practice.

The easiest caulks to work with are ones that are water-based or can be cleaned up with water. I fill a 3.5-gallon bucket with warm water and have one of my special tile grout sponges handy. These sponges have no sharp edges or corners.

I apply the caulk to about 2 feet of the crack or gap. I then tool the caulk with my finger creating a concave appearance. If I applied too much caulk and excess starts to build upon my finger or begins to smear, I lift my finger off the caulk and wipe the excess off my fingertip farther down the crack or gap so no caulk is wasted.

The final step is to take the damp sponge will all excess water squeezed out, and slide it softly across the fresh caulk to remove any smears and to give it a very smooth appearance. Don’t press hard on the sponge while doing this step. Practice on a test crack to master the sponging technique.

I’ve created a page on my website for you that has caulk installation videos and other tips. Go to: caulk

Building Lot Tips

QUESTION #2: Tim, I’m starting to look at lots for a new home. I’ve got no clue as to what’s a good lot and what’s not. What tips can you share about this process? I’m fearful of making a costly mistake. Keith C., Syracuse, NY

Each week I do autopsies for homeowners who have problems at their homes. In many cases, the root cause of the problem is a bad building lot.

I have so many building lot articles on my website that I no doubt could assemble the information into a small book. There are so many things to consider, but here are a few of the major deal-breakers for me.

The size of the lot is important. Will you be able to fit the house and all other things like sheds, decks, patios, etc. you want inside the setback lines as defined in the local zoning code? Is the lot too steep for the house or will it cause driveway issues?

Are all the utilities you need available? If the lot is undeveloped, how hard and expensive is it to get electric to your home from the street? What about Internet access? Is it readily available and the speed you need available?

Compass direction can be critical. The back of my house has a huge deck on it and faces east. I like that so I don’t broil in the intense afternoon sun while on the deck. What about the soil? Is it thin requiring you to blast? Does the lot have great drainage?

I’ve got lots of FREE extra building lot tips for you at my website: buildinglot

Column 1272

Outdoor Shed Tips and Pocket Doors

small shed metal skin

This is a small shed that’s got a metal skin to prevent wood rot on the side walls. Unique shed designs are as common as corn at the grocery. Dream yours now. (C) Copyright 2021 Tim Carter

Outdoor Shed Tips

QUESTION #1: Tim, what can you tell me about outdoor sheds? I’m thinking it could end up being an outdoor retreat more than it might be for garden stuff and junk. How can you keep a shed cool that bakes in the sun all day? I want to make sure the shed is big enough, so please share sizing tips. Eddie R., Nashville, TN

Sheds are popular. I’ve built more sheds than I can remember and several stand out in my mind. My favorite shed of all time was the L-shaped Queen Anne Victorian one I built at my last house. It matched our home in every detail including all the colors. My wife loved that shed. It even had a 6-foot wide overhead door so my garden tractor could go in and out with ease.

Tim's Shed

Based on emails that I get each week, I’d say the biggest mistake you might make when building or buying a pre-built shed is it’s going to be too small. You may look at an 8 x 10-foot shed thinking it’s enormous, but it’s not. You need to keep in mind that you have to be able to access things in the shed so there has to be a clear floor area allowing you to get what you need.

If you’re going to use the shed as a hideout from your significant other or the kids, it’s very important that you use some graph paper to create a crude plan. Create scale cutouts of the furniture you’ll have in the shed and make sure it fits. The easiest way to size one of these hideout-sheds is to look at a room in your home that you feel is a perfect size. Make the shed the same size.

Before you get too far in the project, be sure you’re allowed to build the shed. You need to check with your local government officials to see if there are any zoning restrictions. The last thing you need is a “stop-work” notice because you failed to get all the required permits to do the work.

You may feel the answer to keeping a shed cool in the heat of summer is just adding more insulation. That’s a folly. Insulation gets hot too and it releases the heat slowly. The best way to keep the shed cool is to build a second roof over the shed. I know this sounds crazy, but it’s true. The upper roof will shade the shed. You know this is the best way as you stand in the shade when possible to lower the heat gain on your body.

If you plan to have a wood floor system in your shed, be sure the floor joists and the plywood floor are treated lumber. You may not realize it, but you can purchase plywood that’s been treated with the same chemicals as regular timbers and decking made to resist water.

I’ve created a page at my website that has numerous shed planning videos lots of other shed-building tips. Go to: sheds

Pocket Doors

QUESTION #2: Tim, I saw a show on TV that talked about using pocket doors. I’ve not seen one in decades. Are they still made? Better yet, are they really any good or do they rub and come off the track? I’m not interested in having a problem door, but the thought of a disappearing door intrigues me! Becky T., Boise, ID

I tend to think most of what you see on cable TV home improvement shows is fantasy. But in this case, Becky was given a morsel of information about a great product.

Pocket doors are alive and well and they’re better than ever. You wouldn’t think it possible to constantly improve these devices that are hundreds of years old, but it’s happening all the time.

I’ve installed countless pocket doors on my jobs and had two of them in the last home I built for my family. My daughter is building a new home now and her home will have at least five pocket doors.

I prefer the pocket door hardware that features three-wheeled trolleys. A trolley is what connects to the top of the door and then fits into a special track. These trolleys can’t jump off the track and the nylon rollers with precision ball-bearings will last for generations.

You can now get soft-close hardware for pocket doors. This is a popular feature that’s been on drawers for quite some time. There’s no more banging of doors in the pocket or out on the jamb if you equip it with the soft-close accessory.

Follow the simple installation instructions and you’ll not have any rubbing. The key is to used thin studs that are capped in steel. This prevents warping. You can also purchase an accessory kit that allows you to install thin plywood over the pocket so you can hang heavy pictures right next to the door opening.

I’ve got pocket door videos and lots of tips for you on my website: pocketdoortips

Note: Pocket door wall-mount door kit referenced in October 14, 2010 Newsletter.

Column 1271

October 20, 2018 AsktheBuilder Newsletter

Are you a new subscriber? You've become part of the family at a very special time. Keep reading.

Old-friend subscriber? You're not going to believe what's about to happen.

One never knows what lays ahead. That's part of the magic we get to enjoy with each new day.

Months ago, Kathy and I discovered that our oldest daughter Meghan and her husband Brent were moving back to the East Coast.

They had been in California for the past four years with Brent working for a technology startup that a year ago was purchased by Western Digital. Brent was able to negotiate a work-from-anywhere clause in his new agreement.

Why is this important to you?

Meghan and Brent just broke ground last week on a new home on Mt. Desert Island in Downeast Maine. You may know the area by another name - Bar Harbor, or as the locals say, "Bah Haabaah".

building lot clearing

Their new house is going to be behind that logging skidder.

A Real-Time Journal

Beginning this issue of the newsletter, I'm going to do my best to take you on a journey through the entire building process from start to finish.

Kathy and I are driving up to see Meghan and Brent on Monday. I'll be helping to site the house and take some all-important readings with my builders level.

The first step in this process happened last January. A realtor they were working with told them about the lot. I went by myself to look at it to give a full report to Meghan and Brent back in California.

CLICK HERE to have a feel for what I was thinking about as I walked through the lot.
lot in Maine
This is a photo I took while walking their lot. Yes, that's a white rabbit at the base of the pine tree. I took that as a very good omen.

Fortunately, the early snow that covered the land was eaten up by a January thaw. You want to look at land like this in the winter or early spring when there are minimal leaves on the trees.

The extra advantage I had is that any wet spots on the land were small patches of ice. You want to identify wet spots or if the lot has drainage challenges.

It really makes a difference what time of year you look at lots unless you're in areas where the weather is similar for most of the year.

Each Week A New Chapter

I'm going to share news about the build each week. I'll be sharing new pages at my website filled with photos. I plan to take thousands of photos for you. Yes, I'll be shooting lots of video too.

The issue with video is that it requires so much work with both pre- and post-production not to mention the need for a videographer.

I'll be installing all the plumbing, radiant heating and all the electric in the new home.

The entire house is being built in a local factory and the parts are going to be assembled on the site. Wait until you see the videos of that!

Here's a very basic front elevation of the house. It's going to have a stunning cedar shake product as the siding.
front-elevation

Open Each Newsletter

I'm going to do my best to make it worth your while to open each newsletter.

You're going to see lots of photos and I'll be linking to RELEVANT columns you should scan in the event a new home is in your future.

I hope you're ready for the journey!

My New Haas Garage Doors

About a month ago, I got two new garage doors. My old doors were horrible. I have no clue what the previous owner of this house was thinking when he selected them.

CLICK HERE to see my review and WATCH THE VIDEO.

haas garage door review

That's enough for a weekend. I hope you're as excited about the new home project as I am!

I guarantee you it's going to be one heck of an adventure.

Tim Carter
Founder - www.AsktheBuilder.com
Clean Grout! - www.StainSolver.com
Radio Stories - www.W3ATB.com

​​​​​​​Do It Right, Not Over!

Haas Garage Door Review

haas garage door

Haas garage door - These are my two new doors. The autumn sunlight is seeping through the trees over my left shoulder causing a unique dappled lighting effect on the doors. My old doors were solid green and made the garage look like a commercial building. Read more on Tim's Haas Garage Doors and the mouse barricade. Copyright 2018 Tim Carter

"The decorative glass panels at the top of each door flood the garage with light."

Haas Garage Door - Real Wood Look But Tough Steel

Just a month ago, I had two new Haas garage doors installed at my home. The doors are steel, but anyone visiting my home thinks we've got distinctive real-wood garage doors with leaded glass.

Related Link

Garage Door Openers Save Your Back

Do The Doors Look Like Real Wood?

Yes, the graining on the wood doors is done as if real wood was used to create the doors. The grain runs in the exact directions that you'd find the panels, stiles, and rails.

haas door wood grain

You can see the wood grain runs at 90 degrees to one another as it would had the door been made from solid wood. Copyright 2018 Tim Carter

Are the Door Insulated?

Yes, my new Haas doors are filled with foam insulation that will keep my garage above freezing in the bitter New Hampshire winters. That's a big plus.

Do You Feel The Haas Doors Add Value to Your Home?

Absolutely yes! You be the judge. Imagine if you were able to see the before look and then the after. I did that for you by taking a photo of the first door complete before the second door was installed. You tell me if my home is more attractive?

A picture is worth a thousand words. Leave a comment below telling me if you feel the new door on the right adds value to my home? Copyright 2018 Tim Carter

Do The Glass Panels add Lots of Light to the Garage?

The decorative glass panels at the top of each door flood the garage with light. Before my garage was a dungeon and in broad daylight I had to turn on overhead lights to see anything.

haas decorative glass

Look how bright it is in the garage! You would have needed a flashlight before this door was installed. The white steel color on the inside helps brighten the garage. Copyright 2018 Tim Carter

What About the Decorative Glass?

There are several styles of decorative glass. We wanted the Emerald pattern to match the leaded glass at our front door. The Aqua glass provides privacy with the rippled texture.

haas garage door

This shows you what the decorative glass starts to look like as the sunlight fades. The darker it gets outside the more beautiful my new Haas doors look as the light becomes more golden. Copyright 2018 Tim Carter

Would You Recommend a Haas Door to Your Friends?

You bet. I've installed countless garage doors in my career and my new doors are made in the USA in the great state of Ohio, they're strong, the hardware is substantial, the look is superb, and I know they're going to last for decades. What more can you expect from a garage door?

The Federal Trade Commission requires me to inform you that Haas Door installed these doors at my home at no charge so you could read about what I thought for free. My policy has always been that I don't recommend or review products that I wouldn't be proud of owning or showcasing in my own home. Those products that don't pass that initial quality test probably are reviewed on other blogs.

Concrete Block and Flood Plains

concrete foundation forms

These forms are being used to create a poured concrete foundation. Concrete block is a viable building material if installed correctly. (C) Copyright 2018 Tim Carter

Concrete Block

QUESTION #1: I’ve been researching foundation types for both new homes and room additions. I’ve narrowed it down to either poured concrete or concrete block. Many websites thump their chests saying poured concrete is better than concrete block. What’s your opinion, Tim? Have you worked with both materials? Carol Ann S., Richmond, VA

You may be wondering about the relative merits of poured concrete vs. concrete block foundations just like Carol Ann. The two methods dominate the residential construction industry here in the USA.

I’ve built buildings using both materials. The last home I built for my family had a giant poured concrete foundation but in the backyard, I used concrete block to construct a magical serpentine retaining wall that looks as good as the day I built it decades ago.

Reinforcing Steel Makes The Difference

Here’s the truth. You can build a poured concrete foundation that can crack and cave in within a year and you can build a concrete block foundation that can last for hundreds of years with no failure whatsoever. Reinforcing steel is what determines the winner of the battle between the foundation walls and Mother Nature.

It’s important to realize if you want a super-strong concrete block foundation you need to include both horizontal steel reinforcing wire and the cores must have vertical reinforcing steel that extends up from the concrete footing. The cores of the concrete block need to be filled solid with strong concrete that has small pea-sized aggregate.

Poured concrete foundations also require reinforcing steel if you want the walls to resist the horizontal forces of wet soil. Another key point to remember is that foundation walls buried in the ground are nothing more than retaining walls. They stop the soil from cascading into your basement.

Modern poured concrete foundation forms have revolutionized foundation construction. An experienced foreman with a small team of semi-skilled laborers can set poured concrete foundation forms in the morning and the concrete can be poured in the afternoon. The next day the forms can be stripped off and carpenters can get to work.

It would take a small army of masons to achieve the same results building with concrete block. Poured concrete is a huge time saver. Be sure you use lots of steel no matter what material you decide to choose.

I’ve created a page at my website that has numerous videos and photos of poured concrete and concrete block foundation installation. Go to: pouredorblock

Flood Plains

QUESTION #2: Tim, I’m desperate. My 1972 house was built in a floodplain. Twice in the last nine years, it’s had two feet of water in it, most recently from Hurricane Florence. I’m desperate to sell the house but I doubt anyone will buy this turkey, nor should they. I didn’t understand what I was buying at the time. Can you help? What are my options? Ann L., Chapel Hill, NC

Countless people have the same problem as Ann. Perhaps you’re one or you know someone. Watch the news after each natural disaster and you see images of destroyed or flooded homes. Just last week I saw nothing but concrete slabs next to the shoreline of the Gulf of Mexico along the Florida panhandle. Hurricane Michael’s storm surge ground up the houses like a blender purees vegetables.

My college degree was in geology. I realize that not everyone had the good fortune to pursue this enlightening course of study. Several of the classes I took focused on flooding, earthquakes, and other natural disasters that face homeowners. Sinkholes, landslides, debris flows, and other things can wreak havoc and mayhem in your life should you decide to build a home in a spot where things can go wrong.

There’s little I can do to help Ann now other than have her schedule a meeting with the top three realtors in her neighborhood. I’m talking seasoned realtors who know what’s going on. They’ll be able to outline any and all options.

However, the best advice is to avoid buying or building a home on a lot that has a high or medium probability of suffering damage from most disasters. You can get this advice by talking with a professional engineering geologist. These pros know the best and worst lots to build on in a city, town, or region.

A consult with one may cost several hundred dollars, but it’s the absolute best insurance you can get to ensure your home, or what’s left of it, isn’t front and center on everyone else’s TV.

Dr. John Alexander and Modern College Millennial Students

tim carter ask the builder in 1972 new mexico

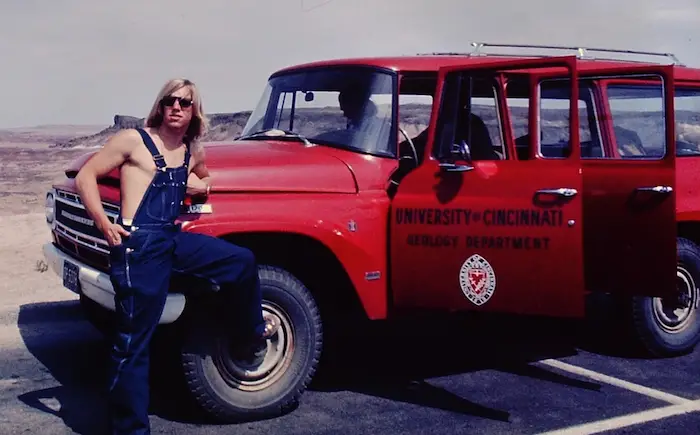
This is me, Tim Carter, in 1972. I was 185 pounds dripping wet. I'm on my first geology field trip. Copyright 2024 Tim Carter

Dr. John Alexander - University of Cincinnati Chemistry Professor

Dr. John Alexander was a physical chemistry professor at the University of Cincinnati (UC). I was fortunate to have him as my physical chemistry lab professor in the 1971-72 academic year.

It's important to realize he was a young professor and I estimate he was no more than thirty years old at the time, although he might have been a little older.

I majored in geology at UC and physical chemistry was a required course.

millennial warning sign

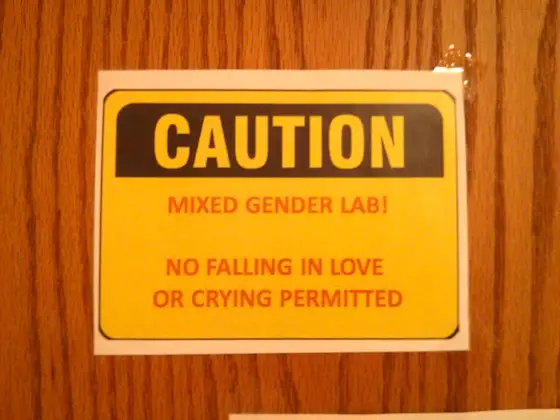
I was invited to speak at the UC Geology Department lecture series in the autumn of 2016. While touring the department I came across this funny sign on a lab door in the Geology Building. It's great to see humor like this on the campus. It's aimed squarely at the millennial students. My guess is some who read it are offended and have to run off to a *Safe Space*. BWAHAHAHAHAHAAHAHA - the babies..... Copyright 2018 Tim Carter

Why was Dr. Alexander Important?

Dr. Alexander was important to me because he oozed authority and respect. You may have vivid memories of some of your high school and college professors for a number of reasons. I admired Dr. Alexander because he was fair, he was knowledgeable, and his style garnered the complete attention and respect of every student. He also possessed a wry sense of humor.

What About the Millennials in 2018?

Dr. Alexander would undoubtedly be fired from his job if he had to deal with today's self-centered millennial college students. The general consensus defines a millennial as a person born between 1982 - 2004. They're also referred to as Generation Y.

This video pokes fun at some in this age group.

I'm going to share two true stories and you be the judge. Wait until you read the second story submitted to me by a college professor here in October of 2018. But first, read about Dr. Alexander.

The First Two Dr. Alexander Labs

This is a true story and I'm not embellishing it one bit. I only wish I could go back in time and record a video of what I'm about to share with you.

I can't remember what day my three-hour physical chemistry lab was on, but I'm fairly certain it was every Thursday from 2 until 5 pm. The first lab class in the autumn quarter is burned into my memory because of what happened a week later.

The modern, at the time, building that housed the chemistry labs had synchronized clocks up on the walls in each classroom. These clocks would buzz for two seconds at the top of each hour.

I got to the classroom at about 1:57 pm on that warm autumn day and Dr. Alexander was leaning against the desk adjacent to the chalkboards in front of the room. He had an impish smile on his face. He may have returned cordial "Hellos", but I don't recall if that happened.

At 2:00 pm the buzzer sounded and the moment it stopped Dr. Alexander said, "Welcome. I'm Dr. John Alexander and I'll be your lab professor the entire year. Each Thursday we'll meet here at 2 pm for just ten minutes. I'll go over what's going to happen in the lab and what's expected of you. You'll produce a lab report about the results of your experiments for each lab session. The report is due NO LATER than 2 pm the following week after the lab. You can place your report right here on the corner of this desk as you enter the room. You can also turn in your lab report earlier if you have it finished. Drop it off in my office, number XXX, here in this building. The office hours are posted on the door."

Dr. Alexander then proceeded to tell us what we were going to do that day and at 2:10 pm he released us to go into the actual lab.

The following week I arrived once again about 1:56 pm and placed my lab report on the stack of lab reports that other students sitting in the chairs had already dropped off. Dr. Alexander was once again leaning on the desk looking out to the class, but at no one in particular. He had that same smile pasted on his face. Note that the smile wasn't a smirk or nasty. It was one that told you something was going on inside his head.

More students filed into the room and put their reports on the growing stack.

At 2 pm the buzzer sounded for two seconds and Dr. Alexander proceeded to start to talk about the lab experiment we were about to perform.

Approximately 30 seconds later, a female classmate arrived late. As she walked by the desk she placed her lab report on top of the others. Dr. Alexander was unfazed by her entrance and continued to talk as if she didn't exist.

Once she took her seat and looked up at Dr. Alexander, he had positioned himself at the corner of the desk. Without breaking his cadence about the subject matter, he casually picked her lab report up out of the pile and as he walked back and forth talking about the lab he was tearing it into small pieces.

About twenty seconds later he ended up by the trash can and dropped the girl's shredded lab report into the can all the while talking about the day's lab activities.

Nine minutes later he finished talking and said, "Are there any questions?"

You could hear a pin drop it was so quiet. All of us in the room were stunned by what Dr. Alexander had done to the girl's lab report.

The girl who arrived late raised her hand and stuttered, "Uh, Dr. Alexander. I think you threw my lab report in the can."

Dr. Alexander looked right at her and with minimal emotion uttered, "Yes, I did. You were late to class and I distinctly said last week that lab reports were due by 2 pm. You get a zero for last week."

It's as if all air had been sucked from the room. Dr. Alexander then stated, "You can all go to your lab desks now."

I have no recollection of anyone ever turning in their lab report late for the remainder of the year and I can tell you that I always made a point to turn my lab report in early.

Lunch Seven Years Later With Dr. Alexander

Dr. Alexander made such an impression on me that I made an effort to stay in touch with him. I used to do construction jobs near UC and one day I asked him if he'd like to have lunch. We met and it was a great time. He asked about my work and I told him how much of what he taught I actually used in construction.

I brought back up that story about the young girl and her report and he couldn't recall it. I was surprised by that. But he said, "Oh, I don't know if I could pull that off today. The students today are not at all like your class, Tim. They need lots more hand-holding."

Note this would have been just about 1980 when he talked about the trend of students not being tough.

Millennial College Students, Safe Spaces, Juice Boxes, and Fruit Roll-ups

I now produce a newsletter that goes out to 45,000 USA consumers from every walk of life. Just days ago in response to one of my newsletters where I talked about how self-centered people are becoming, I received the following reply.

The professor asked for me to keep his name confidential as he didn't want any trouble and is trying to retire.

I've not edited what he sent. You're about to be shocked is all I can say. Dr. Alexander is no doubt spinning in his grave:

"I know what you mean by the unreasonable expectations of people. I completely agree.  I've been teaching college now for almost 28 years and the civility has changed.

Students want an answer to their question RIGHT NOW, even if you're in the middle of presenting a lecture that took hours to prepare.  Often their question is not even on the topic being presented.

It is very COMMON for a student sitting on the front row to wear headphones and listen to music while you teach, or to get up and walk out of class to smoke or go to the bathroom or make/take a phone call, and then wander back in...whenever.

Reading anything or taking notes on anything is out of the question. They want a study guide for every test that tells them EXACTLY what they need to know to pass.

Students from the class that ended 20 minutes ago in the classroom are still there talking, working even when you ask them to leave so you can begin your class.

Office hours?  No, they prefer that you Skype, Zoom, WebEx them at their convenience.  All email must be answered within 48 hours, even if it's the weekend.

I'm done. I'm retiring from teaching and going on to something else."


Concrete Foundation Forms

concrete foundation forms

This shows you what concrete foundation forms look like as they're being assembled. The next day the contractor finished and they filled the forms with concrete! Copyright 2018 Tim Carter

Concrete Foundation Forms Checklist

  • Modular design allows forms to be set in hours
  • Produce perfectly straight and square foundations
  • Allow for the easy installation of reinforcing steel
  • Simple design requires few skills to set up

Related Links

Foundation Footer - Must Be Level and Square - SECRET TIPS HERE - Do NOT Share

 Poured Concrete or Concrete Block? Which is Better?

Concrete Foundation Forms Save Time and Money

Modern concrete foundation forms are modular and can be assembled with almost no tools. All the parts fit together like large children's toys.

Free & Fast Bids

CLICK HERE to get FREE & FAST BIDS from local foundation contractors.

How Were Old Concrete Foundation Forms Made?

Concrete foundation forms used to be made from tongue-and-groove 1x6's assembled by carpenters. After the concrete was hard, they salvaged the wood and used it as the diagonal subflooring for the homes. Whatever was left over was used as roof sheathing.

Modern concrete foundation forms are made with steel and aluminum.

concrete foundation forms

Note the metal cross straps that hold the vertical forms in place against the pressure of the wet concrete. Copyright 2018 Tim Carter

How Long Does it Take to Set Up the Forms?

A simple square or rectangle foundation can be formed up in just a few hours with modular forms. It's important to realize that a level and square footing makes the job go very fast.

How is Foundation Reinforcing Steel Installed?

The cross straps used in some forms have notches in them that hold the reinforcing steel in place. It's best to have two rows of steel bars in concrete foundations. One set of bars should be about a foot up from the bottom of the wall and the other set should be about a foot down from the top of the foundation wall.

concrete foundation forms

The triangular piece of steel helps hold two adjacent forms together. The forms can be assembled with lots of unskilled laborers. Copyright 2018 Tim Carter

Is Skilled Labor Required for Concrete Foundation Forms?

A skilled foreman should be on the job to direct the layout work. However, unskilled labor can do almost all of the assembly of the forms because of the clever design of the interlocking panels and parts.

CLICK HERE to get FREE & FAST BIDS from local foundation contractors.