February 18, 2018 Announcement

Are you a new subscriber in the past few days? This is NOT a normal newsletter.

When one of my sales is about to end, I sent a LAST CALL message.

The We Love You Stain Solver Sale is about to end. (This sale ended Monday, February 19, 2018.)

Just HOURS FROM NOW.

ACT FAST!!!!!

Use:

LUVU

as the promo code to get 10% off and FREE SHIPPING to anyplace in the lower 48.

You need to spend at least $48 to get the promo code to work.

CLICK HERE to place your order.

I'll have a normal newsletter for you probably on Tuesday.

The GOOD NEWS is I'm currently migrating all the websites, including AsktheBuilder.com, to a new ultra-fast server.

Your user experience should be amazing after that happens.

Lots going on and it's all good!

Tim Carter
Founder - www.AsktheBuilder.com

Do It Right, Not Over!

February 13, 2018 AsktheBuilder Newsletter

There's lots to cover in this issue:

  • Stain Solver We-Love-You Sale
  • Another You-Can't-Make-This-Stuff-Up Story
  • Hidden Fire Danger in Your Home
  • Much More

Let's get started!

What Is Stain Solver?

Stain Solver logo

Stain Solver Certfied Organic

I'm investing this time because you may be a new subscriber or you may be a seasoned subscriber that's still a Doubting Thomas.

Stain Solver is a certified organic oxygen bleach powder. It's a multi-purpose cleaner that Kathy and I have manufactured since 1996. You mix the powder with warm or hot water to make an ultra-powerful cleaning solution.

Kathy (my lovely wife) and I own the company, and Roger and Ellen work with us each day to help get your things clean.

If it's water washable, you can almost always clean it with Stain Solver. The list of things you can clean is a mile long. Here's the ONLY things I'd not clean with Stain Solver:

  • natural wool or silk (undyed) - it will discolor them
  • aluminum cookware - it will oxidize and darken it
  • redwood decking / siding - it will darken it - use oxalic acid
  • sterling silver - it will darken it

Everything else in and around your home is fair game! Just last week, I used it for two simple projects around my home. I restored my daughter's favorite tea mug.

For the sake of this photo, I only filled it halfway with hot tap water so you'd see the before & after results in one photo.

stain solver coffee mug
Once the hot water was in the mug, I just dropped in 1/4 teaspoon of Stain Solver powder and walked away. After an hour, I poured out the solution and the mug looked as you see it above. NO SCRUBBING was required.

I then poured about two tablespoons into my dishwasher and set the cycle to pots and pans. The Stain Solver swishes around inside the machine and deep cleans all the accumulated GREASE that's on and HIDDEN INSIDE the washer arms, the internal filters, etc.

If you wonder WHY your clear glasses come out a tiny bit foggy, it's not always because your rinse agent dispenser is empty. It's because you have GREASE inside your dishwasher.

Don't believe me? Get a flashlight and look at your rotating washer arms and your filters!

Want to see my all-time FAVORITE before & after photo sent in by a customer?

Wait until you read Georgia's story just under the two photos. WOW!

CLICK HERE and be prepared to be BLOWN AWAY.

Do you want to try Stain Solver? We sell it in a small sample size bottle if you're skeptical and think I'm just another hawker on the Jersey boardwalk. Here's a photo of the sample size. That's my hand in the photo.
stain solver oxygen bleach
The cute sample size costs just $9.97 including FREE SHIPPING to anywhere in the USA including US Territories.

If you want to take advantage of the We Love You Sale, then purchase a 4.5-pound size or larger. Kathy and I need to reduce the inventory of that size before we do our next manufacturing run.

Use the promo code just below since tomorrow is Valentine's Day.

Kathy and I love you if you're a regular customer and we don't say it often enough!

LUVU

You'll get 10% off any purchase greater than $48.00 and FREE SHIPPING to the lower 48 US states.

CLICK HERE to place your order.

Hidden Fire Danger

A little over a year ago, a very close friend of mine and his wife almost became NFPA statistics. Their home started to catch fire because of an overloaded switch.

Fortunately, they were home and AWAKE before the fire got out of control. I helped correct the problem and all is well.

CLICK HERE to make sure you're not making the same honest mistake they made!

Slush or Exhaust Condensate?

Last week while I was in New York City attending a 1.5-day conference, Gary emailed me with a question about how to solve a water problem on his garage floor.

Gary didn't much care for my suggestions. My advice to you is don't be like Gary.

If you have thoughts about Gary or the suggestions I offered to him, by all means be sure you leave a comment at the bottom of the page.

CLICK HERE to see what Gary's problem was.

Sewer Gas Smell

Do you have issues with chronic or periodic sewer gas smell at your home?

My column may help you. If you need MORE HELP, I can get on the phone with you.

CLICK HERE to get some free advice on how to stop sewer gas in your home.

Low Water Pressure in Faucets

Finally, I want to help you save BIG MONEY. Plumbers can be very expensive. There's a DIY fix for most low-pressure problems in your home.

CLICK HERE to see how to save SWEET MOOLA!

That's quite enough for today.

Remember, We Love You and happy Valentine's Day!

CLICK HERE to get some Stain Solver now.

Tim Carter
Founder - www.AsktheBuilder.com
Co-Founder - www.StainSolver.com
Chief Oxygen Bleach Evangelist
Mr. No Typo Man

Do It Right, Not Over!

Cracked Concrete Carport & Rubbing Door

Cracked Concrete Carport & Rubbing Door

This is a cracked concrete carport slab. There’s no silver bullet to make it better other than start over. (C) Copyright 2018 Tim Carter

Cracked Concrete Carport & Rubbing Door

I’m blessed to have you as a reader and furthermore, I’m fortunate to get about 10,000 visitors a day to my AsktheBuilder.com website. Your questions are the fuel that keep this column vibrant and hopefully interesting! If you’ve got a question, then by all means visit the website and click the Ask Tim link!

Last week, I was flooded with great problems to solve. James H. lives in Evanston Illinois, in a condominium complex. The first thing to remember is not all condo complexes have garages. Some have carports that stop most sunlight, some rain, and no blowing snow.

James sent me two great photos of his crumbling and cracked concrete carport slab. It was in horrible shape. He indicated the slab could be as much as sixty years old! I must admit, it looked in sad shape.

His question was simple: “What can we do to fix this problem other than removing and replacing it, which we don’t want to do?” Having installed thousands of square feet of concrete slabs for driveways and garage floors that get car and truck traffic, I knew the answer.

The answer can be found on Meredith Center Road in Laconia, New Hampshire. It’s a long road that runs north and south along the eastern shore of Lake Winnisquam. My wife and I travel this road each Sunday on our way to and from church. It’s important to realize we have severe frost heaving issues in New Hampshire with our roads.

Three years ago, the state repaved a six-mile stretch of this road. I’m quite interested in projects like this for a host of reasons. They started the project at the south end and I happened to be on the road the day they were delivering the large machines that would do the work.

I saw a very unusual machine I’d never seen before. It turns out it was a giant, and I mean giant, grinder. This machine had the capability to chew through 12, or more, inches of asphalt paving reducing it to a mix of asphalt gravel and sand.

A few days later, I drove the road again and the machine had ground up about 2.5 miles of the roadway. A grading machine smoothed it, created a curved crown for drainage and heavy compactors packed the old ground-up pavement. For some reason, they never ground up the north 3.5 miles of the road.

A month later, they installed new blacktop on the entire road. As you can imagine, the road was smooth as silk and a pleasure to drive on.

This winter has been bitter cold and the frost heaves in the roads are the worst I’ve seen in at least seven years. The south section of Meredith Center Road still looks as good as the day they paved it. There’s not one crack anywhere or any frost damage.

The north section looks horrible. All the frost heave cracks that were there before have telegraphed through the new expensive asphalt. The gapping cracks are allowing more water to flow under the pavement which exacerbates the frost heaving.

The moral of the story is don’t expect any type of overlay on concrete to restore it to its former beauty for long. The nasty cracks will reappear. James needs to rip out the old slab. The new concrete needs to be at least 6 inches thick, it should have 1/2-inch steel bars in it both directions set at 2-foot centers. The grid should look like an empty piece of graph paper. The steel should have at least 2 inches of concrete under it.

I’d order the concrete to be 5,000 pounds-per-square-inch (PSI) strength. The minimum acceptable standard is 4,000 PSI. It costs just a little more for the extra Portland cement to get to 5,000 PSI. This new slab should look good for at least fifty, or more, years.

Dan in Boulder, CO, reached out to me with a simple problem with his bathroom door. The top right corner was sticking to the jamb when he’d try to close or open it. He was able to temporarily solve the problem by tightening the top hinge screws, but in a few weeks the door would rub again.

The solution is simple. I instructed Dan to remove the center screw in the top hinge and take it to his local small neighborhood hardware store. Once there, I told him to get the exact same screw, but be sure it was 2.5 inches long. I also told him to get a 3/16-inch wood dowel rod and a small bottle of yellow carpenter’s glue.

The next step is to open the door fairly wide and place some wood shims under the lower corner of the door directly below the handle. These shims will support the door and eliminate stress on the lower hinge as Dan starts the repair.

I told Dan to remove the other two screws on the hinge where it attaches to the door jamb and swing it out of the way. He then needed to cut two 1-inch pieces of the wood dowel rod and whittle the tip down if needed to get it to fill the holes of the top and bottom hinge screw holes. The carpenter’s glue would be used to coat the dowel and inside of the hole. Dan needed to tap the dowels into the door jamb making sure they were flush.

The next step was to flip the hinge back into position and drive the long screw he bought through the center hinge hole. I told him he’d have to drill a small pilot hole in the rough jamb as well as in the new wood dowels. The long screw would bite into the wood rough jamb behind the visible door jamb and keep the door from sagging in the future.

Column 1235

Water On Garage Floor In Winter

Water on garage floor

Water on a garage floor in winter is solved with a squeegee. I LOVE this one and have had one for years. It's sold on Amazon. CLICK THE PHOTO to have one delivered to your home. If you do buy it, I get a small commission from Amazon.

Water on a garage floor in winter can be a hazard. I'm sharing this email exchange as I feel it provides a valuable teaching moment for all of us.

Civility is dynamic. Go back one hundred or even two hundred years ago and courtesy, respect, and good manners were ingrained in just about everyone. Let me know in the comments below how you feel about the state of civility today. I'm very curious.

Water On Garage Floor In Winter - Yeah, It Can Happen

Gary emailed me with his garage-floor dilemma. I always reprint things exactly as I receive them. Any errors that follow are Gary's:

My wife is driving me crazy. You know how newer cars these days drip water from their tail pipes right? Well in winter that becomes a huge problem. Tail pipe drip freezes on the garage floor and becomes a hazard for a fall. So my wife puts down paper towels on the puddles then we have ice rinks with imbedded paper towels.

Which leads to another issue. We had our garage floor done  last year with epoxy and looks great. The installer sealed the gap between the floor and driveway indicating water going in that crack could rise either concrete structure.

Prior to the new floor I would squeegee water from garage into that crack . We never had an issue. Now if I squeegee the water from garage it goes in the driveway creating icy conditions there as well. My wife wants me to remedy this and I thought you may have the answer. Thanks Gary from Roselle

My Initial Reaction Within Seconds

It's important to realize the instant I read Gary's email several thoughts popped into my head.

"My goodness, how long do they let the car idle in the garage? Once you start a car you'd back out within ten seconds. There's no way a puddle could develop in that short time."

"Did he actually start the car and watch the condensate from the tailpipe collect on the floor or did he assume it was happening?"

What's more, I couldn't get my head around why someone would use paper towels and just leave the soggy water-filled things on the floor. Wouldn't the person concerned with the water bend over, wipe up the water and throw away the paper towels? What did the person think would happen with the saturated paper towels?

Obviously, there was some data Gary had left out. I thought he overlooked the real source of the water. I had to find out what I was missing.

I have water on my garage floor all the time in the winter. It's caused by small amounts of snow and slush that melt once you pull the car into the garage. You may not see it on the sides of the car, but it's under the body and in the wheel wells.

Water also puddles under my car when you pull it into the garage if it's raining outdoors. Even a small amount of light rain on the roads allows quite a bit of water to collect in the tires and under the car body.

Is it possible Gary didn't connect these dots? No way, surely he'd think of that, right?

Water on Garage Floor

Water on a garage floor can turn to ice. It happens in my garage all the time. But this amount of water is generated by snow and slush on the underside of the car that melts once I pull into the garage, not from seconds of exhaust condensate dripping from a tailpipe. See why I wondered about what was really going on with Gary and his wife? I know all about water on a garage floor. BTW, I didn't build the house I currently live in. If I had, this photo would have never been taken. Why? Because there'd be a floor drain under each car in the garage and the floor would be sloped in the garage like a shallow funnel. ALL water dripping from the car would drain to the floor drain(s). This is how garages of old were built. Copyright 2018 Tim Carter

My First Reply to Gary

Trying to get a handle on the moment I sent the following reply to Gary. Realize I get many questions a day and I try to be pithy in the interest of saving time.

"Rhetorical questions: What am I missing? Why would anyone allow their car to idle in the garage? Enormous carbon monoxide poisoning possibility.
Solution: Start car. Within 10 seconds put it in reverse and back out of the garage.
Problem solved."

Gary's Retort

Gary didn't like my reply. I think that's quite evident as he sent the following back to me within minutes:

As soon as you start your car water comes from exhaust.  On flip side when you pull in garage water is dripping from the pipes neither my wife or I EVER let the car run in the garage. I’m not sure where you are coming from. Unless you are driving old model cars and are not familiar with newer cars  tail pipes. 

My Helpful Followup Suggestion

I knew Gary had first mentioned that he had used a squeegee in the past.

Since water evaporates pretty fast if you spread it out and he was forcing it outdoors where he noticed it was creating a fall hazard, I invested more time to help him get in good standing with his wife.

Rubber Blade Squeegee

I've had two of these squeegees. The rubber blade is perfect for spreading out water on a garage floor so it rapidly evaporates. CLICK THE IMAGE NOW to have one delivered to your home.

Here's what I sent:

Easy....

Get this squeegee that I LOVE LOVE LOVE.


Push water to slab UNDER car body. It evaporates while you're away or asleep.
 
Problem solved....

Now Gary's Really Mad

Not too long after sending the above helpful suggestion, Gary sent me this:

remove my email from this list immediately

I Had To Remind Him

As you might imagine, I was now really confused. Gary wasn't on a list. Heck, did he forget he had just emailed me? He started the exchange.

I replied:

You are not on a list. "You" reached out to me for help.

Now I Understand Road Rage

My last response to Gary sent him over the edge. Here's his blistering flame response. I've copied it exactly as he sent it with all the typos, grammar and punctuation errors:

Remove my name from your website notifications . I reached out to you with a legitimate question and you responded in a demeaning disrespectful manner. Is that how you deal with the public? You don’t seem to know anything like you claim to know. I won’t let this incident go unreported. Trust me , you reacted unprofessional to the wrong guy

You Can't Make This Stuff Up

I feel sorry for Gary. While I'm no licensed psychological professional, I think it's safe to say he's dealing with both insecurity and anger issues. Add to that he's not the least bit appreciative of the help I tried to offer.

I was honestly concerned that carbon monoxide could be an issue. You can no longer assume people are aware of common dangers. The more emails I get each week, the more I see common sense as being quite uncommon.

Just think about it. How long would you need to allow a car to idle in one spot that you'd have so much condensate dripping from the exhaust pipe that it would create a puddle big enough to be an issue?

Gary, tape a video buddy! Show us how long it takes to make a 6-inch-diameter puddle!

Repairing Flood Damaged Floor

flood damaged floor

Here’s a hardwood floor being ripped up as part of the hurricane cleanup in Houston, TX. (C) Copyright 2018 Tim Carter

Flood Damaged Floor

Many things that happen in your life each day usually are connected in some fashion. It’s the same with me and today was a very strange day. I’m convinced that you’ll appreciate the story I’m about to tell and no doubt it’s going to benefit you in one way or the other.

My day started before sunrise. I love getting up early and I’ve been devoting about ninety minutes each day revising and updating the thousands of pages of content at my AsktheBuilder.com website.

It’s important to realize I’ve made a conscious effort over the past twenty-five years to create as much evergreen content as possible for you. Many of my past columns are as relevant today as they were the day they were written. An example might be how to install metal flashing around a chimney or how to install a thin concrete overlay. But some columns need to be freshened up.

AsktheBuilder Podcast

CLICK this image and listen to the first call on the podcast. I talked to Jill about how to repair wood kitchen flooring, and possibly installing an inlay border as an option. Copyright 2018 Tim Carter

Each day, I receive through the Ask Tim page at my website questions from readers like you and folks that find me on the Internet. Today I saw a question come in from Roger who lives in Houston, Texas. He was a flooding victim from the horrible Hurricane Harvey that transformed much of his city into a small sea.

When a visitor submits a question to me through my website, they get an automatic response from me letting she / he know that I got the question and how soon I might get back with an answer. I also tell them about an emergency service I offer where I can call you on the phone for a small fee. The calls can happen same day in many cases.

Roger decided to do that. He needed an answer fast. I saw his order come in, I asked him to send photos to me and we jumped on the call. It turns out a few months before the wretched storm he had completely remodeled the house. It was up for sale when the rain fell from the sky. His new hardwood floors were ruined by 10 inches of water.

He and his wife decided they wanted to make the house trouble free for the next owner and wanted to put down a thin concrete overlay. I told Roger I had quite a few columns about the topic and then walked him through his options about the best way to install the 2 inches of concrete he had to put over the existing floor.

We discussed finished flooring and he was unaware of realistic wood-look solid vinyl flooring. When I showed him photos of how it comes in narrow strips like real wood and is waterproof, he was dumbfounded. I thought he had died and gone to Heaven he was so happy!

One thing led to another in the conversation and he discovered I’m about to debut my new podcast. Not too awful long ago, I used to do a two-hour call-in home improvement radio show. It was fun answering live questions and helping homeowners like you each weekend. But podcasts are the new thing and they give listening control to you.

I mentioned to Roger that the next time he needed help and advice, I’d be able to call him and we record the call for the podcast. There would be no cost for this service. He was happy to hear that!

The same is true for you. Each week, I’m going to do a minimum of two calls to a homeowner, or a contractor, builder, remodeler, to try to help solve a problem you might have. My only requirement is that you need to supply at least two high-resolution photos of the problem. Photos allow me to zero in on the best solution to the problem. You can go here to sign up to be on the podcast:

CLICK to go to the AsktheBuilder Podcast Page

At the end of the call, Roger asked me a very unusual question. He was thinking of starting to dive into the remodeling and contracting business and wanted to know what the best resources were where he could bone up on tips and techniques. Roger also expressed that he was terrified of getting taken to the cleaners by contractors and subcontractors that didn’t know how to do jobs the right way.

Oh my, that’s a loaded question if I ever heard one! My advice was somewhat simple. Roger and I both agreed that the Internet right now is like the Wild West of the USA in the late 1800s. In other words, there’s lots of danger out there and vast amounts of misinformation.

The first thing I did was mention to Roger the existence of countless associations in the building products industry. For example, I let him know about the Portland Cement Association, the Brick Industry Association, the California Redwood Association, and several more.

Many of these groups have curated thousands of pages of excellent written white papers filled with professional illustrations or photos about the proper way their products should be installed. I’ve relied on this information for over four decades myself. You simply can’t believe how much great information can be found using these resources.

I then gave him the tip of the day by telling him what to do when he landed on a home improvement website. Instead of looking at the content and photos, I suggested he immediately find the About Us page. Go there and determine who created the content at the website and how many years experience they have working in the homes of paying customers.

It turns out that many websites out there are created by hobby bloggers who’ve never worked a day in a paying customer’s home. You need to be very leery of information you find at websites like that!

Column 1234

February 6, 2018 AsktheBuilder Newsletter

Two days ago, I sent out a newsletter that was rife with errors. I'm talking typographic, spelling and who-knows-what!

I proofread that newsletter no less than five times over a period of two days as I created it. Suffice it to say I was cringing Sunday morning when I received a copy in my Inbox.

When I opened it, the mistakes were like talons and clawed my eyes out.

Arrrrrggggghhhhh! I'll try to do better.

New Subscribers Welcome - Old Subscribers, Hi!

You may be a new subscriber in the past few days. Quite a few signups have happened and I welcome you! If you're a seasoned subscriber, I don't want you to feel left out, so thanks for being here too.

The Scavenger Hunt - Attention New Subscribers!

Early Sunday morning, I sent out a blast about the Ask the Builder 2018 Scavenger Hunt game. You may have missed it with all the excitement about the wretched football game.

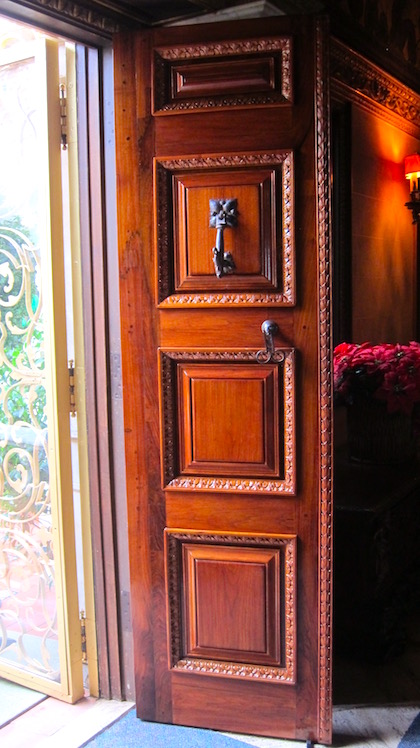
Look at this photo for a second. Go ahead and click it if you want.

pocket door

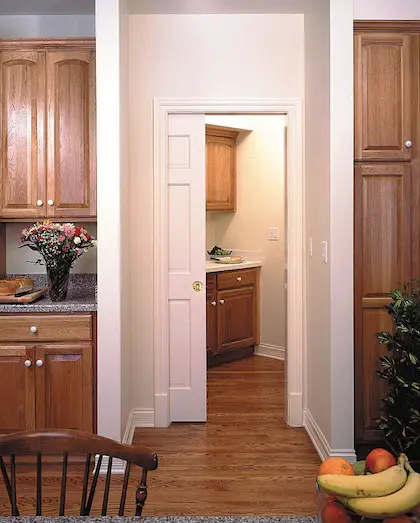
Right in the center is a fantastic LE Johnson pocket door.

There's also lots more in the photo. How many different fruits can you see? You really need to look hard.

When you play the game, you get to see several of these awe-inspiring photos of different types of pocket doors.

Some will take your breath away. No kidding!

My games test your cognitive skills, and I share NEW products at the same time. Here's a few comments from a few happy subscribers that played the game on Sunday:

Sara Martin hails from Knoxville, TN and said, "Loved the glass french doors that slide into the same pocket!"

Colette who lives up in chilly Chipman, Alberta, Canada shared, "The doors make me want to do some renovations."

Jim Regis who calls Downers Grove, IL home said, "Two doors in the same pocket is amazing!"

Jim was talking about the new multi-bypass door system by LE Johnson.

Want to see it? I thought so.

CLICK HERE and get started!

Be SURE to scroll to the TOP of the quiz page after you click SUBMIT. You'll be able to see your score AND the correct answers to my questions.

If you played the game and want to see the CORRECT answers to the questions, play again.

My Old Radio Show - Coming Alive Again

One late winter afternoon in 1994, I was sitting next to another dad at my daughter Meghan's grade school basketball game.

"Marty, guess what I did this morning? I was a guest on Gary Sullivan's home improvement radio show!"

"Cool. Did you have fun? How would you like to have your own show?"

Marty was the program director for the top oldies station in Cincinnati, Ohio - WGRR - 103.5. He knew many of the other program directors and WMOH in Hamilton, Ohio was looking for a host to do a call-in home improvement show.

A month later, I was on the air. I had no idea how hard it was to do radio, but I persevered and went on to do the two-hour show at three different stations over the next 12 years.

It was a boatload of fun answering live calls, and I even ran the control board for about seven of the years. Working the pots on the board, playing the bumper music and doing live radio was exhilarating.

Guess what? I'm bringing the show back using modern technology.

If all goes well on or before March 1st, you're going to hear the first Ask the Builder podcast!

What's a podcast?

A podcast is just like radio, but you the listener are in control of everything.

You control WHEN you listen. You control WHAT you listen to. You can start, pause and stop it when you want.

It's the audio version of your DVR if you tape and watch TV shows and movies.

Here's the format I'm going to start with:

Open - I welcome you and tell you what the podcast is going to cover.

Segment 1 - First homeowner / builder call - I solve a problem for a homeowner, builder or remodeler.

Segment 2 - Second call - same as above

Tim's Time Travel - A short segment where I share a story about something that happened on a past job that's either funny, sad, thought provoking or a teaching moment.

Do you want to be on the podcast? Do you want me to call you and solve your problem for free?

The calls are recorded. You're not on LIVE like a real radio show. Live radio or TV is scary for many.

Recording the calls allows you to relax so we can have some fun!

If you want me to call you on the phone to solve your problem, CLICK HERE and sign up. You must supply at least two great high-resolution photos of your problem.

NOTE TO SPONSORS: I've got an incredible deal for the first eight charter sponsors for the podcast. If you're a marketing director or report to one and have a great product you want me to feature on the podcast, now's the time to get in touch.

You're not going to believe the deal I'm offering - but your product must be great - one I'd use in my own home.

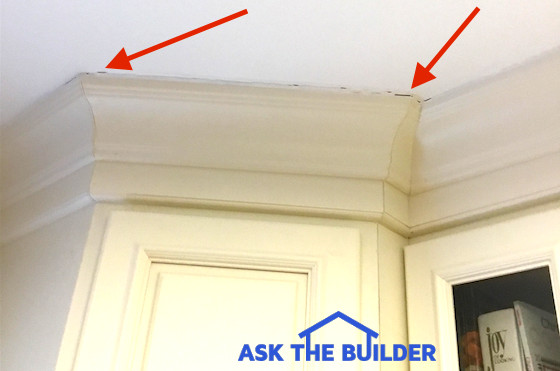
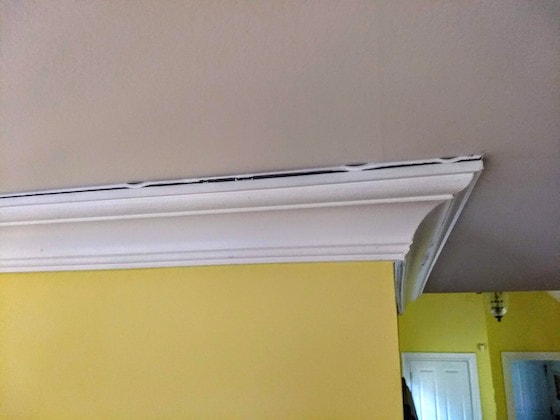
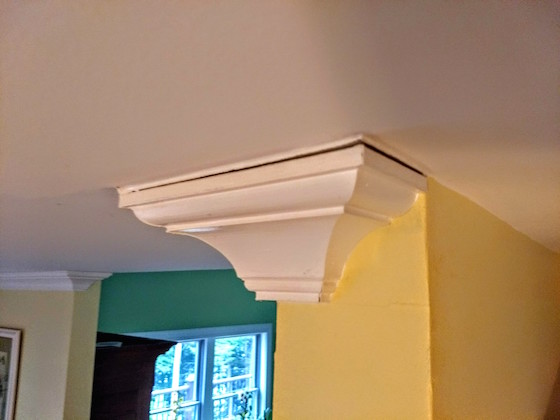
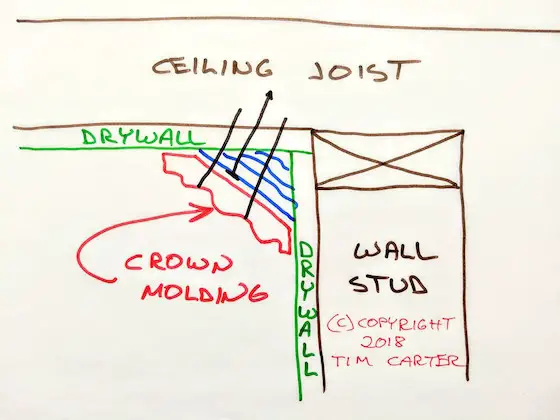
Ugly Crown Molding Ceiling Gaps

Do you have crown molding in your home? In the cool / cold winter months does a gap appear where it touches the ceiling?

crown molding ceiling gap

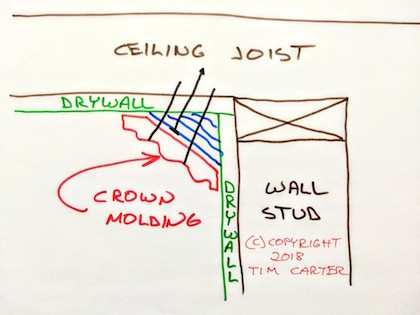
CLICK HERE to discover how to prevent the gaps and how to fix them if you have them.

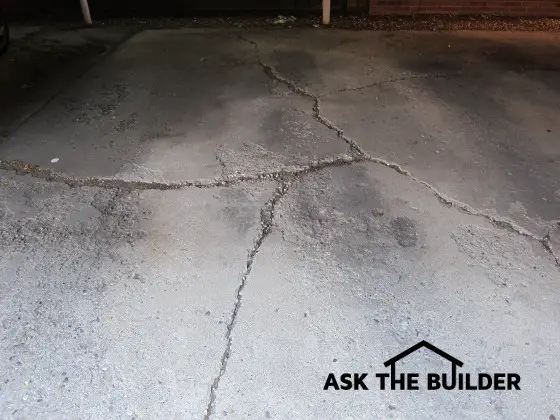
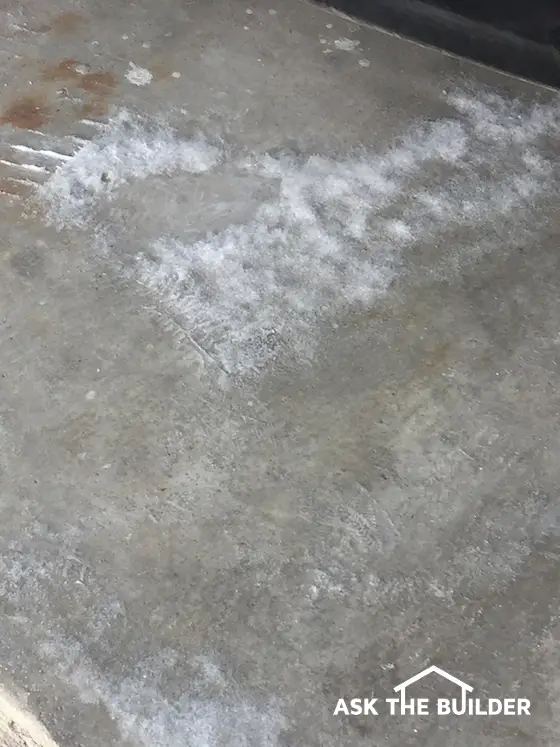
Remove Oil Stains From Concrete

Has a delivery truck dripped oil or hydraulic fluid on your gorgeous concrete or brick paver driveway?

Don't blow a head gasket!!! RELAX!

remove oil from concrete


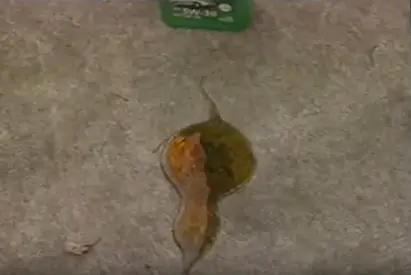
CLICK HERE NOW to see how to clean fresh oil stains fast.

If you have OLDER OIL STAINS, I share how to remove those too. You can get out old oil stains, but it's a bit of a chore.

CLICK NOW.
​​​​​

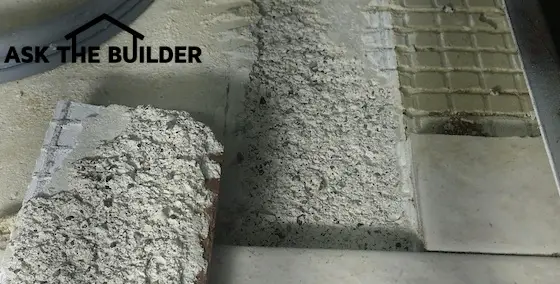
New and Revised Columns For You

Efflorescence or Mold? Does it Damage Concrete?

SECRET Mix for Long Lasting Concrete - It's Possible

Does SALT Ruin Concrete? What's Really Going On Tim? Surprise Answer!

That's quite enough for today.

I'll be in NYC the next three days. Lower Manhattan.

I asked you if you wanted to meet up. Last call if you want to meet up for dinner tomorrow night!

Tim Carter
Founder - www.AsktheBuilder.com

Do It Right, Not Over!

February 4, 2018 AsktheBuilder Newsletter

I was born and raised in Cincinnati, Ohio - a town that not only has a strong Midwestern culture, but it also possesses a rich stock of grand homes in its older neighborhoods.

It wasn't until I approached my mid 30s that I started to fully appreciate how many wonderful things the old houses contained. It's important to realize that I worked on and in many of these sturdy and well-designed homes.

Thousands of these houses were built in the early 1900s and had one or more unique and beneficial features that you don't often find in modern homes. Here's a partial list and I'm leaving out for the time being my favorite feature (you'll see my favorite farther down in the story):

  • laundry chutes
  • window seats
  • built-in pantries
  • closet access panels for tub and shower faucet access
  • dumbwaiters
  • full attics - not wasteful standard trusses

How many of the above things are missing from your home?

Much of this simple and useful technology was kicked to the curb by yet-to-be-born architects who have diligently tried to fill the shoes of the master architects of old.

These new-age young architects made use of the fog of disregard to shroud from you and millions of other homeowners many of the above items.

It didn't matter to them that the things in the above list were great technology. Who cared that they functional? My guess is the new architects thought all the things in the list were dated, frumpy and archaic.

The untested, youthful architects thought they had better ideas. After all, who wants antediluvian design? "Bah!" they probably proclaimed as the thumped their chests.

Did you read the fantastic Lord of the Rings book series by J.R.R. Tolkien? Tolkien knew about this unfortunate chain of events that happens all through time. This famous passage from his book says it all:

“And some things that should not have been forgotten were lost. History became legend. Legend became myth. And for two and a half thousand years, the ring passed out of all knowledge.”

What's the coolest item I didn't list above, and you can find in many of these stately well-built and designed homes?

Simple, yet elegant, pocket doors and their new, modern variations like multi-bypass pocket doors.

I'm about to show you many modern examples that will take your breath away. Seriously. I guarantee you're about to see one, or more, doors that you'll want to put in your home this year.

You wouldn't think it possible to improve on the functionality of pocket doors, but you're wrong.

Imagine two bypass doors that also fit into the SAME pocket?

The double doors of 100 years ago each had their own pocket and the met it the middle of an opening. Yes, you can still do that, but what about a large opening where you only want a single pocket on one side?

​​​​​​​Here's a photo of that magical door. CLICK the image to discover the exact hardware you need to make it work.
pocket doors
What about fancy doors? I mean really fancy doors.

Can you put them in pockets? If you can dream it, you can do it. Wait until you see all the examples below!

Any door you can dream of can be suspended and slide smoothly using made-in-the-USA LE Johnson hardware.

It's the only hardware I'd use for pocket doors or all the other variations I'm about to show you.

I've used LE Johnson hardware in my past two homes. I used it on countless jobs of mine. I've never had a failure.

See this door just below? My daughter and I got to walk through it fifteen months ago on the coast of California. We were touring the Hearst Castle.

You can hang doors just like this using LE Johnson gliding hardware. They'll open and close for decades with no issues.

hearst castle door
It's time now for you to see how you can incorporate into your home some of this amazing old technology that's still made by a humble business located in northern Indiana - L E Johnson Products Inc.

CLICK HERE to discover more about this company that's been around since I was six year old!

CLICK THE FOLLOWING LINKS to see modern-day examples of doors that disappear and get out of the way like the doors of old.

WARNING: You're going to see amazing doors and rooms. Pay close attention to what you see.

When you land on the page, be sure to CLICK the photo so it enlarges. You need to see all the details in the photos.

Secret Sun Room

Two Doors Share One Pocket - BRILLIANT!

BeetleJuice Table - No Kidding!

Sports Gear Hide-away With Ventilation!

Dogs and Kittens Living Together!

Magic Mirrored Sliding Door - What's Behind it?

Fruit & Flowers and Classic Lines

The Hidden Compact Office

The Scavenger Hunt Shall Now Begin

Did you click all the links above? You'll need to so you can answer five easy questions.

If not, go back up and click all and look at what you see.

THANKS in advance for doing this. You'll be amazed at some of the doors.

Let's see how much you remember. Feel free to revisit the pages if necessary.

CLICK HERE and answer the simple easy questions.

Crown Molding Gap Ceiling

crown molding ceiling gap

Here's a crown molding gap at the ceiling. The red arrows point to the ugly gaps. See below how to avoid and fix them. Copyright 2018 Tim Carter

"Crown molding ceiling gap happens because the rough lumber behind the drywall shrinks. It can be prevented by nailing the ceiling molding to the ceiling allowing it to float up and down on the wall."

Why is There a Crown Molding Gap at Ceiling?

Ceiling molding, or crown molding, can pull away from the ceiling because the humidity inside a home is less in the winter months.

Charlie from Easley, SC has a crown molding gap where it meets the ceiling. I have the same issue at my own home.

It's important to realize he’s got ceiling crown molding in at least one room of his home and in the winter months a gap appears between the top of the crown molding and the ceiling.

He felt it was a temperature-change issue, and in some ways he’s correct. However, it’s important to realize the temperature in his home is very likely fairly consistent month to month. Perhaps it varies by eight to ten degrees.


Related Links

Lumber Shrinkage Facts and Secrets

Installing Fancy Crown Molding - Stunning Inside and Outside Corners

Free & Fast Bids

CLICK HERE to get FREE & FAST BIDS from local painters who can caulk the ceiling gap.

crown molding ceiling gap

This ceiling crown molding gap happened because the wall drops down in the winter from lumber shrinkage. Copyright 2018 Tim Carter

Does Rough Lumber Shrinkage Cause Crown Molding Gap?

Yes, rough lumber shrinkage is the cause of crown molding gap.

Crown molding ceiling gap happens because the rough lumber behind the drywall shrinks. It can be prevented by nailing the ceiling molding to the ceiling allowing it to float up and down on the wall.

Another key point is the outside temperature and humidity is much different in South Carolina during the year. As the air cools down during winter months, it holds much less humidity.

The lumber in Charlie’s, and my, house dries out and shrinks. This rough-framing lumber shrinkage is the source of our joint woes.

How Can I Fix Ceiling Molding Gaps?

You can fix ceiling molding gaps temporarily in the winter by caulking the crack. Do this when the gap is the largest and use the most expensive flexible caulk you can buy.

crown molding ceiling gap

This small piece of ceiling molding is affected just like long pieces. It's easy to do it right, but hard to repair. Copyright 2018 Tim Carter

How Can Crown Molding Gap Be Prevented?

The problem could have been prevented had the carpenters that installed the crown molding attached it to the ceiling instead of the wall studs. The foot of the crown molding would then just ride up and down the wall surface as the lumber expands and contracts with the change of seasons.

A simple triangular block of rough lumber that just about fills the void space behind the crown molding could have been nailed to the ceiling joists on two walls and blocking on the other two. The crown molding would then be nailed to this wood with the nails aiming up towards the ceiling.

crown molding nailing

Crown molding gaps at ceilings can be eliminated if you attach the crown molding this way. NO nails should enter the wall studs or top plate. Note the blue triangular block that is custom cut to fill the void behind the crown molding. Nail it to the ceiling joists or blocking in lieu of joists. Then nail the crown molding up through the triangular block into the ceiling. Copyright 2018 Tim Carter

Charlie’s best chance of fixing the crack without reinstalling the crown molding, a huge pain in the keister, is to caulk the gaps in the middle of winter when the gap between the molding and the ceiling is the greatest. I’m going to fix mine by using the most expensive caulk I can locate that has the greatest amount of long-term flexibility.

Six months from now the caulk seam may squeeze out of the gap a little bit, but come next winter if the caulk performs as expected, there will be no gap.

CLICK HERE to get FREE & FAST BIDS from local painters who can caulk the ceiling gap.

Efflorescence Damage Concrete

efflorescence damage concrete

Efflorescence damage concrete? It's almost never a problem. You just need to brush off the white powder. But, the salt that causes the efflorescence CAN cause damage to concrete. READ BELOW. Copyright 2018 Tim Carter

Efflorescence Damage Concrete - Not Usually a Problem

Efflorescence is a white powder created when saltwater evaporates from a masonry surface like concrete. It's a very common problem in cold climates on garage floors. Rarely will it cause a problem inside of your garage.

The first thing to remember is cars carry in snow and ice slush on the underside of the car body. Most cities and towns treat roads with salt. This salt mixes with the snow on the roads and becomes an unwanted parasite under the wheel wells of your car or pickup truck.

Concrete Absorbs the Saltwater Brine

When the salty slush melts, it coats your garage floor with a salty brine. Concrete absorbs this brew like a paper towel. The saltwater brine readily soaks into the concrete, even that which is smooth.

Another key point is the water will evaporate into the air later, but it leaves the salt behind sitting on the surface of your garage floor. That white powder you see is just fine crystals of salt.

efflorescence damage concret

This is a closeup shot of efflorescence. The width of the area you see id about 5 inches or so. The efflorescence looks like Just sweep it away. Copyright 2018 Tim Carter

Wet the tip of your finger, touch the powder and taste it. It's just regular salt mixed with some road dirt. You ate some dirt when you were a kid, right?

Related Links

Long Lasting Concrete is Easy to Make

Salt Damage To Concrete Happens More Outside Than In Garages

It's Not Mold

You may think the white powder is mold. It's not. It's just salt. Mold can grow on your garage floor, but mold usually would tend to flourish in the warm months of summer.

Efflorescence Video - Super Easy To Clean

Watch me and the efflorescence in my own garage:

How to Clean Efflorescence

Do NOT clean up the white powder with water. That just causes the salt to be driven back into the concrete. When the garage floor dries again, the efflorescence will come back.

It's best to just use a broom to sweep it away. It can take many sweepings until the salt is all drawn up out of the concrete.

You may notice the white powder months later after the snow and ice is gone and you've decided to spring clean your garage. You wet the garage floor, scrub it with Stain Solver oxygen bleach and the next day the white powder is back!

Not to worry. That just means there's still salt in the slab and less and less white powder will form as you continue to just brush it outdoors.

Salt Damage to Concrete

salt damage to concrete

The center of the photo looks like salt damage to concrete. The top surface of the concrete scales off and reveals the rough rock and sand below. Blame the concrete contractor, not the salt. Read below how to prevent salt damage. Copyright 2018 Tim Carter

Salt Damage to Concrete - Don't Blame the Salt

Salt is often blamed for damaging concrete. The top surface of concrete sidewalks, driveways and patios may spall or scale off after you broadcast salt on it to melt snow and ice.

The salt is indirectly responsible only because it helps promote more freeze and thaw cycles within the top surface of the concrete. The first thing to remember is water soaks into concrete.

It's important to realize this water inside the top of the concrete expands about nine percent in volume when it freezes. This expansion blasts apart the concrete if it's not strong enough to resist this stretching force.

Related Links

Long Lasting Concrete is Easy to Make

The Truth About DeIcing Salts and Concrete

Free & Fast Bids

CLICK HERE to get FREE & FAST BIDS from local concrete surface repair contractors.

Add Air and More Cement to Concrete

There are many examples of concrete around you that withstand attacks by rock salt and winter weather.

I grew up in Cincinnati, Ohio. Construction of a subway was started just after World War One. On or about 1925 the concrete railing and sidewalk you see in the photo just below were built. That was almost 100 years ago.

Both of these are separated from the wide Central Parkway by the grass strip to the right. Salt spray from traffic got on both the railing and the sidewalk no doubt.

salt damage to concrete

This cast concrete railing was built in 1925. The photo was taken in 2017. The sidewalk next to the railing was poured in the mid 1920s as well. A major roadway is on the other side of the grass strip. Read below why the railing and sidewalk are still in great shape. Copyright 2018 Tim Carter

The concrete railing and sidewalk alongside Central Parkway resist attack from salt spray simply because they contained more Portland cement when they were constructed. It must be remember the master craftsmen that built them also did not add extra water to them as they finished the concrete.

You can add chemicals to modern concrete that create tiny air bubbles in new concrete. These air voids are places where the growing ice crystals can expand to prevent damage from freezing weather.

Contractor Errors When Pouring Are the Real Cause of Damage

The most compelling evidence of scaling and spalling damage to concrete is basic workmanship errors.

Here are the most common mistakes made by contractors that cause damage to concrete:

  • adding too much water to make the concrete
  • adding water to the concrete at the job site to make it easier to place the concrete
  • troweling in bleed water as the concrete starts to harden
  • failure to spray on a clear curing compound to prevent water from evaporating from the concrete

A point often overlooked is how contractors of old installed lasting concrete. Here's what they did:

  • they had enough men on the job so each one finished a smaller area
  • concrete was poured with a 4, maybe, 5-inch slump - this is stiffer and requires more work
  • bleed water was allowed to evaporate or it never happened because minimal water used to mix
  • the finished concrete was wet cured with burlap kept wet for 48-72 hours after the concrete hardened

Recipe for Concrete That Withstands Salt Attack

If you order ready-mix concrete, get it with a 4.5-inch slump and order it with an eight-bag mix or 5,000 PSI minimum.

If you're going to mix small batches with raw materials use this formula:

  • 3 parts gravel
  • 2 parts sand high in silica content
  • 1.5 parts Portland cement
  • 0.5 parts hydrated lime

CLICK HERE to get FREE & FAST BIDS from local concrete surface repair contractors.