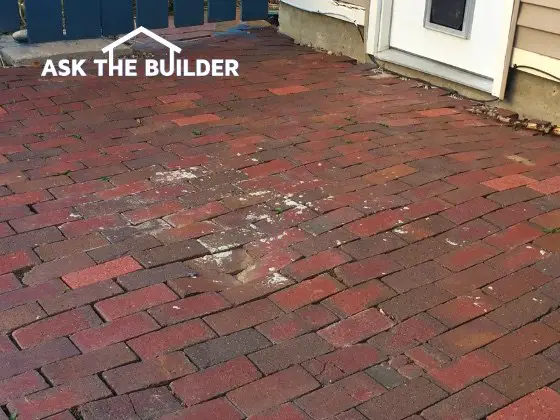
Brick Patio Repair | This brick patio is in sad shape. Inferior workmanship is to blame. (C) Copyright 2018 Tim Carter
"Here and there problems started to crop up. I first noticed the resident ants loved to transport my sand up on top of the brick"
Brick Patio Repair Checklist
- Brick requires strong base beneath it
- A concrete slab is the best option
- Crushed gravel is the second-best base
- Mortar the brick to the concrete or place on a thin bed of sand
Related Links
Brick Patio Mortar Repair - Secret Recipe - Do NOT SHARE
Brick Patio Moss and Mildew Prevention - Spray On a Magic Liquid
DEAR TIM: We bought a house that requires an immediate brick patio repair. The brick patio in the backyard is very warped and looks like a wave ran under it. We want to replace it but don't want it to end up like this.
We live in a mountain town which has freezing ground temperatures for a good portion of the winter and think this has been a contributor. Can you advise how to construct a lasting flat brick patio in our special environment? Evana S., Steamboat Springs, CO
Free & Fast Bids
CLICK HERE to get FREE & FAST BIDS from local patio brick contractors.
DEAR EVANA: Oh your patio is useless based on the photo you sent to me. It’s so bumpy and uneven you’d never be able to put a table or chairs on it. The good news is the high-quality paving brick can be salvaged with ease and reused when you rebuild the patio.
Brick Patio Repair - Don't Experiment As I Did
Your patio reminds me of two failed experiments I tried back when I was in my mid-20s. I thought I knew how to build simple brick patios but Mother Nature decided she’d teach me a tough lesson. At the time I lived in the Midwest where the ground regularly froze to a depth of 24 inches or more!

CLICK this image and listen to the first story - Vic has a gorgeous patio on the back of his house. One part of the patio has sunken down. I've got the fix.
The public Internet didn’t exist back in the mid-1970s. You found home improvement tips in magazines and books. I saw an article that said to lay thin paving brick on a bed of compacted sand. It seemed like a good idea for my young fertile builder’s mind.
Curved Front Brick Sidewalk
I constructed a magnificent curved front sidewalk and side path at my house. They looked smooth and magnificent after many hours of work.
Here and there problems started to crop up. I first noticed the resident ants loved to transport my sand up on top of the brick. The most compelling evidence that I had made a mistake was the edge brick that drifted away from the sides of the walkway.
At the same time brick in the middle of the walkway started to dip and become uneven. My wife was not happy. She wanted a new brick patio in the backyard with a sweeping set of steps leading down to it and made it crystal clear that I was to never do a brick patio repair.
What's the Best Brick Patio Repair Base?
For this reason, I had to come up with a new method to create a brick exterior patio and walkway surface that would remain flat for decades. I don’t remember where the idea came to me, but I decided to incorporate a steel reinforced concrete slab under the brick.
In my opinion, and it’s based on building numerous brick patios and staircases after my failed sand-bed experiments, you start the job by installing a 5-inch-thick poured concrete slab. Install one-half-inch steel reinforcing bars 2 feet on center both directions in this slab.
What Does the Reinforcing Steel Look Like?
The steel will look like an empty sheet of graph paper before the concrete is poured. Be sure the steel rods end up in the middle of the slab with at least 2 inches of concrete under each bar. It must be remembered that the soil under the concrete should be compacted well before you pour the concrete.
CLICK HERE to get FREE & FAST BIDS from local patio brick contractors.
How Smooth Should the Concrete Be?
Screed the top of the concrete so it’s smooth. Be sure the concrete pitches away from your home at least 1/8-inch per foot for good drainage.
How Thick Were the Brick?
I used thin paving brick that were 1.5 inches thick. You can use full-sized brick if that is what you have. You can install the brick directly on the poured concrete if you like, but you’ll get the best results if you mortar them to the fresh concrete.
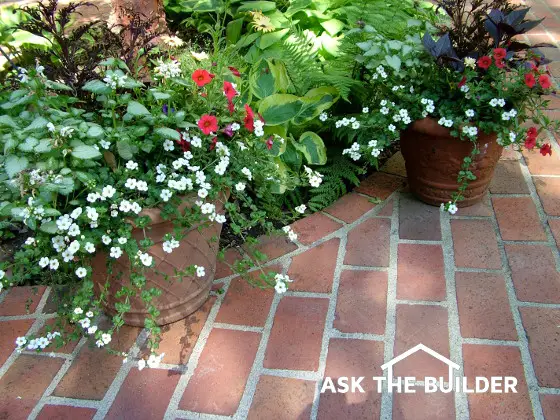
This is the patio built with traditional clay brick pavers. Each brick is only 1.5 inches thick. They could have been set in sand, but laying them in mortar creates a traditional look and feel. Copyright 2018 Tim Carter
Will Weeds Be a Problem?
Your existing patio has the brick touching one another with no mortar joint. Dirt and debris can get in the cracks and weeds will grow in short order. Setting the brick in the mortar with a mortar joint in between them makes it nearly impossible for weeds to gain a foothold.
What's the Best Mortar Mix?
Make a strong mortar mix to resist freezing weather. I used a 1:1 mixture of Portland cement to fine sand. You may need to add additional cement to make the mixture flow with ease from the mortar bag. You use a mortar bag to install the mortar mix between each brick to avoid smearing the face of the brick.
Is the Brick Walkway Still in Good Shape?
I first used the above method in the late 1970s to rebuild my failed front sidewalk. You can drive by the house today in Cincinnati, OH. It’s the first house on the north side of Robison Road just east of Montgomery Road.
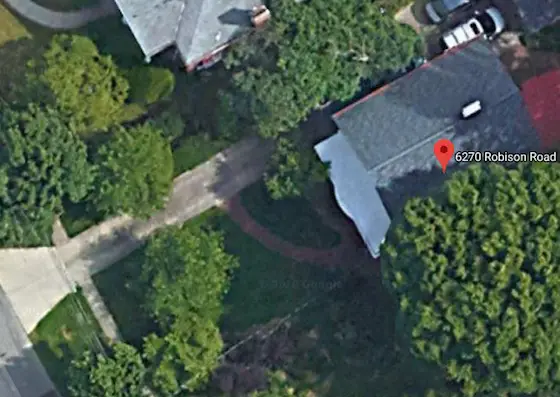
You can see my brick sidewalk in the front lawn! This is a satellite photo taken in 2018 just about 40 years after the sidewalk was put in. Copyright 2018 Google, Inc.
It’s now forty years later and the walkway looks exactly like it did the day I finished rebuilding it. The same is true for all the other patios I built for my wife. You’ll never regret installing your brick on top of a rigid concrete slab!
CLICK HERE to get FREE & FAST BIDS from local patio brick contractors.
Column 1223