Water in Heating Ducts

HVAC Floor Vent

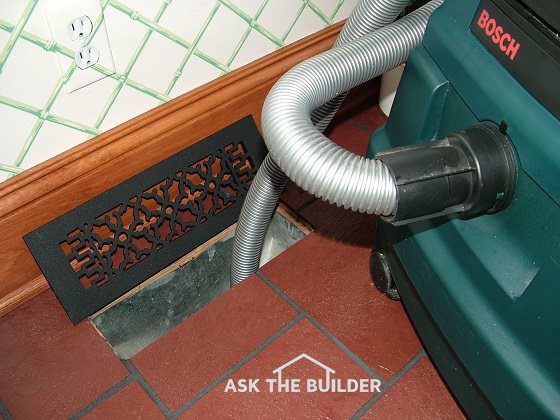
Use a wet-dry vacuum to suck out water from the ducts under a concrete slab. © 2017 Tim Carter

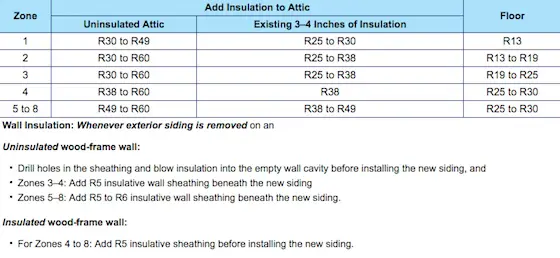
Water in Heating Ducts TIPS

DEAR TIM: My husband and I live in a one-story home built on a slab. The home was built thirty years ago and we are the fourth owners. A few days ago I heard a bubbling noise coming from one of the floor heating vents.

I looked inside the vent and there was standing water! We pumped out water for two hours but the vents filled back up.

Where is the water coming from? How can we stop it? Do you think this problem was known by the previous owner and if so, do we have any recourse? Lynn F., Norcross, GA

DEAR LYNN: Oh my goodness. You've got a serious problem or two.

Water Is In Soil

Water is in just about every soil to one degree or another. I majored in geology in college and took a deep interest in hydrogeology - the study of groundwater.

This sub-surface water can not only cause enormous problems for people who own slabs, but those who have houses on crawlspaces and those built with full basements. Many people who own a slab house think they are immune to problems caused by subsurface water. But I can't begin to tell you how many emails I receive from people who have your identical problem: flooded buried heating and cooling ducts.

CLICK HERE to get FREE & FAST BIDS from local contractors who specialize in duct relocation and problems.

Water Moves Sideways

The problem is happening because water often moves sideways through soil instead of straight down. If you lived in parts of Florida or other parts of the USA where the soil is extremely sandy and drains like water passing through a cooking colander, we'd not be having this conversation. But my guess is that your home is built on soil that has a certain percentage of clay.

When rainwater falls onto the ground it readily passes through the topsoil as this upper level of the soil frequently contains lots of air voids. But as you go deeper into clay soils, the soil becomes extremely dense and often water is blocked from going down.

drain tile

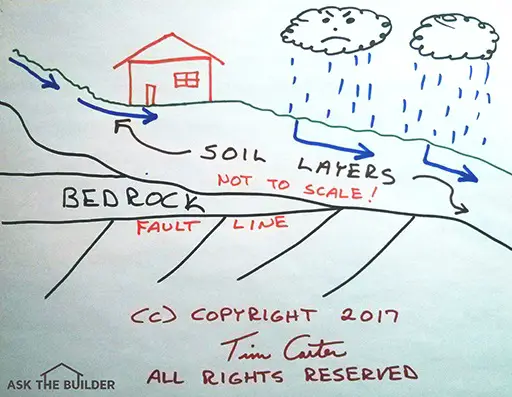
Here's a side view of a typical house. The black clouds release rain. It falls into the soil and starts to go down, but then sideways. The bedrock under the soil generally, but not always, follows the shape of the soil above it. Soil depths can vary from several feet to tens-of-feet thick. ©2017 Tim Carter

The water then starts to move sideways through the soil always flowing downhill and often pops to the surface as a spring. This water is the fuel that creates creeks, streams and rivers.

Thousands of Gallons

If you look outside your home and imagine the vast amount of soil that might be higher in elevation than your house, you might be amazed to learn that there are hundreds of thousands of gallons of water in the soil much of which is moving directly towards your home.

This water can easily find its way under the slab and into the ductwork beneath the slab. It's no wonder the vents filled back up after you pumped them out.

Capture The Water

Anyone who suffers from subsurface water that is invading any part of a house can stop it in almost all cases by capturing the water outdoors and then redirecting this water to the lowest part of the lot.

I've stopped water getting into ducts for decades with my Linear French Drain. CLICK HERE to get a fantastic Streaming Video showing you a DIY install method.

Linear French Drain Streaming Video

Do your own DIY install of a Linear French Drain with Tim Carter's time-tested methods and materials! CLICK IMAGE TO ORDER NOW!

Linear French Drain Video

Watch this quick video to show you how well the linear french drain in my Streaming Video works! Yes, it's the same drain the spring after it was installed!

Gutter In The Ground

Think of how gutters work on the roof of a house. Gutters capture the vast amount of water on a roof, channel it to various outlet holes within the gutter and then this water is piped away from the roof.

Ideally rainwater from a roof should be piped far away from a house and not be allowed to drop out of downspouts onto simple splash blocks adjacent to a foundation.

draintile

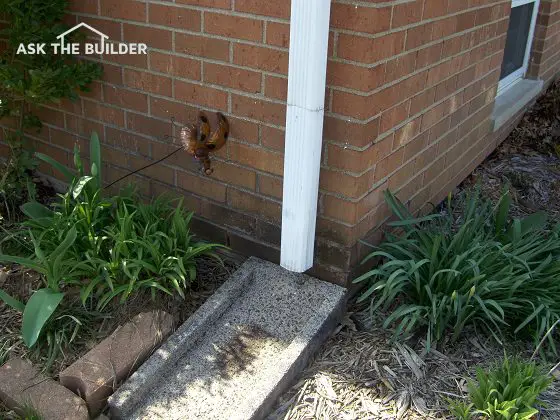
Splash blocks don't do much to channel water away from the foundation. © 2017 Roger Henthorn

Easy DIY Trench

You can capture the subsurface water by digging a trench around the outside of your home. This trench should be placed about 6 to 8-feet away from the edge of your home.

Call 811 first to have any underground utilities marked.

Dig this trench 6 inches wide and between 18 to 24 inches deep. The bottom of the trench should be parallel with the soil as it goes around your home. The trench should be extended away from the house and needs to end up at or near the lowest point of elevation on your building lot.

CLICK HERE to get FREE & FAST BIDS from local landscapers who might dig your linear french drain trench.

Level Trench

As the trench starts away from the house, make the bottom of the trench nearly level. As the ground falls away from the house, the trench will become shallower and eventually the bottom of the trench will be level with the top of the soil.

Best Gravel

You place a 1 or 2-inch layer of washed 1-inch diameter gravel in the bottom of the trench and then place a 4-inch diameter perforated pipe in the trench.

Fill the trench with more 1-inch washed gravel until you are within 1 or 2 inches of the top of the trench. You can place pieces of sod over the gravel.

Path Of Resistance

The subsurface water will now pass through the soil and enter the trench. Because it is easier to pass through gravel instead of soil, the water will drop down to the pipe.

There it will enter the pipe and be transported rapidly away from your home to the lowest part of your lot. The underside of your slab will never be saturated with water again.

Disclosure Law Weenie

If your state has a property disclosure law and the previous owners knew of this serious defect, they may have been obligated to bring this flaw to your attention. You should call the Realtor you used in the transaction to see if there was a property disclosure form that was not given to you.

The last house I purchased was sold to me by a liar. He lied about three or four water issues. My father-in-law had a saying about people like this: The mills of the gods grind slowly but thoroughly.

Fire Department Run Records

You can also stop by your local fire department. Just about every fire department in the nation keeps very good records of each time they leave the station and are asked to put out a fire or help in a situation.

If they were ever called to the house to help pump out the vents, you know the previous owner knew there was a problem. Well there is always the possibility your local fire department has mystic extra-sensory-perception powers!

Serious Health Issues

Water in buried heating and cooling ducts can cause serious health problems. The water in the ducts can initiate the growth of mold. Each time the heating or cooling system operates, the air moving through the ducts can blast millions of mold spores throughout the house.

Relocate Ducts

Although expensive to do, it might be a good idea to investigate the feasibility of moving the ducts into the attic space. The one-time expense may be a great way to protect the health of you and your family.

Believe it or not, it may be cheaper to abandon the under-floor ducts and put everything up in the attic. You'll save the cost of the linear french drain and cleaning the ducts out.

What's more, if you hire a real pro who knows how to properly size ducts so you have the proper flow into each room and the system maintains static pressure throughout, you could be more comfortable with the new ducts!

CLICK HERE to get FREE & FAST BIDS from local contractors who specialize in duct relocation and problems.

Column 561

Foundation Footer

footer frame

These wooden form boards will soon be adjusted and filled with concrete to create a strong foundation footer. ©2017 Tim Carter

Foundation Footing TIPS

DEAR TIM: I’m thinking of a career in new home construction and know very little. One of the things I don’t fully understand is the foundation footer, or footing. I’m also stumped about piers.

What’s the real purpose of these things? Can you install a foundation without concrete footings?

What tips can you share about pouring concrete footings? I’m sure you’ve sloshed around in wet concrete down in more excavations than you care to remember. Brad T., Topeka, KS

DEAR BRAD: You bet I can tell stories about concrete footers.

Big Footing - Perfect Conditions

Several jobs come to mind, but perhaps the one that stands out the most is the time I had to pour a massive footer for a commercial building in Blue Ash, Ohio with just one helper.

CLICK HERE to get FREE & FAST BIDS from local foundation contractors to pour your footings.

Fortunately for me, the job site allowed the concrete trucks access to all sides of the excavation hole, the weather was cool, and my helper that day was lucid.

You can’t afford mistakes to happen when you have expensive concrete tumbling in the drums of several 10-yard ready-mix concrete trucks!

Mother Earth Contact

Structural engineers, building inspectors and other builders may have more to say about this topic than me, but suffice it to say that a foundation footing is perhaps one of the most critical aspects of the house.

It’s almost always the first building element that makes intimate contact with Mother Earth or soil that the house rests upon. In rare cases, a footing may be supported by piers of one type or another that are placed in the soil under a footer.

Spread Footing

The term spread footing was used years ago and it's with good reason.

The primary purpose of the footer is to spread out the weight of the structure across a larger footprint than the foundation would if it was in direct contact with the earth.

Frequently a concrete footer is 20, 24 or even 30 inches wide and at least 8-inches thick. More often than not you’ll see them 10-inches thick. The average foundation wall is usually only 8-inches thick (wide).

wood footer frames

You're looking at the wood forms that will restrain the wet concrete used to create the footing. Those are 1/2-inch steel rebar that's suspended down about four inches from the horizontal spreader boards that hold the forms parallel. The steel needs to overlap at least 18-24 inches at splice points. ©2017 Tim Carter

Enormous Weight

When you calculate the total weight of a completed house plus everything in it, you’d be stunned by the total tonnage. Just the interior furnishings and possessions in an average home can weigh tens of thousands of pounds.

Add this to the many tons of weight of the building materials and you end up with enormous concentrated loads. Without a footer under a foundation wall, the foundation wall may actually start to slice into soil much like a knife cuts into a stick of butter.

Footing Videos

Watch these three videos showing a footing being poured at a house next to mine in New Hampshire. This was NOT my job. I'm just an inquisitive neighbor!


Foundation Form Aid

But a footer, because it’s wider than the foundation wall, displaces this weight over a much larger area. A footer also creates a nice, level surface for the foundation contractor to set his forms.

CLICK HERE to get FREE & FAST BIDS from local foundation contractors to pour your footings.

Piers

Piers are used to provide a solid foundation in weak soils. Think of piers as table legs for a moment.

Some piers that you pour yourself come with an ingenious design that incorporates a footing into the pier. The bottom of the pier is fatter than the top of the pier. CLICK HERE TO ORDER THESE FORMS.

pier form

This is a great pier form I've used to build my shed and for my large deck. It's got a built-in footing at the bottom. No tools required for assembly and the steel comes with it PRE-CUT! It's amazing. CLICK THE IMAGE NOW TO ORDER AS MANY AS YOU NEED.

The top of the table represents the actual footer. The table legs are the piers that extend below the footer until they reach solid soil below. Some piers are designed to have enough sidewall friction where the piers touch the soil along the entire length of the drilled shaft.

DIY Pier Form Video

Here's a quick video that shows you a DIY pier form. It should make sense.

I have MANY MORE pier videos here on the website. Just use my search engine on each page to locate them.

Pre-Cast On Stone

Some pre-cast concrete foundation systems are routinely installed without a poured concrete footer. They rest on compacted gravel that acts as a footer. Be sure this type of footer is approved for your area and the gravel used is crushed and angular.

Rounded gravel might not be a good choice because it can move with ease. Think about how ball bearings roll around.

Steel A Must

Reinforcing steel is a must in concrete footings. Concrete has great compressive strength, but little when subjected to tension.

If the ground moves under the footing, concrete can come under tension, bend, crack and go down.

100X Stronger

The presence of steel dramatically increases the tensile strength of the footer. Average concrete only has about 400 pounds per square inch (PSI) of strength to resist tension failure. The steel rebar you buy at the lumber yard has no less than 40,000 PSI of tensile strength. You can get it with 60,000 PSI or more if you special order it.

Steel Overlap

When overlapping the steel bars, make sure they overlap at least 18 - 24 inches. Structural engineers will specify the best location of the steel inside the concrete footer. They'll often mention in the specifications the minimum overlap distance. It's sometimes referred to as a minimum multiple of the diameter of the steel called for.

You may see a specification say, "Overlap steel bars no less than 20 bar diameters."

Keyways

I like to place a keyway in my foundation footers. This is a channel or groove that’s created after the concrete is smoothed over in the forms. You can slide a 2x4 in the concrete to create this feature.

When you then pour the concrete foundation, that concrete flows into the groove in the footer. This mechanical connection between the two elements helps keep the foundation wall from sliding across the footer if the foundation wall is subjected to horizontal pressure.

Level The Footing

Take the time to ensure the footing is as level as possible. This will make the job of setting the foundation forms much easier. It’s also mission critical that the footing be square so the foundation is centered on the footer. Sigh, so much more to say but there’s just not room!

Nails & Rods

If you’re pouring a trench footing, be sure to place nails, if possible, in the sides of the trench that tell you how deep to pour the footer. You can also drive steel rods in the center of the trench to help you establish the correct depth of the concrete. Take your time to get the concrete level as it will make it so much easier to pour the foundation or lay concrete blocks that may form the foundation walls.

Form Boards

Concrete footing forms should be made from sturdy 2x8’s or 2x10’s. Many foundation contractors prefer to use 2x8’s and stake them up off the ground several inches.

This technique makes it easier to level the form boards in case the excavator was not able to dig a level hole. That’s not as easy to do as you might think.

CLICK HERE to get FREE & FAST BIDS from local foundation contractors to pour your footings.

Column 848

Drywall Cutting Tools and Tips

drywall cutting tools

How to cut drywall you ask? Here are three nifty drywall cutting tools to help cut drywall. The smallest one is the most ingenious and it's new technology. ©2017 Tim Carter

"He was attacking the drywall with a circular saw creating so much dust that I thought the EPA was going to issue a county-wide air quality alert."

Drywall Cutting Tools Checklist

DEAR TIM: I'm a remodeling novice, and am going to be doing some drywall work soon. I've never worked with the material and have no idea how to cut it.

Not only do I have to cut new sheets to size, but I also have to make cutouts in existing drywall walls and ceilings. A friend suggested I use a circular saw. That makes sense to me.

What tools and techniques do you use to cut drywall? I'm interested in both accuracy, speed and safety. Rachel C., Tacoma, WA

DEAR RACHEL: I clearly remember one weekend driving to a potential customer's house to look at a job. His next door neighbor had a sheet of drywall laying flat on two sawhorses out on his driveway.

Can a Circular Saw Cut Drywall?

A circular saw can cut drywall, but it creates far too much dust. The dust is hard on your lungs and it's hard on the moving parts in a circular saw.

He was attacking the drywall with a circular saw creating so much dust that I thought the EPA was going to issue a county-wide air quality alert. Suffice it to say I offered this man the some of the same advice I'll offer to you.

First, don't use a circular saw to cut drywall. It's like using a rock to hammer nails. Both are the wrong tools for the job.

CLICK HERE to get FREE & FAST BIDS from local drywall hangers in case you don't want to get dusty.

A circular saw creates giant clouds of unnecessary dust. This dust causes premature wear on the moving parts of the saw, as well as your lungs and those standing nearby.

How Do Pros Cut Drywall?

Professional drywall hangers use a regular razor knife to make straight cuts on drywall. Standard drywall, or sheetrock, is simply a sandwich product.

drywall cutting tools

This is my FAVORITE razor knife of all time. I've used countless ones and this fits my hand perfectly. You'll never allow anyone to use it once you use it. CLICK THE IMAGE NOW AND BUY TWO OF THEM. You'll hide the second one in case you lose the first one.

This method creates little, or no, dust. That's a good thing.

It's comprised of two outer layers of special paper that conceal a gypsum-based core. Each drywall manufacturer might have a special recipe of ingredients found in the core, including a high-purity synthetic gypsum that's recovered from the flue gasses that are emitted from coal-fired power plants.

Is Drywall Dust Unhealthy?

The fine dust created by a spinning saw blade cutting through the gypsum core in drywall is not healthy for you or your power tools. Spinning saw blades work well with wood because they normally create a harmless dust for the most part.

What is Score & Snap When Cutting Drywall?

Scoring drywall means cutting into the paper facing on one side of the drywall panel. A sharp razor knife will cut through the paper with one stroke.

To cut a straight line with drywall and create minimal airborne dust, you just score one side of the drywall with a sharp razor knife. Apply enough pressure to completely cut through the paper and into the gypsum core about one-eighth inch. You need to cut this line all the way across the piece of drywall from edge to edge.

How Do you Snap a Piece of Drywall?

After making the cut, you go to the other side of the drywall and apply pressure directly behind the cut line. This pressure causes the drywall panel to snap along the cut line and bend over completely on itself.

You finish the cut by simply cutting through the paper backing on the other side of the drywall panel.

How Thick is Standard Drywall?

Standard drywall is one-half-inch thick. You can use this method to cut off pieces as narrow as one and one-half inches wide. If you need to cut narrower pieces from a sheet of drywall, it requires you to make deeper cuts with the razor knife into the gypsum core.

Do this carefully so the razor knife cuts only the drywall and not you.

CLICK HERE to get FREE & FAST BIDS from local drywall hangers in case you don't want to get dusty.

What's the Best Power Tool To Cut Shapes and Holes?

A RotoZip Saw is what professionals use to cut shapes and holes in drywall. It's extremely fast.

This is the dream tool for all drywall hangers. All pro hangers have one because it increases their productivity by a factor of 10X or more.

drywall cutting tools

This is an amazing tool invented decades ago. It cuts holes in drywall accurately and FAST. CLICK THE IMAGE NOW TO ORDER ONE. Get EXTRA spiral bits.

This tool comes with special bits that have cutting edges on the spiral twist of the shaft. You'd think they were just regular drill bits, but you'd be wrong. You need to  cut counterclockwise with these around electrical boxes or the tool will spin right into the drywall!

How Do You Cut Holes By Hand?

A hand, or jab, saw is a great tool rookie or DIYrs use to make square, rectangular, or circle holes in drywall. I've used one for years. You'll discover quickly to apply pressure on the push stroke so you don't create jagged edges on the paper with the pull stroke.

drywall cutting tools

This is a fine saw. You'll use it hundreds of times. CLICK THE IMAGE NOW TO ORDER ONE.

 Keep in mind these blades are normally about 5 or 6 inches long and they can easily reach wires, cables, pipes and other things hidden behind the drywall. A rookie like you can easily create big and expensive repair problems in a hurry using one of these tools.

Use this tool with great care if you're cutting into drywall already attached to a wall. If you're cutting new drywall that's standing up next to you on the stack, cut away post haste!

How Can You Safely Cut Into Existing Drywall?

You can cut safely into existing drywall using a special dull small blade that fits into a reciprocating saw.

To make cuts into existing drywall that's screwed or nailed to walls or ceilings, you can make repeated cuts with a very sharp razor knife, but it's very time consuming and hard to do. The gypsum core creates a large amount of friction making the cutting difficult.

It's far better to use a new short metal blade has been developed for electric-powered reciprocating saws that's designed specifically to cut holes into existing drywall.

drywall cutting tools

Here's a new drywall cutting blade that fits in an electric reciprocating saw. It's perfect for cutting holes in drywall on walls and ceilings but not the things hidden behind the drywall! CLICK THE IMAGE NOW TO BUY THIS GREAT BLADE ©2017 Tim Carter

The blade has a blunt tip, and it's only about one and one-quarter inch long. It doesn't have sharp teeth, but rather square notched cut outs.

It does a splendid job of cutting drywall, but won't cut deep enough to harm anything behind the drywall, especially if you hold the blade at a 45-degree angle as you glide it across the surface of the drywall.

Is It Dangerous to Cut Holes in Ceilings?

Be careful when cutting holes in drywall ceilings. Always wear safety goggles, not safety glasses. Drywall dust and small chunks of gypsum core in your eyes can cause you to make an expensive trip to an emergency room or eye doctor.

Professional drywall hangers use a small rotary cutting tool fitted with a bit that looks like a standard drill bit. This bit has special cutting edges on the spiral shaft that allow it to cut rapidly through drywall.

drywall cutting tools

This is a circle cutter with dust shield. Very handy. CLICK THE IMAGE NOW TO ORDER IT.

You want one that comes with the dust shield. They work well to capture the dust that otherwise would float in your eyes and around the room.

These tools are used by every professional drywall hanger that I know. While they increase production by a factor of five or more, they also create small clouds of dust.

How Do you Smooth the Rough Snapped Edge?

Use a hand rasp to smooth the rough snapped edge of drywall.

When you score and snap drywall you can end up with a rough edge. This handy tool cuts away the gypsum core in seconds allowing you to have a nice fit and no issues with a piece that's an eighth of an inch too BIG!

drywall cutting tools

If you're a perfectionist and want tight-fitting pieces, you'll NEED this tool. CLICK THE IMAGE NOW TO ORDER ONE.

Author's Note: Rob Crangle sent the following email regarding fly ash in drywall.

"Hi Tim,

Enjoy reading your articles. Just finished your article on drywall cutting techniques.

Your concerns regarding fly ash are quite valid. I'm the Gypsum Commodity Analyst at the US Geological Survey. About half of the country's drywall is made of synthetic gypsum, most of which comes from coal-fired electrical power plants, where, indeed, a lot of fly ash is also produced. Thankfully, almost none of that (I'd say zero, but there's likely a lab technician out there who would find a trace of it and make me a liar) ends up in the synthetic-gypsum production stream.

Agree that it's not a good idea to inhale large quantities of drywall dust, but that dust, even if the gypsum originated from a coal-fired plant, probably contains little to no fly ash.

Best,"

Rob Crangle

CLICK HERE to get FREE & FAST BIDS from local drywall hangers in case you don't want to get dusty.


Column 977

Troy Bilt 3 Stage Snowblower Review

Troy Bilt 3 Stage Snowblower Review

I had the distinct pleasure to test this Troy-Bilt 3-stage snowblower yesterday, February 10, 2017. (Reviewed in the February 12, 2017 Newsletter.)

The day before central New Hampshire, Boston, and Maine got hammered by a Nor'easter that dumped about 9 or 10 inches of snow at my house.

The snow slides off my DaVinci Roofscapes synthetic slate roof like an athlete zooming down a luge.

The snow compacts on my rear deck. If you don't remove it, the snow would get 8 feet tall and collapse the deck.

CLICK HERE to get FREE & FAST BIDS to remove the snow at your home if you don't like it when the air hurts your face.

 Since I don't want my Trex Transcend deck ruined, I need to get it off. Shoveling is not an option because the snow can compact like CONCRETE.

That's why I wanted to use a snowblower that's parked on the deck the entire winter.

The high-speed center auger chewed through the packed snow and sent it halfway down to the lake like you might munch on a cracker.

I've never operated a more aggressive snowblower. It exceeded my expectations.

You'll love it and best of all, it's Made in the USA!

troy-bilt-snowblower

This is an amazing snowblower. It's the BEST ONE I've ever used - hands down. CLICK THE IMAGE NOW TO ORDER ONE.

I loved the heated hand grips.

It was easy to start.

The controls are responsive.

The chute was easy to control.

CLICK HERE TO ORDER this amazing snowblower.

I also happen to love the color red as it matched my New England Patriots knit hat!

CLICK HERE to get FREE & FAST BIDS to remove the snow at your home if you don't like it when the air hurts your face.

How to Clean a Deck

Clean a Deck

You have at least two choices when you decide to clean a wood deck. Here are two of them - a pressure washer and oxygen bleach. This column was SO GOOD that I shared with the 31,000 subscribers who read my May 31, 2019 AsktheBuilder Newsletter.  ©2017 Tim Carter

How to Clean a Deck TIPS

DEAR TIM: I'm having a spirited debate with my husband about how to clean a deck. Deck cleaning doesn't seem that hard, but my husband wants to use a pressure washer thinking it will save time.

I want to use a green cleaner that's non-toxic and environmentally safe. What's the proper way to clean a deck and keep it looking nice? Lisa T., Burlington, NC

DEAR LISA: Cleaning a backyard deck is not supposed to create marital strife. In this instance, I think you and your husband might be able to reach a compromise that allows each of you to clean the deck in the manner you see fit. I have cleaned countless decks, and there are pros and cons to each of the methods you mention.

Pressure Washing Hazard

Let's talk about pressure washers. These tools are extremely popular that appeal to homeowners.

Pressure washers are like shoes - they come in all different sizes and the end of the spray wand can be equipped with different tips that concentrate the high-pressure stream of water.

CLICK HERE to get FREE & FAST BIDS from local deck cleaning companies. Ask them about using Stain Solver - see below.

The stream of water that is thrust from the tip of the wand mechanically agitates the surface of whatever it strikes. This is what cleans.

Pressure Destroys Wood

A pressure washer can clean a wood deck much faster than you can do it scrubbing by hand. That's a terrific advantage.

But one of the side effects of a pressure washer is that it frequently destroys the surface of the wood. The stream of water can be so powerful the light-colored spring wood fibers are eroded by the water.

Those that are not eroded can be dislodged so that the wood is fuzzy or rough after it dries.

Pressure Washer Damage Video

Watch this corny video to see the damage done by a pressure washer and the alternative organic cleaner. I taped it for the ABC-TV affiliate in Cincinnati, Ohio and they wanted me to have some fun with it.

Half Truths

Professional deck cleaners argue with me that this only happens when an inexperienced user is working with the tool, the pressure was too great, the tip used at the end of the wand produced a stream of water that is too harsh and/or the tip is held too closely to the wood surface.

Because they have a dog in the fight, that's what I'd expect them to say. The truth is any extreme pressure much more than a regular hose nozzle, will harm wood.

Test For Damage

If you decide to use a pressure washer, then you better test it or have the professional prove to you they can use the tool and not damage the wood. Go to some remote part of the deck and clean one half of one board with a pressure washer.

Wash the other half by hand, rinse and compare for wear.

CLICK HERE to get FREE & FAST BIDS from local deck cleaning companies. Ask them about using Stain Solver - see below.

Gasoline & CO2

If you're really interested in making your deck-cleaning project a green-cleaning activity, you should give serious consideration to the secondary effects gasoline or electric-powered machines have on our environment. How much CO2 will you add to the atmosphere that local trees will have to gobble up to make oxygen?

Toxic Cleaners

I'm a big proponent of non-toxic cleaners. The older I get, I have this sneaking suspicion that certain chemicals we encounter in everyday products are responsible for many health issues.

I'm not a doctor, but common sense tells me that harsh chemicals are not processed well by our bodies.

Certified Organic Cleaner

Years ago, I discovered there are different types of bleaches - one of them being oxygen bleach. Many people think bleach is bleach, but the bleach found in most homes is chlorine bleach.

The active ingredient in chlorine bleach is sodium hypochlorite. Check the label of many bleaches or deck cleaners, and you might see this chemical name. Chlorine bleach is toxic. Very few will argue that it's not.

Stain Solver

Oxygen Bleach

Stain Solver is MADE in the USA with USA ingredients that are food-grade quality. CLICK THE IMAGE to order some NOW.

Stain Solver is a powerful certified organic oxygen bleach cleaner. I own the company along with my wife. We discovered this magic cleaner back around 1995.

It's a powder you mix with warm tap water. When you mix Stain Solver with water to make a deck-cleaning solution, all you create is more water, oxygen and soda ash. 


Oxygen Action

The oxygen bubbles in the solution do most of the work done by the pressure washer. The solution soaks into the dry wood and the oxygen ions deep clean the wood by breaking apart dirt, algae and mildew molecules.

The solution is not toxic. It's safe to use around the plants, bushes or trees around your deck. You can't say that about chlorine bleach. My neighbor systematically murdered her gorgeous maple tree around her deck by cleaning the algae off the concrete patio every spring.

I warned her to stop, but she thought I was an idiot. I'll never forget the day the tree company came and cut down that amazing tree she had poisoned.

Scrub A Dub

When you decide you're going to use a green cleaner, you'll discover you need to spend time and elbow grease to clean the deck.

Here's the simple steps to minimize the work:

  • Start early in the morning working in the shade
  • Apply the Stain Solver solution to dry wood
  • Keep the surface very wet with the solution
  • Wait 15-20 minutes then scrub
  • Rinse with a garden hose

CLICK HERE to get FREE & FAST BIDS from local deck cleaning companies. Ask them about using Stain Solver.

Column 726

Hot Garage Ventilation

garage ventilation

Garage ventilation is needed here. This garage gets very hot in the summer even though it's directly beneath a large shade tree. How to cool a hot garage was in Tim's August 10, 2018 Newsletter. © Copyright 2017 Tim Carter

Hot Garage Ventilation Checklist

DEAR TIM: The garage attached to my townhome gets the full afternoon sun. The temperature in the garage has reached 110 degrees at times this summer.

There's some attic space above the front half of the garage and two bedrooms over the rear half of the garage both of which get very warm during the summer.

Would an insulated garage door help keep the garage cooler, or is there a way to vent the garage to remove some of the hot air? I have a roll-down screen, but in the summer it does not seem to offer much relief from the heat. Jan McM., Largo FL

DEAR JAN: No wonder your garage is an oven.

Is West Facing Garage the Worst?

You garage west-facing orientation couldn't be worse. As the day progresses and temperatures climb, they often peak between 4 and 5 p.m. This is exactly when the direct rays of the sun are cooking everything they shine upon including your garage and everything inside it.

Free & Fast Bids

CLICK HERE to get FREE & FAST BIDS from local fan contractors.

Do Cars Add Heat to a Garage?

Yes, cars that have been out on the road and then park in a garage add considerable heat to the space.

All of the car's mechanical parts can be very hot after it has been driven for just 10 or 15 minutes in the summer months.

Some of the parts, like the disc-brake rotors, can easily be in excess of 250 F. The car will radiate heat into the garage for hours after it's parked.

Does the Concrete Floor Store Heat?

If the sun beats on your concrete floor, it acts like a massive heat sink. I've tried to walk across concrete in the middle of summer with bare feet and scorched the bottoms of my feet. 

You can imagine how much heat the concrete collects from the sun and then releases it later.


garage ventilation

The direct sunlight is cooking the concrete floor raising its temperature. Look at the infrared photo just below to see how hot the concrete is! Copyright 2018 Tim Carter

infrared concrete slab

The concrete is already 126+ F and it's just after noon. After a few more hours, it's going to be getting up or over 140 F! Copyright 2018 Tim Carter

garage ventilation

Look at the difference! The concrete under the car in the shade is only 87.9 F. You can see why you want to keep the concrete shaded if you want your garage cooler. Copyright 2018 Tim Carter

Does an Insulated Door Cool the Garage?

An insulated garage door can trap heat inside a garage. Insulation is designed to slow the transfer of heat.

If you were to install an insulated garage door and close it, you would trap this heat inside the garage where you do not want it. An insulated garage door may be a great idea for other times of year, it just becomes problematic in the summer months.

Does An Insulated Door Help in the Winter?

Insulated doors are excellent if you're in a cold climate and wanting to preserve car heat in the winter months. If you live in parts of the deep southern USA, Florida or the southwest where it rarely gets cold, I don't know if I'd get one if I wanted a cooler garage.

Do All the Contents of the Garage Radiate Heat?

Just as the metal parts in your car absorb and radiate heat, so do all of the objects in the garage. Think of how a dying campfire's embers and any rocks that surround it radiates heat for hours after the flames have stopped flickering.

How Long Will the Heat Last?

This low-level infrared heat can be felt inside a garage even early the next day. I know, as my own garage gets very hot in the summer months.

It's very common for my interior-garage temperature to be 10 or 15 F warmer than the outside air temperature when I go into the garage in the morning. The ceiling and walls of my garage are well insulated.

CLICK HERE to get FREE & FAST BIDS from local fan contractors.

Will the Garage Heat Rise to the Attic?

The heat from the garage will absolutely contribute to high temperatures in the attic space above as well as the finished rooms. Hopefully, the ceiling cavity between the garage and the finished spaces was insulted. If not, you may want to consider adding blown-in insulation.

Heat moves from hot places to cooler places. That's the basic law of thermodynamics.

This means if your garage is 110 F and adjacent rooms are 85 F, then the nearby rooms are going to be absorbing the heat. You can't stop this transfer.

What is the Best Garage Ventilation?

The best garage ventilation is lots of moving air. You want to bring in cooler air from outdoors into the garage.

To cool your garage as efficiently as possible, you probably will need to install one or two powerful sidewall ventilation fans. There are any number of fans designed to pull air through the garage and exhaust it back outdoors.

Garage Fan

Here's a sidewall garage fan. It's meant to ventilate out the side of the garage. These come in different diameters. The bigger the blade, the more air it will move. CLICK THE IMAGE NOW TO BUY ONE.

How Cool Will the Garage Get?

The fans will not be able to drop the temperature lower than the outdoor air temperature. It may feel cooler to you as you stand in the path of the blowing air, but that's caused by the perspiration evaporating from your skin.

This means if it is 90F outdoors at 5 or 6 p.m., it will probably be in the upper 90's F inside the garage.

IMPORTANT TIP: The fans must have plenty of incoming air to feed their voracious appetites. You'll probably have to keep the garage door up off the floor about 4 inches to ensure plenty of air from outdoors is flowing through the garage.

The fans will do the best job of cooling if they're located high on the wall directly opposite the garage door.

The fans will pull the air across the garage if you have this orientation.

Will the Garage Contents Get Cool?

The air stream will seem very cool to you if you stand in it. But don't think the objects in the garage feel as cool as you do.

You feel cool because the evaporating perspiration on your skin is rapidly extracting heat from your body.

The inanimate objects in your garage do not sweat, so they will take a while to cool down.

Should I Install a Timer Or Thermostat Switch?

Consider putting the fans on a timer that allows them to run for several hours or use a thermostat to control when they go off. You can buy thermostats that will turn the fans on and off at predetermined settings.

Timer Switch

This is a time-tested timer switch. You rotate the dial and it operates for how much time you choose. CLICK THE IMAGE NOW TO BUY IT.

How Big Should the Fans Be?

To do any appreciable cooling you're looking for ventilation fans that move thousands of cubic feet of air per minute. Always use price as a guideline.

Fans with well-balanced blades, high-quality motors and excellent exterior weatherproof self-closing louvers will always cost more. I urge you to buy as much fan as you can possibly afford.

Should the Fans Be on a Separate Circuit?

Yes, be sure the electrical wiring that's installed to make the fans work is a separate circuit and done according to all codes.

There's a good chance you'll have to install a new circuit or two if you buy large fans. They can draw a significant amount of electricity, and can overload existing circuits if you are not careful.

CLICK HERE to get FREE & FAST BIDS from local fan contractors.

Author's Comments:

The following are comments from several emails between Norm Sippel and Tim Carter, founder of AsktheBuilder.com.

Dear Tim,

    "I faced a similar problem when I moved here three years ago. My hobby is racing vintage sports cars. I need to work on the cars year-round. Early in March of our first year here, I went to the garage (which faces east) at 10 a.m. I measured the steel door temperature with a pyrometer at 114 degrees. It was a radiator. No way I could work in those conditions in March, much less in August.

My solution - I insulated the garage doors (a double & a single) with 2" foam panels from a big box home store. I glued them to the panels between the ribs & under the beams. The few metal pieces that were still exposed were still hot, but closer to 100 degrees.

The ambient temperature in the garage dropped into the low 90s. I added blown-in insulation after that. Mid-summer the ambient temperature in the garage was down into the high 80s. Running two 5" air conditioning inlets into the ceiling that I can open if necessary dropped the temp even further. I keep them closed when I am not working in the garage & there is no return duct for safety reasons. This dropped the temp in August to the low to mid-80's. That's a tolerable temperature.

You are correct that bringing a hot car into an insulated garage will just keep it hot in there. The brake rotors you note as a major heat source cool a lot faster than the radiator, exhaust & engine do. But if Jan leaves the car out until after dark when it cools down (to the high 70s/low 80s here) before bringing it in, it will be a much-improved situation. And, the insulated garage door will do its job in the afternoon sun. That alone should lower the in-garage temperature about 15 degrees in the circumstances described."

(Tim Carter comment: I'm all for insulated garage doors, you just have to realize they block the heat transfer in both directions. The insulation holds in the heat overnight.)

    "That's true. But, managing the interior temp is a lot easier when you don't have so many square feet of metal radiating heat to the interior.

Before I moved south, people said to avoid west-facing back-yards. I had hoped to find something where I could watch the sunset. Well, that didn't happen. I'm a mile inland from the Gulf. And, the back of my house with big sliders faces north. BUT, I have even bigger sliders that do face west. So, we have to deal with that. The best solution has been Queen Palm trees. In three years, they are tall enough that they shade the sliders by 4 p.m. in mid-summer.

"Here's a link to the magazine I work on: www.vintageracecar.com. But, in a previous business life, I worked for Fine Woodworking."

Norm Sippel
Palm Harbor, FL

Column 690

Shed Floor Material

Shed Floor Material

This large storage shed under construction has a treated wood floor system. It's just one possible option. ©2017 Tim Carter

Shed Floor Material TIPS

DEAR TIM: I'm going to build a storage shed. Actually I'm building two sheds, as my wife wants her own cute garden shed.

I'm not able to get much help for these projects and am wondering what to do about the floor of each shed. I want them to be waterproof, but I can't even imagine pouring a concrete slab myself.

What are my options when it comes to building a shed with a waterproof floor that will stand the test of time? Al H., Asheville, NC

DEAR AL: I commend you on thinking ahead about the durability and longevity of your shed. All too often people just throw something together and fail to realize what things could look like 30 or 50 years down the road.

Wood & Water Bad Juju

The floor of the shed is absolutely important. You bet you want a floor that can handle water. You might bring in a dripping wet garden tractor covered with water. I used to pull my garden tractor into my shed caked with snow on the machine and the plow. When the temperature rose, puddles of water would be in my shed.

CLICK HERE to get FREE & FAST BIDS from local shed builders.

Your wife will probably want a sink in her shed that's fed by a garden hose. You know that water on the floor of that shed is going to happen like the sun is going to rise tomorrow.

Concrete Is Possible

I don't know how big your sheds will be, but if they're 10 x 12 foot in size or smaller, you can pour a concrete slab with ease if the following conditions exist.

If the concrete truck can pull up to the shed location eliminating the need to wheelbarrow the concrete, you'll be in great shape. Second, you have to have just one fairly unskilled laborer who'll help you for less than an hour place the concrete. Once the concrete has been poured, has been screeded and bullfloated, one man can easily finish a 10 x 12-foot slab.

Concrete Floor Video Series

Watch these following videos to see how easy it is to pour a small concrete slab.


Vapor Barrier

If you do decide you can tackle a concrete slab, be sure to put a high-quality vapor barrier under the concrete. You don't want water vapor from the soil permeating into the shed. Also be sure the slab contains reinforcing steel so the slab doesn't crack and break apart.

The best vapor barriers are cross-laminated virgin vinyl ones. I've had great success with Tru-Tuf. CLICK HERE to ORDER IT.

Treated Plywood

If you can't pour concrete, you can have a waterproof shed floor with little effort. The best part is that you can do this completely by yourself.

You can install a treated wood floor system that will not rot and will give you peace of mind for decades, if not longer. I've built sheds with concrete floors and treated wood floors and both have stood the test of time.

Treated Joists Too

A waterproof wood floor system for a shed starts with a floor framing system just like an outdoor deck. You use treated lumber floor joists that are raised up off the soil. I like to have at least 6 inches of air space between the bottom of the floor joists and the top of the soil.

This space allows foxes and other animals to keep mice away. It also allows you to deal with critters that might want to set up a homestead under the shed.

CLICK HERE to get FREE & FAST BIDS from local shed builders.

Closed Cell Foam

I then prefer to install closed-cell foam insulation in between the floor joists that's located just under the treated plywood that is nailed to the top of the floor joists.


The closed cell foam insulation provides superior energy savings and comfort in case you decide to heat the sheds.

It's also an amazing vapor barrier that stops water vapor from entering the shed through the floor. This water vapor can rust tools that you store in the shed.

Visit Real Lumber Yard

Many people don't realize you can purchase treated plywood. You rarely find this at home centers, but traditional lumber yards almost always stock this fantastic product. You'll need a extra sheet or two to make a low-slope ramp to get you in and out of the shed.

Concrete Piers

The entire floor system can rest on concrete piers that rise up out of the ground. You can also connect the wood floor system to wood posts that rest on concrete piers.

Be sure to use approved hold-down anchors to connect the floor system to the buried concrete footers. You don't want your shed tumbling across your yard in a severe windstorm.

Treated Lumber Bottom Plates

When I frame the walls of my sheds, I always use treated lumber for the bottom plates. This is necessary for concrete, but it's a best practice on a wood-floor system. The reason you want treated lumber for a bottom plate is because no matter what floor you have, it's possible for liquid water to flow across the floor and contact the bottom plate.

You never want the possibility of the bottom plate rotting out. Not only is it hard to replace this critical framing element, it's also very time consuming. The cost to use treated lumber vs. regular lumber is just a few dollars.

Shed Building Videos

You can get access to a series of videos that show you how to build a shed, including a wood floor system. Simply click on this link "shed videos".

I also have a complete set of step-by-step videos for building a shed. I completed the shed this year and videoed each step. The videos are broken down into the various aspects of the shed construction. The complete video series is available for purchase at my AsktheBuilder Store. Just click here for the Shed Building Videos.

CLICK HERE to get FREE & FAST BIDS from local shed builders.

Column 964

Tile Falls Off Wall

 tiles fall off the wall

These wall tiles had poor adhesion to the wall. The reasons for failure are many. Photo Credit: Lloyd May

Tile Falls Off Wall TIPS

DEAR TIM: The 8-inch by 10-inch wall tiles in my bathroom are bulging out in places. I pushed on them and they moved.

Further investigation revealed many are loose and only held in place by the grout between the tiles. The tile have been up for eight years installed by a pro who supplied the adhesive.

What might be the cause for this problem? I believe I can salvage the tile. How can I permanently adhere my salvaged tile to the wall? Lloyd May, Sydney, New South Wales, Australia

DEAR LLOYD: I'm sorry to hear about your dilemma.

CLICK HERE to get FREE & FAST BIDS from local tile contractors.

My Own Failure

I've had the same thing happen to me many years ago when I was just getting started in construction. It only took eight days for my tile job to fail, not eight years! It was the first and last time I had a problem with tile failing.

Disappearing Secrets

As each day passes, I'm afraid young contractors and tile setters become more detached from the tile setting methods of old. I have vivid memories of using a sledge hammer to remove ceramic tile from a wall.

It was cemented, yes - real cement - to a bed of cement mortar that was installed over metal lath. That tile, had I not beat it to death with the hammer, would have stayed on the wall for centuries.

New Methods Not Tested

New time and cost-saving methods often push aside time-tested techniques used by the master tile setters of old. Fortunately there's a compromise you can choose allowing you to reinstall your tile so it will not fail.

Organic Glue

Let's first discuss the possible reasons for failure. I can see from your photos the installer used an organic mastic on your wall. This glue resembles warm cake icing and is usually water-based. It's not a bad product and can have strong adhesion if you just follow the use instructions.

Skin Over Blues

The biggest mistake many make when using an organic mastic is allowing it to skin over. This happens if you expose the mastic to air for too much time before you press the tile into the adhesive.

When a skin develops on the mastic, the adhesive doesn't offer much of a mechanical bond to the tile. The water evaporating from the mastic causes the mastic to stick to itself. The best example I can offer is a piece of fresh adhesive tape that gets coated with dust. The tape is no longer sticky.

Possible Defect

The mastic could have been defective, although I would say this is a low probability. The tile setter could have used the wrong sized notched trowel. The instructions that come with the tile or mastic tell you what size trowel to use for each sized tile. Bigger tile need a larger notched trowel.

CLICK HERE to get FREE & FAST BIDS from local tile contractors.

Dust Issues

The wall surface or backs of the tile could have been dusty before the adhesive was applied. Dust and adhesive are bad jujumagumbo. The dust is selfish and steals all the adhesive for itself.

Not Flat

The wall surface could have been irregular with humps and dips in it. I feel this, in conjunction with skinned-over adhesive, is the root cause of your tile failure. As ceramic tile get larger, the wall or floor surface must be flatter and flatter.

Since the tile is flat and in the same plane, the wall surface must also be a perfect match. If the wall has humps, the back of the tile will touch the hump and then not contact the wall where there is a dip.

This is why my tile job failed all those years ago. When I pulled my tile of the wall, you could clearly see bare spots on the tile where no adhesive even touched the tile.

Lady Luck

I'm glad you're able to salvage the tile. Your job now is to remove any organic mastic that is stuck to the tile backing. If you soak the tile in water, the mastic will almost always soften. You can scrape it off with a flat spackling knife or a chisel.

Remove Glue

It's now time for the hard part. You may be able to scrape off any mastic from your walls using the same method. You'll have to spritz the mastic on the wall with water from a spray bottle. You may discover using a paste paint stripper is an easier way to soften the adhesive as paint is nothing more than colored glue.

Fill Hollow Spots

Once the mastic is off the wall, it's time to use a straightedge to determine if the wall surface is perfectly flat. If there are low spots and humps, you need to skim coat the wall with cement-based thinset to get the wall surface flat and in the same plane.

thinset

Thinset is just silica sand and Portland cement. It's dry and needs water. CLICK HERE TO ORDER THIS THINSET NOW.

Cement and Sand

Thinset is a blend of fine silica sand and Portland cement. It's imperative the wall is dust-free and slightly damp when you apply the thinset. You want the thinset to bond very well to the existing wall surface.

Thinset Video

Watch this video just to see what thinset is. I'm using it on a floor, but it goes on walls too. Pay attention to the consistency of it.

Work Fast

You'll use the same thinset to adhere the tile to the wall. Do what the master tile setters did nearly one hundred years ago. Install the tile the day after you flatten the wall with the thinset. The microscopic crystals of the hydrating cement in the thinset already on the wall will interlock with the fresh thinset you trowel onto the wall creating a lasting bond.

Cover in 5

Only apply as much thinset on the wall as you can cover with tile in five minutes. Use cold water to mix the thinset to retard the setting time. Do NOT add water to the thinset if it starts to get hard in the bucket before you spread it. Only mix enough thinset as you can use in one hour or less.

Correct Notched Trowel

Use the correct notched trowel to apply the thinset. CLICK HERE to see lots of great notched trowels.

notched trowel

Here's a 1/4 x 1/4-inch notched trowel. This is a great size for 8 x 8 tile. The bigger the tile, the larger the notch has to be. CLICK THE IMAGE TO BUY THIS TROWEL.

CLICK HERE to get FREE & FAST BIDS from local tile contractors.

This column was featured in the November 6, 2013 AsktheBuilder Newsletter.

Column 1011

Painting Walls or Trim First

Tim painting woodwork outside

When woodwork is flat and waist high, you can make hay while the sun shines!

Painting Walls or Trim First TIPS

DEAR TIM: My husband and I are building a new home. We're going to install all of the door and window trim ourselves and paint the entire interior as well.

Should we paint all of the trim before it's installed and spray paint the walls and ceilings? Is it better to install the trim and paint it in place?

We want to spray as much as possible but don't quite know the order in which things should happen. Johnette P., Ft. Dodge, IA

DEAR JOHNETTE: I don't know if there are correct answers to your questions. My guess is if we had ten painters and ten finish carpenters in a room and presented your case, we'd get back twenty different scenarios as to the precise steps they would take to minimize work and maximize the quality of the overall job.

Pre-Finished Surfaces

Perhaps the biggest challenge you face is working with finished materials. It sounds to me as if you're trying to install pre-painted trim on top of walls that have been finish-painted.

While this sounds good in theory, it doesn't translate well in practice because you will damage the pre-finished surfaces as you finish the job.

CLICK HERE to get FREE & FAST BIDS from local painters who can paint FAST.

Spray Painting

I have no problems with spray painting walls and ceilings. It's been done on several of my jobs with outstanding results. The finished look is as good or better than if the walls had been painted with the best rollers.

The speed with which an experienced person can spray paint a room is astonishing. If you have minimal spray painting experience, I suggest you practice in a garage or closets before moving out into rooms you will see each day.

Airless Sprayers

The technology of DIY paint sprayers has advanced rapidly. There are some very good airless paint sprayers that are easy to operate and clean. When you have the paint thinned correctly, they deliver professional results.

Paint Sprayer Videos

Watch these two DIY paint sprayer videos. I really liked the one sprayer.


Installing Woodwork Dirty

Installing woodwork on walls around windows and doors is not as easy as you might think. I's not uncommon for a wall to get scuffed by a hammer as the finish carpenter taps the edges of trim to adjust it.

A carpenter's hands get dirty while working and she/he may smear a wall by accident. Walls can get nicked and scratched as long lengths of trim are moved around the house. The time spent being careful may be counter productive.

Touch up painting of the spray-painted walls with a brush can also yield less than satisfactory results.

CLICK HERE to get FREE & FAST BIDS from local finish carpenters who can install your woodwork.

Prime Woodwork

It's a great idea to prime woodwork on both sides and applying one coat of finish paint on its exposed face before it's installed. The finish trim will need one final coat of paint after it is installed.

The woodwork can get nicked, scratched and abused as it is installed. What's more, the spackling compound used to fill the countersunk nail holes will have to be sanded, primed and sealed before the final coat of paint is applied if you use the wrong one.

There are spackling compounds that have a built-in primer/sealer. CLICK HERE to buy it.

spackling with primer

Here's a pretty cool spackling compound. It's got paint primer built into it. This saves you time and money. CLICK THE IMAGE NOW TO ORDER THIS SPACKLING.

Flat Dots

If you fail to prime and seal these small filled holes, they often stand out after the finish paint is applied. You see a bunch of dots that have a different sheen than the gloss of the paint on the wood.

The porosity of the adjacent painted wood is much different from that of the sanded porous filler. Primer/sealers even out the porosity between the spackling compound and painted wood.

Caulk Gaps

Woodwork rarely fits perfectly against the walls. There can be long large and small cracks between the woodwork and walls that should be filled with caulk.

If the walls and trim are already painted, the resulting caulk job will look like pinstriping as it is doubtful the caulk color will perfectly match the color of the finish paint. The caulk will look best if it's covered with a coat, or two, of paint.

Partial Paint

If I were in your shoes, I'd spray paint the walls with a primer/sealer paint and then follow with one coat of finish paint. The ceilings can be finish painted at this time if no woodwork touches up against them.

I'd then install all of the woodwork including the baseboard. All cracks would be then caulked and all nail holes would be spackled. I prefer to use the lightweight spackling that can be wet sanded with a damp sponge.

Wet sanding eliminates dust problems. I would then spot prime and seal all spackling, unless I had used the newer spackling compound with the primer / sealer in it.

CLICK HERE to get FREE & FAST BIDS from local painters who can paint FAST.

Paint Walls Next

If I were you I would apply one final coat of paint to the walls. It's a smart thing to brush a very small amount of paint up onto the edges of all the woodwork as you are covering the caulk with the wall paint.

After the wall paint is dry, I'd then apply the final coat of paint to the woodwork using an expensive two-inch tapered brush. The final coat of woodwork paint extends to the edge of the woodwork where it touches up against the walls.

If you have excellent hand-eye coordination, you should have no problem maintaining a crisp paint line at this intersection. Don't believe what you see on the home improvement TV shows about using masking tape. It's a joke and takes too much time.

Caulk Is The Secret

If you desire truly professional results, you'll caulk each and every crack you see. This is the most obvious mistake I see in DIY paint jobs - missing caulk.

The trick to applying caulk is to have a bucket of warm water and a grout sponge with you as you caulk. Cut the tip of the caulk tube so it is slightly smaller than the average sized crack and use a top-quality caulk gun to carefully control the amount of caulk being discharged into the crack.

Caulking Videos

Watch this video to see how I apply and finish caulk. You need to wipe the caulk with a sponge!

Two Feet

Apply caulk to no more than two lineal feet of crack at a time and then use your finger to smooth the caulk. The excess caulk on your finger should be minimal if you applied just enough caulk.

Immediately stroke the caulk twice with the damp, not dripping, sponge to remove any excess caulk that smeared onto the wall or woodwork. The only caulk visible should be that in the crack.

CLICK HERE to get FREE & FAST BIDS from local painters who can paint FAST.

Column 516

R Value Meaning and Map

R Value Meaning & Map TIPS

insulation USA map

This is a very good map showing the different insulation zones in the USA. CLICK THE IMAGE to get MORE INFORMATION.

R Value - What It Means

You may be one that wonders what  R value means. It's pretty easy.

The R represents the word resistance. Pretty good alliteration for 6:45 AM wouldn't you say?

R value is a measurement of resistance to heat flow. There's an entire body of science that studies heat. It's complex and called thermodynamics.

That's a cool word when you stop and think about it. Thermo describes heat and dynamics describes movement.

It's a perfect word because heat is constantly moving to a place where it's colder.

CLICK HERE to get FREE & FAST BIDS from local contractors to INCREASE your INSULATION.

Your Body

Think about your own body and how it reacts to heat and cold. In the summer if it's blistering hot, the heat tries to get inside your body.

Let's say it's 110 F outdoors and you're in Phoenix, Arizona. Your body is 98.6 F if you're feeling fine.

The extreme heat, even in the shade, is trying to creep into your body. You sweat to try to combat the heat transfer. But if you run out of water, it's over.

In the winter, you already know that without great clothes on your body loses heat faster than water going through a colander.

Insulation Resistance

Insulation is designed to slow the transfer of heat. Some insulation work better than others. 

Fiberglass is not a bad insulation and it's found in many homes. It's cheap to make.

Foam insulation works better and it's part of the reason you find it in picnic coolers. On a per-inch-basis, foam slows down heat transfer better than fiberglass.

Moving Target

The US Department of Energy constantly develops new insulation guidelines. This happens so the bureaucrats stay busy and because there are technology changes that bring us better insulating materials.

Minimum Standards

The guidelines are minimum standards. There's absolutely nothing stopping you from installing more insulation. The only thing you need to consider is the long-term payback.

At the time I built my last house in Cincinnati, Ohio, the guidelines for ceiling insulation were an R-30 in my climate zone. I doubled that and installed an R-60 ceiling of blown-in fiberglass.

Did I waste my money? I think not. My neighbors fuel bills for houses smaller than mine were nearly double mine! To be fair, I built a new home and all the homes around me were at least thirty-five years old, some being fifty years old.

I had better wall insulation, better windows and an air-infiltration barrier.

CLICK HERE to get FREE & FAST BIDS from local contractors to INCREASE your INSULATION.

Big Savings Possible

I saved approximately $1,000 per heating season in that Cincinnati, OH house. I probably saved an additional $400 during the cooling season. Most of these savings can be attributed to my thicker sidewall insulation, an air infiltration barrier, and tight building practices. But no doubt I saved hundreds of dollars with the thicker attic insulation.

Savings Not Immediate

However, in your existing home, you might save $150 to $200 per year on average. If it costs you only $300 more to upgrade to an R-60 or more, do so! Within two to three years, you'll be saving money once you pay yourself back in energy savings the amount of money you spent on the extra insulation.


R Value Map

The following table shows the different R values that you need to achieve in ceilings, walls and floors with respect to the zone you live in. Study it for a few moments and it will make sense.

insulation USA map

This is a very good map showing the different insulation zones in the USA. CLICK THE IMAGE to get MORE INFORMATION.

insulation table

This table explains what you need to do depending upon which zone you live in. Look up at the map. (C) Copyright 2017 Me and every other US Taxpayer

CLICK HERE to get FREE & FAST BIDS from local contractors to INCREASE your INSULATION.

Column B165