Attic Insulation Batts or Blown In

attic insulation Insulation Map USA

Attic Insulation Batts or Blown In | This is a very good map showing the different insulation zones in the USA. CLICK THE IMAGE to get MORE INFORMATION.

Attic Insulation Batts or Blown In - Both Work Well

DEAR TIM: I'd like to add additional fiberglass attic insulation in my attic. I can install batt insulation myself. Blown-in fiberglass appears to require professional equipment.

Which type offers better performance? Are there advantages in using one type versus another? Are there any installation tips you can suggest? T.H.

DEAR T. H.: Both systems will deliver excellent results. However, if you intend to do the job with batts, you had better be a detail-oriented, patient individual. The thermal performance of fiberglass insulation is directly related to its ability to trap and maintain very small pockets of air.

Attic insulation batts must be cut tightly and you can't have gaps. Sloppy people aren't suited for this job.

Blown-in fiberglass creates a seamless blanket in your attic. You might spend many hours kneeling in your attic to achieve this same result with fiberglass batts.

CLICK HERE NOW to get FREE & FAST BIDS from local insulation contractors.

Is Basement Foam Board Installation Hard to Do?

No, basement foam board installation is not hard to do. You might consider it instead of batts in your basement.

How Much Insulation Do I Need?

The US Department of Energy has published guidelines for years about how much insulation you should have for where you live. It makes a big difference.

Insulation Map USA

This is a very good map showing the different insulation zones in the USA. CLICK THE IMAGE to get MORE INFORMATION.

Insulation Table

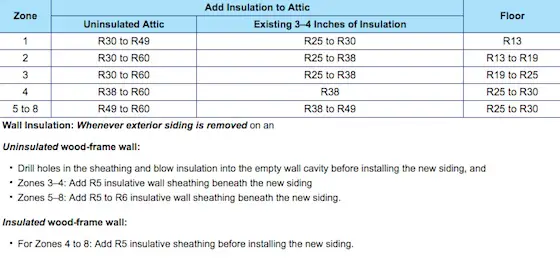
This table explains what you need to do depending upon which zone you live in. Look up at the map. (C) Copyright 2021 Me and every other US Taxpayer

Remember, these are minimum guidelines. You can add more, you just have to do the math to see if you'll get a return on investment for as long as you own the home.

The trouble is, it's not easy to do this analysis. But if you've decided to hire a professional company, they can blow an additional 6 or 8 inches in your attic for just a little bit more money.

Is Insulation Cheap to Install?

Insulation might not be cheap to install if you hire a pro. There are lots of costs the pro has to cover to get the truck, materials, and workers to your home.

The primary cost of the job when a pro comes to your home is:

  • Administrative office staff
  • Salesman commission
  • Drive time to & from your house
  • Truck wear & tear
  • Workmen labor

If it takes the crew just 30 minutes more to add 8 more inches, then the cost is going to be not that much more.

CLICK or TAP HERE to get FREE BIDS from local contractors who will install blown or batt fiberglass.

Are Fiberglass Batts Better Than Blown?

The thermal performance or resistance to heat flow (R-factor) is not the same when comparing fiberglass batts to blown-in fiberglass. Batts offer a slight advantage. You can usually obtain an R-factor of 3.1 to 4.2 or slightly higher per inch of material with batts. The R-factor of blown-in fiberglass is usually 2.3 to 2.8 per inch of material.

Once installed and expanded to the uniform, manufactured thickness, batts offer a known R-factor. Blown-in insulation thickness can vary in an attic space. This will lead to non-uniform R-values.

fiberglass attic insulation roll

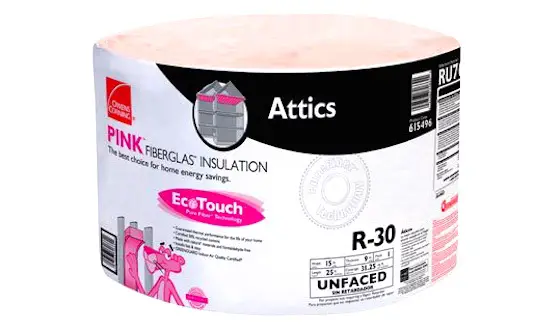
This is name brand unfaced attic fiberglass insulation. It's great stuff. Wear a mask or you'll be coughing for days. CLICK HERE TO ORDER AND HAVE DELIVERED TO YOUR HOME.

Compressed blown-in fiberglass offers a lower R-factor. It needs to be fluffed up but not so much that it doesn't trap air. It's not an easy thing to describe unfortunately!

Should I Do a Simple Cost Analysis?

Before you make your final decision, do a cost analysis. You may be pleasantly surprised.

I recently priced the cost to upgrade a 1,500 square foot attic from R-19 to the new thermal standard of R-49 in my climate zone. The total cost to have the fiberglass blown-in by professionals was $0.60 per square foot or $900. (2017 prices)

I then called the local retail outlet to price batt insulation. The cost of just the material was $0.62 per square foot! (2017 pricing) Clearly it made better sense for me to have the job done by professionals.

CLICK HERE NOW to get FREE & FAST BIDS from local insulation contractors.

If you can find fiberglass batts deeply discounted, you possibly can tackle the job and save some money. Wear a respirator to minimize throat irritation from airborne glass particles. Gloves, long-sleeved shirts, and goggles are also highly recommended.

Be sure to take your time while installing the batts around roof framing members. Carefully cut the batts so they fit tightly around each piece of wood. Oh yes, don't fall through the ceiling to the rooms below.

Fiberglass Insulation Video

Watch this video to give you an idea of what it's like to work with this itchy material!

Should the Batts Be Installed in 90-Degree Layers?

Install your new batts at a 90-degree angle on top of the existing insulation batts. This will help cover any gaps in the original installation.

Do Dark Spots Indicate Air Leaks?

Dark spots in insulation batts and blown-in fiberglass are indicators of air leaks. The fiberglass fibers capture the dirt particles in the air and create the dark spots.

Check your existing insulation for dark spots. These dirty spots may be locations of large air leaks from your finished living space. The existing fiberglass traps dirt from this air as it passes up into the attic. Locate and close these holes before proceeding.

Should Soffit Ventilation Slots Be Blocked?

Do not block soffit ventilation slots. These are the air passageways between your exterior soffits (eaves) and/or vents and the attic with your new insulation. Flow-through attic ventilation is very important.

You can purchase foam or cardboard baffles that fit in between the roof rafters as they pass over exterior walls. These baffles create an unobstructed pathway for air to enter your attic.

Can you Cover Recessed Lights With Insulation?

Never cover any recessed lights with insulation. Some say they're rated for it, but it can be dangerous if someone puts in an oversized light bulb and the heat sensor in the fixture malfunctions.

Don't cover any recessed light fixtures with fiberglass unless you are absolutely positive it is permitted by your local electrical inspectors.

Modern LED recessed lights that use less energy and burn cooler can be retrofitted into older recessed light fixtures. If you do this, you can then cover the recessed light housing and not create a fire hazard.

recessed light transformer kit

Use this kit to transform your energy-wasting recessed lights. It takes minutes working from inside the room. No repainting, no hassle! CLICK THE IMAGE NOW TO BUY THIS GREAT LIGHT. MULTI-PAKS are available.

Should Insulation Depth Gauges Be Put in the Attic?

Insulation depth gauges should be installed in an attic before blown-in insulation is installed. These work just like flood gauges on a river. You can see easily if the insulation is the correct depth across the entire attic.

If you decide to use blown-in insulation, install scrap lumber depth gauges in the attic. These pieces of wood can be pre-marked with a crayon or spray paint to the desired finished thickness of insulation. Tack them to the ceiling joists in various locations. After the job is completed, you can pop your head up into the attic to see if the pros hit the marks!

CLICK HERE NOW to get FREE & FAST BIDS from local insulation contractors.

Column 165

LE Johnson Soft Close Q1 2017 Fun Quiz

Your job is to CLICK  the five links just below. Once at each page, study the photos you'll see. These links were shown in my February 5, 2017 AsktheBuilder Newsletter.

You can click each of the photos to see a BIGGER one.

This will help you later when you take the funny quiz below.

Some of the questions in the quiz below require you to look at fine details in the photos. It's FUN!

Then complete the FUNNY & EASY quiz below.

Good Luck - you'll need it.

IMPORTANT TIP: After you click SUBMIT, slide back up the page and CLICK THE LINK that allows you to see your answers and CORRECT answers with explanations and other secret links.

Easy Tile Grout Cleaning

Grout Cleaning

The grout to the left and lower left of the bottle of Stain Solver oxygen bleach used to be dark gray and filthy as you see on the right side of the photo. It just took a few minutes of soaking and a little scrubbing to get these dramatic results. CLICK THE IMAGE NOW TO ORDER STAIN SOLVER. (C) Copyright 2017 Tim Carter

Tile Grout Cleaning TIPS

DEAR TIM: I’ve tried tile grout cleaning on the floors of my home with little success. The grout just doesn’t come clean. The tiles themselves don’t look like they used to even though I’m using those newer pad-cleaner contraptions.

Is there a miracle method that you know of for cleaning ceramic tile grout? Have you had this problem in your own home? Judith P., Forest Park, IL

DEAR JUDITH: Tile and grout cleaning was the bane of my existence for years at the last house I built for my family. When I built that home, my lovely wife selected a pure-white tile for our kitchen with a light gray grout.

WARNING: Kitchens and Light Grout

I warned her the grout would turn black, but my pleas for mercy fell on deaf ears. To this day, she says it was my idea.

As it turns out, the grout did turn nearly black, especially around the refrigerator and sink, no matter how hard I tried to clean it.

Dirt Soaks Into Grout

It became crystal clear what the issue was one day when I decided to really scrub the grout. Small particles of dirt on the floor were getting dissolved in water that was spilled on the tile.

This dirty water then soaked into the grout just out of reach of the bristles of the scrub brush. This was compounded by spills of liquids like red wine, cranberry juice, iced tea, deep-purple grape juice, etc.

Colored Liquids Stain Too

Any colored liquid that came into contact with the grout soaked into the sanded grout just like it would a sponge.

Pads are Useless

Regular soaps seemed powerless as well as tile and grout cleaning equipment that I rented. I can see why you’re having trouble with the pad cleaning tools as I’m convinced that these get up some of the dirt, but they leave dirt behind if the pads are not changed with great regularity.

The smooth pads are powerless to remove dirt from the grout because in most cases they never even touch the grout. Look closely at a tile floor and you’ll quickly see the grout is almost always recessed lower than the surface of the tile.

The pads just float over the grout never touching it.

Magic Stain Solver

Oxygen Bleach

Stain Solver is MADE in the USA with USA ingredients that are food-grade quality. CLICK THE IMAGE to order some NOW.

My tile & grout cleaning problems disappeared about years ago while I was researching how to properly seal and clean a deck. I interviewed a chemist who exposed me to a product I had never heard of - oxygen bleach.

This product is a powder mixed with warm tap water. The instant this happens, billions of oxygen ions are released into the solution.

These oxygen ions attack dirt and stain molecules blasting them apart. When this happens, they lose their ability to absorb light and the stains disappear.

Not only do they do this on wood decks, but this magic cleaning action happens on anything that’s water washable.

I discovered it works to remove algae, tough laundry stains, oil stains from car carpets, normal indoor carpet stains, and it de-odorizes too. It was indeed magic!

Sell It

Once I saw what it could do, I decided to start selling it myself. Kathy and I came up with the name Stain Solver because it solved every type of stain.

Mix, Stir & Pour

I tried some of this product and couldn’t believe what I saw. Following the instructions given to me by the chemist, I mixed the powder with hot water and stirred it until it dissolved.

I then poured this solution on the tile floor in my kitchen making sure the grout was completely saturated and covered with the clear solution. Then I walked away for 15 minutes allowing the oxygen ions to work on their own.

Grout & Tile Cleaning Video

Watch this video to see how powerful Stain Solver is. This is the exact process I did all those years ago to clean my kitchen floor.

I guarantee you'll get your floor tile grout as clean as mine. The trick is to mix it right and allow the solution to soak for 15, or more, minutes before you scrub. The longer you let it soak and work the LESS you have to scrub.

Let It Soak Then Scrub

After the wait period, I had to add some additional solution where it had soaked into the tile grout. I then used a stiff scrub brush and ran the brush along the grout lines between the tiles.

With almost no effort, the tile grout looked like new. When the chemist told me this would happen on the phone, I didn’t believe him. It sure pays to have an open mind!

Chlorine = TOXIC

You can get nearly the same results using chlorine bleach, but there are some disadvantages using this harsh toxic chemical. First and foremost, the fumes are powerful and make many feel uneasy.

The chlorine bleach is so strong that it can ruin the pigments in some colored floor grouts. If you splash the chlorine bleach on adjacent surfaces like cabinets or carpeting, it can take the color out of them. It’s a tough cleaner to work with.

Never Scrub Again!

Once my tile and grout were clean, I discovered a way to keep them looking that way. I hated getting on my knees to scrub and didn’t want to do that ever again.

One day, I decided to use the oxygen bleach powder in the mop water. I mopped the floor like normal, but instead of rinsing the floor right away, I let the cleaning solution soak on the floor for about 15 minutes.

I discovered if the grout is just lightly soiled, the dirt has not yet soaked into the grout. It didn't take long for the mop-water solution to attack the dirt on the surface and that which had penetrated into the grout.

My kitchen floor looked like new every week. The best part is the squabbles with my wife stopped and both of us had smiles on our faces. The old saying "happy wife / happy life" is true especially when the kitchen floor sparkles.

Different Oxygen Bleaches

You can buy Stain Solver oxygen bleach online.

Stain Solver is:

  • Certified organic
  • Non-toxic - no foul odor
  • Made in the USA with USA ingredients
  • Has much more active ingredient than other brands
  • Family-owned small business

Some other oxygen bleaches are available at retail stores for less money.

IMPORTANT BUYING TIP: The quality of the different oxygen bleaches varies to a great degree. Some big-name national-brands contain ingredients from offshore. They're not certified organic. They may trick you with language that makes you think they were Made in the USA, when in fact, they were packaged in the USA with offshore ingredients.

Not all of the products have the same amount of active ingredient. You’ll discover products that may have more filler in them than oxygen bleach. It pays to do research to get a product you can trust and really works well.

Stain Solver is that product. CLICK HERE NOW to order Stain Solver.

Column 817

How to Insulate an Older Brick Home

home insulation

Drill a two-inch hole in a closet wall to see how much space you have for insulation. © 2017 Tim Carter

How to Insulate an Old Brick House TIPS

DEAR TIM: My story-and-a-half brick home was built in the 1960's. It has no insulation in the walls as far as I can tell. Each contractor I have talked with wants to drill holes in my interior plaster walls and add insulation from the inside.

I prefer to have it done from the outside by drilling holes in the mortar joints between the brick. I don't want all of the dust and repainting mess inside my home. How would you approach this job? What are my alternatives? Bill B., Versailles, KY

DEAR BILL: The house you describe sounds exactly like that of my in-laws. My wife grew up in a brick home built in the 1950's just before your home was constructed.

The exterior of the home is used brick and the second-story dormers that project through the roof out the back of the house are wood frame. The exterior walls of the first story are solid masonry, not brick veneer which is the way most brick homes are now constructed.

Brick Veneer

Today's modern brick homes have a single-thickness of brick that is placed over a wood-framed structure. The wood walls can be covered with insulated sheathing and the wood-wall cavities can be filled with insulation.

CLICK HERE to get FREE & FAST BIDS from local insulation contractors.

Solid Masonry & Foam

Solid-masonry walls can be insulated with modern foam panels that separate the outer layer of masonry from the inner layer, but this method of construction was not in widespread use when your home was built.

Cheap Fuel

The majority of solid masonry brick homes that were built in the 1950's and 1960's were constructed at a time when energy costs were very low. Builders didn't worry about insulation and furnaces were lucky to be 60-percent efficient.

But the Mideast oil embargo of the 1970's changed all that and energy costs soared like a hawk in the sky.

Basement Wall Foam Insulation Video

Watch this video to see how you can use foam on the inside of basements to slow energy loss.

Brick & Block

The masons who built the structures used a finish brick for the outside facing that was usually about four inches in depth. The inner layer of the masonry wall was often concrete block or cinder block that was also a little under four inches in depth.

These block were laid immediately behind the exterior brick. If you can determine that your masonry walls are about eight-inches thick, you know there is no foam insulation between the brick and the hidden block.

The typical total wall thickness for a home built this way is:

  • 8 +/- inches for the brick and block
  • 3/4-inch for the furring strip nailed to the block
  • 1/2-3/4 inch for the interior drywall

Measure Your Wall

This adds up to about 9 and 1/2 inches. You can measure this fairly accurately at a window using a 4-foot straightedge or level that you place flat on the wall.

Slide it along the wall until the tip extends over a pane of glass. Measure between the tip of the level or straightedge to the glass. 

Do the same on the other side of the wall. Add the two dimensions together plus the thickness of the glass.

After the masonry work was completed, carpenters would follow behind and nail 3/4-inch thick by perhaps two-inches wide furring strips to the masonry walls. These wood strips were usually placed 16-inches on center and fastened to the masonry walls with hardened, cut nails. Large sheets of gypsum-based plaster lath were then nailed to the furring strips and the final plaster was applied over the lath boards.

Narrow Place

If your home is constructed in this manner, you can see the problem you have. The only void space that is available for insulating is the narrow 3/4-inch space between the furring strips.

You can confirm this narrow void space exists by creating a two-inch diameter hole in several of your exterior walls. Do it behind a piece of furniture or inside a closet that is on an exterior wall.

Long ROI

If you discover you only have a 3/4-inch space between the back of the plaster or drywall and the beginning of the block facing, you might never get a payback, or return on investment (ROI), in energy savings in your lifetime for the amount the total job would cost including all cleanup, re-plastering and repainting.

I say this even if you could insulate this space with the best foam insulation currently available. 

Energy Audit

You may want to invest in an energy audit and have an energy audit expert come to tell you where you're losing the most energy in your home. It may not be the walls.

CLICK HERE to get FREE & FAST BIDS from local energy-audit contractors.

Wood Floor Foam Insulation

Watch this video to see how to use foam insulation in a wood-floor system.

Outside is Hard

The contractors you spoke to are correct. Attempting to do the job from the exterior presents a host of problems. For one, the mortar joints are often no wider than one-half inch.

A tiny insulation tool would have to be inserted in eight inches and then somehow have to turn a sharp 90-degree angle to squirt insulation up, down and sideways. A specialized nozzle may indeed exist, but then you have to wonder if the entire cavity is being filled with insulation.

Hitting a Strip

What's more, the furring strips present a challenge. They can't be seen from the outside of your home and a hole drilled into the brick at a furring strip location would be useless. Drilling larger holes inside the home allows the contractors to see if they missed a furring strip and it allows them to more easily install the insulation.

Forget About It

But if it were me, I would not even try to insulate the walls. I feel you can save more energy concentrating your efforts on stopping air infiltration leaks, installing the best energy-efficient windows and exterior doors and improving insulation in your attic space.

Heat Loss Calculation

Calculating energy savings for insulating the narrow 3/4-inch wall space is fairly easy. Heating and cooling contractors have done this for years. They have to perform heat loss and heat gain calculations that allow them to properly size furnaces, boilers and air conditioners.

Businesses that sell this equipment to contractors often have sophisticated computer programs that can quickly tell you how many Btus (British thermal units) of extra energy are required to heat or cool a home that does not have insulation in that narrow void space. I have seen the calculation differences and they are indeed very small.

Windows & Air Leaks

But when you start improving the performance of windows by installing ones that have high-performance Low-E coatings, an overall R-value perhaps 500 percent higher than original windows and a shockingly low air infiltration rate, you start to make serious energy-savings headway. Adding reflective-foil-radiant barriers in attics, in addition to upgraded insulation, can also help save energy dollars.

CLICK HERE to get FREE & FAST BIDS from local insulation contractors.

Column 610

How to Drill Ceramic Tile

Drilling Ceramic Tile

Drilling ceramic tile requires a sharp carbide or diamond drill bit.  Drilling into tile requires a slow drill speed and a steady hand. © 2018 Tim Carter

"Real porcelain tile is very hard. Porcelain tile almost always has a high silica content and the tile is dense."

How to Drill Ceramic Tile TIPS

DEAR TIM: Drilling ceramic tile just became a priority. My wife wants me to install several new towel bars and other accessories in an older bathroom.

I also need to install anchors for a new shower door. I tried drilling into the tile but got nowhere fast.

The drill bit smoked and turned cherry red. I need to get this job done before my wife comes back from her business trip. Help me, Tim, you're my only hope. Jonathon O., Los Angeles, CA

Related Links

Cutting Ceramic Tile - Pro Tips

Ceramic Tile Snapping Cutter - Big Tile


DEAR JONATHON: Buddy, you are going to owe me big time. I am going to make you look like a home-improvement super hero. But to do so, you might have to buy a new drill and a few special drill bits.

Why is Ceramic Tile Hard?

Ceramic tile is hard because it's artificial or man-made rock. Any geologist will tell you that some rocks are far harder than others. The same is true for ceramic tile.

Free & Fast Bids

CLICK HERE to get FREE & FAST BIDS from local tile contractors who can drill your tile for you.

What Tile is the Hardest to Drill?

Porcelain tile is the hardest tile to drill.

Real porcelain tile is very hard. Porcelain tile almost always has a high silica content and the tile is dense. If the manufacturer fires it at a hotter temperature for longer in the kiln, the silica-rich clay gets almost as hard as granite.

You might have tried to drill a hole in porcelain with the wrong drill bit and you were drilling far too fast.

What Makes Porcelain Tile So Hard to Drill?

The heating process inside a kiln makes the porcelain tile hard to drill. The high temperature in the kiln modifies the chemistry and crystallography of the silica-rich raw material.

Just like an oven changes liquid batter into cake, the higher kiln temperature transforms the putty-like clay into artificial stone. In the early stages of tile manufacturing, the clay that's used to make the tile is a putty.

Some you can form with your hands but other clay can only be molded by a machine it's so stiff. But when it get's heated, the crystal structure changes and it transforms much like plastic concrete in a read-mix truck turns hard hours after it's poured or cast.

Why Is Porcelain Tile Hard to Snap?

The high silica content of porcelain tile also makes it nearly impossible to cut with a snapper-type tile cutter. The tile often shatters with conchoidal fractures like glass.

Why Does the Tile Glaze Make Drilling Into Tile Difficult?

The shiny glaze on the tile is glass and glass is slippery. The tile drill bits slide around on the tile making it hard to keep the drill bit in place.

Many common ceramic tiles are made primarily with clay, but then coated with a thin glaze that is primarily silica. In the kiln, this silica coating turns into a hard, thin glass coating and the clay transform into a low-grade slate-like rock.

Once a drill bit penetrates the thin glass coating, it usually drills rapidly through the inner core of regular ceramic tile. The inner core of these tiles is fairly soft.

What Tile Drill Bit is Used?

The key to drilling regular ceramic tile is to use a brand-new carbide-tipped masonry drill bit and a drill that has a variable-speed trigger. You never want to drill ceramic tile with the drill at high speed.

What is the Best Tile Drill Bit Speed?

The lowest tile drill bit speed possible, say 100 or 200 revolutions per minute, is perfect to drill standard ceramic tile. Apply moderate even pressure to the drill so the bit grinds away at the glaze or the tile. If you drill fast, you'll overheat the drill bit and ruin it.

Should I use a Hammer Drill Drilling Into Tile?

Never use a hammer drill for ceramic tile. You'll shatter or crack a ceramic tile if you drill using the hammer function. Hammer drills are fine for brick or concrete, but not ceramic tile.

CLICK HERE to get FREE & FAST BIDS from local tile contractors who can drill your tile for you.

How Do You Prevent Scratching Tile?

You prevent scratches on tile by applying light pressure with the drill.

The biggest mistake you can make when first starting to drill into a tile is applying too much pressure. The drill bit can slip on the highly-polished glazed-tile surface, and the bit will slide possibly creating an ugly scratch.

I always placed a piece of duct tape over the spot where I want to drill. I then marked the hole center point on the tape, and begin to drill. The tape does a good job of controlling a wandering drill bit, and it offers scratch protection should the bit slide.

Why Does the Drill Bit Smoke and Get Hot?

Your drill smokes and gets hot because you were drilling too fast. This creates enormous friction which causes rapid heat build up. Slow drill speeds do not create as much heat.

IMPORTANT TIP: You can keep the drill bit cool by dipping it in a small container of fresh cutting oil every 15 - 30 seconds. After dipping the bit in the oil for a few seconds, wipe the bit off with an old rag to keep the tile and grout oil-free. You can buy this special oil at a plumbing supply house. Plumbers use it to keep pipe-threading dies cool.

Tap Magic Cutting Fluid

This is a fantastic cutting oil that can keep your drill bit cool. Drill for 20 seconds then dip it in a small tube filed with the oil. CLICK THE IMAGE NOW TO BUY THIS OIL.

Is a Diamond Tile Drill Bit a Good One to Use?

Yes, a diamond tile drill bit is a great one. Diamonds are extremely hard and cut through the glass tile glaze fast.

If you do have to drill porcelain tile, buy special drill bits that have diamond tips. These bits must also be kept cool with cutting oil, and you must drill slowly to minimize heat buildup. Once the drill bit starts to cut a cone-shaped hole into the tile, the drill will make good progress.

Diamond Drill Bits

Here's a set of diamond drill bits that can drill holes of different sizes. You can also get much larger hole saw bits too. CLICK HERE TO ORDER THEM OR SEE OTHERS.

How Do You Cut Holes in Tile?

Large holes in ceramic tile can be created any number of ways. You can purchase hole saws that have diamond-cutting surfaces.

To drill into existing tile, the hole saw must be equipped with a pilot bit that drills a smaller hole into the center of the larger hole. This pilot bit keeps the larger bit from wandering.


If you have to drill a tile that has not been installed and don't have the tools nor inclination to drill the large hole, take it to a shop that fabricates granite or marble countertops. They have all of the bits and equipment to drill any sized hole.

I used a service like this to drill holes into three pieces of granite tile for my daughter's bathroom. To ensure the holes were drilled in the right places, I covered the face of the granite tile completely with wide masking tape. I then drew the perfect circles in the right locations on each piece of granite. The fabricators did a fantastic job of drilling the holes and all worked perfectly when I installed the granite.

CLICK HERE to get FREE & FAST BIDS from local tile contractors who can drill your tile for you.

Author's Note:

In a Reader's Comment, Mark asked about drilling a 1/2 hole in his kitchen sink for a water dispenser. His sink is porcelain with cast iron underneath.

Gregg W. of Stevens Point, WI, emailed a helpful answer to Mark's question.

"Just happened to see your answer regarding drilling through a porcelain/cast sink to provide a faucet hole.

I've had considerable experience with all types of cast iron in an industrial setting. It isn't hard to drill or tricky but bits do tend to wander in cast if not held rigidly.

My suggestion would be to start with a masonry bit as in drilling tile and then switch to a normal HSS bit after it is obvious you're through the surface. Use the tape trick. I drilled the hole for, and installed a filter tap hole, this way first time without any problems. I used a 3/4 HSS bit with a 3/8" shank. A hole saw might wander far and wide on this surface. Pilots for hole saws are usually HSS and not the best at that."

Related Column:

Holes in Ceramic Tile

Column 674

How to Clean Exterior Siding

Cleaning Exterior Siding

The mildew and algae on this vinyl siding can be removed quickly with a solution of oxygen bleach. (C) Copyright 2017 Tim Carter

How To Clean Exterior Siding TIPS

DEAR TIM: My primary home and a camp I own in the woods both are covered with siding. One is wood, the other is vinyl siding, and both are dirty.

In the past few years, I've been stunned to discover mildew and algae growing on the vinyl siding. I thought vinyl siding was supposed to be maintenance-free, that's why I purchased it.

What's going on? Should I just drag out my pressure washer and get to work, or is there an alternative method to clean siding on houses? Patrick O., Fryeburg, ME

DEAR PATRICK: Each week I receive emails from homeowners just like you. They share your astonishment about having to clean their vinyl siding. Many homeowners are not too happy as the salesmen's claims about no-maintenance seem to be as hollow as an old log.

IMPORTANT TIP: Maintenance-free is a myth. All exterior surfaces must be cleaned on a regular basis. They include:

  • siding
  • decks
  • windows
  • docks
  • roofs

CLICK HERE to get FREE & FAST BIDS from local handymen who can easily clean your siding.

I've seen hundreds of printed ads, heard countless radio commercials, etc. with these maintenance-free statements when it comes to exterior home improvement products.

Decking, siding, railings, fencing, etc. are often touted as requiring no future care. As you now know, it's just not true. Certain products are absolutely reduced-maintenance, but not maintenance-free.

Algae & Mildew Food

You're probably wondering how mildew and algae can survive on plastic, or vinyl siding. The mildew and algae are feeding on sugars, dust, dirt, or other things that are attached to the siding.

Many people are unaware that trees, both evergreen and deciduous, often broadcast ultra-fine aerosols of sugars at different times of years. Park your car under certain trees, and you'll discover thousands of tiny droplets of sap or sugar on the painted finish and glass.

This is yummy food for mildew and algae!

Wood Stain Food

When it comes to wood siding, the mildew and algae are possibly feasting on the actual stains and sealers you may have used to preserve the wood. Many clear and semi-transparent wood sealers and stains are made with alkyd or oil resins.

These natural oils are also delicious food for mildew and algae. Some of the sealers and stains contain chemicals that are designed to prevent mildew and algae growth, but these chemicals do breakdown when exposed to sunlight and repeated exposure to rainwater.

Spiderman® Power

I know that you may love your pressure washer because it's a cool tool, but it can wreak havoc with houses if used improperly. Pressure washers are like Spiderman® - "With great power comes great responsibility."

The water that's ejected from the tip of the pressure washer wand can be driven into cracks and crevices where water is not supposed to go. The intense water stream can and will erode the lighter-colored spring wood in your wood siding causing it to look older than it actually is.

Water Behind Siding

Water driven behind vinyl siding at lap joints and corners can cause wood rot if your house lacks a proper weather barrier under the vinyl siding. Believe it or not, this requirement was lacking from the building code for many years.

There are tens of thousands of houses, maybe hundreds of thousands, that do not have a weather barrier under the siding. The siding is nailed directly to wood sheathing.

CLICK HERE to get FREE & FAST BIDS from local handymen who can easily clean your siding.

Stain Solver

Oxygen Bleach

Stain Solver is MADE in the USA with USA ingredients that are food-grade quality. CLICK THE IMAGE to order some NOW.

Perhaps the better way to clean the mildew and algae off your house is to use a hand-pump garden sprayer, some Stain Solver certified organic oxygen bleach and a brush on a pole. I just demonstrated this method last week to a homeowner, and he was amazed at how well it worked.

Don't confuse oxygen bleach with chlorine bleach. Chlorine bleach can remove the color from wood siding, and it can kill expensive landscaping around your home.

Stain Solver oxygen bleach will not remove color from wood, and it's safe to use around plants and animals.

Easy DIY Use

To clean your wood and vinyl siding, you just mix the powdered Stain Solver with warm water, stir till dissolved and then apply it generously to the siding.

It's best to work when the siding is in the shade. Allow the solution to fizz and bubble on the siding for about ten or fifteen minutes. Scrub with the brush and rinse with clear water from a garden hose. The siding should look brand new once dry.

RV Brush Best

Use the type of brush on a pole RV owners use to clean their expensive vehicles. An RV brush will not scratch automotive paint, so you know it's perfect for your vinyl siding.

rv brush

This is a perfect brush to clean vinyl siding. It's got an adjustable handle and the perfect bristles that remove dirt loosened by using Stain Solver oxygen bleach. CLICK THE IMAGE NOW TO HAVE THIS BRUSH DELIVERED TO YOUR HOME.

Apply Dry

It's always best to apply the oxygen bleach solution to dry siding. This allows the solution to soak into the wood and deep clean it. Oxygen bleach can and will remove sun-damaged wood sealers and stains from the wood. It can absolutely remove sun-damaged and oxidized paint pigments from painted surfaces.

This makes it an excellent product to use if you're getting ready to re-stain or repaint your home. You want to remove these damaged finishes before you apply new.

Clean Twice a Year

For periodic cleaning to prevent mildew and algae buildup, just wash your home twice each year with a solution of liquid dish soap, a small amount of Stain Solver and water. Remove the sugars from the siding before the mildew and algae sit down at the table to feast!

CLICK HERE to get FREE & FAST BIDS from local handymen who can easily clean your siding.

Column 987

Duct and PVC Pipe Noise

piping noise

This ductwork and plastic plumbing piping can be the cause of all sorts of noises. © 2017 Tim Carter

Duct Noise TIPS

DEAR TIM: Our new home is now three-years old. Ever since move-in day there have been annoying ticking noises in several interior walls of our home. Some of the noises start minutes after our furnace comes on.

The clicks then go away five minutes after the furnace shuts off. We also have cracking noises when someone takes a bath or shower in a second-floor bathroom. The builder says all of this is normal and nothing can be done.

We never had this problem before. What's going on and what can be done to stop these very annoying noises? Donna A. Columbus, OH

DEAR DONNA: You're a victim of simple expansion and contraction. The ticking, clicking and cracking noises are a by-product of metal ducting and pipes and plastic drain lines that are rubbing against the wood framing members of your home.

CLICK HERE to get FREE & FAST BIDS from local HVAC contractors who know about duct noise.

Heat Growth

These pipes and ducts grow in size as they're heated by the warm air and hot, or warm, water that passes through them. The expansion is a perfectly normal thing to happen, but the associated noise is not supposed to happen.

At first blush it appears your builder might be guilty of a half-truth. He could be telling the whole truth based on his reality because all his career he could have been building using practices that promote this bad behavior in building materials.

Just keep in mind that a half-truth is a whole lie.

Seasoned Subs

The reason your previous homes were noise-free could be many. Perhaps the plumbing drain lines were cast iron and experienced very little movement when hot water passed through them.

The heating system may have been different as well. The other possibility is that the heating and plumbing pipes in your old homes were made from the same materials as your new home and the tradespeople who installed them were more experienced.

These craftsmen knew how to insure the metal ducts and PVC drain pipes didn't rub up against any of the wood framing.

No Contact

Craftsmen who know that metal ducts and PVC plumbing lines move can do various things to make sure that movement happens with little or no noise. The trick is to isolate as much as possible the pipes from actually touching any wood framing.

For example, the large trunk heating duct is often suspended from the bottom of the floor joists one inch to make sure it does not touch the wood framing.

Expansion Collars

Expansion joint collars often separate the large trunk heating duct from the furnace's extended plenum metal. These collars absorb an enormous amount of the expansion and contraction that happens just above the furnace heat exchanger.

Without these collars, the movement and vibration happening in the furnace, or air handler, can be transferred to all the metal duct that extends through your home.

CLICK HERE to get FREE & FAST BIDS from local HVAC contractors who know about duct noise.

Larger Holes

The experienced heating and plumbing mechanics also know to create slightly enlarged holes for ducts and pipes to pass through. They also check to make sure a pipe can freely move as is passes through one or more studs or framing members.

If the pipe gets into a bind before it is heated and expands, it will most certainly snap, crackle and pop when it starts to grow from being heated.

PVC LOUD

PVC plumbing drain lines are notorious noise makers. Plastic has an enormous expansion contraction coefficient. The material grows in size dramatically and will crack and pop if it rubs against anything.

IMPORTANT TIP: If allowed to move freely, the PVC pipe will not make noise. This means plumbers must not allow the PVC pipe to touch any wood framing.

The PVC pipe noise is two-fold. Once the hot water stops flowing through the pipe, the PVC begins to cool and contract. It makes the same cracking noise as it shrinks back to its original size. Metal heating ducts suffer the same fate as they contract.

piping noise

A large enough hole has been cut in this joist to insure the plastic pipe does not rub against the wood. © 2017 Tim Carter

Fixing the Noise

Exorcizing these demons from your walls isn't going to be easy. You'll need to isolate and identify the exact trouble areas.

Doing this almost always involves removal of the drywall or plaster. You can then often clearly hear and see the location where a pipe or duct might be rubbing against a wood framing member. The contact zone will need to be enlarged if possible so that an air gap exists for the pipe or duct to freely move.

Holes in Wood

Don't start to cut away wood or enlarge holes in joists or studs. There are strict limits to the notches and holes that can be made in framing members. The building code covers this in great detail with respect to the maximum size, shape and location of holes in wall studs, beams and joists.

Crack or Collapse

You can compromise the structural integrity of your home if you enlarge a hole too much. Never notch the bottom or top of a joist.

If in doubt, contact your local building inspector. Many inspection agencies will gladly advise you on what you can and can't cut. They don't want you or a family member to become a statistic.

Lubricants Evaporate

Don't count on lubricants to always solve the problem. They may be a short-term fix but over time the lubricant may dissipate. Permanent noise solution comes when you isolate the pipes and ducts from the wood framing.

Lumber Shrinks

Great builders and craftsmen also account for lumber shrinkage. The lumber used to frame the house can actually shrink over time.

Openings that were fine during the construction phase may become tight only six months later. There's no substitute for experience and brains when it comes to small detail items such as this.

CLICK HERE to get FREE & FAST BIDS from local HVAC contractors who know about duct noise.

Author's Note: I've received other questions about similar problems. Here's one from Greg in Toronto, Ontario.

"I just moved into a brand new 27-story condominium and when it gets cold outside I can hear loud bangs and cracking noises. Once when I heard the cracking sound, I also felt a vibration. Is this the concrete cracking."

Here's another one from Cheryll k. of Fenton, MO, regarding either the need for a water hammer arrestor or just noisy duct work.

"We heard an extremely loud "boom" last night at 4:00 a.m. I was already awake when it happened because my son had come in our room about 10 minutes prior to this because of a bad dream. He was still in our room and awake and heard the noise too. The noise woke my husband from a sound sleep.

Anyway, the noise sounded like dropping a dictionary from a second story down onto a hard floor. The weird part ... the sound appeared to come from right under our bed, right in our room. We got up, checked things and could not figure it out. We even checked our mattress and box springs. Is there any chance the noise could have been caused by something structural that happened between the second story floor and the ceiling below it? We don't see any outward signs of damage, but I am looking for an explanation for the noise. Thanks so much!"

Column 496

Diagonal Brace Tips

Diagonal Brace

These two diagonal braces help prevent the deck from moving side to side. These were just toenailed into the horizontal beam and vertical wood post. It would have been better if they had been bolted using 6-inch-long lag bolts. © 2017 Tim Carter

Diagonal Brace TIPS

DEAR TIM: I have some building projects facing me. One's a tall deck, another is framing a garden shed, and then I need to help a friend with a room addition. I'm wondering about diagonal bracing.

I don't understand it and need to know why it's important. Is there a short cut? Can you give me the executive summary so I don't have any problems on these jobs? Randy P., Kokomo, IN

DEAR RANDY: You'll be getting the executive summary all right. Books have been written about diagonal bracing. Talk to any structural engineer and I'm sure he'll tell you that entire college courses are offered on the topic.

Diagonal bracing is a very complex topic, but I'll do my best to give you the basics so you don't have a failure on any of your projects.

Prevents Collapse

Diagonal bracing is a structural component of just about any building. It provides lateral stability preventing collapse of a wall, deck, roof, etc.

Let's talk about what happens when you don't have diagonal bracing in place so you get a better understanding. Imagine if you were to build a wall using 2x4s 16-inches-on-center and you make it 8-feet-tall.

CLICK HERE to get FREE & FAST BIDS from local carpenters who know all about diagonal bracing.

Straight Down Forces

If you stand the wall up and nail the bottom plate to the floor to hold just that in place, the wall might seem strong if you put weight on the top. The wall can support weight pushing straight down very well if the wall is stabilized.

Don't you stand on the wall to test this. It will collapse.

Sideways Force

But here's the scary test. Get on a stepladder at one end of the wall. Push on the end of the top plate as if you're trying to move the 2x4 plate forward, not side to side so as to make the wall tip over.

You'll quickly discover you can collapse the wall down onto itself with little effort like you'd close an accordion door. In seconds you can have the 8-foot tall wall folded up on itself and only inches high on the floor.

Wind Pressure

Imagine what would happen if you built a home with no, or inferior, diagonal bracing and a severe windstorm blows against the house. Without diagonal bracing, the wind would push against the walls just like you pushed against that simple wall to make it collapse.

The bottom of the walls, or house, would stay attached to the foundation, but the top would go towards the direction the wind was blowing until it collapsed.

Earthquakes

Or imagine the violent side-to-side shaking that happens when the shear waves of an earthquake hit a house.

Earthquakes create two waves that are 90 degrees to one another. The first wave to hit is called the primary, or P, wave. It makes the ground go up and down much like you see waves ripple on a pond when you toss in a stone.

But the shear, or S, waves that come a few seconds later travel sideways through the ground. They look like a snake that's moving at high speed going across the soil. The s waves are the destructive waves that cause buildings to collapse as they shake the structures sideways back and forth like a rag doll in a dog's mouth.

Preventing Collapse

Can you see how the house could easily collapse? When pro carpenters build a house, they install different types of bracing. One might be a metal diagonal bracing from the lower corner of a wall up to the top plate.

Plywood or oriented strand board (OSB) properly nailed will also provide excellent diagonal bracing. You typically only have to put one full sheet of plywood at each corner of a wall to provide the needed stability.

Old carpenters sometimes put in let-in bracing where they mortise in a 1x4 into the wall studs. This brace travel diagonally across the wall studs from the top to the bottom plate. It's time consuming to install.

Diagonal blocking can also be installed in between wall studs. These blocks start at the bottom plate and march up the wall in a straight line until they reach the underside of the top plate. The pieces of wood do double duty acting as fire blocking within a wall.

Stability Secret

The single piece of plywood or OSB works because the sheet in and of itself is rigid. When you lay a full sheet of plywood or OSB on the vertical studs and then nail through it to the studs and the top and bottom plate, the top and bottom plate can't move independently of one another as they can when there's nothing nailed to them.

The plywood or OSB transfers its rigidity to the wall.

 diagonal wall brace

See that angled board nailed to the vertical wall studs? It extends from the top right corner of the wall to the lower left corner bottom plate. It’s a temporary diagonal wall brace used to stabilize the framing while the house is built. © 2017 Tim Carter Builder

Deck Collapses

Deck collapses can also be traced to a lack of sufficient diagonal bracing. I've seen decks built where the outer support beam just rests on wood posts.

If a group of people up on the deck start dancing and a harmonic motion builds up, the entire deck can collapse as the deck starts to shift sideways. Diagonal bracing prevents this side-to-side movement.

CLICK HERE to get FREE & FAST BIDS from local carpenters who know all about diagonal bracing.

Deck Diagonals

You can get great diagonal bracing for a deck by screwing a 2x6 to the underside of the floor joists. Use 4-inch long Simpson Strong-Tie timber screws rated for outdoor exposure.

simpson strong tie timber screw

This is a Simpson Strong-Tie Timber screw. I've used them on my own home. CLICK THE IMAGE NOW TO ORDER THEM.

There are any number of ways to install diagonal bracing for a deck. One way is to put diagonal braces that connect the deck beams to the vertical posts. These braces are typically cut at a 45-degree angle. It's really important to bolt these instead of relying on nails.

Deck Underbelly

You can also install a flat 2x6 or 2x8 on the underside of the floor joists to give the decking great diagonal support. Drive no less than two 16d galvanized nails through the brace at each floor joist. Be sure the nails have the proper coating to match the treated lumber you're using to prevent corrosion.

underside of diagonal brace

You can see the two diagonal braces on the underside of the deck floor joists. Both extend to the outer beam on the left and the ledger board hidden by the white rain gutter. The brownish-orange troughs are Trex Rain-Escape keeping the lower deck dry when it rains.© 2017 Tim Carter

Roof Truss Bracing

Diagonal bracing is really important if you're working with roof trusses on that upcoming room addition. Many a carpenter has been killed or seriously injured when roof trusses suddenly collapse as they're erected. Wind can easily push them over without bracing.

Large truss roofs often come with detailed drawings that show bracing that needs to be installed in the webs of the trusses. Always be sure to reference any drawings or talk with the engineer at the truss company if you have any questions.

Code Guidelines

Be aware there are very strict building code guidelines with respect to diagonal bracing. The code almost always dictates the type of nail, length, shape of the head, special coatings, etc. The reason is simple: Diagonal bracing is mission critical to the structural stability of a building.

Square Walls Before

I've always found it best to install diagonal bracing for walls while the wall is built flat on a floor surface. With the wall down on the ground, it's easy to square it up.

With the wall square on the ground, you can temporarily toenail the bottom and top plate so the wall doesn't move while you nail on the plywood or OSB at the corners.

You can also nail on the rest of the wall sheathing if you like. When you tilt up the wall, it's already square and you can move on to the next wall.

CLICK HERE to get FREE & FAST BIDS from local carpenters who know all about diagonal bracing.

February 8, 2017 AsktheBuilder Newsletter

Column 906

February 2, 2017 AsktheBuilder Newsletter

I don't have much time. I need to scoot out the door in about 35 minutes.

This is FAST. I've been CRAZY BUSY with some amazing new revised columns for you.

The tips in these are astonishing. I'm just going to give you links below and no descriptions. I don't have time for that. The headlines should be good for you.

GREAT NEW DOOR PRODUCT - SUNDAY!

I've got an unbelievable new interior door product to share with you on Sunday. Watch for that email EARLY Sunday morning!

Paint Videos

I got the thumbs up on the two NEW paint videos to share with you!!!!! WOO HOO!

Best part: The manufacturer is going to give YOU an exclusive REBATE offer on both paints.

When I saw the rebate on the one, I about fainted. You'll be stunned too. It's that good. WOW!

The REBATE is only for AsktheBuilder.com subscribers. HOW COOL IS THAT?

Watch for those two videos on Tuesday. You're NOT GOING TO BELIEVE the one video.

New Revised Columns

Please click every one of the links below.

"What's in it for ME Tim? Why should I click?"

  • Lots of new content
  • FANTASTIC PRODUCT LINKS
  • Embedded Videos
  • Tim Carter hand-drawn illustrations
  • and much more

Brush Marks on Trim - How to Prevent ​​​​​​​

Hot Water Loops - Hot Water INSTANTLY!

How To Garage Shelving Ideas

How to Modify Wood Attic Trusses - Doable, But BIG JOB

Different Bathroom Exhaust Fans - Music and QUIET ONES!

Tunneling Under Sidewalks and Driveways

Tar Paper - Time Tested Contender

Efflorescence - Pesky Problem

Long Lasting Concrete Repairs

Matching Paint Colors Perfectly - DIY Style

Adding a Second Story - Lots of Work

Compact Fill Under Slabs For Sure

Clay Soil Water Injection System for Shallow Foundations

Recessed Lighting Problems

How To Polish Marble - DIY EASY!!!​​​​​​​

Crawl Space Vents MythBusting

No translation today

Tim Carter
Founder - www.AsktheBuilder.com

Do It Right, Not Over!

Crawl Space Vents

crawl space vents

Crawl space vents like this one are supposed to allow air into and out of a crawl space. You need many to get great air flow. © 2018 Tim Carter

"The better idea, in my opinion, is to install a high-performance cross-laminated vapor retarder over the soil in the crawl space..."

Crawl Space Vents Tips

DEAR TIM: Should I keep my crawl space vents open year round? Are they really necessary? I live in Maryland and get all four seasons and temperature conditions. What's the latest crawl space ventilation technology? Stephen King, Lexington Park , MD

DEAR STEPHEN: There are thousands of people who wonder what to do with crawl space vents. Years ago when I installed them in room addition projects I often thought about the science behind these smallish vents. The actual net free space that allowed air to pass didn't see that big.

How Much Air Flows Through a Crawl Space?

Not much air flows through a crawl space that has just a few small vents.

I'd actually be in the crawl spaces on windy days and could barely feel a puff of air come through the vents. That led me to believe to this day that there was very little science backing up the minimum building code requirements that forced homeowners to install the vents.

Related Links

Crawl space Encapsulation Holds Promise

Crawl space Ventilation Tips - More is Better

Why Do Crawl Spaces Need Ventilation?

Here is the reasoning behind crawl space ventilation. Take a clear piece of plastic and place it over what appears to be very dry ground in your yard. Put some boards around the edges to weight down the plastic so no air gets under the large plastic sheet. If you can do this on a sunny day you will get almost instantaneous results.

I'll bet within minutes you start to see a slight fog develop on the underside of the plastic. Wait longer and the fog will turn to water droplets. The soil around your house and inside of crawl spaces is constantly liberating water vapor. Sunlight, wind and natural evaporation pull this moisture from the ground.

CLICK HERE to get FREE & FAST BIDS from local contractors who deal with crawlspaces.

Where Does The Water Vapor Come From?

The moisture content comes out of the soil. Tremendous amounts of water in the soil drive this water vapor engine.

People who live in the extreme arid parts of the Southwest USA have little water vapor escaping from the soil for much of the year. But even they have a monsoon season and the soil does get wet at certain times of the year.

People who live in the Northwest, Northeast, Midwest, and Southeast have water vapor streaming from the soil year round.

Where Does The Water From My Lawn Go?

The water vapor in the soil out in your yard readily escapes to the atmosphere. But under a crawl space, this water vapor can collect and begin to condense on the foundation walls and the subfloor structure.

If the subfloor is wood, the water can create mildew in short order and eventually the wood will develop wood rot.

What Was the Theory Behind Vents?

The theory for many years was to install the crawl space vents so that outside air could get into the crawl space and lower the relative humidity.

But I'm here to tell you that I have been in many crawl spaces with plenty of open vents and I felt as if I was in a damp cave. I just feel the vents do little good to circulate enough outside air into the confined crawl space.

What's the Best Way to Treat a Crawl Space?

The better idea, in my opinion, is to install a high-performance cross-laminated vapor retarder over the soil in the crawl space in addition to the building code-required foundation vents.

This vapor retarder needs to lap up onto the sides of the foundation and be secured to the wall with treated lumber or rot-resistant wood strips. Tu-Tuf is a great vapor barrier that's been around for years and works well.

CLICK HERE to order Tu-Tuf vapor barrier now.

The best vapor retarders come with a special tape that allows you to permanently seal any seams where the vapor retarder laps over itself or is cut around objects that stick up through the ground in the crawl space.

Do You Still Need Crawl Space Vents?

These vapor retarders block the water vapor and effectively cancel out the need for the crawl space vents. But be careful: My theory may not be synchronized with your local building code if you decide to build another room addition.

CLICK HERE to get FREE & FAST BIDS from local contractors who deal with crawlspaces.

Watch the Encapsulate Video

Watch this video to see what a crawlspace looks like that's covered with the amazing plastic sheeting.

Are Crawl Space Vents a Code Requirement?

Building inspectors may make you install vents. The issue is there are local customs and beliefs that may not be grounded in science.

Each city, town, or county is it's own little building kingdom and the building inspectors are the rulers. No matter what you do, always be sure to check with your local building department and obey the building code in your area.

What About Conditioned Air in a Crawl Space?

Pumping conditioned air into an encapsulated crawl space may be a good idea.

Some local building departments have adopted code modifications that allow a variation of my theory. They permit installation of the vapor retarders as I describe and do not require any foundation vents.

But if you do not install vents, you must insulate the side walls of the crawl space and the heating contractor must pipe in a small amount of conditioned air into the space.

Furthermore, the foundation insulation must be fireproof or if it is not, it must be covered with a fireproof material.

Do I Need Vents With Encapsulation?

No, you do not need vents if you encapsulate your crawl space.

The bottom line is if you install the high-performance vapor retarders correctly, you can forget about your vents. I don't care if you keep them open or closed, it will make little difference.

The proof of concept of this method of encapsulation is widespread. Any home that's got a full basement and has had waterproofing applied to the outer foundation walls and a great vapor barrier under the concrete slab is going to have a delightfully dry basement that's not damp.

The last home I built for my family had this. My basement was as dry as the Atacama Desert. It was never damp, no water got in and there was no mold.

The high-performance plastic used in encapsulation does the same job.

Is the Code a Minimum Requirement?

Yes, the building code is a set of minimum requirements. You can always build things better than what the code says.

Crawl space ventilation is another prime example of how the building code can be argued to be a set of minimum specifications. The building code is indeed a wonderful set of regulations, but it by no means offers a builder or a homeowner the best possible way to do a task.

There are countless examples of where builders can go beyond the code and do extra work or use better materials that will produce a home that will last hundreds of years instead of perhaps 40 to 70 years.

Is Water a Serious Problem?

Water is a serious menace when it comes to residential construction. It can create havoc and misery when leaks develop or even simple water vapor condenses on crawl space floor joists, attic framing or even exterior walls.

The best defense against water vapor problems in crawl spaces is to keep the water in the soil and don't let it enter the crawl space at all. The same is true for concrete slabs poured on grade.

Always install a high-performance vapor retarder under slabs to stop water vapor from seeping through the concrete.

How Do you Stop Water Flowing into a Crawl Space?

Install one of my linear french drains around the crawlspace if you really want to keep your crawlspace dry. This is just a gutter in the ground that collects and redirects the water in the soil.

The water moving through the soil is trying to get into your crawlspace. The narrow trench with the drain tile and gravel intercepts the water and redirects it to a low spot on your land. 

Get my Linear French Drain Streaming Video to see how to install this wonderful system.

Linear French Drain Streaming Video

Do your own DIY install of a Linear French Drain with Tim Carter's time-tested methods and materials! CLICK IMAGE TO ORDER NOW!

CLICK HERE to get FREE & FAST BIDS from local contractors who deal with crawlspaces. 

Column 543