I scoured the Internet and some historic building handbooks I own to get as many whitewash recipes as I could find.
It didn't take long to realize most of them are very similar. My secret recipe that I used on a very successful project where I had to match 70-year-old weathered whitewash is just below.
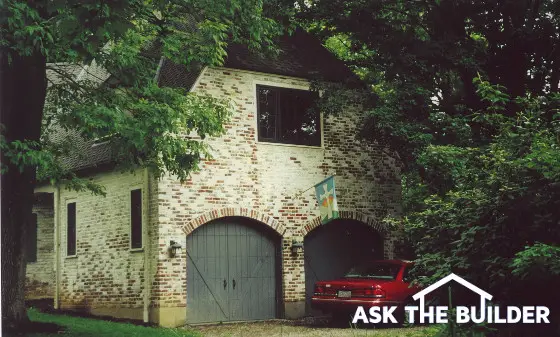
Here's just one part of the project I did. I wish I had taken a wider-angled shot so you could see the original house. Trust me, the whitewash on it looks identical to this addition I built - or vice versa!
The reason some bricks are exposed is that's the look on the existing home. The house resembles a weathered English country home.
CLICK this image and listen to the third call on the podcast. I talk to Sandy about how she can use whitewash on her painted brick home. Copyright 2018 Tim Carter
Optional: Portland Cement Type I or Type II -preferably white cement
Mixing Instructions:
Part A: Mix 12 pounds salt, 6 ounces of alum and 1 quart molasses dissolved in 1.5 gallons of water.
Part B: Mix 50 pounds of the hydrated lime with 5 gallons of hot water. Let this stand for 12 hours. After 12 hours mix Parts A and B together to a brushable consistency.
Optional Step: You can add white Portland cement for more durability. But substitute only up to 10 percent of the lime you use. In this recipe you would use 5 pounds of white cement and 45 pounds of lime.
Optional: Dried color pigments used in brick mortar and white Portland cement for extra durability.
Mixing Instructions:
Blend lime and salt together dry. If using pigment and cement, blend them at this time until the entire mixture is homogeneous.
Add water slowly until mixture resembles pancake batter or a creamy latex paint. Do NOT STOP stirring until all of the lime is dissolved into the water!
Watch this pretty good video about how to mix whitewash. This is how I did it. He talks about using silica sand, but that just adds grit to the finish.
IMPORTANT TIP: Do not add the quartz sand if you want a smooth finish!
Gil Gandenberger's The Ohio Valley Farmer Recipe
Gil, who lived in Cincinnati, OH, emailed me an ancient recipe he discovered in an old copy of The Ohio Valley Farmer dated June, 1860!
WHITEWASH, as used on the President's house, in Washington DC, is made as follows:
Slake half a bushel of unslaked lime with boiling water; cover it during the process
Strain it, and add a peck of salt dissolved in warm water
Add three pounds ground rice, boiled to a thin paste, put in boiling hot to other ingredients
Add half a pound Spanish white, and one pound clear glue, dissolved in warm water
Mix and let the whole stand a few days. Keep in a kettle, and put on hot with a brush.
What is Slaking?
Slaking is the process of adding water to hydrated lime. The lime is chemically unstable in the bag and when mixed with water it begins an exothermic chemical reaction giving off heat.
It's possible for steam to rise from the mix. It's VERY IMPORTANT to stir the mix constantly so all the lime gets mixed with water.
If unslaked lime ends up in the final work, it can pop, pit or disintegrate at a later date. This is more likely to happen when lime is used as the bonding agent in brick mortar rather than whitewash.
The bottom line is STIR WELL.
High-Quality Whitewash Materials
This is excellent hydrated lime. It's a fine white powder and it's going to look great on your home. CLICK THE IMAGE TO ORDER SOME RIGHT NOW.
Here's a giant bag of salt. You may need two or three depending on how much whitewash you mix up. CLICK ON THE IMAGE NOW TO ORDER IT.
Here are just a few of the many many pigments available. You can blend different pigments to get different shades that you don't see here! CLICK THE IMAGE TO BUY ANY WHITEWASH PIGMENT YOU WANT.
To purchase white Portland cement, just do a search on any search engine. You'll find it. At the time I revised this column, it was not for sale on Amazon.com.
When I looked at the specifications for the room addition job years ago, I thought I was seeing things. The architect had actually specified a whitewash finish!
It made sense after you went to the job site to look at the original home. The house was built in the 1920's and looked like an English cottage.
It looked to me as if it was painted white and was simply in need of a new paint job but what I was looking at was a magnificent whitewash finish that was about 35 years old.
One of the things that amazed me was the fact that the finish on the house was not peeling. There were bare brick in places and some places where you could barely see through to the brick below but that was intentional.
The original painters had varied the thickness of the whitewash and actually left it off in places to simulate a faded or worn look. How clever of them!
My challenge was to duplicate this old look on a new room addition. I'll cut to the chase. I did it and if you were to drive up to the job site today you could not tell the difference between old and new. It took a few experimental attempts, but my painters and I got the job done.
This SoundCloud player as of January 23, 2022 is NOT ADA compliant. It has color contrast issues. I reached out to SoundCloud to have them repair it. It's their source code that creates the image below.
CLICK this image and listen to the third call on the podcast. I talk to Sandy about how she can use whitewash on her painted brick home. Copyright 2018 Tim Carter
Some reference all sorts of different ingredients, but the most important two are hydrated lime and table salt.
Hydrated lime is a magic powder that does something special once mixed with water. When you add water to lime a chemical reaction begins. Millions of tiny crystals start to grow.
These crystals allow the lime or whitewash to tenaciously grab onto whatever it is applied to. It is not unlike the small briars that stick to your socks and pants when you walk through the woods. I've gone to all this trouble to write all about whitewash because I don't want this knowledge to transition from history to legend to myth.
There are other strange ingredients in different whitewash recipes. I can't tell you what they do or how they affect the final product since the whitewash I used only contained hydrated lime and salt.
This is excellent hydrated lime. It's a fine white powder and it's going to look great on your home. CLICK THE IMAGE TO ORDER SOME RIGHT NOW.
Here's a giant bag of salt. You may need two or three depending on how much whitewash you mix up. CLICK THE SALT BAG NOW TO ORDER IT.
Whitewash Installation Tips
Once you mix up whitewash you usually don't have to use it right away. In fact some of the recipes want you to let it sit overnight or for a day before you apply it.
It is also a great idea to make sure the surface you are applying it to is clean and damp. The lime crystals will penetrate deeper into the wood or the masonry if it's slightly wet.
The whitewash usually goes on blotchy. It looks like it is not covering well. But wait till the next day! If you put on a normal coat as you would paint, it dries a brilliant white.
The best thing to do is to experiment on small areas. See what you think about how white it turns out.
Add Color To Whitewash
Whitewash doesn't have to be white. You can make it look dirty by adding charcoal dust. You can make it look yellow by adding dry shake pigments.
There are all sorts of ways to color it. The key is to experiment!
When you work with dry pigments like you see in the photo below, it's mission critical to keep precise records of how you're mixing the batches.
Mix small batches and carefully note the concentrations. Always let it dry for several days to see the final color.
Here are just a few of the many many pigments available. You can blend different pigments to get different shades that you don't see here! CLICK THE IMAGE TO BUY ANY WHITEWASH PIGMENT YOU WANT.
Working with Colored Whitewash
Even if you go to great lengths to make sure you measure the lime, salt, pigments and anything else exactly, there's a chance you can get the shade off just a little bit. To minimize the chances of seeing this issue, always have enough of one mixed batch that will allow you to get to an outside or inside corner of where you're working.
A color issue halfway down or across a wall will be noticeable. But shadows at corners hide these imperfections.
Remember, the key to success with whitewash is experimentation. You want to try it on a test wall or some spot to get the feel and look of it. Wait till you see it!
"Once my grout was dry and cured, I used a special oil-based grout stain I purchased from the tile company. Not all grout manufacturers offer this stain."
DEAR TIM: The grout on the wall and floor ceramic tile in the master bathroom of our new home was supposed to be the same color. The floor grout is much lighter than the walls.
The builder and tile company agree it is a manufacturing defect as the batch of dry grout was mixed wrong at the factory. The tile company wants to stain the floor grout to match.
What is the best way to stain tile grout? What could have been done to prevent this problem? Jennifer H., Virginia Beach, VA
DEAR JENNIFER: Years ago, I had the same thing happen to me. When I left the tile store I made sure the batch numbers on the grout bags were identical and even from the same pallet. I assumed that since the bags were next to one another on the pallet the contents had to be from the same giant mixing hopper at the factory.
Can Colored Grout Not Match One Another?
Yes, you can have colored grout batches that don't match.
Well, don't ask me what went wrong, but I ended up with two totally different colors once the grout dried. It was a huge problem.
Grout colors can be changed successfully and permanently. I had to do it in my own home on my Entrance Hall slate floor.
When I built my home, the salesperson at the tile store sold me a super-duper grout additive that was supposed to make the grout stronger and more stain resistant.
Can Grout Additives Alter Grout Color?
Yes, grout additives can change and ruin colored grout. I suggest you don't use them.
The additive was a milky latex product that was mixed with the dry grout. I added it exactly as was told by the additive and grout manufacturers and the end result was a splotchy mottled deep gray grout instead of the jet black color I was supposed to get. It was a DISASTER!
I decided after this #Failure that I'd never again use a grout additive.
What Is the First Step of Changing Grout Color?
The first step is deep cleaning the tile and grout. There are two reasons:
The dirt, oil, and grease need to be out of the way so the new stain penetrates into the grout.
Clean and dry grout ensure you get an even finished color. If the grout is dirty in places, your finished stained grout WILL BE different shades!
What is the Best Tile Grout Cleaner?
Stain Solver is MADE in the USA with USA ingredients that are food-grade quality. CLICK THE IMAGE to order some NOW.
I've used Stain Solver oxygen bleach for decades to deep clean floor and wall grout. It's a pure white powder you mix with hot tap water.
After you stir it for a couple of minutes, you just pour it on floor grout. It starts to bubble and fizz as the trillions of oxygen ions start to clean the grout.
I usually wait about fifteen minutes, then I use a stiff scrub brush to ensure all the dirt, oil, grease, etc. are taken off the grout.
Once my grout was dry and cured, I used a special oil-based grout stain I purchased from the tile company. Not all grout manufacturers offer this stain. I wish they would.
Does Tile Grout Stain Look Like Wood Stain?
The stain looked just like a can of stain you might use on woodwork. It worked perfectly and the color of the grout is the jet black I wanted in the first place. Even after repeated floor cleanings, the color is as rich and deep as the day I put it down.
Why is Oil Stain Better?
Oil stains, in my opinion, work better than water-based ones because the oil solvents allow the pigments to penetrate deeper into the hard cement-based grout. Be sure your contractor gets an oil based grout if at all possible.
The neat thing about oil-based grout stains is they can be applied to grout of any age. You can stain grout thirty days or thirty years old with the same fantastic results. Remember, you get the BEST RESULTS when the grout is perfectly clean. Don't skip this step.
For the staining job to be a stunning success, you or your contractor need to follow a few simple steps:
The grout must be completely clean and dry
New grout should cure at least 30 days before staining
Deep clean dirty grout using Stain Solver - it will not remove any of the grout's existing color
What is the Hardest Part of the Job?
The hardest part of the job is applying the stain. You must do it carefully with certain flooring materials. Tiles that have a high-gloss glaze are the easiest to stain.
If a little stain gets on the tile, it can usually be wiped off the tile with little effort. But tiles with little or no glaze and slate can be a nightmare to stain. You must slowly and carefully apply the stain to just the grout.
What are the Best Brushes to Apply the Stain?
I find that a stiff artist's brush with a square tip and 1/4-inch-wide bristles works best. You do not want a brush that has limp bristles. You need a stiff bristle brush that will give you excellent control.
The brush second from the left in this kit is what I'm talking about. You may find you like a chiseled - or angled brush better. CLICK THE IMAGE TO ORDER THESE BRUSHES NOW.
Once the grout is dry, you may choose to seal it. It is not necessary, but it does help keep the grout clean. The sealers minimize the amount of liquid that can penetrate the grout.
How Can You Avoid Mismatched Grout Color?
You can avoid mismatched grout colors by blending all of the bags of grout together before you add any water to a small batch of the powder.
After my nightmare years ago, I always bought one extra bag of colored grout. Before I started grouting, I took all of the bags and emptied them into a clean wheelbarrow.
I blended the dry powdered grouts together until they were well mixed. The grout was then transferred to clean dry plastic buckets with tight-fitting lids. This method produces grout that is absolutely uniform in color when it dries.
Does the Grout Stain Fade?
Grout stains really work and work well. A high-quality stain will not fade.
For some reason, they are not talked about very much. All too often people re-grout to get rid of ugly grout when many times a simple stain will rejuvenate a ceramic tile job.
The best part is that colored grouts can enhance colored ceramic tile. Frequently tile setters or architects specify white grout when a colored grout actually makes the colored tile look better.
Can Dark Grout Be Stained a Lighter Color?
It is very difficult, if not impossible, to make a dark grout appear lighter. Keep in mind that grout stains are not paints.
In fact, you would never want to apply a paint to grout as they are films and will peel over time. Grout stains penetrate into the grout and carry the color pigments with them. Some stay at the surface so you can see the new color. But never will enough light pigments stay at the surface to mask a dark colored grout.
Are Some Grout Stains Just Paint?
There are grout stain products out that are just paint.
A stain is a thin liquid much like water that soaks into the grout. Paint is thicker like gravy and forms a film on top of the grout.
These messy paints will look horrible. What's more, if it is a paint, it will peel.
Always do a TEST to see if it's a penetrating stain or a paint-like film that sits on the surface of the grout.
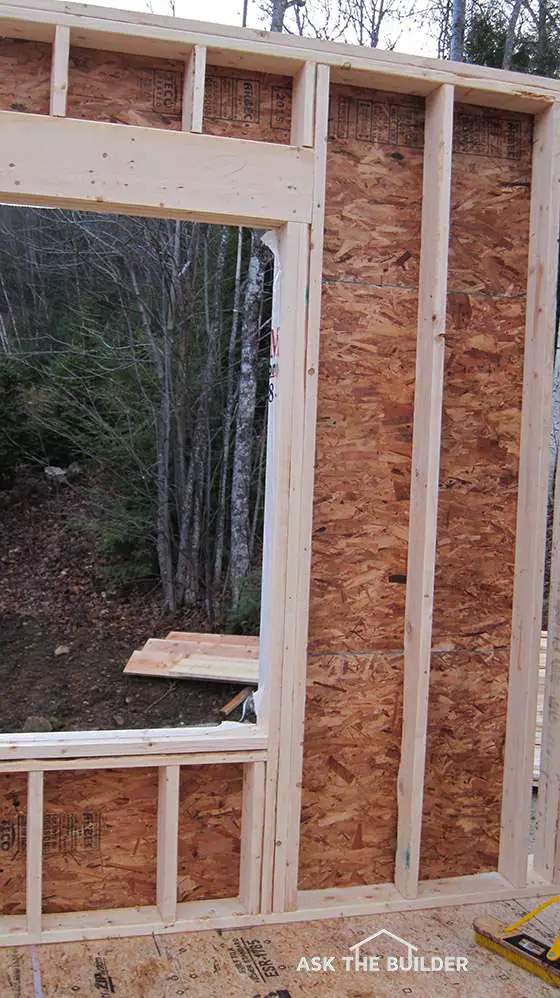
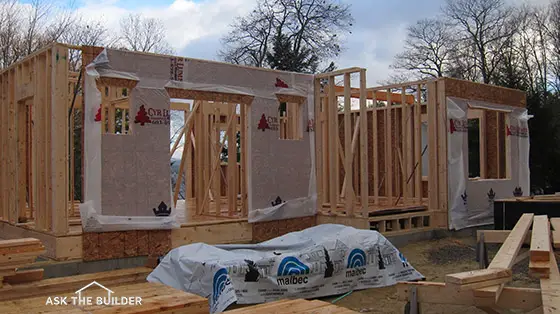
Here's a typical 2x6 exterior wall before anything is put in the cavity. A 16-foot-long by 9-foot-tall wall with sheathing on it can easily weigh 200 pounds. (C) Copyright 2017 Tim Carter
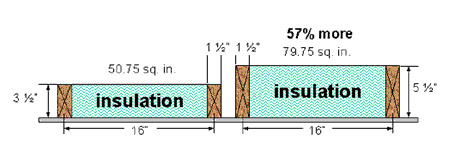
2x4 and 2x6 framing looks the same but there are significant extra costs to build with 2x6s. How long before you get a payback is a great question.
DEAR TIM: My husband and I are getting ready to build a new home. We want to spend as little as possible on heating and cooling fuel costs. 2x6 wall studs are two inches deeper than standard wall studs allowing you to add more insulation.
How much does it really cost to increase the exterior wall thickness of a house? Is it worth the extra money? What else can we do to lower fuel costs? Karen V., Springfield, IL
DEAR KAREN: There are several things you need to consider when calculating the cost of increasing the exterior wall thickness of a house. The wall studs, top and bottom wall plates, insulation, and window and door extension jambs will all cost more money.
Once you have calculated the total added cost, you need to calculate how soon you might receive a payback. The soundness of the investment depends upon where you live and how close you are to sea level.
You don't have to have a PhD in math to realize a 2x6 wall cavity has lots more insulation space than that of a 2x4 wall cavity.
Many Things Add to 2x6 Framing Cost
Depending upon the size of your home, the cost to upgrade from 2x4 to 2x6 exterior walls can be significant. I decided to make a list of all the things you need to take into account when you upgrade from 2x4 to 2x6 exterior walls. You have to do your own material takeoff from your own plans to see what it will cost you:
Bottom wall plates - in Northeast carpenters double them - one treated one regular
Top wall plates - there are always two
Window extension jambs
Door extension jambs
Extra insulation
Big Walls
2x6 walls are bigger than 2x4 walls. They're harder to lift and the headers on exterior walls require more work.
Great builders add 2.5 inches of closed-cell foam to the headers over windows and doors to help cut down on energy bills.
2x4 vs 2x6 Framing Video
This is the best video I could find when editing this column. I'm going to make my own one in the spring because this one is just not that great. However, it's still worth watching.
Calculating the Payback of 2x4 vs 2x6
To calculate the possible payback, you need to determine how much fuel you will save by increasing the wall thickness. This is a very time consuming and complicated process. Thankfully some scientists at the Building Research Council at the University of Illinois at Urbana-Champaign have done this. The results of their research are fascinating.
The scientists discovered that two very important things impact the payback period on wall insulation thickness upgrades. The most important item is simple: How cold does it get where you live and how long does it stay cold? There's an accepted method for measuring this from one city to the next
It is called the degree-day method. The meteorologists who work for the National Weather Service calculate this for each day of the heating season in your city.
Degree days are easy to calculate. You must determine the average temperature in degrees Fahrenheit for each day of the heating season. Add together the recorded high and low temperature for each day, and divide this sum by 2. Take this average daily temperature and subtract it from 65 degrees.
The result is the total degree days for that date. As the weather gets warmer, you obviously have fewer degree days per day. When the average daily temperature is 65 degrees or more, you have 0 degree days for that date.
The scientists at the University of Illinois determined that if you live in an area that experiences 5,750 or more degree days per year, then it begins to make economic sense to switch to 2x6 exterior walls.
CLICK HERE to see how many degree days you have where you live.
The more heating degree days you have above 5,750 the faster your payback will occur.
Altitude above sea level also makes a difference. Those people who live closer to sea level experience a more rapid conductive heat loss through the air. Because the air is denser as you get closer to sea level, heat travels from air molecule to air molecule more quickly.
For every 1,000 foot gain in altitude, five percent less heat is lost through conduction. This is one reason why solar energy houses work great in mountain areas and perform poorly in seaside situations. Houses at or near sea level need to be well insulated and tightly sealed.
People who live in the Sun Belt of the United States who tend to use air conditioners much more than furnaces face the same tough choices as you do. The cooler a person wishes the inside of their house to be, the more sense it makes to upgrade to 2x6 walls.
A person who prefers an indoor temperature of 70 F during the summer months will use considerably more energy than a person who can survive an indoor temperature of 76 F. The added insulation that a 2x6 wall provides will allow the 70 F house to achieve a much more rapid payback.
Don't Forget Attic Insulation
Probably the best way to save energy is to increase the amount of attic insulation. Heat loss is significant through insulated ceiling areas because of the large footprint of the attic space as a percentage of the building envelope.
Consider upgrading your blown-in attic insulation to a R-value of 38 or higher. I put in enough fiberglass in a my home I built in Cincinnati, OH to achieve a R-58 attic insulation value.
AAMA-Approved Windows and Doors
Windows and doors are another significant source of heat loss and heat gain. Purchase the best windows and doors you can afford.
Windows and doors that have the AAMA Gold label are the best hands down.
Look for ones that have the lowest air-infiltration loss through the weatherstripping and the highest overall R-value.
You should also invest in air-infiltration barriers. These will block those toasty warm air molecules from escaping your magnificent new home during the winter months!
The latest trend in house sheathing makes it so you don't need an air barrier. The OSB has a plastic coating on it that passes water vapor but doesn't allow liquid water to enter you home.
The carpenters apply a sticky tape to the seams of the plastic-coated OSB creating a wind-proof barrier.
Marvin windows review: These are Marvin double hung windows in my own home. It's a Queen Anne Victorian I built for my family that looks like it was built in 1890. Copyright 2018 Tim Carter
"If you want the best windows out there, then you want ones that carry the American Architectural Manufacturing Association's (AAMA) Gold Label."
Andersen, Pella and Marvin Window Reviews Checklist
Look for AAMA Gold Label
Higher prices usually equate to high quality
READ installation instructions yourself - don't HOPE they get installed right
DEAR TIM:I was looking at your web page for some information on windows, specifically for Pella window reviews and Marvin window reviews.
I thought I had a handle on the basics of double pane, gas-sealed, low-e, high-efficiency thermo-pane windows, but from what I've seen of Pella windows, they're not sealed at all.
To me, this blows the whole "sealed = high efficiency" thing out of the water. How can Pella boast high/higher efficiency, when all they seem to do is provide two unsealed panes of glass? Am I missing something?
I know some folks swear by Pella, but to me, Andersen or Marvin seem to be a better product because their windows actually provide a sealed-space, which I thought insulated better.
I like Pella's casement product from a standpoint of no chance of seal failures and fogging, plus the in-between mini-blinds, but I'm not convinced that they actually deliver the same level of efficiency. Vic Johansen, Cincinnati, OH
DEAR VIC: A good friend of mine who happens to be a CPA and a former mentor of mine taught me several years ago that numbers don't lie. When you couple this fact with independent certification numbers assigned by testing laboratories to the different windows, you have a clear-cut method of scientifically choosing top-quality windows.
What are the Best Windows?
The best windows are ones that have the gold AAMA label.
If you want the best windows out there, then you want ones that carry the American Architectural Manufacturing Association's (AAMA) Gold Label. CLICK HERE to discover all about this very important certification.
Windows that sport the gold AAMA label are simply the best ones made. Period.
What was Pella's Old Window Design?
Pella's window design for years has used a removable pane of glass that had a built-in gasket. This gasket, believe it or not, produced a seal that could rival those of the insulated glass you see in other windows.
Pella window reviews all show that Pella windows now have insulated glass. Years ago they offered a model that married the insulated glass with a third removable gasketed glazed panel.
What Windows Have you Installed, Tim?
I've installed all three windows, Andersen, Pella and Marvin in my jobs in the past. The last home I build for myself and my family had Marvin windows in it. They were gorgeous up-down sash windows with authentic divided lites that matched the Queen Anne architecture style of the home.
Marvin Windows Reviews - I Loved Mine
My wife and I loved our Marvin up-down sash windows. I installed them myself and the quality was superb. The fit and finish was exactly what you'd expect from a top manufacturer.
I currently live in New Hampshire. I didn't build the house I'm in, but it has Andersen windows and doors throughout it. They were installed around the year 2001 and at the time this column was revised in 2017, they all were doing well. I've not had one seal failure or any other type of problem.
The jobs where I installed Pella windows all went smoothly. Not one of my customers ever complained about their Pella windows.
Correct installation is very important. You can ruin a great window with a bad installation job.
You can't hope your expensive windows will be installed correctly. I beg you to take a little time, once you've made your decision, and read the simple installation instructions.
Be familiar with the steps the contractor must take so you don't have any water or air leaks.
Here's a video I taped years ago covering the most basic steps in the window installation process:
Should I Use Expandable Foam Insulation?
Yes, be sure to use expandable foam insulation around your windows. You want the brand that's made for windows and doors. Look at the image just below for a great one.
Read your installation instructions and see if you're allowed to use expandable foam. It provides the best seal.
But you can't use just any foam. Use the wrong one and it will expand too much causing the windows to not work, or seal, right.
You can buy a special foam that is meant to use for windows and doors. Here's one I've used with great success:
This is a brand-name foam that's meant to be sprayed around the frames of windows and doors. CLICK THE IMAGE NOW TO BUY IT.
Is Window Flashing Tape Necessary?
Window flashing tape is necessary to prevent leaks. There are many different tapes and some confusion about how they're to be installed.
Most new windows come with a nailing, or installation flange. This flange is integral in the frame and provides a waterproof seal.
It's imperative this flange be taped with a rubberized adhesive tape that is applied over the flange and to the sidewall of the house.
The tape needs to be installed so it sheds water that might get behind the exterior covering of the house. The window installation instructions cover how these tapes should be installed.
"If you're setting fence posts, you may want to consider using concrete at corner posts and on each side of a gate. Those are the only places I'd ever use it."
Fence Post Checklist
Posts must resist wind pressure
Set posts in crushed gravel instead of concrete
Gravel is easier to remove than concrete in future
DEAR TIM: What's the preferred method to set fence posts? My 5-foot-tall solid-picket privacy fence has had some issues over the past ten years. The latest problem is posts set in concrete that have snapped.
I've installed some temporary steel fence posts to stabilize the fence as winter winds have caused it to lean. How would you install wood fence posts? Should I be using treated fence posts? Ron W., Maumee, OH
DEAR RON: Fence posts can be a real hassle. I've fixed my fair share of them over the years. My guess is there are as many opinions as to the right way to set fence posts as there are posts encircling a one-acre field! But about fifteen years ago, I stumbled upon a method of setting wood fence posts that appears to be working really well.
Does Wind Cause Problems With Fences?
Your fence posts have a tremendous amount of force against them each time the wind blows. You may not think a 5-foot-tall fence is high, but in terms of wind load, it is substantial.
To get an idea of what I am talking about, lift a 4x8 sheet of plywood up and take it outdoors on a windy day. If you're not prepared, the wind may either knock you over or rip the plywood from your hands. Imagine the pressure on the entire fence being held back by a single fence post every 8 feet!
The average wood fence post seems to be a square timber that is a 4-inch by 4-inch post or possibly a 6-inch by 6-inch post. The surface area of the post in the soil is what determines how quickly a fence will tip in the wind. Smaller fence posts will yield much faster than larger posts assuming both are buried at the same depth.
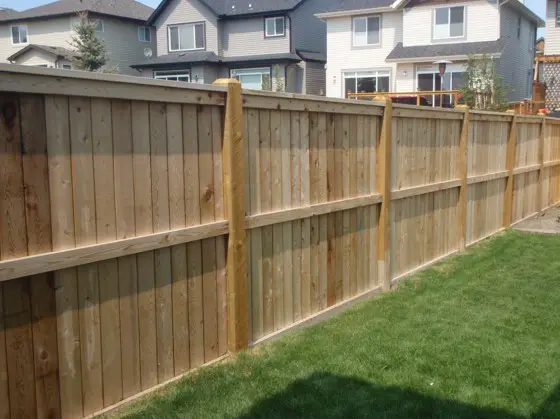
These are 6x6 posts. The wind load on this fence will be significant because it's a solid wall. Copyright 2018 Tim Carter
How Deep Should Fence Posts Be?
Your fence posts need to be deep in the ground to resist tipping forces, whatever they may be. To prevent your fence from tipping over from gravity or the wind, you need to think about leverage.
My first real fence I built was back in the 1980's. It was a gorgeous wood fence that's still in fantastic shape today. The tip of the posts was only 4 feet out of the ground, but they extended 2 feet into the soil.
When the fence was complete the posts were extremely solid. Had they only been in the ground about 1 foot, I know I could have tipped the fence with little effort.
Where Should Concrete Be Used?
If you're setting fence posts, you may want to consider using concrete at corner posts and on each side of a gate. Those are the only places I'd ever use it.
Why? Keep reading.
Is Crushed Gravel a Good Idea?
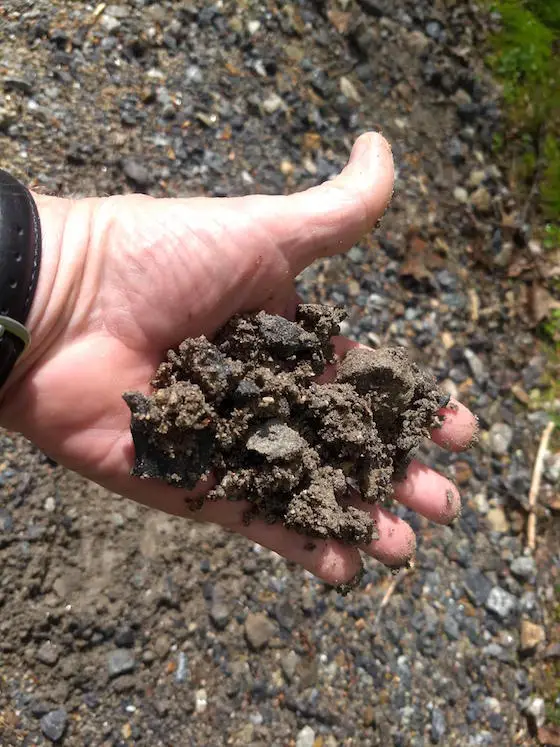
The trick I discovered is that you can use crushed, angular gravel to trick the wind into thinking a massive fence post is installed. The crushed gravel is affordable and it is easier to deal with than concrete that becomes as solid as a rock.
What is Crushed Gravel?
Crushed gravel consists of small pieces of angular stone that have irregular sharp edges. You want the pieces of gravel to range from the size of a large grape down to the size of coarse granular sugar.
This is a good example of crushed gravel. It's wet and has an assortment of sizes of angular gravel ranging from large grapes down to sand-sized pieces like granular sugar. It interlocks together making a dense material. Copyright 2019 Tim Carter
This is an example of crushed washed gravel. When it's washed, the smaller pieces that range down to granular sugar are missing. You want to have small pieces for fence posts so the stone knits together much like concrete without the Portland cement. Copyright 2018 Tim Carter
The angular nature of the rock and different random sizes interlock to create a very dense material that's quite like poured concrete.
You're about to discover how hard it is to deal with concrete that is deep in the ground around your fence posts. My guess is that you will be swearing like a sailor by the time you get to removing the concrete around your third fence post.
Is it Hard To Remove Concrete Around a Fence Post?
It is extremely hard to remove concrete that's poured around a fence post. Many people don't think about how hard it will be in the future to take out what they're putting in.
Breaking up a concrete sidewalk is not too bad. Wait until you try to break apart and lift out of a hole, the concrete you placed around a fence post 15 years earlier!
What is a Simple Way to Install a Fence Post?
My method of setting fence posts is quite simple. If I'm installing a 4x4 wood fence post, I dig a hole 10 inches in diameter. The depth of the hole is important.
My tests over the years have shown that the amount of buried post should be half the length that extends above the ground. In your case my guess is your fence posts were taller than the fence, so your wood fence posts should be in the ground at least 3 feet.
When it is time to install the fence post, be sure it is in line with the other posts and it is plumb. It is also important that the fence post is centered in the hole.
How Do You Install Crushed Gravel Around the Posts?
Start to add the crushed gravel in 5-inch lifts. This means add 5 inches of gravel around the post and use a long heavy 2x4 to tamp and compact the gravel. Add a little bit of water to the gravel as you tamp it. The water helps compact the gravel.
Each time you are finished tamping the gravel, check to make sure the fence post is still in the correct position.
Continue to install the crushed gravel until it is just a few inches from the top of the hole. You can add topsoil to finish off filling the hole in case you want vegetation around the fence post. Some people like the look of gravel, so it can extend to the surface. You can even use decorative, colored gravel if you like to finish off the hole.
Does the Gravel Lock the Post in Place?
The mass of interlocking gravel acts like an anchor when the wind blows against the fence. It also can facilitate drainage of water away from the fence post as the soil moisture drops in late spring and all summer long.
Is Gravel Easier to Remove?
The gravel is also easier to remove than solid concrete in the event you need to work on the fence in the future. A metal spud bar will quickly loosen crushed gravel that has been in the ground for many years.
What Fences Have the Least Wind Load?
Fences that are not solid have less wind load against them. A split-rail fence or a regular picket fence that has spaces between the individual pickets allows much of the wind to pass through the fence thus lowering the tipping force. In these instances, the fence posts do not have to be buried as deeply.
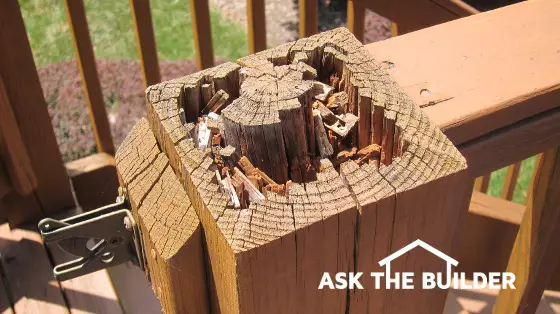
What is the Best Treated Lumber For Fence Posts?
If you decide to use treated fence posts, be sure to use the proper timbers. Not all treated lumber is approved for burial in the ground. The treated fence posts should be labeled that they are approved for direct burial.
This is treated lumber that was not buried! It's been regularly sealed yet it still rotted out! Copyright 2017 Tim Carter
When Should I Call 811?
Always be sure to call the national Call-Before-You-Dig Number a few days before you start your fence project. Simply dial 811 or go to their website www.call811.com. You may prevent death, serious injury or substantial expense by doing this. You would not be the first person to strike an electric line, phone line or even a buried natural gas line with a posthole digger!
DEAR TIM: I’m renovating a 1969 ranch homethat’s over a crawl space. I pulled up the existing foyer tile floor so I can put down an interlocking laminate or engineered flooring.Much to my surprise I found a concrete mortar bed under the tile. I'm assuming the mortar must be removed and I add more wood sub-flooring on top of the existing plywood subfloor. Is that a correct assumption? The mortar sits, on average, about 1 inch below the existing finished floors. What would you do at this point? How would you deal with this wretched concrete mess? Dave H., Charlotte, NC
DEAR DAVE: What’s that old saying? “One man’s trash is another man’s treasure.” Yeah, that’s it. My friend, you’ve been blessed is all I can say. I suggest you prance around your house singing Happy Days are Here Again.
That concrete mortar floor is an excellent base for your new laminate floor once you dress it up.
Allow me to share a story. A friend of mine purchased an older home in the town where I live. She and her boyfriend embarked on doing lots of remodeling to this tired, old one-bedroom home.
One of the last projects they tackled was installing a laminate floor. This woman knows that I have a little bit of knowledge about matters of home construction and remodeling, yet she didn’t call me up. I think it might have had something to do with offending her boyfriend’s skills. It’s too bad that as most people get older, their egos get more fragile, but that’s a story for another day.
I don’t know if they didn’t read and understand the laminate flooring instructions, were in a rush, were too tired at the end of the job or thought they knew better, but they made a grievous error.
Interlocking laminate flooring materials are very interesting products. I put down one in my man cave ham-radio shack about three years ago that looks like random-width v-groove distressed oak flooring. Everyone that’s seen it thinks that it’s real oak and that the floor is perhaps fifty, or more, years old. It looks that good.
But I read the installation instructions and they say the flooring must be installed on a solid floor that’s all in the same plane. This means the sub-flooring shouldn’t move or flex and that it must be smooth with no humps or low spots. If you don’t satisfy these basic requirements, the laminate flooring will snap, crackle and pop as you walk across it.
My friend made this mistake and her floor creaks and snaps as she walks across it. She called me a month after the install asking me if there was a way to repair it. I told her she might be able to inject a material, with great effort, under the floor in the worst spots, but that the best way was to disassemble the floor, get the subfloor in the same plane, and re-install the flooring. She chose not to do that.
How does all this relate to you? Simple. That concrete mortar floor is nearly as solid as the Rock of Gibraltar. I’m pretty certain a month ago before you started the demolition when you walked across that tile foyer floor you felt like you were on bedrock. That satisfies the first requirement for a laminate floor. Your subfloor is solid with no flex.
The issue you have now is the concrete is not in the same plane. The concrete mortar is uneven, it’s gross and it’s well below the level of the existing floors in the adjacent rooms. That’s easy to fix with a self-leveling pourable floor compound.
This is a powder you mix with water. You then pour it and it levels itself. It's magic. CLICK THE IMAGE NOW TO ORDER IT.
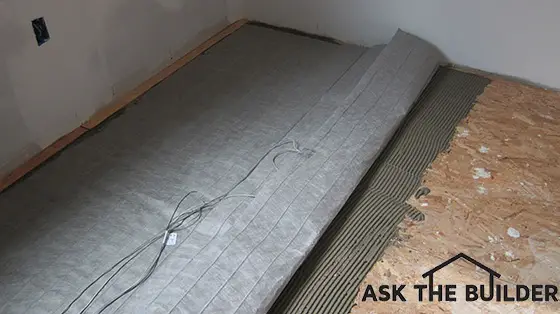
Radiant Floor Heat Pad? - Do It NOW!
You have a unique opportunity at this point to install an electric radiant heat mat should that floor need extra heat. If this were a bathroom you were working on, I’d insist on it. I have a mat like this in my man cave under my laminate flooring and it produces a luxurious heat. I used the NuHeat electric floor mat and it was an easy DIY project I finished in about four hours.
Last year I had the opportunity to retrofit my master bathroom floor with radiant heating and my wife’s feet are toasty warm now n frigid winter mornings. The bathroom is also much warmer with the extra heat.
Your task at this point is to add just enough self-leveling compound so the top of the laminate flooring will be flush with the adjacent rooms. Hopefully the original builder made all the floors flush with the tile, so this should be an easy task.
Read the instructions on the self-leveling floor compound. My guess is you’ll want to use a wet-dry vacuum to get all grit and dust up from the concrete mortar. Since the self-leveling compounds require water to mix them, it might be a good idea to spritz the concrete mortar with water just before covering it with the self-leveling mixture. This ensures you’ll get a great bond and the concrete mortar won’t suck too much water from the leveling compound too fast.
If that happens, the compound may not flow like it should giving you that smooth level surface. I suggest you experiment with a bag of the self-leveling compound to make sure you have a feel for how it works. Build a small rectangle frame out of 3/4-inch trim lumber that’s 2 feet by 4 feet. Set it on a sheet of 6 mil plastic on your garage floor. Mix up some compound and pour away. The plastic will keep it from bonding to your garage floor.
Once the compound sets up, you can break it apart with a hammer with ease. You'll be stunned how easy it is to work with.
Pay CLOSE ATTENTION to the amount of water the instructions say to add. If you add too much water, you can ruin the compound.
Not all gutter guards are like this one. This is the Holy Grail of gutter guards. Copyright 2018 Tim Carter
"You may want to know the exact brand of the gutter guard here at my house. I'm not sharing it because the company and I parted ways after I received many complaints from my followers. They were put off by the high price and the high-pressure sales tactics. CLICK HERE to get great ones on Amazon. Have a roofer or handyman install them just like I show in this column.
The gutter guard was made using a fine stainless-steel mesh that resembled a woman's pantyhose. Furthermore, the weaving of the thin threads of stainless steel was so tight nothing could get through, not even ceramic roof granules."
Gutter Guard Test Results Checklist
Inferior gutter guards allow small debris into gutters
Small debris collects in gutter turning to organic muck
Years ago, I started testing gutter guards on my own home. Not only was I having issues with leaves and tree debris in the winter, spring and summer, but I was getting regular emails from people just like you about the frustration you were having.
I sought out and tested just about every gutter guard I could find. Many of the brands and types are no longer made. There are many reasons for this, not the least of which is some were very poor in design.
Did you Test Home & Garden Show Displays?
My tests started at home-and-garden and national builder shows where I saw tiny working displays. In the booth would be a small roof with a gutter covered by that company's gutter guard.
While the salesman would talk to a potential customer or future dealer, I'd tear off tiny scraps of paper resembling pieces of leaves and watch them either get sucked down into the gutter or start to clog the wire-brush or similar gutter guard.
On more than one occasion the gutter guard company, once they saw what I was doing, asked me to leave and never come back. No pun intended!
This is the best gutter guard I've ever tested. This is my own home in central New Hampshire. A stainless-steel micro mesh prevents any debris from getting into the gutter. Copyright 2017 Tim Carter ALL RIGHTS RESERVED COPYING PROHIBITED
This gutter guard has been undergoing testing for ten months. So far it has done very well. Copyright 2108 Tim Carter
How Many Gutter Guards Failed the Test?
Once I started testing at my own home, I discovered just about every gutter guard failed.
They either allowed small debris into gutters and/or the actual gutter guard clogged with debris.
All of them did a great job of stopping full leaves from getting into gutters. But they couldn't stop:
small pieces of leaves
small twigs
evergreen tree needles
tree bark
etc.
Consider purchasing a micromesh product from Amazon.com and having your local handyman install them for you. CLICK the photo below for just one of the micromesh products I discovered on Amazon:
There are many micromesh gutter guard products. You can save LOTS of money putting them on yourself. CLICK ON THE IMAGE to see how low-cost they can be.
What is a Reverse Curve Gutter Guard?
A reverse curve gutter guard is one that directs water into the gutter using a curved piece of metal or plastic. The surface tension of the water causes the water to flow into the gutter while the debris floating on top of the water is supposed to go to the ground.
Many heavily advertised gutter guards have a reverse curve design.
The simple way to think about this is a waterfall. Water flows across the gutter guard and encounters a slit or some other narrow opening that is curved and bends down into the gutter.
The surface tension of the water provides the grip so the water flows into the gutter and doesn't overshoot to the ground.
Watch the following video to see an example of a reverse-curve gutter guard. It's the white plastic guard I hold in my hands. It's stained with mildew and mold from being on the roof during my testing.
Reverse Curve Gutter Guard Video
Here's a video just below I shot for the Cincinnati, OH ABC-TV affiliate, Channel 9 News. Very early in my testing, I made a video showcasing several gutter guards had already failed.
I had already discovered that with ALL OF the gutter guards I had tested up to this point, you STILL HAD TO CLEAN YOUR GUTTERS OR THE GUTTER GUARDS!
That pretty much defeats the purpose of the products because most sales literature and claims by salesmen were that you'd never have to do any gutter cleaning EVER AGAIN.
All three of the gutter guards you see in this video at the end of spring had FAILED COMPLETELY. Organic crap from my trees filled all the grooves, slots and mesh in the gutter guards.
Is Micromesh the Best Gutter Guard?
Yes, my independent testing has proven that micromesh is the best gutter guard.
I was at the national builders show one year and walked past a booth that had the unique gutter guard I had seen.
The gutter guard was made using a fine stainless-steel mesh that resembled a woman's pantyhose. Furthermore, the weaving of the thin threads of stainless steel was so tight nothing could get through, not even ceramic roof granules.
But the gutter guards allowed water to pass with no problems.
I knew instinctively these were the Holy Grail of gutter guards.
How Does a Micromesh Gutter Guard Work?
The surface tension of water pulls water through the fine stainless steel micromesh. It's simply magic.
When you first look at the micro mesh gutter guard, you think there's no way it can work. Since the mesh is so tight it seems water will flow over the mesh.
The magic is in physics. Water has surface tension and likes to grab onto things. This is why water beads up on a piece of glass.
This surface tension helps pull the water through the mesh.
I've stood on a ladder and watched the water streaming down my roof in a rainstorm and it gets swallowed by the mesh.
Even in the worst downpours, the mesh sucks the water into the gutter!
Are There Different Brands of Micromesh Gutter Guards?
There used to be just one or two micromesh gutter guards, but now there are many.
Being a syndicated newspaper columnist, I've written the Ask the Builder newspaper column since 1993. Furthermore, it wasn't hard for me to discover how many companies made this micro-mesh gutter guard.
I reached out to the two companies at the time that sold the product. Both of the companies sent their own crews to install the product.
Prior to them showing up, I cleaned the gutters on my garage making them look like new.
The two brands were:
MasterShield
GutterGlove
Did the Owner of GutterGlove Sell Mastershield Product?
Yes, the owner of GutterGlove started out as a dealer for MasterShield. Advance a few years and there are numerous micro mesh gutter guards that have worked their way around the different design patents.
IMPORTANT AUTHOR'S NOTE:Both of these companies sell through a dealer network. I've received numerous complaints from homeowners like you about high-pressure sales tactics, out-of-this-world estimates in the thousands of dollars, and very unprofessional salespeople coming to homes.
Because of this, I can no longer afford to tarnish my good name and reputation telling you which guard I used. I don't want you to have a bad encounter or pay more than you have to.
I'm currently investigating other brands of stainless steel micro mesh gutter guards that you can install yourself or pay a local handyman to do for you saving you a vast amount of money.
How Did You Test the Micromesh Gutter Guard?
Here's a video I shot after the second company had stopped by to install their product. It was the perfect time to start the test because the giant maple and oak trees that overhang my garage were just starting to bud. Believe me, after years of testing I discovered that gutter guards all do a great job in the fall. It's spring when they fail.
What Happened Several Months Into the Test?
The video below is what my garage roof looked like after months of testing. It's very obvious that the way the gutter guard is installed makes a very big difference:
The one gutter guard performed better than the other. You can clearly see that.
You can't dispute the findings in the above video.
What is the Latest Update on Gutter Guards?
You may discover there are knock-off products out there. At the time I did my test, there were only two micro-mesh gutter guards available. Realize that most of the products have a design patent. It's fairly easy to defeat a design patent and this explains why you see all the competing brands in the marketplace.
Some products may have stronger utility patents. If you're like me, you don't much care about the intricacies of design or utility patents. You don't care if one company is fighting another, or if one company stole the patents or is infringing on a patent. That's not your care or business.
All you should care about is:
is the micromesh stainless steel
is the gutter guard strong enough to last for decades
is the design such that it will not lift or blow away
As a result, this may seem like it makes it harder to select the best micro-mesh gutter guard. Hence you just need one that seems like it's made well and is priced competitively.
Author's Notes
P.S. I've left this column open to comments. You'll discover quite a few comments below that challenge what my tests showed. In many cases below, owners of gutter guard franchises that FAILED in my tests authored the comments. These comment authors have a dog in the fight and you just need to be aware of that.
In many cases, they may have invested tens of thousands of dollars to get the exclusive rights to the product they sell so they don't want to see their investment sour.
Whenever you see harsh comments about anything, try to look through the fog and ask yourself what their motivation is. If they're able to support their comment with cold, hard facts, then it's absolutely worthy of your attention. Most don't have any facts, simply opinions or half-truths. You know what a half-truth is, don't you? A half-truth is a WHOLE lie.
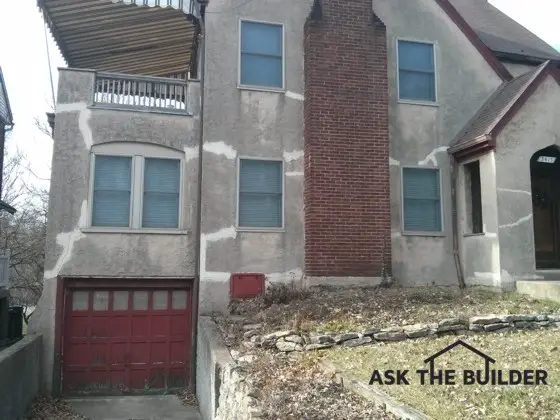
House settling cracks were patched here. See all the white lines? The person who repaired the cracks made several critical mistakes. The stucco should have been washed first. The patching material should have been tested on the side or rear of the home for a perfect match. Copyright 2018 Tim Carter
House settling cracks come in all types and sizes. Settling cracks can often just be lumber shrinkage cracks in new homes. True settlement cracks tend to get larger over time.
Shrinkage Cracks Most Likely Instead Of House Settling Cracks
Cracks happen for all sorts of reasons. But all too often people name every crack in their house as a settlement crack.
New homes are plagued with shrinkage cracks because the wood framing is shrinking as it looses water. If you feel you have a true settlement crack, the best person to call to get an opinion is a structural engineer.
Shrinkage cracks can happen in concrete. For every ten feet of concrete that are poured, be it a wall or a slab, it will shrink 1/16th of an inch in about a year's time.
But people see a crack in a concrete wall and immediately think it's a settlement crack.
Different construction materials have different expansion and contraction coefficients.
House Settling Cracks Video
Watch this short video to see some common house settling cracks.
Some materials change shape and size as they absorb water and water vapor while materials immediately adjacent to them do not budge. An example of this is hardwood flooring. Wood is hygroscopic. That means it changes shape and size as it soaks up water and then releases it.
Mother Earth is a dynamic too, meaning soils can move. But this is somewhat rare unless you live on a steep hillside.
There are all sorts of soil-movement problems in parts of Greater Cincinnati, Ohio because of an unstable soil. It's found wherever you have the Kope or Lower Fairview formation.
You can use geologic maps like the one below to identify bad soils.
This is a copy of a United States Geologic Survey (USGS) geologic topographic map of the East End of Cincinnati, OH. The downtown area would be just to the left of what you see. The Kope and Lower Fairview formations are the light pink rock just above the magenta alluvium that's north of the Ohio River. (C) Copyright 2017 USGS and every US taxpayer that owns the maps.CLICK THE IMAGE TO BUY GEOLOGIC MAPS FOR YOUR AREA.
Understanding House Settling Cracks
If you have an understanding as to why cracks happen, then you can often work to make permanent repairs. There are some cracks that can't be easily repaired.
What's more, it is hard to totally disguise some cracks.
These are places where the house relieves movement, just like the joints in our fingers, arms and legs. I often see cracks in modern homes where columns support beams. You can see cracks right where the contact point between these two structural members meet.
Hardwood floors often develop cracks. There are all sorts of reasons for that to happen, and almost always they can be traced to a humidity or moisture problem.
Soil Problems Cause House Settling Cracks
I routinely act as an expert witness in court cases involving poor quality construction. Recently, I finished a case that involved a house built on poor soil.
The builder built a house that was constructed over the top of a ravine that was filled in. Believe it or not, the excavation contractors bulldozed trees, limbs, and other vegetation into a small valley.
Then they placed soil on top of this. They rolled over the soil making it look like a great place to build.
Two years after the house was built, problems started to happen.
The foundation actually dropped several inches in numerous places and caused all sorts of havoc within the home and in its outside walls.
There were huge vertical cracks in the brickwork, the basement floor looked like an earthquake had struck and interior steel I-beams were twisted and compressed so much that they were crushing 2x4 plates. I was amazed at what can really happen when houses are built on poor soil.
Foundation Settlement Repair Video
Watch this short video to see one method to repair foundation settlement cracks.
Insurance Claims
The insurance company needs to be sent a copy of the letter to put them on notice of a possible claim. These letters need to be sent to both companies via certified mail with a return receipt being sent to you. Keep these very valuable receipts.
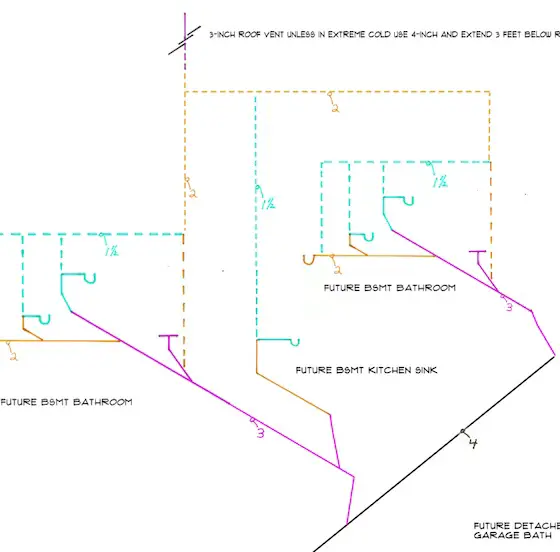
Rough-In Plumbing Diagram | You'll need a master plumber to draw a riser diagram like this. CLICK or TAP HERE and I'll draw your rough-in plumbing diagram in just a day or two.
DEAR TIM:My city allows homeowners to install their own plumbing. But to get the permit I need to supply them with a rough-in plumbing diagram.
What is a plumbing diagram? Can I just do a bathroom plumbing diagram since all I am doing is adding a new bathroom to my home? Is it a good idea to include a bathroom plumbing vent diagram when I submit my paperwork to get my permit? Dave B., Cincinnati, OH
DEAR DAVE: You should count your blessings that you live in a community that allows you to do your own work. Some areas of the nation do not allow owners of single-family homes to do their own work. Plumbing permit help is my specialty because I've been installing plumbing for decades.
I became a master plumber before the age of 30 and used to do all the plumbing work on all my jobs. I loved running drain and vent pipe and especially heavy black iron for natural gas lines. I've tapped my fair share of sewers and lived to tell about it!
It's my opinion that certain homeowners can do better work than some of the plumbers I've seen in my years in the field. If you can install the piping correctly and it meets or exceeds the plumbing code, why shouldn't you be allowed to do the work?
A rough-in plumbing diagram is a simple isometric drawing that illustrates what your drainage and vent lines would look like if they were installed, but all of the other building materials in your house were magically removed. You would see the pipes in three dimensions, and be able to see all of the connections, the pipe sizes, fittings and vent piping.
By drawing the lines that represent each pipe at certain angles, you can make a three-dimensional drawing on a flat piece of paper. Any artist can tell you this is simply a matter of perspective. Imagine looking at your house's plumbing system as you hover in the air and at an angle instead of just looking at your house from the front door. This is what a rough-in plumbing diagram looks like.
You create the interesting 3D perspective in the 2D drawing by using a simple 30 - 60 - 90 triangle. These are very inexpensive and do a great job of showing the sloping and intersecting wye fittings as if you were able to see a real plumbing system without all the wood or steel framing in the way.
This is the infamous 30-60-90 triangle. Eventually they'll be collector's items with everyone switching to computer graphics! CLICK THE IMAGE NOW TO BUY ONE. VERY CHEAP
Solve Problems Early
A plumbing diagram is a really useful tool that can save you lots of money and headaches. The drawing communicates to the plumbing inspector that your system will meet the minimum standards of the code. When you apply for your permit, an inspector studies your rough-in plumbing diagram making sure the pipe sizes are correct and that you're using the correct fittings at the places where pipes connect to one another.
For example, let's imagine you think it's okay to install a fitting connecting two drain pipes together at a 90-degree angle, and this pipe is in the ground under a concrete slab. In almost every jurisdiction I know of, this is an illegal connection. You draw this and the plumbing inspector corrects this mistake before you install the pipe and have to rip it out to make the correct connection using two 45-degree bends to make the 90-degree turn.
You should just have to do a bathroom plumbing diagram for your job since you're remodeling. It would be unreasonable for you to have to make a drawing of your entire plumbing system, especially since it's hidden behind the walls.
You'll be expected to show how and where your new drains will connect to your existing plumbing system. This is very important as the new branch line you install must connect to an existing plumbing drain in the right location.
Vents are Dashed Lines
The diagram will absolutely have to include a bathroom plumbing vent diagram. Vent pipes on plumbing diagrams are drawn as dashed lines while pipes that carry water are drawn as solid lines.
Some pipes that are waste lines can be vent lines at the same time. It can get confusing. In the drawing I made above there's an example.
Look at the slightly enlarged image I cut out of the overall diagram at the top of the page. I've made two lines red.
This section of piping is 3-inch in size and starts at the one end of the wye fitting where the toilet drain pipe also connects. The toilet drain pipe extends from the wye and terminates with the "T"-shaped symbol. The "T" represents the actual toilet flange.
Wet Venting
The red section of piping takes the water waste from the vanity that sits next to the toilet. Since the drain pipe is 3-inches in diameter, there's plenty of space for both water and air to exist if you were to fill the vanity sink with water and pull the drain plug while flushing the toilet at the exact same time. The rushing toilet water would not rob the vanity p-trap of air because it can get plenty of air in the 3-inch pipe.
Some plumbers and inspectors call this wet venting. In other words the toilet has a wet vent because water from the vanity flows through that small section of vent pipe. There are some inspectors that will not allow wet vents. I've never had a problem with one so long as you maintain the size of the vent pipe for the fixture being vented. In this case, the toiled drain is 3 inches so its wet vent needs to be 3 inches.
Once the wet vent terminates at the 3 x 1 1/2 tee fitting where the vanity drain connects, the vent for both the toilet and vanity can be 1 1/2 inches.
You'll need to show how and where your new vent pipe connects to an existing vent pipe or exits the roof as a new separate vent. If you're going to go through the roof with this new vent pipe, be sure it's sized correctly to prevent getting choked with ice. This can happen in your climate in periods of severe cold weather if the pipe exiting the roof is too small a diameter.
Plumbing Vent Video
Watch this video to see some plumbing drain lines, but more importantly, lots of plumbing vent lines.
Call Out Pipe Sizes
Be sure you call out the size of each pipe shown on your rough-in plumbing diagram. Show all changes of direction correctly. If you intend to use a fitting that turns a hard 90-degree angle, show that on your drawing. If you intend to use fittings that turn just 45 degrees, draw that acute angle on the paper. It's not that hard to make a plumbing diagram so long as you can visualize the pipes in your head before you install them.
Study Other Drawings
If you struggle to make your rough-in plumbing diagram, the first thing to do is ask your local plumbing inspector or the plumbing department if they have any sample plumbing diagrams you can study. Once you see how they're drawn, it will make complete sense to you. If they don't offer a free sample, consider purchasing a copy of your local plumbing code. Often the code books have great examples of the isometric rough-in plumbing diagrams.
Use Correct Symbols
When you see a sample rough-in diagram, you'll notice that certain simple symbols are used to indicate the fixtures you will eventually connect to the pipes. Be sure to use these symbols properly so the inspector reviewing your drawing doesn't think you will be connecting your toilet to your bathroom vanity pipe!
To make the drawing, you'll discover that a drafting 30-60-90 plastic triangle will be invaluable. The 30-degree angle side of the triangle is perfect to illustrate pipes that run horizontally with the code-required slope. CLICK HERE NOW to buy one of these dandy plastic triangles. Some computer software also allows you to draw lines at specific angles.