How to Install a Deck Post

install deck post

You install a deck post using the correct hardware and supported by a pier that distributes the concentrated load. Note the approved metal connectors at both ends of the post. © 2018 Tim Carter

"You install a deck post using special metal connectors and fasteners that have a thick coating of zinc. Cheap connectors can corrode and the deck will collapse."

Revised November 2018

Install a Deck Post TIPS

DEAR TIM: This is the year of the deck at my home. I’ve scheduled the time off and I’m ready to build, however, I need your help on several things.

How do I connect the deck posts to the deck? How do the posts connect to the concrete pier, or do they just rest on the concrete? Should the posts be buried in the soil?

How do you calculate where to place the concrete piers so the posts are centered on them? Can you just come over hand help me do all this? Catherine R., Uncasville, CT

Related Links

How To Connect a Deck Railing Post to a Deck - Great Video Here

Diagonal Bracing For Ultimate Deck Strength and Safety

DEAR CATHERINE: I’d love to help you, but you know what happens next, right? “Tim, you helped Catherine with her deck, so surely you can help me install my water heater.” I’m going to do my best to answer your questions and I urge you to visit my AsktheBuilder.com website where I have an entire category titled Deck Construction.

I’m hoping your deck is a small one and not too high off the ground. That’s a good beginner’s project, especially if the deck is just one level and a rectangle or a square. As decks become more complex, you need quite a bit of carpentry experience to ensure everything comes out as it should.

Free & Fast Bids

CLICK HERE to Get FREE & FAST BIDS from local deck builders in your city or town.

When Did the Deck Building Boom Begin?

The deck building boom started in earnest in the early 1970s with the widespread availability of CCA treated lumber.

When I first got into the building business decks were just starting to explode in popularity. It makes sense as many love to be outdoors and a deck can be an excellent outdoor room if designed properly and outfitted with shade structures and sometimes screening.

One of the coolest decks I ever built was the platform for a gorgeous screened porch for an older woman. The vaulted ceiling along with the wood floor made for an ideal spot to spend all day and night.

As the deck industry exploded, one or two manufacturers responded by developing engineered metal connectors that allowed carpenters and homeowners to safely and securely connect the parts of decks so they don’t fall down.

What About Deck Collapse Issues?

Deck collapses are real, they happen annually and people get killed or severely injured when decks suddenly fall to the ground. For this reason, you MUST be sure your deck is code-compliant and you get the necessary permits from your local building department. Not all towns require building permits for decks but check to make sure.

How Do I Install a Deck Post?

Deck posts must rest on something solid. The deck post must be connected to a concrete pier if possible using metal connectors and fasteners.

How Much Do Decks Weigh?

The average deck can weigh several tons or over 4,000 pounds.

The amount of weight being transferred to two or three deck posts that are just 4x4s or even 6x6s is enormous.

The average deck is rated for 60 pounds per square foot. Let's say you have a deck that's 12 x 20 or 240 square feet. It's possible the total weight of the deck with people, furniture, etc. on it could be 14, 400 pounds.

Half of that weight could be transferred to the two 4 x 4 posts. That means each post is supporting about 3,600 pounds.

If the post were just resting on the soil, it would transfer about 293 pounds per square inch to the soil. The post could easily sink into the soft soil.

Concrete deck piers have large footprints often being 24 inches in diameter or 24 inches square. That means the load from the post resting on a pier like this would exert only 6.25 pounds per square inch on the soil. Isn't that crazy the difference?

Cold Climates and Frost Heaving Deck Posts

The soil in cold climates can and does lift up as it freezes. At my own home here in central New Hampshire, the soil can lift as much as four, or more inches!

install a deck post

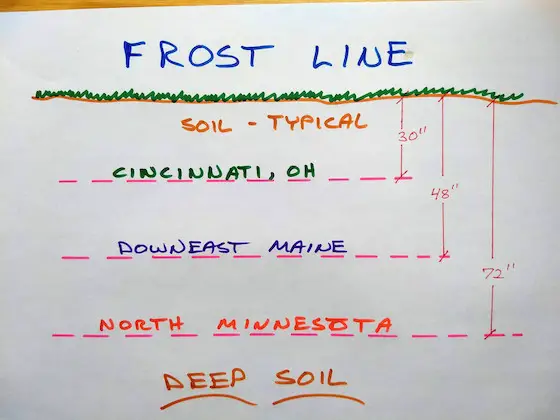
The dashed lines represent the frost line in different parts of the USA. It can be a few inches or a few feet! Copyright 2018 Tim Carter

You don't want a deck moving up and down as it can cause all sorts of issues. You solve this by placing the bottom of a concrete deck pier BELOW the frost line for your area.

The frost depth in central New Hampshire is about 54 inches. It can be six feet, or more, in northern Minnesota! Check with your local building department for the frost depth at your home.

CLICK HERE to Get FREE & FAST BIDS from local deck builders in your city or town.

Should I Install a Deck Post with Galvanized Structural Deck Post Connectors?

You’re going to use approved galvanized metal connectors sized to your deck lumber to connect the vertical posts to the outer beam that supports your deck joists. The most common connector is a plate that has two tabs of metal that point up and two that point down creating the letter U.

Special corrosion-proof fasteners are used to connect this metal bracket to the post and beam. These brackets come in various sizes for the different sized posts and beams. You’ll find these connectors online, at home centers and at lumberyards that sell lumber for deck construction.

My favorite brand, and I've used it for decades, is Simpson Strong-Tie. I have many of their connectors on my own giant decks here in New Hampshire. The photo just below is a common connector you'd use to connect a wood post to a concrete pier.

deck post base

This is a very common post base made by Simpson Strong-Tie. These can be used to connect a deck post to concrete or a wood deck under-carriage. The small rectangle on the right fits inside the larger metal square. You turn over the smaller square and set the post on top of it. The giant square washer connects the entire assembly to the anchor bolt in the concrete. CLICK THE IMAGE TO ORDER ONE NOW.

The deck posts connect to the concrete piers using similar metal connection post bases. There are several types of metal post bases, but they all connect to the concrete pier and to the wood post. Once again, you’ll size the metal post base to the wood post that you’re using.

Can Wind Lift Up a Deck?

It's possible for wind to lift up a deck.

You don’t want the deck posts to just rest on the concrete pier. Wind uplift, shifting soil, garden tractor accidents, etc. could cause the post to shift off the pier contributing to the deck collapsing. Connecting the post to the concrete pier anchors the deck to the earth.

Should Deck Posts Be Buried in the Ground?

In my opinion, it’s not a great idea to bury the deck posts in the soil even if they’re resting on concrete piers. I’ve seen lumber that’s treated for ground contact succumb to rot and insect infestation.

install a deck post

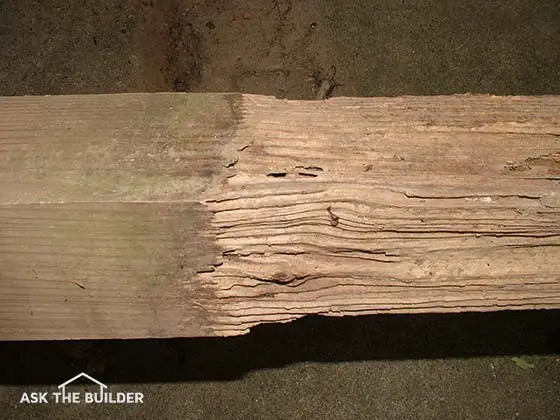
Lookie lookie, Can you see the extensive termite damage on the right side of the post? Imagine my reaction when I pulled this post out of the ground. ©2017 Tim Carter

Keeping the treated lumber above grade allows it to dry rapidly thus extending its useful lifespan.

post cap connector Simpson

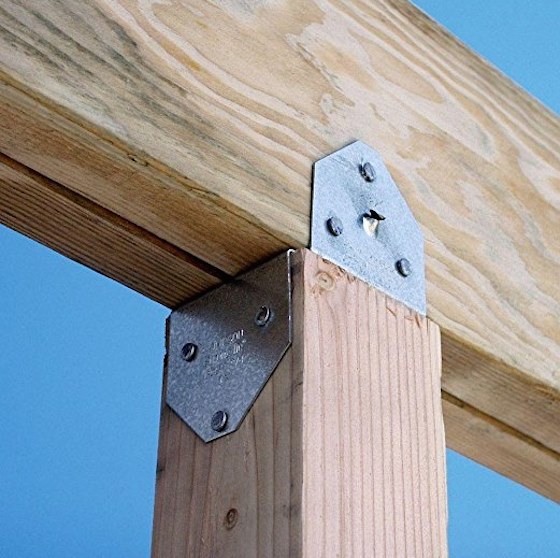
Here's a post cap connector. Simpson makes them in all different sizes to connect different posts to different width beams. CLICK THE IMAGE TO SEE ALL THE SIMPSON PRODUCTS YOU'LL NEED FOR YOUR PERGOLA.

What is the Correct Concrete Pier Spacing?

Some lumber yards have great computer software that can calculate the size of your deck beams and the number of posts you need. This will tell you what the spacing between the posts will be.

Generally speaking, you probably won't exceed 10 feet between posts/piers. You can exceed that if you incorporate steel beams into your deck design.

How Do I Get Piers in the Right Spot?

The placement of the concrete piers that support your deck posts is very critical. I discovered long ago from a fellow carpenter a fairly easy way to get them perfect each time. Once again, if your deck is low to the ground, this will be very easy to do.

I’ve found it best to create the actual outline of the deck using the deck lumber. This means you’ll connect the ledger board to your home using all the approved flashings and internal metal connectors ensuring this board will not pull away from your home.

You then attach the two end joists that extend out from the house and cap those with the band board joist that runs parallel with the ledger board along the house. You now have a square or rectangular box. Suspend this box in the air with temporary posts made from 2x4s or 2x6s. Make sure the box is level and square.

To square up this box, lay flat 2x4s on the top of the box that extends from the center of the end joists to the ledger board and to the outer band board. These should be oriented roughly at a 45-degree angle across the top box. When the diagonal measurements from one corner to the opposite corner across the box are equal, the box is square. Making sure the measurements are the same, put two nails at each end of the flat 2x4s.

You can now suspend an old-fashioned and reliable plumb bob from each corner of the box to the ground. These two points on the ground can be used to help you calculate the exact position of your concrete piers based on the deck plan you’re using. Let me know how it works out!

CLICK HERE to Get FREE & FAST BIDS from local deck builders in your city or town.

Column 1037

Bathroom Exhaust Fan Leaks Cold Air

bathroom exhaust fan attic

Bathroom Fan Leaks Cold Air | The off-white, overweight flying saucer is really a quiet bathroom exhaust fan. You can see the flexible insulated exhaust pipe that prevents condensation. The humid bath air goes out the roof. © 2021 Tim Carter

Bathroom Fan Leaks Cold Air TIPS

I can call you on the phone to solve your bathroom fan leaking cold air problem. The call is FREE if you're not satisfied with my solution. CLICK HERE to set up the call.


DEAR TIM: My husband and I purchased a small ranch home built in the 1950s. A year ago we installed new exhaust fans in the bathrooms, kitchen, and basement. Last winter I noticed cold air would fall out of the fan covers when the fan was not operating. The small bathroom is now the coldest room in the house. Did we make a mistake? Why is cold air coming into the house? What's the best way to exhaust the air from the bathrooms? Because heating costs are rising, we must stop or minimize the cold air infiltration. Jill L-H., Maumee, OH

DEAR JILL: My gut reaction is that you did nothing wrong. My experience tells me that you probably didn't do some extra things that would have made a big difference.

Unfortunately, these extra added touches don't come as part of the written instructions with many exhaust fans. I have never seen these tips on a sheet of paper. When you install as many fans as I have, you start to learn what works best.

CLICK HERE to get FREE & FAST BIDS from a local bath-fan installer.

bathroom exhaust fan

This exhaust fan has a built-in damper, but most fit poorly allowing cold air to drift back into a home. © 2017 Tim Carter

Why Do Bath Fans Leak Cold Air?

Let's briefly discuss the dynamics of what is happening with the exhaust fans. I assume you used the suggested smooth-metal piping to connect the fan to the exterior of your home. My guess is the bathroom fan exhaust pipe is located in a cold attic space.

If so, the pipe gets very cold when the fan is not in use. This cold pipe can cause the air inside the pipe to go from warm to cold.

Cold air is denser and heavier than warm air and wants to go down, not up. This is why you feel it fall down out of the exhaust fan cover.

Should Pipe Joints be Sealed?

Metal pipe joints should be sealed with special metal duct tape used by professional HVAC contractors.

Cold air from the attic can also be entering the joints in the metal piping if they are unsealed. It is an excellent idea to use aluminum duct tape that heating and cooling contractors use to seal ducts.

This is an inexpensive special tape you often can only find where furnaces, air conditioners and ductwork are sold. Do not confuse this professional tape with the common duct tape sold at home centers and hardware stores.

aluminum duct tape adhesive

This is very cool duct tape. Pros never use the crap tape you see at home centers. This tape is thin aluminum with a strong adhesive. CLICK THE IMAGE NOW TO ORDER SOME.

Should a Bath Fan Vent Outdoors?

All bath fans should vent or exhaust to the outdoors. Never allow a bath fan to dump moist air into an attic.

Should Bath Fans Have an Internal Damper?

Bath fans should have an internal flapper damper that blocks cold air. These dampers usually fit poorly inside the fan housing and the cold air can seep by them. If you want to stop cold air, you need to have a great damper, or double damper at the exhaust hood where the air leaves your home.

Should Vent Hoods Have a Sealed Door?

Some vent hoods made by the fan manufacturers have swinging doors that have a felt seal. These are not bad. I've had decent success with these.

But the best vent hood I've ever used to stop cold air is one that exits the sidewall of your home and has a double damper. These are ingenious and inexpensive bathroom exhaust vent hoods that are very easy to install. Here's the one I have at my own home:

clothes dryer vent double door

Look at the double doors. This keeps pests out and prevents cold air from backdrafting into your home. CLICK THE IMAGE to order it now.

Where Should a Bath Fan Exhaust Outdoors?

A bath fan can exhaust through the roof or you can go out a sidewall of your home.

Exhausting bath exhaust out a roof is the safest and best method. This ensures all humid air from showers and baths will never rot any wood. If you exhaust bath air under, or near, a roof overhang, the humid air can get sucked into the attic through soffit vents. This moisture can condense on the trusses, roof rafters and roof sheathing and cause wood rot and mold growth.

What Vent Flashing is Used on the Roof?

I prefer to install a roof vent that is made to compliment the high-quality exhaust fans I install. Most high-quality exhaust fans, and I've installed Fantech in my own home with great results, come with a special hood that's made to be used with shingles, shakes, or metal roofs. The Fantech exhaust fans are very quiet because you install the motor up in an attic or at some other location away from the bathroom. These fans vacuum the air out of the bathroom and you simply don't hear much noise at all.

bathroom exhaust fan

Here's a typical Fantech bath exhaust fan setup. The odd cone-shaped metal thing is the fan. The two boxes that have the round white covers are place up in the ceiling joists of the bathrooms. All you see are the sleek round white covers. They come with and without lights! I LOVED these in my last house. CLICK THE IMAGE TO BUY the SET NOW.

These self-flashing exit caps have a great flapper damper with a felt seal that really closes tightly when the fan is not in use. Virtually no air works its way back down my exhaust pipes so long as the flapper is checked annually for dirt and debris buildup.

CLICK HERE to get FREE & FAST BIDS from a bath-fan installer in your city or town.

What About Insulating Metal Exhaust Pipe?

It is also a great idea to insulate the metal pipe in any unconditioned space where it passes. If the metal pipe is not insulated, the moist humid air in the pipe will condense on the side walls. Often this water finds its way back to the fan and drips into the bathroom. Many a homeowner thinks they have a roof leak, when in fact the issue is condensation inside the pipe.

I prefer to spray the metal exhaust pipes with foam insulation. This insulation is available in aerosol cans and is quite easy to work with. Be sure to clean the exterior of the metal pipe with soap and water as the metal pipe often is coated with a fine film of oil from the manufacturing mill. Wear very old clothes when working with the spray foam. Many foams have a urethane component and if the urethane foam gets on the clothes and dries, you can't get it off.

Be sure the entire length of the exhaust pipe is insulated all the way from the fan to the underside of the roof where it exits the house. This insulation will provide a secondary benefit by preventing or minimizing condensation inside the exhaust pipe. Many people think they have a roof leak during winter months as the exhaust fans operate. In most cases the water is simply condensation that forms against the cold sidewalls of the exhaust pipe and then runs downhill back to the fan.

WATCH these Bath Fan VIDEOS:


Not all exhaust fans are created equal. Some have low-powered fans that can barely push open the first flapper damper much less the second flapper at the roof. As with many consumer products, the things that work better and are more reliable often cost more. When you shop for fans you will be shocked to discover it only costs a little more money to get a very high-quality fan.

Can I Install a Remote Fan in an Attic?

You can install a remote fan in an attic. The advantage is the fan noise is not above your head in the bathroom. The remote fan can be 10, 20, or 30 feet away from the bathroom.

If you want the best bathroom exhaust fan, I recommend you get the Fantech fan that I had in the last home I built. I loved them so much, I had two of them, one for the master bathroom and another one exhausted the air from two back-to-back bathrooms in my home.

Do I Need a Makeup of Fresh Air Intake?

Your house should also be equipped with a makeup or fresh-air intake vent. When exhaust fans, clothes dryers, central vacuum cleaners, fuel-burning furnaces and water heaters and fireplaces operate, they consume vast amounts of air. It is entirely possible that back drafting is happening in the bathroom fan exhaust pipe as it becomes the point of entry for air needed by another appliance that is sucking air from the house.

fresh air intake vent

This fresh-air intake vent will do a great job. You may need several to get enough air indoors to satisfy all fuel-burning appliances. Pipe them with solid 4-inch metal pipe. CLICK THE IMAGE TO ORDER THIS VENT NOW.

Makeup air intake ports can be as simple as a clothes dryer exhaust cap that has holes drilled in the flapper. I have also seen small hoods where the flapper is removed and small galvanized hardware cloth is inserted in its place. These makeup air intake points should be located in the utility room where furnaces and water heaters are located.

CLICK HERE to get FREE & FAST BIDS from a bath-fan installer in your city or town.

Column 594

If Punch List OK – Then Pay

straighten hinge pin

If Punch List OK - Then Pay | Strike a hinge pin just like this with a hammer and doors will stop swinging open or closed by themselves. © 2017 Tim Carter

Punch List Tips

  • Finished job = Money - don't pay until complete
  • Quick tips on fixing an interior door that swings closed
  • WATCH DIY caulking video Below
  • Quick fix for a light socket that burns out bulbs quick
  • CLICK HERE to Get Tim's FREE & FUNNY Newsletter!

DEAR TIM: The builder of my new home has a punch list that is two months old. I've grown tired of waiting for him to come and make these minor adjustments. But several things need immediate attention:

1. An interior door swings closed when I want it to stay opened.

2. The joint between the tile and bathtub is open and needs caulking again.

3. A hall light fixture consumes light bulbs. I have put in three bulbs in two months.

How can I fix these things or how can I twist the arm of the builder to fix them? Frances D., Redmond WA

DEAR FRANCES: I think many builders fall down when it comes to punch lists for several reasons. First, many lose interest in the job. They need a new challenge and move onto the next home to be built. Second, they're poor business people.

Many builders fail to realize that happy customers generate new sales. Happy customers tell their friends and neighbors about great contractors who finish jobs.

Your builder's absence could be a money issue. If you've already paid the builder all money that is due, only his honor will bring him back to your doorstep. You must ALWAYS hold onto enough money to finish whatever things are not done at your home. When the builder has completed the job and you're happy, then pay him immediately.

CLICK HERE to get FREE & FAST BIDS from local handymen to handle punch lists.

Believe me, the money that's withheld is a strong incentive for the builder to finish.

Less Stress

As much as I would like to see the AWOL builder do this work, I think you can fix the three things you mention and many others on your list in the time it might take you to call the missing builder several times.

Not only will this lower your stress, but you'll also possibly achieve a level of quality equal to or greater than what the builder might produce.

Bend the Pin

The pesky door that has a mind of its own is very easy to remedy. You will need a flat-bladed screwdriver and a hammer for this task. The door is closing because its weight is overpowering the well-lubricated hinges. You solve the problem by introducing extra friction into the hinges.

Bending one or more of the hinge pins will create this needed friction. I prefer to start with the top hinge as it typically has more lateral force on it than the middle or lower hinges. Use the hammer and screwdriver to remove the hinge pin from the hinge. To insure that you do not stress the remaining hinges, fit several wood shims under the bottom of the door so it does not droop when the hinge pin is removed.

Once the hinge pin is removed, take it outdoors and lay it on a concrete surface. Using your hammer, strike the pin in the center of the shaft. This blow will create a bend in the hinge pin. Insert the bent pin into the hinge, remove the wood shims and test to see if the door closes on its own. If it does, remove another hinge pin and bend it as well. Typically you just have to bend one hinge pin to get the desired result.

CLICK HERE to get FREE & FAST BIDS from local handymen to handle punch lists.

Caulking is Easy

Caulking the tile joint at the tub is a simple chore. Buy a tube of water-based mildew-proof caulk and follow the directions on the tube. Carefully rim the tip of the tube so the hole is the same size as the crack.

Watch the following Easy DIY Caulking Tutorial VIDEO:

Apply the caulk carefully so that just a little extra caulk is left above the actual crack. Slide your finger across the fresh caulk to force it into the crack and to smooth its surface. Immediately wipe the joint with a damp sponge several times to remove any excess caulk that smeared onto the tub or the tile.

Bend the Tab

The electrical light that eats light bulbs is a common problem. The brass tab at the base of the socket has been bent down too far.

CLICK HERE to read a past column of mine that explains this issue in great detail.

This may have been a manufacturing defect or the first person who inserted the original bulb over-tightened the bulb. Electrical arcing is probably taking place between the bottom of the bulbs and the brass tab because of poor contact.

It doesn't take long before the arcing eats a hole in the bottom of the bulb. When this happens, the gas in the bulb escapes and the filament burns up rapidly.

Turn off the circuit breaker that supplies current to this fixture. Use a voltage tester to make sure the current is off.

Once you are positive there is no current, use a needle-nosed pliers to pull the tab back up. Do this carefully so as not to break the brass tab. You generally only have to pull the tab back up one quarter inch or so. When you insert a new bulb, do not over-tighten it!

CLICK HERE to get FREE & FAST BIDS from local handymen to handle punch lists.

Column 464

Residential Steel Beams

Residential Steel Beams

Residential steel beam - There are quite a few in a home I built in Amberley Village, Ohio. The beams are 10 inches tall and weigh 31 pounds per linear foot. You can span up to 14 feet with these! © 2018 Tim Carter

A residential steel beam is very common in most homes. Most are 8 inches tall, but 10 or 12-inch-high beams allow you to span greater distances with fewer pesky columns.

Revised February 2018

Residential Steel Beam TIPS

  • Beams come in all sizes, thicknesses, weights, lengths and galvanized
  • Steel columns supporting beams should be welded and the columns filled with sand
  • Watch VIDEOS below about beams & columns!
  • Taller beams allow you to put columns farther apart
  • Structural engineers or architects must size beams
  • CLICK HERE to Get Tim's FREE & FUNNY Newsletter

DEAR TIM: My house plan calls for steel beams that will support the floor joists and even parts of a brick wall. Can I substitute wood beams for steel? Is a steel I beam hard to handle on the jobsite?

Do you think I can install one with some friends? How can you get the best steel beam prices as my budget is pretty tight? If I find a used steel beam, do you see any problems incorporating that into my new home? Steve B., Cinnaminson, NJ

Related Links

Column & Beam Construction - Use Steel and Wood

Beam Installation Basics - Be Careful!

DEAR STEVE: Steel I beams are pretty husky structural components used sparingly on a residential building site, because wood is the primary structural material found in most homes.

However, steel is a ho-hum material on a commercial or industrial construction project as it’s the mainstay of these larger projects where wood is scorned because of its inherent fire danger and limited characteristics as buildings get big.

Residential Steel Beam Video - Exposed Beams For Modern Look

This video has lots of great photos of steel beams used in homes. You may get inspiration from watching this. It's worth it.

CLICK HERE to get FREE & FAST BIDS from local structural engineers in your city or town.

Architects and engineers employ steel beam design in homes for both beams and columns because it’s so strong. You can typically hold up the same loads with wood, but you need more of it and usually the size of a wood beam is much larger than a steel I beam, that’s holding up the same amount of weight.

Termites and other wood-destroying insects don’t eat steel, so that’s a distinct advantage if you want certain parts of your home to remain standing.

You can substitute, in many cases, a wood beam for a structural steel beam. If you desire to do this, be sure you have a structural engineer, or an architect, specify the material and the needed supports.

If you do use steel, pay close attention to the connection details at the steel beam support. The connections between the beam and columns must be secure.

Steel is Heavy - Human Crane Lifts Kitchen Steel Beam Video

Watch this video to see how many men can lift a steel beam. Better have people you can TRUST doing this!

Don't rely on simple thin straps on top of columns that bend over the bottom flange of the beam. These tabs are just temporary measures until a welder shows up.

Do NOT Put Masonry On A Wood Beam

I would never install masonry on a wood beam. There's too great a chance the wood will deflect and cause failures in the masonry. What’s more, it may be a building-code violation in your area.

Steel beams, as you might suspect, are heavy. Steel beam dimensions and sizes are not the same. You can have two different beams that are nearly identical in height and length, but one may weigh twice as much as the other beam.

Typically, you’ll see beam sizes called out in numeric form like 8x17. Usually this means the steel beam is very close to 8 inches tall and weighs 17 pounds per linear foot. This is a very common size found in many residential homes. But you can get 8-inch-tall steel I-beams that weigh over 35 pounds per foot. I installed 10x31 beams in the last house I built for myself.

Two Men Setting a Residential Steel Beam

Watch these two corn-fed men put a steel beam in place in less than two minutes! WOW!

CLICK HERE to get FREE & FAST BIDS from local structural engineers in your city or town.

Taller Beams are Better

The issue with the typical 8x17 steel beams you find in many homes is they require support columns about every 8 feet on average. If you go to finish a basement, these columns are problematic.

You can avoid lots of columns by installing a taller beam. The taller the beam, say 10 or 12 inches rather than 8 inches, the greater the distance you can span between support posts. I had spans as great as 14 feet in my own basement using the 10x31 steel beams.

Heavier beams can sometimes span greater distances between posts. An 8x35 steel beam can carry more weight than an 8x17. A structural engineer or savvy architect can refer to his steel-beam guide and determine all of this for you.

CLICK HERE to get FREE & FAST BIDS from local STEEL-BEAM fabricators!

Rust Prevention for a Residential Steel Beam - Galvanize or Paint

If you're going to be using steel in a wet area and are worried about rust, you can order them hot-dipped galvanized. I worked with galvanized beams and columns for a job I did at an orphanage in Jamaica. The cost is higher, but if you need that rust protection, realize it's available.

If you can't afford galvanizing, then prime and finish paint the steel beams and columns before you install them. Put on three coats of paint for the best protection and use a special rust-preventative paint made for steel.

x-o rust paint and primer

Here's a spray paint that's great for steel beams and columns. It contains a metal primer. This brand also is available in quart or gallon cans if you have LOTS of steel to paint. CLICK THE IMAGE TO ORDER IT NOW.

But take a moment and do the math. Let’s say you have a ranch home and a 40-foot-long 8x17 beam is called for in the plans. You can have that beam delivered to your building site.

Don’t try lifting it yourself, as it weighs almost 700 pounds. A smaller beam that long presents handling challenges as well because it will be like a wet piece of spaghetti when you pick it up with all your friends. If you’ve never handled beams before, it’s best to work with smaller ones before trying to handle long pieces of steel.

Steel Is Cheap - Well Worth The Investment

Steel is a commodity, and its price fluctuates. The current steel beam price you have to pay for new steel may not be bad as you might think. Currently, the market is depressed and supply may be far greater than demand. You may be pleasantly surprised to discover that you can purchase a construction steel beam for not much money.

You may be able to find decent steel beams from a demolition contractor who routinely salvages them from buildings. They sell them for scrap, so the price you pay will usually be much less than that of a new beam. However, you have all sorts of challenges when dealing with used beams. You might not get the exact size you need, the beams can be bent and you have to figure out how to transport it to your job site. My guess is a demolition contractor is not set up to do this for you. But stranger things have happened.

At the end of the day when you compare all the costs involved in obtaining a used beam instead of a new one, you may discover there’s not that much of a difference in price. In any event, be sure the beams you use are primed and painted to prevent or minimize rust. Scroll up to get the best paint.

Steel Columns

I'd never use wood to support a steel column. It's best to use steel. Round steel columns are the universal standard in residential construction. The issue is in a fire, the steel columns can soften and the beam can collapse.

You can avoid steel columns from bending and failing in a fire by filling them with dry sand. Just order the steel column with a 1/2-inch hole drilled about two inches down from the top. Use a plastic tube and a funnel to pour the sand into the column.

Be sure you have a welder weld the steel column to the underside of the beam for the best connection. You can also have the steel fabricators drill holes in the bottom of the beam flange and bolt the column to the beam. You'll have to price out each option to see what's the most economical in your area.

If you decide to try to erect the steel yourself on a job site, be very aware of the dangers. The pockets in a poured concrete foundation are not that deep and if you’re not careful the beam can slide out of one end while you’re futzing with the other end of the beam.

To level beams in pockets you need solid-steel shims of different thicknesses. Never use wood shims, even treated lumber that is not supposed to rot. The heavy loads on the beam can compress the wood over time.

Steel beams can be blown over by wind if they are not secured. I’ve seen beams collapse after a rainstorm saturated clay soil causing it to expand and lift up columns that are supporting the beams. Hundreds of pounds of weight floating above your head and body on a construction site are never to be underestimated.

The size of steel beams and the size and spacing of the steel columns that support the beams needs to be done by a trained and educated professional. You can't guess and hope the beams and columns will work. Hire a structural engineer or an architect that has deep experience in sizing beams and columns when you decide to install or modify any you might be working with in your home.

Author's Notes

I received the following email from James Calhoun, who is an Architect. He wrote:

"Tim, something you might want to know. Most municipality building codes do now allow used structural elements, like old steel beams, to be placed into new constructions without certifications by an Architect or Engineer (who in their right mind would do that...) or a serious (50%) devaluation of the rated structural capability of the member. Otherwise, you did a good piece on the advantages of steel in residential structures. I design steel for homes all the time."

Thanks, James.

CLICK HERE to get FREE & FAST BIDS from local structural engineers in your city or town.

Jason could have benefited from this column. Read the August 18, 2019 Newsletter to see dramatic photos of Jason's problems.

Column 818

Caulk Removal

caulk removal tool

Caulk removal is easy if you use a caulk removal tool that will cut caulk out of corners. CLICK THE IMAGE NOW TO ORDER ONE.

"The best caulk remover might be your wife's hairdryer. This unusual tool is probably the best silicone caulk remover. Be sure to get her permission to use it!"

Caulk Removal TIPS

DEAR TIM: I need to know how to remove caulk in several places in my bathroom. The caulk has mildewed. Can you show me how to remove silicone caulk?

What kind of caulk can I install that will not support the growth of mildew? How can I STOP mildew growth in my bathroom? Andrea Z., Hobe Sound, FL

Free & Fast Bids

CLICK HERE to get FREE & FAST BIDS from local handymen that can remove caulk.

DEAR ANDREA: I can show you how to remove caulk and how to remove silicone caulk. Believe it or not, it's easy and you probably use the primary tool on your hair each morning.

Many homeowners, including myself, have battled unsightly caulk joints in bathrooms, kitchens and other high moisture locations for years.

You can now purchase mildew-resistant caulks to eliminate future mildewed caulk problems. It's going to take some effort on your part to remove the existing caulk, but it's not that hard.

You're going to start with heat first. WATCH the following video.

If that doesn't work for you, then there are some solvents you can use to remove caulk. You'll also need to use a caulk removal tool to minimize damage to adjacent surfaces.

Silicone Caulk Remover Video

Watch this short video to see a most unusual silicone caulk remover. Your wife has it in your bathroom. Get her permission to use it!

How to Remove Caulk Video

Here's a second video that shows a simple caulk removal tool and how to carefully use it.

Why Does Mildew Grow on Caulk?

Mildew grows on caulk because there's water, mildew spores and mildew food on the caulk.

Bathrooms, and kitchens are ideal locations for mildew growth. Mildew spores are everywhere in your home. They float in the air and settle on everything.

For mildew to blossom and grow it just needs two things: water and food. Bathrooms - especially tub and shower areas - provide ideal growth conditions for mildew. Daily showers and baths supply water that often ponds at the locations where you frequently use caulk. These areas are often the last to dry out as the water evaporates.

Body oils, soap films, shampoos, and other hair care products almost always contain ingredients, or food,  that provide mildew spores a continuous, delectable smorgasbord. Certain caulks actually contain organic ingredients that mildew eat.

How Do I Stop Mildew on Caulk?

You stop mildew on caulk by cutting off the water supply to the mildew spores.

It's important to realize you must also keep the caulk clean. Body oils, dirt, and other things are food for mildew. Clean these off and the mildew can't survive.

Sadly most people don't have the diligence and discipline to do what's needed. After each shower, you must use a squeegee to get as much water off the walls and any other surfaces in the shower area. If you have a shower curtain, shake it to get as much water off as possible before using the squeegee. Use the squeegee to pull the water to the drain.

How Can I Dry Off the Caulk?

You dry off caulk by leaving the shower curtain or shower door open to allow air to get into the tub or shower area. Leave the bathroom door open so house air can lower the humidity in the bathroom.

Use a high-quality bathroom exhaust fan to get as much humid air out of the room as possible. I happen to LOVE the Fantech bathroom exhaust fan.

Bathroom Exhaust Fan Setup

Here's a typical Fantech bath exhaust fan setup. The odd cone-shaped metal thing is the fan. The two boxes that have the round white covers are place up in the ceiling joists of the bathrooms. All you see are the sleek round white covers. They come with and without lights! I LOVED these in my last house. CLICK THE IMAGE TO BUY the SET NOW.

What is the Best Caulk Remover?

The best caulk remover might just be a hairdryer. The heat softens cured caulk sometimes making it easy to scrape.

Caulk removal begins by softening the old caulk. There are some solvents you can try. 3M makes a caulk-removal solvent they say works on all caulks. Be patient with them as it can take a while for them to soften the caulk. The older the caulk is, the longer it may take for the solvent to work.

Caulk Remover

Here's a caulk removal solvent. 3M claims that it works on any type of caulk. The key is to let it work after you apply it. Don't be impatient. CLICK THE IMAGE NOW to ORDER IT.

CLICK HERE to get FREE & FAST BIDS from local handymen that can remove caulk for you.

How Do You Use Liquid Caulk Removers?

You use liquid caulk removers with care. The first thing to realize is you need to read the instructions on the label.

Once you have allowed the solvent to work, you manually scrape out the bulk of the old caulk. You can use a razor blade or any other type of cutting or scraping tool that will not hurt you or the materials adjacent or beneath the caulk.

If you decide to use a razor knife of any type, I suggest you wear medium duty leather gloves to protect your hands during the removal process.

What is a Good Caulk Removal Tool?

A good caulk removal tool is one that has guides that protect the surfaces the caulk touches. The tool must be sharp and be able to get into corners.

Here's a unique tool that is made specifically to remove caulk. It has a stainless-steel guide and cutting plow to get caulk out of corners. Be sure to always read reviews about any tool before you invest in it.

Caulk Removal Tool

This tool will cut caulk out of corners. CLICK THE IMAGE NOW TO ORDER ONE.

There are other caulk-removal hand tools out there. Some are made for flat seams instead of corner seams. CLICK HERE to see a wide assortment of caulk-removal tools.

When using a caulk-removal tool, feel free to incorporate some water as a lubricant. The water will help to minimize scratches to tile or plumbing fixtures. Work slowly and carefully. Remember, the more power you exert while scraping or cutting, the more control you lose over the scraping tool.

Are There DIY Caulk-Removal Liquids?

Yes, you may have some effective caulk removal liquids in your kitchen pantry or under your bathroom sink. Regular isopropyl alcohol is a handy caulk remover.

If you don't want to try a specialty off-the-shelf caulk remover, there are products you may already have in your own home. Experiment first with plain water. If the original caulk was a non-acrylic water-based caulk, soaking it with water saturated rags for three days can soften the caulk remnants.

Water-based acrylic caulks and those made with polyvinyl acetate resins can often be softened by soaking them with isopropyl rubbing alcohol. The alcohol swells the old caulk molecules and helps to lift them from the surrounding materials. Be careful when using the alcohol as it is a flammable substance and often burns with little or no flame.

How To Remove Silicone Caulk

Silicone caulks are the hardest caulk to remove. Start to remove silicone caulk with heat from a hairdryer. If that doesn't work, step up to some softening chemicals.

Some of my readers have had success with WD-40. You can also scroll up and try the 3M product I mentioned earlier.

Multiple applications of strong alkaline compounds like sodium or potassium hydroxide can soften silicone caulk. Oven cleaners contain this chemical.

DANGER WARNING: These chemical compounds are dangerous and can often burn you or the materials surrounding the caulk. Apply these carefully to the caulk with a cotton swab. These compounds can dull plastic laminate tops, acrylic and fiberglass tub and shower units and many other bath and kitchen materials. You must work slowly and carefully.

CLICK HERE to get FREE & FAST BIDS from local handymen that can remove caulk for you.

What is the Best Caulk to Use?

The best caulk to use is one that contains mildewcides. These caulks contain chemicals that leach from the caulk over time and poison the mildew spores. Some of the caulks come in beautiful colors and offer lifetime guarantees against mildew growth.

You can minimize mildew growth in bath and shower areas by cleaning them on a frequent basis. Cleaning and rinsing all surfaces with clear water will remove mildew food sources. You should also keep tub and shower doors and curtains open after you leave a bathroom. Leave bath doors open as well to speed the drying process.

WATCH THESE TWO VIDEOS to see how to install your new caulk:


CLICK HERE to get FREE & FAST BIDS from local handymen that can remove caulk for you.

Related Articles:   Create Caulk JointsMildew-Proof CaulksMildew-Proof Caulk Manufacturers

This popular column was shared in the April 16, 2014 Newsletter & Tips.

Column 229

Plumbing Vent Piping Tips

Plumbing Vent Pipe

Plumbing Vent Piping | There is more plumbing vent pipe in this photo than drain piping! The fixture on the left is a washing machine drain box. You can see the 2-inch drain pipe leave the box and go into a p-trap. It connects to a 2 x 1.5 x 2 x tee. The vent pipe rising above the tee is just 1.5 pipe and connects to another vent pipe that is coming up from the basement below. That vent pipe leaving the upper right corner of the photo is on its way out through the roof. © 2018 Tim Carter

"Plumbing vent pipe is very important and supplies air from the atmosphere into the drain pipes. The vent pipes must have a slope to drain condensation water."

Revised February 2018

Plumbing Vent Pipe TIPS

DEAR TIM: I've got a remodeling project coming up and I intend to do the plumbing work. I'm good to go on the water lines, but the drain lines and plumbing vents are my weak spot.

Can you give me the executive summary on plumbing vents? Is there a failsafe method of venting so that everything will work fine down the road? What are the biggest things to avoid? Mandy P., Portland, ME

DEAR MANDY: You've asked for the impossible. I've been a master plumber since 1979 and I don't know if it's possible to do a Vulcan mind meld between you and me, but I'll give it my best shot.

Plumbing vent pipes often confuse many, and even apprentice plumbers who are somewhat familiar with the trade often make serious mistakes when it comes to plumbing vent systems.

Related Links

How To Relocate A Vent Pipe

Washing Machine Vent-Pipe DIY Diagram

Best Practices Guide For Installing Vent & Drain Pipes

Free & Fast Bids

CLICK HERE to get FREE & FAST BIDS from local plumbers if you want them to install your vents.

Washing Machine Venting Diagram-560w

The dashed lines are plumbing vent pipe. Note the pipe sizes. It's very important that a washing machine has a 2-inch drain line up to where it connects to the main stack. Look at the interesting wet venting of the toilet! I'm a master plumber. If you want me to DRAW out your entire plumbing system including pipes sizes and fitting list, CLICK HERE. (C) Copyright 2020 Tim Carter - Master Plumber

Can I Install My Own Plumbing Vent Pipe?

The first thing I want to mention is to make sure you check to see if you're allowed to install the piping. Some states and towns only allow licensed plumbers to do this work. The reasoning is based on public health. If you make mistakes when you plumb, you can get some people seriously ill or even cause death.

For the most part, nothing about residential plumbing is that hard. If you're reasonably intelligent, you'll be able to do the work and grasp the physics principals that are involved.

The absolute best book about much of what you need to know was written by a peer of mine, Rex Cauldwell. You should buy his book:

Plumbing Book

Rex is a peer plumber. This is an exceptional book filled with tips. CLICK THE IMAGE NOW to have the book delivered to your home.

What Happens When Water Flows Down Drain Pipes?

Air is pushed out of the way when water flows down drain pipes. This air must be replaced and that's what a plumbing vent pipe does. It brings air from outside into the entire plumbing system.

To help you understand the need for plumbing vents, let's talk about what happens in drain piping when water travels down through the system. In a properly designed plumbing drain and vent system, there is air in the pipes before water is poured down a drain or a toilet is flushed.

As soon as you introduce water, and lots of it quickly, into a plumbing drain, the dynamics of the air changes. The water surging into the system displaces the air often pushing it down the drain in front of the rushing water. This air needs to be replaced so a vacuum doesn't form in the system.

CLICK HERE to get FREE & FAST BIDS from local plumbers if you want them to install your vents.

Are Vacuums in Plumbing Drains Bad?

Vacuums in plumbing drain lines are bad, very bad. You've possibly heard a vacuum getting satisfied if you've been in a bathroom when a tub or sink drain gurgles when you flush the toilet. At a friend's house, this would happen every time his washing machine would drain.

When the washing machine pump came on, his kitchen sink would gurgle and the water in the trap under the sink would be sucked dry. This allowed sewer gas to enter his house and vermin that are crawling around in the sewer lines. Yuck!!

To prevent traps in downstream fixtures from being sucked dry like my friend's kitchen sink, you install a vent pipe, usually within 3 feet, close to the fixture trap. This vent pipe rises vertically towards the roof where it opens to the atmosphere to get the needed replacement air.

What is the normal size of most vent pipes?

It's important to realize a pipe that's 1.5 inches in diameter is sufficient to vent any residential fixture. But understand that some plumbing codes have very specific sizing requirements.

plumbing vent pipe

The horizontal white PVC pipe at the bottom of the photo held up by the j-hook is a drain pipe for a shower. It connects to a 2-inch tee against the wall. Out of the top of the tee, you can see a 1 and 1/2 vent pipe extending up into the floor and wall above on its way to the roof. Copyright 2018 Tim Carter

If you start to collect vent pipes from other fixtures as you head to the roof vent, the pipes will have to get bigger, just as plumbing drain lines and building drain pipes get bigger the more water that enters them.

Can a Plumbing Vent Pipe be Small?

Vent pipes can be tiny and work. I'll never forget visiting a farm owned by another master plumber friend of mine. For fun, he vented all of the fixtures in a large bathroom with 1/2-inch copper water lines! Believe it or not, enough air was able to pass through that tiny pipe to satisfy each of the fixtures.

It was just a simple experiment he did as he knew it would never pass an inspection. Lot's of air can pass quickly through a small unobstructed pipe.

WATCH THIS VIDEO NOW:

Should I Vent All Fixtures?

To be safe, extend a vent pipe from every fixture. Certain fixtures can be wet-vented, this means two fixtures share a common vent, but since I can't be at your house to mentor you on this complex technique, just install separate vents for each fixture. Be sure any vent line that has to run horizontally actually has a tilt to it so any condensate water that forms in the pipe drains down to the sewer or septic tank.

Are Studor Vents a Bad Idea?

Studor vents, in my opinion as a master plumber, are a bad idea. They have moving parts and they will eventually fail.

You should install a loop vent instead.

CLICK or TAP HERE to get access to the rest of the video where I show you exactly what to do.

There are many things to avoid when installing plumbing vent pipes. I'm not a huge fan of the mechanical vents that you might install under an island sink or in some other location where running a traditional atmospheric vent is next to impossible. The common name for these vents is air-admittance valves.

That name should be SCREAMING at you. Why? Because a valve has MOVING PARTS

Every mechanical vent I've installed has failed over time. Anything that has a moving part will fail eventually

Can Ice Choke Off Vent Pipe Air?

Yes, ice can choke off a vent pipe. It happens at my own home in bitterly cold weather. This ice is often called hoarfrost.

Mandy, you live in a coastal area, so it doesn't get bitterly cold for too long. But if you live in an area that gets frigid for long periods of time, you have to make sure the vent pipe both above and below the roof is a large pipe, say 4 inches in diameter, so that it doesn't get choked off with frost buildup.

I've seen this happen and it's almost unbelievable to think that ice could form in a vent pipe. It happens because the vent pipe sticking through the roof gets as cold as the air temperature.

If the air temperature is cold enough outdoors, the water vapor traveling up the pipe can freeze right to the sides of the pipe. The ice buildup is the same temperature as the air temperature.

Soon the vent pipe chokes off with ice. This happened to me here at my own home in New Hampshire the winter of 2015-16. I didn't build this house and the plumber just has a 3-inch vent pipe extending through the roof. It should have been 4 inches.

Do I Need a Full-Sized Vent Pipe?

Yes, full-sized vent pipes are a good idea. At least one of the primary 3, or 4-inch, drainage stacks should continue up and through the roof without changing the pipe size. Other smaller vent pipes from other fixtures can connect to this full-sized vent pipe.

Avoid the temptation to eliminate a full-sized vent in your plumbing system. Some new plumbing codes are moving away from full-sized plumbing vents. I'm not a fan of this. A full-sized vent is a primary vent where the drain line transitions at some point and becomes the vent pipe that exits the roof.

In many an older home, this drain pipe is perhaps 4 inches in diameter and stays that size all the way through the roof. Other vent pipes that are smaller may connect to this full-sized vent, and that's perfectly fine.

CLICK HERE to get FREE & FAST BIDS from local plumbers if you want them to install your vents.

Column 883

Heat Pumps – How Well Do They Work?

how does a heat pump work

How does a heat pump work? A heat pump is not much different than a car. You can go forward or reverse in a car. In the winter, the heat pump gets heat from the outside air and brings it into your home. In the summer, the heat pump works in reverse and takes heat from your home, and dumps it outside. In other words, a heat pump is both a heater and an air conditioner! It pumps the heat in different directions depending on the season!

"As the outdoor temperature continues to drop, the heat pump needs help from traditional electric resistance heat coils."

How Does a Heat Pump Work?

  • Heat pumps extract heat from cold outdoor air
  • They produce a cold heat from forced-air vents
  • If outside temperature is below 37 F, heat pumps need to use electric resistance head coils inside the furnace to keep house warm
  • Federal regulations require a refrigerant that can be more difficult to use
  • CLICK HERE to subscribe to Tim's FREE & FUNNY Newsletter

Related Links

Heat Pump Facts

Return Air Ducts Key to Comfort

DEAR TIM: I am going to have a heat pump installed in my home. Can these systems really heat a house in cold weather? How does a heat pump work?

I'm confused about the energy efficiency ratings. Are some heat pumps more efficient than others?

Will I save money in the long run by buying the most efficient unit? Is it true that the refrigerant Freon-22 has been outlawed? Dennis S., Oregon City, OR

CLICK HERE to get FREE & FAST BIDS from heat pump technicians in your city or town.

DEAR DENNIS: Believe it or not there is heat in cool and cold air. Heat pumps can extract this warmth and inject it into your home. They achieve this by doing the same thing air conditioners do only backwards!

In hot weather air conditioners, using the magic of special refrigerant chemicals, take heat from the inside of your house and dispose of it outdoors. It only makes sense that the modified machines can do the exact opposite and pull heat from outdoor air and pump it into your home.

Do Heat Pumps Work Best at 50F?

Heat pumps work very efficiently when the outdoor temperature is in the 50 F range. As the outdoor temperature drops, the heat loss of a home is greater and the heat pump needs to operate for longer periods of time to maintain a constant indoor temperature.

Around 37 F many heat pumps reach what is called the balance point. At or near this temperature the heat pump needs to run constantly to produce enough heat to maintain a comfortable indoor temperature.

What Happens When The Temperature Drops?

As the outdoor temperature continues to drop, the heat pump needs help from traditional electric resistance heat coils. These coils resemble the glowing wires inside your toaster and consume vast amounts of electricity as they burn to keep you warm.

Your thermostat will most probably have a light that comes on when this happens. It is usually labeled as emergency or auxiliary heat.

If this light is on whenever your heat pump is working when the outdoor temperature is above 40 F, you should have a professional service your system.

CLICK HERE to get FREE & FAST BIDS from heat pump technicians in your city or town.

Do Heat Pumps Create Cold Heat?

Heat pumps have a reputation for producing what's called a cold heat. The air flowing from the air vents is around 90 F, and sometimes as low as 85 F.

This may seem warm or hot, but it's not when it's cold outdoors.

The temperature of the air coming out of floor registers that connect to a furnace burning natural gas, propane, or oil might be in excess of 110F if you're close to the furnace.

Are All Heat Pumps the Same Efficiency?

No, manufacturers can make heat pumps operate at different levels of efficiency. The more heat a system can produce or remove from a given amount of electricity, the more efficient it is.

A common measurement of this performance is the Seasonal Energy Efficiency Ratio (SEER).

What are the Newer Heat Pump SEER Regulations?

SEER numbers can vary widely if you compare old heat pumps to new ones. Heat pumps made and installed in the 1980's often had peak SEER numbers of 6.

Before the year 2015, the minimum SEER you can buy today was 13. Federal regulations are always changing and after January 1, 2015, the USA was divided into three regions:

  • North (green area in the map below)
  • South (red area in the map below)
  • Southwest (purple area in the map below)
how does a heat pump work

This map shows the three regions in the USA. Map is made possible by the Fair-Use portion of the US Copyright regulations and is courtesy of American Standard Heating and Cooling. CLICK the IMAGE to see the entire document.

CLICK HERE for a .pdf file created by the Air Conditioning, Heating, and Refrigeration Institute that explains the requirements. Remember, the requirements can change all the time.

The highest SEER heat pumps made at present are a tad over SEER 16. Any heat pump that has a SEER rating above 14 is very high efficiency.

Can SEER Numbers Be Misleading?

The SEER numbers are a little misleading. They actually are a measurement of the efficiency of the heat pump when it is in the cooling or air conditioning mode.

If you live in a warm or hot climate, it might make great sense to purchase a heat pump with a high SEER value. People who live in cool or cold climates may not get a payback for the extra money they spend for a high-value SEER heat pump.

What's more, those who have high electricity costs will save more than those who have access to inexpensive electricity. It can be confusing, to say the least.

For example, if your house needs a 3-ton heat pump, your average electric rate is $.0867 per kilowatt-hour, and you live in New England, you might only save $36 per year in cooling costs when you upgrade from a SEER 10 to a SEER 13 heat pump. Your overall savings when you heat and cool for an entire year might only be $189. A person who lives in south Florida who has the exact same system and utility rates could possibly save $173 per year in cooling costs and an overall annual savings of $215 by upgrading from a SEER 10 to 13. Professional heating and cooling contractors can help you estimate savings for your area.

Why is Freon-22 No Longer Available?

The Environmental Protection Agency, in accordance with the Montreal Protocol, is obligated to phase out over a period of years hydrochloroflourocarbon (HCFC) refrigerants used in heat pump and air conditioning systems.

Most residential systems years ago used a refrigerant called Freon-22 that happens to be in this group. Back in January 2004, contractors had to scale back the use of Freon-22. In 2020, Freon-22 will not be permitted to be imported nor manufactured in the USA.

Do New Refrigerants Operate at Higher Pressures?

The issue with the new refrigerant for you is that it requires much higher operating pressures within the heat pumps. This means the tiniest leak can turn into major problems.

The new regulations also created huge issues for contractors and technicians because they needed new meters, test equipment, etc. to work with the newly mandated refrigerants. But at the same time, they had to keep all old equipment to work on units with Freon-22.

Who Pays the Cost For The New Regulations?

This is but one example of how government regulations put a hidden tax on you. The contractors raise their prices to cover the huge investment they have to make in all the new equipment.

I say this so you understand that there are often secondary unintended consequences to what appear to be wonderful regulations. In the end, you and I pay for all of this. It's always passed through to the consumer.

If you still own one of the last Freon-22 heat pumps, you may have to pay a king's ransom to get your heat pumps filled with refrigerant if a leak develops.

If you’re interested in learning more about heat pump replacement cost I have an article here.

If you want the best heat, and this is my opinion, you want to have radiant floor heat. Once you've been in a home that has radiant floor heat, you'll never want a heat pump.

In the March 7, 2021 AsktheBuilder Newsletter, Wayne emailed asking about replacing or installation a new heating system. This popular column provided the information he needed.


CLICK HERE to get FREE & FAST BIDS from heat pump technicians in your city or town.

Column 294

Drilling Into Stucco

Drilling Into Stucco TIPS

DEAR TIM: My home is made from stucco and I would really like to hang some decorative art objects on the exterior walls. I am having big problems trying to figure out to drill holes into the stucco so as not to damage it. Is it safe to drill into the stucco? Will it cause leaks that can lead to mold? Kristine N., Victorville, CA

DEAR KRISTINA: I think your idea is a splendid one and often wonder why more people don't hang things on their houses. I can understand why someone would not want to drill a hole into a brick or into a decorative stone, but even these things can be cleverly patched with a moderate amount of skill.

As soon as you get the tool and a few inexpensive pieces of hardware you need, your house is going to be the best looking on the street. You will have those pieces of art securely fastened in no time.

CLICK HERE to get FREE & FAST BIDS from local handymen that can drill your stucco for you.

Hard or Soft Stucco?

The first thing you need to determine is the type of stucco you have on your home. Over the past 20 years, a synthetic stucco has been used that too many homeowners think is traditional cement-based stucco. The synthetic stucco is called Exterior Insulation Finishing System or EIFS for short. Most of these systems consist of factory-made acrylic-based products that are applied out of buckets. They are often applied over a layer of foam insulation.

EIFS is Soft

You can tell if your home is made from EIFS in most cases if it looks like the material you see above shops and stores at outdoor malls. Have you seen the colored stucco at these places? Often it's extended down lower where you can touch and feel it. If you tap on it with your fist, it feels a little hollow. Try that at your own home.

Traditional cement stucco plaster is just that. It is a mixture of sand, Portland cement and sometimes some hydrated lime. Once dry, it is as hard as rock because it is actually man-made rock. Cement stucco is much harder than EIFS and it rarely is applied over insulating foam. Cement stucco is typically applied over regular wall sheathing that is covered with tar paper or some other water barrier which is covered with a wire mesh to give the cement stucco great strength.

Cement Stucco NOT Hollow

If you tap or hit cement stucco with your hand, it will NOT FEEL hollow! In fact, don't hit it too hard or you may injure your hand!

If your home is covered with EIFS, you must contact the manufacturer of the system to get their explicit written instructions as to how to drill and seal the hole. If you do not perform each step as outlined, you can void the warranty on the EIFS system. This is very important as many of the EIFS manufacturers have been involved in mold-related cases that stem from water getting into and behind these exterior skins.

Hammer Drill

Traditional cement stucco is easy to work with and drilling into it is simple if you have the right tool. I have successfully used a hammer drill with a 1/4 inch bit to drill holes into stucco. Hammer drills can be rented at tool rental businesses, but you'll be very smart to invest in a great one now. You'll use it for many future projects. Here's a cordless hammer drill that I own and LOVE:

Bosch Cordless Drill

I own this hammer drill and it's a top performer. The lithium-ion batteries provide all sorts of power. CLICK THE IMAGE to BUY IT NOW.

CLICK HERE to get FREE & FAST BIDS from local handymen that can drill your stucco for you.

Remove Dust

Once the hole is drilled, carefully blow out any dust. Use a turkey baster or compressed air to do this, not your mouth as dust may shoot back and get in your eyes. Once the hole is dust-free, squirt a small amount of acrylic caulk into the hole. Then insert a plastic anchor and tap it snugly into the hole.

If you don't own a kit with different anchors, fasteners and masonry drill bits, you should consider getting one. They're fairly inexpensive and they'll save you repeated trips to a hardware store or home center to get one or two small parts. Here's a dandy one:

 Anchor kit drill bits anchors screws

An anchor kit with bits can save you VAST amounts of time driving to a hardware store. CLICK THE IMAGE to BUY THIS ONE NOW.

Stainless Steel = NO RUST

I would then use a stainless steel screw instead of the ones that came with the anchor kit. The hardware store should have stainless steel screws that are the exact same size as the ones in the kit. Stainless steel will not rust over time.

Cement Stucco STRONG

Cement stucco will support a tremendous amount of weight because you are basically drilling into rock. But if you are hanging heavy objects on an EIFS system, you may run into problems. The thin acrylic skin is not structural nor is the foam beneath it. You may think your art work is fine, but over time the anchor holes can enlarge and water may get into the walls. Be very careful hanging any objects on an EIFS system.

Drilling into cement stucco with a hammer drill is like using a regular wood bit and drilling into balsa wood. A hammer drill acts like a miniature jack hammer and pounds the hard surface as the drill bit spins. Even with this seemingly destructive action, the hole that is drilled is extremely precise.

Always make sure you drill only as deep as necessary. Pay attention to the length of the anchor and screw and only drill 1/8 inch deeper than the screw is long. Be very careful around areas where you think electric wires or water lines might be present.

CLICK HERE to get FREE & FAST BIDS from local handymen that can drill your stucco for you.

Column 534

Tankless Water Heater

 tankless water heater

Tankless Water Heater | Inside this box is a tankless water heater. The other mystery is how long will it take for you to recapture the extra initial cost! © 2017 Tim Carter

Tankless Water Heater TIPS

DEAR TIM: I wonder if a tankless water heater is the best thing for a new vacation home I am building in Michigan. Does a tankless hot water heater makes sense since the house will be vacant from November 1 to April 1 and occupied on a random basis the remainder of the time? For the seven months where we will be there from time to time, it seems that turning down a regular heater will waste energy. What would you install if this were your vacation home? Bob S., Amberley Village, OH

Author's Note: This is the second column I've written on this topic. I URGE YOU TO CLICK HERE and read my first column as well. It contains MUCH MORE information and several homeowner stories sent to me from people who have NOT SAVED MONEY using tankless water heaters. In fact, they spend MORE MONEY each month on fuel.

DEAR BOB: Each time I discuss tankless water heaters certain people get really hot. It is one of those topics that seems to polarize people, and I have come to realize that many consumers don't stop and ask all of the right questions before they get out their credit cards or checkbooks. It is impossible in this limited space to fully discuss the topic.

CLICK HERE to get FREE & FAST BIDS from local plumbers who can install water heaters.

To answer your questions, I am going to stick to some basic facts. I gathered them from my own utility bill, tankless water heater manufacturers and websites that sell additional installation parts. I also am adding a pinch of high-school math. Let's state as many facts as the space will allow, and then start a discussion.

Tankless Heaters Expensive!

A tankless water heater can cost up to three times a traditional storage-tank water heater. Some tankless water heaters that use natural gas or propane require expensive stainless-steel exhaust-venting pipes.

The gas lines feeding the heaters need to be larger than a traditional water heater. This is not a challenge in new work like yours, but can add considerable expense in an existing home where the fuel lines might need to be redone.

More Energy Efficient, But...

Tankless water heaters are more energy efficient than traditional storage-tank heaters. A traditional storage-tank water heater might be 60-percent efficient while a newer tankless heater often can produce efficiencies of 80 percent or slightly higher.

I studied a past utility bill and discovered I spent about $36.00 on hot water using a traditional storage-tank heater for a family of five that was sometimes taking two showers a day after sweating to death doing outdoor work and activities.

This means I spent $1.16 per day to heat and store my water. My winter hot-water costs could be expected to be slightly more, since the temperature of the incoming water is colder and must be heated longer to get to the desired temperature.

CLICK HERE to get FREE & FAST BIDS from local plumbers who can install water heaters.

We use our water heater every day. You will be using your water heater for maybe 40 - 50 days a year.

Let's do the math.

If I were to switch to a tankless heater today, I might save $7.00 per month on the efficiency differential and maybe an additional $2.00 per month on the amount of energy lost while the heated water sits in the tank. This means a tankless water heater could save me $108.00 per year. Let's go ahead and be even more aggressive and say $125.00 per year.

Installation Cost is HIGH

I did a calculation and discovered that if my existing water heater failed today and I replaced it with a tankless water heater sized for my family needs, I would have to spend an extra $1,550.00 to install the new tankless heater. Not only is the heater much more expensive than a standard storage-tank heater, I need to do all sorts of extra work installing a larger gas line and vent modifications to make the new heater work. This could easily cost an extra $1,000.

Many Years for ROI

Using the most basic math, it would take me nearly 12 and one-half years just to break even. Remember, if you have to spend extra money on anything to save money, the savings part of the equation does not kick in until such time as you get the extra money back plus any lost interest or investment equity you would have made had you not spent the extra money. I did not include lost-interest income in my payback example above. Had I, the payback period would have been longer.

IMPORTANT: The bottom line in your case is that the economics are far worse. It could take you 30 years or more to break even, since the tankless water heater would sit idle in your vacation home for so many days each year. Tankless water heaters must work very hard each and every day of the year for them to make economic sense for many people.

Vacation Mode

When your vacation house is shut down for the winter, you are going to drain the heater and plumbing lines in case the furnace fails. You use no energy in those months. When you do occupy the house, turn the heater off when you leave to go back to your primary home. Do not use the "Vacation" setback thermostat setting. When you arrive back at the vacation house for each visit, turn the heater back on as soon as you walk in the door. Within 90 minutes or less at least you will have lukewarm water.

Great Machines

Tankless water heaters are marvelous machines if you want an unlimited supply of hot water. They do a splendid job of that and can provide lots of hot water if there is not a drastic difference between the cooler incoming water and the outgoing hot water. If you have a heated-water temperature of 110F and the incoming water is 75F, then some tankless heaters can produce 8.5 gallons per minute of hot water. But if that same heater has incoming water of 45F like I do in January, then you can only get about 5 gallons of hot water per minute.

IMPORTANT TIP: Beware of buying a tankless water heater just to save money. I have received emails from people who spend more each month on both water and fuel. Some people end up using far more hot water than usual once they discover there is an endless supply. CLICK HERE to read some of the emails.

CLICK HERE to get FREE & FAST BIDS from plumbers in your city or town to install a tankless water heater.

Column 710

January 10, 2017 AsktheBuilder Newsletter

Once again, there's lots to share. I'm having a BLAST going back and revising all of my past columns at the AsktheBuilder.com website. More on that in a moment.

My oldest daughter Meghan, and her husband Brent, bought me an Amazon Echo Dot for Christmas. I LOVE IT. It's just a little bigger than a hockey puck. Here's a photo of one:

The dot is your invisible companion that can settle arguments, tell you weather forecast, play music for you, etc. I often use it when we talk about something at the dinner table and two people can't agree. Here's an example.

My son and I wondered if we could get great barbecue in Austin, Texas. He and I are in the early stages of planning a one-week BBQ road trip. So I asked Alexa, "Alexa, can you get good barbecue in Austin, TX?"

She came back with a list of top-rated locations!

CLICK HERE to for a partial list of all the Amazon Echo Dot can do.

We use it downstairs in the giant family room because I have the larger Alexa up in my man cave.

I'm still discovering all the helpful things it can do. For example, I just used it to set an important timer for an upcoming conference call.

I said, "Alexa, set a timer for one hour and six minutes." She responded very politely that the timer had indeed been set.

Some people don't like this technology. You may be one. All I can tell you is that voice recognition is the future and it's a time saver.

You can almost always *talk* faster than you can type or manually set something. Just about every text message I send I do so using voice recognition. I don't *type* all the letters and words. Sometimes you get funny results and I do send those for a laugh.

Meghan and Brent control the temperature in their house with their Alexa. They also control the lights. Instead of walking over to a dimmer switch, Meghan just says, "Alexa, set the kitchen lights at 30 percent."

If you have someone you know that LOVES technology and you're looking for a great gift, consider the Amazon Alexa or the Echo Dot.

Dresser Danger and Toddlers

Did you see the video that went viral a few days ago about the two twin boys who decided to go mountain climbing in their bedroom? Bob Tingler, a good friend and subscriber to this newsletter, asked me to share it with you.

CLICK HERE to watch the video and discover HOW to PREVENT this from happening.

I decided to write out clear step-by-step instructions on how to keep kids like this from getting killed.

In this instance, the one boy kicked the Grim Reaper to the curb. But sadly, other toddlers have died when this happens.

If you have toddler grandchildren, or are about to have some, PLEASE send the following link to your kids or anyone you know that has an infant or an adventurous toddler. Infants will SOON BE toddlers:

Send the following URL to anyone that needs this information. It could be a friend, a son or daughter, a local newspaper letter to the editor, etc. Do whatever you can to spread the word about how to bolt a dresser to the wall.

Dresser Falls on Twins BOLT to Wall

Thanks Bob for the reminder.

I NEED YOUR HELP!!!!

I'm in the final editing phase of my Roofing Ripoff book. Don't ask me how I overlooked this, but last year when I wrote most of it I FORGOT to ask you a few important questions!!!!

I NEED your input to really add some weight to things that are covered in the book.

If you've not yet taken my Asphalt Shingle WARRANTY Survey yet, please do. I just announced it on Sunday.

If you've already taken the survey in the past two days, do NOT take it again.

You should take the survey if you have an asphalt roof, or are planning to put a NEW ONE on this year.

If you take the survey, I'm going to send you a SPECIAL EMAIL when the book is ready. You'll be able to get a 20 percent discount on the .pdf version of the book.

CLICK HERE to take the SHORT survey. Thanks!

Latest REVISED Columns

I'm having a BLAST revising the columns and creating the helpful bullet-point lists.

If you're a new subscriber, I'm going back into my website and refreshing older content, revising it, and adding HELPFUL LINKS to save you time and money. Those columns that talk about the products I LOVE and USE will have DIRECT LINKS so you can get the products yourself.

For example, this morning I revised one I wrote, are you sitting down?, eighteen YEARS ago about tankless water heaters.

You should READ IT, especially the stories sent in by homeowners like you that bought a tankless heater only to be shocked at what happened!

CLICK HERE to read it.

I'm finding out that I'm revising columns faster than I thought. This means it might be a good idea for me to send out emails to you that just have SHORT LISTS of the columns I just did the day before.

If I just wait and save them up, then there may be too many for you to look at when I send out editions of the newsletter like this. I already have a big backlog. UGH!

I know that it's impossible to satisfy everyone, so let's try sending out short announcements and I'll monitor if I get too many complaints.

If it gets overwhelming SEND A REPLY TO ME and I'll make an adjustment. I don't want to stress you out, but I do want to SAVE you time and money!

I plan to make each Subject Line be a little different so you can save the emails if you don't have time to open each one. That may make it easier for you. See below.

It's a hard balance to strike with respect to keeping you informed, but not swamping you at the same time.

Here's a list of FIVE MORE revised columns you should really take a look at:

Light Bulbs Burn Out TOO FAST

STOP Water From Leaking Into Your Basement / Crawlspace

NASTY BioFilm in Your House!!! How to STOP It.

Ten SECRET Drywall Finishing TIPS

Modifying a Load Bearing Wall - SUPER IMPORTANT!

Okay, enough for today. WATCH for the SHORT Announcements about future revisions! I'll make this the Subject Line so you know:

AsktheBuilder.com (insert date) Column Revisions

Passez une bonne journée!

Tim Carter
Founder - AsktheBuilder.com

Do It Right, Not Over!