DIY Shed AsktheBuilder Shed Pier Anchor Position Video


Tim Carter uses a cardboard cutout to show how the wood 6 x 6 and the hold-down anchor must be aligned on top of the diy shed piers once they're poured.

For more DIY Shed building tips and information and the actual plans for the shed in this video, click the following links:

SHED PLANNING: https://www.askthebuilder.com/how-to-plan-a-shed

SHEDS for STORAGE: https://www.askthebuilder.com/storage-sheds

GARDEN SHEDS: https://www.askthebuilder.com/garden-sheds

SHED RAMPS: https://www.askthebuilder.com/shed-ramps/

ACTUAL SHED PLANS: http://go.askthebuilder.com/plans

April 5, 2016 AsktheBuilder Newsletter

It's a sunny morning here in NH, but COLD! Old Man Winter kicked Lady Spring to the curb for a bit. Yesterday, we had 3 inches of snow and it dropped down to 15 F overnight. BRRRRRRRRRR!

The sun is out now and in a few days I'll see the ground again. Oh, and the other good news is that we must have a mature male bald eagle nesting nearby. Each day I see this handsome majestic bird flying right over the shoreline at the lake as he hunts for his next meal.

I can see why the bald eagle was chosen as our national bird. It's truly stunning to see him in flight with his massive wingspan and gorgeous feathers.

This newsletter has got a TON of new information for you. Wait until you see all the links.

But I have some distressing news too. It happened on Sunday after I sent out the newsletter to you.

You'll see a short story about this below.

support askthebuilder
Unbelievable Sliding Doors

Last summer, I had the pleasure of installing two converging doors on a wall in my own basement. That's the type of doors you walk through when you get on and off most modern elevators.

I used the BEST hardware known to woman and man to do it. It's made in Indiana by the great employees at LE Johnson Hardware. I've never been to their factory, but boy would I love to shake the hands of some of the people who work there.

Get the images out of your mind about plain vanilla closet doors that slide. Think about dramatic doors that can showcase a current open arch between two rooms.

Take a look at this photo. Look at the crown molding shelf above the doors! The LE Johnson hardware is hidden behind it. How cool is that???!!!​​​​​​​

LE Johnson Sliding Doors

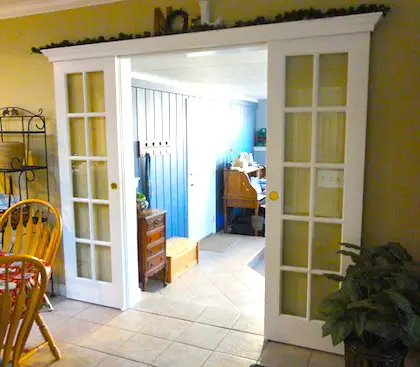
Years ago in old homes it was very common to have converging pocket doors that allowed you to close off one room from another.

If you have two rooms that are open to each other but separated with a wall with a wide or even narrow opening, you can install in an HOUR the hardware I put up. There's NO NEED to have a pocket!!!!

CLICK the following FIVE links and you'll be STUNNED by what you see. Let your imagination run wild and think about what you could do at your home.

CLICK to See a Secret Room

CLICK to see a Larger Set of Glass Doors

CLICK to see Bath Door Solution

CLICK to see CLEVER Attic Room Door

CLICK to see me Install the Hardware!

New Bath Remodel Videos

Are you doing a bath remodel soon? Well, I'm doing one now at my own home while trying to run my business.

Today after I send this email, I'll complete the hardest task of the entire job - breaking into the concrete slab to move the existing shower drain over about 14 inches.

I have to go VERY SLOWLY because there are plastic radiant heating pipes in the slab. If I puncture one, I'm TOAST.

Wait until you see how I found out WHERE the pipes are in the concrete!!!

Here are three more videos for you. We've taped many more, but they're not yet uploaded to YouTube. I expect to do that today and tomorrow.

You'll see on Friday the video showcasing the magic tool I used to ensure I don't poke a hole in my radiant heating pipes!

Wall Tile Removal - Part One
​​​​​​​
Wall Tile Removal - Part Two

Remove Shower Faucet Trim CAREFULLY!

AsktheBuilder Hall of Shame

Several hours after sending out the Sunday newsletter about the fun game, Vard emailed me.

Vard, a subscriber for years, blew his head gasket. I can only surmise he was having a bad day, or a string of them. He sent me a very ugly email.

I receive emails and comments similar to Vard's on a regular basis. I know that it's pointless to argue or respond to these folks. They have built their own "reality" with different building blocks than what you or I used as we've continued down life's path.

Vard's email was so passionate it produced one of those "Ah Hah!" moments in my head.

"Hmmmm, perhaps this can be as a powerful teaching tool. If many read this, maybe they'll think about being kinder and more polite."

Please visit this new page I've created and read my setup then read what Vard sent to me.

I'd sincerely appreciate it if you would take the time to leave a comment at the bottom of that page.

Each and every comment WILL BE PUBLISHED. I have to manually approve all comments on my website, so after you click submit, it may take a few hours for me to approve it.

If you feel like Vard does, that's fine. If you feel the opposite of Vard, let me know.

Let's see how the Court of Public Opinion rules in this case.

CLICK HERE to visit the new Hall of Shame.

That's enough for today. I've get to get downstairs to chip away at the concrete!

Tim Carter
Founder - www.AsktheBuilder.com

Do It Right, Not Over!

DIY Shed AsktheBuilder Pier Digging Complete Video


Tim Carter shows what happens when you use an excavator to dig pier holes for a DIY shed.

For more DIY Shed building tips and information and the actual plans for the shed in this video, click the following links:

SHED PLANNING: https://www.askthebuilder.com/how-to-plan-a-shed

SHEDS for STORAGE: https://www.askthebuilder.com/storage-sheds

GARDEN SHEDS: https://www.askthebuilder.com/garden-sheds

SHED RAMPS: https://www.askthebuilder.com/shed-ramps/

ACTUAL SHED PLANS: http://go.askthebuilder.com/plans

DIY Shed AsktheBuilder Shed Pier Digging Tips Video


Tim Carter talks about how big to dig the hole to place and position a pier for a DIY shed.

For more DIY Shed building tips and information and the actual plans for the shed in this video, click the following links:

SHED PLANNING: https://www.askthebuilder.com/how-to-plan-a-shed

SHEDS for STORAGE: https://www.askthebuilder.com/storage-sheds

GARDEN SHEDS: https://www.askthebuilder.com/garden-sheds

SHED RAMPS: https://www.askthebuilder.com/shed-ramps/

ACTUAL SHED PLANS: http://go.askthebuilder.com/plans

DIY Shed AsktheBuilder Shed Pier Spacing Video


Tim Carter demonstrates how to create the correct spacing for piers for a DIY shed. You have to keep in mind where the floor joists will be so you don't put a pier under a joist.

For more DIY Shed building tips and information and the actual plans for the shed in this video, click the following links:

SHED PLANNING: https://www.askthebuilder.com/how-to-plan-a-shed

SHEDS for STORAGE: https://www.askthebuilder.com/storage-sheds

GARDEN SHEDS: https://www.askthebuilder.com/garden-sheds

SHED RAMPS: https://www.askthebuilder.com/shed-ramps/

ACTUAL SHED PLANS: http://go.askthebuilder.com/plans

DIY Shed AsktheBuilder Shed Pier Foundation Video


Tim Carter demonstrates how to place the concrete piers for his DIY shed.

You have to take into consideration how the posts and hold-down anchors will rest on top of the pier. Both must have solid bearing and not be at the edge of the concrete.

For more DIY Shed building tips and information and the actual plans for the shed in this video, click the following links:

SHED PLANNING: https://www.askthebuilder.com/how-to-plan-a-shed

SHEDS for STORAGE: https://www.askthebuilder.com/storage-sheds

GARDEN SHEDS: https://www.askthebuilder.com/garden-sheds

SHED RAMPS: https://www.askthebuilder.com/shed-ramps/

ACTUAL SHED PLANS: http://go.askthebuilder.com/plans

DIY Shed AsktheBuilder Shed Foundation Layout Video

Shed Foundation Layout Video


Tim Carter demonstrates how to layout a foundation for a DIY shed. The outer dimensions of this shed will be exactly 16 feet wide and 24 feet deep.
For more DIY Shed building tips and information and the actual plans for the shed in this video, click the following links:

SHED PLANNING: https://www.askthebuilder.com/how-to-plan-a-shed

SHEDS for STORAGE: https://www.askthebuilder.com/storage-sheds

GARDEN SHEDS: https://www.askthebuilder.com/garden-sheds

SHED RAMPS: https://www.askthebuilder.com/shed-ramps/

ACTUAL SHED PLANS: http://go.askthebuilder.com/plans

DIY Shed AsktheBuilder Laser Sensor Video


Tim Carter demonstrates how a laser level sensor works while trying to get ground level for the shed building.

For more DIY Shed building tips and information and the actual plans for the shed in this video, click the following links:

SHED PLANNING: https://www.askthebuilder.com/how-to-plan-a-shed

SHEDS for STORAGE: https://www.askthebuilder.com/storage-sheds

GARDEN SHEDS: https://www.askthebuilder.com/garden-sheds

SHED RAMPS: https://www.askthebuilder.com/shed-ramps/

ACTUAL SHED PLANS: http://go.askthebuilder.com/plans


Bath Remodel Remove Mud Shower Pan

DEAR TIM: I’ve decided to do a major bathroom remodel job. One of the things that needs to be demolished is a full ceramic tile shower with a seat and a concrete mud floor. I’m feeling pretty good about removing the tile from the walls and ceiling, but I don’t know the best way to remove the tile floor and the concrete mud floor. Have you ever done this before? What’s been your weapon of choice? What tips can you offer to minimize the pain both to my body, the family and our possessions? Mark P., Tampa, FL

DEAR MARK: I’ve walked the walk. You’re about to undertake a nasty job that few look forward to. The good news is that if it’s a standard-sized shower, then you’ve only got about 10 square feet of misery to face.

I’ve demolished my fair share of these mud shower pans over the years. The most recent job I did involves one where a negligent builder and tile setter installed a full tile shower over a concrete basement floor with no waterproof membrane whatsoever. This shower also had a seat in it and the water flowing over the seat entered hairline cracks under the front lip of the seat and leaked causing all sorts of wood rot and mold.

Use a handy power tool like this hammer drill / chisel and your mud shower pan floor will soon be chunks of rubble. Photo Credit: Tim Carter

Use a handy power tool like this hammer drill / chisel and your mud shower pan floor will soon be chunks of rubble. Photo Credit: Tim Carter

If your new bathroom is going to have a new tile shower, realize that the tile needs to be place over a waterproof membrane or prefabricated shower-base system that directs all water that leaks under the tile back into the shower floor drain just as a hard china or stainless steel sink works in a bathroom or kitchen.

Don’t ever allow a contractor tell you that caulking used in conjunction with cement board or water-resistant gypsum board is sufficient to prevent leaks. There is no substitute for a waterproof membrane under the mud floor or shower seat upon which you lay the tile.

To remove your current mud floor here’s a partial list of what you may, or will, need:

  • four-pound hammer
  • assorted pointed masonry chisels
  • work gloves, goggles, dust mask and hearing protection
  • powered rotary hammer / chisel tool
  • hand-pump garden sprayer

Years ago, I removed the first mud pans of my career by hand. It was mind-numbing work that was brutal. Fortunately, power tool manufacturers created tools that resemble miniature jack hammers you see road contractors use to break apart concrete slabs.

These power tools can be rented and they’ll transform the mud shower pan to small baseball-sized pieces of rubble in minutes. I prefer to use a pointed bit to start the job.

The job goes fast if you have at least one side of the shower pan exposed. In almost all cases this is not the case as you’ll discover the shower pan is boxed in by three walls and a stubby curb. If you can figure out a way to remove the curb you step over to get into the shower, the demolition of the mud floor will proceed much faster.

When you have at least on side of the mud floor exposed, start to chip about 1.5 inches away from the edge. The mud and tile will now have a place to move to. As the pounding bit drives down into the concrete slab, it pushes the chunk of concrete out to the side. If the mud pan is locked in on all four sides you can see that this movement can’t happen.

If you can’t open one or more sides, then you should start to create a hole near the shower drain. Use the garden sprayer to keep the work area wet to keep the dust to a minimum. Plug the drain hole of the shower with a rag so no cement sludge or bits of tile or concrete get into the drain system.

Once you create the hole, then you can use the same procedure as described above where you place the tool bit near the edge of the hole trying to break off small chunks with them breaking off towards the hole. When the hole gets to be about one foot in diameter, you’ll notice the work will proceed at a much faster rate.

Be very careful when first operating the power tool or even when using a hammer and chisel. When you strike ceramic tile hard, it almost always shatters and small pieces of sharp tile go flying. I’ve been cut more than once by these very sharp shards of tile. This is why safety glasses are a must and goggles are even better. A trip to the emergency room to remove a piece of tile from your eye could easily cost you over $1,000.

Don’t underestimate the ability of dust to travel through your home. This fine dust can harm people, animals and your possessions. If you can enlist a helper to keep spraying water as you work with the other tools, that’s best.

Be sure to put down drop cloths to protect nearby floors from the small pieces of grit that get produced by all this mayhem. To help motivate you, realize that jobs like this not only build muscle, they build vast amounts of character and bragging rights at the next neighborhood BBQ or party.

I think there’s even a t-shirt you can order from CafeExpress online: I Survived the Demolition of the Mud Shower Pan! If not, maybe you need to start selling them.

Column 1138