Advantech Flooring Tips Video

Advantech Flooring Tips

Hi, I'm Tim Carter and I'm out here on a jobsite in a light rain. Look at this. The carpenters are putting down the subfloor. This is an OSB product called AdvanTech.

The claim to fame for this particular product deals with swelling. In the past when I installed OSB, it could swell if it got wet and it won't come back down to its original shape. But this product will be as smooth as the day it was installed.

Even with a quarter-inch of water standing on it, if we came back tomorrow, it would still be flat. No swelling, no nothing. Really neat. So if you are going to do an OSB subfloor system, be sure you use a product like this.

Foundation On Bedrock Video

Hi, I’m Tim Carter from AsktheBuilder.com and we’re at a new construction site here in New Hampshire. I want to show you something interesting about how they dug the hole for the foundation and how they got it ready to pour the footer.

There is solid bedrock at the bottom of the hole. They used a machine that blasted through the rock like a giant jackhammer. They dug the hole a little lower then they needed and here’s what they did.

The footer they poured is about 10-inches high. It looks like it is poured on a very thin layer of sand. However, this is really a layer of coarse rock, about 2-inches in diameter and very angular. This was compacted and leveled to provide a flat surface to pour the footer. The footer is not poured directly on to bedrock. The bedrock would be to irregular for the footer.

This is one way to prepare the foundation hole to pour the footer on top of bedrock.

November 28, 2011 AsktheBuilder Newsletter And Tips

What's in This Newsletter?

Latest News
Hand-Powered Sanding Trick
Wet-Dry Vac Follow Up Tips
Flash Checklist Sale!
Dangerous Backdrafting Issues
Help Stop a Monopoly
Facebook News

Yes, I know I just emailed you yesterday. But today is the infamous Cyber Monday!I don't want to be outdone by all those other websites, especially since you and I are friends.

I want you to be able to save some sweet moola with me that you can then use it to buy some other gifts!

Before we get to the unbelievable offer, here are a few tips:


Hand-Powered Sanding Trick

Keith Elder emailed me after the last newsletter was sent. He said:

"Just thought I would share a little discovery with you.  When you have those tiny areas which need sanding, instead of folding sandpaper, go to the dollar store and buy a batch of emery boards. You find them in the nail polish section. They are basically sandpaper on a stick and work really well."

Great tip Keith! I'll add that to get in tight spots take a scissors and trim the emery board to an arrow point.


Wet-Dry Vac Follow Up Tips

Beverly Saltonstall wrote to me after seeing Bob's use of his wet-dry vac to clear his tub drain clog in the last issue:

"I liked your wet-dry vac trick.  Every now and again, I plug up my garbage disposal and it throws up!!!!  I get the handy shop vac out, suck everything out and it is working good as new again.  I have an old Craftsman 16 gal vac that has to be near 25 years old.  I empty my pond with it and use it for all kinds of stuff, and it is still chugging along.  Great stuff those old Craftsman products!"

I want to also add that be sure to stuff a wet rag tightly over the tub overflow as you put the hose of the vacuum on top of the drain to get maximum drain-clearing power.


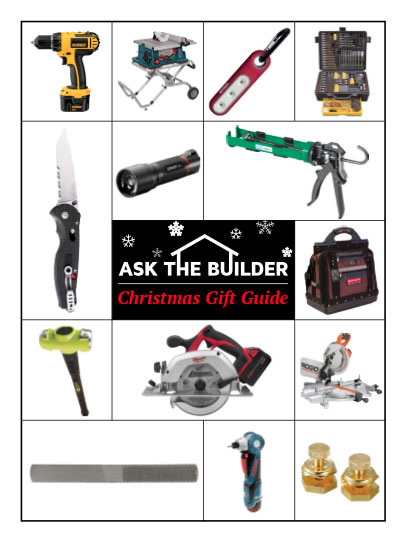
FLASH Checklist Sale!

Checklist SaleFor years, I've sold these great checklists that help you know the most important parts of a job. They really help you find a pro to do a job, or if you're a DIYr, going through the checklists HELPS YOU know where to really pay attention.

I've got about 31 of these bad boys from Interior Painting, to Bath Remodeling, Kitchen Remodeling, Room Additions, and even New Home Construction.

If you went and bought each one separately, you'd spend over $500. No lie. Do the math.

Just ONE checklist can save you hundreds of dollars in mistakes and immeasurable frustration and stress.

I do now sell them in bundles. For example, the Indoor Projects Bundle costs $61. The Outdoor Bundle costs over $80. Those two contain just a handful of ALL of the checklists.

Since it's Crazy Cyber Monday, you can have ALL of the checklists, even my WalkThrough Inspection Checklist for only $79.

That's insanity - on my part.

This deal expires when one of these two things happens:

Kathy finds out what I've done - she'll kill me. Fortunately she doesn't read my newsletter.

or

I'm still alive on Sunday December 4th at midnight Eastern Time and stop the sale.

If you're an old-time subscriber, you KNOW this is a crazy insane sale price.

You'll regret not taking advantage of it. I know that for a fact.


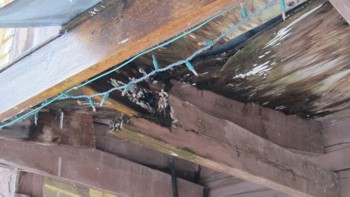
DANGEROUS Backdrafting Issues!

This is the time of year people die from carbon monoxide. If you did a kitchen remodel job recently and installed a powerful vent fan, be aware they can be deadly.

These fans can exhaust tremendous amount of air and they will get the replacement air from the source of least resistance.

That source could be the flue of your furnace, water heater, or other fuel-burning appliance. It could suck in exhaust gas into your house when those fuel-burning heaters are working!

Then there's the triple whammy. Imagine someone having the exhaust fan on high, another person is using the central vacuum and someone else is taking a shower using that exhaust fan. See the problem?

Read this past column of mine to see how to solve the problem. The link to the video about the same vent is right there in the column. Watch it!

If you want one of the cool vents I talk about in the column and video, I'll arrange with Jimmy to get you one. Who's Jimmy? He's the inventor! REPLY to this newsletter email and put "Jimmy" in the subject line. I'll hook you up.


Help STOP a Monopoly - READ THIS!

If you're a seasoned subscriber, you know where I stand with increased government in my life and yours. Grrrrrrr.

Here's a very important factoid: Since the 4th quarter of 2007, there has been only ONE reported incident of a table saw blade contact with the already existing improved saw blade guards. One incident!

It's a long story, but a clever man has pretty much cornered the market on table saw safety. He's lobbying HARD with the Consumer Product Safety Commission to have a new regulation passed that will drastically increase the cost of any table saw.

I'm VERY MUCH against this regulation for many reasons. The bottom line is the tool industry can, and has done, an excellent job of increasing tool safety.

Go to the Power Tool Institute website and read much of the information on the home page. I HOPE it motivates you to Send a Comment to the CPSC while you're there. You'll see the handy buttons to send a comment.


Facebook News!

AsktheBuilder on FacebookDo you use Facebook? I've got a Facebook Fan Page that really sees some action during the week.

We have lots of fun there each week. Go look for yourself..

Please go there now and LIKE me so you can start to get FREE tips from me when you login to your Facebook page.

Water Damage Tips

DEAR TIM: I was at a party this weekend and of all the crazy things to talk about, a discussion started about what's the biggest danger to a house falling down. Wind, poor soil, bad foundation, poor construction, ultraviolet light, etc. were all debated heavily. I so wish you would have been there to settle the debate. What, in your opinion, is the biggest danger to a house? Can you give examples and then offer solutions? Mike C., Bar Harbor, ME

DEAR MIKE: The answer was right there in front of all of you! After all, you live immediately adjacent to the ocean there in Bar Harbor! Had I been invited to the party, and mind you I would have driven from New Hampshire to get there, I would have done my best to convince the crowd it's just one thing: water.

This house is succumbing to the methodical attack by rain water. The water will win in the end unless the wood surfaces are maintained. PHOTO CREDIT:  Tim Carter

This house is succumbing to the methodical attack by rain water. The water will win in the end unless the wood surfaces are maintained. PHOTO CREDIT: Tim Carter

If houses could talk, and in a way they do when they finally collapse, they'd be screeching like the Wicked Witch of the West did when doused with water at the end of the L. Frank Baum's children's book The Wonderful Wizard of Oz.

I realize we can't go back in time and talk with the builders thousands of years ago, but the circumstantial evidence they left for us all around us screams that they knew that the strongest building material is stone. Look at all the great buildings that are still standing after thousands of years. They have one thing in common - stone.

And granite is perhaps the most durable of all. These wise builders knew that water quickly caused wood to rot. They realized that if they wanted to build something that might last thousands of years, they had to use stone.

But even stone is not immune to destruction by both wind and water. All you have to do is visit the Grand Canyon to see what ever patient water can do when combined with gravity. Look at how wind and water are eroding the great Sphinx.

Here in the USA, we still build primarily with wood because it's very cheap when you consider the other options. But the wood we use today in no way resembles the wood taken from the forests 200 years ago. Many of the old growth trees that were felled by our ancestors had much tighter growth rings. In these trees, the summer wood that's much denser and far more resistant to rot made up a much larger percentage of the wood in the tree than the framing lumber you and I can purchase at a lumber yard.

When water saturates wood, it's the fuel to start wood rot. If allowed to continue, as you see happen in abandoned homes or ones that are occupied and neglected, the house, or parts of it, will collapse.

Water will blast apart masonry chimneys over time, it will do the same with rock foundations, and it absolutely will conquer poured concrete given enough time. Add in some freezing weather to this recipe, and the destruction of brick, concrete, stone, etc. is accelerated from the expansion of the water that seeps into micro cracks and then freezes.

Water will attack and corrode steel or iron in a house. Think of how steel is used to support primary structural elements in a home and how thousands of uncoated steel nails are used to connect critical pieces of wood framing. Water laughs at the thin electro-galvanized coating on certain nails used in residential construction. In just decades, it can wear through this and attack the steel core. This is why double hot-dipped galvanized nails are better, and stainless steel fasteners are the best.

Look back at the builders of old and you'll discover they knew all of this. They used simple felt paper to cover the wood framing of houses to keep them dry. The masons of old knew to use mortars that contained lots of hydrated lime in them, as this material would work over time to actually heal tiny hairline cracks in the mortar where water would try to enter.

The roofers of old knew to use 40-pound tin coated steel or copper for roof flashings. These materials could last well over one hundred years and could be soldered to prevent water from touching the wood. These same roofers knew that using stone as a roofing material, slate, would help slow down water's relentless attacks.

The sad thing is that much of the hard-earned knowledge of the older builders is being lost. All of their knowledge can be found in many older homes. You just have to look for it.

You'll see they knew all about stone, slate, copper flashings, heavy felt paper, etc. They also figured out that generous roof overhangs would help keep water away from houses just as we use an umbrella in a rain shower.

The older builders also knew all about the surface tension of water. Who would think that would be something you'd have to worry about? But that's why masonry and wood window sills had a kerf channel cut into them on the front edge of the underside of the sill. This channel causes the water to stop and turn into a droplet that falls to the ground instead of clawing its way under the sill towards the wall face.

I feel there's an abundant amount of evidence that proves that water is the primary foe of a house, and that the long lost builders knew it and tried their best to educate us.

Severe wood rot has decimated the roof rafter and the plywood roof sheathing. You can see the white wood fungus growing on the underside of the plywood.

Severe wood rot has decimated the roof rafter and the plywood roof sheathing. You can see the white wood fungus growing on the underside of the plywood.

Wood rot is causing the center portion of the house to collapse and pull away from the left section. This is what's causing the giant opening just below the roof overhang.

Wood rot is causing the center portion of the house to collapse and pull away from the left section. This is what's causing the giant opening just below the roof overhang.

Column 911

November 27, 2011 AsktheBuilder Newsletter And Tips

What's in This Newsletter?

Latest News
Need Help - Old Floor Joist
Wet-Dry Vacuum Trick
Meghan's Gift Guide
Replacing a Window With a French Door
Facebook News

The race is on now that Thanksgiving here in the USA is behind us. It's now less than a month until Christmas. Yesterday I put up some of our outdoor Christmas lights, battling the burned out LED bulbs. Each year I have visions of me starting a company that makes high-quality strands of outdoor lights that work each time you plug them in. But I digress.

My Christmas Gift Guide has now been out a little over two weeks. Thousands of copies have been viewed and downloaded. I thank you for that if you've done so.

But I wanted to just let you know that you using my Gift Guide really helps me. Your support by using the Gift Guide to shop at Amazon.com allows me to continue to offer the thousands of columns and hundreds of videos at AsktheBuilder.com and this newsletter at no cost.

I'm trying my best to expand AsktheBuilder.com in an effort to give you more of what you want and need. I know you need hundreds more videos. I know you need many new tool and product reviews. I know you need more answers, as I get your emails each day.

But to do all that work requires more resources. You can help by just downloading my Christmas Gift Guide and using it to shop. Simply add items to your shopping cart and check out days or a week from now. Thanks very much!


Need Help - Old Floor Joist

I was having a discussion the other day with my kids about how the framing lumber used today is so much different than that used 125 years ago.

The discussion centered around the second house my wife and I owned. I added a full bathroom in a tiny room next to the master bedroom. Part of the job required me to cut off the tail end of a floor joist revealing the growth rings of the tree.

I want to tape a video of this, but that end cut is long gone. Are you a remodeler, know one, married to one, related to one, etc.?

If you come across an old floor joist in a building built just before 1900 or so, can you cut off a 6-inch long piece and send it to me?

Reply back to this email if you can help.  I'll absolutely credit you in the video.

When you see this video and discover what's in it, you'll not believe your eyes.


Wet-Dry Vacuum Trick

There are hundreds of things you can clean using a wet-dry vacuum.  I'm sure you can add to it.

But my good friend Bob from New York sent me an email a week ago telling me how his vacuum saved an expensive call to a plumber.

"I did something that worked unexpectedly and thought I would share it with you.

At home or at a rental unit when I am tackling a clogged drain or just doing preventive maintenance on a drain, I usually use one of those "Zip-it" plastic things first.  They work very well and you don't end up having to use chemicals.

The drain in our home bathtub has been sluggish and the Zip-it did not make things better.

This tub is the one our guests use and with all the exchange students staying with us over the years there must have been a lot of long hair building up in there.

Yesterday, I was using a shop vac to clean up around the fireplace and then gobble up dog hair under furniture.  As I was headed back towards the garage to put it away, I got the idea to put the hose on the bathtub drain.

It was absolutely amazing how much hair got pulled up to the back of the drain guard by the vacuum cleaner.  There was also some septic vapor that came back and I made sure to flush the toilet and run the water in the tub and sinks on the same line so that the traps would be full of water again.

So ... I just wanted to share that story with you. I can't imagine that I'm the first person to do this, but I never heard of trying this before.  Obviously you should not do this if chemicals have been used recently."

Meghan's Gift Guide

Meghan's Gift GuideAre you in need of gift ideas that are not tool related? If so, I believe you'll love my daughter Meghan's gift guide.

It's got 300 suggestions that will fit everyone's budget. This guide has gifts for people of all ages.

It's going to WOW you when you visit it. There's no need to download it, as you can just view it at her website as if you were flipping through a catalog. Once you're there, just click the "Expand" button to make it work.

Click here to get access to this FREE Holiday Gift Guide.


Replacing a Window With a French Door

Susan C. from York, PA wrote:

"I'm having a window at my home taken out of the front room and replaced with a french door. The size of the opening will not change. Do I need additional support because of the lower wall that's being removed to make way for the door?"

Susan, great news for you! Nothing has to change structurally. The lower wall below the window is not involved with carrying the load of the structure above the current window.

Don't forget to watch my video about installing flashing for an exterior door.


Facebook News!

AsktheBuilder on FacebookDo you use Facebook? I've got a Facebook Fan Page that really sees some action during the week.

We have lots of fun there each week. Go look for yourself..

Please go there now and LIKE me so you can start to get FREE tips from me when you login to your Facebook page.

Wallpaper Tips and Tricks

DEAR TIM: My wife wants me to wallpaper a room. I've never done wallpapering before. I'm really worried that I'm going to mess it up. Can you give me the executive summary on some of the most important things to know before I start this intimidating job?

Is it possible to get professional results the first time out of the gate? What are the biggest mistakes you can make? Brad T., Richmond, VA

DEAR BRAD: First, I believe you can get excellent results even though you're a rookie. It's absolutely impossible in this tiny space for me to impart all the knowledge I've gained over the years hanging hundreds and hundreds of rolls of wallpaper. But I believe I can give you some tips that will help you succeed.

 wallpaper light fixture

The light fixture was taken off the wall before the wallpaper was installed. Don't try to cut around things like this. ©2017 Tim Carter

The first thing you need to do is prepare the room for wallpaper. This means the ceiling needs to be painted, all cracks between woodwork and walls need to be caulked, the walls need to be sealed with a special wallpaper primer, and the woodwork needs to be painted.

The actual wallpaper is the last thing that happens in a room that's being redecorated.

The special wallpaper primer is mission critical. It seals the wall surface so the wallpaper glue does not penetrate through to the drywall paper.

CLICK HERE to get FREE & FAST BIDS from local wallpaper hangers in case you're getting cold feet.

This primer will be an enormous help to you as a rookie. It allows the paper to be re-positioned fairly easily after it contacts the wall in case you need to slide the paper slightly. Don't skip this special primer.

I would recommend using a pre-pasted wallpaper your first time out. To activate the paste, use a premixed clear activator. Don't soak the paper in a tray of water to activate the paste.

If you soak too long, you'll dilute the paste. The activators ensure you never dilute the paste. Apply the activator with a new paint roller cover. It's easy.

Once the activator is applied to the back of the paper, fold the paper onto itself so the glued surfaces are touching one another. Wait ten minutes before you try to hang it.

You may panic thinking you'll not be able to peel it apart. Don't worry, it will come apart in ten minutes. This is a mission-critical step that allows the paper to expand and relax.

If you don't do this and apply the paper immediately after you activate the glue, you'll get bubbles in the paper.

The first strip of paper needs to be perfectly plumb. I always try to start the first piece immediately adjacent to the least visible corner of the room.

Be sure one edge of the paper wraps around the corner no more than 1/4 inch. You want to start in this obscure corner of the room because this is where you'll end the job and the odds of a perfect pattern match here are 1 in a million.

Just A Few Tools

Let's get started with the tools. Fortunately, you don't need many tools to wallpaper.

Here's a list that will get you going on this job:

  • retractable razor knife with snap-off blades
  • 4.5 or 6-inch drywall taping knife
  • smoothing brush or plastic smoother
  • 4-foot level
  • grout sponge
  • measuring tape
  • paint roller & pan
  • paint brush

Click the Image Below to get all, or some, of the tools now:

Wallpaper Tools List

CLICK HERE to get all the tools I recommend in one place. It's easy and fast.

Draw a very fine plumb pencil line 1/8 inch away from the other edge of where the paper will be on the wall. I never hang the paper on a pencil line as it can show through the seam where two pieces of paper meet. Just keep the paper the same distance away from the line and it will be plumb.

Use a 6-inch wide flexible drywall taping knife to help you trim the paper at the ceiling and where it touches woodwork. If the knife is new, take a metal file and round off the sharp edges of the tool. Failure to do this will cause the paper to tear if you slide the blade along the paper.

Before you hang a piece of paper, use the blade to scrape off any tiny bumps on the wall. These nibs will show through wallpaper and look like tiny pimples.

CLICK HERE to get FREE & FAST BIDS from local wallpaper hangers in case you're getting cold feet.

Don't stretch the paper as you hang it. As you hang the subsequent pieces and are matching at the seams, start applying the paper at the seam and smooth the paper out sideways and up and down.

Don't trap air bubbles in the paper as you install it. Use a special brush or plastic smoothing tool to smooth the paper. But don't press so hard you squeeze out the liquid paste at the edges!

Be sure to take off all electrical cover plates, wall sconces, anything that you can easily remove from the wall that you have to cut around. This is how professionals get great results. Be very careful trimming paper around live electrical outlets and switches.

Your razor knife can short out against live wires and screws. You can hurt yourself, ruin the paper or start a fire!

To get pro results at all inside corners, you have to only have about 1/4 inch of paper wrap into and around the corner.

This means you have to make a long vertical cut after the paper wraps around the corner and then you overlay the cut piece on the tiny sliver that wrapped around the corner. Be sure to re-plumb this new thin starter strip so all subsequent pieces on that wall face are plumb.

I urge you to somehow practice hanging paper in a very small room or closet first to see how it all works. You'll never regret doing this practice exercise. You need to get comfortable using the tools and seeing how to control the paper on the wall.

CLICK HERE to get FREE & FAST BIDS from local wallpaper hangers in case you're getting cold feet.

Column 910

November 15, 2011 AsktheBuilder Newsletter And Tips

What's in This Newsletter?

Latest News
Loctite Power Grab Adhesive
Replacing Copper Drain Lines
Christmas Gift Guide
Drywall Plug Video
Tiny Titan Water Heater Video
Facebook News

Can you believe that Thanksgiving here in the USA is next week? Wow! It's my favorite meal of the year and Kathy's pumpkin pie is to die for. So is her pecan pie.There's lots to be thankful for this year as I've totally recovered from my spring shingles episode, and everyone else in the family is healthy. Health is really the most important thing, wouldn't you agree?

This past weekend, I was with some of my friends and my youngest daughter shooting guns - all types of guns. I own a piece of land here in New Hampshire where I'm able to shoot.

Several of my friends had never really shot long guns and a handgun. We were fortunate to have in our midst a former police officer who was responsible for all the gun training at his department, so safety was the word of the day. He did a great job of showing all how to respect and use guns.

Everyone loved my Remington 700 .308 rifle. I felt sorry for the empty dog food cans that sacrificed themselves. .

The second day we were at an indoor range shooting four different machine guns. When you see one used in the movies, it's not like that in real life. Quick bursts produce great accuracy.


Loctite Power Grab Clear Adhesive

Locitie Power Grab
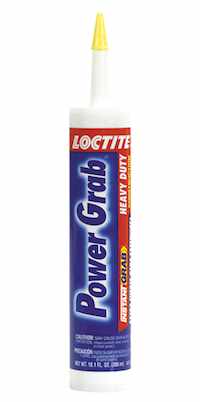
Have you ever wondered if those adhesives that are sold in caulk tubes really work? Did you know there's a clear adhesive you can now get?

I decided to see for myself if the new Loctite Power Grab exterior and interior clear adhesive really does what it says on the label.

I tried it on wood and drywall. They say you can use this for both exterior and interior projects.

You clean up with soap and water, so that's a huge benefit.

I don't have the greatest nose in the world, but I didn't smell any odors like I do with some other adhesives.

It works on all types of surfaces around your home, so this could be a great adhesive for you

The results are in! Please go watch the video and see what I discovered.


Replacing Copper Drain Lines with PVC?

Phil from Cherry Hill, NJ wrote to me asking:

"I'm in the process of gutting my entire kitchen, den and dining room and opening everything up. I have all the walls, ceilings, etc. down to the studs and joists.

My entire house (built in the 60s) has copper drain pipes, 1 1/4 to 4 inch, for the vent pipes going through the roof.
   
A vast majority of the piping is accessible via the ceiling in the kitchen. Does it make fiscal sense to rip all the copper out, recycle it for $$$, and replace it with PVC?
   
If i can make money on the deal the one day investment of time might be worth it, not to mention peace of mind in updating 50-year old pipe within my walls and ceilings. What do you think?"

Phil, I'll tell you what I think. Many people would die to have copper drain and vent lines! I'm a master plumber and copper is the dream piping material. It can last for centuries, is easy to repair, and is MUCH quieter than PVC drain piping.

I would never replace it. What's more, I'm willing to bet that you'll spend more on the new PVC than what you'll get as scrap value for the copper. It's easy to determine this. Just find out what a piece of the drain pipe weighs per foot - do this online - and see what new PVC costs per foot.

The fittings are where you'll see the biggest difference. They are usually wrought copper and are not as valuable as the pure copper drain piping. I'd be stunned to discover you can get more in scrap for the wrought copper than what a new same-sized PVC fitting costs you retail.


Christmas Gift Guide - WOW!

2011 Christmas Gift GuideI announced my new Christmas Gift Guide last week. It looks like it's a huge hit.

If you're looking for stocking stuffers, power tools, or that really special gift for the DIYr that *thinks* they have everything, well my guide is just the ticket.

The Gift Guide is FREE and I'd appreciate it if you would mention it to as many friends, co-workers, relatives , etc. as you can!

Clicking the links in the gift guide helps me a great deal. I'm able to  provide you with this free newsletter, free columns and videos at the website because of the small amount of revenue I get when you purchase something.

If you want AsktheBuilder.com to grow and thrive, please use the Gift Guide and do other Christmas shopping at Amazon while you're at it. Thanks in advance!


Drywall Plug Video

I promised you I'd tape a video about how to make your own drywall plug. I taped it yesterday.

This video does not show installing it. That's another video for another day. But all you have to do is just blow the dust of the edges of the plug and the square hole in the wall.

You then butter the edges of the plug as if you were putting icing on a cake. Then you spread joint compound on the drywall around the hole.

When you press the plug in place the buttered compound fills the gap between the hole and the plug creating a fantastic solid patch.

You just finish the patch as you would any similar tape job. I have two or three other videos at my site that show you how to do this. Just type:  drywall video    into my search engine to see all of them.

Watch the Drywall Plug video now.


Tiny Titan Water Heater

Last week I also taped a video about a great product. It's the Tiny Titan water heater.

This is a compact water heater where you just need a small amount of hot water. Wait till you see how compact this heater is!

Watch the Tiny Titan Water Heater video now.


Facebook News!

AsktheBuilder on FacebookDo you use Facebook? I've got a Facebook Fan Page that really sees some action during the week.

We have lots of fun there each week. Go look for yourself..

Please go there now and LIKE me so you can start to get FREE tips from me when you login to your Facebook page.

Drywall Plug Video

Hi, I’m Tim Carter and today I want to show you how to make a drywall plug. In this example, you can see a hole in a piece of drywall. This hole was created with a hammer. Now the question is how are you going to patch this hole?

You can purchase a drywall plug. That is a piece of drywall cut in a circle with a larger diameter paper facing. These require that you cut a round hole to fit the back of the plug. But some people find it easier to cut a square hole. And if you have a scrap piece of drywall, you can make your own plug.

In this example, I am cutting a square hole around the damaged area about 3-inches square. Before cutting the hole, I marked it with a pencil and made sure that I cut on the outside of the line. This will make the hole in the drywall slightly larger then 3" x 3".

You will need about 1-1/2" of paper around the hole on all sides. Again in this example, you will need a piece of drywall 6" x 6" to make the plug. Draw the 3" x 3" square hole outline in the center of the drywall piece. The areas around that marked area are sections where the drywall will be removed, leaving only the paper behind.

When getting ready to remove the drywall, score the back of the plug on the inside of the 3" x 3" marked area. This means that the plug size will be slightly smaller then the hole that was cut in the drywall itself. This will allow the plug to fit inside the damage wall to be repaired.

Once you have scored the lines, making sure you are marking and scoring on the back side of your plug, snap and bend along those score lines. Then gently peal the drywall core off the paper. We need to save the paper. After pealing, you will have a drywall plug with a 3" x 3" center and 6" x 6" paper size.

Now slide this plug into your damaged wall, and use tape compound to hold the paper down just like you would on any drywall tape. It’s just that simple to make and patch that hole in your drywall.

Tiny Titan Water Heater Video

Tiny Titan Water Heater Checklist

  • easy to install
  • 2.5-gallon capacity
  • electric power
  • compact

Hi, I’m Tim Carter and I am here with Tom Fairbrother of Lakeside Plumbing in Meredith, NH. We are going to install this fantastic, point of use, Tiny Titan Water Heater. It is electric and just plugs in and is really easy to install.

Is the Tiny Titan Water Heater Easy to Install?

The heater is easy to install. It comes with a handy mounting bracket and screws. You just put it on the wall, level it and tighten down the screws. The mounting bracket acts as a French cleat and the water heater just sits down onto the bracket and gravity holds it in place.

What are The Installation Steps?

Now, all that needs to be done is install the cold water supply line and the hot water outlet line. These connections at the heater are standard 1/2-inch iron pipe nipple connections.

Do You Need Female Adapters?

You will need to sweat on a half-inch female adapter on to a piece of copper pipe. That is what Tom has just finished doing.

This one is still extremely hot. You need to solder these on first so you don’t put any unnecessary heat near the top of the water heater.

How Big is the Tiny Titan Water Heater?

This Tiny Titan Compact Water Heater is 2-1/2 gallons. Installation was simple, a wall bracket, cold water supply line, hot water outlet line and an electrical outlet.

Does It Come with a Factory-Installed P&T Valve?

This comes with a temperature - pressure release valve preinstalled from the factory. All you need to do is run a 3/4" copper line from the valve down to the ground, leaving an air gap at the bottom of the line. This line is in case of a pressure malfunction in the water heater, the water comes out of this pipe.

Does the Heater Have an On/Off Switch?

One quick thing - this model has a thermostat with an off switch. You will notice that it is plugged it. But you never want to plug in this water heater until after the water lines are connected and it has water inside the heater.

Since this is an electric water heater and you make a mistake and plug it in before it has water in it and if the thermostat is on, the elements will instantly burn up. So never plug it in until after it has water in it, all the air is out of the system and there are no leaks. Then you can plug it in.

The Tiny Titan Water Heaters are great if you have a need for just a small amount of hot water.