Cutting Pex Tubing Video
Cutting Pex Tubing
Hi, I'm Tim Carter, and today I want to show you a quick tip on how to properly cut Pex plumbing piping tubing. Very simple to do, but first let me tell you what not to do.
I know you will be tempted to use a circular saw or a miter box saw to make the cuts. But don't do it!! These saws will just tear up the pipe and in fact, the pipe might even explode while cutting it this way. That's no good.
Maybe you want to use is a hack saw. Well, you might be able to get halfway decent results, but what will probably happen is you will get ragged edges from the teeth on the blade.
Another option is a razor knife but this is a dangerous tool to use. It might slip and cut you. It will give you a really smooth edge if you have a sharp razor blade.
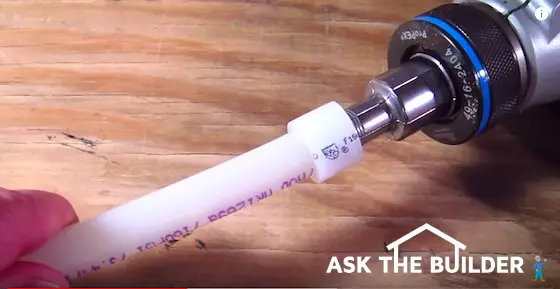
Finally, here's the tool that the piping manufacturer want you to use. It looks like a fancy pair of scissors or shears. It is made for both the 1/2 inch and 3/4 inch tubing. Watch how simple it is to cut the tubing with this tool.
Just take the Pex piping, put it in the shears and just easily squeeze the handle. It easily cuts through like butter. The advantage is it gives you a nice clean cut that is square to the length of the pipe. That is important for a great fit on the fittings. It's that simple.
Metal Flashing Installation Tips
DEAR TIM: My builder is talking about installing metal flashing as he's putting up my vinyl siding. What in the world is this material and why is it necessary? What is it usually made from? Some other people I've talked with have no idea what it is and feel it's not necessary. I don't want to waste money, so can you tell me all you can about flashing and if you would use it when you build the homes you work on or worked on in the past? - Tara P. Oak Harbor, WA
DEAR TARA: Oh gosh, I don't have near the space here to tell you everything I know about flashings of all types. My guess is I could write two or three small books to cover much of the topic. Suffice it to say that flashings have been around for hundreds of years, and if I was in charge of the building code and the best building practices manuals, these materials would be here for a millennium or more.
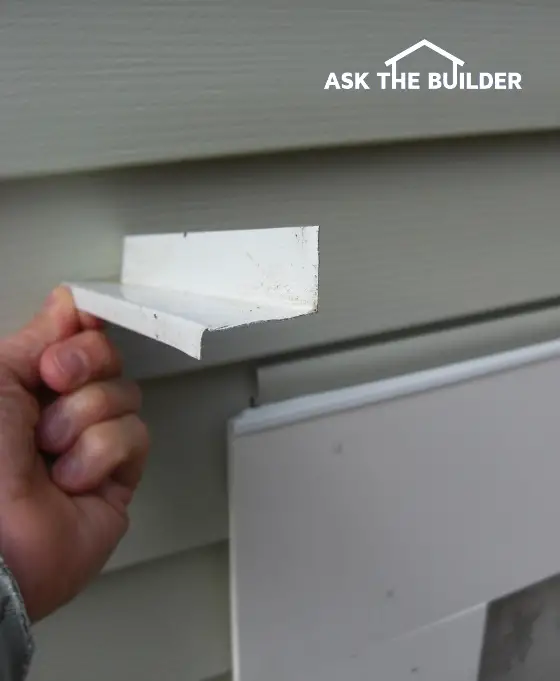
After this funny shaped piece of metal flashing is installed, you typically only see the tiny lip at the bottom. PHOTO CREDIT: Tim Carter
Flashings are used both on exterior walls and primarily on roofs. I describe them as a transitional material. When a flashing is used on a roof, it typically is used to transition from roofing material to something that's not a roof. Flashings can be made from many materials including tin, copper, galvanized metal, plastic, wood, lead, etc.
For example, you would have a piece(s) of flashing where a skylight, chimney, dormer, plumbing vent, air vent, etc. extends up through a roof. The roofing material stops at these things and something must connect the roof to them so there is no leak. That's the job of a flashing.
In your case with the vinyl siding, your exterior trim work has horizontal fascia boards at the bottom of the house and each story line. When the vinyl siding rests on top of these boards, a piece of flashing is needed to create a leak-proof conversion between the first piece of vinyl siding and the horizontal fascia board.
Here's why the metal flashing is so important in your case. You have to think about how roof shingles or feathers on a duck work to get a good understanding.
The reason ducks and birds stay dry is because the way feathers overlap one another. Water can't get under the feathers to the duck's skin. That keeps them warm and dry.
That's where the idiom "Like water off a duck's back" comes from. Water readily flows off the duck because of the composition of the feathers and the overlapping layering.
To keep your house dry so it doesn't rot, you need to build it the same way. This goes for exterior siding as well as roofing. Each time you transition between materials, say foundation, siding, brick, windows, doors, etc. you need to make sure each material sheds water over the top of the material below without getting behind or under the materials.
In your case, there is a great need for a flashing that runs along the top of any of the horizontal fascia boards. There are many different metal flashing shapes, but in your case the metal laps over the fascia board perhaps 1/4 inch, then is bent at a 90 degree angle to pass over the top of the fascia board, then bent again at a 90 degree angle to go up the wall so that it extends behind the first row of vinyl siding.
You should be able to see how this would work to shed water. Without the flashing in place, water would roll down the vinyl siding and contact the top of the fascia board. It would run along the top until it found a tiny crack and then it might flow behind the fascia. This could cause a leak indoors or start to rot the wood fascia board, the wall sheathing, or any other wood indoors.
With the flashing in place, let's see what happens. The water runs down the siding and at the bottom of the first row of vinyl siding it drips off and contacts the metal flashing as it runs across the top of the fascia board. The water then runs off the flashing because it can't go up the flashing as it extends up behind the siding. It rolls off the down-turned edge of the flashing on the face of the fascia board on it's way to the ground below.
To make sure the flashing works to it's best ability, the ends of the flashing at each far end of the fascia board should be turned up making a tiny curb. This forces the water to flow off the front of the flashing across the face of the fascia.
Without these tiny end curbs, the water can roll under the end of the flashing, especially in a fierce wind-driven rainstorm. This expert detailing is often not done by rookies or people who've not got a grasp of what's going on.
Furthermore, because of capillary attraction, the down-turned end of the flashing that folds down over the front of the fascia board should have an air space between the flashing and the fascia board. What's best is that the down-turned edge of the flashing actually should kick out away from the fascia board so the water forms into droplets that fall down to the ground.
If the flashing is tight against the face of the fascia board, the capillary attraction of the water can actually pull the water uphill under the flashing and into the back of the fascia, board. Never underestimate the power of capillary attraction. It's rotted out many a home.
Column 882
May 4, 2011 AsktheBuilder Tips And Newsletter
What's in This Newsletter?
Latest News
Working with Wood Glue
Work Gloves Review
AsktheBuilder on Facebook
Mother's Day Accessory Gift
Latest Columns
Disclaimers & Other Stuff
New to the AsktheBuilder.com newsletter? Welcome!
If you want to read all past issues, here they are for FREE! - https://www.askthebuilder.com/category/qa/ask-the-builder/newsletters/
Latest News
Jim, a college buddy of mine, emailed me yesterday. He's got a problem with a minor landslide in his backyard and wanted to know if bushes would help solve the problem. In his case the answer is No. Trees and large bushes can stabilize soils in certain situations, but not this one.
What state do you think my buddy lives in?
- California
- Colorado
- Ohio
- Oklahoma
I'd be willing to wager two pints of Aglamesis Mocha Chip ice cream that you would have picked California. Mudslides and landslides out in California make the national news each winter.
Odds are only a handful of you got it right. The answer is Ohio, and more specifically Hamilton County, Ohio. This is where my friend Jim lives. Would you ever guess that this part of the Midwest has the highest per capita landslide damage of any other place in the USA? You can discover much more about the crazy geology in southwest Ohio at the website two fellow geologists have created.
Why's this important to you? What's it have to do with your home? Unless you've figured out how to permanently levitate atoms or you live on a houseboat, your house is built on the Earth. And believe it or not, the soils and geology of your area could be something you should know about. Landslides, flooding, drainage issues, radon, abandoned mines, sinkholes, etc. could all affect where you think you might want to live.
Before buying, do some research. Talk to seasoned firefighters that have 20 or more years of experience. Ask them about emergency calls made to the street you're thinking of building or buying an existing home. See if your county extension agent has a copy of the soil map for your county. The wealth of information in this document will blow you away. Just be aware that what appears to be a perfect lot, may have some serious issues. If my buddy Jim had gotten a copy of the Hamilton County Soil Map, he probably would have never purchased the lot.
You can get some great soil data, apparently for free, from this US Department of Agriculture website. Be sure to take your time and read the instructions on how to use the real-time interface.
Working With Wood Glue
Last week, I was building some support blocks made from ¾-inch plywood that fit above the space between my kitchen ceiling and the cabinets. For some reason, the builder built the house with a finished ceiling height of 100 inches which meant I had to fill that gap with trim molding.
I was using standard carpenter's yellow glue made for interior purposes. It's tough not to have smears, so I had a grout sponge and a bucket of water to get any traces of glue off the face of the painted cabinets. If it were to dry, oh it would be a nightmare to remove. Plus, the glue dries much darker over time than when it's wet. So you need to really pay attention to make sure you don't have any residue behind.
As I used the glue, there was more air than glue in the bottle. I was hoping the seal would allow me to compress the bottle squeezing out excess air. But that didn't work. So I added a few drops of water to the top of the glue to keep it from hardening in the bottle. That way it's just like new when I go to use it in possibly three or four months.
Work Gloves Review
The past few days I've been up on some land I own here in New Hampshire working with a great friend Peter Hall. Peter and I were repairing some storm damage from two weeks ago that washed out sections of the road that takes you to the top of the hill. The storm caused some debris to clog pipes that run under the road which, in turn, caused the water to overflow onto the road and erode the gravel.
Peter was at the controls of his cool Kubota excavator machine and I was the ground or hand man. Usually there is a person on the ground doing spot work with a shovel or assisting in other ways.
 I was wearing my favorite work gloves from Milwaukee Tools. I've been using them for a few years and I have to tell you that so far I've not found a glove that fits my hand better than these. They are so comfortable, you don't even know you have them on.
There is an adjustable velcro strap so you can tighten them on your wrist. They are breathable. They are black, so they don't really show dirt. I believe you'll like them. There are different gloves for different tasks, but here are the Milwaukee Work Gloves I was wearing yesterday.
That's an affiliate link. If you buy the gloves, I get a small commission.
AsktheBuilder on Facebook
![]() Do you use Facebook?
Do you use Facebook?
Moments ago, I helped Jan pick the PERFECT countertop material. She discovered I used to barter chili for gems at 5 am in the morning. Go read the thread!
http://www.facebook.com/askthebuilder
Become a fan and you'll get the free tips every time you login to your Facebook page!
Mothers Day Accessory Gift
Steve's a very close friend of mine who lives in Southern California. He's a computer genius and a former rocket scientist of sorts as he used to work for the Jet Propulsion Labs. He's got a dream mom named Patti. His dad Jim is awesome too. It's a great family.
Anyway, since you're on a computer reading this, this has everything to do with you, especially if you're in the growing legions of Mac users like me. If your Mom has a Mac, then you absolutely must keep reading. This is going to make for a great little extra gift for her on Mothers Day, this Sunday!
I used PCs for 25 years, but about four years ago, I exploded when it took 8 minutes to get my PC to go through the start-up menu. I got up from my desk and went out and bought a new MacBook Pro. But switching from a PC to a Mac was a little intimidating, I'll admit that.
Steve has helped solve that! He convinced his Mom to buy a Mac, but she found herself in the same boat as I was so he started creating these cool short videos that help you understand just how intuitive a Mac is.
Yes, I bought David Pogue's Missing Manual book to help me, but Steve's videos are an excellent resource so you can really see in real time what's going on as the mouse moves on the screen and gets clicked.
 If you need help or know of someone who is a new Mac user, Steve's MacHelpforMom.com website - and his Newsletter - is just what you need. Be sure to watch the video of Patti on the home page. Since she already lives in LA, she won't have to commute far to her new job. I have a feeling Hollywood is going to be calling her up. See if you don't agree! Leave a comment with Steve about his mom.
GOSH! I just watched a video there about how to take screen shots and I discovered three new tricks. I'm going back now to sign up for the newsletter. WOW!
Latest Columns
Disclaimers and Other Stuff
I do product reviews frequently. Please read my Disclosure Policy to understand the relationship between me and the companies that make the products or offer the services I review.
PERIODIC OFFERS: This is a free newsletter filled with thousands of dollars of advice for your use and pleasure. From time to time I do offer you some of my products to help offset the time and resources I put into this newsletter. I hope that you consider this when you see me make you an offer.
FOLLOW ME ON TWITTER
Friendly Question Reminder!
If you have a question for me, don't hit the Reply button just yet. Go immediately to my web site and type in the keywords about your problem into my Search engine. The search box is at the top of every page of my web site. You could have your answer in seconds if you do this! Please pay attention to all links you see at my web site. The exact products and services you often need are right in front of you, and you might be ignoring them.
I'll be back soon with more tips!
Tim Carter
Founder - www.AsktheBuilder.com
Do it Right, Not Over!
AsktheBuilder.com
100 Swain Road
Meredith, NH 03253, USA
Marble Floor Repair and Cleaning
DEAR TIM: We just had marble flooring installed in our bathroom. The room has radiant heat with plastic pex plumbing stapled to the underside of the wood subfloor. I was struggling to clean the marble the other day and discovered there are cracks in the veins of the marble. I'm in tears wondering what to do. What do you think caused the cracks, how can they be repaired and is there an easier way to clean marble? Please don't tell me I have to rip out the floor and start over. Denise P., Concord, MA
DEAR DENISE: I'm sorry this has happened to you, but the good news is that there may be a very easy fix. We'll talk about that in just a bit. I'm assuming that the cracks are somewhat minor and that large chunks of marble are not coming up from the floor.
Let's talk first about the possible causes of the cracking. There are many. One or more of these could be the cause of your angst.
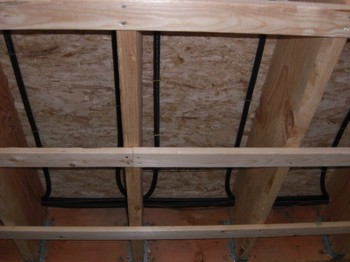
The seemingly harmless black tubes under the wood floor possibly contributed to the cracks in the marble flooring above. PHOTO CREDIT: Tim Carter
Your radiant heating could be the problem as it can cause expansion and contraction in the subflooring that stresses the marble. Stone usually has very high compressive strength meaning if you squeeze it, it doesn't fail. But most stones have low tensile strength - the force that happens when you pull or stretch something. Expansion of the wood floor under the marble, especially if the marble was adhered directly to the wood, could be pulling the marble apart.
The wood floor structure may also be a contributing factor. If the floor is springy and not stiff, the slight up and down movement like that of a trampoline, could be causing the same tension cracks. If there is a large tub that gets filled with water in the room, that concentrated weight can compound the problem if the wood floor joists are undersized.
The marble installer could have also made a mistake. He may not have incorporated a crack isolation membrane as part of the installation process. These membranes ensure the marble floor floats on top of the subfloor so that any sideways movement in the subfloor is not transferred to the marble flooring. This stops the tension forces from pulling apart the marble.
Finally, there could be other structural issues with the house that are manifesting themselves in the bathroom flooring. If you only see cracks in the bathroom, odds are this is not the case, but it's a remote possibility.
If your house is a new one, the issue could be also traced to lumber shrinkage. The lumber used in new homes can sometimes acquire lots of water during the construction process. As the lumber dries out, which can take sometimes over a year, this causes the wood to shrink. Shrinkage creates tension.
Now it's time for the good news. Since you have marble flooring that naturally has random veining, it's easy to disguise the repair of the cracks. I would start by doing a very small test using a wall grout that matches the color of the veining. Grout the cracks in the marble as if they were joints between tile.
It's very important the grout you use is quite stiff. Make it the consistency of premixed cake icing you'd buy at the grocery store that is about 60 F in temperature. As icing gets warmer, it becomes more fluid. You don't want that in your situation.
Use a rubber float to apply the grout and get all of the excess grout off the marble. There will be a very slight haze of grout on the marble. Don't remove this from the marble for about 30 minutes, then using only a very slightly damp sponge. You want to make sure you don't dig out any grout from the crack. The grout must be at the same height when dry as the marble floor.
 I've found that oxygen bleach is a remarkable cleaner for marble. Just a week ago, I used it to remove a stubborn grease stain from marble.
Oxygen bleach is commonly sold as a powder that you mix with water. It attacks organic stains using just oxygen ions. It's color safe and should not harm the marble at all.
The trick is to mix up the solution and pour it onto the floor. You just let it soak on the marble and grout and allow the oxygen to do the work. After 15 minutes, scrub it with a stiff nylon scrub brush and rinse. The results should be remarkable.
Column 881
April 28, 2011 AsktheBuilder Tips And Newsletter
What's in This Newsletter?
Latest News
Bucket Ape Tool Review
AsktheBuilder on Facebook
Rusting Gutters
Helping You
Washington DC Meet-up
Stain Solver Sweepstakes
Latest Columns
Boring, But Necessary Stuff
Latest News
Spring is really trying hard to come to New Hampshire. The Friday before Easter it was 58 F and pretty sunny. That's tee shirt weather up here, especially after you've been buried under snow for three months.
Then last Saturday morning, I awake to wet snow falling. By the time it was over, two inches were on the ground. It looked like December. Easter Sunday, by 1 p.m., the ground was clear of that white covering! Crazy weather indeed.
Yesterday, we put the wood panels on the dock that lowers into the water like a drawbridge. That's how I suggest to Mother Nature, "Okay, it's time for summer!"

Tool Review - Bucket Ape
When I offer tool and product reviews here in the newsletter, I almost always have tested the product to ensure it does what it says. Here's an example of a time I've not done this. The reason why is the tool is so caveman simple, I already know it's going to work. And work WELL.
 Have you ever grouted ceramic tile? Let's say a large floor. You then know that part of the job is emptying out the water bucket countless times in a vain effort to keep the rinse water clean. The cloudy water in the grout bucket is part of the reason there is always a grout haze on the tile.
Imagine if each time you rinsed your sponge in the bucket there was NO GROUT in it. How is that possible you ask? Easy. The Bucket Ape allows you to transform a five-gallon bucket into a crystal clear rinsing station right where you're grouting.
A water hose feeds water to the bucket and a threaded drain fitting at the bottom side of the bucket connects to a second hose that pipes the water outdoors. DUH! As the water flows into the bucket, you get to rinse your sponge completely clean each time. It's a tile setter's dream tool. But wait, it gets better. Do you have a septic system like I do?
This tool is PERFECT for cleaning paint brushes and rollers for anyone, like me, on a septic system. You don't want to ever put latex paint into a septic system or a leach field. I so wish I had this great tool this winter while I was painting the kitchen.
The inventor has set up a special page at his website where you can get a discount. You can buy the entire kit or just the parts to make your own Bucket Ape. If you have scrap hoses around and a bucket, all you need is the Bucket Ape tray and the special fitting for the drain hose.
If you do buy from this link, I do get a very tiny commission on each sale. I only do this with products I really believe in.
AsktheBuilder on Facebook
![]() Do you use Facebook? Here's some of the stuff we discussed in the past few days at the AsktheBuilder.com Facebook Fan Page:
Do you use Facebook? Here's some of the stuff we discussed in the past few days at the AsktheBuilder.com Facebook Fan Page:
http://www.facebook.com/askthebuilder
- I posted another mystery photo that you had to guess what it was.
- Luke commented about my past column on Tankless Water Heaters
- I helped James cut his patio blocks.
- I shared how I got a grease stain out of a new marble top.
- and MUCH more.
Become a fan and you'll get the free tips every time you login to your Facebook page!
Rusting Gutters
Lloyd Adams from Memphis, TN wrote to me:
"My wife and I built our house 22 years ago. The roof is good for awhile longer, but my galvanized gutters are rusting and leaking causing obvious problems. The gutter replacement job is more pressing, but I hate to install new gutters only to have them damaged when the roofers do their thing in a couple of years. Is this a needless worry, or should I go ahead and have the roof work done a bit early to spare potential damage to the gutters?"
Lloyd, I'm wondering if it's possible to salvage the gutters. If the rusting is not too bad such that the metal is paper thin, I'd use a special rust primer paint formulated to stick well to rust and then add a second coat of finish paint on the insides of the gutters.
Be sure to clean them well with soap and water to get all the dirt out before you paint. Once the paint is dry and cured, that can take two weeks, I'd coat all the soldered seams with the special sealant that's used on aluminum gutter joints. That will stick well on top of the paint. I love the sealant made by Alcoa.
Helping You
I need help from you once again so that I can do a better job of making your life easier. Here are some facts:
Tens of thousands of people come to AsktheBuilder.com each day. No doubt each and everyone has a problem. They sure as heck aren't coming to randomly surf my website.
I have thousands of pages of information at my AsktheBuilder.com website. So much information, that it's HARD for you to quickly find the tens of thousands of answers that are there.
If you're like most I talk with, your life is getting more complicated each day. You don't have the time or patience to look through all my content to get to the answers you need.
I get many emails each day with people asking pretty simple questions, but they want the Staples Office Supply store EASY button. If you're one of these people, you just want the quick answer. Right? I don't blame you one bit.
Here's an example. Carol B., from Cincinnati, OH, contacted me several days ago. She had a new concrete slab poured and it developed a crack. She was getting conflicting information about why it happened, who's fault it was and most importantly, WHAT could be done now to fix it.
All of that information was at my website. I've written extensively about it. But Carol was too busy, frustrated, or didn't have the patience to sift through my stuff to find out what to do. I understand that. Lately, I've been in the same mood and have little patience when faced with dilemmas.
After thinking about Carol's situation and knowing the answer was there for her, I had an epiphany.
What if Carol had seen at my Ask Tim page this announcement:
Do you have a problem? One of my 3-Minute Answer Guides could Solve Your Problem Right Now!
You click through and discover there's an Instant Download guide that you can read in 3 minutes or less. The document covers the causes of the problem, how it could have been prevented and the best part - SOLUTIONS to the problem that work.
What do you think about this? Would you like simple documents like this?
Would you take this SHORT survey to help me flush out this idea?
There is a place in the survey where you can tell me WHAT quick guides you want to see.
Washington DC Meet-up
It looks like I'll be in Washington DC again on May 24th with about three hours to kill late afternoon. If you're interested in meeting again and chit chatting, let me know.
Stain Solver Sweepstakes (Now over!)
We're having a new sweepstakes for Stain Solver! Go here for the details.
You could WIN a lot of Stain Solver. Better go look at this.
Latest Columns
Here are some columns I've loaded to the website. I really NEED your help.
When you read a column, note the SHARE button at the top near the headline. Could you do me a huge FAVOR and Share the column if you're on Facebook or Twitter? It will really help me if you do this.
Also, note at the BOTTOM of every column, you can comment to your Facebook friends if you discovered something in the column. That also helps me spread the good word to all that AsktheBuilder.com exists!
http://go.askthebuilder.com/
http://go.askthebuilder.com/
http://go.askthebuilder.com/
http://go.askthebuilder.com/
http://go.askthebuilder.com/
http://go.askthebuilder.com/
Disclaimers and Other Stuff
I do product reviews frequently. Please read my Disclosure Policy to understand the relationship between me and the companies that make the products or offer the services I review.
PERIODIC OFFERS: This is a free newsletter filled with thousands of dollars of advice for your use and pleasure. From time to time I do offer you some of my products to help offset the time and resources I put into this newsletter. I hope that you consider this when you see me make you an offer.
If you wish to Unsubscribe, look all the way at the bottom for the Unsubscribe link. All you have to do is click it to stop getting this newsletter.
FOLLOW ME ON TWITTER
Friendly Question Reminder!
If you have a question for me, don't hit the Reply button just yet. Go immediately to my web site and type in the keywords about your problem into my Search engine. The search box is at the top of every page of my web site. You could have your answer in seconds if you do this! Please pay attention to all links you see at my web site. The exact products and services you often need are right in front of you, and you might be ignoring them.
April 25, 2011 AsktheBuilder Tips And Newsletter
If you're a NEW subscriber to my AsktheBuilder.com newsletter in the last five days, this is NOT a normal newsletter.
This is a very quick reminder that one of my annual promotions is about to expire.
Yes, the Annual Stain Solver Spring Sale is going to END at Midnight tonight April 25, 2011. You have only HOURS left to save not only money, but lots of your possessions.
Use this promo code: ENJOYYOURBACKYARD to get a 25 percent discount off our normal pricing.
If you're a long-time subscriber, you know three things:
- Stain Solver oxygen bleach is perhaps the best stain cleaner out there.
- You know Stain Solver is as green as can be. It's made in the USA from USA ingredients that are food-grade quality. You can't get better than that.
- Stain Solver cleans hundreds of stains.
Just last week, we got dramatic before and after photos of how Stain Solver was used to clean grape jelly from brand new seat cushions.
Yes, it's an amazing product. Don't miss out on this sale.
Go here to discover all the facts about Stain Solver:
Thanks!
Tim Carter
Founder - www.AsktheBuilder.com and StainSolver.com
AsktheBuilder.com
100 Swain Road
Meredith, NH 03253, USA
Pex Plumbing Tips
This is PEX tubing. I'm using a trouble-free UPONOR compression ring to make a connection. WATCH the video below to see it happen in seconds. Copyright 2018 Tim Carter
Connect PEX in Seconds - No Experience Needed!
This column was SO GOOD that I shared with the 31,000 subscribers who read my April 14, 2019 AsktheBuilder Newsletter.
DEAR TIM: Money is very tight in this current economy and I just can’t afford to hire a plumber to install new water supply lines in my home. I’ve seen the pex piping and feel it's the way to go as there are no soldered joints hidden in the walls.
Is it hard to install pex plumbing tubing? Can you share some secrets and tips? Am I crazy to think that I can be successful doing this? Dan G., Belle Mead, NJ
Related Links
Cut PEX Tubing in One Second or Less!
Prevent Frozen Pipes Using PEX - The Only Way to Go!
DEAR DAN: Not only is money in short supply right now for many, but I feel it's also going to get worse. This is going to cause many to jump in and do home repairs and remodeling not because they want to, but because they have to.
Free & Fast Bids
CLICK HERE to get FREE & FAST BIDS from local plumbers who can do PEX in case you're afraid.
There's lots of opportunity here - to make mistakes and to build confidence. Let's put you in the second group.
It's important to realize that some cities and towns don't allow unlicensed people to work on the potable water supply systems in their homes. Keep in mind if your home is connected to a municipal water system, water, in certain situations, can flow out of your home and into the water mains outside your home.
If you've made connections to the system that allow polluted water to flow into the water pipes outdoors, you can make many sick. It's serious business.
One Practice PEX Joint and You're a Pro!
Let's assume you're allowed to do the pex plumbing installation work. I feel, with a little practice, you can be successful doing this major job. There are just a few areas where you'll need some sweet skills to ensure you don't have a leak.
Let's talk first about the many advantages of pex tubing and pex plumbing fittings. As you've already noted, since the pex piping is similar to electrical wiring, there are no joints in the pipe if you decide to install a separate pipe to each fixture from your main mechanical room where the water supply enters your house. That one characteristic of pex is an enormous time saver.
PEX Plastic Has a Memory
The pex tubing I've worked with, and had the best success with, is a special plastic that has a memory. Don't ask me how they figured it out, but when you stretch the material it fights to go back to it's original shape and size.
This property allows the piping and little compression collars to grab tightly onto the knurled surface of the male adapter fittings. This is what creates the leak-free connections between the pex tubing and a manifold or a valve at the end of a run.
PEX Expanding Tool - Just Get Hand-Powered One
To stretch the piping, you need a special tool that has an expanding cone tip. As you crank the tool, this cone expands the plastic.

Here's a PEX hand expansion tool. It's hundreds of dollars cheaper than a power tool. CLICK THE PHOTO now to have this delivered to your home.
The warmer the pipe is, the easier it is to accomplish this. Cold temperatures cause the plastic to react sluggishly. This means it expands slower and goes back to its original size slower.
These special tools come in both hand powered and a sleek cordless electric tool that's very handy. You'll have to get one of these tools to do the job, so give a serious look at the cordless tool. Once you've completed the job, you can sell the tool online if you desire and get back probably 65 percent of the price you paid for it.
Connect PEX Using the UPONOR System
I have PEX in my home and it's the UPONOR system. It has these caveman simple compression collars that keep all joints leak-free. Watch how SIMPLE and FAST it is to make a connection:
Main Manifold May Stretch Your Comfort Level
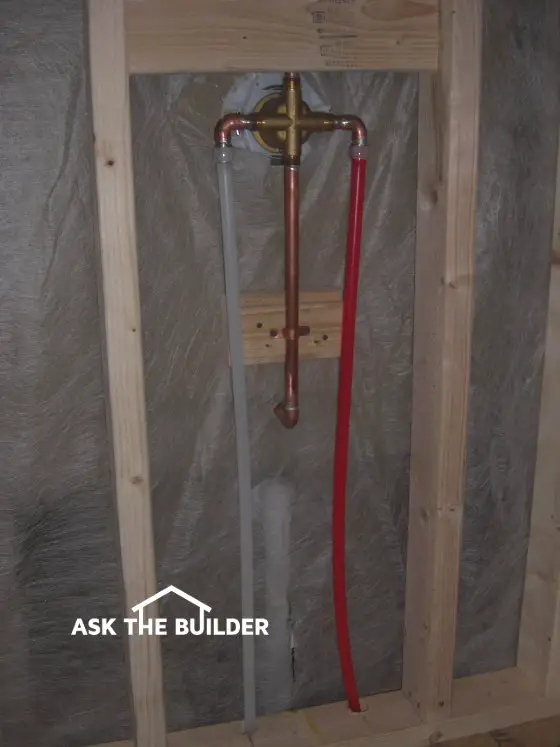
The only place I can see you having problems is installing the two manifolds in your mechanical room. These are usually made from copper and have a shutoff valve at each port where you connect a water line. You'll have to securely attach the manifold to the wall and do some great soldering to connect the manifold to your water supply.
Some plumbers are moving away from the manifolds and installing pex piping like traditional water supply lines. In these cases you do end up with joints hidden behind walls.
CLICK HERE to get FREE & FAST BIDS from local plumbers who can do PEX in case you're afraid.
If you decide to install your system like this, you need to be very conscious of water pressure and friction losses. You'll have to install a 1-inch main trunk line that eventually downsizes to 3/4 inch and then 1/2-inch pipes that supply each fixture.
Employ Best PEX Practices
Be sure you follow all best practices when working with the pex piping. I would absolutely read any and all information that the pipe manufacturer has available. Be sure you don't pinch the pipe. Drill holes that are large enough for the pipe to pass through easily.
You also need to be aware of all the limitations concerning drilling and notching structural framing members. You just can't go start drilling large holes in floor joists. You can't notch floor joists.
The building code often contains good illustrations that show you exactly what you're allowed to do without compromising the structural integrity of your home. Check what's on the other side of a wood member before drilling. You could penetrate a wire or a gas line!
Practice First With PEX - So Simple
Finally, I would highly recommend testing your skills before you advance to putting the pipe and fittings in your home. Create small test joints where you connect a pex pipe or two to actual shutoff valves.
Then connect these short test pipes to your existing plumbing system. See if you have any leaks. Be sure you understand how to completely expand the pipe, rotating the tool as you expand the plastic and then quickly install the pipe and compression collar over the male end of the adapters before the pipe returns to it's original size.
Don't hope that you have leak-free joints. Remember, hope is the emotion of last resort. You hope for something when you can't control the outcome. In your case, with practice, you can control everything!
CLICK HERE to get FREE & FAST BIDS from local plumbers who can do PEX in case you're afraid.
Column 880
April 20, 2011 AsktheBuilder Tips And Newsletter
What's in This Newsletter?
Latest News
Deck Stain Test
Water Heater Pilot Light Outages
AsktheBuilder on Facebook
Stain Solver Sale
Snow & Ice Creating Roof Noise
Boring but Necessary Stuff
Welcome if you're a new subscriber. If you like this newsletter, feel free to forward it to as many of your friends as you wish.
Latest News
If you're a new subscriber in the past 14 days, you're unaware that I was pretty sick about three weeks ago. At the end of March, I was afflicted with a nasty case of the shingles. I'm on the mend, but it really put me behind.
I want to thank you if you sent me Get Well thoughts. I got so many emails that not only did I not have the energy to respond to all, but it just was impossible to answer you personally. I hope you understand.
You may have been one to slightly scold me about the lost opportunity to advise others about the vaccine or preventative medication that's available. Bottom Line: Next time you're at your doctor, ask her/him if you qualify for the vaccine or drug. I believe there is one if you've never had chicken pox - the source of shingles, and there is a different one that can be administered if you have had chicken pox.
All you need to know is that you don't want shingles on your body. They work great on your home, but you don't want them ever on your skin.
I'm getting much better. My scalp, at this point, feels like I have a medium sunburn. It's still sensitive to touch, but the extreme pain is gone as are the debilitating flu-like symptoms.
Deck Stain Test
I'm gathering the top semi-transparent deck sealers right now preparing to create a massive side-by-side test of the top brands. This is an offshoot of the test I did last year on my dock.
This morning I met with the factory rep for Valspar, Maribeth, and she was kind enough to give me two samples of their top-of-the-line deck sealer.
So here's the BAD news. The test results will NOT be available until next May. I want to do a year-long test. I'll have the results for you next Spring. Wait till you see the photos and how I document each step of the way.
I'll be testing the products on both weathered treated lumber and cedar decking.
Water Heater Pilot Light Outages
I've been receiving a rash of complaints about water heater pilot lights going out. Two weeks ago, I went to two of the top water-heater manufacturer websites and used the Contact Form to get someone from each company to talk to me.
Can you believe that I've yet to hear from one of the companies, and the other one just called back today?
If you have a company website with a contact form, I beg you to be more responsive. If you can't respond in 24 hours, then take down the contact form from your site.
What we do here at AsktheBuilder.com is review the incoming messages each day. Complaints and media requests are handled immediately. Questions we get are put in to the queue to be answered on a first-come first-served basis.
What You Missed on the AsktheBuilder Facebook Fan Page
![]() Each week I try to recap what happened in the past week on the AsktheBuilder Facebook Fan Page. If you're not on Facebook getting my updates, you should be. It's FREE. If you don't want to join Facebook, no worries, you can STILL go to the link just below and read all the tips for FREE.
Each week I try to recap what happened in the past week on the AsktheBuilder Facebook Fan Page. If you're not on Facebook getting my updates, you should be. It's FREE. If you don't want to join Facebook, no worries, you can STILL go to the link just below and read all the tips for FREE.
If you're on Facebook, all you do is go to the fan page and click the Like button to get the updates.
www.facebook.com/askthebuilder
Here's a quick recap of what happened:
- I helped Greg put up some wall sconces in his NYC apartment.
- Joe, who lives near Cleveland OH, wanted to know the best roof shingles to buy.
- I did a quick review of the Bosch PS50-2A Multi-X cordless tool. Woo Hoo!
- I upload a photo of some cool wood bead board panels that I installed on a Sub-Zero refrigerator.
I really urge you to get on Facebook and Like my Fan page. There's lots happening there that you're missing. Some of it could save you lots of time and money!
Stain Solver Sale and Distribution News
My illness has caused me to delay the annual Stain Solver Sale. Before we get to the sale announcement, I desperately need your help.
Are you a satisfied Stain Solver customer? Could you please go to www.amazon.com and search for Stain Solver?
We've been selling it there since last September and got fantastic ratings with comments. But a month ago, we uploaded all the new photos and the NEW sizes of Stain Solver.
We didn't realize that would wipe out all of the past great comments customers left. It's really hurting us not having the comments. Would you please invest just 5 minutes of your time and go there leaving us a comment and telling a short story of what Stain Solver cleaned for you? Thank you so very much for doing this.
Now here's the sale information:
Everything about Stain Solver is NEW except the magical powder in the containers. We've not touch the awesome formula that makes Stain Solver, in my opinion, the absolute BEST oxygen bleach on the market.
![]()
But the containers are new, the logo and labels are new, the boxes are new, the website is new.
So here's the sale news. First, in all the years of selling Stain Solver, sixteen I believe, I can't ever recall a discount this big.
I'm offering a 25% off coupon in honor of the outdoor cleaning season to use on decks, patios, siding, roofs, patio furniture, umbrellas, driveways and lawnmowers.
Because the discount is so big, it only lasts until midnight on the Monday after Easter (April 25, 2011). That's LESS than a week away! I'm sure there are those on some vacation and who will not see this email until Monday morning.
To get the discount, use this Promo Code:
ENJOYYOURBACKYARD
Go here to see the new Stain Solver website and all the things it cleans. You'll regret it if you pass on this sale. If you're a subscriber that's been around for years, you know I don't do these deep discounts every month.
I urge you to buy as much as you can afford. Wait till you see the EASY-OPEN containers that we've switched to. You're going to love them.
 Finally, we are starting to place Stain Solver in specialty stores. If you want to SELL Stain Solver in your store, it could become a nifty profit center that you don't currently have.
I've been starting to visit stores here in NH that sell red wine, pet supplies, hardware, ceramic tile, linens, kitchenware, baby clothes, etc. Remember, Stain Solver gets out just about ANY organic stain in minutes.
If you work in one of these stores or own one, you'll want to have our gorgeous 2-pound bottle with the retro metal lid right at the cash register for all to see. It puts people's head on a swivel when they see it.
Go here for details to become a reseller of Stain Solver.
Snow and Ice Creating Roof Noise?
Nicole Carey of Worcester, MA emailed me the following question:
"A large amount of heavy snow and ice built up on the roof of my 4-year-old town home. The condominium management company never used preventive measures to remove the accumulated snow. Now my roof creaks every time there is a strong wind. The creaking happens across the entire second floor. Should a structural engineer look at the roof?"
Nicole,
I don't feel there is any need to call in a structural engineer. I would expect that your roof has been constructed to the minimum requirements for your area anticipating the snow and ice load.
The noises you hear could just be the structure reacting to wind loads. That's perfectly normal. If your house is of wood-framed construction, it can actually move slightly in response to wind loads. This movement creates noise. Almost always the house springs back to it's original position.
Just start monitoring your walls and ceilings for cracking. If you see cracks start to appear and they grow, then it's time to call in an engineer.
Boring but Necessary Disclaimers and Other Stuff
I do product reviews frequently. Please read my Disclosure Policy to understand the relationship between me and the companies that make the products or offer the services I review.
PERIODIC OFFERS: This is a free newsletter filled with thousands of dollars of advice for your use and pleasure. From time to time I do offer you some of my products to help offset the time and resources I put into this newsletter. I hope that you consider this when you see me make you an offer.
FOLLOW ME ON TWITTER
Friendly Question Reminder!
If you have a question for me, don't hit the Reply button just yet. Go immediately to my web site and type in the keywords about your problem into my Search engine. The search box is at the top of every page of my web site. You could have your answer in seconds if you do this! Please pay attention to all links you see at my web site. The exact products and services you often need are right in front of you, and you might be ignoring them.
AsktheBuilder.com
100 Swain Rd
Meredith, NH 03253, USA
Apron Sink Video Part 2
Hi, I'm Tim Carter of AsktheBuilder.com. This is part 2 of the Herbeau Apron Sink Video series. This video will show you the sink installed and more importantly, how it is supported.
In case you missed it, here is the link to part 1 of this series - Apron Sink Video Part 1.
Look at this. The apron sink is installed in the sink base cabinet. This sink cabinet before we started had a solid wooden front. Then the front was marked and a "U" shaped slot was cut out of the cabinet front. This slot has to match the apron sink. This is very important and takes some time. But if you do the measurements correctly, you will have no issues.
At this point, the sink appears to be floating in midair. How is it supported? I will show you. If you look down at the back of the sink, you will see a piece of plywood. That plywood extends completely underneath the sink, and it goes completely side-to-side of the sink base cabinet.
If you look under the plywood, you will see that it is held up by a 2x4 on either side of the sink base cabinet. These 2x4s are screwed into the side of the cabinet. The plywood is 3/4" thick and cutouts had to be made for each of the sink strainers. That is the support system for the apron sink.
That is what keeps the apron sink from dropping down into the cabinet. It is not hard to do. Just need to take a few measurements to match the sink. Remember the height of the plywood is a function of the height of the sink.
In this view, you can see the top of the sink. The top is flush or just slightly below the height of the cabinets on either side of the sink. That is very important. You don't want the sink to be higher then the cabinets on either side. If you install a stone countertop, like will be installed here, that could create a void on either side and if someone puts pressure on the countertop, it could crack. So the little gap from the sink being slightly below the surrounding cabinets, can be caulked with a black silicone caulk and no one will even know they are there. In addition, this will seal the sink so water can't get under the countertop and create rot problems.
So installing an apron sink is really simple. Use a 3/4" thick plywood support board and make sure the 2x4s are securely screwed into the cabinet sides. Do this and your apron sink won't fall down into the cabinet below. Or the basement!