DEAR TIM: I’ve got several places in my yard and along my driveway that erode during periods of heavy rain. I also have issues with the gravel road that I drive to get to my house. What can I do to stop or minimize erosion around my home? I feel like I never stop repairing the damage. It's really a headache. There has to be an effective way to deal with the water. Pamela W., Woonsocket, RI
DEAR PAMELA: My geology degree taught me long ago that water is the ultimate equalizer. Who would ever think that solid granite would succumb to a clear liquid that we drink and bath with? Water, when you swim in it, seems so soft and unassuming.
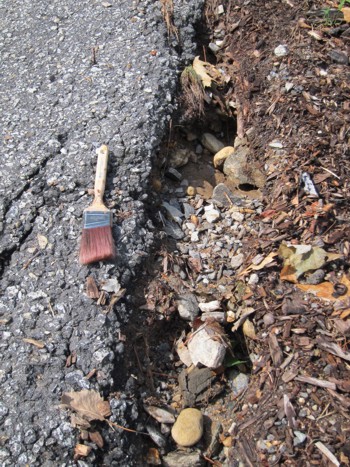
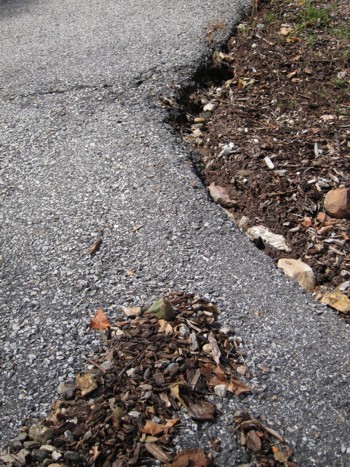
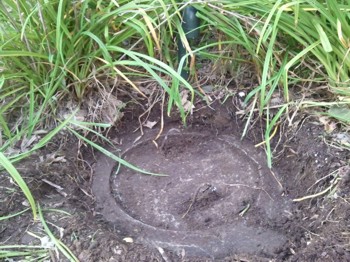
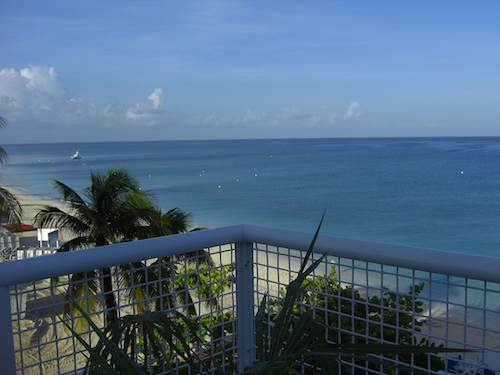
The soil erodes constantly along this steep driveway. It’s easy to prevent the erosion if you fill the crevice with the right material. PHOTO CREDIT: Tim Carter
But if you watch the news on television, hurricanes and tropical storms dump trillions of gallons of water onto the Earth in a period of a few hours. You'll quickly see that water is a wolf in sheep's clothing. When lots of water moves quickly down a stream, it possesses enormous energy and power.
Water is highly efficient at eroding the soil around your home because it's a perfect example of the simple formula many of us discovered when we took high school physics: Force equals mass times acceleration.
Put in terms you and I can understand, the force that water can exert on something is a function of its weight and how fast it's moving. You already know that water is fairly heavy, assuming you've carried a five-gallon bucket of it around. We can't control water's weight, but we can often control the speed that it travels.
What's more, we can look at the other side of the equation, the part about mass. We know that it doesn't take much water mass to move a small grain of sand, which is nothing more than a piece of rock. If you increase the size of the rock, it takes more water to move it.
To help visualize all of this, let's consider my own driveway. It's very steep at one part and I have chronic erosion on one side because a lot of water is concentrated to one side of the drive. The sand and 1-inch angular gravel is constantly washed out of the ground and deposited farther down the drive.
I'm going to solve this dilemma by putting in angular rock that's the size of a baseball. Based on the water flow I've seen in the heaviest rain, I'm quite sure this size material will resist the force of that amount of water. That's the trick - you need to match up the size of the rock to the force of the moving water.
It's also important to use angular stone or rock if you can source it. This material interlocks and it provides more friction when something tries to move it. Rounded gravel reacts like ball bearings. The rounded surface of a rock allows it to move far more easily if the water gets the rock moving.
Depending upon what your landscaping plan looks like and how you can integrate larger rocks into it, you can slow down the water in many cases by having it crash into larger rocks that are in the drainage channel where the water flows. The water expends some of its energy on the rocks instead of the soil in the channel. If you slow down the water, it has less force.
One of the worst things you can do is to create a smooth paved channel for the water to flow in or down. This causes the water to accelerate to its maximum speed depending on the steepness of the channel.
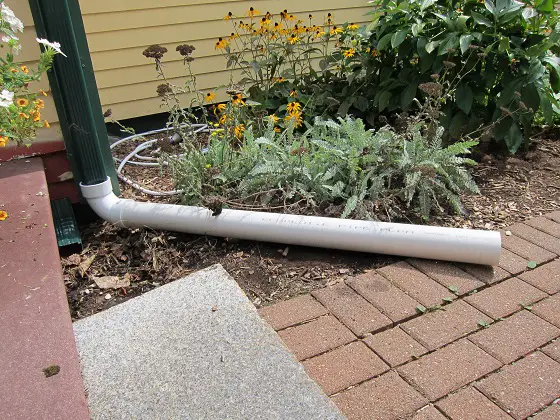
When it gets to the bottom of the channel, the water is looking for something to waste its energy on. If the channel ends in the grass or at some soil, the water will chew away at it. You can often see evidence of this where a drainage pipe exits a hillside. The water shooting out of the smooth pipe causes significant erosion unless there is something there to absorb all that energy.
Gravel roads or driveways often suffer significant erosion because they are shaped wrong. If the center of the drive or road is lower than the edges giving it a V shape, then the water rushes down the center and causes enormous erosion.
Road engineers discovered centuries ago that you solve this problem by creating roads and driveways with a crown in them. This means the driveway surface is not level side-to-side, but has the center higher than the edges.
The crown allows all the water to run to the sides or culvert area of the road. You don't have the volume of water from the entire road rushing down the center. More volume means more mass. More mass means more force. More force means more erosion.
The crown of a roadway or driveway doesn't have to be significant. You just need the water to want to travel, by gravity, to the edges. It's that easy.
Column 901
 When I got to the front desk to check in, the first person to greet me was Ms. Taneisna Campbell. She was very pleasant and looked up my reservation. The expression on her face changed slightly and she told me I had to speak with Ms. Tricia Miller, the manager, who was on the phone helping someone else.
 I highly recommend the mango raspberry smoothie. If you can have it made by Dileep, do it. He's an employee that's been here for over a decade. Dileep hails from Sri Lanka and bleeds the Cayman Islands Beach Suites.
 Times are tough right now and every penny counts. How would you like to win a NEW asphalt shingle roof installation worth $15,000? That's a lot of sweet moola, and right now it could make a difference in your life, that of a neighbor, friend, relative or co-worker.