February 13, 2022 AsktheBuilder Newsletter

AsktheBuilder Newsletter #1169

Is this your first issue? If so, I'm glad you're here. Each issue of my newsletter is created on the fly. I tap into what's happened the previous few days and share that life experience with you.

It just so happens this is a bi-polar issue! I think you'll enjoy it. You get to see what happens when I get stung by a bee so to speak.

You, however, might have signed on with issue #742. Do you recall the column I wrote about painting vinyl siding?
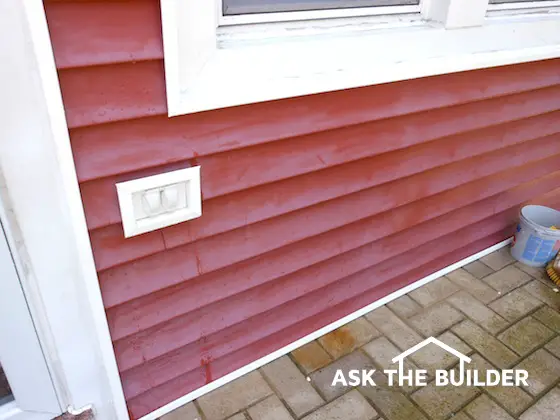
Faded red vinyl siding

Lots of people ask, "Can you paint vinyl siding?"

I have the answer for you in this column.


Become a Sustaining Ask the Builder Member - Should something in this issue save you time or money, you can sustain me with mocha chip ice cream or three cheese coneys and a 5-way.


Steve in France

A few days ago, I did an international consult call with Steve. Actually, we did a ZOOM video call so he could walk around his house to show me the plumbing challenge he faced.

I'm happy to talk with you on the phone too.

Steve is adding a full bathroom and he needed my help understanding how to install both the drain, waste lines, and the vent pipes for each fixture.

I rapidly became aware that Steve is doing much more than the plumbing. He's undertaking a massive remodeling project that involves a large portion of the house.

He had already installed some copper water pipes and he used the magical press fittings that require no soldering. Look at Steve's workmanship:
copper tubing with press fittings

I'm sharing Steve's story because I find it inspirational. He's eating an elephant but doing it one bite at a time.

You can do the same - no matter if you want to build a shed, remodel a kitchen, or build a small room addition.

Steve didn't buy the tool to crimp those fittings onto the copper tubing. He was able to rent it for just 50 Euros a day. You'd be surprised by the tools you can rent so you don't break your budget.

I'm not aware if Steve watched my video about a copper press tool to see how easy it is to install tubing, but I suggest you watch it right now.

Be aware that no matter what project you face, I can be your lifeline. Zoe, a young woman in New Mexico, had me on the phone just a few times last spring. I helped save her over $18,000 when she ended up doing all the plumbing in her new home.

No matter what your project is, I can help you on the phone or in a ZOOM call.

Next week, I'm going to tell you about the other inspirational Steve.
old cincinnati bengals logo bengal tiger

Short-Term Rental Cage Fight

Do you know much about private property rights? If you live here in the USA, they're sacrosanct.

Do you know anything about the Game of Thrones? It's played each and every day in each HOA, every company, each town, city, state, and country.

Right now a strategic Game of Thrones is happening where I live in New Hampshire.

"...There is no middle ground."

Imagine these situations. A different group of eight seniors wants to rent your house each week of the summer so they can play Scrabble out on your deck sitting in the breeze at a large shaded table drinking lemonade. They may occasionally giggle.

Or, imagine a national society that wants to rent your home so a different group of young people who are both deaf and mute can come and sit on your deck each week. All they want to do is meditate and look out at the lake all day.

I could go on and on and on with examples of how you might rent your house to people who would never bother your neighbors.

My HOA Board is trying to muster enough votes from the people that live here to prohibit weekly short-term rentals no matter who I'm renting to.

It's a hateful abuse of private property rights.

I've already done my preliminary research and discovered the courts all across the USA don't look favorably on HOAs that try to change the rules like this after the game has started.

If you're aware of lawsuits where a homeowner BEAT her/his HOA in a similar short-term rental battle, I'd LOVE for you to share it so I can add it to my list. Please email me a link to a page on the Internet about the lawsuit.

There are countless court cases ruling in favor of homeowners who want to rent. The HOAs who want to infringe on your private property rights almost always crawl away from the cage fight bleeding, bruised, and beat.

What's shameful about my HOA's stance is they're not offering to help pay my real estate taxes, upkeep, etc. but they have no issue infringing on my ability to raise the money to do such things.

It's a mindset that far too many have who try to tell you what you can do with your life and your property for goodness sake.

It's one thing to have the rule in place when the development is first put on the market and no one has yet purchased in the HOA. However, it's quite another matter to try to enact something like this after everyone has already purchased their home.

One might say that those newer residents of my HOA that don't like renters maybe shouldn't have bought into this development. They knew at the time they purchased that anyone here can rent their home at will.

But what do I know? I ate lunch for 20+ years sitting on overturned empty drywall mud buckets. I'm trying to convince the Board to stop this before it gets ugly and we just enrich the local lawyers.

Do you stand up for your rights when someone tries to put a boot on your throat? If not, you'll suffocate.

Do you recall what General Stark wrote in a letter in response to an invitation to attend a reunion celebrating his Revolutionary War victory in Bennington, VT?

“They were men that had not learned the art of submission, nor had they been trained to the art of war. But our astonishing success taught the enemies of liberty that undisciplined freemen are superior to veteran slaves.”

At the end of his letter, General Stark included the famous line that had been touched upon years before in other historical conflicts of good vs evil. He intended this line to be said in a toast to his men at the reunion so the story goes:

“Live free or die. Death is not the greatest of evils.”

My HOA Board heard a shot whistle about 1 foot above their deck Friday morning when they opened an email I sent around 8 AM. We shall see if they have the courage to do the right thing and back down.

If I were a betting man, I'd wager they're going to hold fast even though I shared that the proposed bylaw amendment is most certainly illegal.

In the email I sent to them, I opened the bomb bay doors and showed them I have an atom bomb.

Just before the next meeting, I'm going to drop it if they don't back away from this initiative.

The reference to the atom bomb comes from a fantastic attorney I served with on Amberley Village's Council. His name is Louis.

Louis taught me in negotiations of any kind if you have the strong hand, you do a low-pass fly over and open your bomb bay doors to show your opponent that you do, indeed, possess the atom bomb.

That said, you never drop the atom bomb unless you have to as utter destruction results. There are no negotiations after you drop an atom bomb.

My HOA Board made a grievous tactical mistake in an email reply to me about ten days ago. That error is going to be shared with all the folks in my HOA just before the meeting where the vote will be cast on this short-term rental agreement.

Yes, I made it crystal clear to the Board in my email that was the atom bomb fashioned by this undisciplined freeman.

Here's one thing about me you may not know. I don't like to start conflict. But by gosh if one is forced upon me, I'm all in like in Texas Hold 'em.

That's enough about bombs, bad jujumagumbo, and royal flushes on a Sunday morning.

I'll be back next Sunday. You didn't know I could fly a B-52 just above stall speed did you? You might even wonder if I've flown in an F/A-18 Hornet.

By gosh, you learn something new each Sunday in an AsktheBuilder.com newsletter! Look just below to toss me a treat.

Tim Carter
Founder - www.AsktheBuilder.com
Hilton Hotels Clean With - www.StainSolver.com
K-2666 POTA - www.W3ATB.com

Do It Right, Not Over!

P.S. Can you guess what it might have cost to build the Old Tech building on the University of Cincinnati campus back in 1901? It was a pretty big brick building, two stories with a big basement. Let me know if you were within 25 percent. Here's a photo of it. It's NOT the giant building with the spire in the right photo. It's the building to the right still partly in the shade.

old tech building at university of cincinnati

WHO DEY?

Become a Sustaining Ask the Builder Member - You can sustain me with mocha chip ice cream or three cheese coneys and a 5-way should something in this issue save you time or money.

Drain Clog Prevention

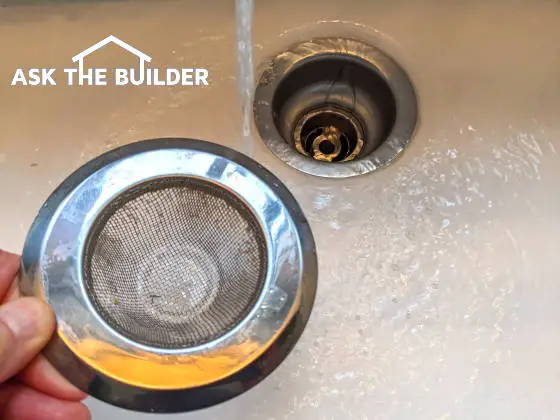
screened sink strainer

Drain Clog Prevention | This very inexpensive food catcher screened strainer can save you hundreds and thousands of dollars in drain-cleaning fees. It fits perfectly over the basket strainer at the top of the photo. ORDER SEVERAL of them now right here. Copyright 2022 Tim Carter

Drain Clog Prevention

The inspiration for this column came from two different friends of mine who live in Los Angeles (LA), California yet don’t know each other, but do know that I’ve been a master plumber since 1981. One was my best friend Steve who asked me about a mailer he received from a local plumber advertising a high-pressure drain-cleaning service.

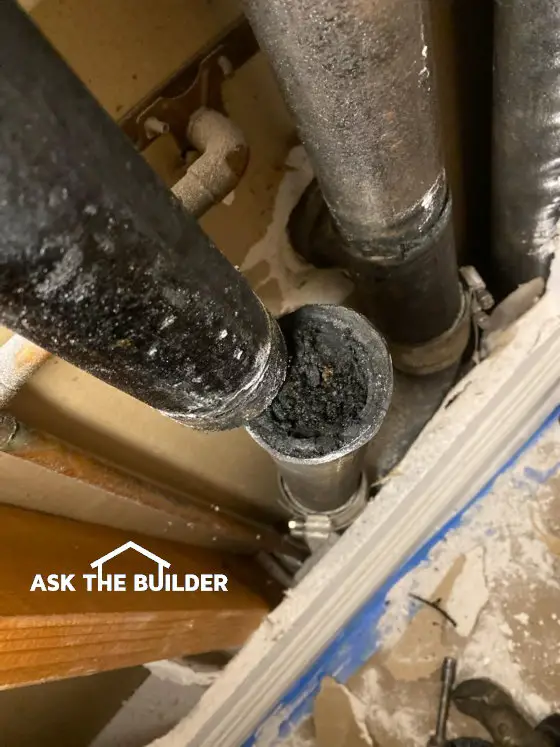
The other friend is Alex, a contractor, who tunes into my new live streaming video each M-F. He sent me a photo of a clogged 2-inch kitchen drain stack and this comment, "I have a client that kept snaking their drains and was reluctant to change out the pipe. He wanted to know why he had to call a plumber to come out each month. I looked at years of plumbing bills and told him, ‘Congratulations, you put this fine plumber’s child through college.’ "

The photo Alex sent me showed the stack completely clogged with gross black organic debris. No wonder the pipe had to be snaked each month to get the sink to drain. All of this misery and expense is preventable not only in the LA house but yours too! Allow me to share decades of experience so you can avoid clogged drains in your home.

cast iron stack completely clogged

This is a cast-iron stack completely clogged with organic debris. Grease was the main cause of the clogging. (C) Copyright 2022 Tim Carter

What Should Be Put Down Plumbing Drains?

First and foremost, the only thing that should flow through the plumbing drains in your home is water, human waste both solid and liquid, and very tiny particles of solid food. Note that I didn’t say toilet paper is okay. Realize that people who live in other parts of the world think the use of toilet paper is actually somewhat unsanitary and unacceptable. They use water to cleanse their body parts.

I find it shocking that major US plumbing fixture manufacturers don’t heavily promote bidets. You should watch my Flushable Wipes video to see how high-quality toilet paper doesn’t break down much at all as it travels through your drain pipes.

What is the Worst Thing to Put Down a Plumbing Drain?

Grease is one of the worst things you can put down your drains as Alex’s client has come to discover. While you can liquefy it and seemingly emulsify it by mixing in liquid dish soap with the grease in the pan, the grease will eventually begin to coat the inside of the drain pipes. This grease can capture larger food particles and rapidly choke off the drain line.

The way to deal with grease is simple. If you use paper towels for light cleaning or to dry your hands as I know some to do, put these wet or damp towels aside and allow them to dry. Use these to sop up warm liquid grease in your pots and pans. Wipe off greasy plates and bowls with these used towels and then throw them in the garbage. Your goal is to minimize the amount of grease you put in your drain system.

greasy pan with paper towel

I've already started to wipe some of the thick grease from the pan. Look at it on the dry used paper towel. NEVER allow grease like this to go down a drain. (C) Copyright 2022 Tim Carter

What about Tampons, Feminine Napkins, and Flushable Wipes?

NEVER put any feminine hygiene products or flushable wipes into a toilet. These are absolutely unacceptable in a septic system and it’s not a good idea if you’re on a city sewer. All of these things should be placed in a nice sanitary waste can in the bathroom. The can should have a plastic liner and a lid. Post a sign in the bathroom for guests to use the can for disposal. You should really watch my past video demonstrating what happens to flushable wipes as they travel through your sewer line.

Should I Use a Food-Catcher Sink Strainer?

Purchase a drop-in stainless-steel screened strainer that fits perfectly in the basket strainer of your kitchen sink. These simple and affordable devices collect food particles with ease. Once the strainer starts to fill, lift it out of the sink and dump the food waste into your garbage can.

Are Garbage Disposals Harmful to Plumbing Drains?

Do you use a garbage disposal in your kitchen thinking these are the answer? They’re not because most homeowners have never been trained how to use one so as to prevent clogs. If you want to see what a garbage disposal creates, just get out your blender with the clear blender jar. Put your food scraps in it, add a little water, turn it on, and look at the sludge you create.

If all of this sludge is not transported to the septic tank or city sewer, it can start to coat the sides of the drain pipes and choke them off over time. If you insist on using your disposal, then you must keep the sink water running for 30 seconds after you turn off the machine. Better yet, after you turn off the water, pour two gallons of water as fast as possible into the kitchen sink to flush the sidewalls of the horizontal branch drain arm in the wall and the vertical drain stack that services the kitchen sink.

How Can I Dissolve Grease in a Plumbing Drain Line?

It’s a great idea, if you can do it, to pour about 15 gallons of very hot water down your kitchen sink once a month. You want to pour this heated water into the sink as fast as possible being careful not to burn yourself. The idea is to put so much water into the pipes that the tubing under the sink and the horizontal branch arm in the wall behind the sink completely fill with hot water. This will dissolve any grease from the sides and top of the pipes keeping them as open as possible.

How Can I Flush Out my Main Sewer Drain Line?

Each week it’s a great idea to pour ten, or even 15, gallons of cold water into your toilet as fast as possible. If you can do this with a helper all the better. Your goal is to create a man-made flash flood in your bathroom drain pipe and stack as well as your main building drain. Just as Mother Nature keeps creeks and stream beds clean of accumulated debris with an occasional flood, you should do the same. This massive surge of water flowing through the pipes goes a long way to keep them wide open.

If Steve does this, he can use the money he would have given the plumber who sent the mailer and take his soulmate out to in nice dinner down the hill in Pasadena!

Column 1442

Building a Front Porch

Building a Front Porch

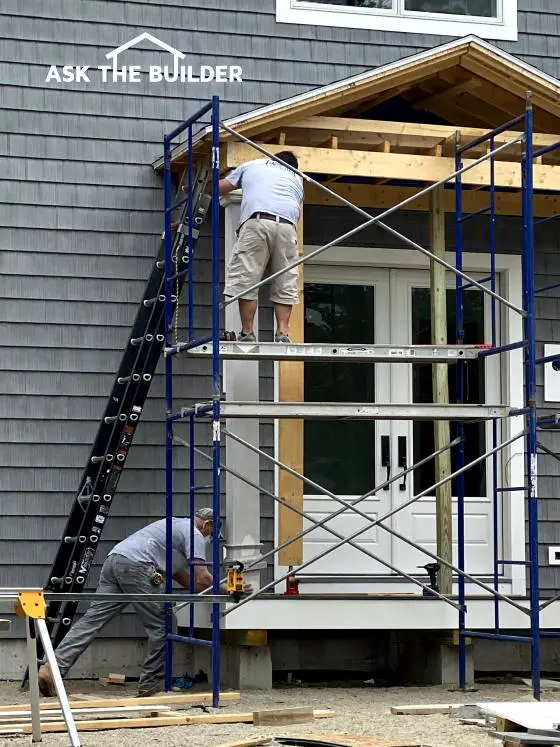
Building a Front Porch - This front porch adds value and interest to the look of this new home. It also acts like a warrior’s shield. Copyright 2022 Tim Carter

Building a Front Porch - Size Matters

Does your home have a covered front porch? Do you need front porch building ideas? If so, I've got valuable ideas about how to build a front porch just below.

Every house I’ve owned, except for the one I live in now, has had one. It’s important to realize I didn’t build the house I live in now.

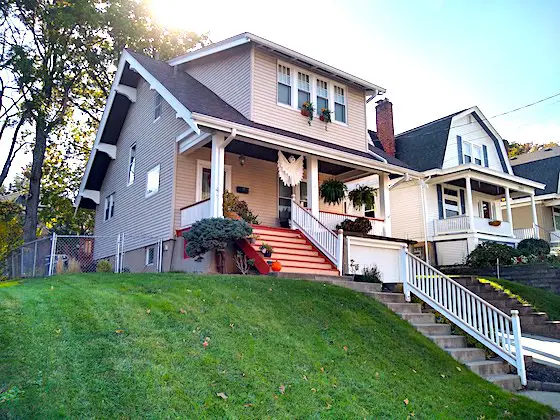
The first two homes I lived in had magnificent covered front porches that were as wide as the entire house. The first home was a craftsman-style one with the original giant iron eyelets in the ceiling put there to support a two-person porch swing. I’ll never forget that house and each time I visit my hometown, I carve out time to drive by it, park in front of the modest home, and reminisce about the wonderful nights spent on that porch with my new bride!

2865 Minto Ave Cincinnati

This is the first house I owned! It's at 2865 Minto Ave in Cincinnati, OH. Look at the magnificent covered front porch. It's still in marvelous shape. I remember dumping all the plaster from the second-floor rooms into a chute we had made that went into Tony Albanese's 1-ton dump truck in the driveway. See that lower set of concrete steps? I installed those in the fall of 1975 myself. This photo was shot in 2019 when I went to Cincinnati to visit a very dear friend. The steps were in perfect condition.

I was so lucky to grow up and start my career in Cincinnati, Ohio. The city has an abundance of fine homes built in the late 1800s and early 1900s. While I didn’t appreciate it at the time because of a lack of life experience, I now realize the architects and builders back then were exceptionally wise.

6270 Robison Road 45213 house

This is the second home I owned. Look at that huge covered front porch. You can't really tell from the photo, but the center section of railing next to the steps going up to the front door is curved! The owner before me had taken all the railings down but fortunately had saved them in an old wood shed in the backyard. This photo was taken by a very dear friend of mine who lives less than a mile away. Her childhood home is just behind this house and to the right through the woods behind this house. It's a small world, isn't it?

It’s possible I could write a book about all of what I think they did to create houses that would stand the test of time, but today let’s just focus on front porch building plans.

Is a Front Porch an Outdoor Room?

A covered front porch is really an outdoor room. Today many homeowners are trying to accomplish the same thing by putting a shade sail over an outdoor deck or patio. Little do they know, the concept of staying out of the sun and rain outdoors is by no means new!

Do Covered Front Porches Protect the House?

It’s hard to know exactly what the primary purpose of the covered front porch was years ago, but I can tell you that front doors last so much longer if protected from the rain. Water leaks into homes without covered front doors are common if the requests for help streaming into my Ask Tim page at my AsktheBuilder.com website are any indication.

In fact, two years ago I stopped by a house that was under construction just a mile from my own home. All of the siding was on and the inside drywall had just been finished. Fortunately, there was no finished flooring installed.

There was no porch at the front door. I took a photograph of a huge water stain on the subfloor where water had pooled. A covered front porch would have prevented this as well as professionally installed flashing under the door.

Cost to Build a Front Porch - You can get FREE BIDS from Local Contractors here.

Should a Front Porch Have a Roof?

If you’re planning to build a new home or do an extensive remodel of your existing home, give serious consideration to a front porch that’s got a nice roof over it. Be sure you make it at least 9 feet deep so you can put chairs, a love seat, and possibly a small table and not be cramped for space.

A covered porch makes for a delightful outdoor playroom for children. I have a photo of myself at age five or six playing a board game with my neighbor Cathy Conrad and her sister on their amazing covered porch. Cathy was my age and we’d often play on this porch in the summer during a rain shower. That way we stayed out of Cathy’s mom’s hair who was inside.

What are Good Front Porch Building Ideas?

A covered front porch doesn’t have to be huge if all you want to do is protect your front door from all but the worst driving rainstorms. My daughter installed one on her new home that projects just five feet from the house and is about twelve feet wide. The only unfortunate thing is the front of the house faces west and the door is not fully protected from direct punishing ultraviolet rays.

As you might suspect, I helped my daughter with her house plans. I insisted that the floor of the front porch be completely separated from the house to prevent any water damage to the house floor joists and sheathing.

Two poured concrete brackets were incorporated into the foundation. The top of these angle supports was 4 inches below the top of the foundation. I did this on purpose so no water that got on the brackets could seep into the crawlspace of the home.

The porch floor structure was built on these two brackets and a 2-inch space was maintained between the finish siding of the house and the porch floor structure. This space allows for any water that gets on the porch floor to drain to the ground with no chance of it getting behind the house siding.

I also made sure the porch floor was a simple 7.5-inch step down from the main floor of the house. Once again, I had seen this for decades at all the older homes I worked on in Cincinnati. The architects and builders respected water and didn’t want it flowing under the front door either.

I realize that back 100 years ago homeowners used their front porches as their social media platform. You spent time on the porch to see who was doing what on your street. You were able to have conversations with neighbors walking by as you now do on your smartphone.

For this reason, you may want to put a smaller covered front porch on and spend your money on a much larger one in the back of your home where you can text, tweet, and press the thumbs-up button in a more private setting. Have fun and stay dry!

Column 1441

Concrete Front Steps Makeover – Use Lime

Concrete Front Steps Makeover - Use Cement Stucco

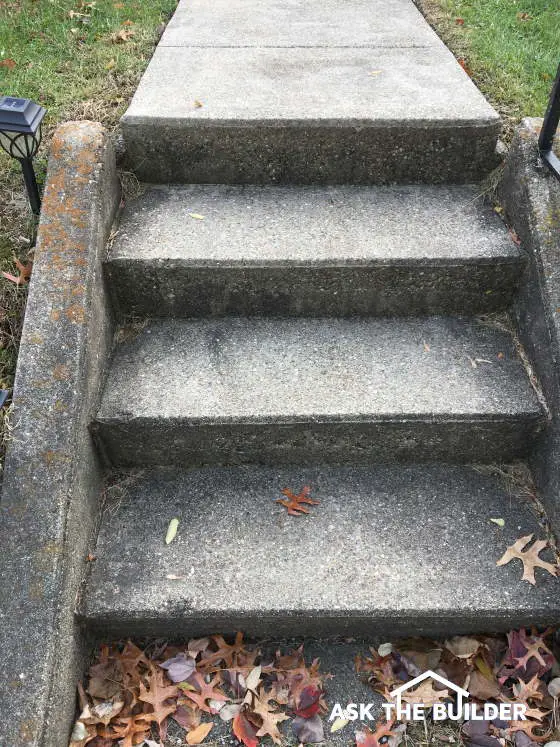
cast concrete steps

Concrete Front Steps Makeover - These cast concrete steps are very likely over 100 years old and are in nearly perfect condition. The clue to their age is the presence of the sidewalls. Copyright 2022 Tim Carter

Basic Building Products Last Long

A few days ago, I dedicated one of the new LIVE streaming videos I do each M-F on my YouTube channel at 4 PM Eastern Time to one of the first building products used by man. I’m going back thousands of years and referring to hydrated lime. It’s perhaps one of the most amazing multi-purpose building products ever discovered and then put into widespread use.

A more modern example might be steel. While steel was first invented by those living in India thousands of years ago, the widespread manufacturing of normal steel didn’t start until just before the War of Northern Aggression, often referred to as the Civil War, here in the USA. Steel has countless uses and can be found in tens of thousands of items. Hydrated lime can be found all over the world in countless buildings used both as a mortar and as plaster.

You might wonder, “Tim, what does lime have to do with concrete steps or precast concrete steps?” Well, I told that tale in great detail during my LIVE stream and am happy to share it here.

Modern Concrete Steps Can Fall Apart

Let’s begin by talking about modern concrete that you might have at your home or walk on in your city or town. The Internet is littered with hundreds and thousands of woeful homeowner stories about how their new or newer concrete is crumbling. I’ve got no less than ten older columns about concrete resurfacing on my AsktheBuilder.com website that tell you why this happened. I suggest you read those.

I wish you and I could take a road trip to Cincinnati, Ohio. I’d take you to a few neighborhoods, one being Pleasant Ridge on the east side of town. There I’d be able to show you at least twenty or thirty outside sets of concrete steps that are just like the one in the photo that was provided with this column.

These ancient concrete steps are original in almost all cases and installed when the quaint houses were built in Pleasant Ridge in the early 1900s. How is it that these concrete porch steps, all of them coated with cement stucco I might add, have survived nearly a hundred years and look almost brand new?

That’s a great question and one you should ask each time you see some new product fail and wonder about how an older product that was pushed aside is still in service.

Get FREE and FAST BIDS from local concrete contractors right here.

Why are Old Concrete Steps in Great Shape?

The answer as to why the concrete steps lasted so long is really pretty simple. Back then concrete masons knew that if you added more Portland cement to the concrete mix it made it stronger. This magic gray powder is very similar to hydrated lime. When you mix both with water, you start a chemical reaction where trillions of microscopic crystals start to grow.

These crystals act like modern Velcro. They’re the glue that holds together the sand and stones in the concrete mix. While it would take a chemical analysis to determine if this was true, there’s a very good chance the concrete masons who installed the concrete steps in Pleasant Ridge also added hydrated lime to their mix.

I get excited about hydrated lime for two reasons, one being my college degree in geology. I grew up in Cincinnati, Ohio, and as a youngster had no idea that geologists from all across the world visited my city. It turns out Cincinnati is the world-type section for upper Ordovician sedimentary rocks. If you want to see the best plant and animal fossils of that time period, you come and split apart the limestone rocks interbedded in the shale at all the road cuts in greater Cincinnati.

hydrated lime book

I own this book. It contains magic formulas to help you make long-lasting concrete and brick mortar. You can order this book now and have it delivered to your home.

I knew limestone was hard and durable as a geology student but I wasn’t aware that dense fine-grained limestone can be heated to create the lime that’s then used as brick mortar, plaster, and a super-adhesive additive in regular concrete. Yes, when you heat up limestone, its chemical composition is CaCO3, you drive off the CO2 and are left with CaO.

Once you grind up this CaO into a powder and then add water, you end up re-creating the limestone. This is why plaster is so hard. This is why true whitewash made from lime and then painted on brick buildings, fences, or other walls lasts for decades. You’re basically painting on or troweling on a thin layer of limestone for goodness sake!

You can now see why it’s a good idea to add hydrated lime to concrete, can’t you? The Portland cement is strong, but why not give it a little boost. Keep in mind the normal MINIMUM standard for exterior concrete exposed to cold temperatures is a six-bag mix. This means six 94-pound bags of Portland cement are in each cubic yard of concrete. It’s probably a better idea to add seven or eight bags to your exterior concrete.

You can bet the old masons building the steps added extra cement and they most likely put in a shovelful or two of hydrated lime. The railroad bridge engineers did the same. This is why you see concrete railroad bridge abutments in your city or town in such great shape after 100, or more, years.

Column 1440

February 6, 2022 AsktheBuilder Newsletter

Newsletter Issue #1168

You have such great taste in friends! You're right up front with Jack, Elisabeth, Jimmy, Coleen, Iyrs, Joan, and about 120 other new subscribers in the past seven days. WOW! Thanks for your trust.

This should be an interesting issue for you.

How about you, though? Maybe your first issue was #329. It's possible I shared this video about using my favorite caulk gun back then. The video was recorded by Ron Fischer over twenty years ago so that's why it's not HD. Ron was a great man and videographer at Channel Nine News (ABC-TV affiliate) in Cincinnati, Ohio. Ron taught me how to create engaging videos and we became good friends working together. He was so patient with me! Thanks, Ron!

DONATE TODAY - Support Solid Home Improvement Tips & Money-Saving Secrets


Furnace, Boiler, Heat Pump REPLACEMENT Checklist
on SALE Today!
Normally $14.95 - ON SALE $9.95
SPECIAL OFFER AWAITS You Too!


Disappointing Survey Results
🙁

Last Sunday, I was excited about a new Ask the Builder Academy idea and asked you to take part in a survey to help me bring it to life.

Well, the air went out of that thought balloon faster than water flows through a chain-link fence!

First, less than 0.5% of those who read about my Academy idea took the short survey. That's the most important survey takeaway for me. It telegraphed to me there's virtually no interest in the video call academy.

Second, look at the results of the second-last question:

pie chart of academy fee answers
See the purple and blue pieces of the pie? They add up to 62% of the responses. You might be one of the purple people that expected the class to be free. Yeeouch! The blue folks only thought a class would be worth $10.

The bottom line is it appears there's very little interest in the academy idea and those that are interested don't place much value in the content.

This is precisely why I do the surveys before investing the time in a new product. If you took the survey, thanks for your time and input.

Another Interesting Survey Takeaway

It's as obvious as the nose on my face, I do a horrible job of sharing with you how to discover answers on my website.

The last question of the survey gave you a chance to tell me what classes you'd like to see in my new Academy.

It turns out you want to know about things I've already covered in great detail on my website!

Just below is a very small partial list of the ideas you may have entered that you wanted covered in an academy class. I've LINKED each one to a past column or VIDEO on my website about that exact topic. In other words, the content you might want in a new ATB Academy class already exists and you can get it right now.

It's important to realize that I just supply ONE LINK below to the topics. In almost ALL INSTANCES, I have multiple columns and/or videos about the topic:

Insulation Basics
Basement Waterproofing
Diverting Water on a Gravel Driveway
Deck Building
Supervise a Roofing Contractor
Property Groundwater Drainage Problems
Mortar Repair

I received over 150 Academy class ideas and well over 70% of them I've already covered.

When you have a problem at your home, please please please use my search engine, scroll down past the Google ads, and look at all the FREE advice I have for you.

GET FREE BIDS for any job from Local Contractors right now!

Arlen's Not-Happy Wife

Arlen reached out to me two days ago. His better half was none too happy about running out of hot water during a recent shower. It was the first time this happened in twelve years.

No, silly, she takes a shower every day not once every twelve years! But never before did the hot water run out.

Why do you think it happened? Being a master plumber since 1981, I'm pretty sure I know why she turned off the shower tap faster than you'd swat a mosquito on a summer evening. Let's see if you have mystic powers too!

Relocating a BathTub - What Possibly Could Go Wrong?

Peer at this photo with your peepers:

bathtub vent pipe on floor

What in the heck is going on? I suggest you read about what can go sideways when you relocate a bathtub. Click the photo to read the article.


Did you discover something that helped you in this issue? If so, maybe you might treat me to a mocha-chip ice cream cone. I like treats and don't get enough of them doled out to me each week. I know, I know, I'll take a piece of cheese with my whine.


Tim Carter
Founder - www.AsktheBuilder.com
Hilton Hotels USE - www.StainSolver.com
Maritime SOS Story Here - www.W3ATB.com

Do It Right, Not Over!

P.S. What about Flushable Wipes? Which side of the fence are you on? Watch my flushable wipes video. Rest assured I saluted the army men before I sent them on their mission!

History of Old Tech Geology Building University of Cincinnati

old tech geology building at uc

This is the north-facing wall of Old Tech. Its west-facing wall was perhaps 175 feet from the McMicken Hall building which is the iconic image of the University of Cincinnati.

A History of Old Tech Geology Building University of Cincinnati

This page has been copied from deep in the bowels of the University of Cincinnati website in case it disappears in the future.

Already the UC website is throwing 404-page errors for the larger full-sized photos of the extra photos that are linked to from this page. Go to that page and click a thumbnail photo and see what happens. It's only a matter of time before this information is lost to posterity. I was a geology undergraduate student who went to class in Old Tech from 1970-74 and don't want the detailed history below to be eroded away like the soft shale of the Lower Fairview Formation. The reproduction of the content from the UC website is a Fair Use as UC is a public institution.

A History of Old Tech

Goetzman & Folmer, Architects

June 1982 

"Old Tech” was built as a result of an agreement between the University of Cincinnati and the Technical School of Cincinnati, a manual training school. The Board of Directors of the Technical School offered to give the University its equipment and charter provided the University would operate the school as the Technical School of the College of Engineering. The trustees of the Technical School further helped facilitate this agreement by raising the money to construct a building on University grounds. James E. Mooney was one of the principal donors.

A report by Howard Ayers, President of the Board of Directors of U.C. on June 24, 1901 states "…..a building thoroughly adapted to the needs of Manual Training and Technical Instruction would form an integral part of our School of Engineering and furnish the preliminary and indispensable shop-training in wood and metalwork, which all of our Engineering students are required to have. In the second place, it would constitute a portion of the experimental course of the Teachers College, and thus serve an important purpose not only in properly training teachers for their profession, but also in giving them adequate practical experience in the fundamental principles of their professional work. The University would maintain the Manual Training course of study of the Technical School until such time as the Board of Education of Cincinnati shall establish a satisfactory Manual Training High School or other Manual Training School in this city."

The cost of the building was estimated to be $12,430.00. It was believed that it would be relatively inexpensive to operate because it would utilize heat, light and power provided by the University's existing plant (The Commons) and because the administration would be handled by the Engineering Department. By the fall of 1901 the foundation was laid and by March of 1902 the building was ready for use, but in 1907 the Technical School was discontinued and the building and equipment were turned over completely to the College of Engineering.  When Baldwin Hall was built in 1912, most of the engineering facilities were moved. The Geology and Geography Department grew eventually to complete occupancy of the structure.

old tech university of cincinnati salvaged brick

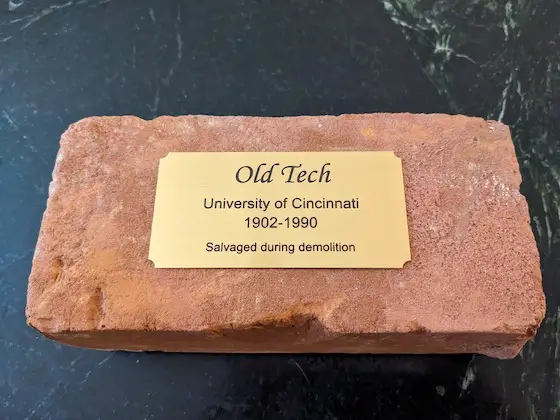
This brick was salvaged by Dr. Kilinc during demolition. He was kind enough to give it to me in 2022. Tim Carter

You can see more photos of Old Tech here.

old tech building university of cincinnati

You can see how close Old Tech was to McMicken Hall.

The "Old Tech" Building has the look of a structure that hasn't seen much change since the day it was built, but that is not the case. It was originally designed with a two-story center section and one story wings. Windows were shorter with arched heads and the entrance was on the east side. The two story central portion originally contained a carpenter shop on the first floor and classrooms on the second. The wings were wide open one-story spaces with roof rafters exposed. The north wing contained a "Forge Shop" and the south wing a "Machine Shop" over a basement. Changes were made so carefully and were kept in such character with the original building that without the original drawings it would be very difficult to tell what is "new." The original drawings by well known Cincinnati architects, Elzner and Anderson, call for omitting the north wing. So it is very possible that this wing did not go with the original building. But it was definitely there by 1907 when drawings by Tietig and Lee, architects, show the second floor being added to that wing. To accomplish this, the exterior walls were taken down to the tops of window openings, arch heads were removed, and the present square transom section added. Footings and columns to support the new floor were added. The first floor of the wing was partitioned into three classrooms, a "large testing lab'" at the north end, two offices, a "toilet room" and a set of stairs to the second floor. The second floor was divided in a similar fashion with a large drafting room at the north end.

Two years later architects Tietig and Lee produced drawings to balance off the building by adding a second story to the south wing. This time exterior walls were taken down all the way to the top of the basement foundation. Stairs to the basement were removed from the inside and the north areaway deepened to allow steps down on the outside in their present location. It was at about this same time that reinforced concrete was coming into common use, so whereas the north addition was done like the main building with wood joists and steel beams, the south wing used reinforced concrete columns and beams and floor panels.

The drawings of 1909 also show that the recently added partitions, toilet room, and stair on the first floor of the north wing were now being removed. Only one office and a large room remained. The toilet room reappeared on the second floor where the stair had been. Two of the second floor classrooms were combined into one and a corridor ran through to a new fire escape on the east side. The top floor on the south side was partitioned off in a fashion similar to the north side with an office taking the place of the toilet room. The first floor was left without partitions. The large lecture room in the center of the building was part of this phase as well as the stone portico centered in the east facade, which gives outside access to it. It also included the addition of a classroom in the second floor roof space where the skylight had been. Second floor classrooms were also reduced in size to allow for a corridor into the wings. It was also at this time that the arches were removed from the windows of the building's center section and openings raised to duplicate those of the wings.

At the end of this phase of construction the elements of the exterior looked almost exactly as they do today. Likewise the second floor was much as it is now. The main exception is that the fire escapes on the east side and the corridors to them were eliminated with new escapes (existing) being located on the west side.

The first floor has been in more of a state of flux with partitions being added, removed and added once again. The museum first appears on 1913 drawings in only the west side of the south wing, then shifts to the north wing where it was later divided and then relocated in its present position in the south wing. It was torn down in 1990 to make room for a wall and some lawn.

Old Tech University of Cincinnati demolition


Hot Water Runs Out Fast

gas water heater

Hot Water Runs Out Too Fast | This is a gas water heater. I'm guessing it's what Arlen has in his home. Who's Arlen? Keep reading, silly!

Hot Water Runs Out Fast - Especially in Winter

Arlen is a subscriber to my FREE newsletter.  He knows I've been a master plumber since 1981 and would have some insight. He shared this with me:

My wife was taking a normal shower last week and suddenly ran out of hot water. I checked the water heater, and everything appeared to be ok. So I just bumped up the thermostat a bit and I took a shower with no problem. Since the Richmond 40 gallon is just about out of its 12-year warranty, I decided to do what you preach and that is contact the manufacturer. The service tech gave me this story about how the water is much colder in the winter and so naturally you have to turn the thermostat higher. I called BS at that point. Yes, the water gets colder, but I have never had to adjust the thermostat in the previous 12 years we've had the heater. So why does my hot water run out so fast? He had to answer to that. I did replace that anode rod and flushed it last summer per your suggestions. When I asked him about adding a second anode rod as you mentioned in your library, he said it was not possible.

When do I need to replace this heater? I don't want to push my luck and end up with no hot water on a Saturday night!! So what say ye?

Thanks, Tim!

Why Arlen's Hot Water Runs Out Too Fast

Let's unpack Arlen's conundrum. There are quite a few things that contributed to his wife jumping out of the shower faster than jack pops out of a box.

An intriguing and important clue he offered up is this has never been an issue in the previous twelve years. Let's assume the winter weather has been the same where Arlen lives, his wife is in the shower the same amount of time, and she adjusts the water temperature to the same heat level during each shower. I know, that's a big bag of assumptions.

If that's the case, there's a somewhat rare possibility the dip tube in Arlen's heater has worn out or has developed a defect.

What Does A Dip Tube Have to do With my Water Heater Running Out of Hot Water?

A dip tube is a long plastic tube that's like a straw but it's about 3/4-inch in diameter. You find these tubes on the cold-water inlet of water heaters. The dip tube directs incoming cold water to the bottom of the heater.

If no dip tube were in place, the incoming cold water could migrate sideways about ten inches and mix with the hot water that's leaving the hot-water outlet. Years ago, there was a spate of dip tubes that were made with an inferior plastic that caused them to disintegrate within the heater.

Was the Richmond Tech's Advice about Cold Water Correct?

If you live where it gets cold in the winter, and are on city water, yes the incoming cold water temperature is colder than in August. I say this assuming your city water department gets its water from a nearby river. If the water source is a deep well, your incoming water temperature should be about the same year-round. 

Your water heater running out of hot water in the winter might have to do with what maybe Arlen's wife did a few days ago.

If the bathroom was colder than normal during below-normal winter weather, it's common for a person to reduce the chill by raising the temperature of the water flowing from the showerhead. This, by default, means you'll use up more of the stored hot water in the water heater tank faster than normal.

Add to this the fact that the incoming cold water is colder and a 40-gallon water heater could struggle to deliver 120F hot water for more than five to seven minutes. It's all a matter of how many gallons of hot water are flowing through the shower faucet.

Why Didn't Arlen Run Out of Hot Water During His Shower?

Arlen was able to use less hot water per minute because the incoming temperature of the hot water at the shower valve was higher. This means he had to use more cold water and less hot water to not get scalded. Once again, we need to assume that the temperature of the water coming out of the showerhead is the same for both Arlen and his better half. This may not be true!

Your Hot Water Runs Out Quickly - What Can You Do?

If your hot water runs out too fast, you can install a tankless heater. I have one and they're magnificent.

state proline xe combi boiler

This is my tankless water heater. It's also the boiler that heats my 4-bedroom home. The box is the size of a piece of checked luggage!

It's important to realize you shouldn't base your decision on buying a tankless water heater to save money. You should read the comments sent in by homeowners like you who have seen an increase in their fuel bills after installing a tankless heater. You can read those comments in a past tankless water heater column. I recommend that you also read my original tankless water heater column because I never received pushback from the manufacturers. That tells you everything I said in the column was TRUE.

How Much Life is Left in Arlen's Water Heater?

Since Arlen added a new anode rod, he might get another 12-15 years out of his heater. If you regularly replace the anode rod, a tank water heater can last for decades.

Get FREE BIDS from local plumbers that will replace your anode rod.

Remodeling A Bathtub

remodeling a bathtub

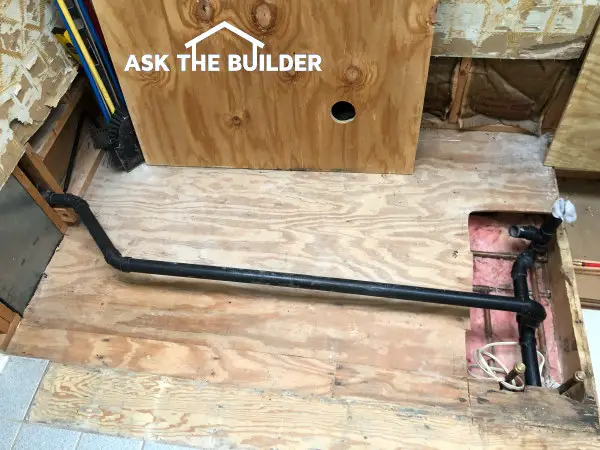
A homeowner discovered an unpleasant surprise when he decided to remove a platform tub and replace it with a modern giant vessel tub. This black vent pipe needs to be relocated. Copyright 2022 Tim Carter

Relocating a Bathtub - It can be Challenging

Over the weekend, I got Steve out of a big jamb. He lives near Pittsburgh, and his wife decided it was time to tear out an outdated platform bathtub. She wanted a new sleek soaking tub shaped like an elongated giant vessel sink. I must admit, they look amazing as I installed one in my daughter’s new home two years ago. They’re also very comfortable.

I’ve been a master plumber since 1981, and as crazy as this sounds, I love installing plumbing pipes of all types, including traditional black-iron piping for gas lines. It’s my hope that one day you get to spin a cutting die around the end of an iron pipe to create threads. When you experience the deep satisfaction of seeing spiral threads produced on a pipe that was smooth just minutes before, you might understand why I gravitate to this profession.

Steve discovered that I do over-the-phone plumbing coaching. Just six months ago, Zoe in New Mexico got me on the phone twice to help her install the plumbing drain and vent pipes in a house she was building herself. A month before, I had drawn the necessary plumbing plans she needed to obtain her permit. It made me so happy when she let me know her inspection passed with flying colors. Good for you, Zoe!

Where Can Vent Pipes Go?

Years ago, the plumber that installed Steve’s platform tub took a logical shortcut and installed the required vent pipe for the tub drain line on top of the subfloor. There was plenty of space to do this under the platform and it met the code requirements.

It’s important for you to realize the importance of plumbing vent pipes. These all-important pipes are the pathway air must follow when you decide to flush a toilet, use a washing machine, or brush your teeth.

What Do Vent Pipes Do?

Before you turn on a faucet the only water in the plumbing pipes in your home is that you’ll find sitting still in a p-trap under a fixture or floor drain. This water in the trap provides a barrier for vermin and sewer gas from entering your home. When no water is flowing, both the drain pipes and the vent pipes are simply filled with either air or a mixture of air and sewer gas.

As soon as you flush a toilet or run water in a fixture, you introduce water into the drain pipes. This water displaces the air and sometimes pushes it down the drain pipes like a snowplow pushes snow. The air must be replaced immediately and this happens by air being sucked down into the pipe that sticks up out of your roof. All this time you thought that pipe worked like a smokestack just letting gas out, didn’t you?

If enough water travels fast enough through the plumbing drains and the vent pipes are clogged or non-existent, a vacuum will form and the needed air will enter the system via one of the plumbing p-traps.

I Hear a Gurgling Noise in my Sink - What is That?

Perhaps at some point in your life, you may have heard a slurping noise from a tub or sink when you flushed a nearby toilet or a washing machine started to pump water into the system. This gurgling or slurping noise is air making its way into the system. This is not a good thing as the p-traps then lose their ability to stop sewer gas and vermin from entering your home. You want vent pipes to be installed correctly and to be free of debris. There must always be an open pathway up from each fixture to the roof.

Steve supplied me with excellent photos of his situation so I understood how to solve his problem. I described how he could relocate the vent pipe so it was no longer above the floor yet would meet code and function properly for decades and decades using Mother Nature’s toolset.

Should I Use an Air-Admittance Valve (AAV)?

No. I dislike AAVs because they have moving parts. These fail over time. Traditional vent pipes always work if installed correctly.

I really prefer venting plumbing fixtures with pipes that interconnect with one another and eventually exit the roof of a house. I recorded a video showing this in the last house I plumbed for a friend. It’s on my Ask the Builder website.

You can have multiple vent pipes poking up through the roof to save on pipe material. It’s so very easy to flash the vent pipes so you never have a roof leak. I prefer to use a flashing boot made by Lifetime Tool that has a powder-coated metal base and a special silicon-rubber boot that’s far better than the flimsy plain-rubber-boot flashings used by most plumbers.

Should I Clean Out My Roof Vent Pipe?

Yes, you should clean or rinse out your roof vent pipe. Every few years, assuming you can get up on your roof safely, you should put a garden hose down the roof vent pipe and run water down the pipe for a few minutes to wash out any accumulated dust, tree debris, or even bird poop.

If you do this, be sure you put sentries within the house to spot any leaks. Although it’s very rare, it’s possible a vent pipe in an attic or in a wall might have a crack or a fitting was never properly sealed. This might not be a problem for air, but it becomes a big issue when you’re putting gallons of water into the vent pipes!

You need to have someone by the hose faucet handle who can turn off the water immediately if a leak is spotted. You’ll benefit from discovering this leak as it could be the reason you’re noticing a slight sewer gas smell every now and then!

Column 1439

DIY Wood Window Restoration

Window has seen better days

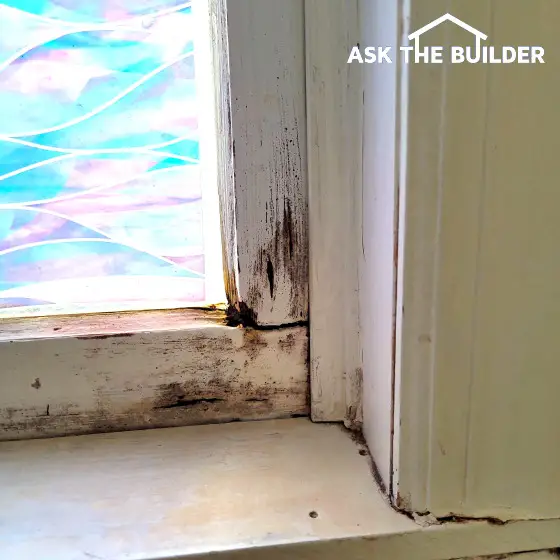
Window Restoration - This window has seen better days, but it’s not yet ready for the landfill. You can fix it with minimal skills. Copyright 2022 Tim Carter

Window Restoration

A fellow amateur radio operator sent me a photo of a wood window that’s in his girlfriend’s bathroom. The window is suffering from some rot and the sash frame is starting to separate.

While I don’t have the epic enhanced observation powers exhibited by the Shawn Spencer character in the popular and funny TV series Psych that is now in reruns, I was able to determine looking closely at the photo what caused the issue. That photo is shown at the top of this column.

Jeff’s significant other’s problem should put your head on a swivel because of the raging inflation that’s gripping our nation. A year ago, I broke the glass in one of my own up-down sash wood windows while cleaning it. I discovered it’s cheaper to buy a new sash from Andersen Windows than to go to all the hassle of ordering a custom insulated glass pane, remove the broken glass, install the new glass, and then try to match the custom exterior color.

What Does a New Window Cost?

Much to my surprise, the simple small window sash I need costs in excess of $350.00. I decided to wait until the glass starts to fog up before I replace it. The odds are it’s now approaching $400 for the sash. Jeff’s girlfriend could have stopped the wood rot, as well as the mildew on the sash, by doing one simple thing each day.

When I looked closely at the photograph, I could see a depressed part of the sash profile in the lower right corner. Water vapor from hot showers no doubt condensed on the glass pane, it then rolled down the window, and finally found a tiny crack to enter the wood at the sash corner.

Does Glass Cause Wood to Separate?

The problem has been going on for some time is my educated guess as the weight of the glass pushing down on the lower horizontal sash frame caused the two pieces of wood to separate it the corner. As the crack got bigger, more water entered faster and deeper accelerating the rot.

Fortunately, I feel my radio buddy can salvage this sash with a small amount of effort. Although it might be nice to wait for warmer weather, a repair can be initiated in the winter if he has the skills to cut a piece of plywood the same size as the sash so he can pull out the damaged sash to work on it. In warm weather, I’d just use a piece of thick cardboard to close up the opening while I’m repairing the sash.

How Do You Restore a Wood Window?

The first thing that needs to be done in my opinion is to clean the mildew off the sash and try to use a fan to dry the wood at the corner. Once the wood is fairly dry, I’d use a long squeeze clamp to see if a moderate amount of pressure will close up the gap between the two pieces of wood that make up the corner.

Get FREE BIDS from local handymen that can restore your wood windows.

Just in case you’re able to draw the corner tight with the clamp, I’d squirt some yellow carpenter’s glue in the crack and use a Popsicle stick or other thin piece of wood to spread it around in the crack. I’d then start to tighten the clamp hoping the corner draws up tight. If it does, I’d leave the clamp in place for a few hours.

It’s important to realize I’d place the bottom pad of the clamp about 1 inch from the outside corner of the sash. I’d want to be able to drill a pilot hole in the bottom of the sash about 1/2-inch from the outside corner so I could install a 3-inch-long stainless-steel wood screw up through the horizontal sash frame member into the vertical frame member while the clamp is in place. Carefully drill the pilot hole so the screw stays centered in the wood frame.

If you can’t draw the corner tight with the clamp, the crack can be filled with wood epoxy. I’ve got two videos on my AsktheBuilder.com website that show how to mix, apply and sand this wonderful material.

How Do You Avoid Wood Rot in Bathrooms?

This rot problem could have been avoided. All the woman had to do was place an old towel in contact with the bottom of the window glass each time she showered. The towel would capture the dripping condensate before it could get to the wood.

After getting dressed, she should then use the towel to wipe off the glass pane to ensure it’s dry. Any other visible liquid water on the window should also be dried off with the towel.

The towel should then be hung up to dry. The door to the bathroom should be left open to lower the overall humidity in that room as rapidly as possible. The reason bathrooms like hers have plentiful mildew growth is simple. There’s a great chance that condensate fog is forming on all the walls and surfaces as you see on the mirror.

The mirror in the bathroom is probably the same temperature as the walls and ceiling. Condensate fog forms on all the surfaces that are the same temperature, or cooler, than the mirror. You can’t see the fog because the walls and ceiling are opaque, but trust me, it’s there. This condensate is the water mildew needs to grow and thrive.

Column 1438

eTape16 Review

eTape16™ Review - It's Superb

etape 16 electronic tape measure

This is a superb small tape measure perfect for a homeowner. Be sure you get the generation 2 one with the silver function buttons.

I've tested countless tape measures in my life. You'd be surprised at the differences between them.

The eTape16™ immediately got my attention as soon as I tried it out. Two different models were sent to me. The eTAPE has evolved over the past few years getting better and better.

The eTAPE16™ was featured on the February 1, 2022 LIVE video stream.

You can also purchase the eTAPE16™ direct.

Did Anyone Else Test the eTape16™?

As soon as I used it, I thought, "Wow, this is pretty cool." I was stunned by the accuracy as it measures how much tape has exited the body.

I then decided to put it to the REAL test. I handed it to my 29-year-old daughter and didn't say a word.

She looked at it, noticing the screen, pulled out the tape, her eyes got BIG, and she said, "Dad, this is amazing. I want to buy this from you."

It was now time to put it to the ultimate test, She Who Must Be Obeyed - my wife of 47 years. I did with her what I did with my daughter handing it to her not saying a word.

My wife had THE EXACT SAME REACTION as did my daughter. But Kathy didn't offer to buy it from me.

Is it Hard to Read the Measurement on the eTAPE16™?

No. All you do is pull it out and read the crisp display. Watch this how-to-use the eTAPE16™ video:

Here's how hard it USED TO BE to read tape measures!

Watch this decades-old video I recorded to show you how to read tapes BEFORE the eTAPE16™ was even a glimmer in the eye of the inventor:

What are the eTape16™ Features?

  • Large LED display that is easy to read in full sunlight or a darker room
  • Inside and Outside measuring capability
  • Three memories
  • US/Metric Conversion
  • Centerline Calculation

What Else Can You Share about the eTAPE16™?

The backlit display makes it very easy to read, even in sunlight. A professional finish carpenter might like to try this tape out to see if it doesn't increase his efficiency. I feel for a person who's uncomfortable trying to figure out how to read a conventional tape measure the eTAPE16 will save time and money. It's a great tool for younger people who might not be getting a great math education in school. I hale from an older generation where fractions were a major part of our grade school math class. I'm not sure that's the case today.

etape max 16 tape measure

It appears there are at least two models of the eTape16. Note this one has red buttons to activate its functions. This model also has a locking button I found very difficult to get to lock.

etape 16 electronic tape measure

This is the easy-to-read display of the eTape16.

etape 16 electronic tape measure

Here's the eTape16 in action. I've extended the tape 1.5 inches and you can see that on the display.

etape 16 electronic tape measure

This is the better tape-locking button. It takes little effort to lock the tape when you push down the top of the slide.